Stuff
On Friday morning the very sweet Susan Carnahan who flew down from San Francisco for today’s program at the Natural History magazine and the Birds of the World exhibit opening joined Mike Gotthelf and me for a morning of photographic instruction. Inspired by the coastal fog we tried something new and different by visiting two of my favorite San Diego bird photography locations. My plan worked perfectly as we did quite well at both spots. That followed by a 90 minute working lunch at Deli-icious. More on that great eatery here soon.
This blog post, which took 1 1/2 hours to prepare, was published at 4:15am Pacific time on Saturday morning, 7:15am in the east.
I will be sharing 100-400 images along with additional positives and a very few negatives on the new lens. Promise. I used the 100-400 II a lot on this trip with both the 1D X and the 7D II and on occasion, with the 1.4X III TC. I shot all morning in La Jolla on Thursday with the hand held 1-4II and the 1D X. With great results. Images and comments soon.
South Georgia October 2015
Do consider joining me in South Georgia next October for the trip of a lifetime. See here for the complete details.
Save $242
Register now for the South Georgia trip and receive a $242 on your return airfare. Please e-mail for details.
Please Remember to use our Affiliate Links 🙂
To show your appreciation for my continuing efforts here, we ask, as always, that you use our the B&H and Amazon affiliate links on the right side of the blog for all of your purchases. B&H is recommended for you major photography gear purchases, Amazon for your household, entertainment, and general purpose stuff. Please check the availability of all photographic accessories in the BIRDS AS ART Online Store, especially the Mongoose M3.6 tripod heads, Gitzo tripods, Wimberley heads and plates, LensCoats and accessories, and the like. We sell only what I have used, have tested, and can depend on. We will not sell you junk. We know what you need to make creating great images easy and fun. And we are always glad to answer your gear questions via e-mail. I just learned that my account was suspended during my absence; it should be up and running by Monday at the latest.
I would of course appreciate your using our B&H affiliate links for all of your major gear, video, and electronic purchases. For the photographic stuff mentioned in the paragraph above we, meaning BAA, would of course greatly appreciate your business. Here is a huge thank you to the many who have been using our links on a regular basis and visiting the BAA Online store as well.
|
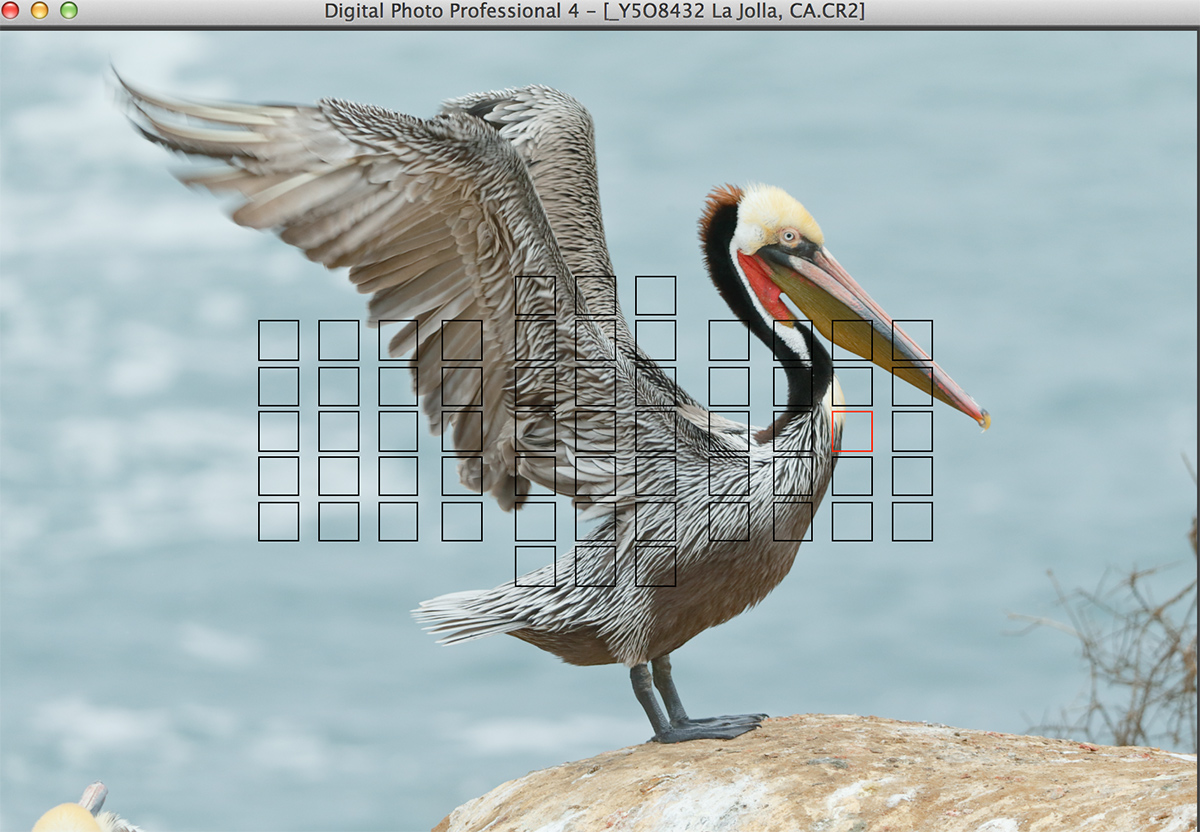
This image was created with the tripod-mounted Canon EF 200-400mm f/4L IS USM lens with Internal 1.4x Extender (at 320mm) and the Canon EOS-1D X . ISO 1600. Evaluative metering +2 2/3 stops off the grey sky: 1/500 sec. at f/5.6 was about 1/2 stop underexposure. Four AF points to the right of the center AF point (manual selection)/AI Servo Shutter Button AF as framed was active at the moment of exposure. I have been switching between Rear Button and Shutter Button AF more and more recently. Click on the image to see a larger version. This DPP 4 screen capture represents the original RAW file. |
The Original
In the JPEG above that represents the image out-of-camera note the following problems:
1-the image is underexposed.
2-the bush in the lower right corner may be distracting to some. Including me.
3-the top of the 2nd pelican’s head in the lower left corner is distracting.
4-a bit more room in front of the bird would have been nice.
The Situation
I had been making images of this bird rubbing its face on its back with the bill horizontally oriented and pointing toward the tail. Thus the selected AF point as noted above…. I was working with the Internal TC engaged at 478mm. Sensing the flap, I quickly disengaged the TC, zoomed out, and created a series of only three images. I am not very good at holding the shutter button down to the metal when I should…. The third frame, presented here, the image with the wings swept fully back, was the winner.
Note that the active AF point is illuminated in red.
Universal Advice for Better Flight and Action Photography with a Zoom Lens…
Avoid clipping wingtips, feet, heads, and assorted body parts: zoom wider!
|
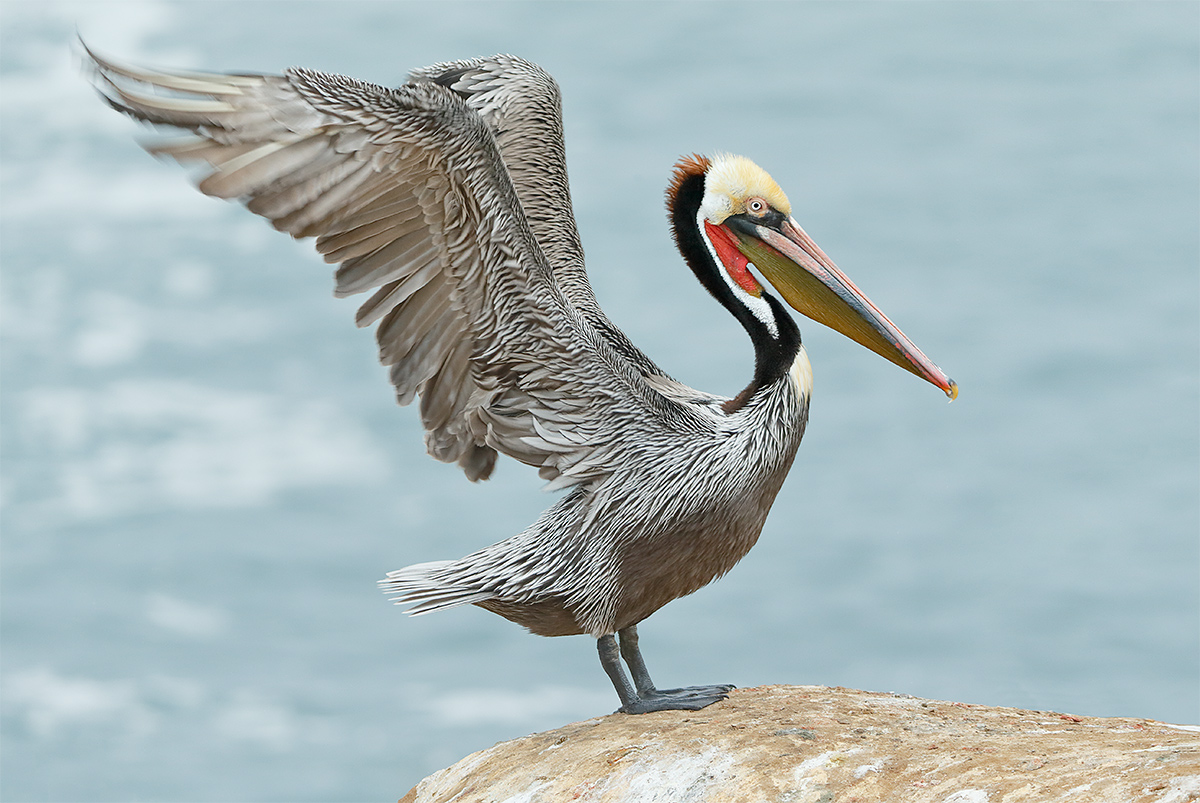
This image was created with the tripod-mounted Canon EF 200-400mm f/4L IS USM lens with Internal 1.4x Extender (at 320mm) and the Canon EOS-1D X . ISO 1600. Evaluative metering +2 2/3 stops off the grey sky: 1/500 sec. at f/5.6 was about 1/2 stop underexposure. Four AF points to the right of the center AF point (manual selection)/AI Servo Rear Focus AF as framed was active at the moment of exposure. Click here to see the latest version of the Rear Focus Tutorial. Click on the image to see a larger version. This JPEG represents the optimized master TIF file. |
The Image Optimization
I lightened the image in DPP during the RAW conversion with the Brightness slider. I also applied Arash’s 1D X Noise Reduction values and opened up the darker tones with DPP’s amazing Shadow slider. Plus the usual.
In Photoshop I eliminated the intruding pelican head with Content aware fill. I employed the divide and conquer technique to separate the larger upper portion of the bush from the smaller lower portion. Then I selected the larger portion with the Patch Tool and executed Content Aware Fill. That left me to deal with the small layer of out-of-focus bush to deal with. I placed the whole image on its own layer and the used Denise Ippolito’s Protective Cloning on a Layer technique. This involves the use of both the Clone Stamp Tool and a Regular Layers Mask. I added canvas front by using using the crop tool method. I filled that in by using the Transform Tool to judiciously stretch the layer that I had selected from in front of the bird with the Rectangular Marquee Tool.
I did the usual Eye Doctor work on the bird’s eye> I selected the face and the bill with the Quick Selection Tool and sharpened that layer only with a Contrast Mask. The I selected the whole bird also with the Quick Selection Tool and applied a 50% layer of my NIK Color Efex Pro 50-50 Detail Extractor/Tonal Contrast recipe to that layer only.
Digital Basics
Everything that I did to optimize both of today’s images is covered in detail in my Digital Basics File–written in my easy-to-follow, easy-to-understand style. Are you tired of making your images look worse in Photoshop? Digital Basics File is an instructional PDF that is sent via e-mail. It includes my complete digital workflow, dozens of great Photoshop tips, details on using all of my image clean-up tools, the use of Contrast Masks, several different ways of expanding and filling in canvas, all of my time-saving Keyboard Shortcuts, Quick Masking, Layer Masking, and NIK Color Efex Pro basics, Contrast Masks, Digital Eye Doctor techniques, using Gaussian Blurs, Tim Grey Dodge and Burn, a variety of ways to make selections, how to create time-saving actions, the Surface Blur (background noise reduction) settings as taught to me by Denise Ippolito, and tons more.
APTATS I & II
Learn the details of advanced Quick Masking techniques in APTATS I. Learn Advanced Layer Masking Techniques in APTATS II. Mention this blog post and apply a $5 discount to either with phone orders only. Buy both APTATS I and APTATS II and we will be glad to apply at $15 discount with phone orders only. Please call Jim or Jennifer at 863-692-0906 weekdays to order.
|
You can order your copy of “The Photographers’ Guide to Canon Digital Photo Professional 4.0” (aka the DPP 4 Raw Conversion eGuide) by Arash Hazeghi and Arthur Morris by clicking here. |
The DPP 4 eGuide (PDF)
Learn how and why I and many other discerning photographers choose and use only DPP 4 to convert their Canon RAW files in the DPP 4 RAW Conversion Guide by Arash Hazeghi and yours truly. The latest version supports all of the newer Canon camera bodies and several older models including the EOS-7D and the EOS-1D Mark IV.
Be sure to like and follow BAA on Facebook by clicking on the logo link upper right. Tanks a stack!
Support the BAA Blog. Support the BAA Bulletins: Shop B&H here!
We want and need to keep providing you with the latest free information, photography and Photoshop lessons, and all manner of related information. Show your appreciation by making your purchases immediately after clicking on any of our B&H or Amazon Affiliate links in this blog post. Remember, B&H ain’t just photography!
Amazon.com
Those who prefer to support BAA by shopping with Amazon may use this link:
Amazon Canada
Many kind folks from north of the border, eh, have e-mailed stating that they would love to help us out by using one of our affiliate links but that living in Canada and doing so presents numerous problems. Now, they can help us out by using our Amazon Canada affiliate link by starting their searches by clicking here. Many thanks to those who have written.
Typos
In all blog posts and Bulletins, feel free to e-mail or to leave a comment regarding any typos or errors. Just be right :).


Good morning Artie. Hope you are fine.
Does DPP 4.0 support older bodies like EOS 600D, 50D and 60D? Many enthusiast photographers are still using these bodies as those are in quite good serviceable condition. Even a few are still happily using 450D and 40D.
Thanks in advance.
Not sure on some of those but mostly not supported. DPP 3 is still better than ACR from where I sit. It does not look as if they will add the older bodies to DPP 4…. I have nothing against bodies like the 50D and 40D. I do not know the others :).
a
Why do you say you have been switching recently from rear AF to shutter AF? Since changing to rear AF we have not gone back.
Barry, Brisbane, Australia.
Hi Barry, I say it because that is what I have been doing :). I suspect that you meant to ask “Why have you been doing it?”
There are several reasons why I have been using shutter button AF more and more:
1- With four triggers fingers and a bum left thumb and wrist in addition, I find that having one less thing to do with my right thumb makes things easier overall. As proponents or shutter button AF (including Denise Ippolito) have been saying for years, it is easier to do one thing than to do two.
2-When hand holding it is always best to be in AI Servo AF. With the wider AF point array on the 7D II it is easier to get an AF point on the bird’s eye or face. This enables one to get away from rear focus and re-compose, a big plus when hand holding.
3-I have enjoyed the convenience.
4-By setting the AF-On button to AF off you can effectively have One-Shot and re-compose while using shutter button AF.
Please note that noting is set in stone and that we need to be learning and adapting every day.
artie
What an amazing Image … especially the Artie Morris version. A PHENOMINAL study of Feathers … especially considering their Aerodynamic Qualities and Use . That the Bird controls EVERY one of them to achieve desired flight characteristics is a MIRACLE … of Spiritual/Metaphysical Creation and Proportion. BEAUTIFUL Work , Artie !