Stuff
Thursday was a busy, busy day. Tomorrow I fly to Islip to pay my 92-year old Mom a surprise visit. I was so busy that I have not packed a single thing and I leave the house at 9:30am. Yikes. I’d better get to bed soon. I did have time for a swim and an ice bath today.
This blog post, the 99th in a row, took about 2 hours to prepare and was published at one minute after midnight on Friday.
Travis Hamonic
If you have 14 minutes and a box of tissues handy check out the E-60 video here on young New York Ranger Travis Hamonic’s efforts to help out kids who’ve lost their dads. Again, thanks to older daughter Jennifer for opening my eyes to this one.
Please Remember to use our Affiliate Links 🙂
To show your appreciation for my continuing efforts here, we ask, as always, that you use our the B&H and Amazon affiliate links on the right side of the blog for all of your purchases. B&H is recommended for you major photography gear purchases, Amazon for your household, entertainment, and general purpose stuff. Please check the availability of all photographic accessories in the BIRDS AS ART Online Store, especially the Mongoose M3.6 tripod heads, Gitzo tripods, Wimberley heads and plates, LensCoats and accessories, and the like. We sell only what I have used, have tested, and can depend on. We will not sell you junk. We know what you need to make creating great images easy and fun. And we are always glad to answer your gear questions via e-mail. I just learned that my account was suspended during my absence; it should be up and running by Monday at the latest.
I would of course appreciate your using our B&H affiliate links for all of your major gear, video, and electronic purchases. For the photographic stuff mentioned in the paragraph above we, meaning BAA, would of course greatly appreciate your business. Here is a huge thank you to the many who have been using our links on a regular basis and visiting the BAA Online store as well.
|
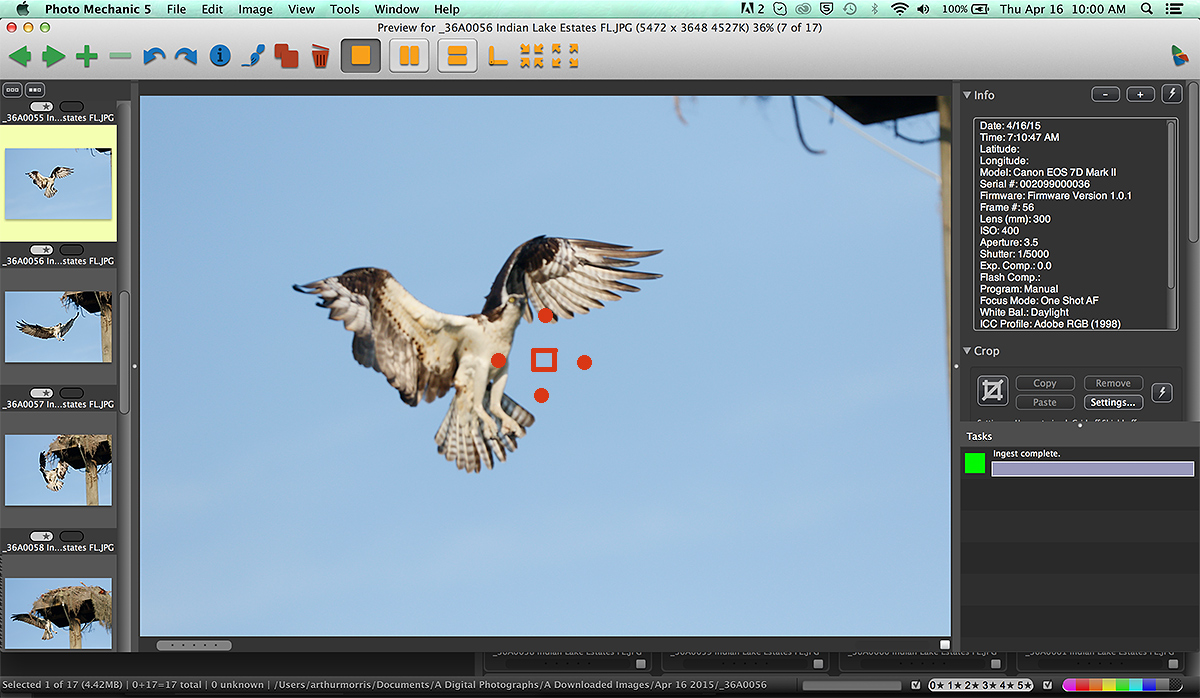
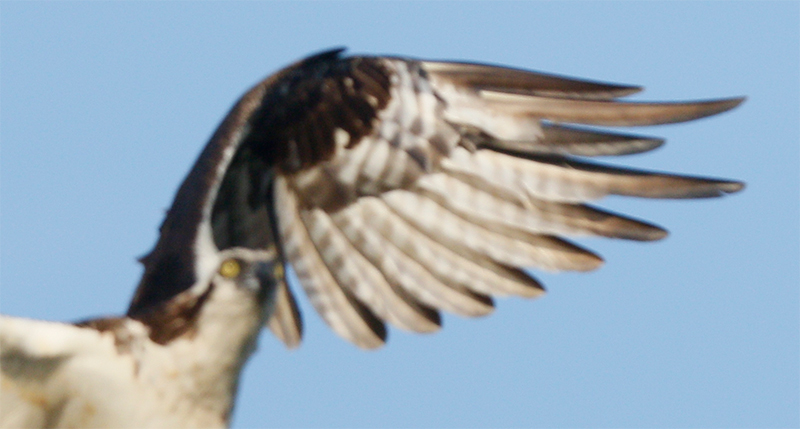
This image was created down by the lake near my home at Indian Lake Estates, FL with the hand held Canon EF 300mm f/2.8L IS II USM lens and the Canon EOS 7D Mark II. ISO 400. Evaluative metering +2/3 stop off the blue sky: 1/5000 sec. at f/3.5. in Manual mode. Center AF point/Expand/Shutter Button AF as framed was active at the moment of exposure. Click on the image to see a larger version. Badly out of focus Osprey |
Lousy Camera or Lousy Photographer?
How the heck did Mr. Professional Photographer wind up with an image that is miles out of focus? Share your thoughts and your proof if any by leaving a comment.
Photo Mechanic Screen Capture
Above is a Photo Mechanic screen capture. When I switched fairly recently to a Mac, more specifically to a Apple 15.4″ MacBook Pro Notebook Computer with Retina Display (Mid 2014), my plan was to run BreezeBrowser on my Mac using Parallels. I had used and loved BreezeBrowser every day for more than 13 years but knew all along that there was no Mac version….
“How’d that go with Parallels?” you ask. Not well. Which left me pretty much high and dry until I tried Photo Mechanic. As expected, it took me a while to get things rolling with the new program but I was more than impressed with the quality of Camera Bits’ phone support. In a word, it was amazing.
I now use and depend on Photo Mechanic every day. The Photo Mechanic Ingest feature allows me to download my images just as quickly and easily as I did with Downloader Pro. And picking my keepers is a snap as well. Without Photo Mechanic it would be impossible to work on a Mac. Which I have come to love more than life itself.
AF Point note: Photo Mechanic does not offer a Show Focus Points feature; I added the AF points in the screen capture above in Photoshop to represent Center AF point/Expand.
Editing (Picking Your Keepers) Tips
I set the default so that the images are arranged by Capture Time when I open a folder.
To view your images in Photo Mechanic simply select the first image in the folder and then hit the spacebar. After that, hit the right arrow key to advance to the next slide. I hit letter T to tag my keepers. You can hit T again if you change your mind. I go to Preferences > Preview and then–under Automatically advance to the next photo when:– I uncheck the tag is changed box. That way when I tag a keeper it does not automatically advance to the next frame.
When I am done editing the folder I set Filter view by to Untagged. Then I hit Command A (select all) and Command delete to delete all the rejected images. Done deal. I will be sharing more of my digital workflow here with you in the not-to-distant future.
Photo Mechanic Magnified Viewing and Tips
While viewing your image you can zoom in to 100% by hitting “Z.” An even better trick when you want to enlarge from a specific spot (like the bird’s eye) rather than from the center is to place the cursor on the specific area that you want to view at 100% and then hit Command + Left click. To get back to the full screen view simply hit “Z.” (Not Escape!)
|
You can purchase a copy of Photo Mechanic in the BIRDS AS ART Online Store here. See important details below. |
Photo Mechanic: $150
I use Photo Mechanic every day for ingesting (downloading) my images, picking my keepers, and sorting and arranging image files. It is fast and easy to use with great phone support: +1 503.547.2888 Mon-Fri, 9:00am-5:00pm [PST/PDT]. Purchase Photo Mechanic from BIRDS AS ART and your license code will be sent to you via e-mail within 1-7 business days (usually within 1-3 business days). Your copy of Photo Mechanic will be delivered to you via electronic download from the manufacturer’s website.
Photo Mechanic is a standalone image browser and workflow accelerator that lets you view your digital photos with convenience and speed. Photo Mechanic’s super fast browsing and its ability to quickly Ingest, Edit, and Export your photos, takes the hard work out of your workflow. Its powerful batch processing, full support of IPTC and Exif metadata, and innovative use of image variables and code replacements, make Photo Mechanic an indispensable tool for digital photographers.
Photo Mechanic works on both PCs and Macs. Folks using a PC need to read the fine print to decide between Photo Mechanic and BreezeBrowser.
Best News
Folks who subscribe to the blog can call Jim or Jennifer at 863-692-0906 weekdays before 2pm to receive a small thank you discount. Or, if they wish to purchase Photo Mechanic in the BIRDS AS ART Online Store here, they can e-mail Jim for a discount code.
|
PM’s auto Ingest rocks! |
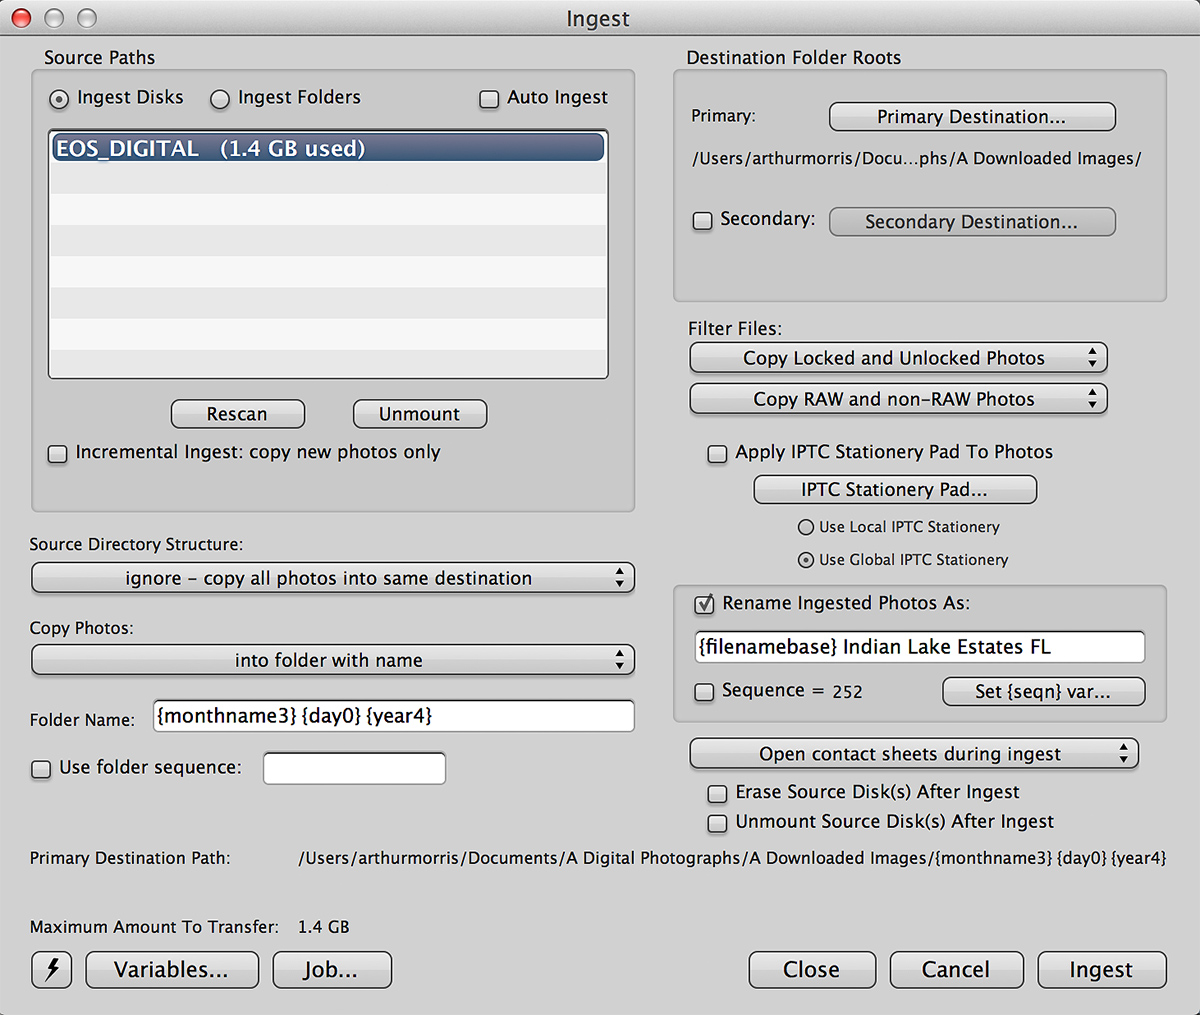
Photo Mechanic’s Auto Ingest
Stick the card in your Delkin Dual Slot Card Reader, set up your Ingest screen exactly as above, and your images will be placed in a dated folder with the location that you type in appearing after the image’s file name/number. Just as I do most every day.
Questions
Please leave a comment if you are already using Photo Mechanic or if you have any questions. I will do my best to help.
|
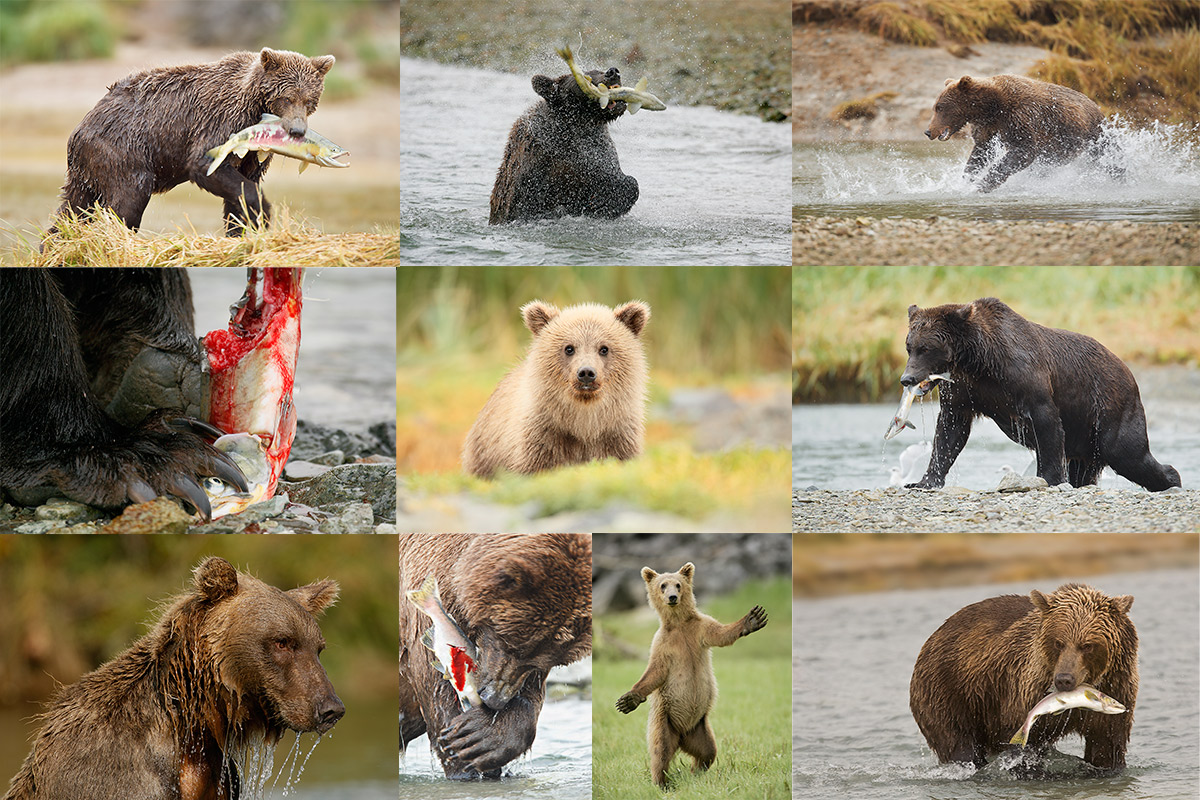
All of the images in the bear boat card above were created in Katmai National Park during the month of September. |
Due to a recent cancellation there are once again three slots open.
Bear Boat/Bears Catching Salmon IPT: September 1-8, 2015 from Kodiak, AK/6 FULL & 2 1/2 DAYS: $6699. Happy campers only! Maximum 8/Openings: 3. Plus the leader: Arthur Morris.
Join me in Katmai National Park, AK for seven days of photographing Coastal Brown Bears (grizzlies) catching salmon, fattening up for the long winter. Other subjects will include Mew and Glaucous-winged Gulls in flight and dip-feeding on salmon roe. Did I mention that we live on a boat and that the food is great? Most of our photography will be done in a variety of famed locations: Geographic Harbor, Kinak Bay, and Kukak Bay. We once had 39 bears fishing the creek at Kukak….
It is mandatory that you be in Kodiak no later than the late afternoon of August 31, 2015 September to avoid missing the float planes to the boat on the morning of September 1. With air travel in AK being what it is, with the chance of fog or other bad weather–being on Kodiak on August 30 is an even better plan). I will be on Kodiak on August 30 to avoid any potential disaster. That said in my nearly a dozen bear boat trips I was delayed only once but since I was day early as noted above there was no harm, no foul.
We will take one or more float planes to the boat mid-morning on September 1. We will photograph bears fishing that afternoon and every day for the next six days (weather permitting of course). We should have bears catching salmon every day. In addition, we will get some nice stuff on Mew Gull and Glaucous-winged Gulls dining on roe and the remains of predated salmon. We may–depending on where the concentrations of bears are–get to photograph Harbor seals and some hauled out Steller’s Sea Lions (an endangered species). Halibut fishing (license required) is optional. On September 8, our last morning on the boat, those who would like to enjoy one last photo session will do so. The group returns to Kodiak via float plane midday. Most folks will fly to Anchorage and then continue on red-eye flights to their home cities.
The eight days will consist of six full days (Sept 2, 3, 4, 5, 6, & 7) of photography featuring lots of Coastal Brown Bears catching salmon as above plus a variety of other natural history subjects plus some nice scenic photography that I forgot to mention above. Plus the first afternoon and the last morning.
What’s included? 8 DAYS/7 NIGHTS on the boat as above. All meals on the boat. (The food is quite excellent.) National Park fees. One night’s double occupancy lodging on Kodiak; arrive: Sept 1/depart: Sept 2. The thank-you-in-advance dinner on Sept 1. In-the-field photo tips, instruction, and guidance. An insight into the mind of a top professional; I will constantly let you know what I am thinking, what I am doing, and why I am doing it. Small group image review, image sharing, and Photoshop instruction on the boat.
What’s not included: Your round trip airfare to and from Kodiak, AK (almost surely through Anchorage). All necessary lodging other than the cost of your double occupancy room on the night of August 31 should you opt to arrive early–we can arrange that in advance for you. We will let you know the cost of a single supplement for the one night if so desired. The cost of the round-trip float plane to the boat on September 2 and back to Kodiak on September 9. The cost of a round trip this year was $500. The suggested crew tip of $210.
Is this an expensive trip? Yes, of course. But with 6 full and two half days, a wealth of great subjects, and the fact that you will be walking with the bears just yards away (or less….) it will be one of the great natural history experiences of your life. Most folks who take part in a Bear Boat IPT wind up coming back for more.
A $2,000 per person non-refundable deposit by check only made out to “Arthur Morris” is required to hold your spot. Please click here to read our cancellation policy. Then please print, read, and sign the necessary paperwork here and send it to us.
Your deposit is due immediately. That will leave a balance of $4699. The next payment of $2699 will be due on February 15, 2015. The final payment of $2000 is due on May 1, 2015.
I hope that you can join us for this wondrously exciting trip.
Be sure to like and follow BAA on Facebook by clicking on the logo link upper right. Tanks a stack!
Support the BAA Blog. Support the BAA Bulletins: Shop B&H here!
We want and need to keep providing you with the latest free information, photography and Photoshop lessons, and all manner of related information. Show your appreciation by making your purchases immediately after clicking on any of our B&H or Amazon Affiliate links in this blog post. Remember, B&H ain’t just photography!
Amazon.com
Those who prefer to support BAA by shopping with Amazon may use this link:
Amazon Canada
Many kind folks from north of the border, eh, have e-mailed stating that they would love to help us out by using one of our affiliate links but that living in Canada and doing so presents numerous problems. Now, they can help us out by using our Amazon Canada affiliate link by starting their searches by clicking here. Many thanks to those who have written.
Typos
In all blog posts and Bulletins, feel free to e-mail or to leave a comment regarding any typos or errors. Just be right :).




Hi Artie,
I’m going to buck the trend here. I think it’s a depth of field issue due to the f-stop. Probably wrong, but that’s my 2 cents.
Kathleen
A depth of field issue for which image? artie
The “badly out of focus osprey” image.
Thanks. In order for d-o-f to be an issue an image needs to be in sharp focus. This one is totally out of focus. The explanation of how that happened is below. artie
Hi Artie ,
One more vote for one shot mode.
Camera grabbed focus ok but bird is closer to camera in the instant the shutter fires.
Just doesn’t seem right to say “lousy photographer.”
The best of us can make a simple mistake. Once. And correct it.
Lousy is making the mistake over and over, then blaming the camera.
Now that, kind sir, is definitely not you.
Case closed.
Kind regards
DP
It’s practically unanimous! a
Hi Artie,
Regarding your quiz question, It appears that you took this photo in one shot auto focus mode whereas you typically recommend AI Servo mode for birds in flight.
Warm regards.
Jeff
Jeff is right! a
This is an easy one. According to the info screen in the preview window, the “good-but-absent-minded” photographer. Left his camera in One Shot Autofocus mode and the bird didn’t hold still long enough for him. 🙂
Well done and with humor 🙂
a
Focus Mode: One Shot AF
You got it. a
Since you mention the reason the image is OOF is obvious, I’m going to say that you were shooting a burst and the camera was in the process of getting focus when this image was captured. I bet the next one in the series is tack sharp.
cheers
Nope 🙂 a
It says in the shooting info – One -Shot AF
That’ll “OOF” a flyer no problem.
🙂 a
Hi Artie –
Re: Out of focus – I would guess it was caused by using one shot af rather than continuous, as shown in info.
Re: Viewing files in trash on Mac – You can select multiple files in trash and use control to bring up contextual menu and then select quick view to view in preview – BUT a better/quicker way would be to drag all the files out of the trash and into a new folder (maybe labeled rejects) and then view that folder in Photomechanic. You could then move any files you wish to keep out of the reject folder, and drag the rest back into the trash. Not as elegant as PM sub folder but workable. To make things easier be sure to empty trash before starting.
Right on the One-Shot. Your suggestion on dragging the images to a new folder is the best available right now…. So thanks for that. The BrBr solution is far better right now. As storage is so cheap right now I may actually start downloading to two locations and keep the one on an external HD intact…. a
The info screen indicates the focus mode was one shot AF. I am guessing you may have switched modes for a static image and never switched back?
Correct-o-mundo! a
As to the out of focus shot. Looks like you were in One-Shot instead of AI Servo according to the data on the right side. One shot and flying osprey probably don’t perform well together.
Duh! a
Possibly because focus mode was one shot and was not tracking
That is correct sir. a
Artie I’m going to say the out of focus photo was the result of a brain fart as the camera was set to “one shot AF”.
Bingo. artie
Artie,
With an image is in the trash, click the trash icon in the dock, then click on the image & it will open while in the trash.
Andrew
Thanks Andrew, but not on my Macbook Pro, not for Canon RAW files and now, not even for the embedded JPEGs. But even if they did open it is still a pain in the you know where to have to open a few thousand images files by clicking on them. The BrBr way is so, so simple. You can view the rejects right there in the browser by just clicking on the sub-folder. artie
Photo Mechanic is intriguing. However I have invested a lot of time into Lightroom 5 (I use a Mac Powerbook). It is a bit slow loading up, I guess, but I’m finally getting used to the PP features. So my question is: how do you ee Photo Mechanic interfacing with Lightroom 5? Does it replace it or supplement it? It’s not clear to me that Photo Mechanic has a full-menu of post processing features.
Hi Ralph, Lots of folks invest lots of time in LR but I have never figured out why….. I have not, do not, and never will use LR. See the upcoming post on the subject. I use Photo Mechanic to edit (pick my keepers) and to browse (look at and search for images)> I convert my RAW files beautifully in DPP, and do my image optimizations in Photoshop…. best, artie
ps: as far as I know there are no post-processing features in PM….
Hi Artie, per that screengrab, you’re in “one shot” AF mode. Were you taking photos of a static bird and then saw this one coming in to land and just panned over? I thought actually that you used rear-button focus, in which case you would just leave the camera in AI Servo mode 100% of the time. That’s what I do now, I cannot image ever changing it over. Then again I’ve not used the 7D2, does it not have that custom function perhaps? Surely it must?
Jonathan
You are correct. Normally I never get out of AI Servo AF…. See my excuse in Monday’s blog post 🙂 a
I have no proof but I suspect that EVERYONE gets out of focus shots at some point, even when they use great technique. Camera AF is not perfect and we are bound to get a certain % of shots oof, even when the shooter is not at fault. AF settings can have something to do with it but the camera in general is not a perfect machine–after all it runs based on man-made software. Personally, I find the 7D2 much more UNreliable in getting good focus than my 5D3. My 5D3 is sharp probably 85-90% of the time, where the 7D2 is lucky to hit 40% reliability, with the same lens (500 ii). I’m not surprised that the osprey is oof here with the 7D2. I’ve gotten many shots oof like yours even when one or more active AF points are on the bird–stationary or not. I know that my technique may not be perfect but I use the same technique with both camera bodies and there is a substantial difference in results. My main point is that just because a person is a pro does not mean they cannot make technique errors on a few frames, and, none of our camera bodies’ AF systems can respond with perfection 100% of the time.
I have also read articles by a pro photographer who says that in some situations, invisible ‘atmospheric heat refractions’ can cause the lens/AF to be fooled and give a bad reading to the camera, resulting in oof focus shots. This is the result of certain weather conditions. But the sample osprey shot above seems to be too far out of focus for this to be the cause.
#1: everyone gets lots of unsharp images. I will be doing a post at some point entitled “The Vagaries of Autofocus.” Perhaps I have a small percentage more OOF images with the 7D II than with my 1D X but certainly no more than 5-10% more….. If you are photographing a static bird with the lens on a tripod and the image is way out of focus you either need to look in the mirror (likely) or have your camera checked for defects (possible but unlikely). LensAlign is great for folks look for the ultimate in sharpness….
You must be relatively new here because I have intentionally published short series of really bad flight photographs, images out of focus with various body parts cut off and maybe even one toe (a bird toe of course) sticking into the frame :).
And yes, heat shimmer AF problems are indeed real.
In the case here you are , however, missing the very obvious answer as to why to why the image was not sharp….. later and love, artie
Artie, Regarding the out of focus Osprey, I do not know if you have the same focus failure issue on your 7D2 as I have but, gross out of focus has occurred on occasion with my 7D2. I have found that sometimes, for no reason at all, the camera refuses to focus even on good contrast close subjects. Most recently (yesterday) my camera with 70-200L IS would not focus on a Belted Kingfisher at 20 ft. sitting on a wire against a clear blue sky! I even changed focus mode from servo to single shot and back again. Also changed from center surround to single point and spot with same results. The bird filled the center focus square with ease. This has happened before – a few weeks ago while shooting Scoters in very cold conditions (been a dandy winter here in Nova Scotia) the camera refused to focus. I blamed the cold temperature and thought it possible the focus sensor was fogging when I moved the camera back and forth between the warm car and freezing conditions outside (-15 deg C). Yesterday however was “warm” at +8 deg C. Eventually, the camera started focusing again but it may have been in response to turning it off and back on again – I was trying everything in rapid succession so not sure why camera started to focus properly again.
Love your work, advice and humour – just wish you would focus a little more on the lenses us poor folk can afford! US$12,000 lenses are not in the wife’s approved budget – EVER! But I’m still negotiating. LOL
Paul Murray
Nova Scotia
Hi Paul, If you are in a situation where the camera will not focus try focusing manually so that the bird is at least recognizable through the viewfinder…. Let me know how that works.
artie
ps: have you missed all of the great images that I have posted that were created with the 100-400II? 🙂
pps: lens are tools. The results depend on the carpenter 🙂
ppps: not a good idea keeping the heat on in the car in way cold temps….
Artie, I’ve been following your blog for some time and always amazed with your pictures and have tried to implement many of the suggestions you make as sometimes it isn’t the tools but the user. However, it seems there is a great advantage to higher end “good glass”. So, I sympathize with Paul in his request to have some blogs focused on lower priced lenses, provided you even work with any of them. I am also one who cannot even afford the 100-400 II lens. It would be great if something were done with those lenses in the $1-$2K price range. I do my best with what I have and would love to learn more on how to deal with the issues lower priced lenses bring to the table because I’m at a point where I can’t figure out if it’s the operator or the equipment failing to produce quality images nor am I in a position to buy higher quality glass at triple the cost of what my budget will allow.
Hi Donna, Our job is to learn to make the best images with the gear that we have in our hands, regardless of cost. Have you looked at a used 70-200mm f/4 L IS? With a used series II 1.4X TC?
I once taught a group from the UK. Old folks. Their relatively cheap gear was held together with rubber bands and glue. Their images were gorgeous. In 99.99% of the cases it ain’t the camera and it ain’t the lens 🙂
later and love, artie
Next question, how does one make that determination? Gear or operator? I suppose I’d ask that should image issues prove to be on account of the gear, are these issues that the manufacturer can/should fix (faulty mechanical issues) or something inherent in the equipment we must live with and work with as best we can?
In this case, the clear evidence is in plain sight. You just have to open your eyes and think. No worries, this discussion will be continued. artie
I have had a similar issue occasionally with my 7D MkII. When adding a TC it sometimes shows as manual focus mode in the viewfinder and will not focus. Turning the camera off and on has no effect – removing and replacing the battery fixes it. This only happens occasionally.
I still love this body though.
Have you tried cleaning the contacts on the TC with LensClens? a
Lousy Camera or Lousy Photographer?
Looks like you were in One Shot Auto Focus…lousy photographer 🙂
Doug
What do you like and what do you dislike about Photo Mechanic vs BreezBrowser? Thx, Paul
BreezeBrowser always offered the fastest viewing and I loved that. Photo Mechanic is much faster. If you hold down the right arrow key it looks as if you are watching a movie.
I wish that there was an option so that you could use the up and down arrow keys to tag an image rather than the “T.” Why? You could edit with one hand without ever moving it. And sometimes when I am really tired my hand slips off the “T” key and winds up on the “R” or the “G” key. Once you figure that out you might need to go back and re-edit more than a few images.
The biggest short-coming with PM is that there is no option to place deleted images into a Deleted sub-folder created by the program (as is an important feature in BreezeBrowser). If you screw up in PM and accidentally delete a keeper, you need to look for it in the Trash folder and that is a huge pain. On a related note, does anyone know for sure how to view the RAW files (or the embedded JPEGs) on a Mac while they are in the Trash?
Both PM and DPP4 offer some great sorting features. Both PM and BrBr offer tons of tons extra features that I rarely if ever use. There is some extra stuff in PM that sound quite attractive; I just need to learn to use it. I will be sharing lots more on PM as time goes by and I learn more.
I wish Photo Mechanic had a feature that would show focus points. Perhaps you could put pressure on the folks at Camera Bits to do this. Thanks.
Hey Graham. Me too, but with my workflow that it not a big deal as both PM and DPP are always open on my Macbook Pro and toggling between them is simple.
There has been a thread on the subject in the PM Forum for quite some time….
artie