What’s Up?
The second Palouse IPT is continuing along smoothly with a variety of weather, skies full of huge white clouds, and a plethora of beautiful and interesting subjects.
Couples and IPT veterans are invited to e-mail for discount information.
The Streak
Today’s blog post marks a totally insane completely ridiculous 217 days in a row with a new educational (and fun) blog post. And I still have dozens of new topics to cover; there should be no end in sight until my big South America trip next fall. As always-–and folks have been doing a really great job recently–-please remember to use our B&H links for your major gear purchases. For best results use one of our many product-specific links; after clicking on one of those you can continue shopping with all subsequent purchases invisibly tracked to BAA. Your doing so is always greatly appreciated. Please remember: web orders only. Please remember that if you are shopping for items that we carry in the BAA Online Store (as noted in red at the close of this post below) we would appreciate your business.
|
This image was created on the 2015 Japan in winter IPT with the Induro GIT 304L/Mongoose M3.6-mounted Canon EF 400mm f/4 DO IS II USM lens and the mega mega-pixel Canon EOS 5DS R. ISO 500. Evaluative metering +2 1/3 stops: 1/640 sec. at f/5.6. Center AF point/AI Servo Expand/Rear Focus AF on the bird’s eye and re-compose. Click here to see the latest version of the Rear Focus Tutorial. Click on the image to see a larger version. Image #1: Adult Whooper Swan sleeping |
The Original Image–the straight shot…
I loved the pure white snow on the lake and the soft light. And the posture of the sleeping bird. With a sleeping bird you have the option of putting it on either side of the frame. As here, I prefer to have the bird “looking” back into the wide part of the frame. If you do not use rear focus and re-compose you need to be in One-Shot AF (S–single servo for Nikon).
|
This image was created from the original image above as detailed below. Image #2: Soft/sharp creation from a single image… |
An Adobe Camera RAW Creative Advantage
On the first IPT, one of the participants reminded me that instead of moving the Clarity slider to the right from +15 to +30 that you have the option of moving it to the left to produce a soft, glowing, out of focus look. So aside from wanting to be able to convert my Sony Alpha a7R II images, I wanted to be able to play around with the Clarity slider with 5DS R and 1D X Mark II images.
First I converted the RAW file in ACR (instead of my usual DPP 4) straight up, moving the Clarity slider to +20 (for a bit of out of camera sharpening). I named the file “straight up” and saved it. The I converted it again but this time I move the Clarity slider to -80 to give the whole image a soft, glowing look. I named it “soft” and saved it. With both images in Photoshop I created a duplicate layer of the soft version and used the Move Tool to pull it on top of the straight up version. Once you are close the top layer snaps into place. You can click the eyeball on and off for the top layer to make sure that the images are perfectly aligned.
Then I added a Regular Layer mask to the top layer and working large, I painted away the eye, the yellow triangle of the bill, and the legs and feet to reveal the sharp layer below to create Image #2. In effect, I created a sharp/soft blur from a single image.
You Know the Drill…
Which of the two images is your favorite, the straight-up version or the soft/sharp creation? Why?
|
Consider joining me in Japan in February, 2017, for the world’s best Japan in Winter workshop. Click on the card to enjoy the spectacular larger version. |
Japan In Winter IPT. February 9-24, 2017: $11,499 (was $13,999)/double occupancy. Limit 9/Openings: 5.
Price Reduced $2,500 on 3-8-16!
All lodging including the Tokyo hotel on 9 FEB, all breakfasts & dinners, ground transport and transfers including bus to the monkey park hotel, and all entrance fees and in-country flights are included. Not included: international flights, all lunches–most are on the run, and alcoholic beverages.
Please e-mail for couple and IPT repeat customer discount information.
This trip is one day longer than the great 2014 trip to allow for more flexibility, more time with the cranes, and most importantly, more time for landscape photography. Hokkaido is gorgeous. You will enjoy tons of pre-trip planning and gear advice, in-the-field instruction and guidance, at-the-lodge Photoshop and image review sessions in addition to short introductory slide programs for each of the amazing locations. Skilled photographer Paul McKenzie handles the logistics and we enjoy the services of Japan’s best wildlife photography guide whom I affectionately call “Hokkaido Bear.” His network of local contacts and his knowledge of the weather, the area, and the birds is unparalleled and enables him to have us in the best location every day.
|
Amazing subjects. Beautiful settings. Nonstop action and unlimited opportunities. Join me. |
The Logistics
Arrive Tokyo: 9 FEB 2017 the latest. 8 FEB is safer and gives you a day to get acclimated to the time change. Your hotel room for the night of the 9th is covered.
Bus Travel to Monkey Park Hotel: 10 FEB: A 1/2 DAY of monkey photography is likely depending on our travel time… This traditional hotel is first class all the way. Our stay includes three ten course Japanese dinners; these sumptuous meals will astound you and delight your taste buds. There are many traditional hot springs mineral baths (onsens) on site in this 150 year old hotel.
Full Day snow monkeys: FEB 11.
Full Day snow monkeys: FEB 12.
13 FEB: Full travel day to Hokkaido/arrive at our lodge in the late afternoon. The lodge is wonderful. All the rooms at the lodge have beds. Bring your warm pajamas. A local onsen (hot springs bath and tubs) is available for $5 each day before dinner–when you are cold, it is the best thing since sliced bread. The home-cooked Japanese styles meals at the lodge are to die for. What’s the best news? Only a small stand of woods separates us from the very best crane sanctuary. During one big snowstorm we were the only photo group to be able to get to Tsurui Ito; we had the whole place to ourselves in perfect conditions for crane photography!
FEB 14-23: Red-crowned Crane, raptors in flight, Whooper Swans, and scenic photography. Ural Owl possible. An overnight trip to Rausu for Steller’s Sea Eagle and White-tailed Eagle photography on the tourists boats is 100% dependent on the weather, road, and sea ice conditions. Only our trip offers complete flexibility in this area. It has saved us on more than once occasion. The cost of 2 eagle-boat trips is included. If the group would like to do more than two boat trips and we all agree, there will be an additional charge for the extra trip or trips. No matter the sea ice conditions, we will do two eagle boat trips (as long as we can make the drive to Rausu; it snows a lot up there). We have never been shut out.In 2016 there was no sea ice but our guide arranged for two amazingly productive boat trips.
Lodging notes: bring your long johns for sleeping in the lodge. At the Snow Monkey Park, and in Rausu, the hotel the rooms are Japanese-style. You sleep on comfortable mats on the floor. Wi-fi is available every day of the trip.
FEB 24. Fly back to Tokyo for transfer to your airport if you are flying home that night, or, to your hotel if you are overnighting. If you need to overnight, the cost of that room is on you.
|
Life is short. Hop on the merry-go-round. |
To Sign Up
To save your spot, please send your $5,000 non-refundable deposit check made out to “Birds as Art” to Arthur Morris/BIRDS AS ART, PO Box 7245, Indian Lake Estates, FL 33855. I do hope that you can join me for this trip of a lifetime. Do e-mail with any questions or give me a buzz at 863-692-0906.
Purchasing travel insurance within 2 weeks of our cashing your deposit check is strongly recommended. On two fairly recent Galapagos cruises a total of 5 folks were forced to cancel less than one week prior to the trip. My family and I use Travel Insurance Services and strongly recommend that you do the same.
Please Remember to use our Affiliate Links and to Visit the New BAA Online Store 🙂
To show your appreciation for my continuing efforts here, we ask, as always, that you get in the habit of using my B&H affiliate links on the right side of the blog for all of your photo and electronics purchases. Please check the availability of all photographic accessories in the New BIRDS AS ART Online Store, especially the Mongoose M3.6 tripod head, Wimberley lens plates, Delkin flash cards and accessories, and LensCoat stuff.
As always, we sell only what I have used, have tested, and can depend on. We will not sell you junk. We know what you need to make creating great images easy and fun. And we are always glad to answer your gear questions via e-mail.
I would of course appreciate your using our B&H affiliate links for all of your major gear, video, and electronic purchases. For the photographic stuff mentioned in the paragraph above we, and for everything else in the new store, we, meaning BAA, would of course greatly appreciate your business. Here is a huge thank you to the many who have been using our links on a regular basis and those who will be visiting the New BIRDS AS ART Online Store as well.
Be sure to like and follow BAA on Facebook by clicking on the logo link upper right. Tanks a stack!
Typos
In all blog posts and Bulletins, feel free to e-mail or to leave a comment regarding any typos or errors. Just be right 🙂

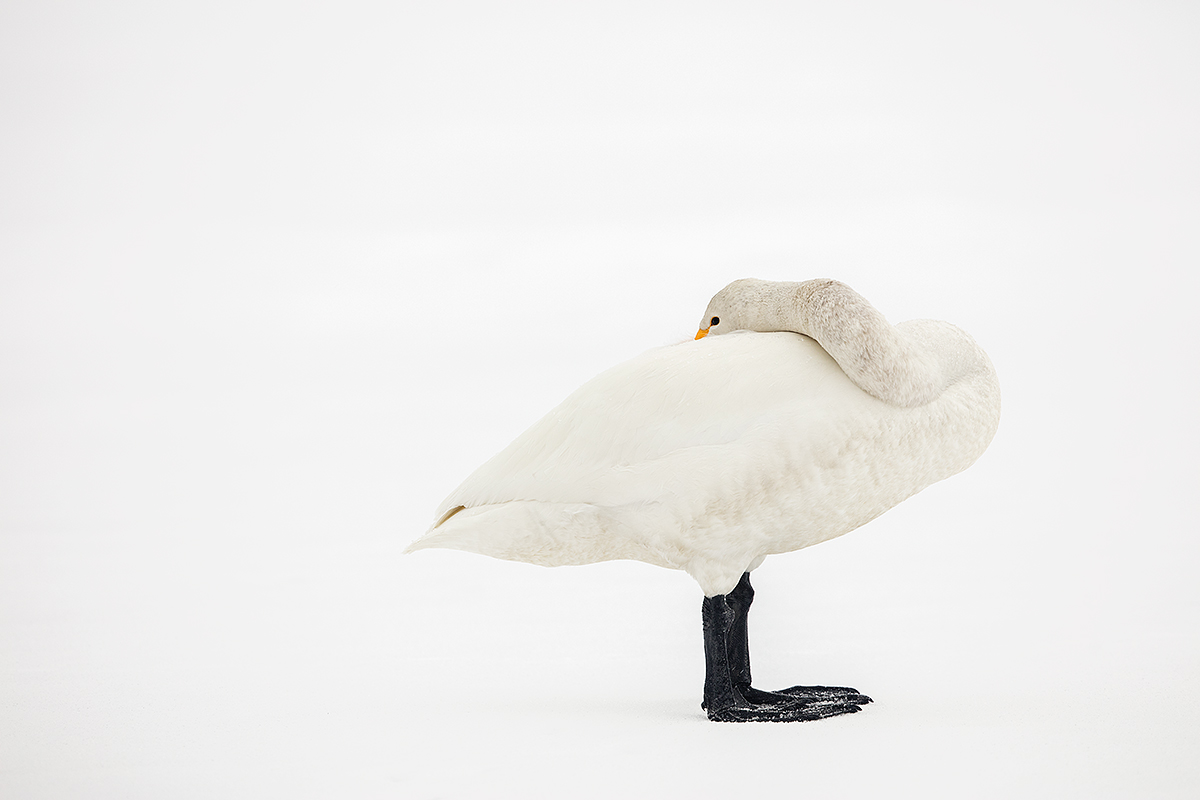
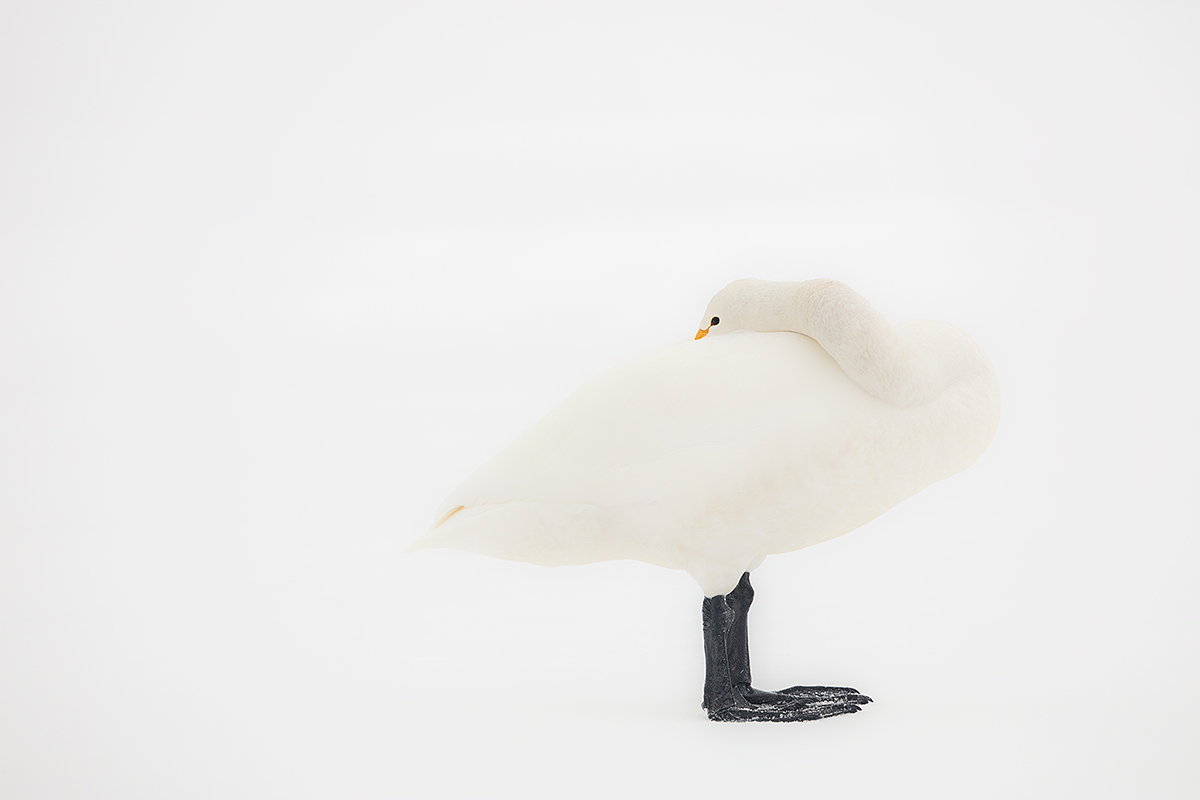


Oh my, #1 is gorgeous, oversized feet that look like they’re rainboots, and a dirty looking neck to make it look like the swan really didn’t go to any trouble to get prepared for the photo. I love the humour in the image, the shadow, the clear outline of the swan. I prefer it to #2, as it makes me immediately smile.
Artie the brush and gradient tool etc is on the top left of the screen in the ACR, when you select the brush you can adjust any number of parameters by using the sliders on the RHS.
ADJUSTMENT BRUSH IN ACR. Can be loaded with a heap of features including Temp, Tint, Exposure, contrast, highlights’ shadows, clarity, saturation, sharpness, NR, Moire Reduction, Defringe and more colour options. Try it for “Eye doctor” work. Overdo the sliders initially to see where it is applied and then tone it back. Anything bleeding into surrounding areas or the dark pupil can quickly be painted out with a new brush that has the normal settings (or darker for the pupil).
I started out loving #1 for it’s clarity, detail and the swan being wrapped with the soft white snow…but #2 has won my heart. The bird looks soft as the snow…the curve and shadow of the neck and the shadow of the wing near the tail defines the Swan from the snow….keeping the legs, eye and bill sharp was a must and I still see the yellow outline of the eye (in the soft image). The soft image gives the a feeling of being hunkered down in a white-out waiting for it to past.
Artie: “With a sleeping bird you have the option of putting it on either side of the frame. As here, I prefer to have the bird “looking” back into the wide part of the frame.”
If you had moved the bird to the other side of the frame it wouldn’t have been balanced. I’m learning to give more distance on the eye side of the bird….
Both images are A+
For me it’s about the animal IN it’s environment, not taken out of it for the sake of a clichéd artistic interpretation. So, I almost applauded when I read Belinda’s comment. The art for me is to blend the two in a vision, not to always remove the environment because it’s a distraction from the perfect image. However, in this case, and for me, I’m strangely drawn to #2 because it seems to do a better job of showing the subject absorbed by it’s environment. I was surprised, because it took a while to come to this conclusion, at first I thought it obvious that #1 would do the better job.
Please remove the apostrophes from the 2nd and 4th it’s, before the grammar police get me.
If you like #2 you need to reconsider applauding the now-missing Belinda…
a
Arthur,
Excellent technique applied to particular images, not every image on the camera card.
Works well with this image. Terrific interpretation, Image two best. Jim Amato
Love the second image! It’s the white on white with the little pop of black and orange. Beautiful, well done!
Both images are beautiful!
When I look at image #2, my eye goes straight to the amazing black feet (looks like the bird is wearing galoshes), the eye and the yellow/orange spot of the bill. I’m not looking at what’s going on with the discoloration on the neck and wing. Image 2 has a very ethereal and dreamy feeling to me, more so than #1.
Note: the orange around the eye is nearly gone in image 2. I like seeing that and would want that adjusted back into the image.
Hi Art
Greetings
I prefer the first image. The dirty neck and being able to determine the details near the neck and belly works for me. The first one is less blended into the background which is also a plus for me. The first one according to me has also a dream like feel to it
It’s #1 for me. I like the swan with detail but background with none except for the hint of a shadow behind the feet. I like that subtle shadow.
The brush in ACR is an adjustment brush found in the tool bar at the top (brush symbol w/o dots). I’ve hardly used it, so maybe Jon can give you the steps to put it to work.
Hard for me to tell on a small screen but I think I prefer the first, dirty neck notwithstanding. Maybe if I could compare two large prints I’d prefer the second. Typo in second line: should be skies, not sky’s.
Thanks for the catch. I typed skies originally and then had a brain lapse and changed it 🙁
a
The first…… Sorry!
You like what you like and that’s fine. Do let us know why though 🙂 a
a
Equally you could paint negative clarity with the brush in ACR and then add clarity to the bird, different stokes and all that.
Does not sound the same to me… The white feathers of the bird got the negative clarity. a
PS: Did not know that there is a brush in ACR. Can you elucidate?
a