Stuff
Friday afternoon was wind against sun so I went out late and found some excellent backlit and silhouette situations. The east wind persisted on Saturday morning when IPT veteran Winn Krafton joined me in the pre-dawn darkness. After a very nice sunrise we had some good chances with flying pelicans, Common and Sandwich Terns, Snowy Egret, and Ruddy Turnstone. See some of the exciting keepers from those two sessions here.
The Streak
Today makes eighty-seven days in a row with a new educational blog post! This blog post took less than an hour to prepare. With all of my upcoming free time (or not…), the plan right now is to break the current record streak of (I think) four hundred eighty something … Good health and good internet connections willing.
Booking.Com
Booking.Com came through for me twice again recently with both the DeSoto Fall IPT and next July’s UK Puffins, Gannets, and Bempton Pre-trip room reservations. And all the rates were great. If you’d like to give Booking.Com a shot, click here and you will earn a $25 reward. Thanks to the many who have already tried and used this great service.


Gear Questions and Advice
Too many folks attending BAA IPTs and dozens of folks whom I see in the field, and on BPN, are–out of ignorance–using the wrong gear especially when it comes to tripods and more especially, tripod heads… Please know that I am always glad to answer your gear questions via e-mail.
|
|
|
All four of these images were created on the early morning of Sunday, October 15 well before the sun came onto the birds. I used the hand held Canon EF 100-400mm f/4.5-5.6L IS II USM lens (at 400mm) and my favorite skimmer photography camera, the Canon EOS 5D Mark IV. The ISOs ranged from 800 to 1250. All at Evaluative metering +2 stops: 1/320 sec. at f/6.3 (except for the last image at f/7.1) in Tv mode. AWB. ‘s One AF point to the right of the center AF point/AI Servo/Expand/Shutter Button AF was active at the moment of exposure. The selected AF point fell somewhere on the bird face below the eye in each image. Please click on the image to enlarge it. FocusTune/LensAlign Micro Adjustment: -5. Black Skimmer at water’s edge (four ways) |
Following Up; My Best Skimmer …
In the Black Skimmer Editing Practice blog post here, I posted two items:
Item #1: Black Skimmer Editing Practice
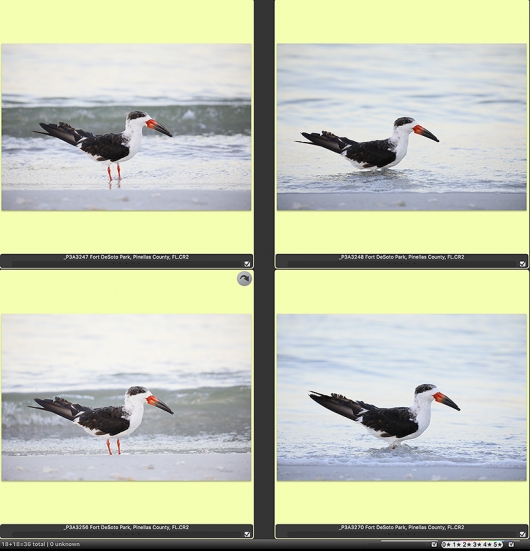
Click on the composite above to view the images larger. Which is the strongest image? Why? Which is the weakest image? Why? What do you think of the two images with the breaking wave included?
For those not blessed with eagle eyes here are the file numbers from left to right, top row first, then the bottom row.
- _P3A3247 (at 7:50am)
- _P3A3248 (five seconds after 3247)
- _P3A3256 (40 seconds after 3248)
- _P3A3270 (4 1/2 minutes after 3256)
My Favorite Skimmer Image
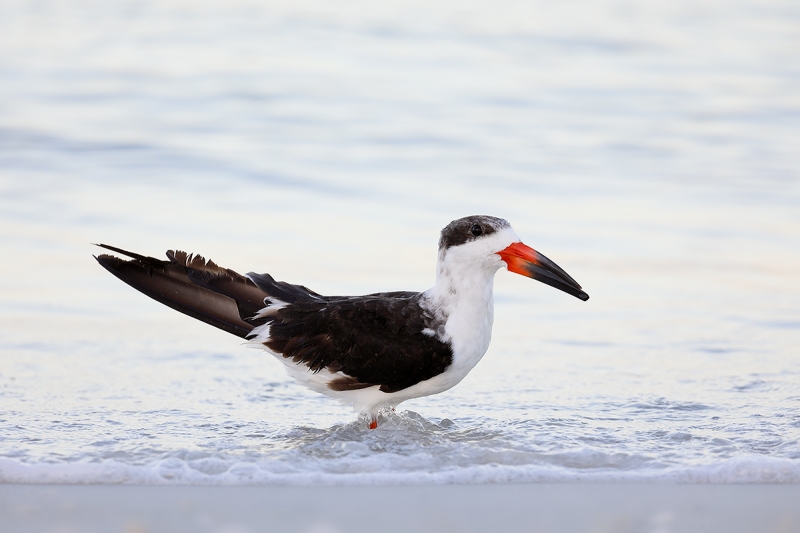
For the most part I do not like breaking waves in images of single birds along the shore. I will admit that 3247 is stronger than 3256, but I kept those two only for educational purposes. That left me with 3248 and 3270 with the latter image being the clear winner. Why? The bird is larger in the frame and super sharp. Ans I like the bubbles left over from a breaking wave near the bird’s feet. You can see my optimized version below.
Item #2: High Level Exposure Question
Considering that the exposure compensation for each image was +2 stops, why is _P3A3270 considerably brighter than _P3A3256? Please note that it has nothing to do with the fact that the light has increased; remember that I was in an automatic exposure mode, Tv …
The Exposure Answer
This was actually a very basic question and I was surprised that nobody came up with the right answer. For 3270, I had gotten closer to the bird and as a result the bird is larger in the frame. With more dark (feathers) in the frame, the meter opened up. Thus the lighter background. This principle goes all the way back to the crude exposure diagrams in the chapter on Exposure in the original The Art of Bird Photography. A second factor might have been that the light have gotten a bit stronger; that possibly brought the following principle into play: in soft light situations the meter begins to get smarter when the light begins to get brighter …
|
|
|
This image was created on the early morning of Sunday, October 15 with the hand held Canon EF 100-400mm f/4.5-5.6L IS II USM lens (at 371mm) and my favorite pelicans in flight photography camera, the Canon EOS 5D Mark IV. ISO 800. Evaluative metering +2 stops: 1/320 sec. at f/6.3 in Tv mode. AWB. Center AF point/AI Servo/Expand/Shutter Button AF was active at the moment of exposure. As originally framed, the selected AF point fell on the bird’s face just behind and below the eye (as seen in the DPP 4 screen capture below). Please click on the image to enlarge it. FocusTune/LensAlign Micro Adjustment: -4 (extrapolated). Black Skimmer, winter adult on the edge of the surfBe sure to click on the image to see the larger version and the excellent sharpness. |
My Favorite Optimized
Both Jake Levin and Greg agreed that 3270 was their favorite. Keith Swinndell liked 3247 best because the wave framed rather than cut the top of the bird’s head as it does in 3256.
The only two things of note during the otherwise straightforward image optimization was the RGB Curves Color Balance adjustment that did more to brighten the image than to correct any color casts and a bit of Gaussian Blur to the near shoreline. (I applied it to the whole image on a layer, added and Inverse (Black or Hide-all) Layer Mask, and then painted the effect in as needed. Learn exactly how I optimize my images in The BIRDS AS ART Current Workflow e-Guide (Digital Basics II), an instructional PDF that is sent via e-mail.
|
|
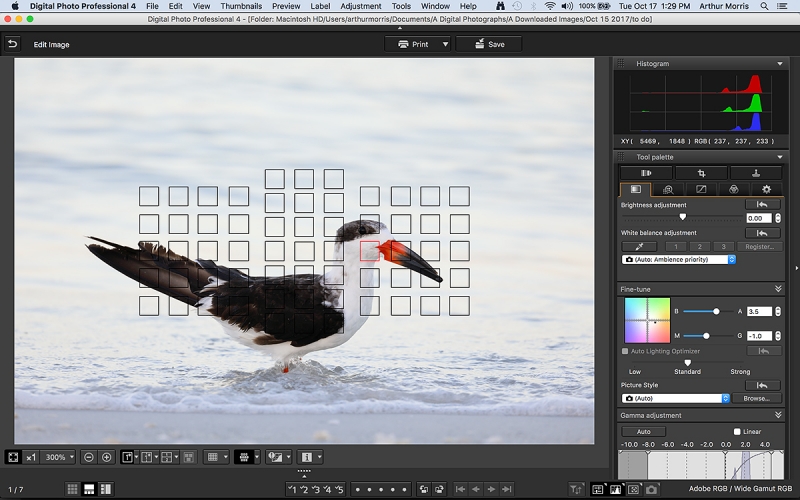
The DPP 4 Screen Capture for today’s featured image |
The DPP 4 Screen Capture for today’s featured image
Note the perfect placement of the selected AF point. Note the excellent exposure. Note the almost perfect RGB values for the brightest WHITEs: 237, 237, 233. Lastly, note that I moved the Color fine tune dot away from BLUE to reduce the BLUE color cast. Learn how and why I and other discerning Canon shooters convert nearly all of their Canon digital RAW files in DPP 4 using Canon Digital Photo Professional in the DPP 4 RAW conversion Guide here
If In Doubt …
If in doubt about using the BAA B&H affiliate link correctly, you can always start your search by clicking here. Please note that the tracking is invisible. Web orders only. Please, however, remember to shoot me your receipt via e-mail.


Please Remember to use my Affiliate Links and to Visit the New BAA Online Store 🙂
To show your appreciation for my continuing efforts here, we ask, as always, that you get in the habit of using my B&H affiliate links on the right side of the blog for all of your photo and electronics purchases. Please check the availability of all photographic accessories in the New BIRDS AS ART Online Store, especially the Mongoose M3.6 tripod head, Wimberley lens plates, Delkin flash cards and accessories, and LensCoat stuff.
As always, we sell only what I have used, have tested, and can depend on. We will not sell you junk. We know what you need to make creating great images easy and fun. And please remember that I am always glad to answer your gear questions via e-mail.
I would of course appreciate your using our B&H affiliate links for all of your major gear, video, and electronic purchases. For the photographic stuff mentioned in the paragraph above, and for everything else in the new store, we, meaning BAA, would of course greatly appreciate your business. Here is a huge thank you to the many who have been using our links on a regular basis and those who will be visiting the New BIRDS AS ART Online Store as well.
Amazon.com
Those who prefer to support BAA by shopping with Amazon may use the logo link above.
Amazon Canada
Many kind folks from north of the border, eh, have e-mailed stating that they would love to help us out by using one of our affiliate links but that living in Canada and doing so presents numerous problems. Now, they can help us out by using our Amazon Canada affiliate link by starting their searches by clicking here.
Be sure to like and follow BAA on Facebook by clicking on the logo link upper right. Tanks a stack.
Typos
In all blog posts and Bulletins, feel free to e-mail or to leave a comment regarding any typos or errors. Just be right :).


Thanks for that!
Jack
You are most welcome.
with love, artie
I’m never sure I’m right because I am a relative newbie and in this case I’m confused.
Agree.
If you moved closer as you say
Yes, I got a bit closer. Both images were made at 400mm …
but I see the bird framed identically
The framing was similar in all four but the bird in 3270 is well larger than it is in any of the other images, especially and including 3248 … If you do not see that then you need to measure.
did you zoom the lens (there was no cropping in any of these?)?
No cropping. Both at 400mm so no zooming. All four were the RAW files so they are what came out of the camera. Therefore no cropping 🙂
I don’t know the 5D4
The camera body has nothing to do with this 🙂
but with some camera’s like the 1DX2 you have a choice in manual of different metering modes.
That is true with all modern bodies.
When shooting a Pileated woodpecker at close range his black body would excessively influence the exposure so I opted to meter off his head using an upper focus point.
You do NOT meter with a focus point. Period 🙂
Theoretically at least, one can watch the analog meter and judge exposure by aiming at some different areas in the frame.
That is 100%: the exposure changes depending on the framing, how much dark, how much light …
However, like I said, I’m the one trying to learn, not teach because I’m not qualified and given my age likely never will be.
Not true at all on the latter 🙂 Part of your misunderstanding seems to come because you think that the AF point is in some way connected to the metering. It is not. You can set up spot-metering linked to the focus point with many cameras (and I am pretty sure that that includes both the 5D IV and the 1DX II) but I do NOT recommend that anyone use spot metering with birds. For about a dozen reasons the first and most important is that few folks who say that the “use” spot metering have no idea how to use it properly.
My best advice it to study the chapter on Exposure in the original “The Art of Bird Photography” and follow that up by mastering the material in the Exposure Simplified section of ABP II. Or buy the two book bundle and start studying.
with love, artie
Did we know of the frame size change? Do you ever use manual with a chosen mode such as exposure linked to a single point?
Jack
Hi Jack, You were looking at four RAW files so the size of the bird in the frame was the size of the bird in the frame 🙂 I almost always use Manual mode. But, there is no such thing as using “manual mode with the exposure linked to a single point … ”
If you are sure that I am wrong or if you would like to explain further, please do so.
respectfully with love, artie
Was Jack referring to shooting in manual mode, but using Spot Metering with a single point that would only indicate on the analog scale? I know you don’t recommend Spot Metering, I was just trying to understand his question.
Just a thought…
Hi Warren, It is possible that that is what he meant but I was as confused as you were by his question 🙂 I tried to help him as best as I could and it seems that he got it.
with love, artie