What’s Up?
I was so into assembling this blog post that I stayed in on an absolutely gorgeous morning. This blog post took about eight hours to prepare (including the time spent on the image optimizations. There is a ton of great stuff below. Note especially the versatility of the Canon RF 100-500, the great things that can be done with Topaz DeNoise and Sharpen AI, the fun I had on both Friday and Saturday, and the incredible variety of (tame!) subjects available at Fort DeSoto Park.
And the craziest thing is that I could post ten more really good images from the same two sessions.
Since the powers that be have effectively closed New Mexico and California to tourism, I will be offering many programs at Fort DeSoto Park just below St. Petersburg, FL. The first of those follows immediately.
Please consider leaving a comment letting us know which of today’s (ten!) featured images you think is the strongest, and why.
Fort DeSoto In-the-Field Instructional Sessions
As the weather is looking excellent again for this coming Friday and Saturday, I will almost surely be headed over to Fort DeSoto to photograph early on Friday and Saturday mornings. If you would like to join me for one or two morning sessions (and possibly for a Friday afternoon session as well), please contact me via e-mail to learn the low rates.
R5 Bodies Available Right Now!
Steve Elkins at Bedfords Camera still has a handful of R5 bodies ready to ship second day air with the 3% discount for using the BIRDSASART code at checkout. Not to mention a free copy of the Canon R5/R6 AF e-Guide. Scroll down to get in touch with Steve.
Canon R5/R6 AF e-Guide Info
Yesterday, thirteen folks sent PayPals for their copy of the Canon R5/R6 AF e-Guide. And twelve who used my affiliate links to purchase their R5 e-mailed for their free copy of the guide. If you e-mailed or sent a PayPal and did not receive your guide, please LMK immediately via e-mail.
Feedback has been overwhelmingly positive so far. Two folks wrote stating that they had a better way of setting up AF on their R5s. When I wrote back explaining why they were in error, they both back-tracked. Be sure to scroll down to read about my plans for a Canon R5/R6 User’s e-Guide. Understand that the info in the BAA Canon R5/R6 Autofocus e-Guide is so important that I opted to publish the AF guide immediately as the R5/R6 User’s Guide will take at least a month to finish.
BAA Canon R5/R6 Autofocus e-Guide
Twenty-one pages. 3,452 words. 28-DPP4 screen captures showing the R5’s vaunted AF system in action. Note: the AF system of the R5 is identical to the AF system of the R6.
You will learn:
1- The two most useful AF Methods for general bird photography and for birds in flight.
2- How to set up your R5/R6 AF Menus.
3- What boxes to check (and un-check) under Limit AF Methods.
4- How to change the AF Method quickly, easily, and efficiently. Note: the default way of doing this is clunky, cumbersome, and inefficient at best. One person replied that this tip alone was worth the price of admission.
5- The only setting that should be used for Initial Servo AF pt for Face Detection + Tracking.
I you are currently using multiple back buttons either for general bird photography or for birds in flight, what you learn in this guide will change your life. For the better.
Here are the first three paragraphs of this e-Guide:
From the moment I learned about the new Canon mirrorless bodies, I read about using two or three back-buttons to focus using different AF methods. The word on the street said that the way to go for birds in flight was to use one button to acquire focus with Zone AF or with Large Zone: Horizontal AF and then switch to another button to activate Face Detection + Tracking AF and then use the shutter button to make an image. My immediate thought was, “This is insanity! There has got to be a better way.” In short, there is a far superior way to set up AF on your R5 or R6.
Remember that I got away from any form of back-button or rear focusing many years ago after finally realizing that it is always easier to do one thing (press the shutter button), than it is to do two things (press a back button and then press the shutter button).
The default method of switching AF Methods with the R5/R6 bodies is cumbersome at best. It involves first pressing the grid button (my name) on the upper right back of the camera and then pressing the hard-to-access M-Fn button to toggle through the AF Methods. This method is so bad that it will not be mentioned again in this guide.
The guide is free to all who have ordered an R5 or an R6 using my B&H affiliate link or from Steve Elkins/Bedfords using the BIRDSASART coupon code at checkout. Please send your receipt to me via e-mail. It will take me a few days to a week to verify the B&H purchases. Bedfords folks should expect their free e-Guides fairly quickly.
To purchase your copy of the e-Guide, please send a PayPal for $25.00 to birdsasart@verizon.net and be sure to include the words R5/R6 AF Guide in your PayPal e-mail.
Everyone who gets the guide will receive a free update no later than the first week in January.
Canon R5/R6 User’s e-Guide
I am planning on doing a complete Canon R5/R6 User’s e-Guide. This will require a lot of research, a lot of time, and a lot of effort. I am hoping to have it complete by mid- to late January. As always, folks who use the BAA affiliate links to purchase their Canon gear will receive a substantial discount.
Understand that the info in the BAA Canon R5/R6 Autofocus e-Guide is so important that I opted to publish the AF guide ASAP.
Please Remember
With income from IPTs approaching zero, please, if you enjoy and learn from the blog, remember to use one of my two affiliate programs when purchasing new gear. Doing so just might make it possible for me to avoid having to try to get a job as a Walmart greeter and will not cost you a single penny more. And if you use Bedfords and remember to enter the BIRDSASART code at checkout, you will save 3% on every order and enjoy free second-day air shipping. In these crazy times — I am out at least forty to sixty thousand dollars so far due to COVID 19 (with lots more to come) — remembering to use my B&H link or to shop at Bedfords will help me out a ton and be greatly appreciated. Overseas folks who cannot order from the US because of import fees, duties, and taxes can always help out by clicking here if they see fit.
Great Topaz News!
Folks who use the BAA Topaz link to purchase Sharpen AI, DeNoise AI, or the Utility Bundle (or any other Topaz plugins) will receive a 15% discount by entering the ARTHUR15 code at checkout. To get the discount you must use my link and you must enter the discount code. Be sure to start with this link.
Topaz Stuff
As I said just a while back and have said often many times before, I should have listened sooner. If you, like me, are new to the Topaz party, please use this link to purchase. Right now I can wholeheartedly recommend both Topaz Sharpen AI and Topaz DeNoise AI. Though I have not yet worked with JPEGtoRAW AI or Gigapixel AI, I have installed both of these plug-ins and look forward to trying them on some I-Phone 11 images fairly soon. If you are thinking like me, consider the Utility Bundle that includes all four plug-ins mentioned above at a money-saving price.
Again, those who purchase Sharpen AI or DeNoise AI using my link, can e-mail to request a short Getting Started with Topaz e-Guide. I had a bit of trouble getting the two plug-ins installed and having them appear in the Photoshop Filter Menu. In addition, I will explain how to best learn about the two plug-ins by applying them on a Layer (in Photoshop).
New and Better Bedfords Discount Policy!
You can now save 3% on all of your Bedfords photo gear purchases by entering the BIRDSASART coupon code at checkout. Your discount will be applied to your pre-tax total. In addition, by using the code you will get 2nd day air shipping via Fed Ex.
Grab a Nikon AF-S Teleconverter TC-14E III and save $14.99. Purchase a Canon EOS R5 and your discount will be $116.97. Purchase a Sony FE 600mm f/4 GM OSS lens and save a remarkable $389.94! Your Bedford’s purchase no longer needs to be greater than $1,000.00 for you to receive a discount. The more you spend, the more you save.
Money Saving Reminder
Many have learned that if you need a hot photo item that is out of stock at B&H and would enjoy free overnight shipping, your best bet is to click here, place an order with Bedfords, and enter the coupon code BIRDSASART at checkout. If an item is out of stock, contact Steve Elkins via e-mail or on his cell phone at (479) 381-2592 (Eastern time). Be sure to mention the BIRDSASART coupon code and use it for your online order. Steve has been great at getting folks the hot items that are out of stock at B&H and everywhere else. The wait lists at the big stores can be a year or longer for the hard to get items. Steve will surely get you your gear long before that. For the past year, he has been helping BAA Blog folks get their hands on items like the SONY a9 ii, the SONY 200-600 G OSS lens, the Canon EOS R5, the Canon RF 100-500mm lens, and the Nikon 500mm PF. Steve is personable, helpful, and eager to please.
|
|
|
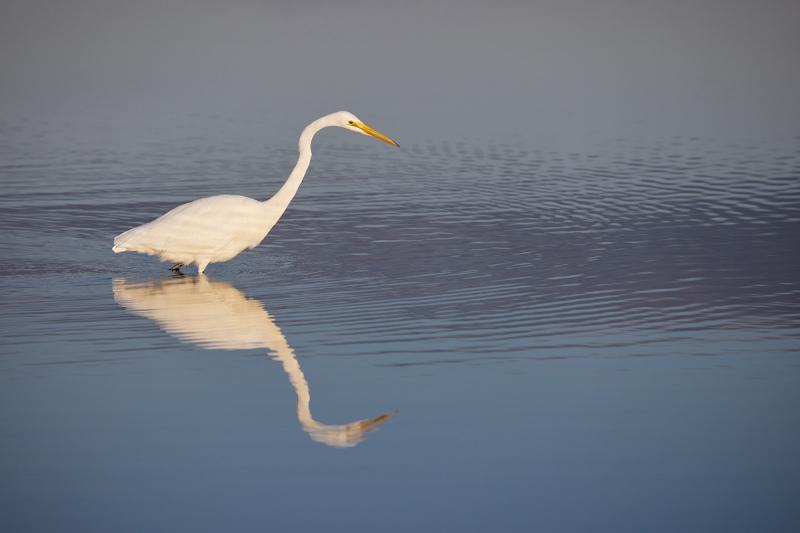
This image was created on 11 December 2020 at Fort DeSoto Park during a morning session with old and new friend Joe Usewicz. I used the handheld Canon RF 100-500mm f/4.5-7.1L IS USM lens (at 400mm) and the highly touted 45MP Canon EOS R5 Mirrorless Digital camera body. ISO 800. Exposure determined by experience and luck and confirmed as perfect by RawDigger: 1/2000 sec. at f/7.1 (wide open) in Manual mode. AWB at 7:36am on a clear sunny morning. Face Detection + Tracking/AI Servo AF was active at the moment of exposure and performed well; the active AF point caught the back of the bird’s head just behind and on the same plane as the bird’s eye. Click on the image to see a larger version. Image #1: Great Egret in early morning light |
The Start of a Great Two Days of Learning for Everyone!
I love this one for the dark cloud reflected in the water. Without Zebras I am still struggling with getting the exposure right with the R5 but I did manage to get this one right as I had time to make a test image or two. Notice that zooming out here enabled me to include the whole reflection.
|
|
|
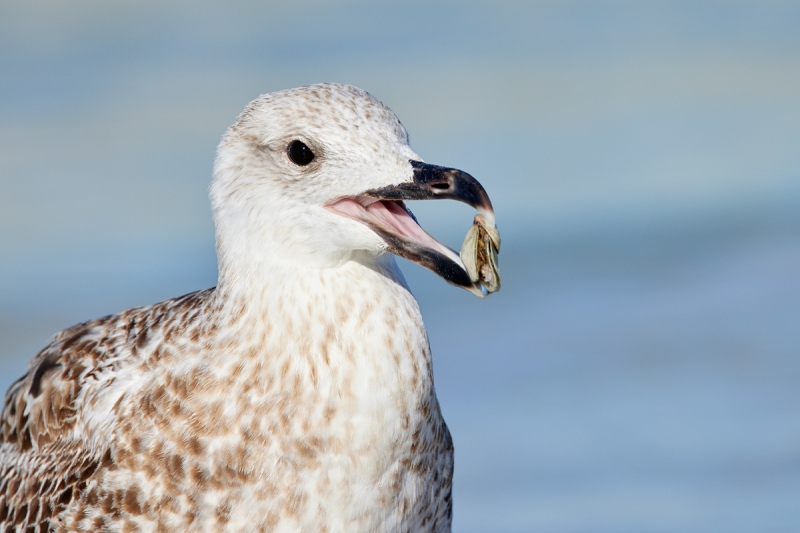
This image was also created on 11 December 2020 at Fort DeSoto Park during the morning session with old and new friend Joe Usewicz. I used the handheld Canon RF 100-500mm f/4.5-7.1L IS USM lens with the Canon Extender RF 1.4x (at 700mm) and the highly touted 45MP Canon EOS R5 Mirrorless Digital camera body. ISO 640. Exposure determined by experience and luck and confirmed as near-perfect by RawDigger: 1/1250 sec. at f/11 (stopped down 1/3 stop) in Manual mode. AWB at 9:52am on a mostly sunny morning. Face Detection + Tracking/AI Servo AF was active at the moment of exposure and performed perfectly by nailing the eye. Click on the image to see a larger version. Image #2: Immature Great Black-backed Gull with mollusk (or mollusks?) |
Lots of Great Gulls!
Joe and I took a nice walk down the beach at my favorite morning backup location. At one point we had five gull species right in front of us: Laughing, Ring-billed, Herring, Lesser Black-backed, and Great Black-backed. The latter is not a common bird in Florida and was quite cooperative. Lesser Black-backed began occurring recently in Florida about a decade ago. Twenty years ago it was a mega-rarity. For the last few years I see more lessers than greats.
|
|
|
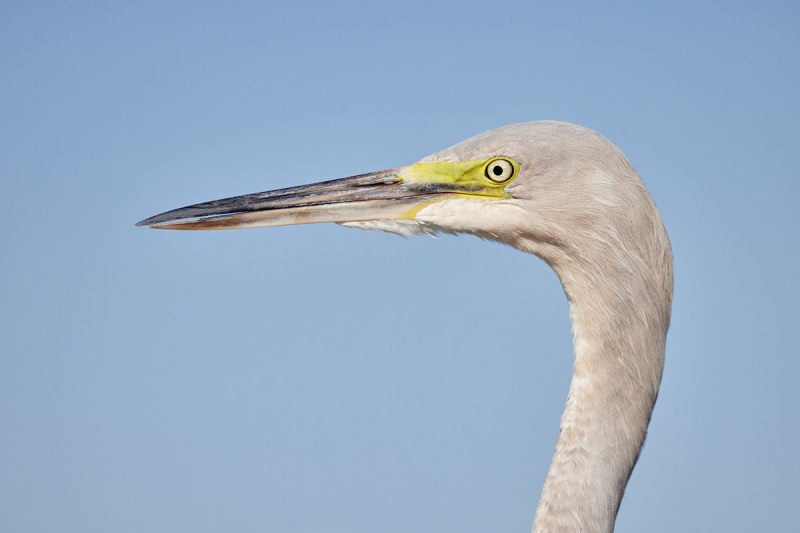
This image was also created during the morning in-the-field session on 11 December 2020 at Fort DeSoto Park. I used the handheld Canon RF 100-500mm f/4.5-7.1L IS USM lens with the Canon Extender RF 1.4x (at 599mm) and the highly touted 45MP Canon EOS R5 Mirrorless Digital camera body. ISO 640. Exposure determined by experience and luck and confirmed as near-perfect by RawDigger: 1/1600 sec. at f/9 (wide open at 599mm) in Manual mode. AWB at 10:19am on a mostly sunny morning. I was working overtime 🙂 Face Detection + Tracking/AI Servo AF was active at the moment of exposure and performed perfectly by nailing the eye. Click on the image to see a larger version. Image #3: Immature Reddish Egret head portrait |
Immature Reddish Egret
This bird is silly-tame. I located it again on Saturday but it grabbed a fish from a fisherman’s bucket, flew up to the top of a very tall light post and stayed there. Note that immature Reddish Egrets have greenish-yellow lores.
|
|
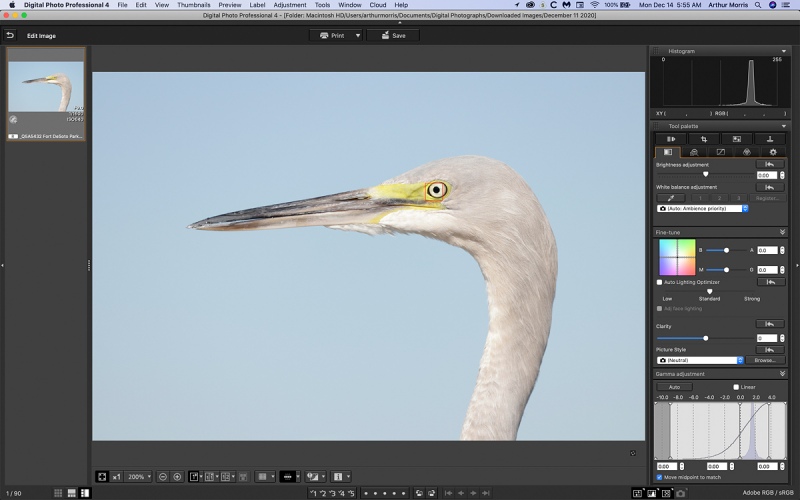
Image #3A: The DPP4 screen capture for the immature Reddish Egret head portrait image showing the active AF point. |
DPP4 Screen Capture
Note the red square right on the bird’s eye. With Face Detection + Tracking AF and relatively static subjects, successful image designs are the attained by careful framing along with lots of practice. It is easy to be sloppy and mis-frame an image … I will be doing a blog post soon showing lots of those.
|
Bill Tip Clean-Up
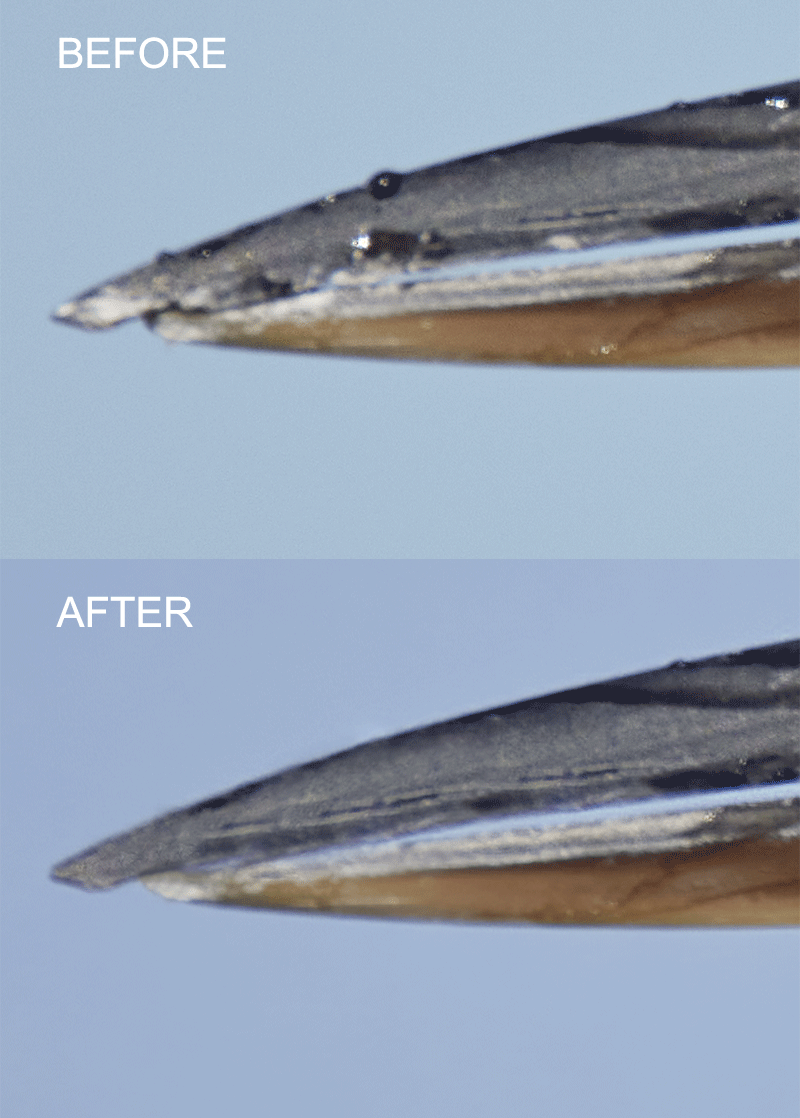
The butt-ugly bill tip here really bugged me. I used my usual cadre of clean-up tools for the repairs: the Spot Healing Brush, Content Aware Fill, several Quick Masks both transformed and refined by Regular Layer Masks, and rarely, the Clone Stamp Tool. The clean-up techniques mentioned above and tons more great Photoshop tips are detailed in the BIRDS AS ART Current Workflow e-Guide (Digital Basics II), an instructional PDF that is sent via e-mail. You can learn advanced Quick Masking and advanced Layer Masking techniques in APTATS I & II. You can save $15 by purchasing the pair.
|
|
|
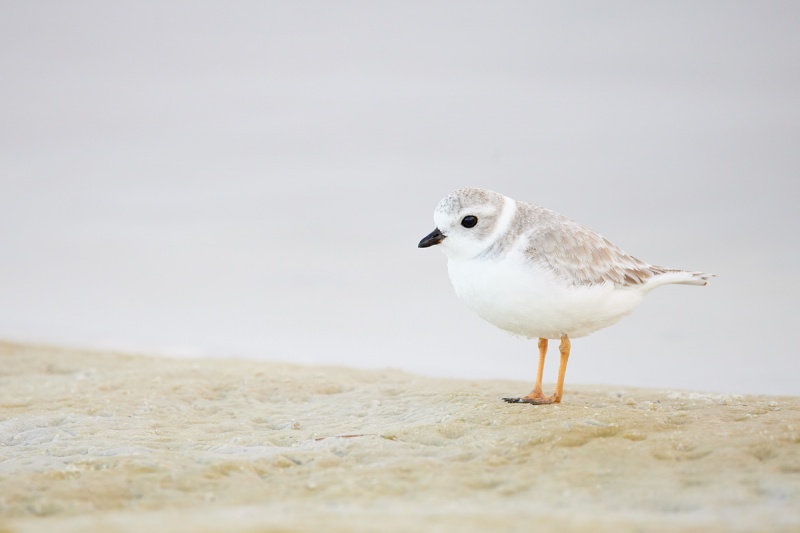
This image was created on 12 December 2020 at Fort DeSoto Park during a morning session with new friend Carl Page. I used the handheld Canon RF 100-500mm f/4.5-7.1L IS USM lens (at 500mm) and the highly touted 45MP Canon EOS R5 Mirrorless Digital camera body. ISO 5000. Exposure determined by experience and luck and confirmed as perfect by RawDigger: 1/640 sec. at f/7.1 (wide open) in Manual mode. AWB at 7:31am on a very cloudy morning. Face Detection + Tracking/AI Servo AF was active at the moment of exposure and performed to perfection by nailing the eye. Click on the image to enjoy a larger version. Image #4: Immature Piping Plover |
The Start of the Second of Great Two Days of Learning for Everyone!
Carl Page was enthusiastic and learn a ton. Here is what he said via text message:
Thank you again Artie. I learned a lot, made a new friend, and had fun.
With the low light conditions, adding the TC would have been fatal. I have been amazed at how easy it is to get close to small birds like this Piping Plover when you are not lugging around a huge lens and a big tripod …
|
|
|
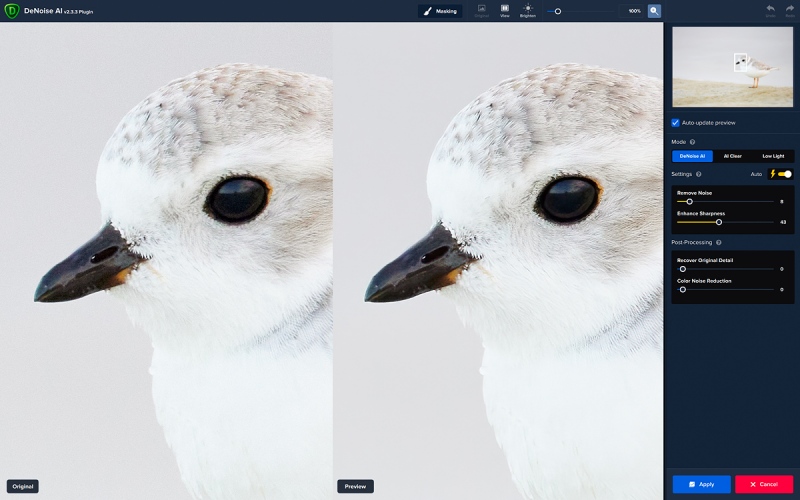
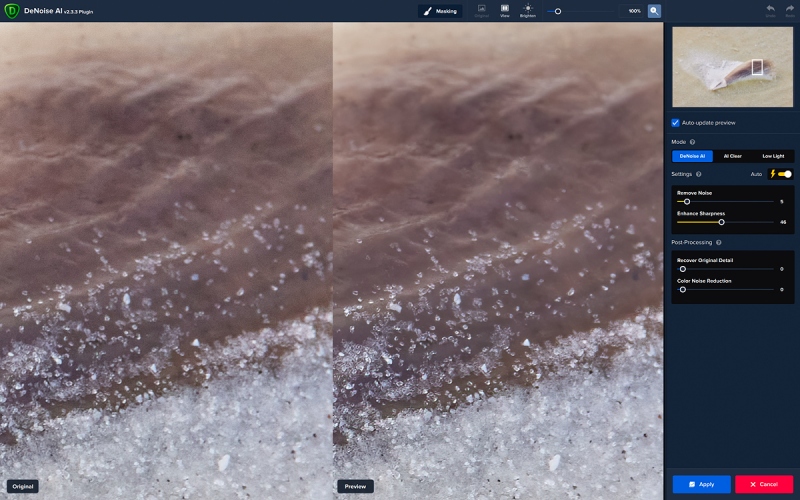
Be sure to click on the image to view it larger. Image #4A: Topaz DeNoise AI on Auto on the immature Piping Plover image at 100% |
Topaz DeNoise AI on the Immature Piping Plover image
ISO 5000? Are you kidding me? By mega-exposing to the right (thanks to RawDigger) there was not much noise in this ISO 5000 image to start with. Topaz DeNoise AI on Auto cleaned it up beautifully while sharpening it non-destructively. As I have been saying here a lot recently, it is a whole new world.
Be sure to click on the image to see the fine feather detail (FFD). Note; with WHITEs in soft light you will never see much FFD.
|
|
|
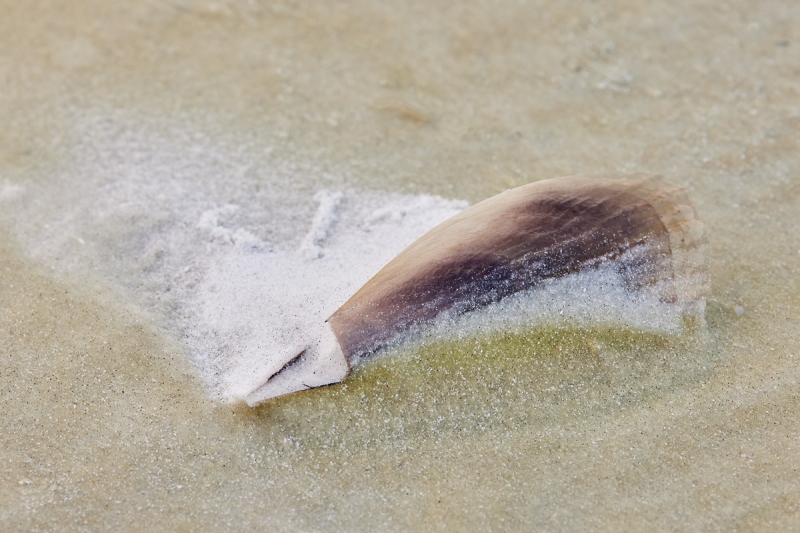
This image was created on 12 December 2020 at Fort DeSoto Park during a morning session with new friend Carl Page. I used the handheld Canon RF 100-500mm f/4.5-7.1L IS USM lens (at 500mm) and the highly touted 45MP Canon EOS R5 Mirrorless Digital camera body. ISO 2000. Exposure determined by experience and luck and confirmed as perfect by RawDigger: 1/160 sec. at f/13 in Manual mode. AWB at 7:45am on a very cloudy morning. 1-point/AI Servo AF was active at the moment of exposure and performed perfectly as expected. Click on the image to enjoy a larger version. Image #5: Mussel shell on beach |
100-500 RF Close Focusing!
As noted in the big An Honest and Extensive Comparison: the Canon R5/RF 100-500L IS lens/Extender 1.4X versus the SONY a9 ii/200-600 G OSS lens/FE Teleconverter 1.4X blog post here, the RF 100-500 at 500mm focuses down to 3.94 feet or 1.2 meters offering 0.33X maximum magnification.
There was lots of small interesting stuff on the beach that caught my eye. The great MFD of the RF 100-500 allowed me — by standing tall — to stand almost directly above this mussel shell (at 500mm or a bit less with focus breathing). The 0.33X magnification greatly expands the versatility of the Canon 1-5.
|
|
|
Be sure to click on the image to better see the noise reduction on the shell. Image #5A: Topaz DeNoise AI on Auto on the Mussel shell on beach image at 100% |
R5 Problems with Under-exposed Shadows …
Since I had to expose for the brightest white sand, the middle-toned shell is about 1 stop under. Be sure to click on the image to see how Topaz DeNoise AI on Auto cleaned up the noise on the shell very nicely. In an e-mail conversation with blog regular Adam Rubenstein, I learned that noise with under-exposed R5 images can be a serious problem, much more so than with SONY images. I will be sharing what I learned with you in a blog here post soon.
|
|
|
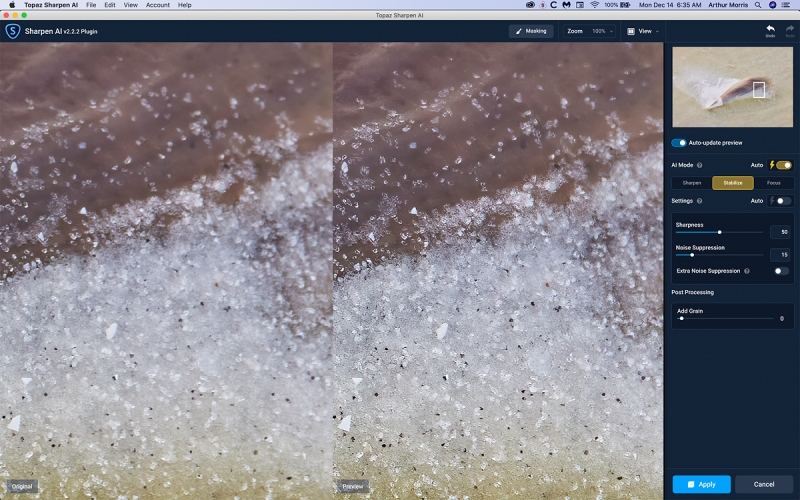
Be sure to click on the image to better see the noise reduction on the shell. Image #5B: Topaz Sharpen AI on Auto on the Mussel shell on beach image at 100% |
Topaz Sharpen AI on the Mussel shell on Beach image
Click on the image to see the amazing non-destructive sharpening of the grains os sand provided by Topaz Sharpen AI at 100%. I figured that I had not done a good job of holding the lens steady so I was not surprised to see that Sharpen AI went with Stability which does a great job with motion blur. Since I had already ran DeNoise AI, I reduced the Noise Suppression slider setting from 45 to 15. In short, I should’ve been on a tripod 🙂
|
|
|
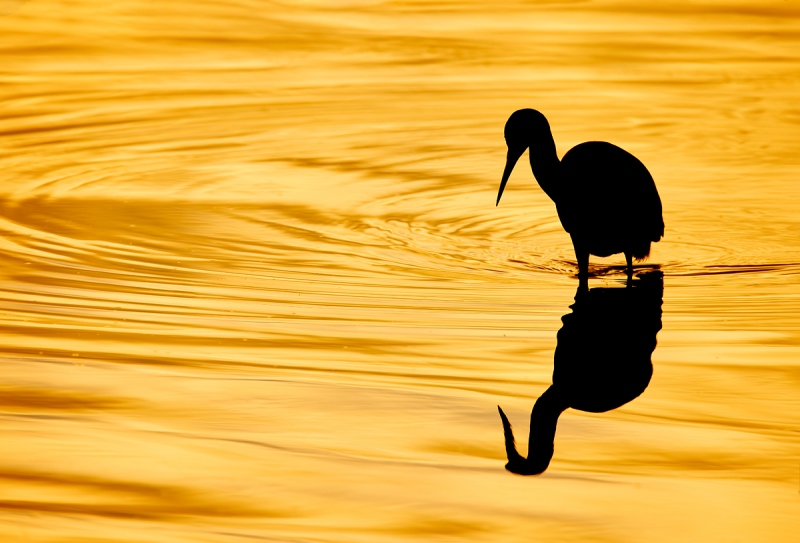
This image was created on 12 December 2020 at Fort DeSoto Park during a morning in-the field session. I used the handheld Canon RF 100-500mm f/4.5-7.1L IS USM lens (at 451mm) and the highly touted 45MP Canon EOS R5 Mirrorless Digital camera body. ISO 320. Exposure determined by experience and luck: 1/1000 sec. at f/7.1 (wide open) in Manual mode. AWB at 7:55am on a now partly cloudy morning. Face Detection + Tracking/AI Servo AF was active at the moment of exposure and performed to perfection by nailing the eye. Click on the image to enjoy a larger version. Image #6: Little Blue Heron delayed sunrise silhouette |
Little Blue Heron delayed-sunrise silhouette
When I saw the sun peeking through the clouds about 30 minutes after sunrise, I saw the possibility for a nice silhouette. I called Carl but he was too busy having fun elsewhere. Note that the exposed to the right raw file was totally blah as far as the color. Knowing the potential, I brought the image to life during the raw conversion in Capture One with the Advanced Color Editor.
|
|
|
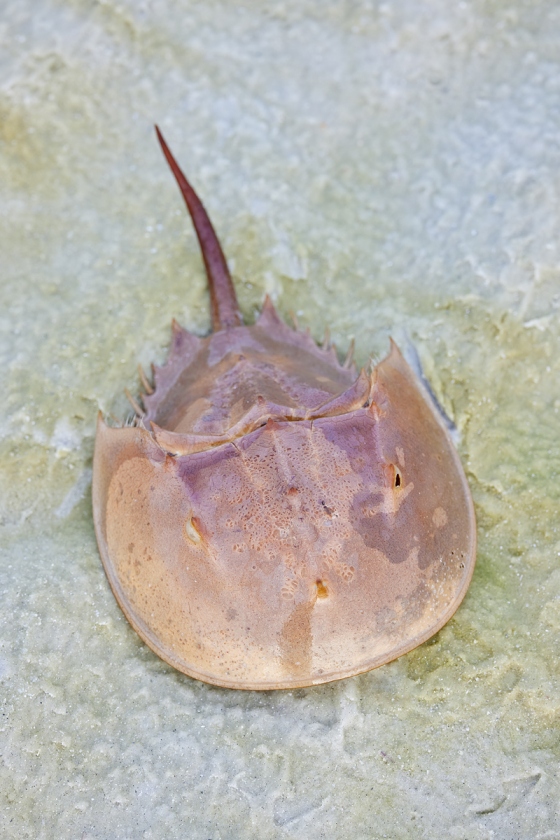
This image was created on 12 December 2020 at Fort DeSoto Park during the morning in-the field session. I used the handheld Canon RF 100-500mm f/4.5-7.1L IS USM lens (at 200mm) and the highly touted 45MP Canon EOS R5 Mirrorless Digital camera body. ISO 800. Exposure determined by experience and luck: 1/160 sec. at f/7.1 (wide open) in Manual mode. AWB at 8:00am on a now cloudy morning. 1-point/AI Servo AF was active at the moment of exposure and performed to perfection by nailing the eye. Click on the image to enjoy a larger version. Image #7: Horseshoe Crab molted shell |
Living and Learning
Here was another interesting non-bird subject. I thought that it was a dead Horseshoe Crab, but was not really sure that. An online search led me to the Virginian-Pilot article here where I learned that the molted shells of these arthropods typically include the legs!
|
|
|
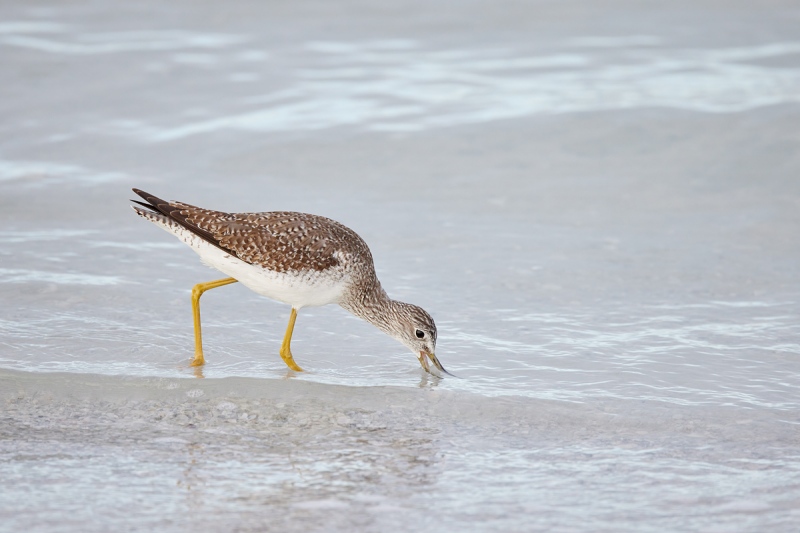
This image was also created on 12 December 2020 at Fort DeSoto Park during the morning in-the field session. I used the handheld Canon RF 100-500mm f/4.5-7.1L IS USM lens (at 500mm) and the highly touted 45MP Canon EOS R5 Mirrorless Digital camera body. ISO 5000. Exposure determined by experience and luck: 1/2000 sec. at f/7.1 (wide open) in Manual mode. AWB at 8:08am on a cloudy morning. Face Detection + Tracking/AI Servo AF was active at the moment of exposure and performed to perfection by tracking and nailing the bird’s eye. Click on the image to enjoy a larger version. Image #8: Greater Yellowlegs rush-feeding |
Greater Yellowlegs Rush-feeding
Several species of shorebirds — most notably the avocets — exhibit the rush-feeding behavior. Rush-feeding birds run through shallow water with their heads down and their bills held open hoping to capture prey. While we enjoy two species of yellowlegs in North America, only Greater Yellowlegs rush-feeds. Lesser Yellowlegs never do.
|
|
|
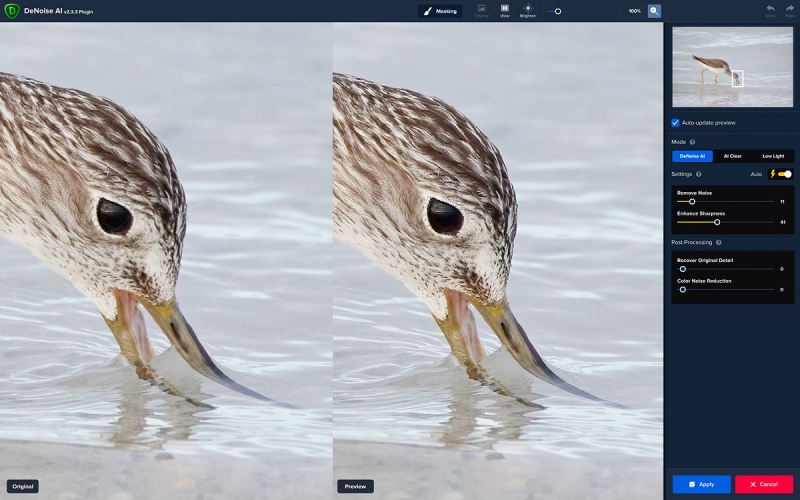
Be sure to click on the image to view it larger. Image #8A: Topaz DeNoise AI on Auto on the Greater Yellowlegs rush-feeding image at 100% |
Topaz DeNoise AI on the Greater Yellowlegs Rush-feeding image
This is another ISO 5000/are you kidding me? image. Here, Topaz DeNoise AI on Auto completely eliminated the noise in the water while sharpening the bird non-destructively. Yup. It’s a whole new world.
|
|
|
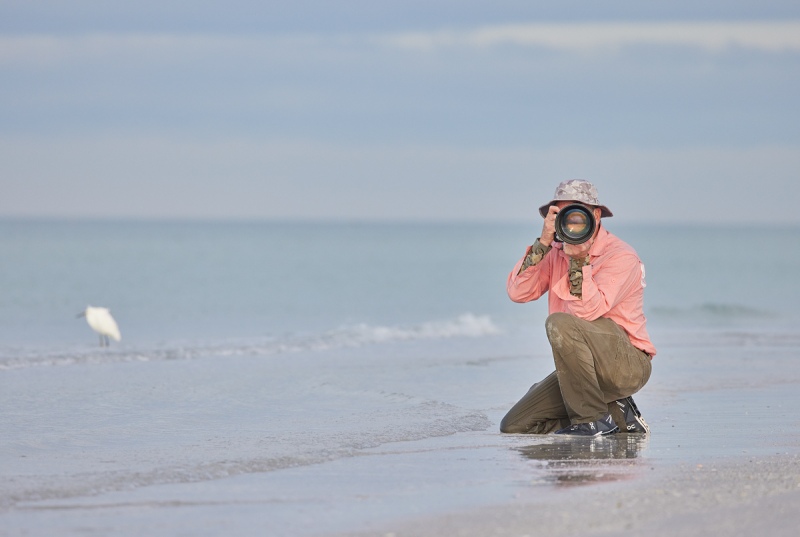
This image was also created on 12 December 2020 at Fort DeSoto Park during the morning in-the field session. I used the handheld Canon RF 100-500mm f/4.5-7.1L IS USM lens (at 428mm) and the highly touted 45MP Canon EOS R5 Mirrorless Digital camera body. ISO 5000. Exposure determined by experience and luck: 1/2000 sec. at f/7.1 (wide open) in Manual mode. AWB at 8:23am on a now partly cloudy morning. Face Detection + Tracking/AI Servo AF was active at the moment of exposure and performed to perfection. Click on the image to enjoy a larger version. Image #9: Carl Page caught in the act |
Carl Page Caught in the Act
I learned quickly on Saturday morning that Carl liked to photograph people. Here, I caught him the act. Turnabout, is after all, fair play!
|
|
|
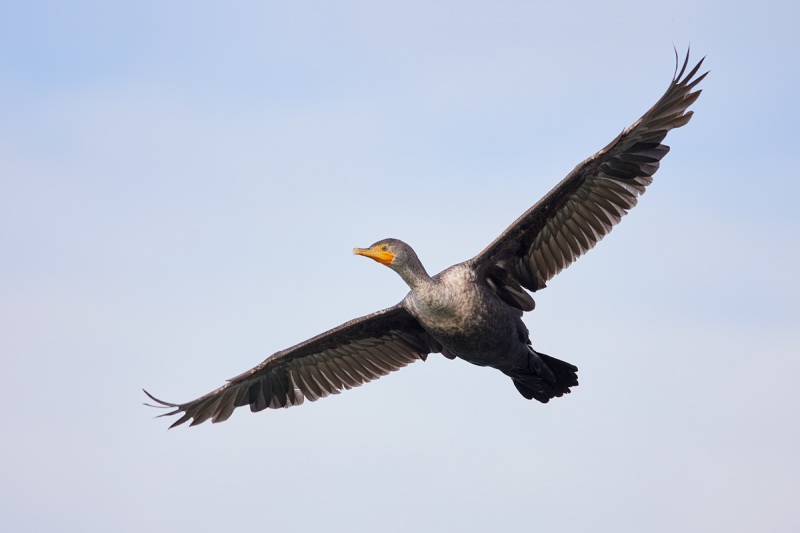
This image was also created on 12 December 2020 at Fort DeSoto Park during the morning in-the field session. I used the handheld Canon RF 100-500mm f/4.5-7.1L IS USM lens (at 500mm) and the highly touted 45MP Canon EOS R5 Mirrorless Digital camera body. ISO 1600. Exposure determined by experience and luck: 1/2000 sec. at f/7.1 (wide open) in Manual mode. AWB at 9:32am on a now partly cloudy morning. Face Detection + Tracking/AI Servo AF was active at the moment of exposure and performed to perfection. Click on the image to enjoy a larger version. Image #10: Double-crested Cormorant in flight |
An In-the-Field Exposure Lesson
I was set up in Manual exposure mode to photograph white birds in flight at ISO 800, 1/2000 sec. at f/7.1. When I saw the cormorant coming I knew that I needed a lot more light so I spun the big rear wheel four clicks to raise the ISO to 2000. Bingo. Remember that dark-toned birds need more light than light-toned birds.
|
|
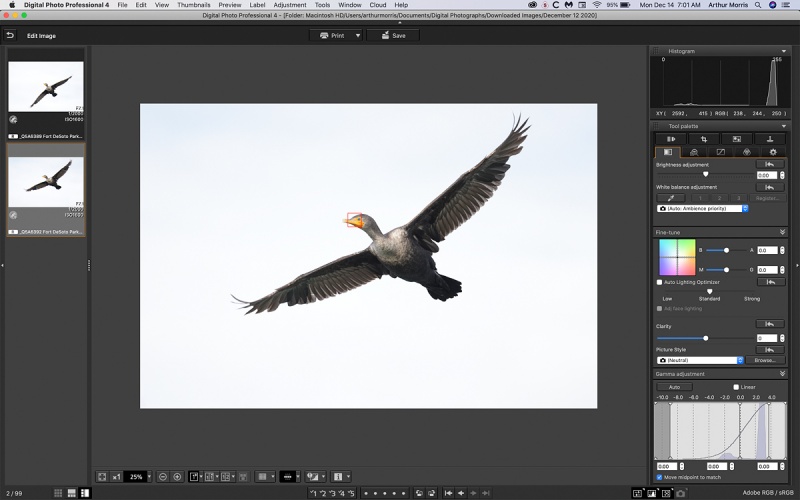
Image #10A: The DPP4 screen capture for the Double-crested Cormorant in flight showing the active AF point. |
DPP4 Screen Capture
Note the red square right on the bird’s face. Though I have not gotten to do a lot of flight photography with the Canon loaner gear yet, I can say with absolute confidence that Face Detection + Tracking AF does not work this perfectly all the time. At least for me.
Compare the optimized image (#10) with the original here, and you will see that I moved the bird nicely down in the frame using the techniques in APTATS I & II. You can save $15 by purchasing the pair.
|
|
The DeSoto Site Guide — includes a recent update! |
The Fort DeSoto Site Guide
You can get yourself a copy of the Fort DeSoto Site Guide here. Fort DeSoto is about the only bird photography hotspot that I know of that has the potential to offer great opportunities every day of the year. The big attractions here are shorebirds, all the large wading birds (including Roseate Spoonbill at various seasons), and many species of terns, and gulls. In the spring photograph the breeding behaviors of Royal & Sandwich Terns and Laughing Gull. Flight photography can be good when feeding sprees occur just off of the beach. These feature terns and gulls and Brown Pelican. Spring and fall migration can be excellent for all manner of warblers, vireos, gnatcatchers, tanagers, grosbeaks, and orioles in some of the wooded areas. The Skyway Bridge Piers and environs are also covered in this Site Guide. By purchasing the guide you will know exactly where to be on what tide and what wind. Why waste your time searching for the birds when you can just show up and act like a DeSoto veteran?
Typos
Feel free to e-mail or to leave a comment regarding any typos or errors. Just be right :). with love, artie




Hi Artie!
Just want to let you and the readers know that Topaz is having a 30% off site-wide sale right now. Best of all, when I used your link and promotion code I also got the additional 15% off! I already had Ai Sharpen, but you’ve convinced me I need DeNoise Ai. Very pleased to get it for under $50, everybody needs to act fast, use your link and code for the win!
You are correct sir! Thanks much.
with love, artie
Thanks to Artie and Bill, I just scored Sharpen and DeNoise for $95.18! Thank you, gentlemen!
Artie – what’s your current workflow process with the Topaz products? Are you using DeNoise & Sharpen AI on all images? Also, is there a link to purchase Topaz products through the BAA site?
CJ, I have been discussing the DeNoise/Sharpen AI workflow in various blog posts for about two months now. I will go over the basics here for you now:
1-I run DeNoise on virtually every image, on the whole thing, on a layer. It is the first thing I do after converting the image in Capture One and bringing the TIF into Photoshop. I use Auto and only rarely reduce the amount of sharpening.
2-I rarely use Sharpen and when I do, it is always on a selection of the bird or the face of the bird. Again, always on a Layer. Auto will tell you if the problem is motion blur (Stabilize) or inaccurate focus (Focus). I will almost always reduce the noise suppression either by 2/3rds or by moving the slider back to zero (since I have already run DeNoise on the whole image).
Topaz Still on Sale!
Right now Topaz is offering price reductions on the Utility Bundle and the Creator Bundle. The former normally sells for $359.96. It is on sale now for $249.95. Click here, scroll all the way down to the sale, and enter the ARTHUR15 code at checkout to save an additional 15%! The Creator Bundle usually sells for #279.97 and is now on sale for $149.99. Using the ARTHUR15 code at checkout brings the price down to $127.49!
Great Topaz News!
Folks who use the BAA Topaz link to purchase Sharpen AI, DeNoise AI, or the Utility Bundle (or any other Topaz plugins) will receive a 15% discount by entering the ARTHUR15 code at checkout. To get the discount you must use my link and you must enter the discount code. Be sure to start with this link.
Topaz Stuff
As I said just a while back and have said often many times before, I should have listened sooner. If you, like me, are new to the Topaz party, please use this link to purchase. Right now I can wholeheartedly recommend both Topaz Sharpen AI and Topaz DeNoise AI. Though I have not yet worked with JPEGtoRAW AI or Gigapixel AI, I have installed both of these plug-ins and look forward to trying them on some I-Phone 11 images fairly soon. If you are thinking like me, consider the Utility Bundle that includes all four plug-ins mentioned above at a money-saving price.
Again, those who purchase Sharpen AI or DeNoise AI using my link, can e-mail to request a short Getting Started with Topaz e-Guide. I had a bit of trouble getting the two plug-ins installed and having them appear in the Photoshop Filter Menu. In addition, I will explain how to best learn about the two plug-ins by applying them on a Layer (in Photoshop).
with love, artie
Love the silhouette and the piping plover. For some strange reason that little one speaks to me. The issue of nailing exposure is critical with the R5 with respect to reducing color noise. It is a lot less forgiving than the a9(ii) or a7riv. Though I use the live histogram in the EVF (Menu Camera>7> shooting info. disp.>VF info/toggle settings>screen 2>info(edit screen)>uncheck detailed shooting info>check histogram display), it isn’t all that helpful and the lack of zebras is frustrating and inexcusable. The histogram doesn’t display clipping warnings in either brightness or RGB modes. Canon was on the forefront all those years ago with the “blinkies” on playback, but “come on man” Canon, it’s 2020 and there is no reason zebras or clipping warnings are absent.
Thanks, Adam. I love that one too. I will be doing a blog post sharing what you taught me about R5 color noise in the shadows with underexposed images …
And yeah, the lack of Zebras kills me too 🙂
with love, artie
Would have to pick the heron silhouette, though all look great. The color really gets your attention. Will not be able to get to Desoto soon but remember the amazing opportunities there.
Thank you Doctor Dick. Be safe.
much love, artie
For me the strongest is image 4, Immature Piping Plover. The contrast of the dark eye and bill on the white background really draws me in.
Thanks, Bruce. I love shorebirds and PIPL is a real cutie.
with love, artie
#6 the Heron silhouette, love the composition and color. Simple, colorful and clean. That would make a nice print. Also like #9 because it is a “fun” image and a little different. Is that the eye of the person visible in the lens?
Thanks, Jim. The far shoreline is reflected in Carl’s lens. I am sure that he and his eye are in there too but much too tiny to be seen.
with love, artie
I think my choices would be #6 and #1. I like the graphics of them.
All the others are really good, too, but I’m a sucker for the simpler images. That’s just me. Thanks for all that you are doing. Sorry about the cancellation of the NM and CA trips.
Be well out there and have a great holiday season.
Guido
Thanks, Guy. And thanks and ditto on the good wishes.
with love, artie