|
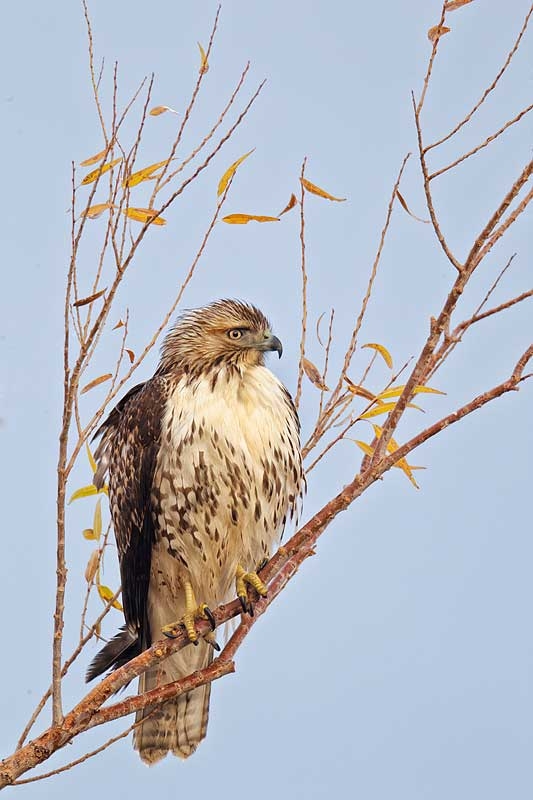
Red-tailed Hawk, immature perched in cottonwood tree, Bosque del Apache NWR, San Antonio, NM. From the recently concluded Bosque IPT. This image was created with the tripod-mounted Canon 800mm f/5.6L IS lens, the 1.4X III TC, and the EOS-1D Mark IV. ISO 400. Evaluative metering +1 2/3 stops: 1/125 sec. at f/9 in Av Mode. Central Sensor (by necessity) Rear Focus/AI Servo AF and recompose. Click here if you missed the Rear Focus Tutorial. Lens/TC/camera body Micro-adjustment: +4. |
My Thoughts on the Red-tailed Hawk Images
In comments on the December 8th post, Sun or No Sun: Which Red-tail Image Do You Prefer? , the reactions were about as I expected: by a margin of about two to one folks preferred the light in the image created when a cloud covered the sun. Me too. I addition I liked the composition in that image as the bird was tucked a bit more into the corner of the frame. And I liked the head angle better on that one too. All that in spite of the nice dark cloud background in the image made while the sun was out and the higher contrast.
I hope that folks realized the importance of choosing the perfect perspective for this image, first by positioning my rental car and then by positioning my tripod. Had I moved either left or right the bird’s head would not have been placed so nicely between the small twigs that serve as a frame.
I am usually a fan of sweet, low angled sunlight. But in this case, with the light slightly off-angle, the shaded parts of the bird–as many folks noted in their comments–were rendered without detail. (Remember, my choice of perspective was made in an effort to frame the bird’s head with the twigs; I could not simply choose to work right down sun angle….) I am, however, 100% positive that I could create a very nice optimized file from the image made with the sun on the bird. But so far I have optimized only my favorite, the one made while the sun was obscured. See more on the image optimization process below.

|
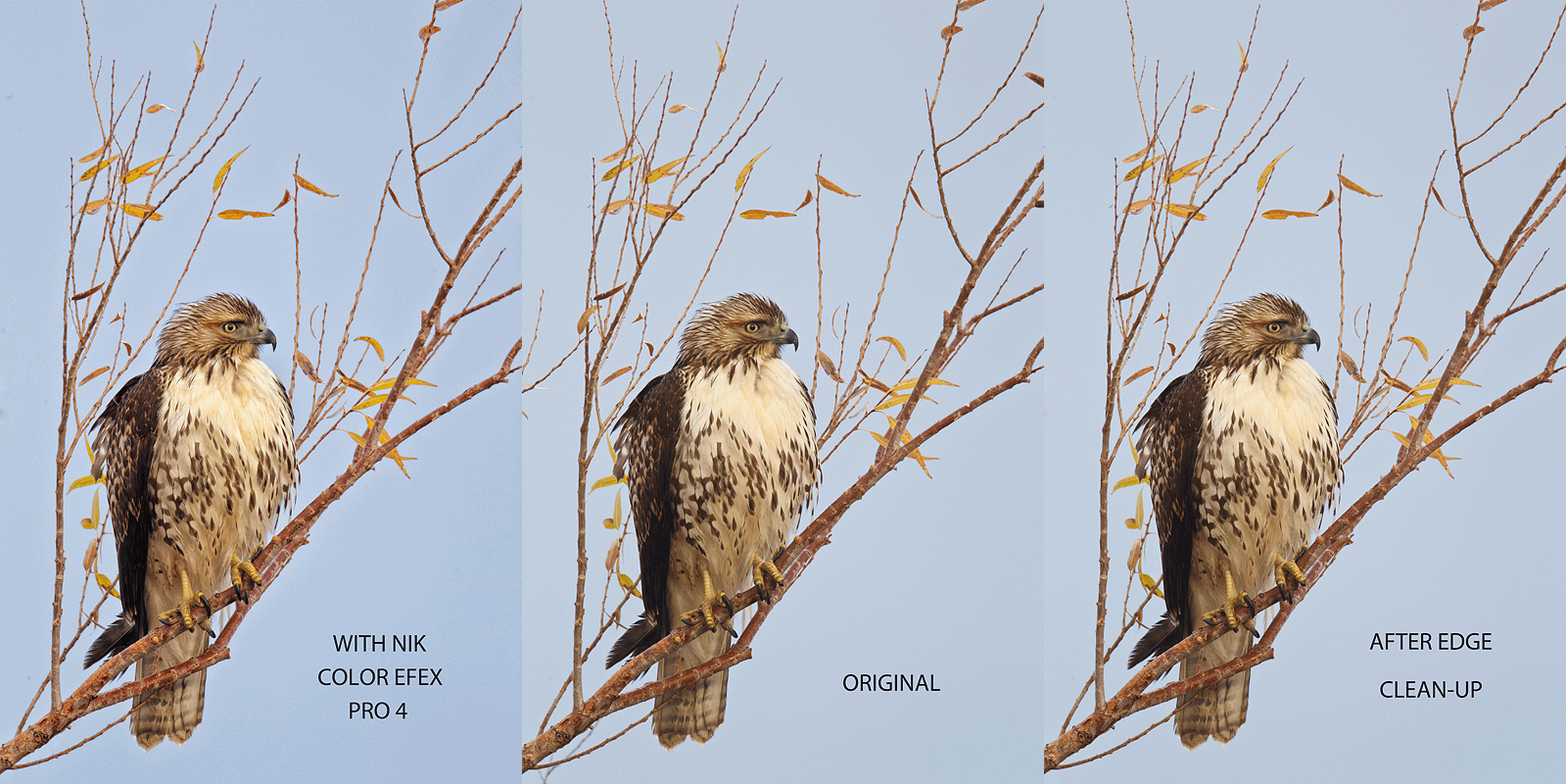
I eliminated the twigs on the left frame edge using a variety of techniques described in detail in Digital Basics (including Protect and Defend Cloning, the Clone Stamp Tool, the Patch Tool, and a series of small Quick Masks). In NIK Color Efex Pro 4 I used the Tonal Contrast filter at about 60% opacity and the White Neutralizer filter at about 80% Opacity. Remember, you can save 15% on all NIK products by clicking here and entering BAA in the Promo Code box at check-out. Then hit Apply to see your savings. If you doubt me (could that be possible :)?), you can download a trial copy that will work for 15 days and allow you to create full sized images.
NIK Creative Efex Collection
NIK recently announced the availability of a special limited production bundle of 3 of their most popular products, Color Efex Pro 4, Silver Efex Pro 2, and HDR Efex Pro. You can save more than $200 on the bundle which is available only through NIK affiliates. If you would like additional info, please e-mail with the words “Creative Efex Collection” in the Subject line. If you have been on the fence about purchasing the plug-ins mentioned above this is a great chance to save some significant bucks.
Shopper’s Guide
Below is a list of the gear used to create the images talked about in this blog post. Thanks a stack to all who have used the Shopper’s Guide links to purchase their gear as a thank you for all the free information that we bring you on the Blog and in the Bulletins. Before you purchase anything be sure to check out the advice in our Shopper’s Guide.
Canon 800mm f/5.L IS lens. Right now this is my all time favorite super-telephoto lens.
Canon 1.4X III Teleconverter. Designed to work best with the new Series II super-telephoto lenses.
Canon EOS-1D Mark IV professional digital camera body. My two Mark IVs are my workhorse digital camera bodies.
And from the BAA On-line Store:
LensCoats. I have a LensCoat on each of my big lenses to protect them from nicks and thus increase their re-sales value. All my big lens LensCoat stuff is in Hardwood Snow pattern.
LegCoat Tripod Leg Covers. I have four tripods active and each has a Hardwood Snow LegCoat on it to help prevent further damage to my tender shoulders 🙂
Gitzo GT3530LS Tripod. This one will last you a lifetime.
Mongoose M3.6 Tripod Head. Right now this is the best tripod head around for use with lenses that weigh less than 9 pounds. For heavier lenses, check out the Wimberley V2 head.
CR-80 Replacement Foot for Canon 800. When using the 800 on a Mongoose as I do, replacing the lens foot with this accessory lets the lens sit like a dog whether pointed up or down and prevents wind-blown spinning of your lens on breezy days by centering the lens directly over the tripod.
Double Bubble Level. You will find one in my camera’s hot shoe whenever I am not using flash.
Be sure to check out our camera body User’s Guides here.
BLUBB. I personally designed the Big Lens Ultimate BeanBag and have it made in the good old US of A. This large beanbag is ideal when working with super-telephoto lenses from your vehicle. Beware of cheaper and much inferior copycat rip-offs; you get what you pay for just like your Daddy said.
The Lens Align Mark II. I use the Lens Align Mark II pretty much religiously to micro-adjust all of my gear an average of once a month and always before a major trip. Enjoy our free comprehensive tutorial here.
Canon EOS-1D Mark IV User’s Guide. Learn to use your Mark IV the way that I use mine. Also available for the 7D and the Mark III here.


Guess I’m still going to have to disagree with you about this photo. I still like the soft light version better.
No problema 🙂 If everyone agreed with me 100% of the time it would be pretty boring. artie
Yes the framing was spot on Artie, almost studio like. 😉 But that Color Efex thing is, WoW! I love it!
Artie, you took a great shot and made it even better, outstanding! That NIK software is impressive.
Hi, Artie. No problem on my end; I was just commenting on how hard it is to divorce the lighting from the composition in evaluating a photo. And that was stimulated because immediately after writing “Me too.”, you wrote about the composition. To beat a dead horse, I also preferred the composition in the overcast image but tried very hard to ignore that. Thanks again.David
YAW. My point was that I often prefer overcast to sun with many subjects, even sweet light brings problems at times. Here, even if I had been able to point my shadow directly at the bird I would have like the image without any sun. artie
David and Fabrizio. I clearly stated (when I wrote “Me too”) that I preferred the light in the image “created when the cloud covered the sun.” Then I offered additional comments on the image. So I am confused as to where the problem lies Hmm…. artie
Yes, Artie, I’m a bit puzzled by the response, not for the pick per se (personal taste), but for the motivation. Removing the bird attitude, that I understood – as David – was not to be considered, we only have exposure and details. You say that details were not excellent even with the sunlight, but you are positive they could be enhanced with the proper postprocessing… So, in the end the only difference seems to be the bird attitude… hmm… 🙂
Thanks, Artie. Helpful as always. Just an aside; in your original post, you instructed us specifically NOT to consider composition in our comments. That’s easier said than done!
Thanks again.
David