The One Big Secret to Making Great Bird Photographs
With Arthur Morris/BIRDS AS ART — Free NANPA Webinar
Yes, boys and girls. There really is just one big secret. It will be revealed at the very end of the webinar. Join me on July 13 from 4:00 to 5:00 pm EDT to learn a ton. Click here to register. This program is free and open to all. Covered topics will include seeing the shot, finding the best perspective, getting close to free and wild birds, the importance of wind direction in bird photography, understanding the direction and qualities of natural light, flight photography tips, getting the right exposure, image composition and design, and lots more.
What’s Up?
Jon Hoiles and I enjoyed another great morning at Huguenot Memorial Park just northeast of Jacksonville, FL. That despite a brisk southwest wind blowing right at the sun on a clear morning. Conditions for flight were so bad that we were actually doing landing-away shots. We had a decent sunrise and then worked the chicks for two hours. We both have sore butts. It stormed all afternoon, so I stayed in and got lots of work done both on the blog and the upcoming webinar.
I was thrilled to learn on Saturday that two folks more folks signed up for the August 2023 Galapagos trip. It may very well be sold out soon.
Be sure to scroll down all the way to view Images #2 and 2A, and to read my comments on “ghastly?” And be sure to click on each image to see the high-res version to increase your viewing pleasure.
Today is Sunday 3 July 2022. The forecast for this morning in Jacksonville is for more of the same — sunny to partly to mostly cloudy with a breeze from the west. Again, this is generally a kiss of death forecast for bird photography, but we will be out there again teaching and learning and having a ton of fun. When Jon got out of my vehicle in the morning, he said, “I can’t believe a place like this exists!”
Wherever you are and whatever you are doing, I hope that you too have a great day. This blog post took less than an hour to prepare and makes one hundred six days in a row with a new one.
Please remember to use the B&H and Amazon links that are found on most blog pages and to use the BIRDSASART discount code at checkout when purchasing your new gear from Bedfords to get 3% back on your credit card and enjoy free second-day air FedEx. Please, also, consider joining a BAA IPT. You will be amazed at how much you will learn!
Follow me on Instagram here. I am trying to feature both new and old images, especially images that have not appeared recently on the blog. Or search for birds_as_art.
|
|
|
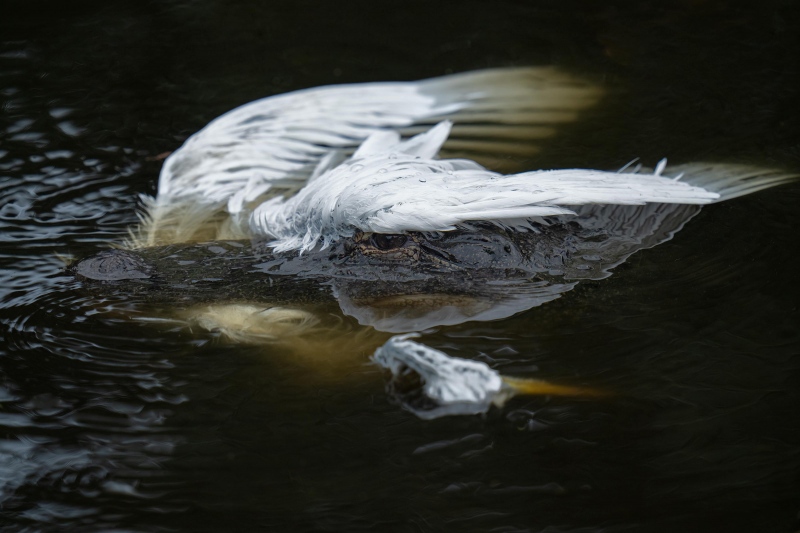
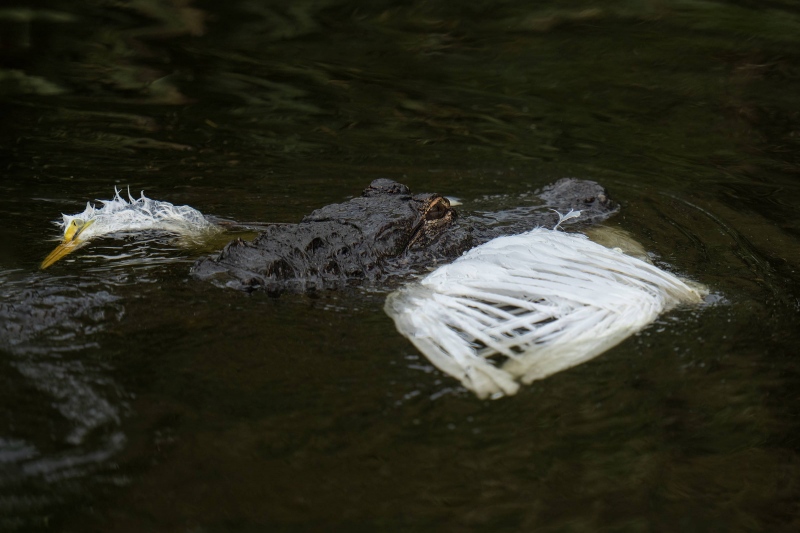
This image was created on 1 July 2022 at St. Augustine Alligator Farm. I used the handheld Sony FE 400mm f/2.8 GM OSS lens Tracking: Spot S with AF-C with Bird Face/Eye detection enabled. — I did not think fast enough to switch to Animal, but the system performed well enough. Be sure to click on the image to enjoy a high-res version. Image #1: American Alligator with a nearly-fledged Great Egret chick in its jaws |
A Ghastly (?) Scene at St. Augustine
The young father to my right let out a scream to alert his young son that a gator had grabbed a bird that had fallen into the moat. The big reptile swam slowly from my right to left. “It may surface soon” I called out. And it did. The preponderance of alligators actually protects the young birds from ground predators like raccoons and opossoms.
Women’s Hats
Many of you know that in the late 1800s, more than 50 species of North American birds were being slaughtered annually, their feathers used by the millinery trade to adorn women’s hats. By the turn of that century many millions of birds were being killed by plume hunters each year. To learn how the carnage was ended, click here to read How Two Women Ended the Deadly Feather Trade on the Smithsonian Magazine website.
The above came to mind when I realized that the gator appears to be wearing an egret for a hat!
Getting the Right Exposure
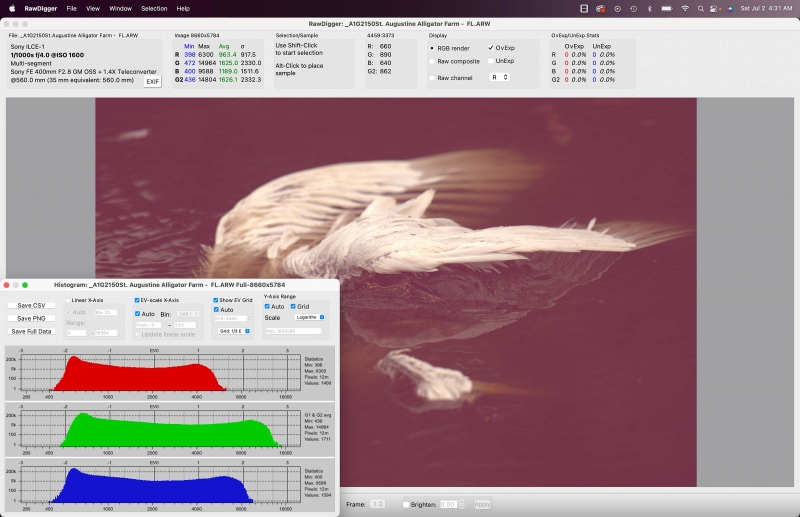
This is one of the most difficult exposures that you could ever hope (or hope not to) run across: a dark, almost black subject with a white bird in its jaws. I am glad the sun was not out! With Zebra technology getting it right was almost too easy. I picked my shutter speed, 1/1000 second in case the gator started thrashing around. I went with my usual wide-open aperture, f/4. Then I simply increased the ISO until I saw faint Zebras on the whitest feathers. And fired away. See the RawDigger item below for confirmation.
|
|
The BIRDS AS ART Current Workflow e-Guide (Digital Basics II).You can order your copy from the BAA Online Store here, by sending a PayPal for $40 here, or by calling Jim or Jennifer weekdays at 863-692-0906 with your credit card in hand. Be sure to specify Digital Basics II. |
The BIRDS AS ART Current Workflow e-Guide (Digital Basics II)
The techniques mentioned above and tons more great Photoshop tips and techniques — along with my complete digital workflow, Digital Eye Doctor Techniques, and all my personalized Keyboard Shortcuts — are covered in detail in the BIRDS AS ART Current Workflow e-Guide (Digital Basics II), an instructional PDF that is sent via e-mail. Note: folks working on a PC and/or those who do not want to miss anything Photoshop may wish to purchase the original Digital Basics along with DB II while saving $15 by clicking here to buy the DB Bundle.
Folks who learn well by following along rather than by reading can check out the complete collection of MP 4 Photoshop Tutorial Videos by clicking here. Note: most of the videos are now priced at an amazingly low $5.00 each.
You can learn how and why I converted all of my Canon digital RAW files in DPP 4 in the DPP 4 RAW Conversion Guide here. More recently, I became proficient at converting my Nikon RAW (NEF) files in Adobe Camera Raw. About three years ago I began converting my Nikon and Sony RAW files in Capture One and did that for two years. You can learn more about Capture One in the Capture One Pro 12 Simplified MP4 Video here. The next step would be to get a copy of Arash Hazeghi’s “The Nikon Photographers’ Guide to Phase One Capture One Pro e-Guide” in the blog post here. Today, I convert my Sony raw files in Photoshop with Adobe Camera Raw.
You can learn advanced Quick Masking and advanced Layer Masking techniques in APTATS I & II. You can save $15 by purchasing the pair.
|
|
Image #1A: RawDigger screen capture for the American Alligator with a nearly-fledged Great Egret chick in its jaws image |
Ho Hum, Another Perfect Exposure
What can I say? The combination of Zebras live in the viewfinder (with your camera set up properly) and post-capture study of the raw files in RawDigger makes it pretty much child’s play to come up with perfect exposure after perfect exposure. Even in the most difficult situations. It would be impossible to overstate how much I have learned by studying RawDigger and how much better my exposures have become since I started with the program almost three years ago. The raw file brightness for today’s featured image is perfect with the G channel almost making the 16000 line.
RawDigger — not for the faint of heart …
Nothing has ever helped me learn to create perfect exposures to the degree that RawDigger has. I think that many folks are — as I was for many years, reluctant to learn that most of their images are underexposed by one or more full stops and that highlight warnings in Photoshop, Lightroom, Capture One, and your in-camera histogram are often bogus as they are based on the embedded JPEGs. Only your raw files tell the truth all the time. Heck, I resisted RawDigger for several years … Once you get over that feeling, RawDigger can become your very best exposure friend no matter what system you are using. On the recent IPTs and In-the-Field sessions, we have demonstrated that fact. Convincingly.
The RawDigger Adapted (pink) Histogram
In the RawDigger e-Guide, you will learn exactly how to set up the Adapted “pink” RawDigger Histogram and how to use it to quickly and easily evaluate the exposure or raw file brightness of images from all digital cameras currently in use. RawDigger was especially helpful to me as I have struggled with R5 exposures and learned my new camera body, the Sony Alpha a1.
|
|
RawDigger e-Guide with Two Videos |
The RawDigger e-Guide with Two Videos
by Arthur Morris with Patrick Sparkman
The RawDigger e-Guide was created only for serious photographers who wish to get the absolute most out of their raw files.
Patrick and I began work on the guide in July 2020. At first, we struggled. We asked questions. We learned about Max-G values. We puzzled as to why the Max G values for different cameras were different. IPT veteran Bart Deamer asked lots of questions that we could not answer. We got help from RawDigger creator Iliah Borg. We learned. In December, Patrick came up with an Adapted Histogram that allows us to evaluate the exposures and raw file brightness for all images created with all digital camera bodies from the last two decades. What we learned each time prompted three complete beginning to end re-writes.
The point of the guide is to teach you to truly expose to the mega-Expose-to-the-Right so that you will minimize noise, maximize image quality, best utilize your camera’s dynamic range, and attain the highest possible level of shadow detail in your RAW files in every situation. In addition, your properly exposed RAW files will contain more tonal information and feature the smoothest possible transitions between tones. And your optimized images will feature rich, accurate color.
We teach you why the GREEN channel is almost always the first to over-expose. We save you money by advising you which version of RawDigger you need. We teach you how to interpret the Max G values for your Canon, Nikon, and SONY camera bodies. It is very likely that the Shock-your-World section will shock you. And lastly — thanks to the technical and practical brilliance of Patrick Sparkman — we teach you a simple way to evaluate your exposures and the raw file brightness quickly and easily the Adapted RawDigger histogram.
The flower video takes you through a session where artie edits a folder of images in Capture One while checking the exposures and Max-G values in RawDigger. The Adapted Histogram video examines a series of recent images with the pink histograms and covers lots of fine points including and especially how to deal with specular highlights. The directions for setting up the Adapted Histogram are in the text.
If we priced this guide based on how much effort we put into it, it would sell it for $999.00. But as this guide will be purchased only by a limited number of serious photographers, we have priced it at $51.00. You can order yours here in the BAA Online Store.
|
|
|
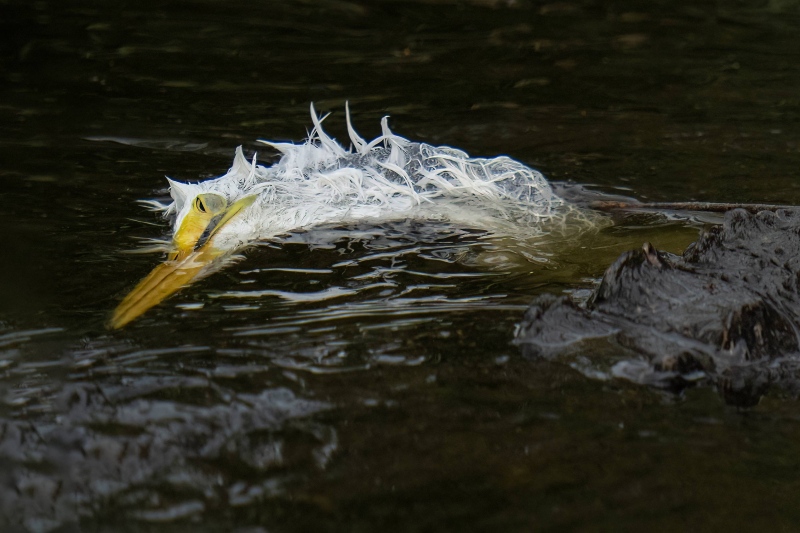
This image was created on 1 July 2022 at St. Augustine Alligator Farm. I used the handheld Sony FE 400mm f/2.8 GM OSS lens Tracking: Spot S with AF-C with Bird Face/Eye detection enabled. — I did not think fast enough to switch to Animal, but the system performed well enough. Be sure to click on the image to enjoy a high-res version. Image #2: American Alligator swimming away with a nearly-fledged Great Egret chick in its jaws |
Going Away
The gator turned right as it approached a small island and swam away from me. I kept shooting figuring “What the heck? What better could I be doing? Even with the gator heading away, I liked this frame because the egret’s head broke the surface.
The Image Optimizations
Even with a dead-solid perfect exposure, great care was required when optimizing both of today’s featured images. First, I used Select > Color Range to select the WHITEs, placed the selection on its own layer, removed the BLUE, and restored some detail with a Linear Burn. Next, I selected the dark tones of the gator using the Quick Selection Tool, placed the selection on its own layer, and went Filter > Camera Raw Filter. There, I applied a big Shadow slider adjustment, and, in Curves, moved the Darks and the Shadows sliders to the right being sure not to overdo it.
|
|
|
Be sure to click on the image to enjoy a high-res version. Image #2A: a large crop of the heron’s head in the American Alligator swimming away with a nearly-fledged Great Egret chick in its jaws image |
What’s the Best Part?
When I asked myself that question for Image #2, the obvious answer was the head of the young bird that had broken the surface. So, I executed a relatively huge crop to create the image above. Sony Alpha a1 file size and image quality allowed for the big crop. I did select the young egret’s face and head and applied some Topaz Sharpen AI to that layer only. I will admit that it did a great job.
Ghastly?
As far as ghastly goes, remember that I am always rooting for the predators. Gators and raptors gotta eat too.
Typos
With all blog posts, feel free to e-mail or to leave a comment regarding any typos or errors.



Thanks so much for including the link to the Smithsonian article about the two women who began the movement to stop the trade in bird feathers.
My pleasure. There are lots more good articles on that subject.
with love, artie
A few years ago, I saw that same behavior at the St. Augustine Alligator Farm. I managed to get a few photos. It happens so fast.
I witnessed the same thing at High Island’s Smith Oaks Rookery earlier this year. An Egret got too close to the water’s edge and the alligator who had been waiting patiently submerged, the water exploded and the bird was gone. I missed the main action because I was turned around telling another photographer to get ready because the Egret was too close to the water’s edge. The only photo I got was the gator swimming away with the bird in its mouth. Next time I will stay focused on the upcoming action.
Been there, done that. One of my problems has always been that the second I relax, or the second I decide to adjust my tripod, the bird does something spectacular 🙂
with love, artie
Reminds me of watching, with you, leopard seals eating king penguins in South Georgia. But that was more ghastly, I think. Typo: under the heading “Ghastly (?) Scene in St. Augustine,” “the big reptile slowly saw [swam] from my left…”
I was not on that zodiac. Maybe you confused me with Anita North 🙂
with love, artie
Confusing you with Anita North would be quite a trick, Artie!