|
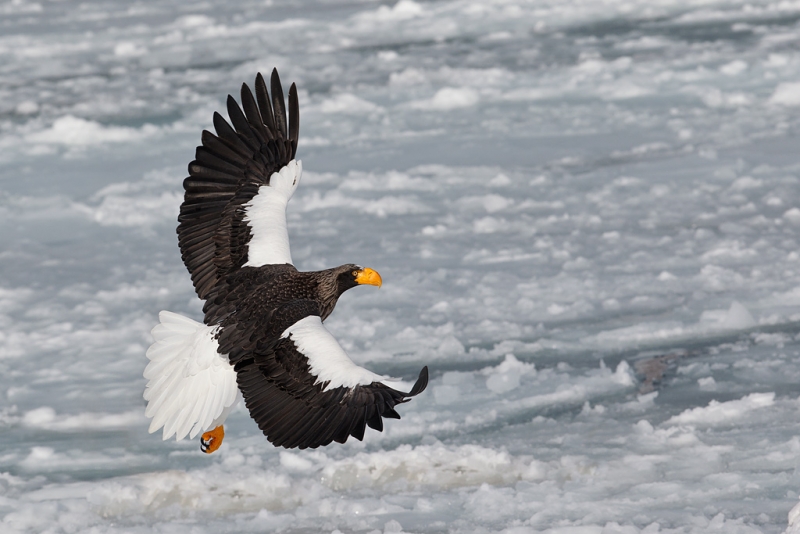
This Steller’s Sea Eagle in flight was photographed in Rausu, Hokkaido, Japan with the hand held Canon 300mm f/2.8 L IS II lens and the Canon EOS-1D Mark IV. ISO 400. Evaluative metering +2/3 stop off the ice: 1/2500 sec. at f/8 in Manual mode. Central Sensor/AI Servo Rear Focus active at the moment of exposure. Expand AF points left and right as noted in the Mark IV User’s Guide. Click here if you missed the Rear Focus Tutorial. Click on the image for a larger version. |
Bad Luck/Worse Luck
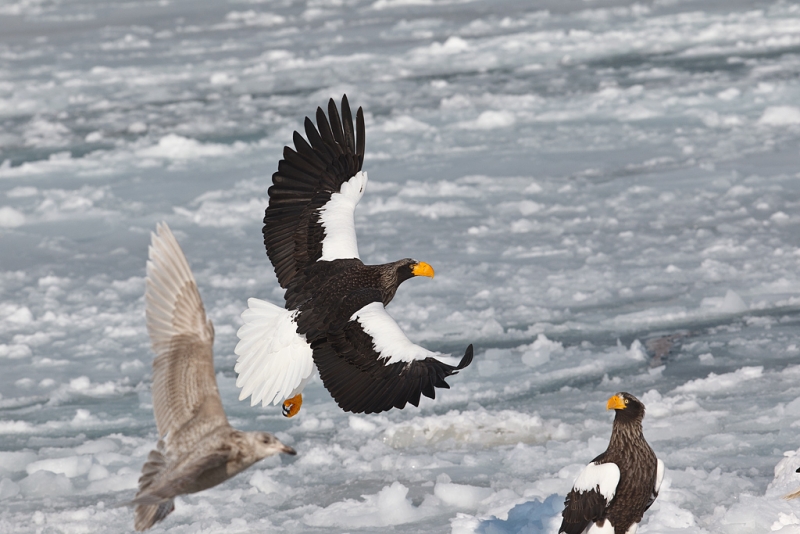
One of the big challenges on the sea eagle boat was isolating the subject. At times, it was impossible. My advice to the group was that when they did have other birds in the frame that they try to avoid merges. I did that with the bad luck image above. When I saw the image on the back of the camera I was pretty sure that I could do something with it. When I saw it on the computer I marveled at the sharpness and the beautiful dorsal view the wings; I knew that I had to do something to salvage it.
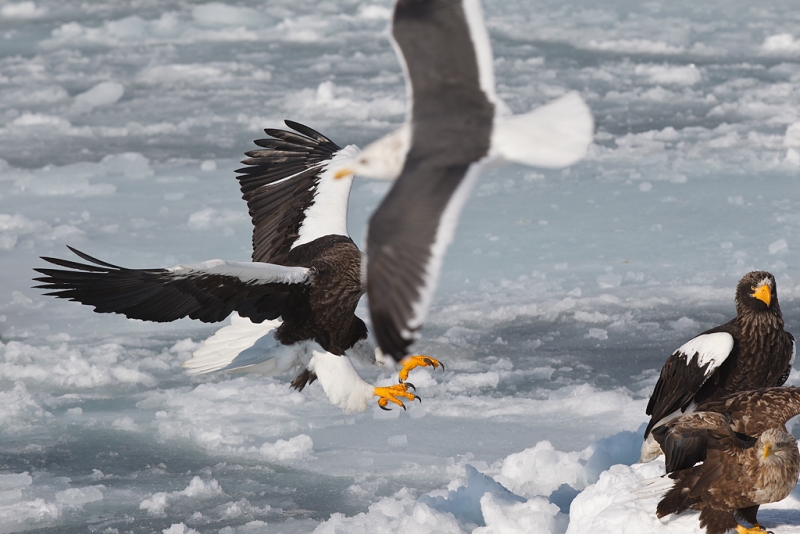
With the worse luck image below, I could not conceive of a way to try to save it.
|
Same bird, same gear, same exposure data. I thought that this was the same bird depicted in the first image but it is actually a different individual. The action must have been fast and furious as this image was created only 37/100ths of after the image above. With a bit of luck this one could have been spectacular. |
Image Optimization
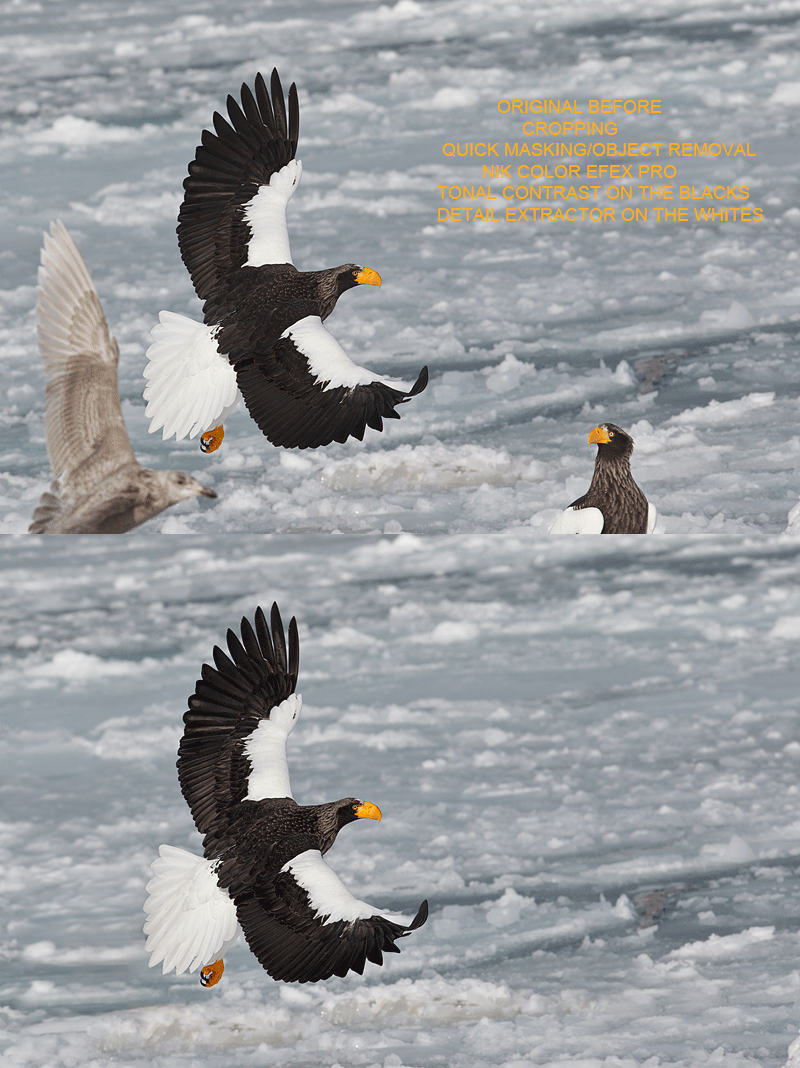
In the animated GIF below you can see the before and after images.
|
Bye Bye Birdies
There is lots to learn by studying the animated GIF above so be sure to let it cycle through at least a few times. I covered each of the two offending birds with two or three transformed Quick Masks. I have been working on a new trick where I paint a mask next to the object that needs to be covered, put it on its own Layer, hit Control T, and then drag one of the handles to stretch the layer over the object that needs to be covered. Here I moved the layer before stretching it. And I created at least one mask on each side of each of the two birds. Each mask was refined with a regular layer mask. After each new layer was merged I eliminated any obvious repeat patterns using the Patch Tool.
The basics of Quick Masking, Layer Masking and image clean-up are covered in detail in Digital Basics, an e-mailable PDF that includes my complete digital workflow and dozens of great Photoshop tips and tricks. Advanced Quick Masking Techniques are covered in Robert O’Toole’s APTATS II.
Hello Color Efex Pro
Now go back to the animated GIF and check out the BLACKs. Note the increased detail and contrast. That was done with a Tonal Contrast layer at 100% from NIK’s Color Efex Pro plug-in with the Midtones and Shadows sliders each moved about 15 points to the right. Note the increased detail and density in the WHITEs, especially on the leading edge of the wing. That was done with a 50% Detail Extractor layer, again with the NIK Color Efex Pro plug-in. With that filter on its own layer, I added a layer mask and erased 50% of the effect on the white areas of the upper wing as they had become somewhat greyed out. I left the full effect on the leading edge of the wing which was super-bright white in the original even with no RBG values above 235. A Color Efex Selection tutorial follows.
|
This is the optimized version. Though it seems like a lot of work the total time in Photoshop was less than 15 minutes. I just love the killer view of the upper wing, back, and tail surfaces. Click on the image to see a spectacular larger version. |
Color Efex Selection Tutorial
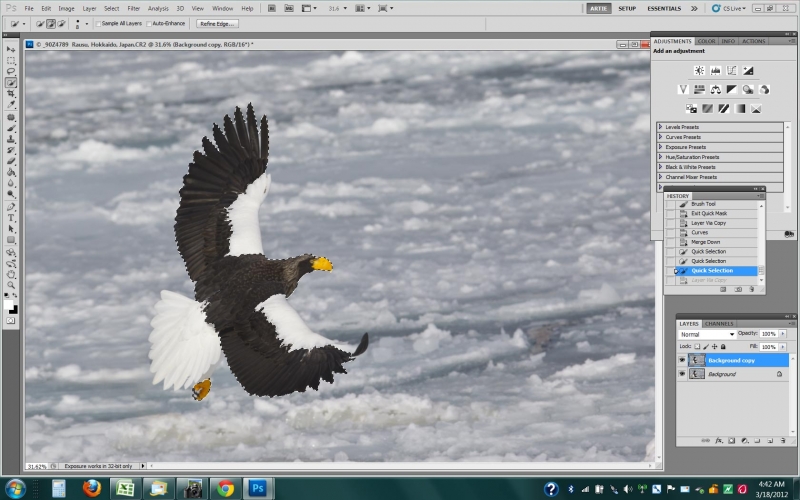
Lots of folks rave about the + and – Control Points in the various NIK plug-ins. Those of course include Color Efex Pro. I have been practicing using the control points and am getting better. For selections with less than sharp edges they do a beautiful job of masking. But for images like the one here today it makes much more sense to me to make your selections using the Quick Selection Tool. I click-drag a rather small + brush along the edges and then release the cursor. Most times with the strong black and white delineations that we see here I make a perfect selection on the first try. If not, you can work with a smaller – brush to refine the selection. In the screen below you can see that the marching ants have made a perfect selection of the blacks and the bird’s bill. (Being a screen capture the ants of course are not marching. But they are visible.)
|
When working with high contrast edges it is faster and easier to work with the Quick Selection Tool than with Control Points. |
Any Questions?
Please feel free to leave any questions or comments below.
NIK
As regular readers know NIK’s Color Efex Pro 4 is now an integral part of my workflow. You can save 15% on all NIK products by clicking here and entering BAA in the Promo Code box at check-out. Then hit Apply to see your savings. You can download a trial copy that will work for 15 days and allow you to create full sized images.
Earn Free Contest Entries and Support both the Bulletins and the Blog by making all your B & H purchases here.
More and more folks are earning multiple contest entries with their B & H purchases. See here for details on that. Eleven great categories, 34 winning and honored images, and prize pools valued in excess of $20,000. Click here to visit the competition home page.
Shopper’s Guide
Below is a list of the gear used to create the image above. Thanks a stack to all who have used the Shopper’s Guide links to purchase their gear as a thank you for all the free information that we bring you on the Blog and in the Bulletins. Before you purchase anything be sure to check out the advice in our Shopper’s Guide.
Canon 300mm f/2.8 L IS II lens. The 300 f/2.8 L IS II alone is amazingly sharp even wide open.
Canon EOS-1D Mark IV professional digital camera body. My two Mark IVs are my workhorse digital camera bodies.
And from the BAA On-line Store:
LensCoats. I have a LensCoat on each of my big lenses to protect them from nicks and thus increase their re-sales value. All my big lens LensCoat stuff is in Hardwood Snow pattern.
The Lens Align Mark II. I use the Lens Align Mark II pretty much religiously to micro-adjust all of my gear an average of once a month and always before a major trip. Enjoy our free comprehensive tutorial here.
Canon EOS-1D Mark IV User’s Guide. Learn to use your Mark IV the way that I use mine. Also available for the 7D, the Mark III, and for Nikon dSLRs here.
BreezeBrowser. I do not see how any digital photographer can exist without this program.



Oh my goodness! I am so much in love with these spectacular Steller’s Eagles! And what a shot! Gorgeous enters right into it. 🙂 Well worth the 15 mins work to isolate the main subject. Though I kind of like the juxtaposed birds in the original, just for ‘comedy’ value. Hmm, the ice that once was Gull doesn’t look quite kosher to me, the rest seems to have a ‘strata’, whereas Gulliver’s bit has a slightly different angle. But, if I didn’t know the image history, maybe I wouldn’t notice it. 😉
This is a favourite shot for sure!
Agree. If you had not seen the original you would have been in the dark….
Mr Morris,
As good as the final image is (and let me tell you how impressed I am at your ingenuity) I’ll also tell you that the original image has a wonderful cartoony & humorous quality to it. I would be inclined to keep a version with the peeking eagle (but not the gull), just for laughs. Lose the gull and the eye drifts over to this sweet eagle looking at the incoming flier. I’m not sure it’s your cup of tea, but there’s a wonderful warmth and zing to it. I’m not joking! Anyhow, mostly I’m writing to say thanks for sharing this goodness. One day, baruch hashem, I’ll get over to some of these fine places in the world…to be honest with you, my first reaction to such sights would be tears, I’d guess. Which is to say: I’d be overwhelmed! Living in Toronto with relatively limited birds can do that to a man!
Be well! Keep them coming! Huzzah!
A version with the 2nd eagle looking up would not kill me :).
So you have no aversion to a second Eagle version? Teehee! Sorry!
Do the newer ultra fast Delkin cards work well with older cameras such as the D300?
Will Nik’s Eflex pro4 work with Mac?
Yes and yes. artie
Your section above on the quick masks, you refer to “transformed quick masks”. What are they? That little section on making lost me completely.
Thanks for another great post. Learned a bunch again. I too love Color Efex Pro and it has become a major part of my workflow.
Once you create a QM you hit Control T and a transform box comes up around the selected area. You can then transform the selection by dragging the handles on the edge of the box or right click for more options including Warp. Details are in APTATS I.
Never mind. I figured it out–you just click on the star next to the filter name.
Great eagle shot! Love the wing angles. Question: How do you get menu items in Color Effex into the Favorites group? I cnnot find any button or menu for this.
Thanks. I do not know…. I will try to get Robert O’Toole to chime in here.
Artie, your blogs are great. I learn something from every one (your tips on sparrows the other day helped me get a couple nice keepers of savannahs). Just one question on your optimized image…why did you leave the blob in the ice in front of the eagle (above and to the right of where the second eagle used to be)? I cannot tell what it is and my eye keeps drifing to it.
Thanks Grace. I noticed that but did not find it distracting enough to work on. See you on BPN.
I meant publications. It’s late and I’m old!
Me too! And I am jet-lagged to boot!
I agree great clean-up job. I have purchased a number of your publicans and they all give the most bang for the buck vs. other guides.
Thanks for your kind and accurate words :). artie
Great clean-up and beautiful bird. Folks can’t go wrong with ‘Digital Basics’ or ‘APTATS II’…they are well worth the price and changed the way I edit and optimize my image files.
Thank you kind sir!