Today’s Challenge
All are invited to leave a comment by putting the three images in order of their preference; put the image you judge to be the strongest first, your next favorite second, the least strongest third on the list. For example (arbitrarily): #3, #1, #2. Warning: all three images are pretty darned good. I still cannot decide on my number one pick …
What’s Up?
After a fabulous Black Vulture session on Tuesday morning– see Images #1 & #2 below — Wednesday morning was not as good despite seemingly perfect conditions — mostly sunny with a NE breeze. After a big rainstorm on Tuesday afternoon, the beach was littered with all sorts of clutter. Conditions were perfect for flight but many of the images of flying vultures had the pier in the background 🙁 The forty or so Black Vultures that came to the gar on Tuesday mornings were virtually absent; on Wednesday, about a dozen Turkey Vultures predominated –see Image #3 below.
Yesterday, I got lots of work done on my 2023 taxes and began laying the groundwork for a lawsuit against AirBnB with regard to my month long Lido Beach rental; the alleged Superhost did not tell me that a major construction project would be going on during my entire stay. When I texted her about the noise, she told me to contact the next door neighbor in her absence. He was pretty close to worthless.
Today is Thursday 12 September and I will be heading down to the lake again no matter the forecast. Whatever you are doing, I hope that you too choose to have fun and to enjoy life.
Please remember to use the B&H links that are found on most blog pages and to use the BIRDSASART discount code at checkout when purchasing your new gear from Bedfords to get 3% back on your credit card and enjoy free second-day air FedEx. Please, also, consider joining a BAA IPT. You will be amazed at how much you will learn!
If an item — a Delkin flash card, or a tripod head — for example, that is available from B&H and/or Bedfords, is also available in the BAA Online Store, it would be great, and greatly appreciated, if you would opt to purchase from us. We will match any price. Please remember also to use my B&H affiliate links or to earn 3% cash back at Bedfords by using the BIRDSASART discount code at checkout for your major gear purchases. Doing either often earns you free guides and/or discounts. And always earns my great appreciation.
Supporting My Efforts Here
If you enjoy and learn from the blog, are all set for gear, or live overseas, consider leaving a Thank You gift here.
If you enjoy and learn from the blog, please consider using one of my affiliate links when purchasing new gear. It will never cost you a single penny. To support my effort here, please order from B&H by beginning your search here. Or, click here, to order from Bedfords and enter the discount code BIRDSASART at checkout to receive 3% cash back to your credit card and enjoy free Second-Day Air Fed-Ex shipping. It is always best to write for advice via e-mail.
In many cases, I can help you save some serious dollars. And/or prevent you from purchasing the wrong gear.
|
|
|
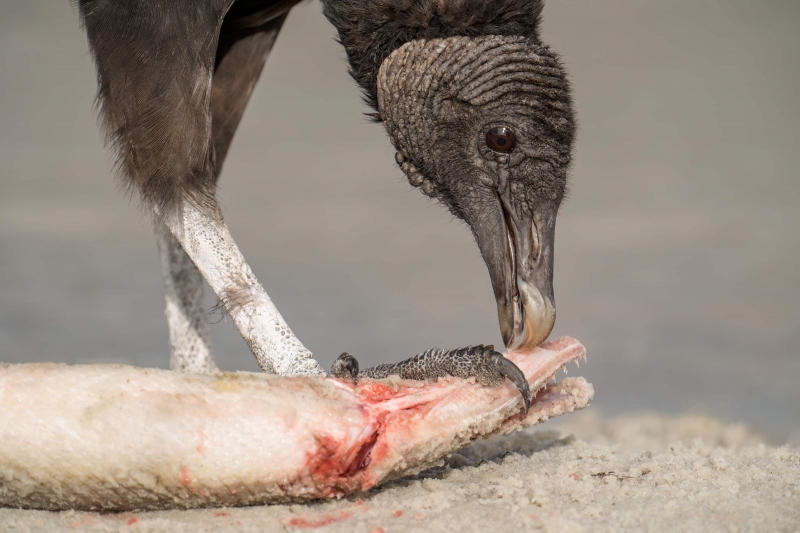
This image was also created on 10 September 2024 down by the lake near my home at Indian Lake Estates, FL. Working from the front seat of my SUV, I used the BLUBB-supported Levered-Clamp FlexShooter Pro-mounted Sony FE 600mm f/4 GM OSS lens, the Sony FE 2.0x Teleconverter, and the ridiculously amazing Sony a9 III Mirrorless Camera. The exposure was determined via Zebra technology with ISO on the thumb dial. ISO 640. 1/1250 sec. at f/8 (wide open) in Manual mode. When evaluated in RawDigger, the raw file brightness was determined to be dead-solid perfect. AWB at 9:04:16am on a then sunny morning. Tracking: Expand Spot/AF-C with Bird-Eye/Face Detection performed perfectly. Be sure to click on the image to enjoy a high-res version. Image #1: Black Vulture scavenging Florida Gar |
Super Tight
My first instinct is often to work super tight. Image #1 is un-cropped and the clean-up was minimal. The trick with images like this is coming up with a pleasing composition and a perfect head angle. The bird-eye tracking with the a9 iii performed perfectly by first grabbing the eye and then tracking it perfectly as the bird alternately raised and lowered its head. That made it easy to shoot aggressively and wind up with lots of image design choices. Except when shooting flight, I work at only 60 fps with the a9 iii. 120 fps with pre-capture is reserved for pure flight situations.
Could I have done anything different in the field to make this image better?
|
|
|
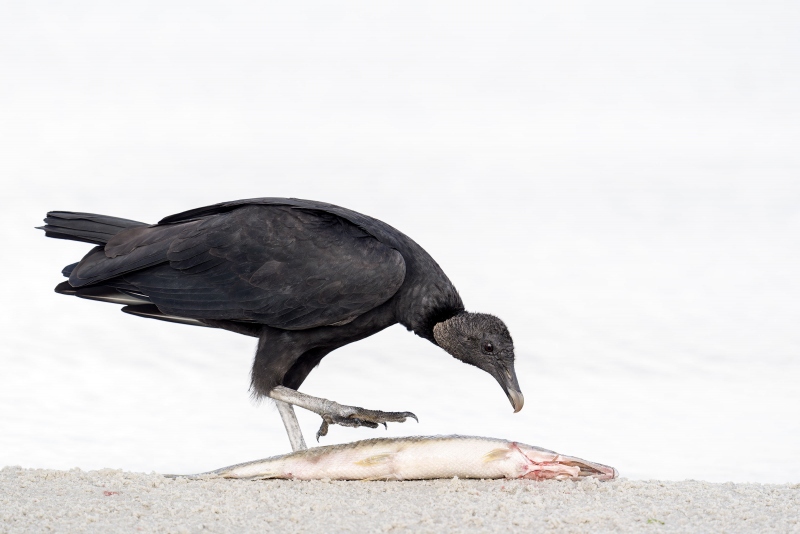
This image was also created on 10 September 2024 down by the lake near my home at Indian Lake Estates, FL. Working from the front seat of my SUV, I used the BLUBB-supported Levered-Clamp FlexShooter Pro-mounted Sony FE 600mm f/4 GM OSS lens and the ridiculously amazing Sony a9 III Mirrorless Camera. The exposure was determined via Zebra technology with ISO on the thumb dial. ISO 800. 1/1250 sec. at f/5 (stopped down 2/3-stop) in Manual mode. When evaluated in RawDigger, the raw file brightness was determined to be dead-solid perfect. AWB at 9:21:29am on a variably cloudy morning. Tracking: Expand Spot/AF-C with Bird-Eye/Face Detection performed perfectly. Be sure to click on the image to enjoy a high-res version. Image #2: Black Vulture scavenging Florida Gar |
Sony Zebra Technology
On Tuesday morning the light was changing constantly. Image #1 was created in complete sun. I raised the ISO until I saw Zebras (live in the viewfinder) on the bird’s very white legs. When a cloud covered the sun to whatever degree, I did the exact same thing, raising the ISO until I saw Zebras on the bird’s very white legs. Fifteen minutes later, substantial clouds covered the sun. Working now at f/4 with the bare 600mm lens, I raised the ISO until there were lots of Zebras on the water and some Zebras on the bird’s very white legs. Both exposures were determined by RawDigger to be dead-solid perfect. (Note: most folks are scared to use RawDigger and learn how badly they are underexposing their raw files.)
When the sun is going in and out every few seconds because of passing clouds, I always think how blessed I am to be using Zebra technology to determine the exposures. Not having to create a test image and then evaluate the JPEG enables me to keep shooting without having to waste time every time that a cloud moves. What a huge advantage.
As to the water color question, I made no effort to add any blue to the water or two darken it. I love the look of the image, the image design, the soft light, the raised foot, and yes, the white water. This is a small crop and as with Image #1, very little clean-up was done.
Could I have done anything different in the field to make this image better?
|
|
|
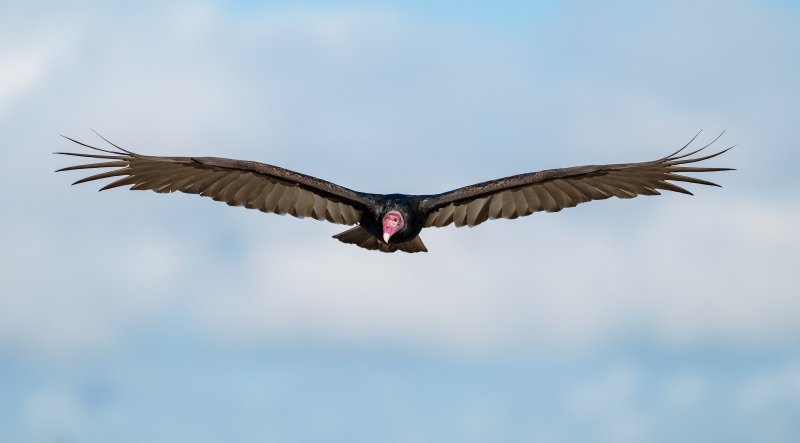
This image was created on 11 September 2024 down by the lake near my home at Indian Lake Estates, FL. Seated on damp sand, I used the and held Sony FE 300mm f/2.8 GM OSS lens and The One, the Sony Alpha 1 Mirrorless Digital Camera). The exposure was determined via Zebra technology with ISO on the Thumb Dial. ISO 400. 1/4000 sec. at f/3.2 (stopped down 1/3 stop) in Manual mode. When evaluated in RawDigger, the raw file brightness was determined to be dead-solid perfect (ho hum). AWB at 8:56:00 am on a then sunny morning. Zone/AF-C with Bird Face/Eye detection enabled performed to perfection. Be sure to click on the image to enjoy a high-res version. Image #3: Turkey Vulture adult in flight — incoming |
Flight Decisions
I went with the a1 rather than with the a9 iii so that I could see how the a-1 AF system worked after updating from Firmware 1.31 to 2.01. It seemed that nothing had changed; results were as expected. Image #3 was perfectly sharp with the AF point on the bird’s head barely below and just a bit to the right of the vulture’s eye. More than good enough.
I elected not to work from my SUV, opting instead to sit on the sand with the 300mm f/2.8. As it was sunny, I added the 1.4X TC but quickly learned that I was too close as I clipped the wings of most of the incoming birds. As I did not bring my fanny pack along — always a big mistake, I removed the TC and laid it atop my cell phone on the sand.
Image #3 represents yet another pretty much perfect capture with close to zero cleanup — just a few specks of sand were removed from the bird’s bill. After a small crop from left and right, and a crop to a pano from above and below.
Could I have done anything different in the field to make this image better?
|
|
|
Click on the composite to view a larger version and be even more impressed. The Art & Science of Photographing Birds in Flight with the Sony α-1
|
The Art & Science of Photographing Birds in Flight with the Sony α-1
by Arash Hazeghi and Arthur Morris
First of all, if you use Nikon or Canon (or Olympus or Fuji) gear, or a Sony a9 iii, do not be put off by the title. While a portion of the guide deals specifically with the Sony α-1, there is a ton of priceless information, tips, and techniques that can help you become a better flight photographer. No matter what system you are using. If you do not use a Sony α-1, be sure to read down to the bottom to save a few bucks.
Arash Hazeghi and Arthur Morris have created the definitive and most comprehensive ever treatise on photographing birds in flight. With more than sixty years of experience photographing birds, they know what you need to know but have not figured out yet! You will be astounded by the depth of their knowledge and the tips they have to offer. More than six months in the making, the guide contains 229 pages, 24,321 words,97 exceptional and inspirational flight images — each with a legendary, enlightening BIRDS AS ART caption, and 22 screen captures. The guide contains a wealth of useful, practical, and for the most part — never-before-available information.
Purchase
Click here to purchase your copy in the BAA Online Store.
What Everyone Will Learn
We will teach you the basic concepts that you need to master to become a great flight photographer along with the techniques used by the world’s best flight photographers.
You will learn that most any telephoto lens can be perfect for flight photography in a given situation; focal lengths for the images in the book range from 200mm to 1200mm and everywhere in between.
We discuss the merits of various lenses in depth, including and especially comparing the 400mm f/2.8 lenses with the 600mm f/4s.
We guide you in getting your hands on the flight photography lens that will best meet your needs. We offer a variety of handholding and rest position tips and include tips on working with a big lens on a tripod when working with a flight lens that is otherwise too heavy for you.
Both authors offer their thoughts on getting the right exposure when photographing birds in flight. You will learn to get the right exposure on foggy days and even when photographing black birds in white sky conditions.
You will learn the tremendous importance of pre-focusing, of finding the bird in the viewfinder quickly, acquiring focus almost instantly (with tips on doing all three).
You will learn the role of image stabilization in flight photography and the best settings.
Both authors share their thoughts on using the focus range limiter switch. In the same vein, you will learn to use Direct Manual Focus to make your flight photography life easier.
All will learn about the best wing positions and the importance of the background with images of birds in flight. With lots of examples.
You will learn about the best shutter speeds (and the best aperture) to use when photographing flying birds.
You will learn to photograph flight while seated and the many advantages of doing so.
You will learn the best methods of controlling high ISO noise.
All will learn to properly and safely format their flash cards.
You will learn what to do when your AF system is temporarily blinded.
All will learn the huge effect that wind strength and direction has on flight photography and to evaluate the quality and direction of the light on both sunny and cloudy days.
You will learn why it is vitally important to shoot aggressively when photographing birds in flight.
You will learn to carefully observe and evaluate a variety of bird behaviors that may shine light on some excellent opportunities for photographing birds in flight. And about getting into the best position from which to photograph.
You will learn to be a much better flight photographer.
What Sony Folks Will Learn
Exactly how Artie uses Zebras to come up with perfect exposure after perfect exposure.
The fine points and recommended settings for Optical Steady Shot (OSS).
The concept of Auto-Focus (AF) tracking in the α-1.
Everything there is to know about the complex Sony autofocus system.
About all the AF patterns, how to quickly switch them, and about those favored by each author. And why.
The Tracking and Non-tracking AF patterns. When and why Arash uses Non-Tracking Zone. And why Artie uses only two AF patterns.
How to set and use Bird Face-Eye detection for flight photography.
How and why to assign various custom functions to the various programmable buttons on the α-1 body.
The perfect settings for the many, many Menu items that are vitally related to flight photography.
How and why the Sony α-1 uses both contrast and phase detection AF to determine focus (and the benefits thereof).
Which are the best memory cards for the Sony α-1.
To quickly access frequently used menu items.
Non-Sony α-1 Discount
Using the honor system, folks who do not use a Sony α-1 body are invited to click here to save $25.00 on the purchase price of the guide.
Typos
With all blog posts, feel free to e-mail or to leave a comment regarding any typos or errors.


Hi, Artie. #1 is an easy winner for me. I love the two claws on the fish. Then #3, then #2. I agree with you that all are at least very good.
Thanks and yes, the talons are in just the right place.
a
All the images are ‘winners’. Hope you are as well with the AirB&B suit.
Tanks, Marc. Did you get to the “Say Less” book signing?
with love, artie
1,2,3- One is tack sharp. Two and three are really a toss up.
Close to my choices.
wit love, a
3,2,1
I think you can brighten #1 even more. #3 seems like a loaded question–“Could I have done anything different in the field to make this image better?” Not really, but I think the composition is what it is, as you cant crop anymore. Maybe the underside of the wing tips are blue?
Thanks. So how did you rate them?
with love, artie
I rate them very highly of course! #2, 1 and then 3 in that order for me. #2 for the composition and creamy background, #1 for the closeup detail, and #3 for inflight….but maybe you have another frame with different wing position now that I’m thinking?
Also very close to my choices. Tanks, AA,
a
So a-1 firmware 2.01 is safe? I don’t doubt it, but maybe I’ll let you test it for another few weeks, LOL!
I’d stick with 1.32 until I get done testing 2.01 and 2.02.
with love, a
Wing position is tough on Turkey Vultures as the just float ond soar above
Not always. however, though technically perfect with some nice blue in the sky and the head cocked #3 is on the boring side.
a
1, 3, 2. All very nice keepers but the closeup detail in #1 IMO is a very unique perspective, so it’s my favorite.
Thanks, Chris. I like tat one a lot too!
with love, a
#1 was my first choice because of the incredible detail and sharpness. #3 was my second choice because of the position of the bird’s head. I liked #2 the least because of the stark white background.
I love the stark white background in #2. And so does Maggi!
with love, artie
2, 1, 3.
Tanks!
a