August 18th, 2015 What’s Up?
After taking a nap on the way from Nickerson to my Mom’s house in Holbrook on Sunday, I took another nap. And relaxed. On Monday I relaxed some more. And prepared a broiled flounder dinner for my Mom, my sister Arna, my younger daughter Alissa, and the older of two sons, Ilyas. Her husband and younger son are in Uzbekistan for two weeks of visiting family and friends. After dinner it was early to bed for me. All in the Nickerson IPT group were up by 4am every day…. I am looking forward to resting the next few days while getting ready for my two-week Alaska trip.
I took me more than 2 1/2 hours to prepare this blog post at my Mom’s. If I did everything right, it should be published automatically at about 5:30am on Tuesday, August 18, 2015. Please remember to use our affiliate links especially for your major gear purchases. As always, that thoughtfulness is greatly appreciated.
|

|
|
This image was created on the East Pond at Jamaica Bay Wildlife Refuge at 6:44m on Day 2 of the Nickerson Beach/JBWR IPT. I used the tripod-mounted Canon EF 600mm f/4L IS II USM lens, the Canon Extender EF 1.4X III, and the Canon EOS-1D X. ISO 400. Evaluative metering +1/3 stop: 1/8 sec. at at f/6.3 in Tv (shutter priority) mode with the Singh-Ray 52mm Mor-Slo 5-stop Glass Neutral Density filter.
Center AF point (Manual selection)/AI Servo/Rear Focus AF just below the middle of the frame (and release) and panned left to right during the exposure. Click here to see the latest version of the Rear Focus Tutorial. Be sure to click on the image to see a larger version.
MUD AS ART: Horizontal pan blur of small stream on South Flats
|
Why Neutral Density Filters (with Super-Telephoto Lenses)?
Here is a question asked by Dan in a comment on the Nickerson Gear Bag blog post here:
In what situations would you require a 3 or 5-stop ND in your super telephoto lenses? Would it be purely when doing panning work and wanting to keep the aperture open wide to avoid distractions?
My (expanded) reply:
Hi Dan, Not at all. I use the Singh-Ray 3-stop resin or 5-stop glass Neutral Density filters (both the 52mm drop-in NDs to fit the filter holders of the Canon super-telephotos) and the 77mm circular NDs) for three main reasons:
1-Like many top professionals I choose and use Singh-Ray filters because they are the highest quality filters available.
2-I use the 3-stop and 5-stop NDs as noted above to achieve really slow shutter speeds in situations where doing so would be impossible even at the lowest available ISO. You simply cannot get down to 1/2 second on a clear sunny day without using an ND filter.
3-I use the 3-stop and 5-stop NDs as above to achieve really slow shutter speeds in situations where doing so would result in tiny apertures such as f/22, f/32, f/45, and f/64 (the latter two show up often when you are using TCs with telephoto lenses). When using really small apertures like those mentioned above (and even somewhat wider apertures like f/16 and even f/11) you will wind up having to spend lots of time cleaning dust spots from your images because even microscopic dust shows up when you are using small apertures. With wider apertures like f/4, f/5.6, and sometimes f/8, dust spots are minimized; only substantially sized dust bunnies will show up.
In today’s featured image I only had to deal with three dust spots. Had I been working without the 5-stop ND drop-in filter in place I would have been at f/36 and would have had to deal with many dozens of dust bunnies. Even if I had reduced the ISO to 50 working at f/13 would have yielded more than a dozen dust bunnies. And remember that with the 7D II you can only get down to ISO 100.
Many or even most potentially distracting background features will not be a problem when you are doing pan blurs at slow shutter speeds such as 1/8 sec., 1/4 sec., and 1/2 sec.
Aside from being used to create pan blurs, ND filters are commonly used to achieve the slow shutters speeds needed when photographing moving water such as with waterfalls or breaking surf. At times many creative photographers use telephoto lenses to photograph moving water….
artie
Horizontal Pan Blur Tip
First level the tripod base by centering the bubble in the leveling circle by adjusting the legs and/or by pushing them into the mud as I did before creating today’s featured image. Then determine the pitch, how high or low you will be aiming your lens. Next lock the vertical panning knob on your tripod head. Leave the horizontal panning knob loose. Now make some images while panning. Using this technique will ensure a perfectly level pan. As always when trying to create a really pleasing blur, make lots of images. One will surely stand out as best.
For vertical pan blurs do the opposite with the locking knobs. Note: hand holding when creating pan blurs can add some interesting twists to the images….
Do Not Forget List!
Whenever I choose to leave one of my Singh-Ray filters at home on a big trip I always come to regret it. Quickly. So I recently added the following items to my “Do Not Forget Items to Bring on all Trips” packing list:
Singh-Ray 77mm Warming Circular Polarizer
Singh-Ray 77mm Mor-Slo 5-stop Glass ND filter
Singh-Ray 77mm Mor-Slo 3-stop Resin ND filter
Singh-Ray 5-stop glass 52mm filter to fit the Canon drop-in Filter Holder
I absolutely love the Singh-Ray 3-stop Resin and 5-stop Glass Neutral Density Filters. I use the 77mm versions of these filters on my 24-105, my 70-200mm f/2.8 L IS, and my new and beloved 100-400mm IS II lens so that I can create blurs on sunny days without having to stop down to f/too-many dust spots…. With a 5-stop glass ND in place I can easily get down to shutter speeds of 1/2 second and slower on clear, bright sunny days.
Important Corrected Ordering Info for Singh-Ray 52mm Drop-In ND Filters
BIRDS AS ART ad A Creative Adventure worked with Singh-Ray to produce both a 3-stop Resin Neutral Density filter ($124) and a 5-stop Glass ND filter ($275) to fit the filter drawers of Canon Super-telephoto lenses. If you will be heading to Bosque this season, you will want at least one of the 52mm ND filters in your Xtrahand vest. To order one of the 52mm Mor-Slo filters for Canon, you will need to call Singh-Ray at 1-800-486-5501 (toll free) or 1-863-993-4100 (eastern time zone). Tell them that you want either the 52mm 3-stop Resin Mor-Slo ND or the 52mm 5-stop Glass ND (or both), give them the code artie10, and then arrange to send them your filter holder. Why? Singh-Ray needs to confirm a perfect fit for each order and in addition, they will install and clean the filter. That’s why you need an extra filter holder or two:) See below for info on those.
Folks who use other brand lenses will need to follow the procedure above, specify their lens brand and filter size, and mention the artie10 code. Those folks are invited to contact me via e-mail if they would like me to create a logo link for their brand-specific filter holder….
Please remember that you will not get your 10% discount without mentioning the artie10 code. And I would not receive my affiliate commission. Thanks as always for remembering to use our discount/affiliate code with your Singh-Ray phone and web orders.

Singh-Ray Filters
Singh-Ray filters have been used by the world’s top photographers for many decades. As always, I will have my 77mm Singh-Ray Warming Polarizer in my vest in case of rainbows. And I now travel (as above) with various Singh-Ray ND filters so that I can create pleasing blurs even with clear skies and bright sun. See here for a great example.
No other filter manufacturer comes close to matching the quality of Singh-Ray’s optical glass that is comparable to that used by NASA. And they continue to pioneer the most innovative products on the market like their ColorCombo polarizer, Vari-ND variable and Mor-Slo 15-stop neutral density filters. When you use their filters, you’ll create better, more dramatic images and, unlike other filters, with absolutely no sacrifice in image quality. All Singh-Ray filters are handcrafted in the USA.
Best News: 10% Discount/Code at checkout: artie10
To shop for a Singh-Ray’s most popular solid ND filter, the 10-Stop Mor-Slo Glass Filter liter (for example), click on the logo link above, click on “Neutral and color Solid Neutral Density Filters (glass), then click on “Mor-Slo™ 5, 10, 15 and 20-Stop Solid Neutral Density Filters (glass),” choose the size and model, add to cart, and then checkout. At checkout, type artie10 into the “Have a coupon? Click here to enter your code” box, and a healthy 10% discount will be applied to your total. In addition to enjoying the world’s best filter at 10% off you will be supporting my efforts here on the blog.
The 10- and 15stop Mor Slo filters are great for landscapes with water and moving clouds. With the 10-stop, 1/125th becomes 8 seconds and with the 15-stop, 4 minutes. I need to get at least one of those soon….
52mm Filter Holder Insanity
It would be complete insanity to have to screw out the glass filter and then screw in a 52mm ND filter each time that you need it. The only option is to purchase a spare filter holder or two, screw the filter in, and keep that setup intact and ready to use. Singh-Ray includes a really neat soft leather filter holder with each purchase. I store all of the filters that I travel with in one of the small upper zippered pockets of my Xtrahand vest. I have two extra filter holders and will be bringing both the 3-Stop 52mm Resin ND and the 5-Stop 52mm Glass ND to Bosque.
A Guide to Pleasing Blurs
If you would like to learn the fine points of creating pleasing pan-blurs and in addition, would like to learn the many other techniques that Denise and I use to create our popular pleasingly blurred images, but can’t make an IPT, get yourself a copy of A Guide to Pleasing Blurs by Denise Ippolito and yours truly.
Facebook
Be sure to like and follow BAA on Facebook by clicking on the logo link upper right. Tanks a stack!
Support the BAA Blog. Support the BAA Bulletins: Shop B&H here!
We want and need to keep providing you with the latest free information, photography and Photoshop lessons, and all manner of related information. Show your appreciation by making your purchases immediately after clicking on any of our B&H or Amazon Affiliate links in this blog post. Remember, B&H ain’t just photography!
…..
Amazon.com
Those who prefer to support BAA by shopping with Amazon may use this link:
Amazon Canada
Many kind folks from north of the border, eh, have e-mailed stating that they would love to help us out by using one of our affiliate links but that living in Canada and doing so presents numerous problems. Now, they can help us out by using our Amazon Canada affiliate link by starting their searches by clicking here. Many thanks to those who have written.
Typos
In all blog posts and Bulletins, feel free to e-mail or to leave a comment regarding any typos or errors. Just be right :).
August 17th, 2015 Stuff
On the last morning of the Nickerson Beach IPT we had some nice clouds in the east to go with our steady diet of west winds…. Hooray. The group was great. I took everyone out on Saturday afternoon for an early thank you dinner. As always, the food at Centre Thai Bistro at 268 Atlantic Ave., East Rockaway, NY 11518 was beyond superb. The appetizers were so amazing that we wished that we had not ordered our dinners so that we could have sampled more appetizers!
After dinner we headed out to the beach for our last afternoon. I woke an hour before the alarm at 3:06am and decided to pack up the car. I headed back to my Mom’s after our morning shooting session.
I took me close to an hour to optimize today’s featured image–see below for details–and another 45 minutes to prepare the blog post. If I did everything right, it should be published automatically at 6am on Monday, August 17, 2015.
Namibia IPT
If you missed the info on this great trip, please click here. So far we have assembled a cast of international participants: one from the US, two from South Africa, one from Hong Kong, and one from Australia. More than a few are world class photographic talent….
Selling Your Used Photo Gear Through BIRDS AS ART
Selling your used (or like-new) photo gear through the BAA Blog or via a BAA Online Bulletin is a great idea. We charge only a 5% commission. One of the more popular used gear for sale sites charges a minimum of 20%. Plus assorted fees! Yikes. The minimum item price here is $500 (or less for a $25 fee). If you are interested please e-mail with the words Items for Sale Info Request cut and pasted into the Subject line :). Stuff that is priced fairly–I offer free pricing advice, usually sells in no time flat. In the past two months we have sold almost everything in sight. Do know that prices on some items like the EOS-1D Mark IV, the old Canon 500mm, the EOS-7D, and the original 400mm IS DO lens have been dropping steadily. You can see the complete listings here.
Brand New Listing
Used Canon EF 400mm f/4 IS DO Lens
Sold! 8/19/2015
John Armitage is offering a used Canon 400 mm f/4 IS DO lens in like-new condition for $3,000.00. As Steve Leimberg did, John is giving this one away…. The lens was recently cleaned, checked, and calibrated by Canon Factory Service. The sale includes the lens trunk and key, the leather front lens cover, the rear lens cap and strap, and a Wimberley lens plate. The sale also includes insured shipping via either UPS or FED-EX Ground. Your item will not ship until your check clears unless other arrangements are made.
Please contact John by e-mail or by phone at 970-250-6080 (Pacific time).
I used this lens for several years with great success, especially for birds in flight and while working from various type of water craft. In addition, it would make a great prime super-telephoto lens for folks with a 7D II. Gannets in Love was created with the 400 DO. You can see that one and 13 other killer images that I made with my old 400 DO here. The title of that blog post is “The Canon 400mm f/4 IS DO Lens: Fourteen Images that Prove that the Internet Experts are Idiots.” John’s lens is priced to sell immediately. artie
|

|
|
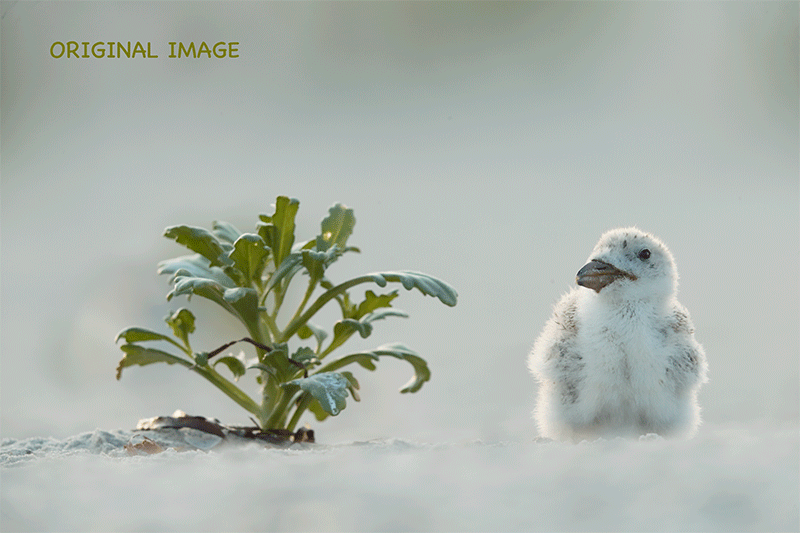
This image was created on the last morning of the Nickerson Beach IPT. I used the tripod-mounted Canon EF 600mm f/4L IS II USM lens, the Canon Extender EF 2X III, and the Canon EOS-1D X. ISO 640. Evaluative metering +2/3 stop: 1/640 sec. at f/9.
Center AF point (by necessity)/AI Servo Expand/Rear Focus on the chicks eye and re-compose. Click here to see the latest version of the Rear Focus Tutorial. Be sure to click on the image to see a larger version.
Black Skimmer chick on cloudy morning
|
Simplicity Defined
I was photographing another chick when I noticed this one to my left. I took a frame or two but the image was way too cluttered. I scrambled on my belly dragging my splayed tripod with the 600 on it through the sand. I stopped and made another image but was still not thrilled so I scrambled another two yards to my left. Voila!
Sun Angle Lesson
With the wind from the west the chick was facing west. Had it been a clear morning we would have enjoyed some nice backlit situations for a very short while after the sun came up. Had it not been for the blessed cloud, this image, created an hour after sunrise, would not have been possible as the backlight would have been far too harsh.
The Image Optimization
After converting the RAW file in DPP I brought the TIFF into Photoshop. The first thing that I did was eliminate the color cast. Next, I went after the dark areas behind the bush using the Protective Cloning on a Layer technique as taught to me by Denise Ippolito. This depends on a thorough mastery of Layer Masking; it alone took me more than 30 minutes. Denise could have polished it off in about 1/3 of that time…. Then a bit of beach clean up using my usual tools: the Spot Healing Brush Tool, the Clone Stamp Tool, my beloved Patch Tool, a few Quick Masks that were refined by Layer Masks, and even a few Content Aware Fills.
Then I selected the bird, applied a layer of my NIK Color Efex Pro 50/50 recipe at about 40% opacity. I pulled the curve up on the bird only to lighten it and finished things off with a Contrast Mask to sharpen the face. It was a great way to end the IPT.
Digital Basics
Nearly everything that I did to optimize today’s image is covered in detail in my Digital Basics File–written in my easy-to-follow, easy-to-understand style. Are you tired of making your images look worse in Photoshop? Digital Basics File is an instructional PDF that is sent via e-mail. It includes my complete digital workflow, dozens of great Photoshop tips, details on using all of my image clean-up tools, the use of Contrast Masks, several different ways of expanding and filling in canvas, all of my time-saving Keyboard Shortcuts, Quick Masking, Layer Masking, and NIK Color Efex Pro basics, Contrast Masks, Digital Eye Doctor techniques, using Gaussian Blurs, Tim Grey Dodge and Burn, a variety of ways to make selections, how to create time-saving actions, the Surface Blur (background noise reduction) settings and Brush Opacity Magic both taught to me by Denise Ippolito, and tons more.
|

|
|
You can order your copy of “The Photographers’ Guide to Canon Digital Photo Professional 4.0” (aka the DPP 4 Raw Conversion eGuide) by Arash Hazeghi and Arthur Morris by clicking here.
|
The DPP 4 eGuide (PDF)
Learn how and why I and many other discerning photographers choose and use only DPP 4 to convert their Canon RAW files in the DPP 4 RAW Conversion Guide by Arash Hazeghi and yours truly. The latest version supports all of the newer Canon camera bodies and several older models including the EOS-7D and the EOS-1D Mark IV. The DPP IV Guide is the ideal companion to the 7D Mark II User’s Guide, a runaway best seller.
Facebook
Be sure to like and follow BAA on Facebook by clicking on the logo link upper right. Tanks a stack!
Support the BAA Blog. Support the BAA Bulletins: Shop B&H here!
We want and need to keep providing you with the latest free information, photography and Photoshop lessons, and all manner of related information. Show your appreciation by making your purchases immediately after clicking on any of our B&H or Amazon Affiliate links in this blog post. Remember, B&H ain’t just photography!
…..
Amazon.com
Those who prefer to support BAA by shopping with Amazon may use this link:
Amazon Canada
Many kind folks from north of the border, eh, have e-mailed stating that they would love to help us out by using one of our affiliate links but that living in Canada and doing so presents numerous problems. Now, they can help us out by using our Amazon Canada affiliate link by starting their searches by clicking here. Many thanks to those who have written.
Typos
In all blog posts and Bulletins, feel free to e-mail or to leave a comment regarding any typos or errors. Just be right :).
August 16th, 2015 Stuff
As predicted Friday afternoon was superb. On Saturday we enjoyed some great pre-dawn blur action followed by a glorious sunrise. Then it was more SW winds and more clear skies….
This blog post took less than an hour to prepare and, if I did everything right, it should be published automatically at 6am on Sunday, August 16, 2015.
Namibia IPT
If you missed the info on this great trip, please click here. So far we have assembled a cast of international participants: one from the US, two from South Africa, one from Hong Kong, and one from Australia. More than a few are world class photographic talent….
Should I Smash My 2X III TC With a Baseball Bat?
A few years back, my friend Andy Rouse had this to say about 2X teleconverters:
…. take the 2x converter, place it gently on the ground so that it is bathed in lovely soft, evening light. Then paint your teeth red and smash it violently to pieces with a large baseball bat, cackling maniacally all the time at passers by. Go on do it, it will feel so good. Now before you think I have an issue against Canon 2x converters, I don’t! I hate ALL 2x teleconverters equally!!! I consider them a complete waste of space and money; it is always better to use a 1.4x teleconverter and crop. Of course that is just my view!
|

|
|
This image was created at Jamaica Bay Wildlife Refuge on the 2nd morning of the Nickerson Beach IPT. I used the tripod-mounted Canon EF 600mm f/4L IS II USM lens, the Canon Extender EF 2X III, and the Canon EOS-1D X. ISO 400. Evaluative metering -1/3 stop: 1/1000 sec. at f/8.
Center AF point (by necessity)/AI Servo Expand/Shutter Button AF as originally framed was active at the moment of exposure. The righ hand assist point barely caught the spot where the bird’s neck and breast meet. Click on the image to see a larger version.
Juvenile Lesser Yellowlegs with spray flying after invertebrate capture
|
Me and My 2X III TC
Andy is a widely traveled highly respected wildlife photographer with more than a few BBC honored images under his belt. Like me he is highly opinionated and like me, he enjoys making waves on occasion. In this case as regular readers might surmise, I disagree with him. To my eye, the images of this bird that I made with the 2X III TC looked sharper than the images that I made with the 600 II alone…. Do see the 100% crop below.
Image Question
Are there any subtle or obvious signs of background image clean-up or any signs of major Photoshop hanky panky? If yes, state your case and offer your proof.
What Do You Think?
What do you think of the image sharpness, the image quality, and the fine feather detail?
|

|
|
This is an unsharpened 100% crop of today’s featured image.
|
The 100% Crop
To my eye, this image is professionally sharp and exhibits satisfactory fine feather detail. Of course that is just my view!
Facebook
Be sure to like and follow BAA on Facebook by clicking on the logo link upper right. Tanks a stack!
Support the BAA Blog. Support the BAA Bulletins: Shop B&H here!
We want and need to keep providing you with the latest free information, photography and Photoshop lessons, and all manner of related information. Show your appreciation by making your purchases immediately after clicking on any of our B&H or Amazon Affiliate links in this blog post. Remember, B&H ain’t just photography!
…..
Amazon.com
Those who prefer to support BAA by shopping with Amazon may use this link:
Amazon Canada
Many kind folks from north of the border, eh, have e-mailed stating that they would love to help us out by using one of our affiliate links but that living in Canada and doing so presents numerous problems. Now, they can help us out by using our Amazon Canada affiliate link by starting their searches by clicking here. Many thanks to those who have written.
Typos
In all blog posts and Bulletins, feel free to e-mail or to leave a comment regarding any typos or errors. Just be right :).
August 15th, 2015 Stuff
We photographed at Jamaica Bay Wildlife Refuge on Friday morning and after a relatively slow start we did quite well. Everyone enjoyed seeing and photographing the shorebirds in the mud.
I prepared this blog post in my motel room after our Friday afternoon image review and Photoshop session. This blog post took less than an hour to prepare and, if I did everything right, it should be published automatically at 6am on Saturday, August 15, 2015.
Namibia IPT
If you missed the info on this great trip, please click here. So far we have assembled a cast of international participants: one from the US, two from South Africa, one from Hong Kong, and one from Australia. More than a few are world class photographic talent….
|

|
|
This image was created at 6:42pm on the first afternoon of the Nickerson IPT with the hand held Canon EF 400mm f/4 DO IS II USM lens and the amazing Canon EOS 7D Mark II. ISO 400. Evaluative metering +2/3 stop off the blue sky: 1/5000 sec. at f/4. AWB.
Center AF point/Manual selection/AI Servo/Shutter Button AF as framed was active at the moment of exposure (as is always best when hand holding). The active point missed the subject’s head by a bit but kept tracking accurately most likely due to my Custom Case settings (as detailed in the 7D Mark II Guide. Click on the image to see a larger version.
Common Tern above nest with baitfish for chick
|
400 DO II/7D II for Flight
While the winds with westerly components have made things difficult on clear mornings (can you say wind against sun?) they are just what the doctor ordered for the afternoons. We enjoyed lots of great flight photography opportunities on Thursday afternoon and expect more of the same on Friday. I was quite pleased with the performance of the 400 DO II/7D II combo. Though you obviously lose the ability to zoom out that you have with the Canon EF 100-400mm f/4.5-5.6L IS II USM lens, the extra stop of speed (f/4 as compared to f/5.6) provides faster initial AF acquisition. In addition, you can enjoy super-fast shutter speeds at ISO 400. Aside from being able to zoom out when needed the 100-400mm IIis lighter than the 400 DO II, 3.5 lbs as compared to 4.63 lbs. For some folks that is a huge difference. Which is best for you? There are many, many factors involved and in the end, that needs to be a personal decision.
There will be lots more here over the next few weeks on the 400 DO II as it will serve as my super-telephoto lens on the Bear Boat IPT. I’ll be shipping the 600 II home just before I fly to Alaska in a week.
Unfortunate Nickerson News
All visiting photographers were dismayed on Friday afternoon when they realized that the ropes that protect the colony had been moved back 25-40 feet during the day…. Someone in the group asked a birder if they new anything. “They thought that the photographers had been too close to the birds.”
I am not sure who they is. All that I can say is that all of the photographers respected the colony boundaries and that the breeding skimmers were pretty much at peace with our presence. Adults Black Skimmers routinely fed their chicks, some fairly close to the ropes, despite the presence of photographers.
Many times in my career I have seen large groups of well-behaved photographers enjoying great conditions only to have them (the authorities whomever they are) dramatically alter the situation either overnight or in a matter of hours for a variety of reasons….
|

|
|
All of the images on the bear boat card above were created in Katmai National Park during the month of September.
|
Bear Boat/Bears Catching Salmon IPT: September 1-8, 2015 from Kodiak, AK/6 FULL & 2 HALF DAYS: $6699. Happy campers only! Maximum 8/Openings: 2. Plus the leader: Arthur Morris.
Please e-mail or call me on my cell at 863-221-2372 for late registration discount info; leave a message if I do not pick up.
Join me in Katmai National Park, AK for seven days of photographing Coastal Brown Bears (grizzlies) catching salmon, fattening up for the long winter. Other subjects will include Mew and Glaucous-winged Gulls in flight and dip-feeding on salmon roe. Did I mention that we live on a boat and that the food is great? Most of our photography will be done in a variety of famed locations: Geographic Harbor, Kinak Bay, and Kukak Bay. We once had 39 bears fishing the creek at Kukak….
It is mandatory that you be in Kodiak no later than the late afternoon of August 31, 2015 September to avoid missing the float planes to the boat on the morning of September 1. With air travel in AK being what it is, with the chance of fog or other bad weather–being on Kodiak on August 30 is an even better plan). I will be on Kodiak on August 30 to avoid any potential disaster. That said in my nearly a dozen bear boat trips I was delayed only once but since I was day early as noted above there was no harm, no foul.
We will take one or more float planes to the boat mid-morning on September 1. We will photograph bears fishing that afternoon and every day for the next six days (weather permitting of course). We should have bears catching salmon every day. In addition, we will get some nice stuff on Mew Gull and Glaucous-winged Gulls dining on roe and the remains of predated salmon. We may–depending on where the concentrations of bears are–get to photograph Harbor seals and some hauled out Steller’s Sea Lions (an endangered species). Halibut fishing (license required) is optional. On September 8, our last morning on the boat, those who would like to enjoy one last photo session will do so. The group returns to Kodiak via float plane midday. Most folks will fly to Anchorage and then continue on red-eye flights to their home cities.
The eight days will consist of six full days (Sept 2, 3, 4, 5, 6, & 7) of photography featuring lots of Coastal Brown Bears catching salmon as above plus a variety of other natural history subjects plus some nice scenic photography that I forgot to mention above. Plus the first afternoon and the last morning.
What’s included? 8 DAYS/7 NIGHTS on the boat as above. All meals on the boat. (The food is quite excellent.) National Park fees. One night’s double occupancy lodging on Kodiak; arrive: Sept 1/depart: Sept 2. The thank-you-in-advance dinner on Sept 1. In-the-field photo tips, instruction, and guidance. An insight into the mind of a top professional; I will constantly let you know what I am thinking, what I am doing, and why I am doing it. Small group image review, image sharing, and Photoshop instruction on the boat.
What’s not included: Your round trip airfare to and from Kodiak, AK (almost surely through Anchorage). All necessary lodging other than the cost of your double occupancy room on the night of August 31 should you opt to arrive early–we can arrange that in advance for you. We will let you know the cost of a single supplement for the one night if so desired. The cost of the round-trip float plane to the boat on September 2 and back to Kodiak on September 9. The cost of a round trip this year was $500. The suggested crew tip of $210.
Is this an expensive trip? Yes, of course. But with 6 full and two half days, a wealth of great subjects, and the fact that you will be walking with the bears just yards away (or less….) it will be one of the great natural history experiences of your life. Most folks who take part in a Bear Boat IPT wind up coming back for more.
A $2,000 per person non-refundable deposit by check only made out to “Arthur Morris” is required to hold your spot. Please click here to read our cancellation policy. Then please print, read, and sign the necessary paperwork here and send it to us.
Your deposit is due immediately. That will leave a balance of $4699. The next payment of $2699 will be due on February 15, 2015. The final payment of $2000 is due on May 1, 2015.
I hope that you can join us for this wondrously exciting trip.
Facebook
Be sure to like and follow BAA on Facebook by clicking on the logo link upper right. Tanks a stack!
Support the BAA Blog. Support the BAA Bulletins: Shop B&H here!
We want and need to keep providing you with the latest free information, photography and Photoshop lessons, and all manner of related information. Show your appreciation by making your purchases immediately after clicking on any of our B&H or Amazon Affiliate links in this blog post. Remember, B&H ain’t just photography!
…..
Amazon.com
Those who prefer to support BAA by shopping with Amazon may use this link:
Amazon Canada
Many kind folks from north of the border, eh, have e-mailed stating that they would love to help us out by using one of our affiliate links but that living in Canada and doing so presents numerous problems. Now, they can help us out by using our Amazon Canada affiliate link by starting their searches by clicking here. Many thanks to those who have written.
Typos
In all blog posts and Bulletins, feel free to e-mail or to leave a comment regarding any typos or errors. Just be right :).
August 14th, 2015 Stuff
It is Thursday afternoon. I just woke up from a long nap. The Nickerson Beach IPT group is great. They were still smiling this morning despite the continuing NW wind and clear skies. Things are looking great for the afternoon.
I prepared this blog post in my motel room after optimizing today’s image for the private clients in the bagel place where we had brunch on Wednesday. All in all this blog post took less than an hour to prepare and, if I did everything right, it should be published automatically at 6am on Friday, August 14, 2015.
|

|
|
This image was created yesterday on the Nickerson Beach with the tripod-mounted Canon EF 600mm f/4L IS II USM lens, the Canon Extender EF 1.4X III, and the Canon EOS-1D X. ISO 800. Evaluative metering +1 1/3 stops: 1/125 sec. at f/7.1.
Center AF point/AI Servo Expand/Rear Focus AF on the bird’s eye and re-compose to get the bird out of the center of the frame. Click here to see the latest version of the Rear Focus Tutorial. Click on the image to see a larger version.
Black Skimmer with chick in nest scrape
|
600 II plus 1.4X III plus TV (Shutter Priority) Mode = Nickerson Beach Predawn Success
As I pointed out (again) in the recycled blog post here, folks who insist that real photographers work in Manual mode 100% of the time are ignorant of the fact that at times other shooting modes work just great. Here, assuming that folks know what they are doing exposure-wise. But heck, guess what? Simply working in Manual mode does not guarantee getting the right exposure unless the folks using Manual mode know what they are doing exposure-wise.
Here in the low, changing light of predawn I felt confident making sharp images at 840mm with a shutter speed of 1/125 sec. so I worked in TC mode, dialed in the correct EC (Exposure Compensation), and went to work. With success.
|

|
|
In 2015, we are offering a 3-DAY IPT before Thanksgiving and a 4-DAY IPT after the holiday. You can attend either and spend Thanksgiving Day with your family. Sign up for both and we will be glad to apply a $100 discount to your balance. We know that there are lots of less costly workshops being offered these days. Many of them are downright cheap. Please remember that you get exactly what you pay for. With us you will have two full time pros there for you every minute we are in the field. Together they have more than 28 seasons of experience at the refuge. If you want the finest in photographic instruction and want to be assured of being in the right spot at exactly the right time every day, do join us.
|
Bosque del Apache 2015 BIRDS AS ART/A Creative Adventure Instructional Photo-Tour (IPT). 3-FULL DAY IPT: NOV 22-24, 2015. $1149. Two great leaders: Denise Ippolito and Arthur Morris. Meet and greet and introductory slide program after dinner on your own at 7:00pm on SAT NOV 21.
Tens of thousands of Snow Geese, 10,000 Sandhill Cranes, ducks, amazing sunrises, sunsets, and blast-offs. Live, eat, and breathe photography with two of the world’s premier photographic educators at one of their very favorite photography locations on the planet. Top-notch in-the-field and Photoshop instruction. This will make 21 consecutive Novembers at Bosque for artie. This will be denise’s 7th workshop at the refuge. Nobody knows the place better than artie does. Join us to learn to think like a pro, to recognize situations and to anticipate them based on the weather, especially the sky conditions, the light, and the wind direction. Every time we make a move we will let you know why. When you head home being able to apply what you’ve learned on your home turf will prove to be invaluable.
This workshop includes 3 morning and 3 afternoon photography sessions, an inspirational introductory slide program after dinner on your own on Saturday, 11/21, all lunches, and after-lunch digital workflow, Photoshop, and image critiquing sessions.
There is never a strict itinerary on a Bosque IPT as each day is tailored to the local conditions at the time and to the weather. We are totally flexible in order to maximize both the photographic and learning opportunities. We are up early each day leaving the hotel by 5:30 am to be in position for sunrise. We usually photograph until about 10:30am. Then it is back to Socorro for lunch and then a classroom session with the group most days. We head back to the refuge at about 3:30pm each day and photograph until sunset. We will be photographing lots of Snow Geese and lots of Sandhill Cranes with the emphasis on expanding both your technical skills and your creativity.
A $449 non-refundable deposit is required to hold your slot for this IPT. Your balance, payable only by check, will be due on 7/25/2015. If you cancel and the trip fills, we will be glad to apply a credit applicable to a future IPT for the full amount less a $100 processing fee. If we do not receive your check for the balance on or before the due date we will try to fill your spot from the waiting list. Whether or not your spot is filled, you will lose your deposit. If not, you can secure your spot by paying your balance.
Please print, complete, and sign the form that is linked to here and shoot it to us along with your deposit check (made out to “Arthur Morris.”) You can also leave your deposit with a credit card by calling the office at 863-692-0906. If you register by phone, please print, complete and sign the form as noted above and either mail it to us or e-mail the scan. If you have any questions, please feel free to contact me via e-mail.
|

|
|
In 2015, we are offering a 3-DAY IPT before Thanksgiving and a 4-DAY IPT after the holiday. You can attend either and spend Thanksgiving Day with your family. Sign up for both and we will be glad to apply a $100 discount to your balance.
We know that there are lots of less costly workshops being offered these days. Please remember that you get exactly what you pay for. If you want the finest in photographic instruction and want to be assured of being in the right spot at exactly the right time, do join us.
|
Bosque del Apache 2015 BIRDS AS ART/A Creative Adventure Instructional Photo-Tour (IPT). 4-DAY IPT: (three full and two 1/2 DAYS) NOV 28-DEC 2, 2015. $1499. Two great leaders: Denise Ippolito and Arthur Morris. Meet and greet at 3pm on SAT NOV 28 followed by an afternoon photo session at the crane pools and the introductory slide program after dinner on your own.
Tens of thousands of Snow Geese, 10,000 Sandhill Cranes, ducks, amazing sunrises, sunsets, and blast-offs. Live, eat, and breathe photography with two of the world’s premier photographic educators at one of their very favorite photography locations on the planet. Top-notch in-the-field and Photoshop instruction. This will make 21 consecutive Novembers at Bosque for artie. This will be denise’s 7th workshop at the refuge. Nobody knows the place better than artie does. Join us to learn to think like a pro, to recognize situations and to anticipate them based on the weather, especially the sky conditions, the light, and the wind direction. Every time we make a move we will let you know why. When you head home being able to apply what you’ve learned on your home turf will prove to be invaluable.
This workshop includes 4 afternoon (11/28through 12/1), 4 morning (11/29 to 12/2) photography sessions, an inspirational introductory slide program after dinner on your own on Saturday, 11/28, all lunches, and after-lunch digital workflow, Photoshop, and image critiquing sessions.
There is never a strict itinerary on a Bosque IPT as each day is tailored to the local conditions at the time and to the weather. We are totally flexible in order to maximize both the photographic and learning opportunities. We are up early each day leaving the hotel by 5:30 am to be in position for sunrise. We usually photograph until about 10:30am. Then it is back to Socorro for lunch and then a classroom session with the group most days. We head back to the refuge at about 3:30pm each day and photograph until sunset. We will be photographing lots of Snow Geese and lots of Sandhill Cranes with the emphasis on expanding both your technical skills and your creativity.
A $599 non-refundable deposit is required to hold your slot for this IPT. Your balance, payable only by check, will be due on 7/25/2015. If you cancel and the trip fills, we will be glad to apply a credit applicable to a future IPT for the full amount less a $100 processing fee. If we do not receive your check for the balance on or before the due date we will try to fill your spot from the waiting list. Whether or not your spot is filled, you will lose your deposit. If not, you can secure your spot by paying your balance.
Please print, complete, and sign the form that is linked to here and shoot it to us along with your deposit check (made out to “Arthur Morris.”) You can also leave your deposit with a credit card by calling the office at 863-692-0906. If you register by phone, please print, complete and sign the form as noted above and either mail it to us or e-mail the scan. If you have any questions, please feel free to contact me via e-mail.
Facebook
Be sure to like and follow BAA on Facebook by clicking on the logo link upper right. Tanks a stack!
Support the BAA Blog. Support the BAA Bulletins: Shop B&H here!
We want and need to keep providing you with the latest free information, photography and Photoshop lessons, and all manner of related information. Show your appreciation by making your purchases immediately after clicking on any of our B&H or Amazon Affiliate links in this blog post. Remember, B&H ain’t just photography!
…..
Amazon.com
Those who prefer to support BAA by shopping with Amazon may use this link:
Amazon Canada
Many kind folks from north of the border, eh, have e-mailed stating that they would love to help us out by using one of our affiliate links but that living in Canada and doing so presents numerous problems. Now, they can help us out by using our Amazon Canada affiliate link by starting their searches by clicking here. Many thanks to those who have written.
Typos
In all blog posts and Bulletins, feel free to e-mail or to leave a comment regarding any typos or errors. Just be right :).
August 13th, 2015 Stuff
I set the alarm for 3:15am so that I could meet my three private clients at Nickerson at 5am. We had a great time and the boys and girls learned a ton despite the difficult wind (15+ mph from the NW) against sun conditions. Tonight is the meet and greet for the Nickerson Beach IPT. The one thing that always amazes me is that 90% of the folks at Nickerson (and most other locations that I visit regularly) have no clue as to how to try and make a good image. And that goes for double in difficult situations.
I prepared this blog post at my Mom’s in about one hour after optimizing the image on my flight to ISP on Monday past. If I did everything right, it should be published automatically at 6am on Thursday, August 13, 2015.
Thanks to All!
Thanks to the many who have been participating here on the blog more frequently after my recent plea for increased interactivity.
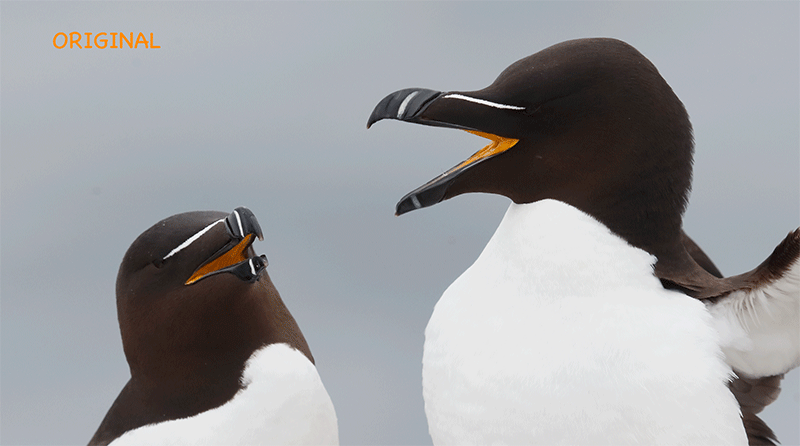
Razorbill Iris Exposure Answer
Many gave answers that would likely receive full credit on an exam but nobody gave the text book answer that I was looking for, the one that showed a complete and thorough understanding of exposure theory. Here is my answer:
The (middle-dark toned) iris of a Razorbill in a properly exposed RAW file will be about 1 1/2 stops underexposed because the correct exposure for a middle-dark tone needs to be about 1 1/2 stops more than the correct exposure for a bright WHITE in the same light. In other words, to be properly exposed, bright WHITEs need less light than a middle tone and middle-dark tones need more light than middle tones….
Learn more in the chapter on exposure in the original classic, The Art of Bird Photography (in softcover only) and in the “Exposure Simplified” section of The Art of Bird Photography II (ABP II: 916 pages, 900+ images, on CD only). Best bet: Save $10 by ordering the two-book bundle here. I can only wish that the info in these two comprehensive books had been available when I started in 1983….
|

|
|
This image was created with the tripod-mounted Canon EF 100-400mm f/4.5-5.6L IS II USM lens, the Canon Extender EF 1.4X III (at 560mm) and the Canon EOS-1D X.. ISO 400. Evaluative metering at zero: 1/400 sec. at f/9 in Manual mode. AWB.
Center AF point/AI Servo Expand (by necessity)/Rear Focus AF as framed. The active AF sensor was fell on a spot to the right of and just below the bir’s eye. Click here to see the latest version of the Rear Focus Tutorial.
Image #1: Breeding plumage Pacific race Brown Pelican scratching.
|
Secrets to Success with the Hand Held 100-400 II/1.4X III/1D X Combination
Sorry; there will be nothing earthshaking here.
#1: Whatever the camera body, hand holding the 100-400 II with the 1.4X III TC yields the very best results when the sun is shining. That goes for double if you are using a 7D Mark II or another 1.6X crop factor body.
#2: For topnotch results when the sun is shining, work right on sun angle with your shadow pointed directly at the subject.
#3: Do not use One-Shot or Rear Focus and re-compose AF; doing so will result in unsharp images should you shift your position even a fraction of a millimeter as you do when you are breathing. With all due respect to the doubters, this too goes for double if you are using a 7D Mark II or another 1.6X crop factor body; with denser pixels the effects of gear shake will be greater on a pixel level with a crop factor camera than with a full frame body.
#4: The corollary to #3: always work in AI Servo mode and, after choosing a spot on the bird that will yield a sharp eye, have AF active at the moment of exposure.
#5: Even when working with AI Servo AF actively tracking, be sure to support your left forearm for added stability (and thus, increased sharpness). For today’s image my left forearm was resting on top of a cliff. I was standing in a natural, chest-high trench.
Note: The speed of initial AF acquisition with this combo is slowed as it is whenever a TC is added to the mix. This goes double for the 7D II or any of the pro-sumer bodies because the pro bodies have stronger batteries that better drive the AF system. My best advice for combatting this problem is to pre-focus at the approximate distance to the flying birds.
|

|
|
San Diego offers a wealth of very attractive natural history subjects. With annual visits spanning more than three decades I have lot of experience there….
|
2016 San Diego 4 1/2-DAY BIRDS AS ART Instructional Photo-Tour (IPT) JAN 8 thru the morning of JAN 12, 2016: $1899 (Limit: 10)
Meet and Greet at 7:00pm on the day before the IPT begins
Two great leaders: Arthur Morris and Denise Ippolito
Join us in San Diego to photograph the spectacular breeding plumage Brown Pelicans with their fire-engine red and olive green bill pouches; Brandt’s and Double-crested Cormorants in breeding plumage with their amazing crests; breeding plumage Wood and Ring-necked Duck; other species possible including Lesser Scaup, Redhead, and Surf Scoter; a variety of gulls including Western, California, and the gorgeous Heerman’s, all in full breeding plumage; shorebirds including Marbled Godwit, Willet, Sanderling and Black-bellied Plover; many others possible including Least, Western, and Spotted Sandpiper, Whimbrel, Black and Ruddy Turnstone, Semipalmated Plover, and Surfbird; Harbor Seals (depending on the current regulations) and California Sea Lions likely; and Bird of Paradise flowers. And as you can see by studying the two IPT cards there are some nice landscape opportunities as well.
Did I mention that there are wealth of great birds and natural history subjects in San Diego in winter?
|

|
|
Though the pelicans will be the stars of the show on this IPT there will be many other handsome and captivating subjects in wonderful settings.
|
The San Diego Details
This IPT will include five 3 1/2 hour morning photo sessions, four 2 1/2 hour afternoon photo sessions, five lunches, after-lunch image review and Photoshop sessions, and a thank you dinner. To ensure early starts, breakfasts will be your responsibility.
A $499 non-refundable deposit is required to hold your slot for this IPT. You can send a check (made out to “Arthur Morris) to us at BIRDS AS ART, PO Box 7245, Indian Lake Estates, FL, 33855. Or call Jim or Jennifer at the office with a credit card at 863-692-0906. Your balance, payable only by check, will be due on 11/1//2015. If we do not receive your check for the balance on or before the due date we will try to fill your spot from the waiting list. Please print, complete, and sign the form that is linked to here and shoot it to us along with your deposit check. If you register by phone, please print, complete and sign the form as noted above and either mail it to us or e-mail the scan. If you have any questions, please feel free to contact me via e-mail.
Facebook
Be sure to like and follow BAA on Facebook by clicking on the logo link upper right. Tanks a stack!
Support the BAA Blog. Support the BAA Bulletins: Shop B&H here!
We want and need to keep providing you with the latest free information, photography and Photoshop lessons, and all manner of related information. Show your appreciation by making your purchases immediately after clicking on any of our B&H or Amazon Affiliate links in this blog post. Remember, B&H ain’t just photography!
…..
Amazon.com
Those who prefer to support BAA by shopping with Amazon may use this link:
Amazon Canada
Many kind folks from north of the border, eh, have e-mailed stating that they would love to help us out by using one of our affiliate links but that living in Canada and doing so presents numerous problems. Now, they can help us out by using our Amazon Canada affiliate link by starting their searches by clicking here. Many thanks to those who have written.
Typos
In all blog posts and Bulletins, feel free to e-mail or to leave a comment regarding any typos or errors. Just be right :).
August 12th, 2015 Stuff
After the very wet morning photo session, I spent a great hour with Dr. Dan Holland, my Long Island Active Release Technique chiropractor. Then I spent some time with my Mom, did a little shopping and cooking, and worked on this blog post. I meet three of the 8 IPT folks for an add-on private morning tomorrow. After our working brunch I will head back to my Mom’s for some rest, drive to the IPT motel, and meet the group at 8pm.
Including the time spent on image optimization this blog post took about 1 1/2 hours to prepare; that is practically like a day off :).
Singh-Ray Drop-in Filter Clarification
After going back and forth with my friends at Sing-Rey yesterday I have learned that the following is correct:
To order either the 3 stop Resin or the 5-stop Glass filters for the super-telephoto drop-ins folks will need to call Singh-Ray at 800-486-5501 (toll free) or 863-993-4100. If for Canon, tell them which 52mm Mor-Slo filter you want to order, give them the code artie10, and then arrange to send in your filter holder. Why do you need to send your filter holder? They need to confirm a perfect fit for each order and they will install and clean the filter. Folks using other brand lenses need to let them know the size and will of course need to send in the filter holder after ordering. Did I mention that you need to give them the code artie10 to receive your discount and to ensure that I get my affiliate credit ? 🙂
Click here for more Singh-Ray info and for the B&H filter holder links.
|

|
|
This image was created with the tripod-mounted Canon EF 100-400mm f/4.5-5.6L IS II USM lens (at 400mm) and the Canon EOS-1D X.. ISO 1600 (set by ISO Safety Shift). Evaluative metering +1 stop: 1/80 sec. at f/6.3 in Tv mode. AWB.
Center AF point/AI Servo/Rear Focus AF on the closest bird and recompose. Click here to see the latest version of the Rear Focus Tutorial. Click on the image to see a larger version.
Image #1: Shorebird flock in Armageddon Downpour
|
Photographing in a Downpour/East Pond Insanity
The plan was to meet Chris Billman at the refuge “rain or shine.” When I left my Mom’s at 4:50am, it was not raining. As I traversed the Southern State, it was drizzling a bit. That became rain once I got on the Belt Parkway. By the time we had donned our rain gear at JBWR it was raining pretty good. Only one of us brought some photographic gear. 🙂 Once we got out the the East Pond we had to deal with rain, hard rain, and more than a few minutes of Armageddon: periods of 30 degree slanted downpours with gusts to 30mph from the southwest. What fun.
|

|
|
This image was created with the tripod-mounted Canon EF 100-400mm f/4.5-5.6L IS II USM lens (at 222mm) and the Canon EOS-1D X.. ISO 800. Evaluative metering +1 stop: 1/60 sec. at f/7.1 in Tv mode.
Center AF point/AI Servo/Rear Focus AF on the closest bird and recompose. Click here to see the latest version of the Rear Focus Tutorial. Click on the image to see a larger version.
Image #2: Medium-sized flock of Semipalmated Sandpipers feeding
|
East Pond Conditions
Water levels were somewhat higher than would be optimal. We had about 400 birds on the South Flat; most were Semipalmated Sandpipers with a smattering of Leasts. In addition, there were a few Semipalmated Plovers. There would typically be a few White-rumped and Western Sandpipers on this date but who could see? I identified a single Short-billed Dowitcher in Image #3. Can you spot it?
As you can see in each of today’s images, there are the big mats of algae that typically occur every few years.
|

|
|
This image was created with the tripod-mounted Canon EF 100-400mm f/4.5-5.6L IS II USM lens (at 105mm) and the Canon EOS-1D X.. ISO 800. Evaluative metering +1 stop: 1/60 sec. at f/7.1 in Tv mode.
Center AF point/AI Servo Expand/Rear Focus AF as framed was active at the moment of exposure (as is always best when hand holding). Click here to see the latest version of the Rear Focus Tutorial. Click on the image to see a larger version.
Image #3: Shorebird flock in flight blur
|
Why TV Mode?
Plus 1 stop EC (exposure compensation) was pretty much fine wherever I pointed the lens. With ISO Safety Shift enabled the camera would raise the ISO to achieve a given shutter speed. If I wanted an image fairly sharp, I simply set the shutter speed to 1/60 or 1/80 or 1/100sec. If I saw the flock take flight, I would drop down to 1/30 sec. It is somewhat ironic that my very favorite pleasing blur was created at 1/60 sec., one of my “sharp” settings.
Your Favorite?
Please take a minute to let us know what you think about today’s images? Like ’em all? Hate ’em all? Like one or more? Wherever you sit, please let us know why.
Facebook
Be sure to like and follow BAA on Facebook by clicking on the logo link upper right. Tanks a stack!
Support the BAA Blog. Support the BAA Bulletins: Shop B&H here!
We want and need to keep providing you with the latest free information, photography and Photoshop lessons, and all manner of related information. Show your appreciation by making your purchases immediately after clicking on any of our B&H or Amazon Affiliate links in this blog post. Remember, B&H ain’t just photography!
…..
Amazon.com
Those who prefer to support BAA by shopping with Amazon may use this link:
Amazon Canada
Many kind folks from north of the border, eh, have e-mailed stating that they would love to help us out by using one of our affiliate links but that living in Canada and doing so presents numerous problems. Now, they can help us out by using our Amazon Canada affiliate link by starting their searches by clicking here. Many thanks to those who have written.
Typos
In all blog posts and Bulletins, feel free to e-mail or to leave a comment regarding any typos or errors. Just be right :).
August 11th, 2015 Stuff
My late afternoon flight to Islip was a breeze. My younger daughter Alissa picked me up and brought me to my Mom’s. Forecasts of my Mom’s imminent death are at least somewhat premature. After three steps its as if she ran a marathon. Other than that she is as good as new. She will be 93 on September 19 if she makes it that long. She has been ready to check out for at least a few months in part because it is so hard for her to get around.
I head to JBWR early tomorrow for a short scouting visit.
This seemingly easy to assemble, mostly cut and pasted blog post actually took me about 3 hours to prepare. It will be published automatically from my Mom’s house in Holbrook, NY at 6:00am on Tuesday, August 11, 2015.
Please Remember to shop the BAA Online Store, and to use our Affiliate Links 🙂
To show your appreciation for my continuing efforts here, we ask, as always, that you use our the B&H and Amazon affiliate links on the right side of the blog for all of your purchases. B&H is recommended for you major photography gear purchases, Amazon for your household, entertainment, and general purpose stuff. Please check the availability of all photographic accessories in the BIRDS AS ART Online Store, especially the Mongoose M3.6 tripod heads, Gitzo tripods, Wimberley heads and plates, LensCoats and accessories, and the like. We sell only what I have used, have tested, and can depend on. We will not sell you junk. We know what you need to make creating great images easy and fun. And we are always glad to answer your gear questions via e-mail. I just learned that my account was suspended during my absence; it should be up and running by Monday at the latest.
I would of course appreciate your using our B&H affiliate links for all of your major gear, video, and electronic purchases. For the photographic stuff mentioned in the paragraph above we, meaning BAA, would of course greatly appreciate your business. Here is a huge thank you to the many who have been using our links on a regular basis and visiting the BAA Online store as well.
Wheeleeze
Without my Long Island Wheeleeze I would not be taking much gear to the beach at all. And I cernainly would not be lugging the 600 II. You can learn more about the great beach cart that enables me to get a ton of gear out on the beach without much effort here. Purchase yours Wheeleeze by clicking on the logo link below.
Nickerson Beach Gear Bag
Though my shoulder has been bugging me a bit and it was a close call on going with the 600 II as my big lens, I decided to bring–actually to ship, the big glass. Read more below on that decision in the section on the 400 DO II.
Canon EF 600mm f/4L IS II USM Lens. I’ve never been to Nickerson Beach without either the 600 f/4 or the 800mm f/5.6L IS. Aside from my bum right shoulder, there is no reason to start now. I expect to use the 600 most often with either teleconverter or naked for flight photography, the latter often from behind my seated tripod. I will have my Long Island Wheeleeze with me on all beach outings. I shipped the 600 II via UPS ground to my Mom’s house last week.
I am headed to the East Pond at Jamaica Bay Wildlife Refuge early tomorrow morning with Chris Billman to do some scouting. No carrier can make it through the mud there so I will be carrying the 600 II with the 1D X mounted on it in the LensCoat 4X Expandable Long Lens Bag (with harness). Call it shoulder love.
Canon EF 100-400mm f/4.5-5.6L IS II USM lens. I will be using this lens as my on-the-shoulder intermediate telephoto zoom lens with either the 5D III or the 7D II via a Black Rapid RS-7 strap). The 100-400 focal length fits almost perfectly with the 600. I will be using it for both for flight and for close work. I will be doing lots of pre-dawn and late in the day blurs where its sometimes problematic f/5.6 aperture will not be an issue. It was a pretty easy decision to leave the Canon EF 70-200mm f/2.8L IS II USM lens at home for the Nicerkson Beach IPT.
Canon EF 24-105mm f/4L IS USM Lens. This all-purpose B-roll lens will be in my Vested Interest Xtrahand vest where it can be grabbed when needed.
For me it was a no-brainer to bring the Canon EF 400mm f/4 DO IS II USM lens. Many would think that it duplicates the 100-400 II but there are lots of advantages that come along with its lighter weight (as compared to the 600 II) and its wider f/4 aperture (as compared to the 100-400II).
If my right shoulder gets worse instead of better, the 400 DO II if fully capable of serving me well as my big lens. Working with the 2X III TC (extender) gives me 800m mm of reach with the 1D X at f/8. In a much lighter and easier to maneuver package. If I need additional reach I can go to the 7D II. In addition, my suspicion is that the 400 DO II/1.4X III/1D X combo will outperform the 400 DO II/7D II combo as far as AF tracking accuracy with birds in flight. In need to try both set-ups and try to figure out if there actually is a definitive edge for the former…. And the 400 DO II offers a measure of insurance should fate claim my 600 II.
THE Canon EF 100mm f/2.8L Macro IS USM Lens with the optional Canon Tripod Mount Ring D for IS 100mm f/2.8L Macro Lens can be a plus on a still morning at the East Pond where Salt Marsh Fleabane is usually in bloom at this time of year. It can be useful at times out on the beach for photographing dead chicks or feathers (though the 100-400 II with its amazing close focus does a good job of filling that role. There was plenty of room in my ThinkTank Airport SecurityTM V2.0 for this lens (along with the 16-35mm that will be with me on my two Alaska trips).
Camera Bodies
EOS-1D X. I will use my rugged pro body primarily with the 600 II, going with the 7D II on the big lens only when I need the extra reach. The more powerful 1D X battery makes it better for flight and for driving the AF system when either TC is added.
5D Mark III). Depending on the situation, I will use either the 5D III or the 7D II on the 100-400 II.
EOS-7D Mark II. In addition to part time pairing with the 100-400 II I will go to the 7D II/600II combo (with or without either TC) whenever I need the extra reach.
TCs
I will, as usual, be making this trip with three Canon 1.4X III TCs and two 2X III TCs, Why so many TCs? With my style of bid photography–tight, clean, and graphic–I cannot afford to be without both TCs in the event of an accident or malfunction. Most common in the latter category would be that the locking pin sticks occasionally. When that happens, there is a risk of having your camera body hit the ground….
Questions Welcome
If you have a question about any of my gear choices please feel free to leave a comment. Do you disagree with any of my choices? What would you be brining to Nickerson Beach? And why?
Do Not Forget List!
Whenever I choose to leave one of my Singh-Ray filters at home on a big trip I always come to regret it. Quickly. So I recently added the following items to my “Do Not Forget Items to Bring on all Trips” packing list:
Singh-Ray 77mm Warming Circular Polarizer
Singh-Ray 77mm Mor-Slo 5-stop Glass ND filter
Singh-Ray 77mm Mor-Slo 3-stop Resin ND filter
Singh-Ray 5-stop glass 52mm filter to fit the Canon drop-in Filter Holder
I absolutely love the Singh-Ray 3-stop Resin and 5-stop Glass Neutral Density Filters. I use the 77mm versions of these filters on my 24-105, my 70-200mm f/2.8 L IS, and my new and beloved 100-400mm IS II lens so that I can create blurs on sunny days without having to stop down to f/too-many dust spots…. With a 5-stop glass ND in place I can easily get down to shutter speeds of 1/2 second and slower on clear, bright sunny days.
BIRDS AS ART worked with Singh-Ray to produce both a 3-stop Resin Neutral Density filter ($124) and a 5-stop Glass ND filter ($275) to fit the filter drawers of Canon Super-telephoto lenses. If you will be heading to Bosque this season, you will want at least one of the 52mm ND filters in your Xtrahand vest. To order one of the 52mm Mor-Slo filters you will need to call Singh-Ray at1-800-486-5501 (toll free) or 1-863-993-4100 (eastern time zone). Tell them that you want either the 52mm 3-stop Resin Mor-Slo ND or the 52mm 5-stop Glass ND (or both), give them the code artie10, and then arrange to send them your filter holder. Singh-Ray needs to confirm a perfect fit for each order and in addition, they will install and clean the filter. That’s why you need an extra filter holder or two:)
Remember that you will not get your 10% discount without mentioning the artie10 code. And I would not receive my affiliate commission. Thanks as always for remembering to use our discount/affiliate code with your Singh-Ray phone orders.
Singh-Ray Filters
Singh-Ray filters have been used by the world’s top photographers for many decades. As always, I will have my 77mm Singh-Ray Warming Polarizer in my vest in case of rainbows. And I now travel (as above) with various Singh-Ray ND filters so that I can create pleasing blurs even with clear skies and bright sun. See here for a great example.
No other filter manufacturer comes close to matching the quality of Singh-Ray’s optical glass that is comparable to that used by NASA. And they continue to pioneer the most innovative products on the market like their ColorCombo polarizer, Vari-ND variable and Mor-Slo 15-stop neutral density filters. When you use their filters, you’ll create better, more dramatic images and, unlike other filters, with absolutely no sacrifice in image quality. All Singh-Ray filters are handcrafted in the USA.
Best News: 10% Discount/Code at checkout: artie10
To shop for a Singh-Ray’s most popular solid ND filter, the 10-Stop Mor-Slo Glass Filter liter (for example), click on the logo link above, click on “Neutral and color Solid Neutral Density Filters (glass), then click on “Mor-Slo™ 5, 10, 15 and 20-Stop Solid Neutral Density Filters (glass),” choose the size and model, add to cart, and then checkout. At checkout, type artie10 into the “Have a coupon? Click here to enter your code” box, and a healthy 10% discount will be applied to your total. In addition to enjoying the world’s best filter at 10% off you will be supporting my efforts here on the blog.
52mm Filter Holder Insanity
It would be complete insanity to have to screw out the glass filter and then screw in a 52mm ND filter each time that you need it. The only option is to purchase a spare filter holder or two, screw the filter in, and keep that setup intact and ready to use. Singh-Ray includes a really neat soft leather filter holder with each purchase. I store all of the filters that I travel with in one of the small upper zippered pockets of my Xtrahand vest. I have two extra filter holders and will be bringing both the 3-Stop 52mm Resin ND and the 5-Stop 52mm Glass ND to Bosque.
Think Tank Rolling Bags
I will be using the larger of my two Think Tank rolling bags, the Airport Security™ V 2.0 Rolling Camera Bag. I will use the slightly smaller of the two, the Airport International™ LE Classic for my Southern Ocean trip. Except for the Singh-Ray polarizer, I everything above fit easily into my Airport Security™ V 2.0 Rolling Camera Bag on Thursday afternoon. It tipped the scales at 44 1/4 pounds; the legal limit for US flights is 40 pounds. Nearly all countries in the world give you slack as far as the 40 pounds goes on the way back to the US. As far as the extra 4 1/4 pounds, I have only been hassled for weight once in more than three decades of flying around the world…. I hope that I do not give myself a kine-ahora.
Think Tank Urban Disguise Laptop Shoulder Bag
Both denise and I use and love this amazing bag as it has tons of room and enables us to bring tons of extra stuff.
Please click on my Think Tank affiliate link here to earn a free gift when you purchase a Think Tank Rolling Bag.
Delkin Flash Cards
As always, I will have a 64gb Delkin e-Film Pro Flash Card in each camera body so that I never have to change cards in the field thus reducing the risk of losing a card…. Please note the new lower prices here. I do have a few extra 32 and 64gb cards in a Delkin CF Memory Card Tote, mostly to protect against operator errors….
Facebook
Be sure to like and follow BAA on Facebook by clicking on the logo link upper right. Tanks a stack!
Support the BAA Blog. Support the BAA Bulletins: Shop B&H here!
We want and need to keep providing you with the latest free information, photography and Photoshop lessons, and all manner of related information. Show your appreciation by making your purchases immediately after clicking on any of our B&H or Amazon Affiliate links in this blog post. Remember, B&H ain’t just photography!
…..
Amazon.com
Those who prefer to support BAA by shopping with Amazon may use this link:
Amazon Canada
Many kind folks from north of the border, eh, have e-mailed stating that they would love to help us out by using one of our affiliate links but that living in Canada and doing so presents numerous problems. Now, they can help us out by using our Amazon Canada affiliate link by starting their searches by clicking here. Many thanks to those who have written.
Typos
In all blog posts and Bulletins, feel free to e-mail or to leave a comment regarding any typos or errors. Just be right :).
August 10th, 2015 Stuff
Yesterday was a fairly relaxing day. I packed one of my two checked bags and my gear bag; details on the latter in tomorrow’s blog post. I still have to to pack my second checked bag, my Think Tank Urban Disguise laptop bag, and my Xtrahand vest but I have lots of time as my flight to Islip is at 3:00pm this afternoon. After two days of rest and some stretching my right shoulder is feeling a lot better. As am I. 🙂
This blog post took about an hour to assemble. It was published just before 6:00am on Monday, August 10 from my home in Indian Lake Estates, FL.
2nd Chance Challenges…
At times–after a while–folks start to take the blog for granted and get a bit lazy. Sure, most read it every day, but with a few specific posts folks lately have not been that interested in answering my questions by leaving a comment. The purpose of the blog it to get you to think and therefore to have everyone learn. In today’s blog post I will re-post two images, each with a previously ignored question. I challenge each of you to come up with a good answer. An interactive blog is a better blog….
Before and after animated GIF. Note the browner tones and the much-improved eyes in the optimized version….
|
Important Exposure Question
In the “Dealing With Those Hard to See Eyes…” blog post here, I posted the animated GIF above and the question below. The answer to the questions reveals an important exposure principle, one that all good photographers should have completely mastered. I know from experience that few have done that. Do take a crack at it. I will be posting the answer and the explanation soon.
High Level Exposure Question
Why are the irises of Razorbills underexposed by about 1 1/2 stops in a properly exposed RAW file?
|

|
Image #2: Another version
|
Slightly Less Important Image Design Question
In the “Palouse Group Infrared Wind Turbine Image” blog post here, I posted the following with regards to both images.
Image Design Question
Do you like the little black triangle in the lower left corner? Why or why not?
|

|
|
Subject and focal lengths from upper left to right and then around to center.
Palouse Falls: 11mm; homemade kiddie race car: 105mm; barn siding pan blur: 798mm; Rolling fields diorama: 110mm; Crayola drums: 343 mm; Hay barn interior: 19mm; vintage gas station: 40mm; Dilapidated farm building: 13mm; Denise’s tree Infrared: 20mm.
Images and card design by Arthur Morris/BIRDS AS ART.
|
The Palouse ~ A Creative Adventure/BIRDS AS ART Instructional Photo-Tour (IPT)/Eastern Washington State. June 3-7, 2016/5 Full Days: $1699/Limit 12
The Palouse ~ A Creative Adventure/BIRDS AS ART Instructional Photo-Tour (IPT)/Eastern Washington State. June 10-14, 2016/5 Full Days: $1699/Limit 12
Double Header!
Maximize both your travel dollars and your learning experience by signing up for both IPTs.
|

|
|
Images and card design by Denise Ippolito/A Creative Adventure.
|
The Palouse IPTs
Rolling farmlands provide a magical patchwork of textures and colors, especially when viewed from the top of Steptoe Butte where we will likely enjoy spectacular sunrises and possibly a nice sunset. We will photograph grand landscapes and mini-scenics of the rolling hills and farm fields. We will take you to some really neat old abandoned barns and farmhouses in idyllic settings. There is no better way to improve your compositional and image design skills and to develop your creativity than to join us for this trip. Two great leaders: Denise Ippolito and Arthur Morris. Photoshop and image sharing sessions when we have the time and energy…. We get up early and stay out late and the days are long.
After 6 days of back-breaking scouting work in early June 2014 we found all of the iconic locations and, in addition, lots of spectacular new old barns and breath-taking landforms and views. On three additional scouting days in 2015 we discovered several more truly amazing locations. We will teach you what makes one situation prime and another seemingly similar one a waste of your time.
What’s included: In-the-field instruction, guidance, lessons, and inspiration, our newfound but very extensive knowledge of the area, all lunches, motel lobby grab and go breakfasts, and Photoshop and image sharing sessions when possible. There will be a meet and greet at 7:30pm on the evening before each workshop begins.
You will learn and hone both basic and advanced compositional and image design skills. You will learn to get the right exposure every time. You will learn to develop your creative eye. You will learn the basics of HDR (high dynamic range) photography. You will learn a variety of in-camera creative techniques. Most importantly you will learn to see the situation and to create a variety of top-notch images. Do see both of our blogs for lots more on that in the coming weeks. You will learn how the quality and direction of light combine to determine the success of your images. And–please don’t gasp–we will be working quite a bit with sidelight when creating landscapes. Lastly, we will be doing some infrared photography.
To Sign Up
A non-refundable $699 deposit is due now. The balance will be due on February 15, 2016. If we do not receive your check for the balance on or before the due date we will try to fill your spot from the waiting list. Whether or not your spot is filled, you will lose your deposit. If not, you can secure your spot by paying your balance.
With the spectacular success that we enjoyed in 2015 it seems quite likely that this one will fill up very quickly. Please let me know via e-mail that you will be joining us. Then you can either call Jim or Jennifer at 863-692-0906 during business hours or send us a check to leave a deposit; the latter is preferred. If by check, please make out to “Arthur Morris” and mail it to: Arthur Morris/BIRDS AS ART, PO Box 7245, Indian Lake Estates, FL, 33855. If you have any questions, please feel free to contact us via e-mail: artie or denise.
Travel Insurance Services offers a variety of plans and options. Included with the Elite Option or available as an upgrade to the Basic & Plus Options. You can also purchase Cancel for Any Reason Coverage that expands the list of reasons for your canceling to include things such as sudden work or family obligation and even a simple change of mind. You can learn more here: Travel Insurance Services. Do note that many plans require that you purchase your travel insurance within 14 days of our cashing your deposit check. Whenever purchasing travel insurance be sure to read the fine print carefully even when dealing with reputable firms like TSI.
Facebook
Be sure to like and follow BAA on Facebook by clicking on the logo link upper right. Tanks a stack!
Support the BAA Blog. Support the BAA Bulletins: Shop B&H here!
We want and need to keep providing you with the latest free information, photography and Photoshop lessons, and all manner of related information. Show your appreciation by making your purchases immediately after clicking on any of our B&H or Amazon Affiliate links in this blog post. Remember, B&H ain’t just photography!
…..
Amazon.com
Those who prefer to support BAA by shopping with Amazon may use this link:
Amazon Canada
Many kind folks from north of the border, eh, have e-mailed stating that they would love to help us out by using one of our affiliate links but that living in Canada and doing so presents numerous problems. Now, they can help us out by using our Amazon Canada affiliate link by starting their searches by clicking here. Many thanks to those who have written.
Typos
In all blog posts and Bulletins, feel free to e-mail or to leave a comment regarding any typos or errors. Just be right :).
August 9th, 2015 Stuff
I spent most of the day yesterday relaxing and not getting much done. Took a late easy swim, mostly kicking as the right shoulder is still a bit sore and stiff :).
This blog post which took about 1 1/2 hours to put together, was published at 8:40am from my home in Indian Lake Estates, FL. Tomorrow: fly to Islip and get ready for the Nickerson Beach IPT. I guess that I need to think about packing….
Lightroom Bashing?
The text below is adapted from a comment that I left in the long, mostly wonderful discussion that followed the “RAW Conversion 101/Step One & More Lightroom Insanity; Can You Help?” blog post here.
Howdy, You might wish to check your attitude at the door; this post was intended to help LR folks…. If you read the comments you will see that that is just what has happened. Many who (again) think or thought or assumed that my intent here was to trash or bash Lightroom. That is not at all true: my intentions were to find a solution to what I saw as a serious problem and to educate others; we have done both. And the next time I run into LR folks who do not know how to go about controlling their WHITEs in the Develop Module, I will know exactly how to help them.
Please understand that inflammatory comments like those the appeared in the “Lightroom/My Take” blog post here and provocative title phrases like “LR Insanity” will get more folks to visit than a boring title :)”
I still do not understand why anyone would use LR but I am fine that they do…. What I’ve always asked is “Aside from cataloguing, what can LR do that Photoshop can’t?” Do remember that PS can do dozens of important things that LR cannot do…. artie
The Comments Paved the Way to Understanding
Thanks to the many who commented and got things headed in the right direction. That group included Belinda, Dieter Schaefer, David Bose, Mike Moore, Jim Thomson :), Ted Thelin, Fabrizio Giudici, John Rowell, Rich LaBella, Kim Biledgaard, Alan Lillich, and Steen Torner. Steen’s comments put Alan Lillich and me on a straight path to the summary that follows immediately. Thanks again to all.
Lightroom Highlight % Values vs RGB Values Lessons Learned and Summary
The following text is adapted from an e-mail sent to me by many, many multiple IPT veteran (along with wife Pat) yesterday. Alan’s comments pretty much matched the conclusions that I had reached but had not committed yet to Word Press :). Thanks Alan.
Artie,
This turns out to be a deep story with many nuances. Lots of the web comments have bits of truth, most (mine included) oversimplified things in terms of actual working practices. Feel free to rework this, or we can collaborate on something to post. I’ll speak generically below, “you” means anyone, “Artie” means you specifically.
Bottom line: Figure out something that works for your workflow. Do not obsess about using simplistic adaptations of someone else’s workflow. Artie picks a specific white limit in his PS workflow because it works for him. Denise uses a slightly different limit. Someone using LR might do well to start with a simple percentage conversion, but they must go on to understand why artie or denise chose their numbers and decide for themselves what LR percentage works for them.
Comparing two people’s experience is very difficult without understanding exactly what each is doing and exactly what the applications and settings used by each are doing. In other words, lots of little changes in your workflow can change your results, sometimes dramatically. This is why it is very important for each person to use what works best for their specific workflow.
Here are some bits of the deeper story told while trying not to get too intense on the theory or obscure details.
Yes, turning on soft proofing in LR makes it display pixel RGB values as whole numbers from 0 to 255 instead of as percentages. Those pixel values are, however, affected by the soft proofing options. Thus, they only make sense if those options are as close as possible to the intended final output. Or if you are sure that those settings accurately reflect your early stage workflow. Consider that artie’s use of a WHITE limit is dealt with right out of the box as the first step in his workflow (after he has applied the standard recipe specific to each camera at a given ISO). He strives to render his WHITEs as clean bright WHITEs that do not at all approach GRAY while retaining the potential for fine detail. That might be too early to be making decisions based on specific output options, unless you always output the same way – always to the web, always to the same printer/paper/ink, etc.
(Notes: Alan chose the words “potential for” knowing that in many cases the detail in the WHITEs are revealed with either my NIK 50-50 recipe or via a Layer of Linear Burn, both usually with Opacity reduced after the effect is applied. See Digital Basics for complete details.
I make my JPEGs from my optimized TIFFs. I print from the optimized TIFFs that are sized and then sharpened by my right hand man, Jim Litzenberg. artie) My optimized TIFFs, my JPEGs, and my prints all look great at least to my eye. For some folks, folks like me, keeping things very simple works quite well. artie)
Choice of color space can have a big impact on pixel values. As this is part of your workflow, you’re always working on an image in a given color space. When soft-proofing is off, the in-memory RGB values are converted from the working color space to the color space of the monitor for display. This is why calibrating your monitor is important. Turning on soft-proofing adds another step, the working color space values are first converted to the output color space and then to the monitor color space.
LR works on RAW files in a unique manner. It is not different in massive ways from Photoshop or from DPP 4, but the RAW conversion process is different. The working color space in LR is close to but not identical to standard ProPhoto RGB; it uses slightly different gamma values (tone curves). Here is the link to a good article on the topic if you want to learn more:
http://ptgmedia.pearsoncmg.com/imprint_downloads/peachpit/peachpit/lightroom4/pdf_files/LightroomRGB_Space.pdf
Unless you really understand what the different gamma values mean, exactly what LR and ACR do, and exactly what ProPhoto RGB means within PS, don’t get obsessed with precise comparisons of LR percentages and RGB pixel values.
As a bit of anecdotal evidence, I photographed an X-Rite Color Checker Passport and then compared LR values as percentages and numbers using soft proofing with PS RGB numbers in a few ways. In summary, the LR percentages were reasonably close to the PS values converted to percent, much closer than the LR numbers using soft proofing. This is not to say Steen’s comments are wrong! Not at all. This says that my workflow and procedures differed from his. Yours are probably differ from both of ours. Here reasonably close means within a few percent. Steen’s example of 90% to 95% is on the edge of what I call reasonably close. Close enough as a starting point for everyone to be able to develop a strategy using the LR percentage values so that they wind up with bright WHITEs with lots of detail.
Hope this helps. Alan
Facebook
Be sure to like and follow BAA on Facebook by clicking on the logo link upper right. Tanks a stack!
Support the BAA Blog. Support the BAA Bulletins: Shop B&H here!
We want and need to keep providing you with the latest free information, photography and Photoshop lessons, and all manner of related information. Show your appreciation by making your purchases immediately after clicking on any of our B&H or Amazon Affiliate links in this blog post. Remember, B&H ain’t just photography!
…..
Amazon.com
Those who prefer to support BAA by shopping with Amazon may use this link:
Amazon Canada
Many kind folks from north of the border, eh, have e-mailed stating that they would love to help us out by using one of our affiliate links but that living in Canada and doing so presents numerous problems. Now, they can help us out by using our Amazon Canada affiliate link by starting their searches by clicking here. Many thanks to those who have written.
Typos
In all blog posts and Bulletins, feel free to e-mail or to leave a comment regarding any typos or errors. Just be right :).
August 8th, 2015
Apple 15.4″ Macbook Pro Notebook Computers with Retina Displays
Though the exact model I have fallen in love with is no longer in production the items in the logo link above are quite similar. The $3149 model is pretty much a slightly updated version of the machine I am currently using. Though it took me more than a month to comfortably transition from a PC to a Mac I can only wish now that I had switched a decade ago…. artie
August 8th, 2015 What’s Up?
I am feeling much better today. My right shoulder was the only thing still seriously bugging me by yesterday afternoon but I was able to get a late, last minute appointment with TJ McKeon, my Active Release Technique chiropractor and good friend. He hurt me pretty good but the shoulder is much improved this morning.
This blog post took about 1 1/2 hours to prepare. It was published from my home at Indian Lake Estates, FL just after 6:15am on Saturday August 8, 2015. I fly to Long Island on Monday afternoon to visit my Mom and lead the Nickerson Beach/JBWR IPT. With back to back Alaska trips (including the Bear Boat IPT) I will not be back home until September 9.
Namibia IPT
If you missed the info on this great trip, please click here. So far we have assembled a cast of international participants: one from the US, two from South Africa, one from Hong Kong, and one from Australia. More than a few are world class photographic talent….
Bright Sun Lesson
It had been cloudy as we sailed to South Plaza and cloudy while we rested a bit after a great lunch. It was cloudy when I woke up from my nap and cloudy as we boarded the pangas (zodiacs). It was cloudy as we made the dry landing just after 2:30pm. And then the big cloud moved to the east as the sun moved slowly toward the western horizon. We had to deal with bright sun and blue skies.
As is usually the case, there were lots of big Land Iguanas basking on the rocks near the landing site. Everyone was excited as they properly moved to our right to sun angle. But we were limited by several Stop signs; nobody could get right on sun angle with their shadows pointing at the subjects. I cautioned that the resulting side-lit images would be less than pleasing in the harsh sun, but big yellow male Land Iguanas were too much for folks to resist. Even when I pointed out the lovely lady iguana sitting in the shade the boys and girls continued making bad images despite my protestations…. Sometimes the clients just don’t listen. During an image sharing session everyone loved my in the shade lady but were–as I had predicted, not too happy with their images of the males in bright sidelight….
Made With the 100-400 II/2X III/1D X? Seriously You Jest
I had chosen the tripod-mounted 100-400 II/1D X combo for our session at the landing as the male iguanas were both close and fairly tame. My 400 DO was resting comfortably in my Think Tank Glass Limo. My TCs were in my fanny pack. Once I spotted the lovely lady iguana sitting in the shade I reached for the 1.4X TC and mounted it. But I still did not have enough reach. So I did something unthinkable: I reached for the 2X III TC and switched out the TCs. Why earthshaking? At f/11 I would have to focus manually; you lose two stops of light with the 2X and go from f/.5.6 to f/11. Without AF. But I was too lazy to get up off of my comfortable perch on a smooth lava rock….
While focusing manually (note that being on a sturdy tripod with a good tripod head is a necessity) I simply concentrated on the iguana’s captivating eye. Focusing accurately was actually a snap. Even as she changed position slightly I was able to focus accurately. Most every image in the series was incredibly sharp. At one point I focused automatically using contrast off the sensor in Live View but the manually focused images were just as sharp and it was easier to re-focus manually when the animal changed position so I quit using Live View.
|

|
|
This (sharpened) 100% crop gives you an idea of how sharp the optics are with the 100-400 II/2X III combo and gives you an idea of how easy it is to focus manually when you concentrate on the subject’s eye….
|
The Ramifications?
#1: the new 100-400II is so sharp that using it with the 2X III TC yielded super-sharp images.
#2: the techniques detailed above will work only with relatively static subjects provided that the photographer is working on a tripod. Do not even think about using the 100-400II/2X III combo (yes, this will work with the 7D II as well as with the 1D X) when hand holding.
#3: though of somewhat limited use, working with the 2X III TC and the 100-400II further expands the amazing versatility of the new 1-4.
If what you have read in today’s blog post prompts or inspires you to purchase either the new 1-4 or the 2X III TC please use our affiliate logo link above to order either or both. If just one, simply click on the desired item.
|
|
|
All of the images on the bear boat card above were created in Katmai National Park during the month of September.
|
Bear Boat/Bears Catching Salmon IPT: September 1-8, 2015 from Kodiak, AK/6 FULL & 2 HALF DAYS: $6699. Happy campers only! Maximum 8/Openings: 2. Plus the leader: Arthur Morris.
Call for late registration discount info: 863-692-0906 and ask for me.
Join me in Katmai National Park, AK for seven days of photographing Coastal Brown Bears (grizzlies) catching salmon, fattening up for the long winter. Other subjects will include Mew and Glaucous-winged Gulls in flight and dip-feeding on salmon roe. Did I mention that we live on a boat and that the food is great? Most of our photography will be done in a variety of famed locations: Geographic Harbor, Kinak Bay, and Kukak Bay. We once had 39 bears fishing the creek at Kukak….
It is mandatory that you be in Kodiak no later than the late afternoon of August 31, 2015 September to avoid missing the float planes to the boat on the morning of September 1. With air travel in AK being what it is, with the chance of fog or other bad weather–being on Kodiak on August 30 is an even better plan). I will be on Kodiak on August 30 to avoid any potential disaster. That said in my nearly a dozen bear boat trips I was delayed only once but since I was day early as noted above there was no harm, no foul.
We will take one or more float planes to the boat mid-morning on September 1. We will photograph bears fishing that afternoon and every day for the next six days (weather permitting of course). We should have bears catching salmon every day. In addition, we will get some nice stuff on Mew Gull and Glaucous-winged Gulls dining on roe and the remains of predated salmon. We may–depending on where the concentrations of bears are–get to photograph Harbor seals and some hauled out Steller’s Sea Lions (an endangered species). Halibut fishing (license required) is optional. On September 8, our last morning on the boat, those who would like to enjoy one last photo session will do so. The group returns to Kodiak via float plane midday. Most folks will fly to Anchorage and then continue on red-eye flights to their home cities.
The eight days will consist of six full days (Sept 2, 3, 4, 5, 6, & 7) of photography featuring lots of Coastal Brown Bears catching salmon as above plus a variety of other natural history subjects plus some nice scenic photography that I forgot to mention above. Plus the first afternoon and the last morning.
What’s included? 8 DAYS/7 NIGHTS on the boat as above. All meals on the boat. (The food is quite excellent.) National Park fees. One night’s double occupancy lodging on Kodiak; arrive: Sept 1/depart: Sept 2. The thank-you-in-advance dinner on Sept 1. In-the-field photo tips, instruction, and guidance. An insight into the mind of a top professional; I will constantly let you know what I am thinking, what I am doing, and why I am doing it. Small group image review, image sharing, and Photoshop instruction on the boat.
What’s not included: Your round trip airfare to and from Kodiak, AK (almost surely through Anchorage). All necessary lodging other than the cost of your double occupancy room on the night of August 31 should you opt to arrive early–we can arrange that in advance for you. We will let you know the cost of a single supplement for the one night if so desired. The cost of the round-trip float plane to the boat on September 2 and back to Kodiak on September 9. The cost of a round trip this year was $500. The suggested crew tip of $210.
Is this an expensive trip? Yes, of course. But with 6 full and two half days, a wealth of great subjects, and the fact that you will be walking with the bears just yards away (or less….) it will be one of the great natural history experiences of your life. Most folks who take part in a Bear Boat IPT wind up coming back for more.
A $2,000 per person non-refundable deposit by check only made out to “Arthur Morris” is required to hold your spot. Please click here to read our cancellation policy. Then please print, read, and sign the necessary paperwork here and send it to us.
Your deposit is due immediately. That will leave a balance of $4699. The next payment of $2699 will be due on February 15, 2015. The final payment of $2000 is due on May 1, 2015.
I hope that you can join us for this wondrously exciting trip.
Facebook
Be sure to like and follow BAA on Facebook by clicking on the logo link upper right. Tanks a stack!
Support the BAA Blog. Support the BAA Bulletins: Shop B&H here!
We want and need to keep providing you with the latest free information, photography and Photoshop lessons, and all manner of related information. Show your appreciation by making your purchases immediately after clicking on any of our B&H or Amazon Affiliate links in this blog post. Remember, B&H ain’t just photography!
…..
Amazon.com
Those who prefer to support BAA by shopping with Amazon may use this link:
Amazon Canada
Many kind folks from north of the border, eh, have e-mailed stating that they would love to help us out by using one of our affiliate links but that living in Canada and doing so presents numerous problems. Now, they can help us out by using our Amazon Canada affiliate link by starting their searches by clicking here. Many thanks to those who have written.
Typos
In all blog posts and Bulletins, feel free to e-mail or to leave a comment regarding any typos or errors. Just be right :).
August 7th, 2015 It Was a Long, Strange Night
I can only guess that I have been swimming too long and too hard (even though I go pretty slow). On Thursday everything felt great. My left shoulder that had bothered me a bit at the beginning of the Galapagos trip was feeling fine. It had not bothered me for about six years before that. My chronically bad right shoulder was feeling fine. My chronically bad twice surgically (not) repaired left knee was feeling great. Even my De Quervain’s inflicted left thumb was OK–it had been flaring up recently after being calmed down a few months ago by a cortisone shot (which Dr. Oliver warned against). During my swim yesterday my right shoulder began to ache along with my left knee so I took it a bit easier. After dinner the tendon above my left thumb was hurting pretty bad, the worst it has been since the shot. I figured that rest and sleep would help everything.
Though I slept pretty well: nearly eight hours with one pit stop–great for me, I was aware of my pains all night. Even my left shoulder was aching. At about 2am I took three Advil and was able to sleep a pretty solid four hours. Man, you gotta love getting old. Strange though that everything came on so quickly…. I am feeling much better this morning, probably thanks to the Advil….
Selling Your Used Gear Through BAA
Selling your used (or like-new) photo gear through the BAA Blog or via a BAA Online Bulletin is a great idea. We charge only a 5% commission. One of the more popular used gear for sale sites charges a minimum of 20%. Plus assorted fees! Yikes. The minimum item price here is $500 (or less for a $25 fee). If you are interested please e-mail with the words Items for Sale Info Request cut and pasted into the Subject line :). Stuff that is priced fairly–I offer free pricing advice, usually sells in no time flat. In the past few months we have sold nearly everything in sight. Do know that prices on some items like the EOS-1D Mark IV, the old Canon 500mm, the EOS-7D, and the original 400mm IS DO lens have been dropping steadily. You can see the complete listings here.
Brand New Listing
Canon 600mm f/4 L IS Lens
Multiple IPT veteran Dean Newman is offering a used Canon 600mm f/4 L IS lens, the “old six,”, in very good + condition for the lowest ever BAA price of $4,999.00. There are a few surface wear marks on the lens hood from normal use but nothing significant. The lens barrel is in mint condition as it was protected by a LensCoat since day one. In preparation for this sale, the lens was sent to the Canon Factory Service Center for a checkup and they found it to be in perfect condition after it underwent a general clean and check. The sale includes the lens trunk (hard case), the lens hood, the hood cover, the original LensCoat in forest green, and a low-profile foot. The original foot is also be included as well as is insured shipping via UPS Ground with a signature required on delivery. Your item will not ship until your check clears or other arrangements are made. Please contact Dean via e-mail or by phone at 301.672.5464 between 6 a.m. and 8 p.m. Eastern time. Photos of the lens are available upon request.
The old six was my go-to super-telephoto lens for well more than a decade, heck, probably for two decades if you include the monstrously heavy original version. Today I use and depend on the newer, lighter version, the Canon EF 600mm f/4L IS II USM lens. Note, the new six sells for a hefty $11,499. The old six is super sharp, works great with both TCs, and offers near-maximum reach along with three focal lengths: 600, 840, and 1200…. At $200 less than the previous record-low BAA price, Dean’s 600 is priced to sell quickly. artie
Updated Listing
Canon EF 500 IS USM Lens and EF Extender 1.4x II
John Gill is offering a Canon lens EF 500mm f/4 L IS USM lens (along with a Canon EF Extender (teleconverter) 1.4X II for $4199.00. The glass is in excellent condition, the paint shows some wear. The sale includes the lens trunk (hard travel case), the hood, the front leather lens cap, the lens strap, a LensCoat, the manual, and insured shipping via UPS Ground. Your item will not ship until your wire transfer clears. Please contact John via e-mail or by phone at (603) 528-6608, eastern time.
Student Outdoes Instructor/By a Mile!
I really did not see a shot when I created the IR image that I shared with you in the “Palouse Group Infrared Wind Turbine Image” blog post here. I remember hearing Phil talking about getting his 5-stop ND but even that did not ring any bells for me. Sometimes we can get in a photographic funk so deep that we cannot get out of it even when we are given a clue. The glowing blur of the wind turbine blades really put this one over the top for me. And I love the image design and the wispy clouds. I look forward to seeing and working with Phil again soon on the early September Bear Boat IPT; we still have some room on that one. Call me at 863-692-2806 for late registration discount info if you are interested.
Singh-Ray 5-stop ND
Without a healthy ND filter in place there is no way to get down to a 1 second shutter speed in cloudy bright conditions. Phil used the SINGH-RAY THIN 82mm MOR-SLO ND-5 STOP FILTER in order to be able to work at a variety of slow shutter speeds. He experimented with shutter speeds of 1/4 sec., 1/2 sec., and one full second. The one second exposure was the bomb.
Singh-Ray Filters
Singh-Ray filters have been used by the world’s top photographers for many decades. Most notably the late Galen Rowell. Singh-Ray has been and is the name in quality filters. I often use the Singh-Ray 77mm Warming Circular Polarizer set to dark when photographing rainbows, to eliminate reflections when photographing on or around the water (and when photographing the water itself as with today’s spectacular image), and to juice up a cloud-filled sky on a on bright sunny day, the latter especially when working off sun angle.
And I absolutely love the Singh-Ray 3-stop resin and 5-stop glass Neutral Density Filters. I use the 77mm versions of these filters on my 24-105, my 70-200mm f/2.8 L IS, and my new and beloved 100-400mm IS II lens so that I can create blurs on sunny days without having to stop down to f/too-many dust spots…. With a 5-stop glass ND in place I can easily get down to shutter speeds of 1/2 second and slower on clear, bright sunny days.
BIRDS AS ART has been working with Singh-Ray to produce a 5-stop Neutral Density filter to to fit the filter drawers of Canon Super-telephoto lenses. Info on the filter will be presented here very soon so stay tuned. If you will be heading to Bosque this season, you will want at least one of the 52mm ND filters in your Xtrahand vest.
No other filter manufacturer comes close to matching the quality of Singh-Ray’s optical glass; it is comparable to that used by NASA. And they continue to pioneer the most innovative products on the market like their ColorCombo polarizers and the Mor-Slo 15-stop neutral density filter. When you use their filters, you’ll create better, more dramatic images and, unlike as with other filters, with absolutely no sacrifice in image quality. All Singh-Ray filters are handcrafted in the USA.
Best News: 10% Discount/Code at checkout: artie10
To shop for a Singh-Ray Warming Circular Polarizer (for example), click on the logo link above or the one in the right hand column of each blog post, click on Polarizers/color enhancing on the menu bar, choose LB Warming Polarizer, choose the size and model, add to cart, and then checkout. Click on Continue to checkout. In the “Have a Coupon?” box (the second from the top), click on this active link: “Click here to enter your code” and then type “artie10” into the box. Click on “Apply Coupon” and a healthy 10% discount will be applied to your total. In addition to enjoying the world’s best filter at 10% off you will be supporting my efforts here on the blog. In the same manner, you can shop for a 3-stop or 5-stop ND by first clicking on the Neutral and Color Density menu bar.
|
|
|
Subject and focal lengths from upper left to right and then around to center.
Palouse Falls: 11mm; homemade kiddie race car: 105mm; barn siding pan blur: 798mm; Rolling fields diorama: 110mm; Crayola drums: 343 mm; Hay barn interior: 19mm; vintage gas station: 40mm; Dilapidated farm building: 13mm; Denise’s tree Infrared: 20mm.
Images and card design by Arthur Morris/BIRDS AS ART.
|
The Palouse ~ A Creative Adventure/BIRDS AS ART Instructional Photo-Tour (IPT)/Eastern Washington State. June 3-7, 2016/5 Full Days: $1699/Limit 12
The Palouse ~ A Creative Adventure/BIRDS AS ART Instructional Photo-Tour (IPT)/Eastern Washington State. June 10-14, 2016/5 Full Days: $1699/Limit 12
Double Header!
Maximize both your travel dollars and your learning experience by signing up for both IPTs.
|
|
|
Images and card design by Denise Ippolito/A Creative Adventure.
|
The Palouse IPTs
Rolling farmlands provide a magical patchwork of textures and colors, especially when viewed from the top of Steptoe Butte where we will likely enjoy spectacular sunrises and possibly a nice sunset. We will photograph grand landscapes and mini-scenics of the rolling hills and farm fields. We will take you to some really neat old abandoned barns and farmhouses in idyllic settings. There is no better way to improve your compositional and image design skills and to develop your creativity than to join us for this trip. Two great leaders: Denise Ippolito and Arthur Morris. Photoshop and image sharing sessions when we have the time and energy…. We get up early and stay out late and the days are long.
After 6 days of back-breaking scouting work in early June 2014 we found all of the iconic locations and, in addition, lots of spectacular new old barns and breath-taking landforms and views. On three additional scouting days in 2015 we discovered several more truly amazing locations. We will teach you what makes one situation prime and another seemingly similar one a waste of your time.
What’s included: In-the-field instruction, guidance, lessons, and inspiration, our newfound but very extensive knowledge of the area, all lunches, motel lobby grab and go breakfasts, and Photoshop and image sharing sessions when possible. There will be a meet and greet at 7:30pm on the evening before each workshop begins.
You will learn and hone both basic and advanced compositional and image design skills. You will learn to get the right exposure every time. You will learn to develop your creative eye. You will learn the basics of HDR (high dynamic range) photography. You will learn a variety of in-camera creative techniques. Most importantly you will learn to see the situation and to create a variety of top-notch images. Do see both of our blogs for lots more on that in the coming weeks. You will learn how the quality and direction of light combine to determine the success of your images. And–please don’t gasp–we will be working quite a bit with sidelight when creating landscapes. Lastly, we will be doing some infrared photography.
To Sign Up
A non-refundable $699 deposit is due now. The balance will be due on February 15, 2016. If we do not receive your check for the balance on or before the due date we will try to fill your spot from the waiting list. Whether or not your spot is filled, you will lose your deposit. If not, you can secure your spot by paying your balance.
With the spectacular success that we enjoyed in 2015 it seems quite likely that this one will fill up very quickly. Please let me know via e-mail that you will be joining us. Then you can either call Jim or Jennifer at 863-692-0906 during business hours or send us a check to leave a deposit; the latter is preferred. If by check, please make out to “Arthur Morris” and mail it to: Arthur Morris/BIRDS AS ART, PO Box 7245, Indian Lake Estates, FL, 33855. If you have any questions, please feel free to contact us via e-mail: artie or denise.
Travel Insurance Services offers a variety of plans and options. Included with the Elite Option or available as an upgrade to the Basic & Plus Options. You can also purchase Cancel for Any Reason Coverage that expands the list of reasons for your canceling to include things such as sudden work or family obligation and even a simple change of mind. You can learn more here: Travel Insurance Services. Do note that many plans require that you purchase your travel insurance within 14 days of our cashing your deposit check. Whenever purchasing travel insurance be sure to read the fine print carefully even when dealing with reputable firms like TSI.
Facebook
Be sure to like and follow BAA on Facebook by clicking on the logo link upper right. Tanks a stack!
Support the BAA Blog. Support the BAA Bulletins: Shop B&H here!
We want and need to keep providing you with the latest free information, photography and Photoshop lessons, and all manner of related information. Show your appreciation by making your purchases immediately after clicking on any of our B&H or Amazon Affiliate links in this blog post. Remember, B&H ain’t just photography!
…..
Amazon.com
Those who prefer to support BAA by shopping with Amazon may use this link:
Amazon Canada
Many kind folks from north of the border, eh, have e-mailed stating that they would love to help us out by using one of our affiliate links but that living in Canada and doing so presents numerous problems. Now, they can help us out by using our Amazon Canada affiliate link by starting their searches by clicking here. Many thanks to those who have written.
Typos
In all blog posts and Bulletins, feel free to e-mail or to leave a comment regarding any typos or errors. Just be right :).
August 6th, 2015 Stuff
Got lots done yesterday. My main task was to prepare a long e-mail asking for Canon Explorer of Light support for a big project. More of the same today for several other projects. Plus a great swim, my core exercises, and a chilly ice bath. This blog post took about 1 hour 15 minutes to prepare and was published from my home at Indian Lake Estates, FL at 6:15am on Thursday, August 6.
Namibia IPT
If you missed the info on this great trip, please click here.
Please Help Support My Work on the BAA Blog
Thanks a Stack! July was a Great Month.
Thanks a stack to the many who used our B&H links for purchases large and small. To show your appreciation for my efforts here, we ask, as always, that you use our the B&H and Amazon affiliate links on the right side of the blog for all of your purchases. B&H Is recommended for you major photography gear purchases, Amazon for your household, entertainment, and general purpose stuff. Please check the availability of all photographic accessories in the BIRDS AS ART Online Store, especially Gitzo tripods, Mongooses and Wimberley stuff, and the like. We sell only what I have used, have tested, and can depend on. We will not sell you junk. We know what you need to make creating great images easy and fun. And we are always glad to answer your gear questions via e-mail.
I would of course appreciate your using our B&H affiliate links for all of your major gear, video, and electronic purchases. For the photographic stuff mentioned in the paragraph above we, meaning BAA, would of course greatly appreciate your business. Here is a huge thank you to the many who have been using our links on a regular basis and visiting the BAA Online store as well. Lastly, overseas folks who do not patronize B&H via our links can consider thanking me for my efforts here by visiting the BAA Blog Thanks page here.
|

|
|
This is how the image opened up in DPP 4. Note the RGB values: R=247, G=232, B=198 (upper right). The RED cast is caused by the early morning light. If using Click White Balance makes the image look too neutral it is best to work with the color temperature slider. The same is true if you are converting in ACR or in Lightroom.
|
RAW Conversion 101 Step One
Well more than 90% of natural history images have at least some WHITEs or other fairly bright highlights. The first thing that you should be doing when converting the vast majority of your images is to place the cursor and what you judge to be the brightest highlights and note the RGB values. Move the cursor around slowly as you note the RGB values. The highest individual values are what you are looking for. My preference is that I have no individual RGB values much greater than 235. Denise Ippolito is fine with her brightest highlights having individual RGB values no higher than the low 240s.
Color balance note: the closer your RGB values are to being exactly the same, the closer you are to having a pure WHITE. So for me, a perfect WHITE with no color cast would be R=235, G= 235, B = 235. With many RAW converters including and especially DPP 4 using click White Balance can get you at or close to perfect WHITEs with a single click.
Do understand that RGB values of 254, 254, 254 are not technically overexposed and that in theory, such areas still have detail. But, and this is a very big BUT, if you consistently find yourself working with the brightest highlights coming in with RGB values in the greater-than-250 range, you will have a very hard time revealing, restoring, or maintaining detail in those areas. Well, you will either have a very hard time or be facing an impossible task. For me, no higher than the mid-230s is the way to go.
How does one know about what the WHITE or highlight RGB values will be when photographing in the field? By studying their histograms carefully. With birds with bright WHITEs in full sun I do not want my histogram pushed right up against the right hand axis as that will likely yield WHITEs with RGB values in the 250s. If I get a few blinkies on the subject one click darker will get rid of the blinkies but two clicks darker will yield WHITEs with no RGB values greater than 235 or so. Just as I want.
To reiterate, when you bring an image with bright highlights into your RAW converter–be it DPP 4, ACR, or Lightroom, the very first thing that you should be doing is putting the cursor on the brightest highlights and noting the RB values. If they are too high, the best way to best deal with them is to work at recovering detail during the RAW conversion process. Doing that in DPP 4 is covered in detail in the DPP 4 RAW Conversion Guide and doing it in ACR is covered in detail in Digital Basics.
More Lightroom Insanity; Can You Help?
On the recent and fantastic Galapagos Photo-Cruise, we had lots of time for DPP 4 and Photoshop sessions. More than a few folks on the trip use Lightroom. At one point, all of the Lightroom folks were sitting around shooting the breeze and working on images. Curious I asked one of them to show me how to check the RGB values of the brightest highlights. All that I got was a blank stare so I asked another LR advocate. Another blank stare. Then I asked the LR folks collectively, how do you check the RGB values of the brightest highlights when you first bring an image into LR to be converted? One of the five actually knew how to get the cursor on the brightest WHITEs and check the RGB values. The problem was that the RGB values were expressed as worthless percentages. And none of the LR users knew how to convert the percentages to the actual RGB values.
If you use LR and know how to check the RGB values as actual values rather than percentages, please feel free to write a short tutorial and post it as a comment. Do understand that writing good how to is a skill. Be sure to write clearly and to go over and over the steps to make sure that a 2nd grader can understand your tutorial before you post it. That is assuming that someone out there actually knows how to do this very basic first step…. If you do not know how to control and fine tune your WHITEs or bright highlights during RAW conversion then you are simply wasting your time.
|
|
|
All of the images on the bear boat card above were created in Katmai National Park during the month of September.
|
Bear Boat/Bears Catching Salmon IPT: September 1-8, 2015 from Kodiak, AK/6 FULL & 2 HALF DAYS: $6699. Happy campers only! Maximum 8/Openings: 2. Plus the leader: Arthur Morris.
Call for late registration discount info: 863-692-0906 and ask for me.
Join me in Katmai National Park, AK for seven days of photographing Coastal Brown Bears (grizzlies) catching salmon, fattening up for the long winter. Other subjects will include Mew and Glaucous-winged Gulls in flight and dip-feeding on salmon roe. Did I mention that we live on a boat and that the food is great? Most of our photography will be done in a variety of famed locations: Geographic Harbor, Kinak Bay, and Kukak Bay. We once had 39 bears fishing the creek at Kukak….
It is mandatory that you be in Kodiak no later than the late afternoon of August 31, 2015 September to avoid missing the float planes to the boat on the morning of September 1. With air travel in AK being what it is, with the chance of fog or other bad weather–being on Kodiak on August 30 is an even better plan). I will be on Kodiak on August 30 to avoid any potential disaster. That said in my nearly a dozen bear boat trips I was delayed only once but since I was day early as noted above there was no harm, no foul.
We will take one or more float planes to the boat mid-morning on September 1. We will photograph bears fishing that afternoon and every day for the next six days (weather permitting of course). We should have bears catching salmon every day. In addition, we will get some nice stuff on Mew Gull and Glaucous-winged Gulls dining on roe and the remains of predated salmon. We may–depending on where the concentrations of bears are–get to photograph Harbor seals and some hauled out Steller’s Sea Lions (an endangered species). Halibut fishing (license required) is optional. On September 8, our last morning on the boat, those who would like to enjoy one last photo session will do so. The group returns to Kodiak via float plane midday. Most folks will fly to Anchorage and then continue on red-eye flights to their home cities.
The eight days will consist of six full days (Sept 2, 3, 4, 5, 6, & 7) of photography featuring lots of Coastal Brown Bears catching salmon as above plus a variety of other natural history subjects plus some nice scenic photography that I forgot to mention above. Plus the first afternoon and the last morning.
What’s included? 8 DAYS/7 NIGHTS on the boat as above. All meals on the boat. (The food is quite excellent.) National Park fees. One night’s double occupancy lodging on Kodiak; arrive: Sept 1/depart: Sept 2. The thank-you-in-advance dinner on Sept 1. In-the-field photo tips, instruction, and guidance. An insight into the mind of a top professional; I will constantly let you know what I am thinking, what I am doing, and why I am doing it. Small group image review, image sharing, and Photoshop instruction on the boat.
What’s not included: Your round trip airfare to and from Kodiak, AK (almost surely through Anchorage). All necessary lodging other than the cost of your double occupancy room on the night of August 31 should you opt to arrive early–we can arrange that in advance for you. We will let you know the cost of a single supplement for the one night if so desired. The cost of the round-trip float plane to the boat on September 2 and back to Kodiak on September 9. The cost of a round trip this year was $500. The suggested crew tip of $210.
Is this an expensive trip? Yes, of course. But with 6 full and two half days, a wealth of great subjects, and the fact that you will be walking with the bears just yards away (or less….) it will be one of the great natural history experiences of your life. Most folks who take part in a Bear Boat IPT wind up coming back for more.
A $2,000 per person non-refundable deposit by check only made out to “Arthur Morris” is required to hold your spot. Please click here to read our cancellation policy. Then please print, read, and sign the necessary paperwork here and send it to us.
Your deposit is due immediately. That will leave a balance of $4699. The next payment of $2699 will be due on February 15, 2015. The final payment of $2000 is due on May 1, 2015.
I hope that you can join us for this wondrously exciting trip.
Facebook
Be sure to like and follow BAA on Facebook by clicking on the logo link upper right. Tanks a stack!
Support the BAA Blog. Support the BAA Bulletins: Shop B&H here!
We want and need to keep providing you with the latest free information, photography and Photoshop lessons, and all manner of related information. Show your appreciation by making your purchases immediately after clicking on any of our B&H or Amazon Affiliate links in this blog post. Remember, B&H ain’t just photography!
…..
Amazon.com
Those who prefer to support BAA by shopping with Amazon may use this link:
Amazon Canada
Many kind folks from north of the border, eh, have e-mailed stating that they would love to help us out by using one of our affiliate links but that living in Canada and doing so presents numerous problems. Now, they can help us out by using our Amazon Canada affiliate link by starting their searches by clicking here. Many thanks to those who have written.
Typos
In all blog posts and Bulletins, feel free to e-mail or to leave a comment regarding any typos or errors. Just be right :).
August 5th, 2015 Stuff
Lots more work done yesterday. But still time for getting teeth cleaned in town, shopping, core exercises, a great swim, and an ice bath. This blog post took about two hours to prepare and was published from my home at Indian Lake Estates, FL just before 7:00am on Wednesday, August 5, 2015. Enjoy and learn.
|
|
|
This image was created on the second 2015 Palouse IPT with the hand held Canon EF 11-24mm f/4L USM lens (at 15mm) and a 5D Mark II converted to IR by Kolari Vision. The 5D II had been replaced by the Canon EOS 5D Mark III . ISO 300. Evaluative metering +1 2/3 stops: 1/500 sec. at f/7.1. Custom white balance set off green vegetation.
Center AF point (Manual selection)/One Shot/Shutter button AF on the nearest photographer and re-compose. Click on the image to see a larger version.
Image #1: Palouse IPT group photographing wind turbine farm
Denise Ippolito is sixth from the right, in blue.
|
720 Nanometer Infrared Capture
My Canon 5D Mark II was converted to IR by Kolari Vision. After much study I opted to go with the he Standard IR Filter (720nm). As you can see in the image above, 720nm yields images with a bit of color, usually blues and bronzes. You can learn more about the various filter options by clicking here.
Why do I continue bringing my IR camera on every trip? There are several reasons:
#1: it is great fun.
#2: it is intriguing to try to learn which subjects and scenes might work well with IR and which will not. I am still learning.
#3: it is a challenge to learn to work in a new medium.
#4: using IR teaches you to see in Black and White and teaches you to better understand contrast….
#5: the images can be quite beautiful, interesting, and different.
Why do you like IR?
|

|
Image #2: Another version
|
Another Version
To create this image from the image above I simply desaturated the BLUE and the CYAN channels. An option would have been to bring the image into NK Silver Efex Pro and experiment withe my favorite B&W presets. Denise Ippolito has explored and discovered many additional ways to play with both color and B&W versions of IR images. We started on an IR Guide but that is currently on the back burner.
Image Design Question
Do you like the little black triangle in the lower left corner? Why or why not?
Your Favorite?
Which version do you prefer? Why?
Coming Soon
I will be featuring a really cool wind turbine image made by Palouse IPT participant Phil Frigon. I think that Phil was off-camera right when the group photo was created.
Kolari Vision BAA Discount
Get your camera converted to IR and enjoy a $10 discount by entering the code morris2015 in the Coupon code box at checkout. Then hit Apply Coupon and Update Cart. You will need to scroll down to see that your discount has been applied.
Note: denise and I share the small affiliate fee that we receive when you use our Kolari link.

Kolari Visions Infrared Camera Conversions
If you are ready to join the fun and have a camera converted to Infrared, use either the Kolari Vision logo-link above or the LifePixel logo-link below to order your conversion we will gladly send you our simple guide to properly setting a Custom White Balance for infrared photography at 720nm. Simply e-mail us your receipt and we will be glad to shoot you the PDF once your order appears in our affiliate account.
Kolari Visions prides themselves on their fast turnaround times and excellent customer service; they are getting better and faster as they employ several full time technicians to service everything as quickly as possible. The filters they use have been specifically designed for each camera and filter combination to be the optimal thickness for best autofocus performance between lenses, and the best corner sharpness. The filters also fit directly into the frame making the conversion non-damaging and reversible if needed. Others uses a few standard-sized thick filters that they calibrate the camera around. Doing this reaches accurate autofocus with their test lens. But when a filter is too thick for what the optics were designed for, the sharpness can suffer, particularly in the corners, and other lenses will not consistently focus accurately. Some other IR converters glue their filters directly to the sensor; that makes it almost impossible to revert back or to change the filter.
Kolari offers a comprehensive shop for infrared bodies; customers can order converted cameras directly from KV. Their focus on optical quality built from the ground up has allowed them to recently offer a service that improves the performance of Sony A7 series cameras to the level of the Leica M240 cameras. Content-wise, Kolari has a very comprehensive article list and an exhaustive lens performance database chock full of technical details. Soon, KV will feature an interactive gallery that will showcase different camera/filter picture combinations to get rid of some of the mystery of picking a camera to convert.
Choosing a Filter
Filter Choices
The text below is cut and pasted from an informative Kolari Visions’ article. You can access the complete photo illustrated tutorial by clicking here.
We currently have 6 filters to pick from. We offer the 720nm standard infrared, the 850nm deep infrared, the 665nm extra color infrared, the 590nm infrared, a full spectrum filter, and a two spectrum filter. All filters are the same price.
The Standard IR Filter (720nm) allows for good false color, and good contrast for black and white. This is equivalent to the Hoya R72 and the Wratten 89b.
The Ultra Color filter (590nm) lets more visible light in. It produces the most vibrant colors: leaves are golden yellow, skies are bright blue.
The Enhanced Color filter (665nm) has an effect between the 720nm and 590nm, producing more vibrant colors than the 720nm for pale yellow leaves and soft blue skies.
The Deep Black and White filter (850nm) is good for a dedicated black and white IR. The camera and will produce bright whites and pronounced blacks. It is Equivalent to the Wratten 87c.
As above, after some serious thinking I converted my camera at 720nm. We did get a chance to experiment with Catherine Costolo’s super-color IR camera and had great fun. I will share an image or two made with her camera here with you at some point.

LifePixel Infrared Camera Conversions
LifePixel has an extensive IR tutorial section. You can access it by clicking here or on the logo-link above and then clicking on the fourth tab: IR Primer. LifePixel offers excellent Digital Infrared conversions as well.
Costs
Kolari Vision offers more economical IR conversions than LifePixel and did a great job with my camera.
Denise’s Infrared Gallery
If you are developing an interest in Infrared photography be sure to check out denise’s Infrared gallery here. See if you can figure out how she created the Milwaukee Road image. We would be glad to try to answer any basic IR questions that you have via e-mail as follows: artie or denise.
|
|
|
Subject and focal lengths from upper left to right and then around to center.
Palouse Falls: 11mm; homemade kiddie race car: 105mm; barn siding pan blur: 798mm; Rolling fields diorama: 110mm; Crayola drums: 343 mm; Hay barn interior: 19mm; vintage gas station: 40mm; Dilapidated farm building: 13mm; Denise’s tree Infrared: 20mm.
Images and card design by Arthur Morris/BIRDS AS ART.
|
The Palouse ~ A Creative Adventure/BIRDS AS ART Instructional Photo-Tour (IPT)/Eastern Washington State. June 3-7, 2016/5 Full Days: $1699/Limit 12
The Palouse ~ A Creative Adventure/BIRDS AS ART Instructional Photo-Tour (IPT)/Eastern Washington State. June 10-14, 2016/5 Full Days: $1699/Limit 12
Double Header!
Maximize both your travel dollars and your learning experience by signing up for both IPTs.
|
|
|
Images and card design by Denise Ippolito/A Creative Adventure.
|
The Palouse IPTs
Rolling farmlands provide a magical patchwork of textures and colors, especially when viewed from the top of Steptoe Butte where we will likely enjoy spectacular sunrises and possibly a nice sunset. We will photograph grand landscapes and mini-scenics of the rolling hills and farm fields. We will take you to some really neat old abandoned barns and farmhouses in idyllic settings. There is no better way to improve your compositional and image design skills and to develop your creativity than to join us for this trip. Two great leaders: Denise Ippolito and Arthur Morris. Photoshop and image sharing sessions when we have the time and energy…. We get up early and stay out late and the days are long.
After 6 days of back-breaking scouting work in early June 2014 we found all of the iconic locations and, in addition, lots of spectacular new old barns and breath-taking landforms and views. On three additional scouting days in 2015 we discovered several more truly amazing locations. We will teach you what makes one situation prime and another seemingly similar one a waste of your time.
What’s included: In-the-field instruction, guidance, lessons, and inspiration, our newfound but very extensive knowledge of the area, all lunches, motel lobby grab and go breakfasts, and Photoshop and image sharing sessions when possible. There will be a meet and greet at 7:30pm on the evening before each workshop begins.
You will learn and hone both basic and advanced compositional and image design skills. You will learn to get the right exposure every time. You will learn to develop your creative eye. You will learn the basics of HDR (high dynamic range) photography. You will learn a variety of in-camera creative techniques. Most importantly you will learn to see the situation and to create a variety of top-notch images. Do see both of our blogs for lots more on that in the coming weeks. You will learn how the quality and direction of light combine to determine the success of your images. And–please don’t gasp–we will be working quite a bit with sidelight when creating landscapes. Lastly, we will be doing some infrared photography.
To Sign Up
A non-refundable $699 deposit is due now. The balance will be due on February 15, 2016. If we do not receive your check for the balance on or before the due date we will try to fill your spot from the waiting list. Whether or not your spot is filled, you will lose your deposit. If not, you can secure your spot by paying your balance.
With the spectacular success that we enjoyed in 2015 it seems quite likely that this one will fill up very quickly. Please let me know via e-mail that you will be joining us. Then you can either call Jim or Jennifer at 863-692-0906 during business hours or send us a check to leave a deposit; the latter is preferred. If by check, please make out to “Arthur Morris” and mail it to: Arthur Morris/BIRDS AS ART, PO Box 7245, Indian Lake Estates, FL, 33855. If you have any questions, please feel free to contact us via e-mail: artie or denise.
Travel Insurance Services offers a variety of plans and options. Included with the Elite Option or available as an upgrade to the Basic & Plus Options. You can also purchase Cancel for Any Reason Coverage that expands the list of reasons for your canceling to include things such as sudden work or family obligation and even a simple change of mind. You can learn more here: Travel Insurance Services. Do note that many plans require that you purchase your travel insurance within 14 days of our cashing your deposit check. Whenever purchasing travel insurance be sure to read the fine print carefully even when dealing with reputable firms like TSI.
Facebook
Be sure to like and follow BAA on Facebook by clicking on the logo link upper right. Tanks a stack!
Support the BAA Blog. Support the BAA Bulletins: Shop B&H here!
We want and need to keep providing you with the latest free information, photography and Photoshop lessons, and all manner of related information. Show your appreciation by making your purchases immediately after clicking on any of our B&H or Amazon Affiliate links in this blog post. Remember, B&H ain’t just photography!
…..
Amazon.com
Those who prefer to support BAA by shopping with Amazon may use this link:
Amazon Canada
Many kind folks from north of the border, eh, have e-mailed stating that they would love to help us out by using one of our affiliate links but that living in Canada and doing so presents numerous problems. Now, they can help us out by using our Amazon Canada affiliate link by starting their searches by clicking here. Many thanks to those who have written.
Typos
In all blog posts and Bulletins, feel free to e-mail or to leave a comment regarding any typos or errors. Just be right :).
August 4th, 2015 What’s Up?
I am not sure where time went yesterday. I know that I worked long and hard but not on anything specific though I did book our flights to Greece. I did get word that both of Tom Blackman’s lenses sold. This blog post was published at 7:15am on Tuesday, August 4, 2015.
Selling Your Used Photo Gear Through BIRDS AS ART
Selling your used (or like-new) photo gear through the BAA Blog or via a BAA Online Bulletin is a great idea. We charge only a 5% commission. One of the more popular used gear for sale sites charges a minimum of 20%. Plus assorted fees! Yikes. The minimum item price here is $500 (or less for a $25 fee). If you are interested please e-mail with the words Items for Sale Info Request cut and pasted into the Subject line :). Stuff that is priced fairly–I offer free pricing advice, usually sells in no time flat. In the past few months we have sold nearly everything in sight. Do know that prices on some items like the EOS-1D Mark IV, the old Canon 500mm, the EOS-7D, and the original 400mm IS DO lens have been dropping steadily. You can see the complete listings here.
Brand New Listing
Canon 400mm f/4 IS DO Lens
Multiple IPT veteran Michael Gotthelf is offering a used, super-sharp copy of the Canon 400 mm f/4 IS DO lens in excellent condition (with just a bit of paint wear) for $3250.00. The sale includes the lens trunk and key, the leather front lens cover, the rear lens cap and strap, and a RRS lens plate. The sale also includes insured shipping via either UPS or FED-EX Ground. Your item will not ship until your check clears unless other arrangements are made.
Please contact Mike by e-mail or by phone at 978-407-0679 (eastern time).
I used this lens for several years with great success, especially for birds in flight and while working from various type of water craft. In addition, it would make a great prime super-telephoto lens for folks with a 7D II. Gannets in Love was created with the 400 DO. You can see that one and 13 other killer images that I made with my old 400 DO here. The title of that blog post is “The Canon 400mm f/4 IS DO Lens: Fourteen Images that Prove that the Internet Experts are Idiots.” Mikes lens is priced to sell. artie
|

|
|
This image was created at Lake Kerkini, Greece with the hand held Canon EF 70-200mm f/2.8L IS II USM lens (at 125mm) and the EOS-1D Mark IV (now replaced by the Canon EOS-1D X. ISO 400. Evaluative metering +2/3 stop in soft early morning light: 1/320 sec. at f/11. AWB.
Three AF points up from the center AF point/AI Servo/Rear Focus AF as framed was active at the moment of exposure (as is always best when hand holding). Click here to see the latest version of the Rear Focus Tutorial. Click on the image to see a larger version.
Perfect Dalmatian Pelican Reflection
|
Perfect Reflections…
Most times, reflections are ruined by even a slight breeze that distorts them. In those cases, I generally frame tight cutting off most but not all of the reflection; if you include the complete reflection in those situations the images will have a top heavy look. All of the above is true for both horizontals and verticals. The conditions for creating perfect reflections: zero wind, are very rare. And of course you need a subject in the water with lots of room below and above. Clear skies and sun are great, but you can create perfect reflection images with cloudy skies as long as it is dead still.
On the Lake Kerkini IPT we purchase live fish from the local boatman and have the pelicans come to us. The one in today’s featured image posed for us by flying in and the floating for a while. It is rare that one or two Dalmatian Pelican images is not honored in one or more of the major photo contests in a given year. Do consider joining us in Greece for an amazing workshop. Keep on reading for details.
|

|
|
Images copyright 2011: Arthur Morris/BIRDS AS ART. Card design by Denise Ippolito.
|
Dalmatian Pelicans ~ Northern Greece
: A Creative Adventure/BIRDS AS ART Workshop/denise ippolito & arthur morris
. January 24th – 29th, 2016 ~ 5 Nights/ 4 Full days of photography: $2950. Limit: 6/Almost sold out.
This trip is a go.
Photograph beautiful Dalmatian Pelicans in Greece. Our trip will be from January 24-29th, 2016. Our hotel accommodations are located fifteen minutes from Lake Kerkini. This is a huge plus as we will be able to take advantage of great light at a moment’s notice. This location is well known as the best location on the planet to photograph these beautiful, common, and extremely photogenic birds. And we will enjoy tons of flight photography. Though your 70-200 will be your very best friend, you will be able to use almost every lens in your gear bag. Wide angle shots, close portrait work, flight shots, creative blurs- you name it. Our expert guide knows the area like the back of his hand; he guides some of the most world renowned photographers.
There will be in-the-field instructional photography sessions each morning and afternoon from the shore and we will enjoy extended small boat sessions. Image review and post processing sessions will be informal; we will cover a ton of information during both our in-the-field and indoor session. With two great leaders that only thing that will limit your learning is a lack of stamina.
More than 100 pairs of Dalmatian Pelicans nest on specially constructed platforms on the lake. They remain at the lake during the winter. During our time in Greece the Pelicans will be in their brightest and most impressive breeding plumage. The birds hang around the local fisherman and in addition, we purchase live bait to bring the pelicans close. They are silly tame as they have been begging fish from the locals for many decades. The groups of Dalmatian Pelicans are often accompanied by a gorgeous Great White Pelican or two. And we might get to photograph Pygmy Cormorant and Great Cormorants.
The price of this IPT IS $2950.00 per person USD, based on double occupancy; The single supplement is $360. The workshop fee includes hotel accommodations, WiFi, breakfast, lunch and dinner daily, round trip transfers from Thessaloniki Airport, all ground transportation during trip, boat fees and lots of fish.
Not included: Round trip airfare to Thessaloniki Airport, alcoholic beverages, personal items including but not limited to laundry, phone, or fax services.
This workshop is strictly limited to 6 participants. A non-refundable deposit of $1000.00 is required to hold your spot for this workshop. Balances are are due on August 1st, 2015 and are also non-refundable. Payments in full are of course welcome at any time. All payments including the deposit must be made by check made out to “Arthur Morris.” Please be sure to check your calendar carefully. If we do not receive your check for the balance on or before the due date we will try to fill your spot from the waiting list. If your spot is filled, you will lose your deposit. If not, you can secure your spot by paying your balance.
This is an especially attractive workshop for folks from Europe…. Wherever you are coming from, you will need to be at Thessaloniki Airport (SKG-Macedonia) on the early morning of January 23, 2016. There is a one-stop connection in Istanbul with Turkish Airlines Flight 4 that leave JFK at 1:40pm. Denise and I will be on that flight. Can you make it?
Please contact us via e-mail to check on availability or write with questions: artie or denise. All deposits and balances must be paid by personal check or money order made out to “Arthur Morris” and mailed to BIRDS AS ART, PO Box 7245, Indian Lake Estates, FL 33855. Overseas folks can, however, pay their deposits and balances by wire transfer; the registrant is responsible for the fees on both ends.
Travel Insurance Services offers a variety of plans and options. Included with the Elite Option or available as an upgrade to the Basic & Plus Options. You can also purchase Cancel for Any Reason Coverage that expands the list of reasons for your canceling to include things such as sudden work or family obligation and even a simple change of mind. You can learn more here: Travel Insurance Services. Do note that many plans require that you purchase your travel insurance within 14 days of our cashing your deposit check. Whenever purchasing travel insurance be sure to read the fine print carefully even when dealing with reputable firms like TSI.
We do hope that you can join us. artie and denise
Facebook
Be sure to like and follow BAA on Facebook by clicking on the logo link upper right. Tanks a stack!
Support the BAA Blog. Support the BAA Bulletins: Shop B&H here!
We want and need to keep providing you with the latest free information, photography and Photoshop lessons, and all manner of related information. Show your appreciation by making your purchases immediately after clicking on any of our B&H or Amazon Affiliate links in this blog post. Remember, B&H ain’t just photography!
…..
Amazon.com
Those who prefer to support BAA by shopping with Amazon may use this link:
Amazon Canada
Many kind folks from north of the border, eh, have e-mailed stating that they would love to help us out by using one of our affiliate links but that living in Canada and doing so presents numerous problems. Now, they can help us out by using our Amazon Canada affiliate link by starting their searches by clicking here. Many thanks to those who have written.
Typos
In all blog posts and Bulletins, feel free to e-mail or to leave a comment regarding any typos or errors. Just be right :).
August 3rd, 2015 Stuff
Sunday was business as usual with great swim, my core exercises, and lots of time spent wrapping up the details of the Namibia IPT and getting our flights. And answering e-mails. For details on the Namibia trip, see yesterday’s blog post. The 2016 UK Puffins and Gannets IPT has only one slot left; scroll down for details. Ron Paulk’s Canon 200-400 sold almost instantly. He wrote, Hi Art, Just got off the phone with a buyer for my 200-400 who found it on your site. She is sending a check tomorrow: I will let you know when the deal is done and get a check out to you at that time. Great work and thank you! Ron
This blog post took about 2 1/2 hours to prepare was was published just before 6:00am on Monday, August 3, 2015.
Please Help Support My Work on the BAA Blog
Thanks a Stack! July was a Great Month.
Thanks a stack to the many who used our B&H links in July for purchases large and small. The 400 DO II lenses continue to be in very short supply. The sooner you order, the sooner you will get yours. Most everything else is in stock ready to ship to you wherever you live.
To show your appreciation for my efforts here, we ask, as always, that you use our the B&H and Amazon affiliate links on the right side of the blog for all of your purchases. B&H Is recommended for you major photography gear purchases, Amazon for your household, entertainment, and general purpose stuff. Please check the availability of all photographic accessories in the BIRDS AS ART Online Store, especially Gitzo tripods, Wimberley tripod heads, and the like. We sell only what I have used, have tested, and can depend on. We will not sell you junk. We know what you need to make creating great images easy and fun. And we are always glad to answer your gear questions via e-mail.
I would of course appreciate your using our B&H affiliate links for all of your major gear, video, and electronic purchases. For the photographic stuff mentioned in the paragraph above we, meaning BAA, would of course greatly appreciate your business. Here is a huge thank you to the many who have been using our links on a regular basis and visiting the BAA Online store as well.
Selling Your Used Photo Gear Through BIRDS AS ART
Selling your used (or like-new) photo gear through the BAA Blog or via a BAA Online Bulletin is a great idea. We charge only a 5% commission. One of the more popular used gear for sale sites charges a minimum of 20%. Plus assorted fees! Yikes. The minimum item price here is $500 (or less for a $25 fee). If you are interested please e-mail with the words Items for Sale Info Request cut and pasted into the Subject line :). Stuff that is priced fairly–I offer free pricing advice, usually sells in no time flat. In the past few months we have sold nearly everything in sight. Do know that prices on some items like the EOS-1D Mark IV, the old Canon 500mm, the EOS-7D, and the original 400mm IS DO lens have been dropping steadily. You can see the complete listings here.
Brand New Listing
Canon 400mm f/4 IS DO Lens
Multiple IPT veteran Michael Gotthelf is offering a used, super-sharp copy of the Canon 400 mm f/4 IS DO lens in excellent condition (with just a bit of paint wear) for $3250.00. The sale includes the lens trunk and key, the leather front lens cover, the rear lens cap and strap, and a RRS lens plate. The sale also includes insured shipping via either UPS or FED-EX Ground. Your item will not ship until your check clears unless other arrangements are made.
Please contact Mike by e-mail or by phone at 978-407-0679 (eastern time).
I used this lens for several years with great success, especially for birds in flight and while working from various type of water craft. In addition, it would make a great prime super-telephoto lens for folks with a 7D II. Gannets in Love was created with the 400 DO. You can see that one and 13 other killer images that I made with my old 400 DO here. The title of that blog post is “The Canon 400mm f/4 IS DO Lens: Fourteen Images that Prove that the Internet Experts are Idiots.” Mikes lens is priced to sell. artie
|

|
|
This image was created on the 2015 UK Puffins and Gannets IPT with the tripod-mounted Canon EF 600mm f/4L IS II USM lens, the Canon Extender EF 1.4X III, and my workhorse Canon EOS-1D X. ISO 800. Evaluative metering +1 2/3 stops in cloudy conditions: 1/800 sec. at f/8. AWB.
Center AF point (Manual selection)/AI Servo/Rear Focus AF on the right-hand bird’s eye and re-compose. Click here to see the latest version of the Rear Focus Tutorial. Click on the image to see a larger version.
Razorbill pair courting
|
Pray for Clouds
One of the two best Razorbill spots on our afternoon landing site desperately needs clouds else the sun is coming right at you and the birds are strongly back or sidelit. Not what you want at 2pm. Most days our prayers were answered. Then it is just a matter of setting the right exposure manually (by adding lots of light) and isolating your subject or subjects. On really gray days I start by reading 2 1/3 or 2 2/3 stops off the gray sky, setting that manually, making a test exposure, checking both histograms, making sure there are no blinkies on the subject, and then adjusting the exposure to taste. With experience you can look at the histogram and know when your WHITEs will come into Photoshop with the RGB values in the low to mid 230s. (Note: denise prefers them to be in the high 230s or the low 240s.) Best way to learn that is on an IPT.
Bad Luck…
We had most of the group in perfect position on the small deck that gets close to the south-facing cliff edge. The pair in today’s featured image was sitting alone courting, totally in the clear, for more than 30 minutes. I predicted that they would be copulating soon. Just before they began to mate, a gull landed about a yard in front of them completely blocking my sightline to the birds. Several in the group were well to my right and had a clean shot at the blessed event. I was dead in the water as there was no room for me to move right. They went at it for about three minutes, and eternity for birds. You gotta love it. Bill Lloyd or anyone else: if you got something great on that, shoot me a 1200 wide JPEG.
|
Before and after animated GIF. Note the browner tones and the much-improved eyes in the optimized version….
|
Dealing With Those Hard to See Eyes…
As with the Sterna terns (like Common, Forster’s and Roseate) with their black eyes set in their jet black caps, it can be difficult to get a good look at the eyes of Razorbills… The iris of Razorbill is actually a dark bronze yet in a properly exposed RAW file the irises look dark. In addition, I opened the eye of the Razorbill on the right a bit by Warping a Quick Mask-created layer.
High Level Exposure Question
Why are the irises of Razorbills underexposed about 1 1/2 stops in most properly exposed RAW files?
The RAW Conversion
The RAW conversion in DPP 4 was straightforward. Many folks on the Galapagos Photo Cruise were quite interested in learning to use DPP. They did. All were amazed at how simple it was to use. The key is to create and save a recipe file for each ISO for each camera body. Arash’s recommended Luminance and Chrominance settings and the correct Sharpness setting are entered and saved with each recipe. After applying the recipe, the only thing that I need do with 98% of my images is to adjust the Highlight and Shadow sliders on the Perform basic image adjustment tab. Fast, simple, and easy with great color and the highest image quality available…. Learn more about DPP 4 in the DPP RAW Conversion Guide here.
The Image Optimization
The key to successful Eye Doctor work is not to overdo things. I darkened the pupils by selecting it with a Quick Mask and pulling the Curve down. Just a bit. Then, working very large, I lightened the irises and the light line below the eyes ever-so-slightly with a Tim Grey Dodge and Burn layer. Next I applied a layer of my NIK 50-50 recipe and fine tuned that with the addition of a Regular Layer Mask. This turned the apparent black feathers to a more natural rich brown and added detail to the white feathers. Then I sharpened the faces of both birds with a Contrast Mask. Then I did a bit of face and plumage clean-up using the Spot Healing Brush and the Patch Tool. Total time in Photoshop: less than five minutes. All as detailed in Digital Basics.
Everything that I did to optimize today’s image is covered in detail in my Digital Basics File–written in my easy-to-follow, easy-to-understand style. Are you tired of making your images look worse in Photoshop? Digital Basics File is an instructional PDF that is sent via e-mail. It includes my complete digital workflow, dozens of great Photoshop tips, details on using all of my image clean-up tools, the use of Contrast Masks, several different ways of expanding and filling in canvas, all of my time-saving Keyboard Shortcuts, Quick Masking, Layer Masking, and NIK Color Efex Pro basics, Contrast Masks, Digital Eye Doctor techniques, using Gaussian Blurs, Tim Grey Dodge and Burn, a variety of ways to make selections, how to create time-saving actions, the Surface Blur (background noise reduction) settings as taught to me by Denise Ippolito, and tons more.
APTATS I & II
Learn the details of advanced Quick Masking techniques in APTATS I. Learn Advanced Layer Masking Techniques in APTATS I. Mention this blog post and apply a $5 discount to either with phone orders only. Buy both APTATS I and APTATS II and we will be glad to apply at $15 discount with phone orders only. Please call Jim or Jennifer weekdays at 863-221-2372 to take advantage of this special offer. I am pretty sure that we have extended that offer to the BAA Online Store as well… No time to check right now. 🙂
|
|
|
You can order your copy of “The Photographers’ Guide to Canon Digital Photo Professional 4.0” (aka the DPP 4 Raw Conversion eGuide) by Arash Hazeghi and Arthur Morris by clicking here.
|
The DPP 4 eGuide (PDF)
Learn how and why I and many other discerning photographers choose and use only DPP 4 to convert their Canon RAW files in the DPP 4 RAW Conversion Guide by Arash Hazeghi and yours truly. The latest version supports all of the newer Canon camera bodies and several older models including the EOS-7D and the EOS-1D Mark IV. The DPP IV Guide is the ideal companion to the 7D Mark II User’s Guide, a runaway best seller.
The DPP 4 eGuide (PDF) Updated for 1D Mark IV and the original 7D
The DPP 4 eGuide was recently updated to include the luminance and chrominance noise reduction values for both the 1D Mark IV and the original 7D. If you purchased your copy from BAA please e-mail Jim and request the DPP 4 1d IV/7D update. Please be sure to cut and paste page 1 into your e-mail as proof of purchase.
|

|
|
Images and card design copyright: Arthur Morris/BIRDS AS ART. Click on the card to enjoy a spectacular larger version.
|
2016 UK Puffins and Gannets IPT
June 27 through July 4, 2016: $5699: Limit 10 photographers/only 1 spot left. Two great leaders: Denise Ippolito and Arthur Morris.
This Just In: If all promised deposits arrive only 4 slots left….
Here are the plans: take a red eye from the east coast of the US on June 26 arriving in Edinburgh, Scotland on the morning of Monday 27 June no later than 10am (or simply meet us then at the Edinburgh Airport–EDI, or later in the day at our cottages if you are driving your own vehicle either from the UK or from somewhere in Europe). Stay 7 nights in one of three gorgeous modern country cottages.
There are 5 days of planned puffin/seabird trips and 1 morning of gannet photography, all weather permitting of course.
|

|
|
Images and card design copyright: Arthur Morris/BIRDS AS ART. Click on the card to enjoy a spectacular larger version.
|
The Details
We will get to photograph Atlantic Puffin, Common Murre, Razorbill, Shag, and Northern Gannet; Arctic, Sandwich, and Common Terns, the former with chicks of all sizes; Black-headed, Lesser-Black-backed, and Herring Gulls, many chasing puffins with fish; Black-legged Kittiwake with chicks. And two species of castles 🙂 We will be staying in upscale country-side lodging that are beyond lovely with large living areas and lots of open space for the informal image sharing and Photoshop sessions. The shared rooms are decent-sized, each with a private bathroom. See the limited single supplement info below.
All breakfasts, lunches and dinners are included. All 5 puffins boat lunches will need to be prepared by you in advance, taken with, and consumed at your leisure. I usually eat mine on the short boat trip from one island to the other. Also included is a restaurant lunch on the gannet boat day and a farewell thank you dinner.
Plan to fly home on the early morning of Monday July 4 or to continue your stay or travels.
|

|
|
Images and card design copyright: Arthur Morris/BIRDS AS ART. Click on the card to enjoy a spectacular larger version. Scroll down to join us in the UK in 2016.
|
Deposit Info
If you are good to go sharing a room–couples of course are more than welcome–please send your non-refundable $2,000/person deposit check now to save a spot. Please be sure to check your schedule carefully before committing to the trip and see the travel insurance info below. Your balance will be due on March 29, 2016. Please make your check out to “Arthur Morris” and send it to Arthur Morris/BIRDS AS ART, PO Box 7245, Indian Lake Estates, FL, 33855. If we do not receive your check for the balance on or before the due date we will try to fill your spot from the waiting list. If your spot is filled, you will lose your deposit. If not, you can secure your spot by paying your balance.
Single Supplement Deposit Info
Single supplement rooms are available. To ensure yours, please register early. The single supplement fee is $1575. If you would like your own room, please request it when making your deposit and include payment in full for the single supplement; your single supplement deposit check should be for $3,575. As we will need to commit to renting the extra space, single supplement deposits are non-refundable so please be sure that check your schedule carefully before committing to the trip and see the travel insurance info below.
Travel Insurance
Travel insurance for big international trips is highly recommended as we never know what life has in store for us. I strongly recommend that you purchase quality insurance. Travel Insurance Services offers a variety of plans and options. Included with the Elite Option or available as an upgrade to the Basic & Plus Options you can also purchase Cancel for Any Reason Coverage that expands the list of reasons for your canceling to include things such as sudden work or family obligation and even a simple change of mind. My family and I use and depend on the great policies offered by TIS whenever we travel. You can learn more here: Travel Insurance Services. Do note that many plans require that you purchase your travel insurance within 14 days of our cashing your deposit check of running your credit card. Whenever purchasing travel insurance be sure to read the fine print careful even when dealing with reputable firms like TSI.
We do hope that you can join us. artie and denise
Facebook
Be sure to like and follow BAA on Facebook by clicking on the logo link upper right. Tanks a stack!
Support the BAA Blog. Support the BAA Bulletins: Shop B&H here!
We want and need to keep providing you with the latest free information, photography and Photoshop lessons, and all manner of related information. Show your appreciation by making your purchases immediately after clicking on any of our B&H or Amazon Affiliate links in this blog post. Remember, B&H ain’t just photography!
…..
Amazon.com
Those who prefer to support BAA by shopping with Amazon may use this link:
Amazon Canada
Many kind folks from north of the border, eh, have e-mailed stating that they would love to help us out by using one of our affiliate links but that living in Canada and doing so presents numerous problems. Now, they can help us out by using our Amazon Canada affiliate link by starting their searches by clicking here. Many thanks to those who have written.
Typos
In all blog posts and Bulletins, feel free to e-mail or to leave a comment regarding any typos or errors. Just be right :).
August 2nd, 2015
|

|
Deadvlei Tree photo illustration courtesy of and copyright 2015: Denise Ippolito/A Creative Adventure
Denise created this artwork by combining an image of some Colorado mountains with a tree that she created in Photoshop. The rest is simply her creative filter magic. It is a given that denise’s creativity is virtually unlimited and unmatched. Just don’t ask me how she did it….
|
Namibia
Photos of Namibian dunes, dead trees, birds, and wildlife often grace prestigious natural history calendars and are honored annually in pretty much all of the top flight nature photography contests including and especially the BBC Wildlife Photographer of the Year Competition and the Nature’s Best Windland Smith Rice International Awards Contest. Both denise and I have long dreamed of visiting. Our dream is coming true. With four folks signed up before the tour was even announced, this trip is a go. Most traveling from the US will likely want to be on one of the direct flights to Johannesburg, South Africa from New York’s JFK (on April 13, 2015 so as to arrive in Windhoek on the 14th). In addition, we would both be thrilled to meet some of our overseas followers on this trip.
In addition to enjoying several world class nature photography locations, you will learn more than you ever thought possible via in-the-field instruction from two of the best and informal image sharing and Photoshop sessions at the lodge. We hope that you can join us.
The 2016 Namibia BIRDS AS ART/A Creative Adventure Instructional Photo-Safari: April 14-28, 2016 on the ground: $8999. Limit: 10 photographers/openings: 6.
Our truly great itinerary is below. This workshop was planned with the help of two BBC-honored local photographers with an intimate knowledge of the area who will act as our guides for the entire trip. This IPT will be co-led by Denise Ippolito and yours truly. The dates and the price are set in stone: April 14-28, 2016. 15/days/14 nights: $8999 from Windhoek, Namibia (Hosea Kutako International Airport, airport code WDH). Please contact me via e-mail if you would like to register. Then please fill out, print, and sign the Registration and Release forms that are linked to here. Then mail it to us here: PO Box 7245, Indian Lake Estates FL 33855 along with your $3,000 non-refundable deposit check made out to “Arthur Morris.”
The second payment of $3,000 is due on November 15, 2015 and the final payment of $2,999 is due on February 1, 2015. As with the deposit, checks only.
Single supplements may be available for parts (or all) of the trip. They will be quite expensive. Best not to ask 🙂 Please inquire as to availability. If you or we are unable to line up a same sex roommate for you, you will be charged the single supplement on a pro-rated basis.
Travel Insurance
Please understand that we need the deposits for international trips as arrangements must be paid in full far in advance. If everybody decides to cancel then we are sort left holding a very short straw 🙂 Seriously interested folks are urged to consider getting trip insurance within two weeks of sending their deposit checks. There are lots of options with Travel Services Insurance (TSI). You can explore them here.
The Namibia IPT Itinerary
Day 1: April 14, 2016. Fly into Windhoek (Hosea Kutako International Airport, airport code WDH. Spend the night at River Crossing Lodge. Note: folks traveling from the US and many other destinations will need to depart on redeye flights on April 13th. You need to be sure that you will be in Windhoek on April 14, 2015!
Day 2: Early departure to QuiverTree Forest Lodge on the outskirts of Keetmanshoop. Here we will be able to capture the beauty of the magnificent QuiverTree forest as well as have access to the Giant Playground area for some spectacular landscape photography. The sessions will include afternoon and evening shoots, the latter with stars, milky way, and star trails photography. Night photography instruction will be provided. In addition, we will let you know in advance what lenses and accessories you will need for the night photography.
Day 3: After breakfast we depart for the luxurious Sossusvlei Dune Lodge for 3 nights inside Namib Naukluft National Park. The distance to Sossusvlei is about 550km and the trip should take about 7 hours. Thanks to our experienced guides we will enjoy unparalleled after hours access to dead tree scenics at Dead Vlei. Arrangements have been made to to leave the lodge in the mornings an hour before sunrise to capture the best possible lighting conditions. We will be visiting Dead Vlei and Dune 45. There is a fairly strenuous up-and-down hike to some of the best photo locations that should take really fit folks about 15-20 minutes and as much as 45 minutes for the older fit folks or those with a bad knee. Denise is in the former category, Artie fits in both of the latter categories :). At Sossusvlei two desert systems come together: the beautiful red dunes of the Kalahari desert and the breathtakingly stark Namib desert. The desert experience is a surreal and life-changing one and even the best images do not reflect the amazing beauty of these unique deserts. Deadvlei, with its ancient trees in the now dried up lake, is a feast for photographers who are looking for something stark, different, and dramatic. Along with the spectacular landscapes we should get to photograph some wildlife as well with chances for oryx and springbok among others.
Day 6: From Sossusvlei we head off to Swakopmund to spend some three nights at the Swakopmund Beach Hotel. One morning will head into the dunes to target species such as the Desert Chameleon, Horned Adder, Sand-Diving Lizards, and Palmato Gecko—the world’s cutest gecko. We will spend time photographing the amazing bird life in and around the Walvisbay area. The Salt Mine and bay area is especially productive with a huge selection of waders and other waterfowl along with large numbers of flamingoes. We will enjoy one chartered boat trip to target pelicans in flight. Those and a selections of skua’s and cormorants will keep the most discerning bird photographers happy. Afternoons in the area will be spent driving along the beach to the huge seal colonies and photographing their playful interactions and antics. A tentative schedule is below:
Day 7: Morning (private tour) Desert Experience photographing Palmato Gecko / Sidewinders / Desert Chameleon etc, etc. Afternoon we either shoot Pelican point for seals or Walvisbay for flamingos and more.
Day 8: Morning bay cruise with chartered boat shooting pelicans flying in . We will likely spend the afternoon with the seals at Pelican point.
Day 9: After breakfast we depart for Etosha; arrive that afternoon at Halali and spend 3 nights there. Just when you thought it could not get any better we head further north to the wide-open plains of Etosha. Here the wildlife spectacle is arguably one of the best in Africa. Etosha is home to not only the Big Five, but also a variety of other species such as Cheetah, Honey Badger, Oryx, Springbok, Dik-Dik, Black-Faced Impala, Eland, Ostrich and more. Depending on our route this could take as long as four hours to get to the park entrance and another 2 hours drive to Halali. We will travel about 400km
Day 12:. We wrap-up at Halali and move down to Okaukuejo where we will spend three nights. Okaukuejo Camp is famous for its large floodlit waterhole, the hub of animal activity especially in the early morning and early evening hours. We will see and photograph many species including and especially the endangered Black Rhino. There will be game drives during the say. For the night water hole photography flash is optional but recommended.
Day 15: April 28, 2016. We make the 4-5 hour drive back to Windhoek in time for your international flights.
This price of this tour includes:
All Accommodations.
All breakfasts and dinners.
Logistics make formal lunches impossible. There will, however, be a variety of snacks including nuts and cheeses along with sodas and bottled drinking water in each vehicle.
Bottled water at the lodges and in the vehicles. Also included at the lodges are soft drinks and sodas and local wines and liquors (excluding premium and imported hard drinks).
All transportation from the time you arrive in Windhoek to the time you leave again.
All park entrance fees
One extra-late night in Deadvlei where we will use NWR vehicles for transport.
The chartered boat activities in Walvisbay.
The Private Desert Experience tour in Swakopmund.
The price of this tour does not include:
Your flights to and from Windhoek.
Visa costs: no visa is needed for folks from the US and most other countries.
Gratuities and items of a personal nature.
August 1st, 2015 The Namibia IPT
Namibia 2016 BIRDS AS ART/A Creative Adventure Instructional Photo-Safari: April 14-24 on the ground: $8999. Limit: 10 photographers/openings: 6.
Most of Friday was spent on the phone and on Skype setting up the first-ever Namibia IPT. Photos of Namibian dunes, dead trees, and wildlife are honored annually in pretty much all of the prestigious nature photography contests including and especially the BBC Wildlife Photographer of the Year competition and the Nature’s Best Windland Smith Rice International Awards Contest. We have set up a truly great itinerary; this workshop was planned with the help of two BBC honored local photographers with an intimate knowledge of the area who will act as our guides for the entire trip. This IPT will be co-led by Denise Ippolito and yours truly. The dates and the price are set in stone: April 14-28, 2016. 15/days/14 nights: $8999 from Windhoek, Namibia (Hosea Kutako International Airport, airport code WDH). Please contact me via e-mail if you would like to register or receive the itinerary. To register, please e-mail first and then send your $3,000 non-refundable deposit check made out to “Arthur Morris” to us at PO Box 7245, Indian Lake Estates FL 33855. We do expect this one to sell out very quickly….
Happy campers only please.
Stuff
I did not get much else accomplished but did catch up a bit on e-mail. I enjoyed an early ice bath, my core exercises, and a late swim. I began this blog post at 3:30 am today. It was published just after 6:15am on Saturday August 1, 2015. All who enjoy the blog, especially those who do not regularly use our B&H affiliate links, are invited to thank us by clicking on the BAA Blog Thanks link here.
Selling Your Used Photo Gear Through BIRDS AS ART
Selling your used (or like-new) photo gear through the BAA Blog or via a BAA Online Bulletin is a great idea. We charge only a 5% commission. One of the more popular used gear for sale sites charges a minimum of 20%. Plus assorted fees! Yikes. The minimum item price here is $500 (or less for a $25 fee). If you are interested please e-mail with the words Items for Sale Info Request cut and pasted into the Subject line :). Stuff that is priced fairly–I offer free pricing advice, usually sells in no time flat. In the past few months we have sold nearly everything in sight. Do know that prices on some items like the EOS-1D Mark IV, the old Canon 500mm, the EOS-7D, and the original 400mm IS DO lens have been dropping steadily. You can see the complete listings here.
Brand New Listing
Canon EF 200-400mm f/4L IS Lens with Internal Extender
Sale pending: August 2, 2016.
Ron Paulk is offering a lightly used Canon EF 200-400 f/4 IS USM Lens w/Internal 1.4x Extender in excellent condition for $9299. The sale includes the following items that come with the lens: the lens trunk, the E145C Lens Cover, the rear lens cap E, the lens strap, the lens hood, the 52mm drop-in filter holder, and the strap for the hard case. Also included are a Realtree Max4 LensCoat (a $104 value), a RRS LCF-53 Foot (a $110 value), and and insured shipping to US addresses via FED-EX Ground. Your new lens will ship in the original Canon box after your check clears unless other arrangements are made.
Please contact Ron by e-mail or by phone at 360-391-2090 PDT.
I have owned and used this great lens pretty much since day one. I have had great success with it in the Southern Ocean, in Africa, in the Galapagos, on the first UK Puffins trip, at Nickerson Beach on Long Island, on the San Diego IPT, and on several Bear Boat trips. When you need reach and the ability to frame perfect from 200 through 560mm (or to 784mm at f/8 with an external 1.4X III TC added), this lens cannot be beat. At $9299 Ron’s lens is priced to sell. It currently sells new at B&H for $10,299. The last one we sold through our used gear listings went for $9799. artie
|

|
|
This image was created on a panga (zodiac) ride at Punta Mangle, Fernandina on Day 5 of the 2015 Galapagos Photo Cruise with the hand held Canon EF 400mm f/4 DO IS II USM lensCanon Extender EF 2X III, and the Canon EOS 7D Mark II. ISO 800. Evaluative metering at zero: 1/1600 sec. at f/9 in Manual mode.
Center AF point (by necessity) Manual Selection/AI Servo/Shutter Button AF as framed was active at the moment of exposure (as is always best when hand holding). The selected sensor was on the base of the bird’s upper mandible. Click here to see the latest version of the Rear Focus Tutorial. Click on the image to see a larger version.
Galapagos Penguin head portrait
|
400 DO/2X III TC/7D II Hand Held Miracle
The zodiac was rocking pretty good and framing any subject at any focal length was difficult at best. In retrospect, I have no idea why I went to the 400 DO II/2X III/7D II combination while working in a panga with six other photographers. The effective focal length of this set-up is 400mm times 2 times the 1.6X crop factor of the 7D II: 1280mm or 25.6X magnification. After making a very few images and seeing on the rear LCD that I had properly framed two decent images I swapped the 2X III for the 1.4X III; I remember that even then I had trouble framing anything as the wind had picked up a bit…. To my mind, the capture of today’s featured image was pretty much of a miracle.
Head Angle Comment
Note the perfect head angle with the bird’s head turned about 1 1/2 degrees towards us. This places the bill tip on the same plane as the subject’s eye giving the impression of greater overall sharpness.
The Image Optimization
Note: this image is uncropped. After converting it in DPP 4, the optimization was pretty much straightforward; the image was so sharp out of the camera that I did not feel the need to run my NIK 50-50 recipe…. As detailed in the DPP 4 RAW Conversion Guide, Arash Hazeghi’s 7D II Luminance and Chrominance Noise Reduction values performed admirably. When I shared the image with Denise Ippolito via e-mail she suggested that there was too much BLUE in the BLACKs. After the fact, I brought the image back into Photoshop, selected the BLACKs with the Quick Selection Tool, and reduced the saturation of the BLUEs, GREENs, CYANs, and YELLOWs about 50% as detailed in Digital Basics. Color-wise, the image was much improved. Thanks Lady D.
Image Question
With the sun slightly muted by a thin cloud, why didn’t I add a bit of light to the suggested exposure?
Many Folks Think That I was Right, and So Do I
The following appeared in the blog post here:
I was Wrong in Part: My Errors
Thanks to comments first left by first by John Armitage and backed up by Steve Soderling the major premise of yesterday’s blog, that camera shake is greater with a crop factor camera, was incorrect. I was tricked (if you were) into this error because the shake appears much more evident when you are looking through the viewfinder of a crop factor camera than when you are looking through the viewfinder of a full frame or 1.3X crop factor camera. I apologize for my error.
Thanks to John and Steve for setting me straight.
On the 2015 UK Puffins and Gannets IPT, Alan Lillich opined that I had indeed been right for the following reason: the amount of shake when considered on a pixel level is indeed greater with the 7D II with its more tightly packed pixels. Others e-mailed and stated the same thing. Today, I firmly believe that in order to create sharp images when working with a 7D Mark II you need to keep a lens more steady than when you are working with any full frame or 1.3X crop factor Canon camera body….
Speaking of John Armitage…
Thanks again to John for loaning me his brand new 400 DO II for the Galapagos trip. The lens was shipped back to him yesterday (in new condition) via Fed-Ex 2nd day air along with a few thank you goodies.
|
|
|
All of the images in the bear boat card above were created in Katmai National Park during the month of September.
|
Bear Boat/Bears Catching Salmon IPT: September 1-8, 2015 from Kodiak, AK/6 FULL & 2 1/2 DAYS: $6699. Happy campers only! Maximum 8/Openings: 2. Plus the leader: Arthur Morris.
Call for late registration discount info!
Join me in Katmai National Park, AK for seven days of photographing Coastal Brown Bears (grizzlies) catching salmon, fattening up for the long winter. Other subjects will include Mew and Glaucous-winged Gulls in flight and dip-feeding on salmon roe. Did I mention that we live on a boat and that the food is great? Most of our photography will be done in a variety of famed locations: Geographic Harbor, Kinak Bay, and Kukak Bay. We once had 39 bears fishing the creek at Kukak….
It is mandatory that you be in Kodiak no later than the late afternoon of August 31, 2015 September to avoid missing the float planes to the boat on the morning of September 1. With air travel in AK being what it is, with the chance of fog or other bad weather–being on Kodiak on August 30 is an even better plan). I will be on Kodiak on August 30 to avoid any potential disaster. That said in my nearly a dozen bear boat trips I was delayed only once but since I was day early as noted above there was no harm, no foul.
We will take one or more float planes to the boat mid-morning on September 1. We will photograph bears fishing that afternoon and every day for the next six days (weather permitting of course). We should have bears catching salmon every day. In addition, we will get some nice stuff on Mew Gull and Glaucous-winged Gulls dining on roe and the remains of predated salmon. We may–depending on where the concentrations of bears are–get to photograph Harbor seals and some hauled out Steller’s Sea Lions (an endangered species). Halibut fishing (license required) is optional. On September 8, our last morning on the boat, those who would like to enjoy one last photo session will do so. The group returns to Kodiak via float plane midday. Most folks will fly to Anchorage and then continue on red-eye flights to their home cities.
The eight days will consist of six full days (Sept 2, 3, 4, 5, 6, & 7) of photography featuring lots of Coastal Brown Bears catching salmon as above plus a variety of other natural history subjects plus some nice scenic photography that I forgot to mention above. Plus the first afternoon and the last morning.
What’s included? 8 DAYS/7 NIGHTS on the boat as above. All meals on the boat. (The food is quite excellent.) National Park fees. One night’s double occupancy lodging on Kodiak; arrive: Sept 1/depart: Sept 2. The thank-you-in-advance dinner on Sept 1. In-the-field photo tips, instruction, and guidance. An insight into the mind of a top professional; I will constantly let you know what I am thinking, what I am doing, and why I am doing it. Small group image review, image sharing, and Photoshop instruction on the boat.
What’s not included: Your round trip airfare to and from Kodiak, AK (almost surely through Anchorage). All necessary lodging other than the cost of your double occupancy room on the night of August 31 should you opt to arrive early–we can arrange that in advance for you. We will let you know the cost of a single supplement for the one night if so desired. The cost of the round-trip float plane to the boat on September 2 and back to Kodiak on September 9. The cost of a round trip this year was $500. The suggested crew tip of $210.
Is this an expensive trip? Yes, of course. But with 6 full and two half days, a wealth of great subjects, and the fact that you will be walking with the bears just yards away (or less….) it will be one of the great natural history experiences of your life. Most folks who take part in a Bear Boat IPT wind up coming back for more.
A $2,000 per person non-refundable deposit by check only made out to “Arthur Morris” is required to hold your spot. Please click here to read our cancellation policy. Then please print, read, and sign the necessary paperwork here and send it to us.
Your deposit is due immediately. That will leave a balance of $4699. The next payment of $2699 will be due on February 15, 2015. The final payment of $2000 is due on May 1, 2015.
I hope that you can join us for this wondrously exciting trip.
Facebook
Be sure to like and follow BAA on Facebook by clicking on the logo link upper right. Tanks a stack!
Support the BAA Blog. Support the BAA Bulletins: Shop B&H here!
We want and need to keep providing you with the latest free information, photography and Photoshop lessons, and all manner of related information. Show your appreciation by making your purchases immediately after clicking on any of our B&H or Amazon Affiliate links in this blog post. Remember, B&H ain’t just photography!
…..
Amazon.com
Those who prefer to support BAA by shopping with Amazon may use this link:
Amazon Canada
Many kind folks from north of the border, eh, have e-mailed stating that they would love to help us out by using one of our affiliate links but that living in Canada and doing so presents numerous problems. Now, they can help us out by using our Amazon Canada affiliate link by starting their searches by clicking here. Many thanks to those who have written.
Typos
In all blog posts and Bulletins, feel free to e-mail or to leave a comment regarding any typos or errors. Just be right :).
July 31st, 2015 What’s Up?
Got lots done yesterday. Changed an important flight for my Alaska trip. Finalized the dates for the 2015 Galapagos Photo-Cruise. And answered dozens of important e-mails. It felt good to get into my lap pool, to do my core exercises, and to start eating well.
This blog post was published just before 7:45am from my home-sweet-home at Indian Lake Estates, FL on Friday, July 31, 2015.
The 2017 BIRDS AS ART/A Creative Adventure Galapagos Photo Cruise Dates Finalized
We will be on the ship for this great trip from August 8-22, 2017. The trip will be formally announced within one week. Though we fully expect this trip to sell out quickly, do understand that we will need at least 8 deposits in had by August 2016 or possibly before that date for this trip to run. Do understand that if you make a photography trip to the Galapagos with us that you will be maximizing your photographic opportunities and getting the absolute most out of your travel and workshop dollars. Join us for a world class learning experience.
I would assume that after viewing the variety and quality of the images in this and in recent and coming blog posts that most passionate nature photographers would wish to join us on the next Galapagos photo adventure during the first two weeks of August, 2017. If that includes you, please shoot me an e-mail with the words “Galapagos August 2017 Photo-Cruise” cut and pasted into the Subject Line. Details will be announced shortly after I get back. The best news is that there will be two great leaders, yours truly and Denise Ippolito.
|

|
|
This image was created on a panga ride at Elizabeth Bay, Isabela, on Day 7 of the 2015 Galapagos Photo Cruise with the hand held Canon EF 70-200mm f/2.8L IS II USM lens (at 145mm) and the Canon EOS-1D X. ISO 3200. Evaluative metering -2/3 stop: 1/160 sec. at f/6.3 in Av mode.
Two rows below and four to the left of the center AF point/AI Servo Expand/shutter button AF as framed was active at the moment of exposure (as is always best when hand holding). The active AF point fell on young ray’s upper back just behind its head. Click here to see the latest version of the Rear Focus Tutorial. Click on the image to see a larger version.
With the Singh-Ray 77mm Warming Circular Polarizer set to dark. See the tutorial below.
Spotted Eagle Ray/juvenile swimming
|
The Anticipated Problem
We had an early panga (zodiac) photo session scheduled. It was cloudy dark. The targets in the red mangrove bays would be turtles and rays along with a few birds. It is usually pretty dark in among the mangroves. When photographing creatures swimming slightly under the surface of the water, it is best to use a circular polarizer set to dark to eliminate the reflections. This allows you (and your camera and lens) to “see” better. The polarizer, however, robs you of light. Most circular polarizers steal 3 full stops of light. With the high quality of the Singh-Ray circular polarizers you lose only two stops of light thereby gaining one full stop of ISO.
In short, it was gonna be dark. Choosing the 1D X over the 7D II for its superior high ISO performance was a no-brainer as we have seen in recent blog posts. And going with the 70-200 f/2.8L IS II was also an easy choice as it would save me two full stops of ISO over the much slower 100-400 II at f/5.6 or so. In addition, the subjects would be at close range, actually right next to the pangas.
The Problem in Reality
I started out with ISO 800 adding 1/3 stop of light and found that my shutter speeds were much too slow so I went to ISO 1600. Juan positioned the zodiac perfectly and I fired away. Upon close inspection none of the images juvie rays were sharp at shutter speeds of 1/50 or 1/60 sec. Enlarged on the rear lCD they looked like crap. As Juan and I often tease each other he enjoyed mocking me in front of the group. All in fun of course.
I was not sure what the problem was. Were my shutter speeds still too slow or was the camera having trouble focusing on creatures that were a bit too far below the surface?
I saw some of Indranil Sircar’s images on the back of his 7D II and they looked pretty good. And he was actually underexposing a bit. Thus inspired and fully determined, I went to ISO 3200 and set the EC to -2/3. We had one more good chance and I nailed several images that looked more than sharp enough with the one above being my very favorite.
My Serious Error
Take a close look at the shooting data and leave a comment letting us know what you think was my major error in thinking (and in the execution of today’s image).
Singh-Ray Filters
Singh-Ray filters have been used by the world’s top photographers for many decades. Most notably the late Galen Rowell. Singh-Ray has been and is the name in quality filters. I often use the Singh-Ray 77mm Warming Circular Polarizer set to dark when photographing rainbows, to eliminate reflections when photographing on or around the water (and when photographing the water itself as with today’s spectacular image), and to juice up a cloud-filled sky on a on bright sunny day, the latter especially when working off sun angle.
And I absolutely love the Singh-Ray 3-stop resin and 5-stop glass Neutral Density Filters. I use the 77mm versions of these filters on my 24-105, my 70-200mm f/2.8 L IS, and my new and beloved 100-400mm IS II lens so that I can create blurs on sunny days without having to stop down to f/too-many dust spots…. With a 5-stop glass ND in place I can easily get down to shutter speeds of 1/2 second and slower on clear, bright sunny days.
BIRDS AS ART has been working with Singh-Ray to produce a 5-stop Neutral Density filter to to fit the filter drawers of Canon Super-telephoto lenses. Info on the will be presented here very soon so stay tuned. If you will be heading to Bosque this season, you will want at least one of the 52mm ND filters in your Xtrahand vest.
No other filter manufacturer comes close to matching the quality of Singh-Ray’s optical glass; it is comparable to that used by NASA. And they continue to pioneer the most innovative products on the market like their ColorCombo polarizers and the Mor-Slo 15-stop neutral density filter. When you use their filters, you’ll create better, more dramatic images and, unlike as with other filters, with absolutely no sacrifice in image quality. All Singh-Ray filters are handcrafted in the USA.
Best News: 10% Discount/Code at checkout: artie10
To shop for a Singh-Ray Warming Circular Polarizer (for example), click on the logo link above or the one in the right hand column of each blog post, click on Polarizers/color enhancing on the menu bar, choose LB Warming Polarizer, choose the size and model, add to cart, and then checkout. Click on Continue to checkout. In the “Have a Coupon?” box (the second from the top), click on this active link: “Click here to enter your code” and then type “artie10” into the box. Click on “Apply Coupon” and a healthy 10% discount will be applied to your total. In addition to enjoying the world’s best filter at 10% off you will be supporting my efforts here on the blog.
How to Set A Circular Polarizer to Dark
Mount the polarizer. Put the camera in Av mode with zero Exposure Compensation (EC). Point the lens at the sky 90 degrees off sun angle. Turn the polarizer slowly while noting the shutter speed as you rotate the polarizer. Quit turning the polarizer when you determine the slowest shutter speed. Now you are set up to work right down sun angle several about two stops slower than if you were not using the polarizer (set to dark). Or best photograph rainbows. Or cut down reflections off the surface of the water. Or create more dramatic skies.
|

|
|
The strange thing is that when I lived in New York, I never knew about this amazing and consistently productive location.
|
Nickerson Beach/JBWR (possibly…)/Black Skimmer/Oystercatcher/migrant shorebird IPT: August 13-16, 2015. 3 1/2 DAYS: $1399.
Meet and greet on the evening of WED August 12. Limit 10/Openings 2.
Call for late registration discount info!
Most of our seven photo sessions will be spent at Nickerson beach photographing the nesting Black Skimmers. In flight, sometimes battling. Carrying fish. Chicks of varying sizes from a very few just-hatched to lots of fledglings. It is likely that we will get to see some Great Black-backed Gulls preying on the juvenile skimmers. They swallow them whole. There will be lots of gulls to photograph as well as some Common Terns. Locally breeding shorebird species include American Oystercatcher–pretty much guaranteed, Willet, which is likely, and Piping Plover, which is probable but we need to get lucky with those to get close….
Save a space by calling Jim or Jen at the office and arranging to leave your deposit of $499. The check for you balance is due immediately. I hope that you can join us at this late date.
JBWR?
If local conditions are ideal we may visit Jamaica Bay Wildlife Refuge to photograph southbound migrant shorebirds on one or possibly two mornings. Even if we do not visit JBWR we should get some good chances with the migrant shorebirds at the beach, especially Sanderling and Semipalmated Plover. Red Knot and others are possible.
|

|
|
As you can see, the oystercatchers are quite tame at Nickerson. And we will get you up early and we will stay out late.
|
Facebook
Be sure to like and follow BAA on Facebook by clicking on the logo link upper right. Tanks a stack!
Support the BAA Blog. Support the BAA Bulletins: Shop B&H here!
We want and need to keep providing you with the latest free information, photography and Photoshop lessons, and all manner of related information. Show your appreciation by making your purchases immediately after clicking on any of our B&H or Amazon Affiliate links in this blog post. Remember, B&H ain’t just photography!
…..
Amazon.com
Those who prefer to support BAA by shopping with Amazon may use this link:
Amazon Canada
Many kind folks from north of the border, eh, have e-mailed stating that they would love to help us out by using one of our affiliate links but that living in Canada and doing so presents numerous problems. Now, they can help us out by using our Amazon Canada affiliate link by starting their searches by clicking here. Many thanks to those who have written.
Typos
In all blog posts and Bulletins, feel free to e-mail or to leave a comment regarding any typos or errors. Just be right :).
|
|