March 2nd, 2012
|
|
|
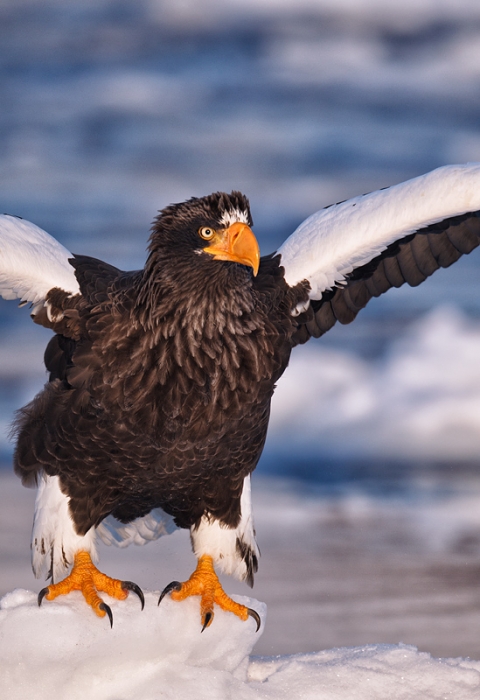
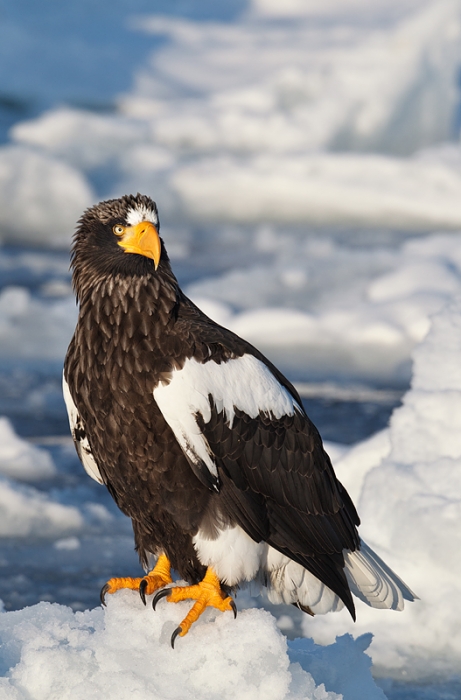
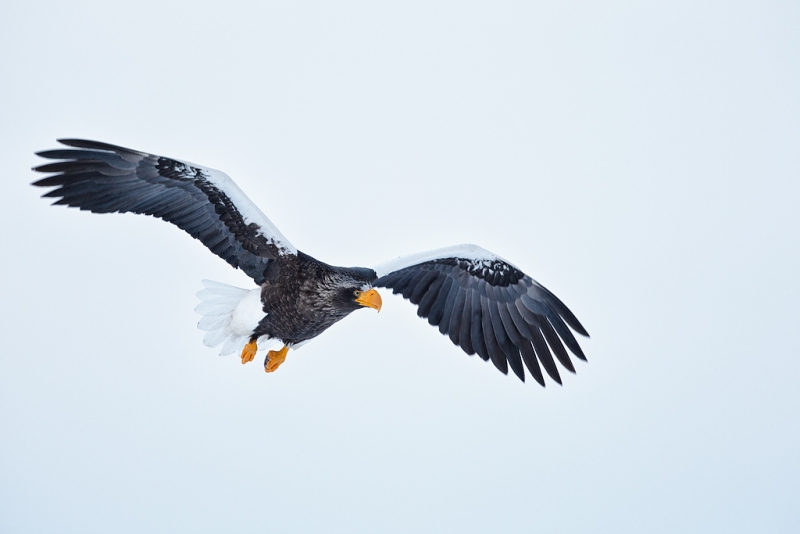
This Steller’s Sea Eagle was photographed from the tourist boat at Rausu, Hokkaido, Japan. I used the tripod-mounted Canon 800mm f/5.6L IS lens and the EOS-1D Mark IV. ISO 400. Evaluative metering +1/3 stop: 1/4000 sec. at f/6.3 in Manual mode.
Central Sensor on the bird’s breast/Rear Focus/AI Servo AF active at the moment of exposure. Click here if you missed the Rear Focus Tutorial. A Double Bubble Level in the camera’s hot shoe ensured that the bird would be square to the world. (The captain puts the boat up on the sea ice for stability so there is no rocking and rolling to deal with.)
For a greater appreciation of the image, left-click on the photo.
|
Taking a More Aggressive Approach to Flight and Action Photography Can Pay Big Dividends…
As a decade long disciple of Byron Katie, The Work; who would you be without your story?, I have learned to question my own unquestioned thoughts and beliefs by asking simply, “Is it true?” For nearly two decades I have been telling folks, “I an not very good at flight and action photography. I leave that to the younger, stronger, faster folks with quicker reflexes. I am at my best photographing static birds; it’s then that I shine.” That’s my story, but on the Japan IPT–still in progress, I began to question it….
For more than two decades I have been telling folks: “When unexpected action occurs, push the shutter button.” Heck, I am pretty sure that you will find those words in the original “The Art of Bird Photography” (Amphoto, NY: 1998). And to think that that was with film…. I am sure that I gave that advice in the all new follow-up, “The Art of Bird Photography II” (916 pages, 900+ images on CD only). With digital, that advice rings even truer. But in believing my own story I had become trapped into not practicing what I have been teaching. On our second morning on the sea eagle boat I was lining up a pristine vertical Steller’s Sea Eagle portrait when I asked myself “Is it true? Are you really poor at capturing images of flight and action?” At that moment I decided that whenever an eagle took flight I would do my best to keep the active sensor on the bird and push the shutter button.
As you can see above (and below), the results were astounding. The more I tried the more I improved and the better the results became. I got some great images of the eagles and gulls gathering to take flight, of birds lifting off the ice and of birds landing. And some killer tight flight images as well. All because I decided to question my own story and start pushing the shutter button.
|
|
|
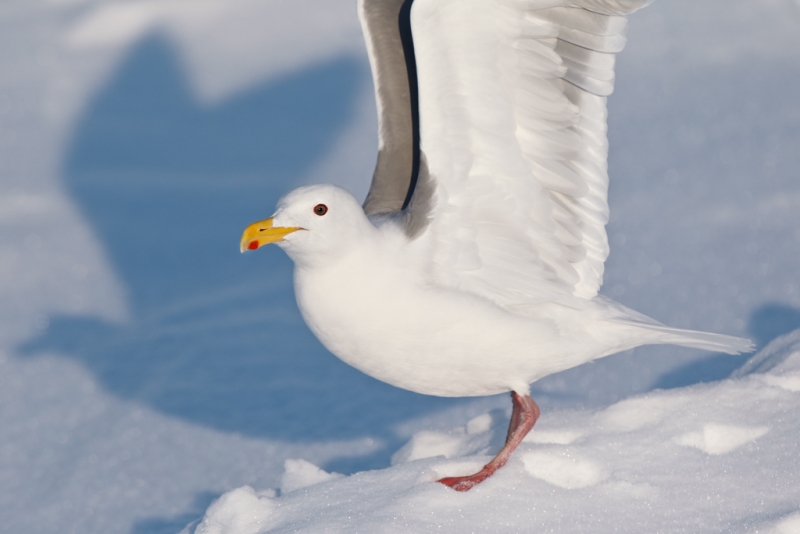
This Glaucous-winged Gull image was created with the hand held Canon 300mm f/2.8 L IS II lens, 1.4X III TC, and the Canon EOS-1D Mark IV. ISO 400. Evaluative metering +2/3 stop: 1/3200 sec. at f/5.6 in Manual mode. Note on this sunny morning this exposure quickly became my go-to exposure for any birds with bright whites.
Central Sensor/AI Servo Rear Focus active at the moment of exposure. Click here if you missed the Rear Focus Tutorial. Click on the image to enjoy a larger version.
|
In the past, when a bird would raise its wings I would think: “I need a shorter lens. I need to zoom wider. I might cut off the wings.” With my new attitude I quit thinking and push the shutter button. Heck, it’s digital. Your gear cost from $2,000 to well more than $20,000 and your trips may cost the same. Storage and computers have gotten cheaper but those costs still add up. After your initial outlay, however, digital is free (even though that initial outlay is considerable). So go ahead, get in the habit, when the bird moves press the shutter button and see what you get. You might be pleasantly surprised.
|
|
|
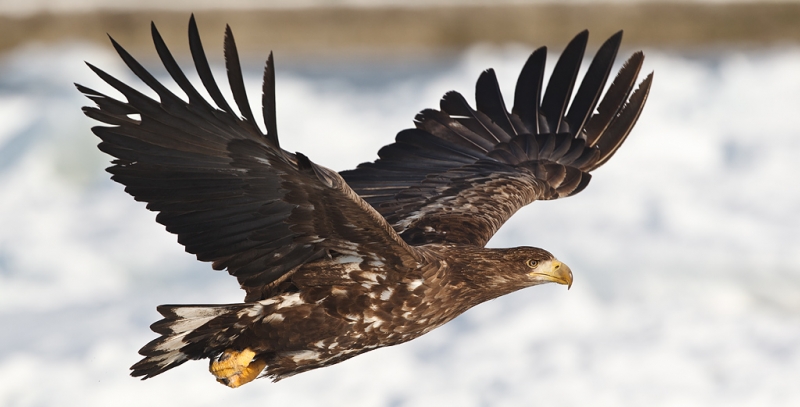
This White-tailed Sea Eagle was photographed with the hand held Canon 300mm f/2.8 L IS II lens, 1.4X III TC, and the Canon EOS-1D Mark IV. ISO 400: 1/2500 sec. at f/5.6 in Manual mode. To get the right exposure here I simply opened up one shutter speed click from the go-to white exposure that I mentioned in the preceding image. With no bright whites on the bird I did not mind having to recover a bit in the snow in exchange for getting more detail in the bird’s darker feathers.
Central Sensor/AI Servo Rear Focus active at the moment of exposure. Click here if you missed the Rear Focus Tutorial. Click on the image to enjoy a larger version.
|
Unless I am doing body parts images such as head portraits, front-end verticals, feather detail, and the like, I generally prefer that my subjects take up no more than three-quarters of the longest dimension of the frame. So when I am photographing birds in flight and they get larger in the frame than that, I simply quit. But not any more. Now I call images like the one above “fit-’em-in-the-frame miracles.” I have been getting a few of those lately now that I let go of my old story.
|
|
|
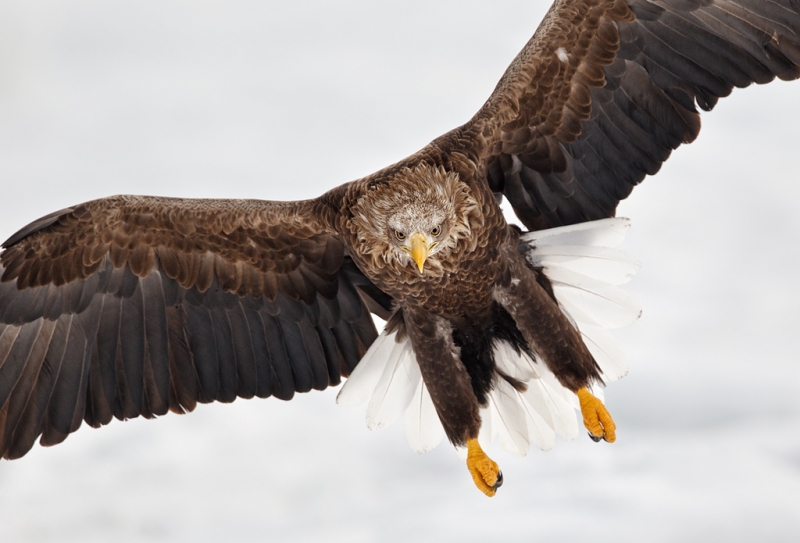
This White-tailed Sea Eagle was photographed with the hand held Canon 300mm f/2.8 L IS II lens, 1.4X III TC, and the Canon EOS-1D Mark IV. ISO 400: 1/2000 sec. at f/4 in Manual mode. Careful readers will surmise (by comparing the exposure here with that in the previous photo) that we were working here in less than full strength sunlight. And they would be correct.
Central Sensor/AI Servo Rear Focus active at the moment of exposure. Click here if you missed the Rear Focus Tutorial. Click on the image to enjoy a larger version.
|
Part of my recent inspiration came from watching Robert O’Toole for the past few years keep firing as birds flew right at us. That well after I had given up and lowered my lens. Many times in these situations the AF system will not track accurately and many times you will mis-frame the image, but as you can see here the results can be stunning. This one is just a small crop form our left and frm below.
|
|
|
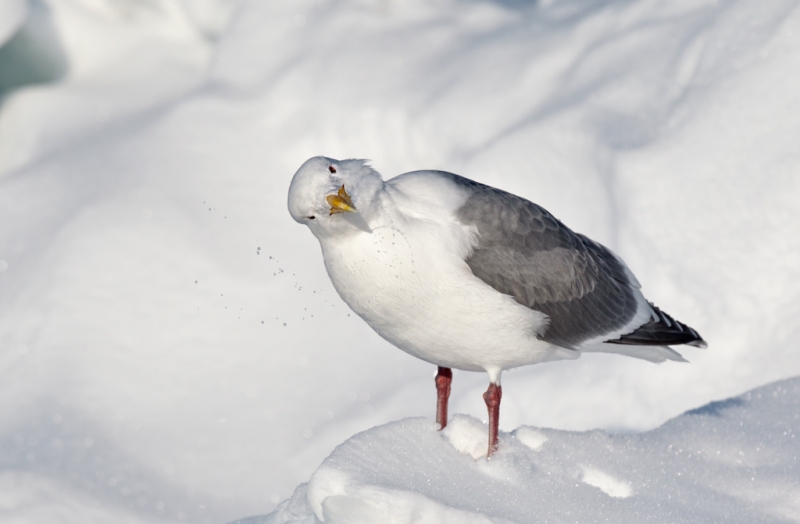
This adult Glaucous-winged Gull was photographed from the boat on the sea ice with the hand held Canon 300mm f/2.8 L IS II lens, 1.4X III TC, and the Canon EOS-1D Mark IV. ISO 400: 1/5000 sec. at f/5.6 in Manual mode.
Central Sensor/AI Servo Rear Focus active at the moment of exposure. Click here if you missed the Rear Focus Tutorial. Click on the image to enjoy a larger version.
|
Prior to the Japan adventure, when a bird would shake its head–they do that often–I would think, “It ruined my perfect field guide portrait.” Since my attitude adjustment, I quit thinking and push the shutter button. Head-shakes can be difficult to anticipate. But if you try you can wind up with flying spray and some neat head positions.
A Caution
Please do not read the above and be encouraged to be come a mindless machine-gunner. Lord, there were many of them on the eagle boat. What is a mindless machine gunner? A photographer who pushes the shutter button and holds it down on any bird that flies by without regards to light angle, the bird’s flight path, the direction of flight–towards or away from you, the framing, and the size of the bird in the frame. If it moves, they make 10, 20, even 30 or more images on a single fly by. I am never sure of their motivation; perhaps they think that they are impressing others? Amazingly, most mindless machine gunners are toting in excess of $20,000 worth of photographic gear. Go figure…. BTW, on most passes I take 2 to five images at most even with my new attitude.
BIRDS AS ART Bulletin #399
BIRDS AS ART Bulletin #399 is on line and can (best) be viewed here. If you have not seen it do visit and check out the collection of Snow Monkey images. Please note the corrected date for the F3C Convention as noted in item next.
- JAPAN IPT REPORT: PART I/THE SNOW MONKEYS
- THE BLOG IS THE BOMB
- F3C CONVENTION
- NIK Color Efex Pro
- POSSE NEWS: JIM NEIGER
- POSSE NEWS: ROBERT AMORUSO
- IPT UPDATES
F3C CONVENTION/Date Correction
Thanks to the generosity of Canon USA and the Explorers of Light program I will be keynoting at the Florida Camera Clubs Council 2012 Annual Conference, “Pixels to Print:” March 23-25, 2012 at the Naples Hilton, Naples, FL. Fellow Canon EOL George Lepp will also be appearing among a large cast of skilled presenters and speakers. In addition to the keynote I will be doing a field workshop at Tigertail Beach. You can follow the links here for complete information.
Shopper’s Guide
Below is a list of the gear used to create the images talked about in this blog post. Thanks a stack to all who have used the Shopper’s Guide links to purchase their gear as a thank you for all the free information that we bring you on the Blog and in the Bulletins. Before you purchase anything be sure to check out the advice in our Shopper’s Guide.
Shopper’s Guide
Below is a list of the gear used to create the image above. Thanks a stack to all who have used the Shopper’s Guide links to purchase their gear as a thank you for all the free information that we bring you on the Blog and in the Bulletins. Before you purchase anything be sure to check out the advice in our Shopper’s Guide.
Canon 300mm f/2.8 L IS II lens. The 300 f/2.8 L IS II with the 1.4X III TC is a killer flight combination.
Canon 800mm f/5.L IS lens. Right now this is my all time favorite super-telephoto lens.
1.4X III TC. The new Series III 1.4X was designed to work best with the new Series II super-telephoto lenses.
Canon EOS-1D Mark IV professional digital camera body. My two Mark IVs are my workhorse digital camera bodies.
And from the BAA On-line Store:
LensCoats. I have a LensCoat on each of my big lenses to protect them from nicks and thus increase their re-sales value. All my big lens LensCoat stuff is in Hardwood Snow pattern.
LegCoat Tripod Leg Covers. I have four tripods active and each has a Hardwood Snow LegCoat on it to help prevent further damage to my tender shoulders 🙂
Gitzo GT3530LS Tripod. This one will last you a lifetime.
Mongoose M3.6 Tripod Head. Right now this is the best tripod head around for use with lenses that weigh less than 9 pounds. For heavier lenses, check out the Wimberley V2 head.
CR-80 Replacement Foot for Canon 800. When using the 800 on a Mongoose as I do, replacing the lens foot with this accessory lets the lens sit like a dog whether pointed up or down and prevents wind-blown spinning of your lens on breezy days by centering the lens directly over the tripod.
Double Bubble Level. You will find one in my camera’s hot shoe whenever I am not using flash.
The Lens Align Mark II. I use the Lens Align Mark II pretty much religiously to micro-adjust all of my gear an average of once a month and always before a major trip. Enjoy our free comprehensive tutorial here.
Canon EOS-1D Mark IV User’s Guide. Learn to use your Mark IV the way that I use mine. Also available for the 7D and the Mark III here.
BreezeBrowser. I do not see how any digital photographer can exist without this program.
February 29th, 2012
Image Caption Contest Results
In the January 25, 2012 post here I asked for humorous captions for the image above. It was the most popular post ever with 52 comments. Good friend Scott Vincent garnered Perseverance honors for his multiple entries many of which put a big smile on my face. But none of his entries was awarded a BAA Store discount certificate. There were many well thought out, clever, and funny captions but one stood out above the rest: For his “F/8 and be hear” Bob Penny (also a multiple entrant) has earned a $20 credit towards his next BAA Online Store purchase. Congrats Bob and thanks to all for sharing their humor with us. Let me know here which one you thought was the funniest/best caption.
Thanks again to Denise Ippolito for the image.
What’s Going On Here Contest? Results
No contest in this division as Bill Richardson was the first and only one to figure out that I was listening to hear if Image Stabilzation was working. Bill has earned a $20 credit towards his next BAA Online Store purchase. Congrats! The lens that I was holding to my ear was the Canon EF 70-300mm f/4-5.6L IS USM zoom lens, a great intermediate telephoto lens for travel, nature, and flight photography. And yes, the IS was working. To learn more about this great lens see the jeager image here.
B&H Specials
As above, learn about the Canon Instant Double Rebates on a variety lenses and Speedlites when bundled with one of several Canon dSLR bodies including two of my favorites–the EOS-7D and the EOS-5D MII–and earn free contest entries by clicking here. Offers expire March 3, 2012.
Looking for a starter outfit? Save up to $350 on Canon lens and camera body bundles (including two of my favorites–the EOS-7D and the EOS-5D MII) and earn free contest entries by clicking here. This offer also expire March 3, 2012.
Earn Free Contest Entries and Support both the Bulletins and the Blog by making all your B & H purchases here.
More and more folks are earning multiple contest entries with their B & H purchases. See here for details on that. Eleven great categories, 34 winning and honored images, and prize pools valued in excess of $20,000. Click here to visit the competition home page.
Shopper’s Guide
Below is a list of the gear used to create the image in today’s blog post. Thanks a stack to all who have used the Shopper’s Guide links to purchase their gear as a thank you for all the free information that we bring you on the Blog and in the Bulletins. Before you purchase anything be sure to check out the advice in our Shopper’s Guide.
Canon 100-400mm IS L zoom lens: A versatile all purpose zoom lens for all types of nature and general photography. Several excellent photographers including Dan Cadieux and Aidan Briggs use this lens as their workhorse bird photography telephoto lens.
Canon EOS-1D Mark IV professional digital camera body. My two Mark IVs are my workhorse digital camera bodies.
And from the BAA On-line Store:
The Lens Align Mark II. I use the Lens Align Mark II pretty much religiously to micro-adjust all of my gear an average of once a month and always before a major trip. Enjoy our free comprehensive tutorial here.
Canon EOS-1D Mark IV User’s Guide. Learn to use your Mark IV the way that I use mine. Also available for the 7D and the Mark III here.
February 28th, 2012
|
|
|
This Steller’s Sea Eagle was photographed from the tourist boat at Rausu, Japan this morning–baited with smelly, frozen fish. It was our first clear sunrise and our first chance with the eagles in sweet, early morning light. I used the tripod-mounted Canon 800mm f/5.6L IS lens and the EOS-1D Mark IV. ISO 400. Evaluative metering +1/3 stop: 1/500 sec. at f/11 in Manual mode.
Central Sensor (by necessity) Rear Focus/AI Servo AF and recompose. Click here if you missed the Rear Focus Tutorial. A Double Bubble Level in the camera’s hot shoe ensured that the bird would be square to the world. (The captain puts the boat up on the sea ice for stability so there is no rocking and rolling to deal with.)
For a greater appreciation of the image, click on the photo.
|
Got a Good One?
As I processed this image this afternoon in the lobby of the traditional Japanese hotel in Rausu, Japan, I recalled a conversation that I had recently with Robert O’Toole and some IPT participants. Robert mentioned that he had checked out the websites of many photographers honored in the most recently concluded BBC contest and was amazed that the images that he saw were in many cases overall poor. I agreed. You do not need to be among the world’s greatest photographers to have an image honored in the world’s most prestigious photography competition.
Got a good one? Do consider entering it in the BIRDS AS ART 1st International Bird Photography Competition; read on for the bad news and the good news.
The Contest: Bad News and Good
First, the bad news. The number of entries is running far behind what we expected. Many categories are crying out for winning entries. Now for the good news. The prize pool still totals more than of $22,000 US. And the list of prizes is still incredible. It includes $2450 worth of B&H gift certificates, a multitude of Delkin 16 and 32 gb UDMA Compact Flash Card, a Wimberley V-2 head and a variety of Wimberley plates, a Mongoose M3-6 head, $1,100 worth of Lens Coat gift certificates, a Giotto’s tiny ballhead, two Kwik-Camon blind, two Lens Align Mark II kits, a Magnum Xtrahand Vest, a Think Tank International Airport V2 rolling bag, $1,000 in gift certificates from Canvas on Demand, 20+ licences for Breezebrowser and Downloader Pro, a variety of Lens Pen kits, Better Beamers and accessories, more than 30 subscriptions to Nature Photographer magazine, and dozens of other great prizes. You can see the complete prize listing here.
Click here and follow the various links to learn everything about the contest that you need to know. Read the organizer’s message here. To register, click here. To learn about payment options including earning free entries with your B&H purchases, click here. To peruse the rules, the categories, and our relaxed digital guidelines, click here.
The deadline is March 31, 2012 so now is a great time to enter. Best of luck.
Support both the Bulletins and the Blog by making all your B & H purchases here.
Remember: you can earn free contest entries with your B & H purchases. Eleven great categories, 34 winning and honored images, and prize pools valued in excess of $20,000. Click here for details.
My Comments on Your Comments.
Still catching up. Responded to numerous questions and comments at the “Home From the Southern Oceans Trip” post and the few at the “China Poot” post.
Shopper’s Guide
Below is a list of the gear used to create the image above. Thanks a stack to all who have used the Shopper’s Guide links to purchase their gear as a thank you for all the free information that we bring you on the Blog and in the Bulletins. Before you purchase anything be sure to check out the advice in our Shopper’s Guide.
Canon 800mm f/5.L IS lens. Right now this is my all time favorite super-telephoto lens.
Canon EOS-1D Mark IV professional digital camera body. My two Mark IVs are my workhorse digital camera bodies.
And from the BAA On-line Store:
LensCoats. I have a LensCoat on each of my big lenses to protect them from nicks and thus increase their re-sales value. All my big lens LensCoat stuff is in Hardwood Snow pattern.
LegCoat Tripod Leg Covers. I have four tripods active and each has a Hardwood Snow LegCoat on it to help prevent further damage to my tender shoulders 🙂
Gitzo GT3530LS Tripod. This one will last you a lifetime.
Mongoose M3.6 Tripod Head. Right now this is the best tripod head around for use with lenses that weigh less than 9 pounds. For heavier lenses, check out the Wimberley V2 head.
CR-80 Replacement Foot for Canon 800. When using the 800 on a Mongoose as I do, replacing the lens foot with this accessory lets the lens sit like a dog whether pointed up or down and prevents wind-blown spinning of your lens on breezy days by centering the lens directly over the tripod.
Double Bubble Level. You will find one in my camera’s hot shoe whenever I am not using flash.
The Lens Align Mark II. I use the Lens Align Mark II pretty much religiously to micro-adjust all of my gear an average of once a month and always before a major trip. Enjoy our free comprehensive tutorial here.
Canon EOS-1D Mark IV User’s Guide. Learn to use your Mark IV the way that I use mine. Also available for the 7D and the Mark III here.
BreezeBrowser. I do not see how any digital photographer can exist without this program.
February 27th, 2012
I Haven’t the Foggiest…
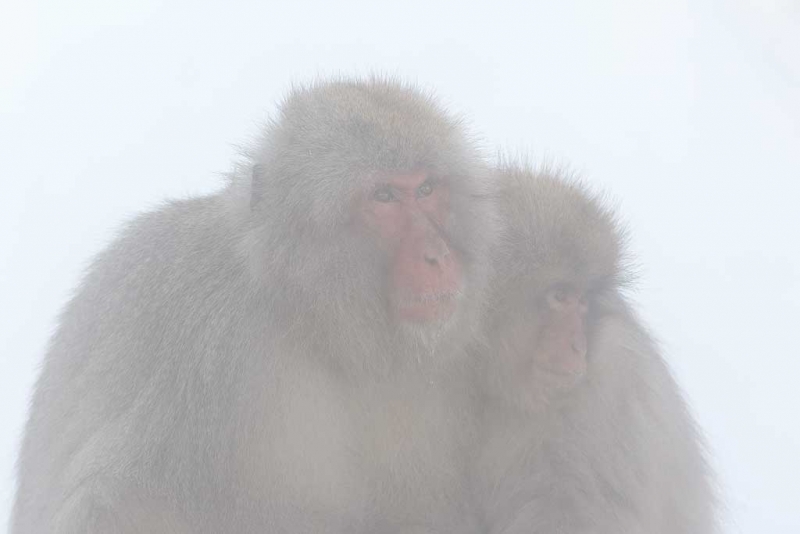
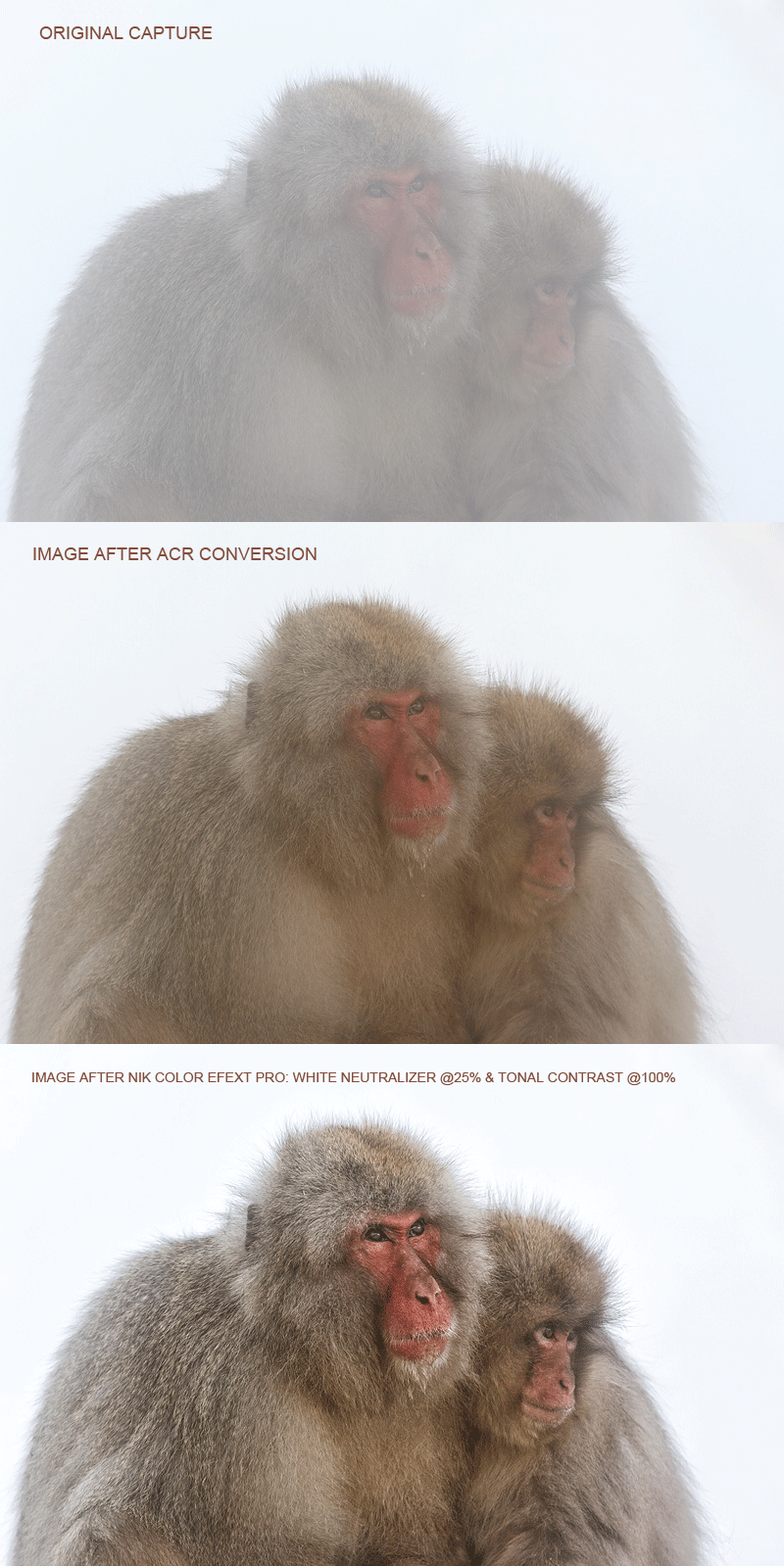
Would you keep this image? I am sure that for the many who do not realize the vast potential of digital captures and those who have no experience working in fog this would be an insta-delete. Heck, many would delete it in the field after chimping. Note: I never delete in the field, even if I take eight images of the out-of-focus ground; there are simply too many ways to screw up. As you may have figured out by now, I kept it.
The image above is from the very first series that I created when we got to the main pool. The steam was swirling off the hot spring pool.Not realizing that the white fog comes and goes with the breezes I began photographing….
|
|
|
This is the optimized image that was created from the original above. No kidding.
|
The first step when working with properly exposed images made in foggy conditions is to set the white and black points in ACR while holding down the Alt key and boost the contrast just a bit. These two processes are described in detail in Digital Basics. Next I brought the image into NIK Color Efex Pro 4 and Details Extractor at about 75% and Tonal Contrast at 20%. Volia! You will have a better understanding of the progression by studying the animated GIF below.
NIK
As regular readers well know, Color Efex Pro 4 is now an integral part of my workflow. You can save 15% on all NIK products by clicking here and entering BAA in the Promo Code box at check-out. Then hit Apply to see your savings. You can download a trial copy that will work for 15 days and allow you to create full sized images.
My Comments on Your Comments
I responded to each and every comment made at the January 20, 2012 blog post here. By a small margin more folks preferred the misty blue version to the B&W rendition.
Support both the Bulletins and the Blog by making all your B & H purchases here.
Remember: you can earn free contest entries with your B & H purchases. Eleven great categories, 34 winning and honored images, and prize pools valued in excess of $20,000. Click here for details.
Shopper’s Guide
Below is a list of the gear used to create the images talked about in this blog post. Thanks a stack to all who have used the Shopper’s Guide links to purchase their gear as a thank you for all the free information that we bring you on the Blog and in the Bulletins. Before you purchase anything be sure to check out the advice in our Shopper’s Guide.
Canon 70-200mm f/2.8L IS II lens. Man, I am loving this lens on my shoulder with the 2X III teleconverter. I also use it a lot–as I did for the image above–with fish–with the 1.4X III TC.
Canon EOS-1D Mark IV professional digital camera body. My two Mark IVs are my workhorse digital camera bodies.
And from the BAA On-line Store:
LegCoat Tripod Leg Covers. I have four tripods active and each has a Hardwood Snow LegCoat on it to help prevent further damage to my tender shoulders 🙂 And you will love them in mega-cold weather….
Gitzo GT3530LS Tripod. This one will last you a lifetime.
Mongoose M3.6 Tripod Head. Right now this is the best tripod head around for use with lenses that weigh less than 9 pounds. For heavier lenses, check out the Wimberley V2 head.
Double Bubble Level. You will find one in my camera’s hot shoe whenever I am not using flash.
The Lens Align Mark II. I use the Lens Align Mark II pretty much religiously to micro-adjust all of my gear an average of once a month and always before a major trip. Enjoy our free comprehensive tutorial here.
Canon EOS-1D Mark IV User’s Guide. Learn to use your Mark IV the way that I use mine. Also available for the 7D and the Mark III here.
BreezeBrowser. I do not see how any digital photographer can exist without this program.
February 26th, 2012
|
|
|
This image was created with the hand held Canon 300mm f/2.8 L IS II lens, 1.4X III TC, and the Canon EOS-1D Mark IV. ISO 800. Evaluative metering +2 2/3 stops off the grey sky: 1/800 sec. at f/4 in Manual mode.
Central Sensor/AI Servo Rear Focus active at the moment of exposure. Click here if you missed the Rear Focus Tutorial. Click on the image to enjoy a larger version.
|
Ten Degrees of Flight Photography…
It was -12 degrees Celius, about ten degrees Fahrenheit when we arrived at the dock in the harbor at Rausu, Hokkaido, Japen at 5:30 am in the dark today, Sunday, February 26, 2012. Though the sun broke through at about ten am it got colder as the morning progressed. We were fortunate to start with some clouds as for the most part, it would have been wind against sun. The clouds allowed to photograph the birds flying and landing toward us.
It was pretty much a flying circus with hundreds of gulls and Long-billed Crows along with our target species, White-tailed and the stellar Steller’s Sea Eagles surrounding each of the nearly half dozen tour boats that feed the eagles daily during the long winters. Even with every type of glove and hand warmer known to man kind the cold brutalized the fingers of my right hand. My core was warm, my left hand was toasty, and my feet were even fine, but oh that right hand. Every ten minutes of so I needed to take a warming break so that I could feel those fingers again. Then it was back to the fray.
The scary part is that weather-wise it was a rather benign morning. Most of the rest of the group did better than I did with the cold. I am not sure if my problems are related to my diabetes–control of my blood sugar levels has been excellent for more than two years now–or if I have simply turned into a Florida wimp.
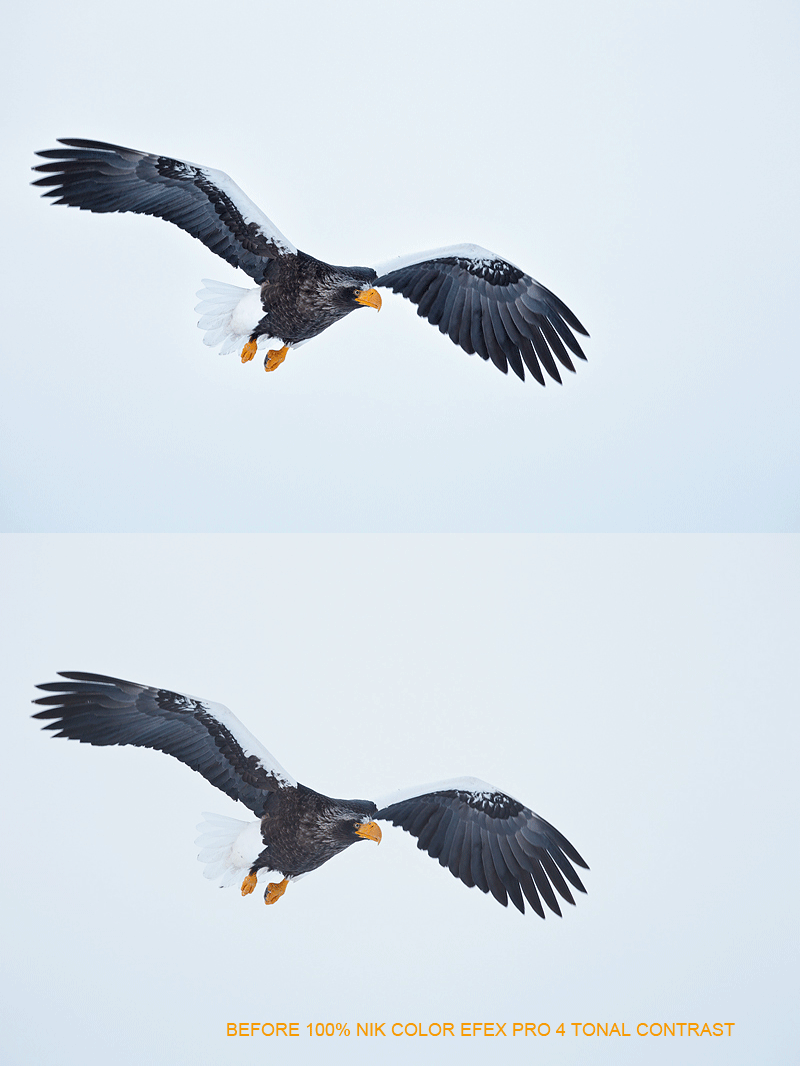
|
Regular readers here know that I have been raving about the manner in which NIK’s Color Efex Pro 4 has completely revamped my workflow. The animated GIF above will give you a good idea of why. Learning when to use Details Extractor (and at what opacity), when to use Tonal Contrast (and at what opacity), and when to use a combination of both requires some practice and experimentation. After converting the RAW file in ACR I figured that Details Extractor would be a no-no with this image but that Tonal Contrast would make it sing. I was correct to the tune of 100%. I ran the Tonal Contrast filter at 100% and did not even bother to see what it looked like with the opacity reduced.
I just peeked out the window of our hotel and see that things bode well for the morning: it is snowing.
Take a Moment
Take a moment to let us know what factors went in to making this a successful image. Note: with a shutter speed of only 1/800 second I am fine with the small amount of blurring of the near wingtip.
NIK
Color Efex Pro 4 is now an integral part of my workflow. Each of the three images above had a 25% White Neutralizer and a 25% Tonal Contrast filter applied immediately after I finished my background clean-up. You can save 15% on all NIK products by clicking here and entering BAA in the Promo Code box at check-out. Then hit Apply to see your savings. You can download a trial copy that will work for 15 days and allow you to create full sized images.
NIK Creative Efex Collection
NIK recently announced the availability of a special limited production bundle of 3 of their most popular products, Color Efex Pro 4, Silver Efex Pro 2, and HDR Efex Pro. You can save more than $200 on the bundle which is available only through NIK affiliates. If you would like additional info, please e-mail with the words “Creative Efex Collection” in the Subject line. If you have been on the fence about purchasing the plug-ins mentioned above this is a great chance to save some significant bucks.
B&H Specials
Learn about the Canon Instant Double Rebates on a variety lenses and Speedlites when bundled with one of several Canon dSLR bodies including two of my favorites–the EOS-7D and the EOS-5D MII–and earn free contest entries by clicking here. Offers expire March 3, 2012.
Save up to $350 on Canon lens and camera body bundles (including two of my favorites–the EOS-7D and the EOS-5D MII) and earn free contest entries by clicking here. This offer also expire March 3, 2012.
Support both the Bulletins and the Blog by making all your B & H purchases here.
Remember: you can earn free contest entries with your B & H purchases. Eleven great categories, 34 winning and honored images, and prize pools valued in excess of $20,000. Click here for details.
Shopper’s Guide
Below is a list of the gear used to create the images talked about in this blog post. Thanks a stack to all who have used the Shopper’s Guide links to purchase their gear as a thank you for all the free information that we bring you on the Blog and in the Bulletins. Before you purchase anything be sure to check out the advice in our Shopper’s Guide.
Canon 300mm f/2.8 L IS II lens. The 300 f/2.8 L IS II with the 1.4X III TC is a killer flight combination.
1.4X III TC. The new Series III 1.4X was designed to work best with the new Series II super-telephoto lenses.
Canon EOS-1D Mark IV professional digital camera body. My two Mark IVs are my workhorse digital camera bodies.
And from the BAA On-line Store:
LensCoats. I have a LensCoat on each of my big lenses to protect them from nicks and thus increase their re-sales value. All my big lens LensCoat stuff is in Hardwood Snow pattern.
Double Bubble Level. You will find one in my camera’s hot shoe whenever I am not using flash.
Black Rapid RS-7 Strap. The Black Rapid RS-& strap allows me easy access to the lens on my shoulder while working behind my big lens on a tripod. And for flight photography from a boat or a zodiac it gives me security knowing that my rig will not wind up in the drink.
The Lens Align Mark II. I use the Lens Align Mark II pretty much religiously to micro-adjust all of my gear an average of once a month and always before a major trip. Enjoy our free comprehensive tutorial here.
Canon EOS-1D Mark IV User’s Guide. Learn to set up your Mark IV for flight photography the way that I do. User’s Guides are also available for the 7D and the Mark III here.
BreezeBrowser. I do not see how any digital photographer can exist without this program.
February 25th, 2012
|
|
|
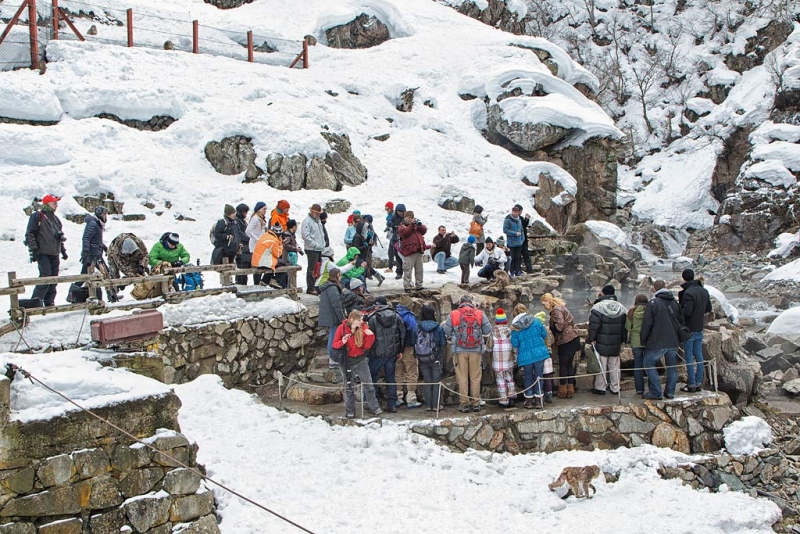
This image was created with the Canon 24-105mm L IS lens (that I borrowed from IPT participant and good friend Mike Gotthelf) and the Canon EOS-1D Mark IV. Hand held at 32mm. ISO 400. Evaluative metering at 0: 1/200 sec. at f/10 in Manual mode (set to yield a few blinkies on the snow).
Click on the image to enlarge.
|
To Give You an Idea…
Yesterday I wrote, “The night before we hiked up the big hill to the Monkey Park I was in bed dreaming fitfully of the location. When we finally made it–and we all had our doubts–see here, we were all somewhat disappointed…. A single man made pool no more than eight meters long was surrounded by dozens of tourists most photographing with their cell phones.”
Today we left Nagano at about 8am, grabbed the Bullet Train to Tokyo Station, switched lines, and grabbed the monorail to Haneda Airport. Then we flew to Hokkaido; all are looking forward to five days with the eagles and to not freezing to death. From the airport in Hokkaido we met our English speaking guide, picked up our two vans, and drove to our hotel in Rausu. I was plugged in and charging and working on images for almost four hours. I processed the image above to give you a feel for the monkey park….
The tan box is the monkey cam. Though difficult to see, there are at least a half dozen or more Snow Monkeys in the pond. Several of those are immediately behind the row of folks on the lower level. At times, it was tough to find a spot to stand let alone make a good image. But the waves of tourists ebbed and flowed and at times we had the place to our selves. Monkey activity also varied greatly. One minute there would be several family groups grooming on the edge of the pond, baby monkeys playing in the snow, momma’s breast feeding young, and groups of two or three huddled together. If you look closely at the pool, you can see the mist rising off the pool. I will be doing a post on dealing with the fog very soon.
It is 9:47 pm on Saturday, 7:47 am on Friday in Florida and New York. As we are leaving for the eagle boat at 5am Sunday I need to get to bed right now. So good night.
B&H Specials
Save up to $350 on Canon lens and camera body bundles (including two of my favorites–the EOS-7D and the EOS-5D MII) and earn free contest entries by clicking here. Offers expire March 3, 2012.
Earn Free Contest Entries and Support both the Bulletins and the Blog by making all your B & H purchases here.
More and more folks are earning multiple contest entries with their B & H purchases. See here for details on that. Eleven great categories, 34 winning and honored images, and prize pools valued in excess of $20,000. Click here to visit the competition home page.
Shopper’s Guide
Below is a list of the gear that Tim used to create the image in today’s blog post. Thanks a stack to all who have used the Shopper’s Guide links to purchase their gear as a thank you for all the free information that we bring you on the Blog and in the Bulletins. Before you purchase anything be sure to check out the advice in our Shopper’s Guide.
Canon 24-105mm L IS lens. This is Canon’s short to mid-range all purpose zoom. I try never to leave home without it.
Canon EOS-1D Mark IV professional digital camera body. My two Mark IVs are my workhorse digital camera bodies.
And from the BAA On-line Store:
Double Bubble Level. You will find one in my camera’s hot shoe whenever I am not using flash.
The Lens Align Mark II. I use the Lens Align Mark II pretty much religiously to micro-adjust all of my gear an average of once a month and always before a major trip. Enjoy our free comprehensive tutorial here.
Canon EOS-1D Mark IV User’s Guide. Learn to use your Mark IV the way that I use mine. Also available for the 7D and the Mark III here.
BreezeBrowser. I do not see how any digital photographer can exist without this program.
February 24th, 2012
Three of a Kind
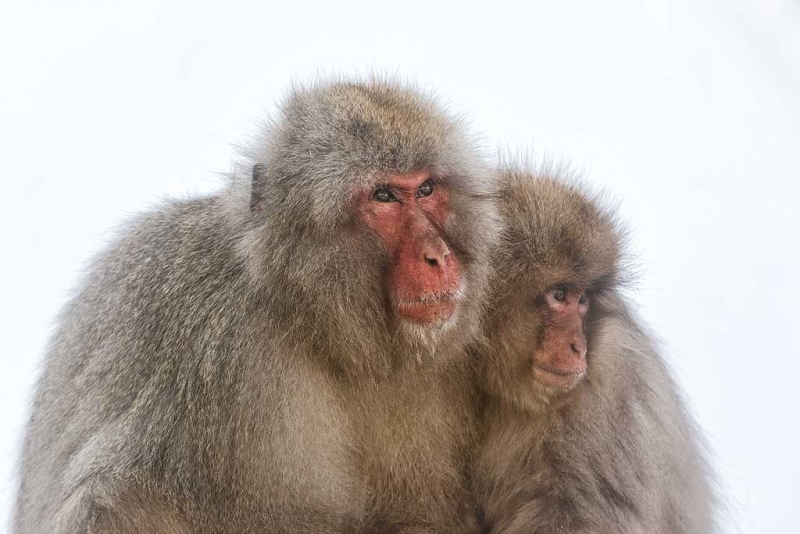
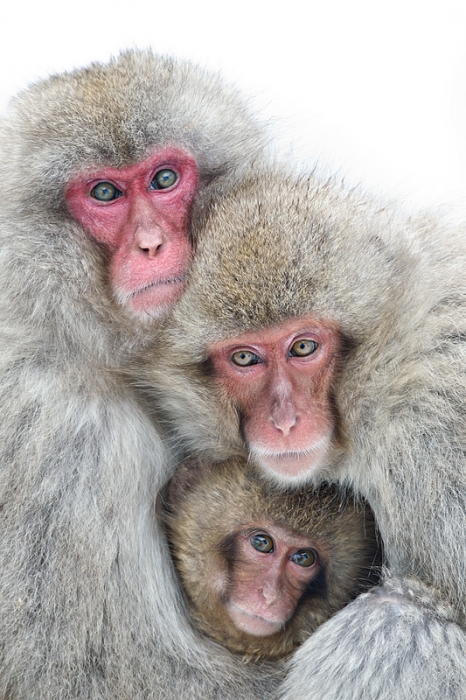
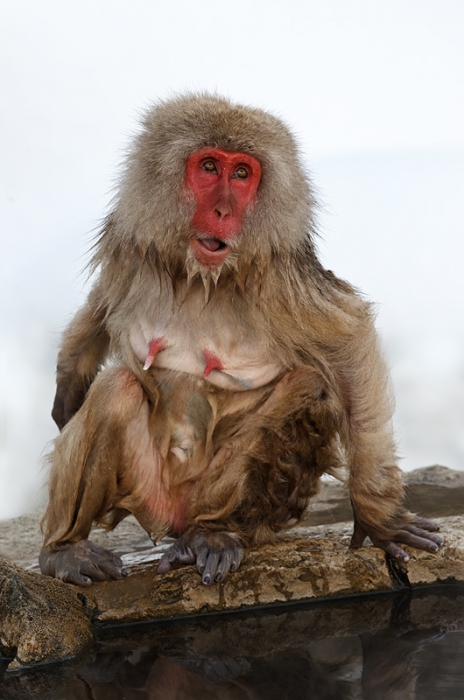
The night before we hiked up the big hill to the Monkey Park I was in bed dreaming fitfully of the location. When we finally made it–and we all had our doubts–see here, we were all somewhat disappointed…. A single man made pool no more than eight meters long was surrounded by dozens of tourists most photographing with their cell phones. Though the monkeys at Jigokudani Yaenkoen are free and wild, the place strikes you at first as nothing more than a glorified zoo. The animals in this troop are attracted by both the hot spring pools and multiple daily feedings. But as the hours passed and we got to witness a wide range of natural monkey behavior we realized how special the place it. You can learn more about the park here.
In that first hour it seemed close to impossible to create a good image. But the crowds of tourists dispersed and we began to find the clean backgrounds and the best angles and to take advantage of dozens of great opportunities. By the end of the second hour we all realized that the place was magical. The family group in the image above was sitting atop a food storage box. They sat for more than 30 minutes until, you guessed it, one of the rangers came by with a bucket of food. He who giveth….
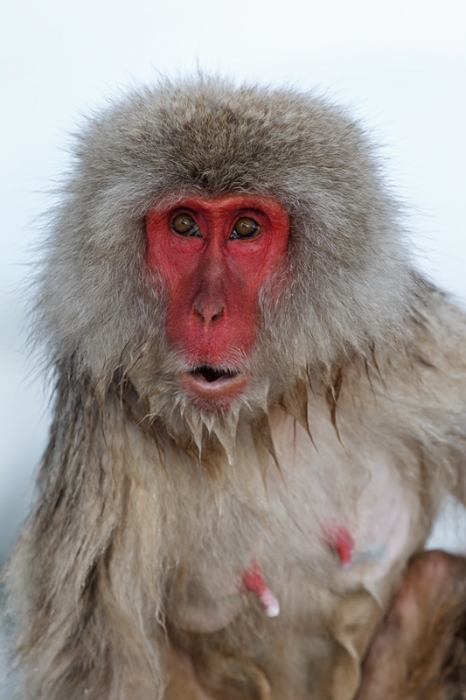
The youngster here had a nose covered with dried momma’s milk that was cleaned up with the Patch Tool and Spot Healing Brush, all as described in detail in our Digital Basics File. Every Snow Monkey image that I have processed so far has benefited from the application of Detail Extractor (and at times, a small dose of Tonal Contrast), both from NIK’s Color Efex Pro. I will be sharing some striking before and after images with you soon.
Best Part?
Take a moment to leave a comment and let us know what you think makes this image so strong. Hint: it was the hardest thing to get….
My Comments on Your Comments
Learn why I was unlucky with the Sandhill Crane taking flight image and read my comments on your comments by clicking here.
NIK
Color Efex Pro 4 is now an integral part of my workflow. I bring every image into Color Efex Pro after I finish my background clean-up. You can save 15% on all NIK products by clicking here and entering BAA in the Promo Code box at check-out. Then hit Apply to see your savings. You can download a trial copy that will work for 15 days and allow you to create full sized images.
B&H Specials
Save up to $350 on Canon lens and camera body bundles (including two of my favorites–the EOS-7D and the EOS-5D MII) and earn free contest entries by clicking here. Offers expire March 3, 2012.
Earn Free Contest Entries and Support both the Bulletins and the Blog by making all your B & H purchases here.
More and more folks are earning multiple contest entries with their B & H purchases. See here for details on that. Eleven great categories, 34 winning and honored images, and prize pools valued in excess of $20,000. Click here to visit the competition home page.
Shopper’s Guide
Below is a list of the gear that Tim used to create the image in today’s blog post. Thanks a stack to all who have used the Shopper’s Guide links to purchase their gear as a thank you for all the free information that we bring you on the Blog and in the Bulletins. Before you purchase anything be sure to check out the advice in our Shopper’s Guide.
Canon 300mm f/2.8 L IS II lens. The 300 f/2.8 L IS II with the 1.4X III TC is a killer flight combination.
1.4X III TC. The new Series III 1.4X was designed to work best with the new Series II super-telephoto lenses.
Canon EOS-1D Mark IV professional digital camera body. My two Mark IVs are my workhorse digital camera bodies.
And from the BAA On-line Store:
LensCoats. I have a LensCoat on each of my big lenses to protect them from nicks and thus increase their re-sales value. All my big lens LensCoat stuff is in Hardwood Snow pattern.
LegCoat Tripod Leg Covers. I have four tripods active and each has a Hardwood Snow LegCoat on it to help prevent further damage to my tender shoulders 🙂 And you will love them in mega-cold weather….
Gitzo GT3530LS Tripod. This one will last you a lifetime.
Mongoose M3.6 Tripod Head. Right now this is the best tripod head around for use with lenses that weigh less than 9 pounds. For heavier lenses, check out the Wimberley V2 head.
Double Bubble Level. You will find one in my camera’s hot shoe whenever I am not using flash.
The Lens Align Mark II. I use the Lens Align Mark II pretty much religiously to micro-adjust all of my gear an average of once a month and always before a major trip. Enjoy our free comprehensive tutorial here.
Canon EOS-1D Mark IV User’s Guide. Learn to use your Mark IV the way that I use mine. Also available for the 7D and the Mark III here.
BreezeBrowser. I do not see how any digital photographer can exist without this program.
February 23rd, 2012
|
|
|
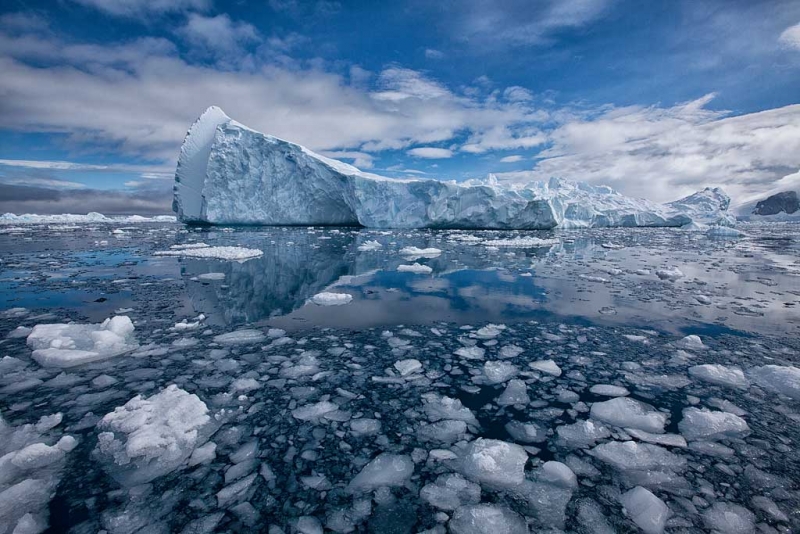
Brash ice & iceberg, Cierva Cove, Antarctica. This image was created from a zodiac with the hand held Canon 16-35mm L lens and the Canon EOS 5D Mark II. ISO 400. Evaluative metering -1 stop: 1/800 sec. at f/16 in Av Mode. AI Servo/lowest central sensor/Rear Focus AF active at the moment of exposure. Click here if you missed the Rear Focus Tutorial.
For a much greater appreciation of this image, click on the photo.
|
Been Dreaming of Antarctica?
Cheesemans’ Antarctic Peninsula In-depth Expedition to the White Continent/December 30, 2012 to January 17, 2013
This in-depth exploration of the Antarctic Peninsula will spend 16 days onboard the Ortelius during the peak Antarctic season featuring active penguin chicks and frequent “chick chases,” greater access to ice-sensitive areas, penguins and seals on sea ice, and large numbers of Humpback and other whales. Our ship, the comfortable Ortelius, has the highest ice-class notation and is very suitable to navigate in solid one-year sea ice and loose multi-year pack ice. On our early 2102 voyage to the Southern Oceans, my roommate Pablo Fernicola and I both found the Ortelius to be a great ship, roomy and stable. It is strong, fast, and safe, the perfect vessel for travel to Antarctica. And the charter is an exclusive one; Cheesemans’ charters the entire ship to ensure a cohesive group experience and allow for maximum flexibility.
|
|
|
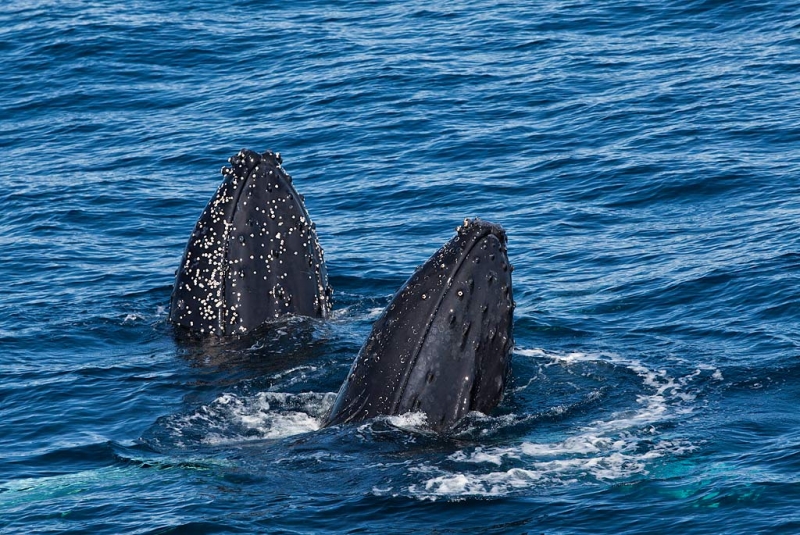
This image was created with the hand held Canon 300mm f/2.8 L IS II lens, 1.4X III TC, and the Canon EOS 5D Mark II. ISO 400. Evaluative metering -1/3 stop: 1/1250 sec. at f/7.1 in Av mode.
Close encounters with Humpback Whales will be likely on the Cheesemans’ In-depth Expedition to the White Continent. These two were photographed in the Weddell Sea.
|
With an incredible ten to eleven days (depending on sea conditions) set aside for landings along the Antarctic Peninsula, you will enjoy far more depth to this itinerary than the typical Antarctic tour. These landings will–weather permitting of course–include extended visits to must-see places such as Paulet Island, the spectacular Baily Head on Deception Island, and several rarely visited sites. This voyage will venture farther south than others to the Weddell Sea and to the Antarctic Circle along the Western Peninsula. Workshops, photo critiques and personal time with seasoned instructors including Patrick Endres and my friends Rod and Marlene Planck will make this an incredible photography experience. Rod’s presentations on my voyage inspired me tremendously and tips from Rod and Tom Murphy allowed me to maximize my ample time on shore; each told me where to go and how to get their quickly. This tour will allow you to truly bask in the magnificence of the Antarctic Peninsula.
|
|
|
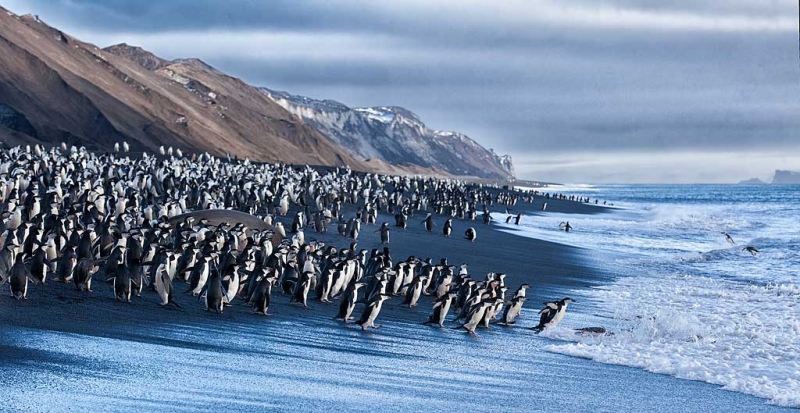
This image was created with the tripod-mounted Canon 70-200mm f/2.8L IS II lens, the 1.4X III TC (at 175mm), and the Canon EOS 5D Mark II. ISO 400. Evaluative metering +1/3 stop: 1/125 sec. at f/8 in Av mode.
The landing at Bailey Head, Deception Island was one of my two favorites on the whole trip. The Chinstrap Penguin colony seemed to go on forever…. See more Bailey Head images here.
|
There will be tons of time on shore and for zodiac cruising so that you can enjoy photography, wildlife observation, and soaking up the landscapes of the great Antarctic. Cheesemans’ priorities are to assure the most in-depth wildlife experience in the Antarctic and your utter and complete safety all made possible by the comprehensive itinerary and their large expedition staff of Antarctic veterans led by expedition leader Hugh Rose. With a total of 13 diverse leaders with a great variety of expertise you will be able to take part in photography seminars, drawing classes, bird and nature walks, plus lectures on geology, history, ecology, and more. This voyage offers a tremendous value with a lower cost per day than other Antarctica only tour while offering an unmatched participant to leader ratio of 7:1. Since 1994 Cheesemans’ Ecology Safaris has operated the longest, most in-depth expeditions to the Antarctic region, a destination of unmatched splendor that deserves no less. If you’ve dreamed of visiting Antarctica to photograph the penguins and mind boggling ice-scapes, you will want to register for this trip asap. Click here for complete details and an itinerary.
|
|
|
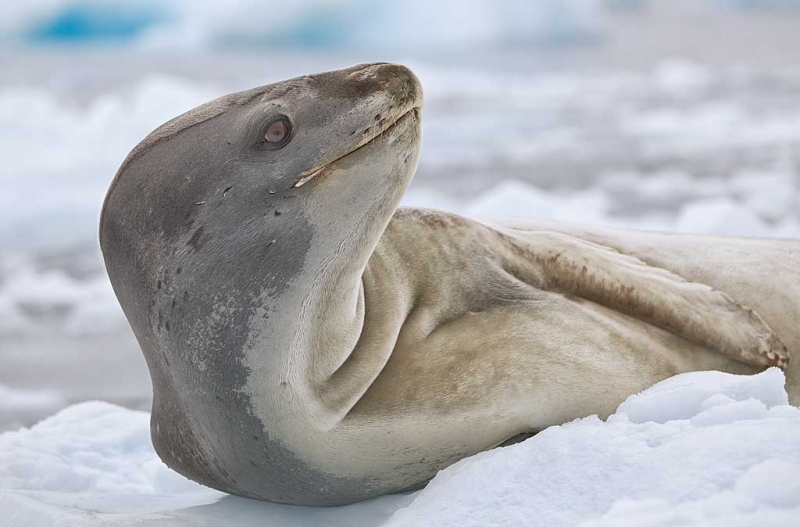
This Leopard Seal image was created from a zodiac with the hand held tripod-mounted Canon 70-200mm f/2.8L IS II lens, 2X III teleconverter (at 245mm), and the Canon EOS 5D Mark II. ISO 400. Evaluative metering +2/3 stop: 1/500 sec. at f/5.6 in Av mode.
I cruised the brash ice and icebergs at Cierva Cove for about 8 hours and opted to head back to the ship at about 4pm. Others opted to stay out an additional 3 hours…. .
|
Here is a pertinent comment from shipmate and IPT veteran Mark Van Bergh: “It was indeed a great trip and I have to echo your comments that every “change of plans” call that Ted made worked out for the best (which I think was just about every day we were in the peninsula).”
Cheesemans’ Ecology Safaris
A great safari is more than remote destinations and remarkable wildlife – it is a journey woven through foreign lands and seas leading to experiences made possible through inspiration, organization, and leadership. For over thirty years, Cheesemans’ Ecology Safaris has provided these unforgettable experiences during in-depth tours to the world’s richest ecosystems. Their itineraries are unique and preparation is thorough, but most importantly, the leadership is exceptional. With broad backgrounds in nature and wildlife, their leaders desire to deepen your understanding of each destination so you can take-away the photographs and memories that allow you to become nature’s ambassador.
Gail and Doug Cheeseman have been leading wildlife safaris to their favorite destinations since 1978. Inspired by his parent’s passion, Ted joined them in leading safaris over 15 years ago. Now the three work together with their staff to offer you superlative nature tours to destinations such as Antarctica, Tanzania, Kenya, Bhutan, Brazil, India, Galapagos, and many more. Doug is a professor emeritus of Ecology and Zoology, Ted holds a Masters in Tropical Conservation Biology, and Gail is a naturalist of the best kind – self-taught through a lifetime in the field. Together, they are a family of truly remarkable ecologists who seek to inspire travelers to enjoy and conserve the Earth’s wild landscapes.
Find out more about Cheesemans’ Ecology Safaris, including a complete tour listing, by clicking here. If you have any questions you can ask them here, shoot them an e-mail or call them at 800.527.5330.
|
|
|
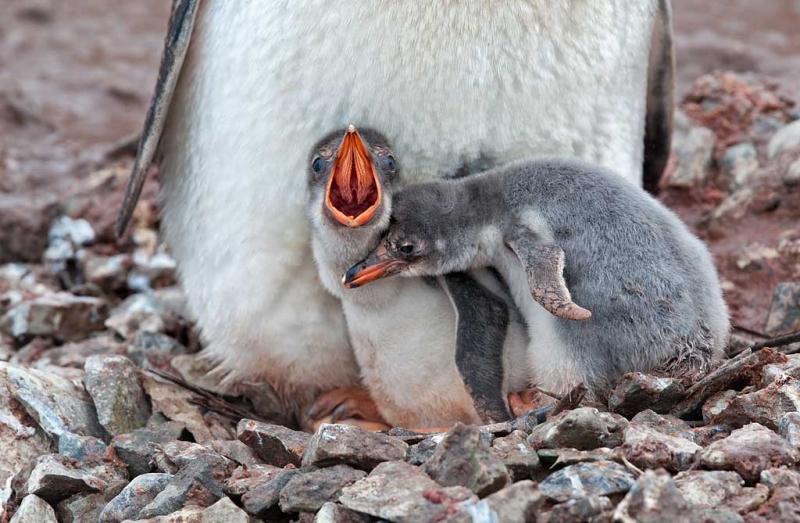
This Gentoo Penguin chick in the nest was photographed at Cuverville Island, Antarctica with the tripod-mounted Canon 300mm f/2.8 L IS II lens, the 2X III teleconverter, and the EOS-1D Mark IV. ISO 400. Evaluative metering +2/3 stop: 1/500 sec. at f/10 in Manual mode.
You will have many opportunities to photograph Gentoo chicks on the Cheesemans’ Antarctic Peninsula In-depth Expedition to the White Continent
|
Support both the Bulletins and the Blog by making all your B & H purchases here.
Remember: you can earn free contest entries with your B & H purchases. Eleven great categories, 34 winning and honored images, and prize pools valued in excess of $20,000. Click here for details.
Shopper’s Guide
Below is a list of the gear used to create the images talked about in this blog post. Thanks a stack to all who have used the Shopper’s Guide links to purchase their gear as a thank you for all the free information that we bring you on the Blog and in the Bulletins. Before you purchase anything be sure to check out the advice in our Shopper’s Guide.
Canon EF 16-35mm f/2.8L II USM Autofocus Lens. This is Canon’s top of the line wide angle zoom lens.
Canon 70-200mm f/2.8L IS II lens. Man, I am loving this lens on my shoulder with the 2X III teleconverter. I also use it a lot–as I did for the image of the eagle with fish–with the 1.4X III TC.
Canon 300mm f/2.8 L IS II lens. This lens proved to be ideal on a tripod for both birds and wildlife with both the 1.4X and 2X III TCs. All images were super-sharp and the lens was light enough for hand-holding both in the zodiacs and when doing flight photograph from the ship.
Canon EOS-1D Mark IV professional digital camera body. My two Mark IVs are my workhorse digital camera bodies.
Canon EOS 5D Mark II Digital Camera. Canon’s lightweight full frame body is perfect for serious landscape photography and worked out great for wildlife on my Southern Oceans voyage.
And from the BAA On-line Store:
LensCoats. I have a LensCoat on each of my big lenses to protect them from nicks and thus increase their re-sales value. All my big lens LensCoat stuff is in Hardwood Snow pattern.
LegCoat Tripod Leg Covers. I have four tripods active and each has a Hardwood Snow LegCoat on it to help prevent further damage to my tender shoulders 🙂 And you will love them in mega-cold weather….
Gitzo GT3530LS Tripod. This one will last you a lifetime.
Mongoose M3.6 Tripod Head. Right now this is the best tripod head around for use with lenses that weigh less than 9 pounds. For heavier lenses, check out the Wimberley V2 head.
Double Bubble Level. You will find one in my camera’s hot shoe whenever I am not using flash.
The Lens Align Mark II. I use the Lens Align Mark II pretty much religiously to micro-adjust all of my gear an average of once a month and always before a major trip. Enjoy our free comprehensive tutorial here.
Canon EOS-1D Mark IV User’s Guide. Learn to use your Mark IV the way that I use mine. Also available for the 7D and the Mark III here.
BreezeBrowser. I do not see how any digital photographer can exist without this program.
February 22nd, 2012
|
|
|
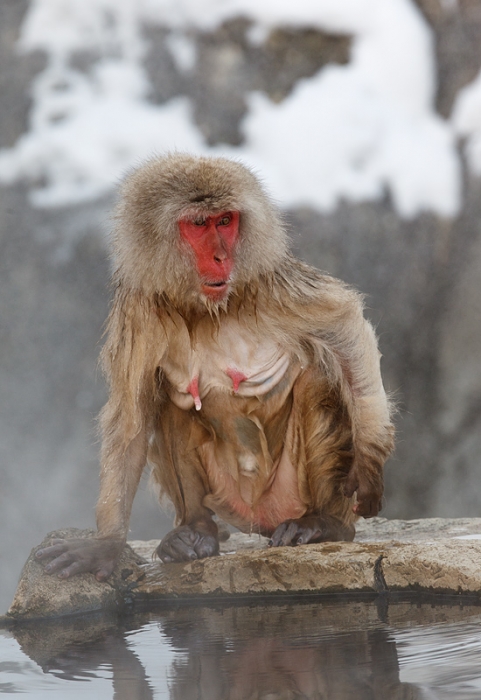
This Snow Monkey image was created at Jigokudani Yaenkoen Nagano Prefecture, Japan with the Canon 70-200mm f/2.8L IS II lens and the Canon 1.4X III TC (hand held at 280mm) with the EOS-1D Mark IV. ISO 400. Evaluative metering + about 1/3 stop: 1/320 sec. at f/8 in Manual mode. I tried to adjust my exposure so that I had blinkies on the snow that did not touch the monkey.
Central Sensor/AI Servo Rear Focus and recompose. Click here if you missed the Rear Focus Tutorial. Click on the image to enlarge it.
|
Granny
The Japan IPT began rather inauspiciously as our day got off to a somewhat challenging start; our bus driver dropped us at the wrong spot and sent us up the very wrong, very steep, snow covered hill with all of our gear…. After we had hiked up about 1/2 mile, the bus driver in his Sunday go to meeting black shoes came up the path and called to us. We were in the wrong spot. Lots of good exercise but for the fact that a much-younger-than-the-rest-of us Robert O’Toole, my co-leader, had volunteered to hike up the hill to make sure that we were in the right spot. He would go on ahead and then come back to get us with the good news…. We screamed for Robert to come back to no avail.
We headed back down the hill to rest in the comfort of the bus figuring that Robert would be back in a few minutes. He was not back in a few minutes. He was not back in 30 minutes. Soon thereafter the bus driver–still in his good shoes–volunteered to hike up the hill to see if Robert had fallen into a ravine. At close to an hour we were happy to see Robert and the bus driver trudging back down the hill. Robert was drenched in sweat and obviously exhausted. He had hiked more than a mile and a half up the hill before turning around.
As it turned out the whole turnaround began when the bus driver learned from two trail rangers that the location of the trail had been moved several years ago…. We were all chagrined when he drove the bus about 200 yards down the hill and parked by the big Snow Monky Park sign that we had passed nearly two hours ago. As I say often, you gotta love it.
After a short hike over mostly flat ground we were photographing the Snow Monkeys. You can learn more about the park here.
I was at one end of the very small main pool when I saw granny hop up on the wall of the hot springs pool. The image above was a grab shot; I was captivated by her personality. After creating a few images–I was not thrilled with the dark/light background–I moved to my left for an all-snow background and created a second series of images. My favorite from that series is immediately below. Lesson for beginners: change the background by changing your perspective. With practice you will be able to visualize the new background before you move. Till then, move and explore.
|
|
|
This image was also created with the Canon 70-200mm f/2.8L IS II lens and the Canon 1.4X III TC (hand held at 222mm) with the EOS-1D Mark IV. ISO 400. Evaluative metering + about 1/3 stop: 1/250 sec. at f/8 in Manual mode. I tried to adjust my exposure so that I had blinkies on the snow that did not touch the monkey.
Central Sensor/AI Servo Rear Focus and recompose. Click here if you missed the Rear Focus Tutorial. Click on the image to enlarge it.
|
To make these images hand held I sat and braced my left elbow on my left knee. When using rear focus it is imperative that that the camera not move even a fraction of a millimeter after focus is set. Getting low ensured the all snow background that I was after.
|
|
|
The final Snow Monkey image for today was created with the Canon 70-200mm f/2.8L IS II lens and the Canon 1.4X III TC (hand held at 265mm) with the EOS-1D Mark IV. ISO 400. Evaluative metering + about 1/3 stop: 1/250 sec. at f/7.1 in Manual mode. Again, I tried to adjust my exposure so that I had blinkies on the snow that did not touch the monkey.
Central Sensor/AI Servo Rear Focus and recompose. Click here if you missed the Rear Focus Tutorial. Click on the image to enlarge it.
|
For the image above I zoomed in to show more of her facial and other details. In a best case scenario I would have been on a tripod and gone to a slower shutter speed for more depth of field. Notice the depth-of-field decreases as magnification increases.
For the record book, I am not at all sure that this is an older female but “Granny” made a good title for this post. If you know any better, please let us know by leaving a comment. Jasper?
Which Image Do You Like Best?
Please take a moment to leave a comment and let us know which image you like best, and why.
NIK
Color Efex Pro 4 is now an integral part of my workflow. Each of the three images above had a 25% White Neutralizer and a 25% Tonal Contrast filter applied immediately after I finished my background clean-up. You can save 15% on all NIK products by clicking here and entering BAA in the Promo Code box at check-out. Then hit Apply to see your savings. You can download a trial copy that will work for 15 days and allow you to create full sized images.
NIK Creative Efex Collection
NIK recently announced the availability of a special limited production bundle of 3 of their most popular products, Color Efex Pro 4, Silver Efex Pro 2, and HDR Efex Pro. You can save more than $200 on the bundle which is available only through NIK affiliates. If you would like additional info, please e-mail with the words “Creative Efex Collection” in the Subject line. If you have been on the fence about purchasing the plug-ins mentioned above this is a great chance to save some significant bucks.
B&H Specials
Learn about the Canon Instant Double Rebates on a variety lenses and Speedlites when bundled with one of several Canon dSLR bodies including two of my favorites–the EOS-7D and the EOS-5D MII–and earn free contest entries by clicking here. Offers expire March 3, 2012.
Support both the Bulletins and the Blog by making all your B & H purchases here.
Remember: you can earn free contest entries with your B & H purchases. Eleven great categories, 34 winning and honored images, and prize pools valued in excess of $20,000. Click here for details.
Shopper’s Guide
Below is a list of the gear used to create the images talked about in this blog post. Thanks a stack to all who have used the Shopper’s Guide links to purchase their gear as a thank you for all the free information that we bring you on the Blog and in the Bulletins. Before you purchase anything be sure to check out the advice in our Shopper’s Guide.
Canon 70-200mm f/2.8L IS II lens. Man, I am loving this lens on my shoulder (or on a tripod as above) with the 2X III teleconverter. I also use it a lot with the 1.4X III TC.
Canon EOS-1D Mark IV professional digital camera body. My two Mark IVs are my workhorse digital camera bodies.
And from the BAA On-line Store:
The Lens Align Mark II. I use the Lens Align Mark II pretty much religiously to micro-adjust all of my gear an average of once a month and always before a major trip. Enjoy our free comprehensive tutorial here.
Canon EOS-1D Mark IV User’s Guide. Learn to use your Mark IV the way that I use mine. Also available for the 7D and the Mark III here.
BreezeBrowser. I do not see how any digital photographer can exist without this program.
February 20th, 2012
|
|
|
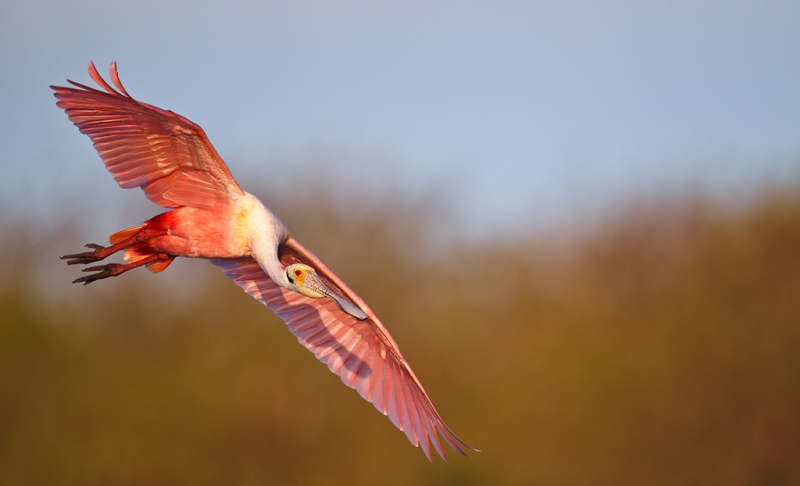
Roseate Spoonbill in flight, Alafia Banks, Tampa Bay, FL aboard the Hooptie Deux, February 14, 2012. With the tripod-mounted Canon 800mm f/5.6L IS lens and the EOS-1D Mark IV. ISO 400. Evaluative metering +1 stop off the blue sky: 1/1250 sec. at f/5.6 in Manual mode.
Central Sensor AI Servo/Rear Focus AF active at the moment of exposure. Click here if you missed the Rear Focus Tutorial. For a greater appreciation of the image, click on the photo.
|
Solving Underwing Problems
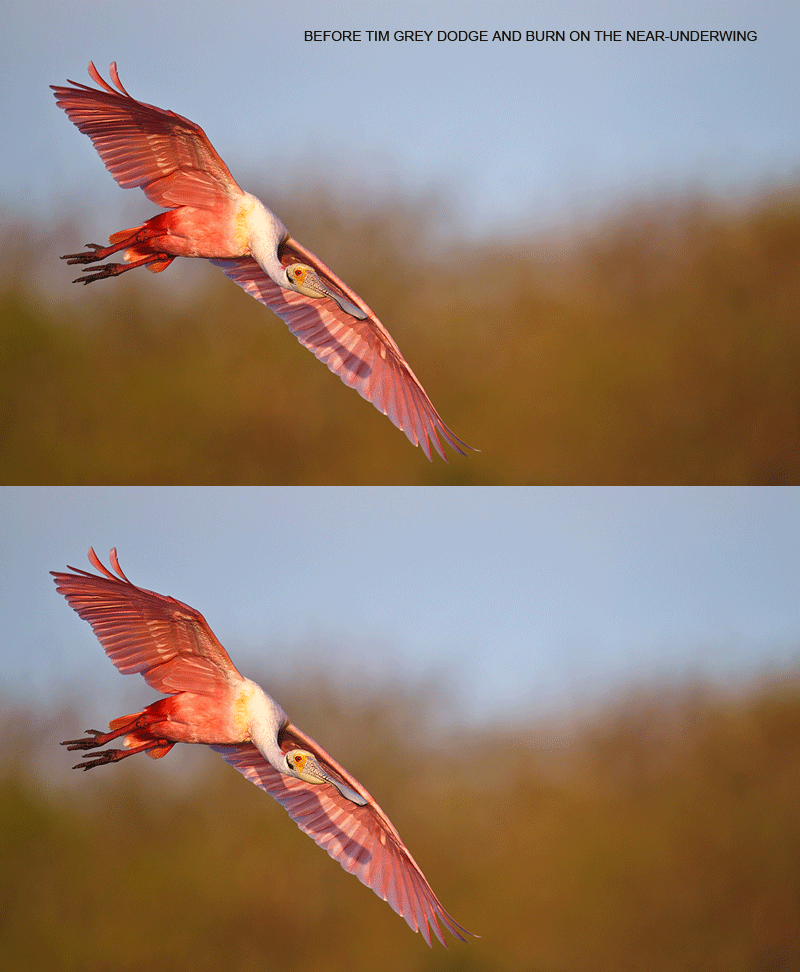
I am not a bit fan of flight images where the near-wing is not in the full upstroke position and the near primaries are curved down a bit. I almost deleted the image above when I decided to see ii I could selectively lighten the shadow on the near-underwing–see below. By using the Tim Grey Dodge and Burn technique I was able to do so quickly and easily. I do realize that some folks would prefer the image with the shadow but I like to see my birds in flight evenly lit from below so the image above works for me. You can see the before and after images in the animated GIF below. Note also that I selectively sharpened and lightened the bird’s face and bill. Which one do you like best, with the shadow or without? Please let us know and let us know why.
There are other ways to lighten the shadow but none give you the control that Tim Grey Dodge and Burn does. You can find detailed instructions on using this technique in our Digital Basics File. This PDF documents my complete digital workflow, contains dozens and dozens of great Photoshop tips, and is updated roughly once a year. The next update will be sent no later than June 2013.
James Shadle and the Hooptie Deux
I am always amazed when folks who visit Florida for the express purpose of photographing Roseate Spoonbill go home disappointed. To say that Ding Darling ain’t what it used to be is a vast understatement…. If you want to photograph lots of spoonbills all that you need to do is spend a few days with James Shadle on his photo-customized pontoon boat, the Hooptie Deux. Click here and scroll down for complete details and to see some of James’ incredible images from Alafia Banks.
James’ “In the Field Workshops” is the original Tampa Bay nature photography (by boat) workshop and tour leader. He has an exciting list of locations that will give you the opportunity to create incredible images of dramatic behavior and stunning plumages. He knows the bay better than anyone as he has been doing it longer than anyone and as the images show, he knows how to make great pictures and can teach you to do the same. James owns and operates a 20′ tri-toon boat (The Hooptie Deux) that has been customized specifically for photography workshops. It’s roomy, comfortable, and stable. The boat is equipped with a quiet and environmentally friendly E-Tec outboard motor. It also has a powerful, silent, electric trolling motor with wireless remote control. The boat can be configured with no top for on-board photography or with a bimini top to provide shelter from sun and rain. Refreshments are available at all times.
Call or e-mail in advance to inquire about dates and rates. You can get in touch with James for additional info or to schedule a Custom Workshop or Tour via e-mail, by cell phone at (813) 363-2854 or on his home phone (early evenings best) at (813-689-5307). If by cell phone it is best to call back rather than to leave a message.
Hooptie Deux Practicalities
While it is possible to photograph from the boat, the best opportunities for spoonbills usually occur when you exit the boat and wade in the Gulf. The bottom is hard but you do of course need to wade slowly and carefully while being careful for rocks, holes, and oyster beds. By wading under James’ careful supervision and with his guidance, you will be able to get much closer to the birds and have more control over light angle and perspective. Waders and surf booties will be provided for those who need them. Do note however that folks without super-telephoto lenses and those who want to stay out of the water can create some great flight images by working from the boat. For those who exit the boat with their big tripod-mounted telephoto lenses it is often best to take only a single lens; having a flight lens on your shoulder may lead to all types of gear disasters….
Here are simple directions for getting to the dock in Gibsonton, FL, just east of Tampa: From I-75 north or south take exit 250, Gibsonton Drive. Head west a bit more than one mile to S. Tamiami Trail which is US 41. If the light at 41 is red do not stop on the RR tracks. 🙂 Turn right (or north) on 41 and cross the low bridge over the Alafia River. The first traffic light will be at Riverview Drive. Turn left there and then turn left immediately, and I do mean immediately, onto the road that leads into Williams Park. Take a spot on the right at the far end of the lot which is closest to the boat ramp. Find James and get ready for the time of your life.
James will let you know when to be at the dock. In a word, early. Here’s a great tip: you will almost always have some great chances to create pleasing blurs of the Fish Crow and White Ibis blast offs with handheld telephoto lenses. Intermediate telephotos and telephoto zooms are ideal. Be sure to set the RGB histogram check it often to avoid burning the red channel. To learn to when, why, and how to work in Tv mode when creating pleasing blurs see A Guide to Pleasing Blurs by yours truly and Denise Ippolito.
Breeding plumage spoonbill photography is generally best from late February through early April. In addition to the spoonbills you will get to photograph Brown Pelican, Double-crested Cormorant, Reddish Egret, Great Blue Heron, and Great Egret in flight. As the season progresses you can add Glossy Ibis, a variety of shorebirds, and by June and July, baby spoonbills just out of the nest. You can see some of my very recent Hooptie Deux images by clicking here and scrolling down.
My Comments on Your Comments
With some free additional free time in Tokyo today I was able to post respond to your comments at the January 17, 2012 post: “Just Duckie: Two Depth-of-Field Questions and Additional Lessons.” Though only a few folks replied they covered all the important points. This one is highly recommended reading for all using big glass on birds at close range. The topics covered include exposure, rapid firing, and of course, depth-of-field at close range.
The Adventure Begins
We leave Tokyo tomorrow morning at 7am, February 21, 2012. That works out to 5pm Monday evening on the east coast of the USA. We are headed for the Snow Monkeys.
Support both the Bulletins and the Blog by making all your B & H purchases here.
Remember: you can earn free contest entries with your B & H purchases. Eleven great categories, 34 winning and honored images, and prize pools valued in excess of $20,000. Click here for details.
Shopper’s Guide
Below is a list of the gear used to create the images talked about in this blog post. Thanks a stack to all who have used the Shopper’s Guide links to purchase their gear as a thank you for all the free information that we bring you on the Blog and in the Bulletins. Before you purchase anything be sure to check out the advice in our Shopper’s Guide.
Canon 800mm f/5.L IS lens. Right now this is my all time favorite super-telephoto lens.
Canon EOS-1D Mark IV professional digital camera body. My two Mark IVs are my workhorse digital camera bodies.
And from the BAA On-line Store:
LensCoats. I have a LensCoat on each of my big lenses to protect them from nicks and thus increase their re-sales value. All my big lens LensCoat stuff is in Hardwood Snow pattern.
LegCoat Tripod Leg Covers. I have four tripods active and each has a Hardwood Snow LegCoat on it to help prevent further damage to my tender shoulders 🙂 And you will love them in mega-cold weather….
Gitzo GT3530LS Tripod. This one will last you a lifetime.
Mongoose M3.6 Tripod Head. Right now this is the best tripod head around for use with lenses that weigh less than 9 pounds. For heavier lenses, check out the Wimberley V2 head.
CR-80 Replacement Foot for Canon 800. When using the 800 on a Mongoose as I do, replacing the lens foot with this accessory lets the lens sit like a dog whether pointed up or down and prevents wind-blown spinning of your lens on breezy days by centering the lens directly over the tripod.
Double Bubble Level. You will find one in my camera’s hot shoe whenever I am not using flash.
The Lens Align Mark II. I use the Lens Align Mark II pretty much religiously to micro-adjust all of my gear an average of once a month and always before a major trip. Enjoy our free comprehensive tutorial here.
Canon EOS-1D Mark IV User’s Guide. Learn to use your Mark IV the way that I use mine. Also available for the 7D and the Mark III here.
BreezeBrowser. I do not see how any digital photographer can exist without this program.
February 19th, 2012
|
|
|
This image was created at Little Estero Lagoon with the Canon 70-200mm f/2.8L IS II lens and the Canon 1.4X III TC (hand held at 98mm) with the EOS-1D Mark IV. ISO 400. Evaluative metering +2/3 stop: 1/320 sec. at f/16 in Manual mode.
Central Sensor/AI Servo Rear Focus and recompose. Click here if you missed the Rear Focus Tutorial. Click on the image to enlarge it.
|
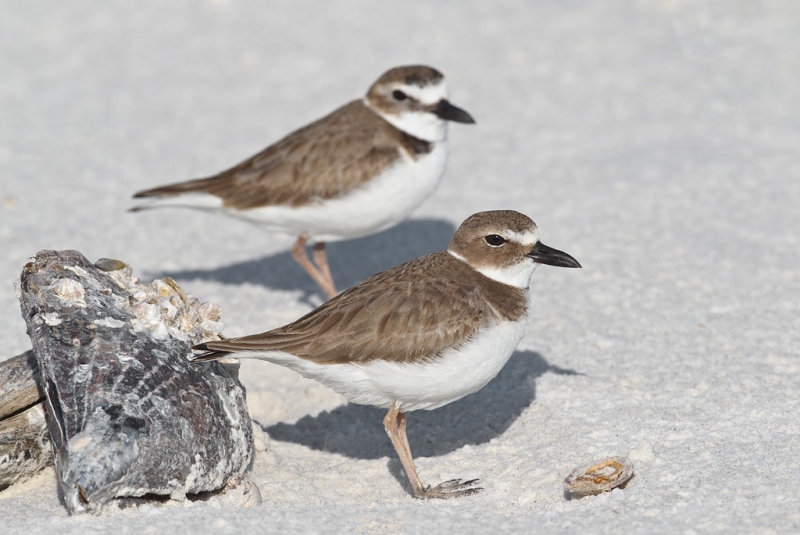
Solving Plover Problems
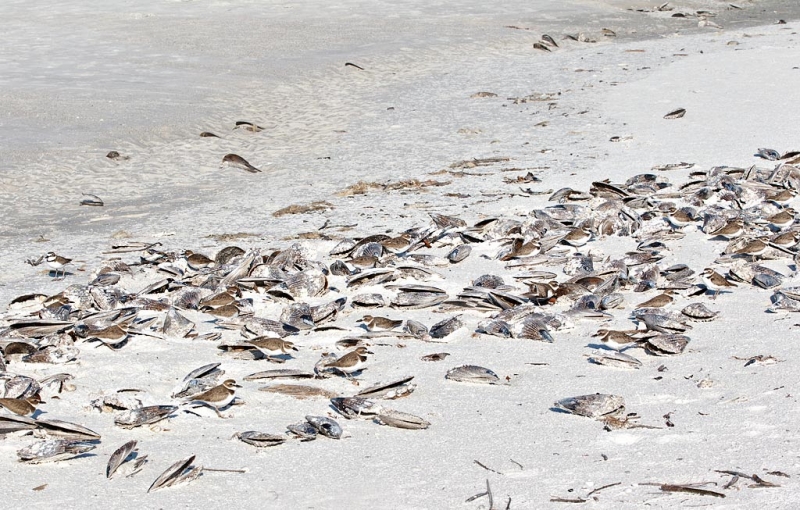
You come upon a large group of Wilson’s Plovers roosting in a field of horse mussels. Isolating a single bird will be difficult and the jumble of large mussels will make for distracting backgrounds in most cases. Confident in their camouflage, the birds are exceedingly tame. What are the best strategies for long lens photography? Your first impulse with tame shorebirds it to get out your Panning Ground Pod or you Skimmer II (or to splay the legs of your tripod) and get down flat on the beach. Would you do that here? (See below for the answer….)
Before you go on please leave a comment and let us know a few things: How many birds do you see in the image above? Are they all Wilson’s Plovers? Why should I have either taken off my teleconverter or taken one big step backwards?
|
|
|
This image was created with the Canon 70-200mm f/2.8L IS II lens (hand held at 70mm) with the EOS-1D Mark IV. ISO 400. Evaluative metering +2/3 stop: 1/320 sec. at f/16 in Manual mode.
Central Sensor/AI Servo Rear Focus and recompose. Click here if you missed the Rear Focus Tutorial. Click on the image to enlarge it.
For this image I did remove the 1.4X TC obviously to get wider.
|
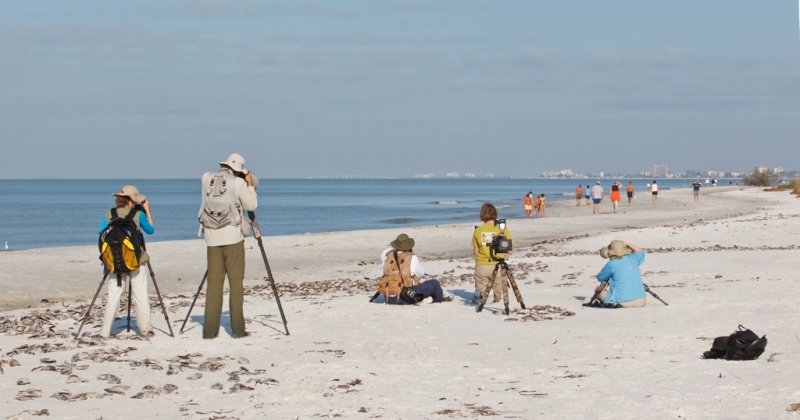
From left to right we have half the SW FLA IPT group: Lynne, Clemens, Wayne, Gail, and Deirdre. The first instinct of several of the folks in the group was to get flat on the ground but I quickly pointed out that the lower you got in this situation the more distracting background elements you would introduce. The best chance to eliminate horse mussels (or at least most of them) from your backgrounds was to remain standing behind your tripod and that is what I did. Kneeling was a good second option. Notice how tame the birds are. And notice the Snowy Egret down at the edge of the Gulf. Click here and scroll down to read the SW FLA IPT Report and see the announcement of the 2013 SW FLA IPT; hope that you can join me.
|
|
|
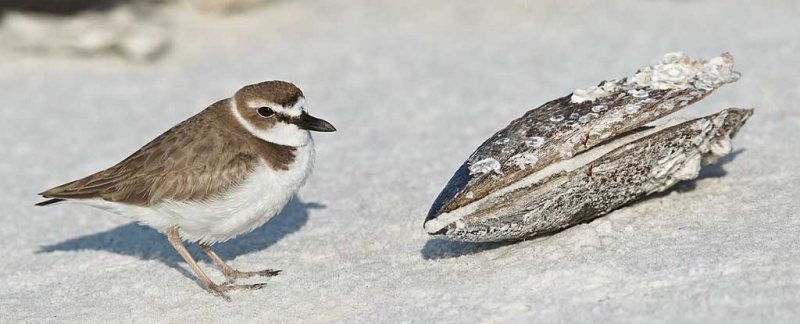
Wilson’s Plover and horse mussel, Little Estero Lagoon, Fort Myers Beach, FL. Created with the tripod-mounted Canon 800mm f/5.6L IS lens, the Canon 1.4X III TC, and the EOS-1D Mark IV. ISO 200. Evaluative metering +2/3 stop: 1/400 sec. at f/11 in Manual mode.
Central Sensor (by necessity) Rear Focus/AI Servo AF and recompose. Click here if you missed the Rear Focus Tutorial. For a greater appreciation of the image, click on the photo.
|
By standing at full height behind my Gitzo GT3530LS Tripod I was able to eliminate more than a few mussels in the distant background. When I saw the opportunity to create a nice stitched pano I created two images, one of the bird and one of the mussel (with a bit of overlap). I was careful to work in Manual mode and not to re-focus after creating the first image. I assembled the two images manually in Photoshop. I chose to leave the mussel in the upper left to balance the composition. Notice that while working in fairly harsh sunlight I opted to point my shadow exactly at the subject….
|
|
|
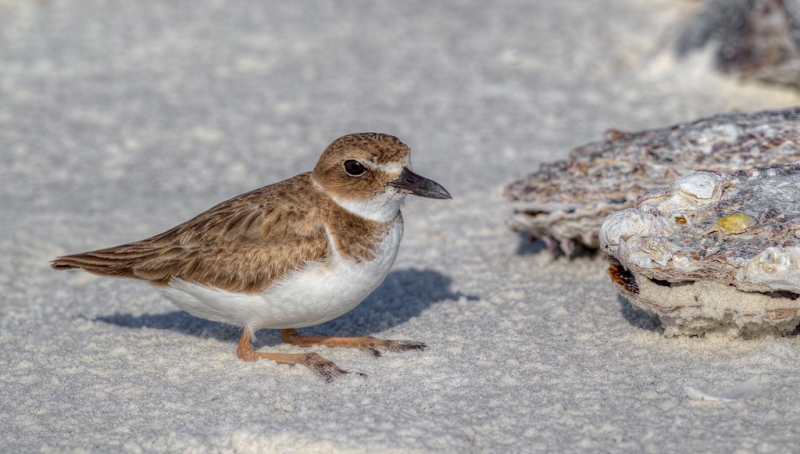
Wilson’s Plover and horse mussel quasi-grunge HDR, Little Estero Lagoon, Fort Myers Beach, FL. Created from three images made with the tripod-mounted Canon 800mm f/5.6L IS lens and the EOS-1D Mark IV. ISO 200. Evaluative metering +2/3 stop with +/- 1 1/3 stops auto exposure bracketing (AEB) around 1/400 sec. at f/11 in Manual mode.
Central Sensor (by necessity) Rear Focus/AI Servo AF and recompose. Click here if you missed the Rear Focus Tutorial. For a greater appreciation of the image, click on the photo. Then click on the enlarged version to close it.
|
When I saw a decent image motif I locked down my Mongoose M3.6, waited until the bird was completely motionless, and fired off three fast images to prevent ghosting. The quasi-HDR Grunge was created in Photomatix. I usually work at settings somewhere between the Painterly and Grunge pre-sets. To purchase Photomatix and save 15% click here and be sure to enter birdsasart as the coupon code. You can download and use a trial copy of Photomatix before you buy. It is fully operational but the processed images will have a visible watermark on them. At some point this summer I hope to finish the HDR Grunge Guide that Denise Ippolito and I started work on a while back.
|
|
|
Wilson’s Plovers, horse mussel, and limpet, Little Estero Lagoon, Fort Myers Beach, FL. This image was created with the tripod-mounted Canon 800mm f/5.6L IS lens and the EOS-1D Mark IV. ISO 200. Evaluative metering +2/3 stop: 1/500 sec. at f/11 in Manual mode.
Central Sensor (by necessity) Rear Focus/AI Servo AF and recompose. Click here if you missed the Rear Focus Tutorial. For a greater appreciation of the image, click on the photo.
|
Above I was working on the framing with a single plover and the horse mussel in the lower left corner when a second Wilson’s walked into the frame and paused in a spot that yielded a rather pleasing juxtaposition.
Comments on Your Comments
With some free time in Tokyo I had some time to respond to your comments at the January 13, 2012 post, My Comments On: For Your Critique/Image #8 and at the January 15, 2012 post, Pushing the Shutter Speed Envelope.
Robert O’Toole Homer Bald Eagle Offer
Robert has openings on his March 28th to April 1st, 2012 Homer, Alaska Bald Eagle trips. Click here for complete details.
Support both the Bulletins and the Blog by making all your B & H purchases here.
Remember: you can earn free contest entries with your B & H purchases. Eleven great categories, 34 winning and honored images, and prize pools valued in excess of $20,000. Click here for details.
Shopper’s Guide
Below is a list of the gear used to create the images talked about in this blog post. Thanks a stack to all who have used the Shopper’s Guide links to purchase their gear as a thank you for all the free information that we bring you on the Blog and in the Bulletins. Before you purchase anything be sure to check out the advice in our Shopper’s Guide.
Canon 70-200mm f/2.8L IS II lens. Man, I am loving this lens on my shoulder (or on a tripod as above) with the 2X III teleconverter. I also use it a lot with the Canon 1.4X III TC.
Canon 800mm f/5.L IS lens. Right now this is my all time favorite super-telephoto lens.
Canon 1.4X III Teleconverter. Designed to work best with the new Series II super-telephoto lenses.
Canon EOS-1D Mark IV professional digital camera body. My two Mark IVs are my workhorse digital camera bodies.
And from the BAA On-line Store:
LensCoats. I have a LensCoat on each of my big lenses to protect them from nicks and thus increase their re-sales value. All my big lens LensCoat stuff is in Hardwood Snow pattern.
LegCoat Tripod Leg Covers. I have four tripods active and each has a Hardwood Snow LegCoat on it to help prevent further damage to my tender shoulders 🙂
Gitzo GT3530LS Tripod. This one will last you a lifetime.
Mongoose M3.6 Tripod Head. Right now this is the best tripod head around for use with lenses that weigh less than 9 pounds. For heavier lenses, check out the Wimberley V2 head.
CR-80 Replacement Foot for Canon 800. When using the 800 on a Mongoose as I do, replacing the lens foot with this accessory lets the lens sit like a dog whether pointed up or down and prevents wind-blown spinning of your lens on breezy days by centering the lens directly over the tripod.
Double Bubble Level. You will find one in my camera’s hot shoe whenever I am not using flash.
The Lens Align Mark II. I use the Lens Align Mark II pretty much religiously to micro-adjust all of my gear an average of once a month and always before a major trip. Enjoy our free comprehensive tutorial here.
Canon EOS-1D Mark IV User’s Guide. Learn to use your Mark IV the way that I use mine. Also available for the 7D and the Mark III here.
BreezeBrowser. I do not see how any digital photographer can exist without this program.
February 17th, 2012 Just Rolling Along…
I am at the Orlando Courtyard Marriott, headed for MCO in a few minutes, then flying first class to DFW and continuing on to Tokyo, Japan for the first and likely last ever Japan IPT. I arrive on Saturday afternoon. I think…. So I am just rolling along enjoying every breath. I should have internet access at most of our lodges so I will see you soon.
|
|
|
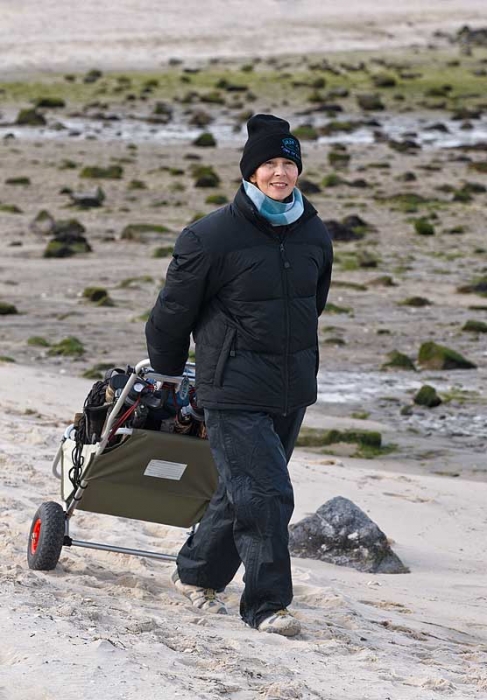
The above image is a rare one as Denise does not like being photographed…. She is pulling a fully loaded, and I mean fully loaded!, Eckla Beach Rolly alongside the Barnegat Jetty.
|
ECKLA BEACH ROLLY SAVES THE DAY!
When I was on Long Island last December my shoulders as previously noted were hurting quite a bit due to too much swimming to soon after I got home from Bosque. No surprise there. I rested a lot while visiting New York but wanted to get in one last trip to the Barnegat Jetty. But I was concerned that the almost mile-long walk with the 800 on my shoulder might not be the smartest thing for me to do. Denise Ippolito saved the day with a suggestion. She volunteered to bring along her customized Eckla Beach Rolly and met me at the jetty. We put both of our big lenses in the rolly along with both tripods and Denise rolled the whole shebang rather easily through one mile of soft sand. I felt like the King of Siam walking along with no tripod and nothing on my shoulder. Thanks Lady D! She was pretty much amazed at how easily it rolled. Don’t get me wrong: Denise is in great shape but she was a bit tired after the long haul out and the long haul back.
That said I could not have made it without her help, and she could not have made it without her Eckla Beach Rolly. I envision several uses for my Beach Rolly. It will be great at places with boardwalks like the St Augustine Alligator Farm and Corkscrew Swamp Sanctuary. You will be able to bring pretty much all of your lenses, and an extra body or two, your flash and accessories, and heck, you can even bring your lunch. On various Florida beaches where you are routinely walking good distances you will be able to do the same. Do realize that my shoulder problem started about eight years ago after twenty years of carrying big glass on a tripod all on my right shoulder… Not too smart. I wish I had had a Beach Rolly back then.
You can learn more about this great product or purchase one by clicking here. See below for accessory details.
|
|
|
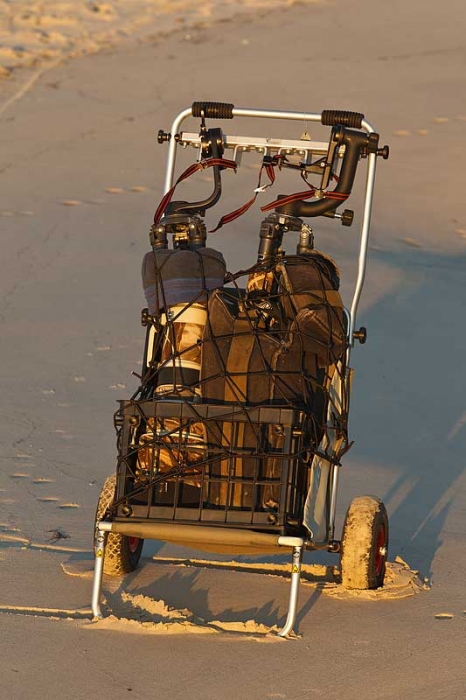
Above is the fully packed Beach Rolly: Denise’s 500mm f/4L IS is on your left, my 800mm f/5.6 L IS on the right in an old Domke Bag. I am still trying to talk Scott Elowitz of LensCoat into making something very similar. My Gitzo 3530LS Carbon Fiber tripod with the Mongoose M3.6 attached is on your left, Denise’s with the Wimberley V-2 is on the right. See details on the Eckla Cargo Net, the Eckla Multi Holding Bar, and the Staples Milk Crate below.
|
Denise customized here Beach Rolly Gear Cart by adding a black plastic milk crate from Staples. It is 11 1/2″H x 13 7/8″W x 16 7/8″D. Yours for only $7.99 here. The milk crate keeps everything in the cart. The Cargo Net keeps stuff safely in place and allows you to overload your rolly without fear :), and the tripods are attached snugly by the Multi-holding Bar. All is all is it a neat set-up that can make your life a lot easier. Please leave a comment and let us know how you use or will be using your Eckla Beach Rolly Gear Cart. (Note: I tried the Eckla Eagle Car Door Camera Support and did not like it at all. I far prefer the BLUBB for car as blind work.)
BAA Bulletin #397
BAA Bulletin #397 is on-line and can be viewed best here.
- THE CONTEST: BAD NEWS AND GOOD
- SOUTHWEST FLA IPT REPORT
- SOUTHWEST FLA 2013 IPT ANNOUNCED
- CHEESEMANS’ FALKLANDS/SOUTH GEORGIA TRIP OCT/NOV 2012
- GEAR FOR SALE
- STICK IT TO EM
- IPT UPDATES
February 15th, 2012
|
|
|
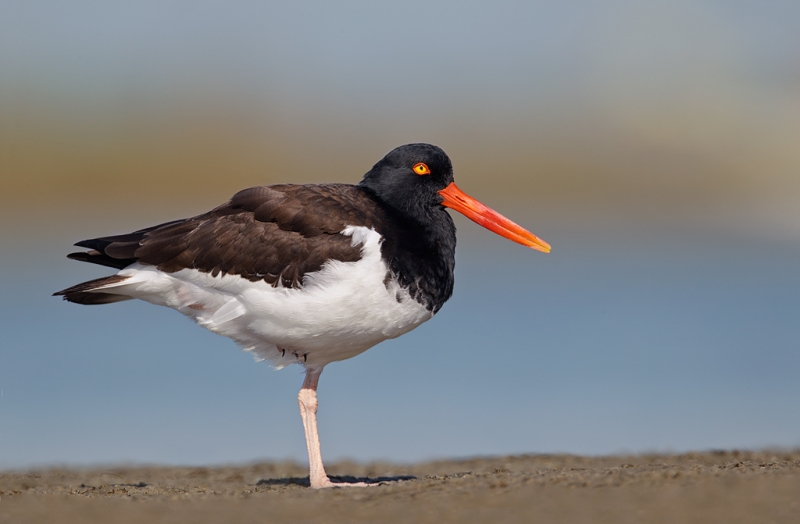
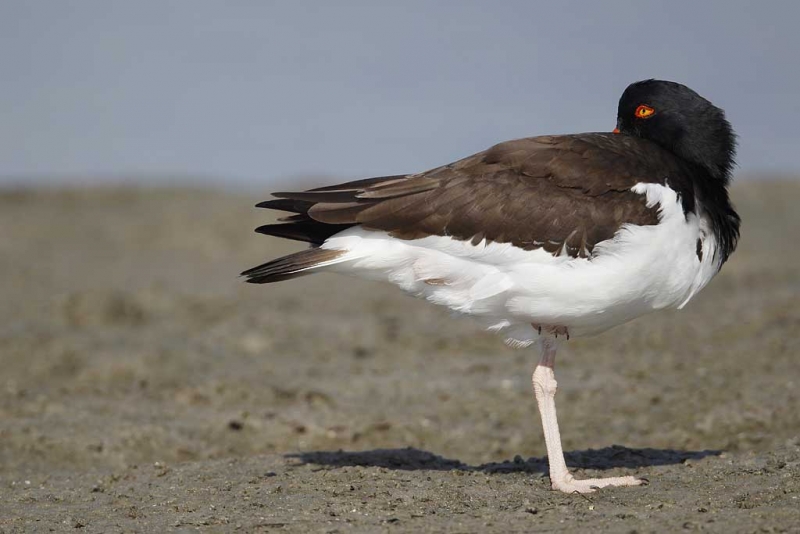
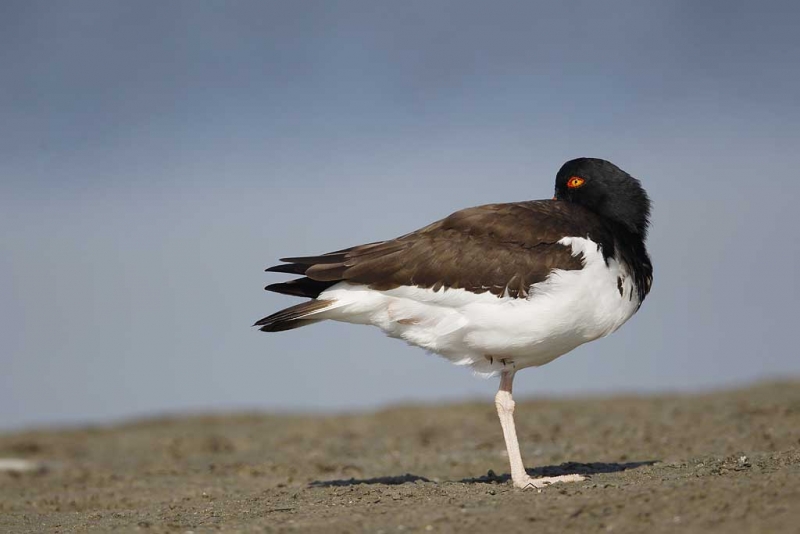
American Oystercatcher, adult, Little Estero Lagoon, Fort Myers Beach, FL. Created with the tripod-mounted Canon 800mm f/5.6L IS lens, the 1.4X III TC, and the EOS-1D Mark IV. ISO 200. Evaluative metering +1/3 stop: 1/500 sec. at f/11 in Av Mode.
Central Sensor (by necessity) Rear Focus/AI Servo AF and recompose. Click here if you missed the Rear Focus Tutorial. For a greater appreciation of the image, click on the photo. Then click on the enlarged version to close it.
|
Was It Worth It?
It was a bit after 10am on a clear day. We had had a great morning on the SW FLA IPT with lots of egrets and Brown Pelicans in flight, lots of tame Wilson’s Plovers, and an Osprey that flew by with a small tree for its nest. We were thinking about heading back to the motel when a family group of 3 American Oystercatchers landed in front of us. I guided everyone on approaching with care so as not to flush these sometimes shy birds.
I created the image above while standing behind my tripod, knowing that with the shoreline dissecting the bird’s neck and upper back that it would not be a good image. And I half expected that the birds would take flight at any moment. But at least the image served as a good exposure check. And I did realize that I was a bit too close; remember: it is generally best that the bird not take up more than 75% of the longest dimension of the frame.
|
|
|
Again, same bird, same gear…
|
I took a few steps back, lowered the tripod legs, and got down on one knee, knowing that with the shoreline cutting the bird’s leg just above the ankle that I would not be happy with the image, all the while realizing that if I got down flat on my belly that I would have a lovely, diffused strip of green background right behind the oystercatcher’s head. But, and this was a very big but, to get down flat I would need to go belly down in wet mud on a somewhat chilly morning. I was not looking forward to it, but I knew that it was the way to go…. So I went.
|
|
|
Image courtesy of and copyright 2012 Tim Kaufman.
|
Yup, that’s me in the wet muck. Not much fun but I like the final image. Note that as I did not have my panning ground pod in my vest–I did not expect many shorebirds–that I simply splayed the legs of the tripod in order to get low fast. Thanks Tim for the image.
The Questions…
There are lots of questions here. Was it worth it? Would you have done it? Of the folks in the group, only Clemens van der Werf got down on his belly but he kept his mid-section out of the water :). I tried that and it worked for a while but I finally succumbed and would up with wet mud-belly.
Support both the Bulletins and the Blog by making all your B & H purchases here.
Remember: you can earn free contest entries with your B & H purchases. Eleven great categories, 34 winning and honored images, and prize pools valued in excess of $20,000. Click here for details.
Comments on Comments
I commented extensively on your comments in the January 6, 2012 post, “My Comments on: For Your Critique/Image #6.” Amazingly, only a single person who commented agreed with me :). Different strokes…
In addition, I did the same on the comments at the January 8, 2012 12 post, “Antarctic Inspiration from Paul Mckenzie.”
Shopper’s Guide
Below is a list of the gear used to create the images talked about in this blog post. Thanks a stack to all who have used the Shopper’s Guide links to purchase their gear as a thank you for all the free information that we bring you on the Blog and in the Bulletins. Before you purchase anything be sure to check out the advice in our Shopper’s Guide.
Canon 800mm f/5.L IS lens. Right now this is my all time favorite super-telephoto lens.
Canon 1.4X III Teleconverter. Designed to work best with the new Series II super-telephoto lenses.
Canon EOS-1D Mark IV professional digital camera body. My two Mark IVs are my workhorse digital camera bodies.
And from the BAA On-line Store:
LensCoats. I have a LensCoat on each of my big lenses to protect them from nicks and thus increase their re-sales value. All my big lens LensCoat stuff is in Hardwood Snow pattern.
LegCoat Tripod Leg Covers. I have four tripods active and each has a Hardwood Snow LegCoat on it to help prevent further damage to my tender shoulders 🙂
Gitzo GT3530LS Tripod. This one will last you a lifetime.
Mongoose M3.6 Tripod Head. Right now this is the best tripod head around for use with lenses that weigh less than 9 pounds. For heavier lenses, check out the Wimberley V2 head.
CR-80 Replacement Foot for Canon 800. When using the 800 on a Mongoose as I do, replacing the lens foot with this accessory lets the lens sit like a dog whether pointed up or down and prevents wind-blown spinning of your lens on breezy days by centering the lens directly over the tripod.
Double Bubble Level. You will find one in my camera’s hot shoe whenever I am not using flash.
The Lens Align Mark II. I use the Lens Align Mark II pretty much religiously to micro-adjust all of my gear an average of once a month and always before a major trip. Enjoy our free comprehensive tutorial here.
Canon EOS-1D Mark IV User’s Guide. Learn to use your Mark IV the way that I use mine. Also available for the 7D and the Mark III here.
BreezeBrowser. I do not see how any digital photographer can exist without this program.
February 12th, 2012
|
|
|
This Great Egret image was created at Little Estero Lagoon with the hand held Canon 70-200mm f/2.8L IS II lens, the Canon 1.4X III TC (at 125mm) and the EOS-1D Mark IV. ISO 400. Evaluative metering +1/3 stop off the blue water: 1/2500 sec. at f/5.6 in Manual mode.
Central Sensor Rear Focus AI Servo AF active at the moment of exposure. Click here if you missed the Rear Focus Tutorial.
|
Dainty Dancers
All Southwest Florida IPTs feature visits to Little Estero Lagoon. We enjoy lots of chances to photograph a variety of herons and egrets at close range with hand held intermediate telephoto zoom lenses. The birds are attracted into photographic range with tossed greenbacks, small baitfish that I catch with a cast net. These sessions are always very popular. The image below was created in early morning light less than a minute before the image above was made. Both images were processed in CS-5 after which a layer of NIK Color Efex Pro’s White Neutralizer was added to sweeten the blues. Both are small crops from vertical original captures.
|
|
|
This Great Egret image was also created at Little Estero Lagoon with the same hand held Canon 70-200mm f/2.8L IS II lens, the Canon 1.4X III TC (at 160mm) and the EOS-1D Mark IV. ISO 400. Evaluative metering +1/3 stop off the blue water: 1/2500 sec. at f/5.6 in Manual mode.
Central Sensor Rear Focus AI Servo AF active at the moment of exposure. Click here if you missed the Rear Focus Tutorial.
|
With some images with lots of blue, White Neutralizer really gets the blues to sing; it can turn somewhat boring grey blue water into brilliant sky blue backdrops. See the animated GIF below. A 50% layer of NIK COler Efex Pro’s Detail Extractor was applied to the WHITEs only in each image via the use of a Hide-All mask. Learn to use Hide-All masks in the Layer Masking for Dummies section of Digital Basics, a PDF that includes my complete digital workflow, dozens of great Photoshop tips and techniques, and free updates for a long as I am still pushing the shutter button. The next update will be no later than this June.
Which Do You Like Best?
Let’s call the top image “Reflections” and the bottom image “Toe Dragger.” Take a moment to let us know which of the two images you like best, and why.
NIK 15% Discount
As regular readers here have seen recently, NIK’s Color Efex Pro has completed streamlined my workflow; you can save 15% on all NIK products by clicking here and entering BAA in the Promo Code box at check-out. Then hit Apply to see your savings. You can download a trial copy that will work for 15 days and allow you to create full sized images.
NIK Creative Efex Collection
NIK recently announced the availability of a special limited production bundle of 3 of their most popular products, Color Efex Pro 4, Silver Efex Pro 2, and HDR Efex Pro. You can save more than $200 on the bundle which is available only through NIK affiliates. If you would like additional info, please e-mail with the words “Creative Efex Collection” in the Subject line. If you have been on the fence about purchasing the plug-ins mentioned above this is a great chance to save some significant bucks.
Earn Free Contest Entries and Support both the Bulletins and the Blog by making all your B & H purchases here.
More and more folks are earning multiple contest entries with their B & H purchases. See here for details on that. Eleven great categories, 34 winning and honored images, and prize pools valued in excess of $20,000. Click here to visit the competition home page.
Support both the Bulletins and the Blog by making all your B & H purchases here.
Remember: you can earn free contest entries with your B & H purchases. Eleven great categories, 34 winning and honored images, and prize pools valued in excess of $20,000. Click herefor details.
Shopper’s Guide
Below is a list of the gear used to create the image in today’s blog post. Thanks a stack to all who have used the Shopper’s Guide links to purchase their gear as a thank you for all the free information that we bring you on the Blog and in the Bulletins. Before you purchase anything be sure to check out the advice in our Shopper’s Guide.
Canon 70-200mm f/2.8L IS II lens. Man, I am loving this lens on my shoulder (or on a tripod as above) with the 2X III teleconverter. I also use it a lot with the 1.4X III TC.
Canon EOS-1D Mark IV professional digital camera body. My two Mark IVs are my workhorse digital camera bodies.
And from the BAA On-line Store:
LensCoats. I have a LensCoat on each of my big lenses to protect them from nicks and thus increase their re-sales value. All my big lens LensCoat stuff is in Hardwood Snow pattern.
Be sure to check out our camera body User’s Guides here.
The Lens Align Mark II. I use the Lens Align Mark II pretty much religiously to micro-adjust all of my gear an average of once a month and always before a major trip. Enjoy our free comprehensive tutorial here.
Black Rapid RS-7 Strap. This ingeniously designed strap allows you to carry an intermediate telephoto lens bandolier-style while leaving it instantly accessible for flight and action photography. To learn more about this strap click here and scroll down.
February 11th, 2012
ER Doc Scores Big Time!
I first met Tim Kaufman when he attended a seminar that I conducted in Dayton, Ohio a few years back. My recollection is that he volunteered to pick me up at the motel and chauffeur me around with my boxes of books and CDs. A few weeks ago he contacted me about joining me as assistant/apprentice on the SW FLA IPT. The first applicant could not make it so Tim was elected to carry my 800 around on the longer walks. Within a day we had designed a great system so that I could get my needs met and Tim would have more than a few chances to make some images. On our second morning we wound up at Blind Pass Beach. It was pretty good. We were headed down the beach to do some Royal Terns when I looked behind us and saw that a g Great Blue Heron has grabbed a Southern Whiting that a fisherman had tossed back into the Gulf (but not quite far enough…)
I had been carrying the 800 at the time and Tim was carrying both the 200mm and the 300mm f/2.8L IS II lenses on his shoulder. Each had a 1.4X III TC mounted. He had been using the 300. When the heron flew by us he made seven images. Four of them were sharp and of those, three featured nice wing positions. This was the best. They guy has potential.
I often say that if you want to photograph flight and action that you are far better off walking around with an intermediate telephoto lens than with big glass. Q.E.D.: quod erat demonstrandum.
In his first career, Tim Kaufman was an aeronautical engineer. He worked for McDonnell-Douglas Aircraft Corporation in St. Louis, MO helping to design a variety of weapons of mass destruction including Tomahawk cruise missiles & the F-18 fighter. He was amazed by medicine when both his Mom and sister were treated for leukemia. He quit his job, enrolled in med school, and in fairly short order became an emergency room doctor. He did not and does not watch he television show ER.
As my assistant he has been amazingly helpful often volunteering for a great variety of tasks that have made my life easier. With Peter Kes, my web man from Switzerland here as my guest doing the driver, and Tim as my assistant, I am living the life of Riley. I just might get used to it….
Please Leave a Comment
Feel free to leave a comment and let Tim know what you think of his image. And why. Processed by yours truly in CS-5 with an 80% round of NIK Color Efex Pro’s Tonal Contrast.
NIK 15% Discount
NIK’s Color Efex Pro has completed streamlined my workflow; you can save 15% on all NIK products by clicking here and entering BAA in the Promo Code box at check-out. Then hit Apply to see your savings. You can download a trial copy that will work for 15 days and allow you to create full sized images.
NIK Creative Efex Collection
NIK recently announced the availability of a special limited production bundle of 3 of their most popular products, Color Efex Pro 4, Silver Efex Pro 2, and HDR Efex Pro. You can save more than $200 on the bundle which is available only through NIK affiliates. If you would like additional info, please e-mail with the words “Creative Efex Collection” in the Subject line. If you have been on the fence about purchasing the plug-ins mentioned above this is a great chance to save some significant bucks.
Earn Free Contest Entries and Support both the Bulletins and the Blog by making all your B & H purchases here.
More and more folks are earning multiple contest entries with their B & H purchases. See here for details on that. Eleven great categories, 34 winning and honored images, and prize pools valued in excess of $20,000. Click here to visit the competition home page.
Shopper’s Guide
Below is a list of the gear that Tim used to create the image in today’s blog post. Thanks a stack to all who have used the Shopper’s Guide links to purchase their gear as a thank you for all the free information that we bring you on the Blog and in the Bulletins. Before you purchase anything be sure to check out the advice in our Shopper’s Guide.
Canon 300mm f/2.8 L IS II lens. The 300 f/2.8 L IS II with the 1.4X III TC is a killer flight combination.
1.4X III TC. The new Series III 1.4X was designed to work best with the new Series II super-telephoto lenses.
Canon EOS-1D Mark IV professional digital camera body. My two Mark IVs are my workhorse digital camera bodies.
And from the BAA On-line Store:
LensCoats. I have a LensCoat on each of my big lenses to protect them from nicks and thus increase their re-sales value. All my big lens LensCoat stuff is in Hardwood Snow pattern.
The Lens Align Mark II. I use the Lens Align Mark II pretty much religiously to micro-adjust all of my gear an average of once a month and always before a major trip. Enjoy our free comprehensive tutorial here.
Canon EOS-1D Mark IV User’s Guide. Learn to use your Mark IV the way that I use mine. Also available for the 7D and the Mark III here.
BreezeBrowser. I do not see how any digital photographer can exist without this program.
February 8th, 2012
The Sweet Little Old Lady From Boston…
After a very good first morning at the Venice Rookery on the sold out Southwest Florida IPT the group enjoyed a nice lunch at Applebee’s. As the group assembled to await directions to our afternoon location a very nice little old lady with grey hair walked by. “Please excuse me” she said sweetly with an obvious New England accent. “Are you from Boston?” I asked with the intention of setting her up. “Yes, of course,” she said.
With a big smile on my face I said, “Too bad about the Patriots.” As she walked past me she gave me a gentle punch on my upper arm and with a smile on her face she said, “You little sh*t you. My son has been crying for three straight days.” So much for setting her up!
Support both the Bulletins and the Blog by making all your B & H purchases here.
Remember: you can earn free contest entries with your B & H purchases. Eleven great categories, 34 winning and honored images, and prize pools valued in excess of $20,000. Click here for details.
Shopper’s Guide
Below is a list of the gear used to create the image in today’s blog post. Thanks a stack to all who have used the Shopper’s Guide links to purchase their gear as a thank you for all the free information that we bring you on the Blog and in the Bulletins. Before you purchase anything be sure to check out the advice in our Shopper’s Guide.
Canon 300mm f/2.8 L IS II lens. The 300 f/2.8 L IS II with the 1.4X III TC is a killer flight combination.
1.4X III TC. The new Series III 1.4X was designed to work best with the new Series II super-telephoto lenses.
Canon EOS-1D Mark IV professional digital camera body. My two Mark IVs are my workhorse digital camera bodies.
And from the BAA On-line Store:
LensCoats. I have a LensCoat on each of my big lenses to protect them from nicks and thus increase their re-sales value. All my big lens LensCoat stuff is in Hardwood Snow pattern.
The Lens Align Mark II. I use the Lens Align Mark II pretty much religiously to micro-adjust all of my gear an average of once a month and always before a major trip. Enjoy our free comprehensive tutorial here.
Canon EOS-1D Mark IV User’s Guide. Learn to use your Mark IV the way that I use mine. Also available for the 7D and the Mark III here.
BreezeBrowser. I do not see how any digital photographer can exist without this program.
February 7th, 2012
|
|
|
This drake Kelp Goose was photographed with the tripod-mounted Canon 300mm f/2.8 L IS II lens, the 2X III teleconverter, and the Canon EOS-1D Mark IV. ISO 200. Evaluative metering -1/3 stop: 1/2000 sec. at f/5.6 in Av mode.
Central Sensor AI Servo Rear Focus AF and recompose. Click here if you missed the Rear Focus Tutorial.
Kelp and Upland Geese are the two common goose species on the Falklands. In most locations they are a bit wary but on West Point those that hang around the dwellings are quite a bit more forgiving. See image last to learn what was inside one of the dwellings….
|
Basic Image Clean-up: Right or Wrong?
Take a moment to check out the animated GIF below. As I do with most images (except those to be entered in the major contests), I used the Patch Tool and a few small Quick Masks to perform the basic clean-up, eliminating some distracting white feathers and small bits of debris. A 40% hardness Clone Stamp Tool was used to get rid of several large specular highlights. Instructions for using all of the basic clean-up tools are detailed in our Digital Basics File. Digital Basics includes my complete digital workflow, dozens of other great Photoshop tips, and free annual updates for as long as I am pushing the shutter button. Advanced Quick Masking techniques are covered in Robert O’Toole’s APTATS I (Advanced Photoshop Tips and Techniques Simplified.)
Right or Wrong?
In your opinion, is basic image clean-up right or wrong in nature photography? As always, be sure to let us know why you feel that way that you do.
|
|
|
The Cheesemans’ provided some very nice extras on the trip. At West Point in the Falklands those who wished a ride up the hill with their gear, about a mile in total, were provided one by the locals. That included me :). In addition, a sumptuous mid-morning snack along with coffee and tea was provided. That’s my roommate Pablo in his yellow slicker. As I mentioned earlier, there were lots of tame birds around the buildings. I took a tiny bite of a brownie just before leaving….
|
Cheesemans’ Ecology Safaris
I traveled to the Southern Ocean with Cheesemans’ Ecology Safaris; find out what I thought about them here. You can learn more about CES by clicking here. If you have any questions you can shoot them an e-mail or call them at 800.527.5330.
Comments on Comments
I commented on the comments in the giant sunflower image repost of January 2, 2012 here. There is lots of interesting and educational material there especially in my response to the comment by Bob McColley who asked about depth-of-field with different lenses…. His misconception is a common one.
Support both the Bulletins and the Blog by making all your B & H purchases here.
Remember: you can earn free contest entries with your B & H purchases. Eleven great categories, 34 winning and honored images, and prize pools valued in excess of $20,000. Click here for details.
Shopper’s Guide
Below is a list of the gear used to create the image in today’s blog post. Thanks a stack to all who have used the Shopper’s Guide links to purchase their gear as a thank you for all the free information that we bring you on the Blog and in the Bulletins. Before you purchase anything be sure to check out the advice in our Shopper’s Guide.
Canon 300mm f/2.8 L IS II lens. This lens proved to be ideal on a tripod for both birds and wildlife with both the 1.4X and 2X III TCs. All images were super-sharp and the lens was light enough for hand-holding both in the zodiacs and when doing flight photograph from the ship.
2X III teleconverter. This new TC is sharper than the 2X II version.
Canon EOS-1D Mark IV professional digital camera body. My two Mark IVs are my workhorse digital camera bodies.
And from the BAA On-line Store:
LensCoats. I have a LensCoat on each of my big lenses to protect them from nicks and thus increase their resale value. All my big lens LensCoat stuff is in Hardwood Snow pattern.
LegCoat Tripod Leg Covers. I have four tripods active and each has a Hardwood Snow LegCoat on it to help prevent further damage to my tender shoulders 🙂
Gitzo GT3530LS Tripod. This one will last you a lifetime.
Mongoose M3.6 Tripod Head. Right now this is the best tripod head around for use with lenses that weigh less than 9 pounds. For heavier lenses, check out the Wimberley V2 head.
Double Bubble Level. You will find one in my camera’s hot shoe whenever I am not using flash.
Be sure to check out our camera body User’s Guides here.
The Lens Align Mark II. I use the Lens Align Mark II pretty much religiously to micro-adjust all of my gear an average of once a month and always before a major trip. Enjoy our free comprehensive tutorial here.
Canon EOS-1D Mark IV User’s Guide. Learn to use your Mark IV the way that I use mine. Also available for the 7D and the Mark III here.
BreezeBrowser. I do not see how any digital photographer can exist without this program.
February 4th, 2012
Love Is…
Unlike the elaborate courtship dances and displays of the Laysan and Black-footed Albatrosses of Midway, Black-browed Albatross courtship involves mild bill clacking, nuzzling, and allo-preening. This courting pair was photographed on New Island in the Falklands on my recent Southern Ocean voyage.
What Makes This a Good Bird Photograph?
If you feel as I do that this is a good bird photograph, take a moment to leave a comment and let us know what about the photograph makes it a good avian image.
|
|
|
When attempting to photograph the heads of two birds interacting it is often the best tack to manually select an outside sensor as indicated by the AF sensor highlighted in red here in the BreezeBrowser screen capture above.
The intruding tail was covered with a few small Quick Masks and then smoothed out with a 40% hardness Clone Stamp Tool. As is usually the case, all as detailed in Digital Basics.
|
Cheesemans’ Ecology Safaris
I traveled to the Southern Ocean with Cheesemans’ Ecology Safaris; find out what I thought about them here. You can learn more about CES by clicking here. If you have any questions you can shoot them an e-mail or call them at 800.527.5330.
My Comments
With a bit of free time I had a chance to respond to the comments posted to the December 27, 2011 blog post “The Best Laid Plans…” and to the December 31 post, “See You Later.”
Support both the Bulletins and the Blog by making all your B & H purchases here.
Remember: you can earn free contest entries with your B & H purchases. Eleven great categories, 34 winning and honored images, and prize pools valued in excess of $20,000. Click here for details.
Shopper’s Guide
Below is a list of the gear used to create the image in today’s blog post. Thanks a stack to all who have used the Shopper’s Guide links to purchase their gear as a thank you for all the free information that we bring you on the Blog and in the Bulletins. Before you purchase anything be sure to check out the advice in our Shopper’s Guide.
Canon 300mm f/2.8 L IS II lens. This lens proved to be ideal on a tripod for both birds and wildlife with both the 1.4X and 2X III TCs. All images were super-sharp and the lens was light enough for hand-holding both in the zodiacs and when doing flight photograph from the ship.
1.4X III TC. The new Series III 1.4X was designed to work best with the new Series II super-telephoto lenses.
Canon EOS-1D Mark IV professional digital camera body. My two Mark IVs are my workhorse digital camera bodies.
And from the BAA On-line Store:
LensCoats. I have a LensCoat on each of my big lenses to protect them from nicks and thus increase their re-sales value. All my big lens LensCoat stuff is in Hardwood Snow pattern.
LegCoat Tripod Leg Covers. I have four tripods active and each has a Hardwood Snow LegCoat on it to help prevent further damage to my tender shoulders 🙂
Gitzo GT3530LS Tripod. This one will last you a lifetime.
Mongoose M3.6 Tripod Head. Right now this is the best tripod head around for use with lenses that weigh less than 9 pounds. For heavier lenses, check out the Wimberley V2 head.
Double Bubble Level. You will find one in my camera’s hot shoe whenever I am not using flash.
Be sure to check out our camera body User’s Guides here.
The Lens Align Mark II. I use the Lens Align Mark II pretty much religiously to micro-adjust all of my gear an average of once a month and always before a major trip. Enjoy our free comprehensive tutorial here.
Canon EOS-1D Mark IV User’s Guide. Learn to use your Mark IV the way that I use mine. Also available for the 7D and the Mark III here.
BreezeBrowser. I do not see how any digital photographer can exist without this program.
February 2nd, 2012
|
|
|
This image above was created from the image below using Fractalius, a really neat Photoshop plug-in from Redfield.
|
Fracted Penguin
I was introduced to Fractalius about two years ago by Denise Ippolito in BPN’s Out of the Box Forum. It is great fun and can produce a variety of looks. I started this one with Glow 100 and adjusted the sliders to taste. See the screen capture below for more details.
Which Do You Like Best?
Take a moment to leave a comment and let us know which of the two images you like best, the Fracted version or the straight version. And do let us know why.
|
|
|
This screen capture shows the settings that I used to produce the Fracted image that opens this blog post.
|
Fracatlius
To learn more about this great plug-in, check out Denise’s free Fractalius tutorials here. To purchase the plug-in which runs only on PCs, please use this link. To see the spectacular images in the original Bulletin feature on Fractalius, click here and scroll down. To see a killer Marine Iguana Fract click here.
Cheesemans’ Ecology Safaris
I traveled to Antarctica with Cheesemans’ Ecology Safaris; find out what I thought about them here. You can learn more about CES by clicking here. If you have any questions you can shoot them an e-mail or call them at 800.527.5330.
Support both the Bulletins and the Blog by making all your B & H purchases here.
Remember: you can earn free contest entries with your B & H purchases. Eleven great categories, 34 winning and honored images, and prize pools valued in excess of $20,000. Click here for details.
Shopper’s Guide
Below is a list of the gear used to create the image in today’s blog post. Thanks a stack to all who have used the Shopper’s Guide links to purchase their gear as a thank you for all the free information that we bring you on the Blog and in the Bulletins. Before you purchase anything be sure to check out the advice in our Shopper’s Guide.
Canon 300mm f/2.8 L IS II lens. This lens proved to be ideal on a tripod for both birds and wildlife with both the 1.4X and 2X III TCs. All images were super-sharp and the lens was light enough for hand-holding both in the zodiacs and when doing flight photograph from the ship.
2X III teleconverter. This new TC is sharper than the 2X II version.
Canon EOS-1D Mark IV professional digital camera body. My two Mark IVs are my workhorse digital camera bodies.
And from the BAA On-line Store:
LensCoats. I have a LensCoat on each of my big lenses to protect them from nicks and thus increase their re-sales value. All my big lens LensCoat stuff is in Hardwood Snow pattern.
LegCoat Tripod Leg Covers. I have four tripods active and each has a Hardwood Snow LegCoat on it to help prevent further damage to my tender shoulders 🙂
Gitzo GT3530LS Tripod. This one will last you a lifetime.
Mongoose M3.6 Tripod Head. Right now this is the best tripod head around for use with lenses that weigh less than 9 pounds. For heavier lenses, check out the Wimberley V2 head.
Double Bubble Level. You will find one in my camera’s hot shoe whenever I am not using flash.
Be sure to check out our camera body User’s Guides here.
The Lens Align Mark II. I use the Lens Align Mark II pretty much religiously to micro-adjust all of my gear an average of once a month and always before a major trip. Enjoy our free comprehensive tutorial here.
Canon EOS-1D Mark IV User’s Guide. Learn to use your Mark IV the way that I use mine. Also available for the 7D and the Mark III here.
BreezeBrowser. I do not see how any digital photographer can exist without this program.
January 31st, 2012
|
|
|
This image of the Cheesemans’ Ecology Safari staff working hard to safely control a zodiac was created at Bailey Head, Antarctica with the tripod-mounted Canon 70-200mm f/2.8L IS II lens, the Canon 1.4X III TC (at 140mm) and the EOS-5D Mark II. ISO 200: 1/8 sec. at f/22 in Manual mode. A 3-stop ND filter had been placed on the front of the lens in order to get down to 1/8 second.
Central Sensor Rear Focus AI Servo AF active at the moment of exposure. Click here if you missed the Rear Focus Tutorial.
I had been creating intentional blurs of large groups of Chinstrap Penguins marching towards the sea–see the image below–when I heard the scream “Big wave!” above the roar of the surf. I turned immediately but had missed the big wave hitting the zodiac; I made this image as a second smaller wave struck the boat. With great force. I figured that a slow shutter speed blur might best convey the sense of struggle so I did not attempt to change anything; when faced with unexpected action the very best tack is to shoot first and ask questions later. If you hesitate or think, you almost always wind up with nothing…. The strategy worked well here.
|
Way to Go CES! (Cheesemans’ Ecology Safaris)
Many of you have been enjoying the images from my recently concluded Southern Oceans trip. Do understand that none of the images would have been possible without the planning, help, expertise, and execution of the plan by CES: Cheesemans’ Ecology Safaris. The itinerary was a fabulous one. We had more than ample time to photograph at all the great spots; at St. Andrews Bay I was ashore for almost ten hours. When it came to landings and zodiac safety, the Cheesemans’ staff was beyond incredible. The opportunity for catastrophic developments exists with every zodiac landing. That is true in the Galapagos as well but with bigger seas on average in the Southern Oceans the dangers are far greater. Every landing and every exit went smoothly. I had tons of help with my gear. With 96 folks getting into and out of zodiacs as often as three times a day a perfect safety record is what you strive for and that is what occurred: zero injuries, zero gear lost or damaged.
Expedition leader Ted Cheeseman, son of founders Doug and Gail, made all the right calls. When plans needed to be changed out of concern for weather and safety, he made the right call every time; everyone on the trip benefited. The programs were excellent–there was lots of free time on the two long crossings. The two primary photographic leaders were both old friends of mine: Tom Murphy, and Rod Planck. I had not see either of them for more than two decades until I laid eyes on them on the Ortelius. It was great seeing them again and working with them. By attending their programs I learned a ton and changed a few things. Rod’s work was as inspirational as it was when I attended two of his programs in the 1990s; seeing images from the various landing planted many seeds in my head. Tom got me working at ISO 200 in sunny conditions and stopping down a bit more than I usually do. And both of them, having been on many Southern Oceans trips, were chock full of advice as to the best locations on each landing. Nobody is ever too old to learn.
The landing at Bailey Head, Antarctica, was especially rewarding to me as I had been sitting in a zodiac 100 yards off shore on my 2007 trip when the zodiac in front of mine swamped and the captain of the ship called off the landing…. Early that day it looked as if my weather Karma might not be working. Ted’s “Good morning shipmates” was followed by the news that we would not be able to land at Bailey Head that morning as the swell was too big. The beach there is sloped tremendously and the sea strives to pull the zodiacs back into the ocean before folks have gotten off with their gear. Tom Murphy had said to me several days before, “We will get you on the beach at Bailey Head.” Ted concluded his morning greetings by saying, “We are sending out a scout team to see if landing is possible.”
After breakfast I was thrilled to hear Ted’s voice again on the PA, “We will be landing at 8am.” Afterwards folks noted that it was the calmest landing ever at this amazingly beautiful spot. My good weather Karma (courtesy of late-wife Elaine) had come through one last time. Along with St. Andrews Bay, it was one of my two favorite super-great once-in-a-lifetime days of the trip. And we even got to enjoy three additional hours at Hannah Point, Antarctica before calling it a wrap and heading for the feared Drake Passage. All thanks to Cheesemans’ Ecology Safaris.
|
|
|
This image was created at Bailey Head, Antarctica with the tripod-mounted Canon 70-200mm f/2.8L IS II lens, the Canon 1.4X III TC (at 270mm) and the EOS-5D Mark II. ISO 200. Evaluative metering +1 2/3 stops off the white water: 1/8 sec. at f/13 in Manual mode. A 3-stop ND filter was placed on the front of the lens in order to get down to 1/8 second.
Central Sensor Rear Focus AI Servo AF on the closest penguin and recompose. Click here if you missed the Rear Focus Tutorial.
|
CES/BAA Partnership
I am proud to announce that on the afternoon of January 31, 2012 Cheesemans’ Ecology Safaris became a BIRDS AS ART sponsor. I am looking forward to a long and fruitful relationship with Doug, Gail, and Ted and the rest of the Cheesemans’ staff.
|
|
|
This image was created at Bailey Head, Antarctica with the tripod-mounted Canon 70-200mm f/2.8L IS II lens and the Canon 1.4X III TC (at 280mm) and the EOS-5D Mark II. ISO 400. Evaluative metering +1/3 stop: 1/125 sec. at f/8 in Manual mode.
Central Sensor Rear Focus AI Servo AF on the closest penguin and recompose. Click here if you missed the Rear Focus Tutorial.
There are something like 100,000 pairs of chinstraps on Bailey Head, Deception. Most of them are pretty much un-photographable. Old friend Tom Murphy led the serious photographers right to he very best nest on the side of a gentle slope with the colony in the background. Thanks Tom!
|
About CES
Cheesemans’ Ecology Safaris has been focused on wildlife for over thirty years.
A great safari is more than remote destinations and remarkable wildlife – it is a journey woven through foreign lands and seas leading to experiences made possible through inspiration, organization, and leadership. For over thirty years, Cheesemans’ Ecology Safaris has provided these unforgettable experiences during in-depth tours to the world’s richest ecosystems. Their itineraries are unique and preparation is thorough, but most importantly, the leadership is exceptional. With broad backgrounds in nature and wildlife, their leaders desire to deepen your understanding of each destination so you can take-away the photographs and memories that allow you to become nature’s ambassador.
Gail and Doug Cheeseman have been leading wildlife safaris to their favorite destinations since 1978. Inspired by his parent’s passion, Ted joined them in leading safaris over 15 years ago. Now the three work together with their staff to offer you superlative nature tours to destinations such as Antarctica, Tanzania, Kenya, Bhutan, Brazil, India, Galapagos, and many more. Doug is a professor emeritus of Ecology and Zoology, Ted holds a Masters in Tropical Conservation Biology, and Gail is a naturalist of the best kind – self-taught through a lifetime in the field. Together, they are a family of truly remarkable ecologists who seek to inspire travelers to enjoy and conserve the Earth’s wild landscapes.
Find out more about Cheesemans’ Ecology Safaris, including a complete tour listing, by clicking here. If you have any questions you can shoot them an e-mail or call 800.527.5330.
B&H Specials
Act now; these Instant Rebates expire February 4, 2012.
If you are interested in an amazing deal on a 7D, a 5D MII (both packaged with various lenses) or a $400 rebate on a Canon PIXMA Pro 9000 Mark II printer (with the purchase of a Canon EOS SLR), click here.
To learn about even more amazing Instant Rebates on Canon lenses and Speedlites click here or on the image below.
Support both the Bulletins and the Blog by making all your B & H purchases here.
Remember: you can earn free contest entries with your B & H purchases. Eleven great categories, 34 winning and honored images, and prize pools valued in excess of $20,000. Click herefor details.
Shopper’s Guide
Below is a list of the gear used to create the image in today’s blog post. Thanks a stack to all who have used the Shopper’s Guide links to purchase their gear as a thank you for all the free information that we bring you on the Blog and in the Bulletins. Before you purchase anything be sure to check out the advice in our Shopper’s Guide.
Canon 70-200mm f/2.8L IS II lens. Man, I am loving this lens on my shoulder (or on a tripod as above) with the 2X III teleconverter. I also use it a lot with the 1.4X III TC.
Canon EOS 5D Mark II Digital Camera. Canon’s lightweight full frame body is perfect for serious landscape photography and as I learned on this trip, is great for wildlife too. See my review here.
And from the BAA On-line Store:
LensCoats. I have a LensCoat on each of my big lenses to protect them from nicks and thus increase their re-sales value. All my big lens LensCoat stuff is in Hardwood Snow pattern.
LegCoat Tripod Leg Covers. I have four tripods active and each has a Hardwood Snow LegCoat on it to help prevent further damage to my tender shoulders 🙂
Gitzo GT3530LS Tripod. This one will last you a lifetime.
Mongoose M3.6 Tripod Head. Right now this is the best tripod head around for use with lenses that weigh less than 9 pounds. For heavier lenses, check out the Wimberley V2 head.
Double Bubble Level. You will find one in my camera’s hot shoe whenever I am not using flash.
Be sure to check out our camera body User’s Guides here.
The Lens Align Mark II. I use the Lens Align Mark II pretty much religiously to micro-adjust all of my gear an average of once a month and always before a major trip. Enjoy our free comprehensive tutorial here.
|
|

