December 27th, 2011
|
|
|
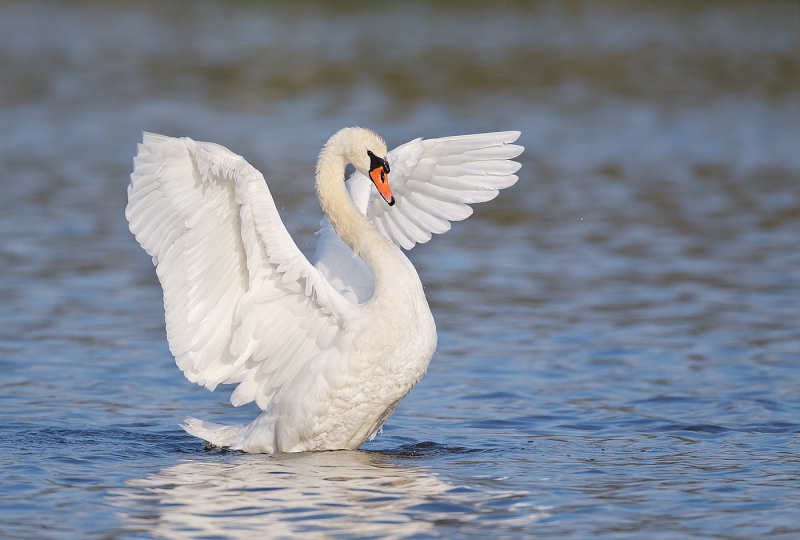
This image of a Mute Swan flapping after a bath was created at the East Pond, Jamaica Bay Wildlife Refuge, Queens, NY with the tripod-mounted Canon 800mm f/5.6L IS lens and the EOS-1D Mark IV. ISO 400. Evaluative metering +2/3 stop: 1/2000 sec. at f/6.3.
For a greater appreciation of the image above, click on the photo to view a larger version. Click on the enlarged version to close it.
|
My Comments on: For Your Critique/Image #7
On September 14, 2011 I posted For Your Critique: Image #7. This one was entered in the Behaviour Birds category of the 2011 WPOTY competition. I like this image a lot, especially for its elegance. As the contest is UK based Mute Swan images often do well. Because I choose to remove distracting background elements from so many of my avian images, I cannot enter them in various contests. This one was pretty much straight out of camera but for dust-spotting, color & contrast adjustments, and sharpening.
Most folks offered positive comments. Some folks like the brown and blue bands in the water. Others did not. I would have preferred all blue without any ripples. (The brown was reflections of the phragmites, the giant reeds, on the far shoreline.) It was suggested that I eliminate the single, large drop of water from the spray in front of the bird. I would have liked to but that is not permitted under the WPOTY rules. (Click here for an interesting discussion on digital contest guidelines.) Some folks praised the exposure and the detail in the white feathers, others felt that the white feathers lacked detail. Two folks thought that the primaries of the near wing had been damaged or clipped; though this species is introduced in the US this was a free and wild bird. The primaries of the near wing are simply foreshortened. As fr the image design and the crop, I love it as is.
Note that in North America both Canada Goose and Mute Swan are often ignored as potential photographic subjects. Though I am not a fan of introduced species like Mute Swan, I do not hesitate to photograph them and use them as teaching aids both in the field and during Photoshop sessions. When you see either species dipping their breasts in the water, get ready to create some dramatic images as they will almost always rise up out of the water and flap for all they are worth. The same goes for most bird families especially shorebirds and ducks.
|
|
|
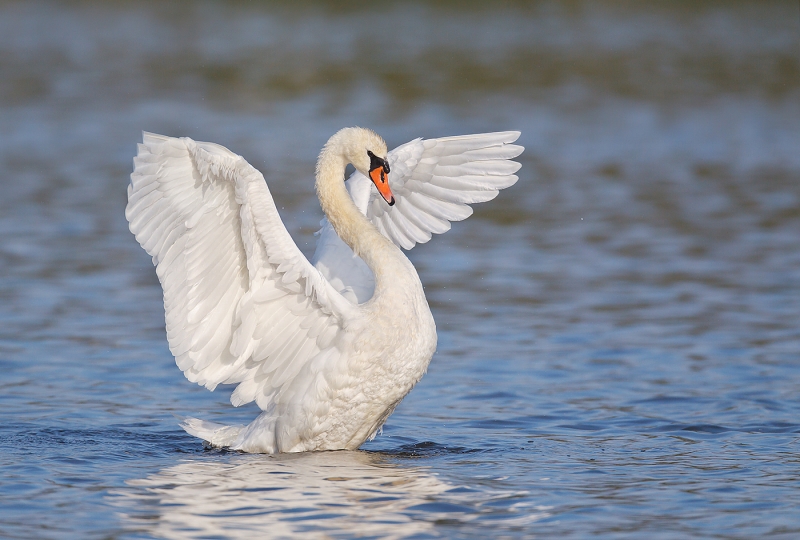
For those who prefer a bit more detail in the WHITEs, I ran NIK Color Efex Pro’s Detail Extractor at about 40% on the image and painted the effect in on the bird only with a Hide-all Mask (as described in detail in Digital Basics).
For a greater appreciation of the detail in the WHITEs in the image above, click on the photo to view a larger version. Click on the enlarged version to close it.
|
NIK Color Efex Pro 4 Recipe Tip
If missed my NIK Color EFEX Pro 4 Recipe Tutorial, click here.
You can see spectacular before and after Color Efex recipe images here.
NIK 15% Discount
You can save 15% on all NIK products by clicking here and entering BAA in the Promo Code box at check-out. Then hit Apply to see your savings. You can download a trial copy that will work for 15 days and allow you to create full sized images.
NIK Creative Efex Collection
NIK recently announced the availability of a special limited production bundle of 3 of their most popular products, Color Efex Pro 4, Silver Efex Pro 2, and HDR Efex Pro. You can save more than $200 on the bundle which is available only through NIK affiliates. If you would like additional info, please e-mail with the words “Creative Efex Collection” in the Subject line. If you have been on the fence about purchasing the plug-ins mentioned above this is a great chance to save some significant bucks.
Thanks to all who commented. Note: this image did not make the final round of judging.
Earn Free Contest Entries and Support both the Bulletins and the Blog by making all your B & H purchases here.
More and more folks are earning multiple contest entries with their B & H purchases. See here for details on that. Eleven great categories, 34 winning and honored images, and prize pools valued in excess of $20,000. Click here to visit the competition home page.
Shopper’s Guide
Below is a list of the gear used to create the image in today’s blog post. Thanks a stack to all who have used the Shopper’s Guide links to purchase their gear as a thank you for all the free information that we bring you on the Blog and in the Bulletins. Before you purchase anything be sure to check out the advice in our Shopper’s Guide.
Support both the Bulletins and the Blog by making all your B & H purchases here.
Remember: you can earn free contest entries with your B & H purchases. Eleven great categories, 34 winning and honored images, and prize pools valued in excess of $20,000. Click here for details.
Shopper’s Guide
Below is a list of the gear used to create the image in today’s blog post. Thanks a stack to all who have used the Shopper’s Guide links to purchase their gear as a thank you for all the free information that we bring you on the Blog and in the Bulletins. Before you purchase anything be sure to check out the advice in our Shopper’s Guide.
Canon 800mm f/5.L IS lens. Right now this is my all time favorite super-telephoto lens.
Canon EOS-1D Mark IV professional digital camera body. My two Mark IVs are my workhorse digital camera bodies.
And from the BAA On-line Store:
LensCoats. I have a LensCoat on each of my big lenses to protect them from nicks and thus increase their re-sales value. All my big lens LensCoat stuff is in Hardwood Snow pattern.
LegCoat Tripod Leg Covers. I have four tripods active and each has a Hardwood Snow LegCoat on it to help prevent further damage to my tender shoulders 🙂
Gitzo GT3530LS Tripod. This one will last you a lifetime.
Mongoose M3.6 Tripod Head. Right now this is the best tripod head around for use with lenses that weigh less than 9 pounds. For heavier lenses, check out the Wimberley V2 head.
CR-80 Replacement Foot for Canon 800. When using the 800 on a Mongoose as I do, replacing the lens foot with this accessory lets the lens sit like a dog whether pointed up or down and prevents wind-blown spinning of your lens on breezy days by centering the lens directly over the tripod.
Double Bubble Level. You will find one in my camera’s hot shoe whenever I am not using flash.
Be sure to check out our camera body User’s Guides here.
The Lens Align Mark II. I use the Lens Align Mark II pretty much religiously to micro-adjust all of my gear an average of once a month and always before a major trip. Enjoy our free comprehensive tutorial here.
Canon EOS-1D Mark IV User’s Guide. Learn to use your Mark IV the way that I use mine. Also available for the 7D and the Mark III here.
December 26th, 2011 Is artie Nuts? Why Would He Spend $11,499 (plus 7% sales tax and shipping) On a Lens He Has Preached Against for More Than Two Decades?
Am I nuts? It very well could be but I do not think so. Here’s the story:
I am flying to Miami on 28 DEC and continuing on overnight to Buenos Aires, Argentina and then flying late afternoon on the 29th to Ushuaia, Argentina to meet the ship and the group for the Falklands/South Georgia/Antarctica voyage that I have signed up for (on my own dime). I had long been planning to purchase the Canon 500mm f/4L IS II lens (7.04 pounds) for this nearly month-long trip and have had one pre-ordered with B&H for many months. Then life intervened. The “sometime in December” release date for the 500 II (and the 600 II as well) was pushed back indefinitely:
Canon U.S.A. Provides Updates On EF Lens Availability
LAKE SUCCESS, N.Y., November 16, 2011 – Canon U.S.A., Inc., a leader in digital imaging solutions, today announced updated availability information for three of its EF lenses:
Canon EF 500mm f/4L IS II USM lens availability yet to be determined
Canon EF 600mm f/4L IS II USM lens availability yet to be determined
Additional information regarding the shipping date of each lens will be made available as soon as possible.
You can read the entire press release here.
Well, there went that idea. I would not have a 500 IS II for the trip. What are the options:
Take the 800mm f/5.6L IS (9.86 pounds). Too slow at f/5.6. And a bad idea with such tame birds…. Not enough focal length flexibility.
Borrow a 500 f/4 L IS (8.54 pounds) from Canon Professional Services. Great focal length flexibility (with both the 1.4X and the 2X TCs) but I really want to see how one of the new Series II Super-telephotos perform with the Series III teleconverters.
Borrow a 600 f/4L IS (11.83 pounds) from Canon Professional Services. What are you nuts? My shoulders are killing me!
Get my hands on a 300mm f/2.8L IS II (5.19 pounds). Relatively light in weight with lots of focal length flexibility. Long enough for most folks but not for me with a maximum reach of 300 times the 2X TC times the 1.3 MIV crop factor = 780mm.
Borrow a 400mm f/2.8L IS II (8.49 pounds)from Canon Professional Services. Sorry, too new. Not available for loan.
Borrow a 400mm f/2.8L IS II (8.49 pounds) through the B&H affiliate program. Sorry, that item exceeds the $10,000 limit on affiliate loans.
Buy a new 400mm f/2.8L IS II (8.49 pounds). Great focal length flexibility (with both the 1.4XIII and the 2XIII TCs) with a nice reach: 400 times the 2X III TC times the 1.3 MIV crop factor = 1040mm. Not shabby. And I would get to see how one of the new Series II lenses works with the Series III TCs. Did you say “buy”?
| [Not a valid template] |
|
Is the new Canon 400mm f/2.8L IS II Super-telephoto lens just what artie needs for his Southern Oceans trip?
|
But wait!
Yeah. I’m the guy who wrote, For bird photography it is always better to choose a longer slower lens than a shorter faster one. And wrote this too, The 400 f/2.8L lenses are simply not a good choice for most bird photographers unless you live out west, also do lots of big mammals in low light, and/or routinely photograph birds at very close range such as at a feeder or another type of set-up.”
But those things were written when the 400 f/2.8s weighed 13 or 14 pounds….
Consider: on a tripod it will give me 400mm, 560mm, and 800mm (all with the the Mark IV’s 1.3X crop factor in addition. It will be mesh perfectly with my 70-200mm f/2.8 L IS II. It weighs a fraction less than the old 500mm (that I was able to hand hold for short periods of time. And it weighs more than 1 1/4 pounds less than the 800 f/5.6. It features the amazing 4-stop Image Stabilization system so I should be able to hand hold it (at least for short periods) on Zodiac rides when I need the reach. And I should be able to hand hold it with the 1.4X III TC for flight photography from the ship.
After much thought, and realizing that you only live once, I ordered a brand new 400mm f/2.8L IS II lens through Canon’s Explorers of Light program. In all likelihood I will be selling it after the voyage. Unless I fall in love with it. Heck, it would be great on the Galapagos too….
December 25th, 2011
SEASON’S GREETINGS
Jim, Jennifer, Peter Kes, and I would like to send each and every one of you best wishes for a joyous holiday season and a wonderful, productive, rewarding, and healthy 2012 filled with great photographic opportunities and wonderful travels. Jennifer will not be back to work until 2012! Jim will be here Monday through Thursday this week (DEC 26-29). He will, however, be out of the office on Wednesday, DEC 28 from 1-4pm and all day on Friday; please leave a phone message and we will get back to you on January 2, 2012.
Please note that as I will be on a Falklands, South Georgia, Antarctica cruise from DEC 28, 2011 through JAN 26, 2012 without internet access except possibly for a day or two at the beginning and/or the end of the trip. Then I am home for a bit spending a week on the road for the sold-out SW FLA IPT. The I disappear again for a month-long (17 FEB to 13 MAR) trip to Japan. (There is lots of room there if you would like to join us.) Jim will be here to help you with your mail order and other needs and Jennifer as always will be handling the IPT registrations; do note that the Morro Bay IPT is now half full.
I simply will be unable to respond to questions in my usual timely fashion until at least mid-March so please hold off with your photography questions till then. You can learn the answers to practically of your questions in ABP, ABPII, and Digital Basics. In addition, there is a killer-good search feature on the blog, the little white box in the upper right of the blog pages. It will lead you to information both on the blog and in the Bulletins. At all times we ask that you try to find the answers to your questions either in the books or on-line before e-mailing. That said I look forward to receiving your fresh, new questions via e-mail this spring.
Despite my absence on the Southern Oceans trip blog folks will scarcely notice my absence as Peter Kes will be posting lots of great stuff for me about every other day. (I have been working hard preparing posts in advance.) I will not, of course, be able to respond to your comments until I get back. One final note, it is getting closer to the time for everyone to enter the BRIDS AS ART 1st International Bird Photography Competition; the deadline is March 31, 2012. Right now, many of the $20,000+ worth of prizes are pretty much unclaimed and there are many empty categories…. The entry fee is only $25 for ten images or see more immediately below.
Earn Free Contest Entries and Support both the Bulletins and the Blog by making all your B & H purchases here.
More and more folks are earning multiple contest entries with their B & H purchases. See here for details on that. Eleven great categories, 34 winning and honored images, and prize pools valued in excess of $20,000. Click here to visit the competition home page.
Shopper’s Guide
Thanks a stack to all who have used the Shopper’s Guide links to purchase their gear as a thank you for all the free information that we bring you on the Blog and in the Bulletins. Before you purchase anything be sure to check out the advice in our Shopper’s Guide.
December 24th, 2011
|
|
|
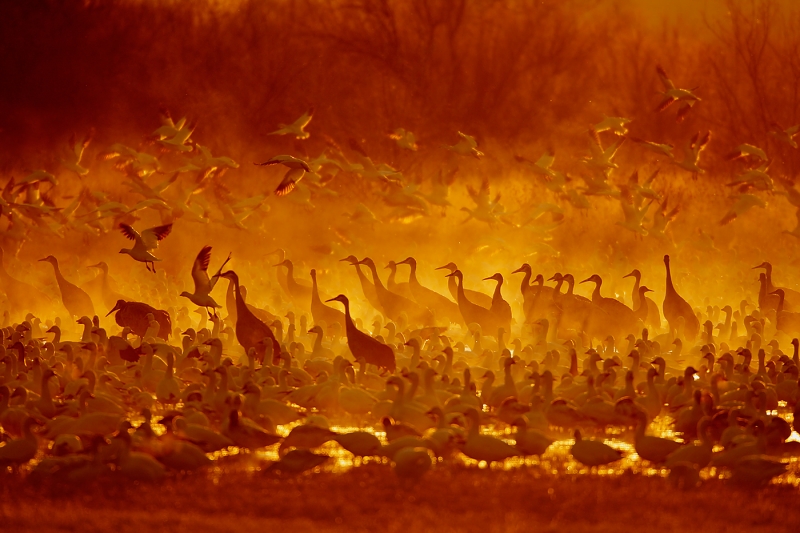
This image was created with the with the tripod-mounted Canon 800mm f/5.6L IS lens and the EOS-1D Mark IV. ISO 400. Evaluative metering +1 1/3 stops: 1/640 sec. at f/5.6 in Av mode. Lens/Camera Body Micro-Adjustment: +2. Central Sensor/Rear Focus/AI Servo AF and re-compose. Click here if you missed the Rear Focus Tutorial. To enjoy viewing a larger sized image, click on the photo. Then click on the enlarged version to close it.
Finding fire in the mist at Bosque is always a thrilling experience. To learn everything that I know about Bosque del Apache NWR before you first visit, be sure to purchase and study a copy of our Bosque Site Guide. After 17 years of visiting I have learned a bit about the place and am eager to share it with you.
|
My Comments on: For Your Critique: Image #3
On July 8, 2011, I posted For Your Critique: Image #3. It was entered in the WPOTY category: Animals in Their Environment. The post inspired 24 comments. Every single comment was a positive one filled with praise for the light, the scene, and the photographer. Two folks mentioned toning down the several bright spots of water in the lower right. I agree of course but I believed that doing so might have put the image in jeopardy of being disqualified from the WPOTY competition; the submission of the RAW file is required for all images that make the final round of judging. There was a single suggestion to crop the image to a panoramic but for me this would have destroyed the depth and in addition, there simply is no place to execute such a crop without clipping birds.
Someone suggested that this image was even better than the original Fire in the Mist, the one that graces the cover of Light on the Earth. For me it is no contest with the original being far stronger.
My problems with Image #3:
- With the wind from the northeast, all of the birds are looking and flying away…
- The out-of-focus geese in front of the row of sharply focused (by necessity) cranes is mildly distracting.
- The three sharpest geese are on the left side of the frame; having them on the right would have been preferred as then they would have at least been flying through part of the frame rather than leaving.
- Some of the geese in the front row are showing us their butts.
Wildlife Photographer of the Year: Portfolio 21
I must say that this year’s Portfolio is the most stunning edition ever. Though they are understandably out of stock, you can order a copy here from Amazon. You will be helping support the Blog and the Bulletins to the tune of a few pennies and will be getting to see some amazing photographs a lot larger and more dramatically than on the web where they are pretty much presented tiny…. Once the book is back in stock I will be discussing various images on the blog (as promised previously).
B&H Specials
B&H has two great specials that run till the end of December.
Canon EOS-5D Mark II Package
You can get a Canon EOS-5D Mark II package that includes a 16GB CompactFlash Card, a Lowepro Adventura 170 Shoulder Bag, and the Red Giant B&H Video Production Software Bundle (a $719.85 value) for only $1,999.95 with free USA shipping by clicking here. The 5D Mark II is everyone’s favorite landscape camera body; see the lead image here. I took one to Bosque to create some very wide images and will be taking one to Antarctica along with the circle lens. Not to mention that it is a killer video camera…. (No questions on video please!)
Canon EF-S 17-55mm f/2.8 IS USM Zoom Lens
If you own a 7D, a 60D, or a 50D, and you like to do landscape and/or side angle photography this would be the Canon EF-S 17-55mm f/2.8 IS zoom lens will thrill you. (Note: this lens will not fit on an EOS-1D Mark IV or other 1D series bodies and it will not on the EOS-5D Mark II.) The $41 instant rebate is good only till the end of the month; you can purchase this lens here.
Earn Free Contest Entries and Support both the Bulletins and the Blog by making all your B & H purchases here.
More and more folks are earning multiple contest entries with their B & H purchases. See here for details on that. Eleven great categories, 34 winning and honored images, and prize pools valued in excess of $20,000. Click here to visit the competition home page.
Shopper’s Guide
Below is a list of the gear used to create the image above. Thanks a stack to all who have used the Shopper’s Guide links to purchase their gear as a thank you for all the free information that we bring you on the Blog and in the Bulletins. Before you purchase anything be sure to check out the advice in our Shopper’s Guide.
Canon 800mm f/5.L IS lens. Right now this is my all time favorite super-telephoto lens.
Canon EOS-1D Mark IV professional digital camera body. My two Mark IVs are my workhorse digital camera bodies.
And from the BAA On-line Store:
LensCoats. I have a LensCoat on each of my big lenses to protect them from nicks and thus increase their re-sales value. All my big lens LensCoat stuff is in Hardwood Snow pattern.
LegCoat Tripod Leg Covers. I have four tripods active and each has a Hardwood Snow LegCoat on it to help prevent further damage to my tender shoulders 🙂
Gitzo GT3530LS Tripod. This one will last you a lifetime.
Mongoose M3.6 Tripod Head. Right now this is the best tripod head around for use with lenses that weigh less than 9 pounds. For heavier lenses, check out the Wimberley V2 head.
CR-80 Replacement Foot for Canon 800. When using the 800 on a Mongoose as I do, replacing the lens foot with this accessory lets the lens sit like a dog whether pointed up or down and prevents wind-blown spinning of your lens on breezy days by centering the lens directly over the tripod.
Double Bubble Level. You will find one in my camera’s hot shoe whenever I am not using flash.
Be sure to check out our camera body User’s Guides here.
The Lens Align Mark II. I use the Lens Align Mark II pretty much religiously to micro-adjust all of my gear an average of once a month and always before a major trip. Enjoy our free comprehensive tutorial here.
Canon EOS-1D Mark IV User’s Guide. Learn to use your Mark IV the way that I use mine. Also available for the 7D and the Mark III here.
December 22nd, 2011

If you give the animated GIF above a moment to play you will note that in the course of optimizing the image I did a fair amount of digital clean-up. See more below. This image was at Indian Lake Estates, FL with the tripod-mounted Canon 70-200mm f/2.8L IS II lens with the 1.4X III TC and the Canon EOS-1D Mark IV ISO 200. This is a 7-frame AEB HDR: +/- one stop around Evaluative metering at zero: 1/800 sec. at f/8. Central sensor/rear-focus AI Servo AF.
Lens/camera body Micro-adjustment: -8.
|
Digital Manipulation and Nature Photography Competitions
I did not have to look far to find an image that would be disqualified from most international nature photography competitions; it is an HDR image that has obviously been cleaned up). As far as the ethics of nature photography are concerned my stance is a simple one: the before image is an image of a lily in a pond and the after image is an image of a lily in a pond. No lies have been told at least from where I sit.
Recently, while searching the web for information on my friend, the late Fritz Pölking, an iconic German nature photographer, I came across a link to an interesting article entitled “Manipulated Images in Nature Photography Competitions; Pure Nature or Pixel Pushing? You can find the entire article here. It is an interesting article that would be well worth reading for all serious nature photographers especially those concerned with the ethics of nature photography (like me) or those (like me) who enjoy entering (and especially having images honored by) one or more of the prestigious international competitions. The article was credited to the “GDT board of management” but at the very end included this “by Thomas Block” and this “German to English translations by Alexandra Korte” so I am a bit confused as to how to credit the authorship.
The GDT
The GDT (Gesellschaft Deutscher Tierfotografen) is based in Germany. Rather than try to explain exactly what they do I offer this from their website:
What does the GDT want?
The GDT set itself the task, to produce photographical appealing, convincing and biologically irrefutable nature photos under the compliance with the prevailling laws and to distribute them to the public by exhibitions, books, photo magazines, catalogues and lectures. That way the GDT wants to contribute to a better understanding of the nature and to advertise for her protection. For GDT members the respect for nature is the most important rule at their photographical work.
What does the GDT do?
Every year the GDT organizes the huge “International Nature Photography Festival” with slide shows by photographers from all over the world, with photo exhibitions and seminars on latest subjects of the nature photography. During the festival a unique photo market presents innovations of the film and equipment market, customized designs, numerous accessories, books and travels about nature photography. Above that, every year the GDT organizes an internal photo contest “GDT – Nature Photographer of the Year” as well as an open contest “European Wildlife Photographer of the Year”.
(I have been meaning to join the GDT ever since I visited to speak about six years ago….)
My Comments
Note: the bold italics in the “What does the GDT want?” paragraph above are mine. The choice of using “biologically irrefutable” to qualify nature photos is an interesting one that clearly implies that little or no digital manipulation (I far prefer the term optimization) is permitted. As you read the article above that implication becomes very clear. And I am fine with their stance. For the contest and for their exhibits. If I do join (I am planning to do that soon) and I enter the contest (as I also plan to do) I will of course abide by the rules.
At the end of the article they included “Statements of some (actually 3) of the members of the jury (for the 2009 European Wildlife Photographer of the Year competition.) The first two judges towed the party line. Here is a typical remark by made by judge Theo Bosboom (Netherlands):
The second day was still pleasant, but brought also a lot of frustration. After viewing the raw-files, we had to eliminate many selected pictures, because the competition rules had been breached by the photographers. Sometimes this decision was easy, for example when all kind of objects had been removed from a picture, or when the picture turned out to be only a small crop of the original (while only 30 % cropping is allowed). In other cases, the decision was less obvious and required extensive discussions between the jury members. It is for example hard to determine whether the contrast and colour temperature of a picture have been changed so much that also “the message of the photograph” has been changed.
We could spend days discussing that single paragraph alone so I will limit myself to a single comment: It is very hard indeed to determine if an image has been “juiced up” too much especially since the judges were not there and in view of the following facts:
1-Digital images are inherently unsharp and low in contrast as they come out of the camera as compared to film images.
2-Properly exposing digital images to the right to ensure that a file of the highest quality will often result in a RAW file that looks dull and washed out.
When I read the comments of the third judge–Dr. Siegmar Bergfeld (Germany) I was, however, stunned. Here they are:
While judging this competition I was once again struck how the intensity of the images had amplified through the use of digital photography. There were a lot of great eyecatchers which were in many cases later identified as a breach of the competition rules. It was a painful task to exclude otherwise great photographs because of undue manipulations. I came to ask myself the following: should we make the creators of these photographs the centre of our criticism or our competition rules?
Back in the analogue era of photography we – as genuine wildlife photographers – accepted the numerous feeding places that we consciously did not incorporate into the photograph, the “manipulations” using graduated filters, ultra zoom lenses, flashes, blurring, a little twig removed and much more…not to
mention the work in the dark room. Now with digital photography at our hands our possibilities to improve images have been increasing magnificently. It is my opinion that we should utilize this (sic: technology) openly rather than making it a taboo (a much straighter approach would be for example to hang a small copy of the original raw file with the corresponding photograph). To avoid any misunderstanding: copying additional objects into an image, distorting the essential meaning and also any kind of composing if not stated, turns wildlife photography into an untrustworthy and interchangeable matter. But great photographs are often not created by adding something but by the art of reduction.
Wow! Stunned is an understatement. Blown away. Shocked. Though the translation (or possibly just the intended meaning) is a bit less than crystal clear here is the judge of a prestigious international competition suggesting that nature photography contests might be better off allowing things like background clean-up so long as the natural history of the situation is preserved.
I am hoping that Dr. Bergfeld proves to be a man ahead of his time….
Do note that the relaxed digital restrictions (see below) in The 1st BIRDS AS ART International Bird Photography Competition accurately reflect Dr. Bergfeld’s suggestions.
From the Rules page:
- Digital Restrictions: Entrants are permitted to remove both major and minor distracting elements from an image so long as the natural history of the scene at the moment of capture is preserved. You may add canvas, a wing-tip, or a tail-tip. Compositional elements that were not present at the moment of capture may not be added. Dust-spotting is of course permitted as are adjustments to color, contrast, and tonality. You may crop your images. Cropping shall not exceed more than 50% of the width and/or the height of the original RAW image.
- RAW files for all winning and honored images (except for those entered in the Digital Creations category) will be requested via e-mail after the close of the contest. They must be submitted in a timely fashion. Instructions for submitting the required files will be sent via e-mail. Failure to submit the requested RAW files will result in the image being eliminated from the competition.
Rejoinder
Nothing above including my comments should be construed as being critical of the GDT. Most prestigious international nature photography competitions have similar digital restrictions. I am hoping of course that in the future things may change drastically.
Your comments on any of the issues raised above are of course welcome.
B&H Specials
B&H has two great specials that run till the end of December.
Canon EOS-5D Mark II Package
You can get a Canon EOS-5D Mark II package that includes a 16GB CompactFlash Card, a Lowepro Adventura 170 Shoulder Bag, and the Red Giant B&H Video Production Software Bundle (a $719.85 value) for only $1,999.95 with free USA shipping by clicking here. The 5D Mark II is everyone’s favorite landscape camera body; see the lead image here. I took one to Bosque to create some very wide images and will be taking one to Antarctica along with the circle lens. Not to mention that it is a killer video camera…. (No questions on video please!)
Canon EF-S 17-55mm f/2.8 IS USM Zoom Lens
If you own a 7D, a 60D, or a 50D, and you like to do landscape and/or side angle photography this would be the Canon EF-S 17-55mm f/2.8 IS zoom lens will thrill you. (Note: this lens will not fit on an EOS-1D Mark IV or other 1D series bodies and it will not on the EOS-5D Mark II.) The $41 instant rebate is good only till the end of the month; you can purchase this lens here.
Earn Free Contest Entries and Support both the Bulletins and the Blog by making all your B & H purchases here.
More and more folks are earning multiple contest entries with their B & H purchases. See here for details on that. Eleven great categories, 34 winning and honored images, and prize pools valued in excess of $20,000. Click here to visit the competition home page.
Shopper’s Guide
Below is a list of the gear used to create the image in today’s blog post. Thanks a stack to all who have used the Shopper’s Guide links to purchase their gear as a thank you for all the free information that we bring you on the Blog and in the Bulletins. Before you purchase anything be sure to check out the advice in our Shopper’s Guide.
Canon 70-200mm f/2.8L IS II lens. Man, I am loving this lens on my shoulder with the 2X III teleconverter. I also use it a lot with the 1.4X III TC.
Canon 1.4X III Teleconverter. Designed to work best with the new Series II super-telephoto lenses.
Canon EOS-1D Mark IV professional digital camera body. My two Mark IVs are my workhorse digital camera bodies.
And from the BAA On-line Store:
LensCoats. I have a LensCoat on each of my big lenses to protect them from nicks and thus increase their re-sales value. All my big lens LensCoat stuff is in Hardwood Snow pattern.
LegCoat Tripod Leg Covers. I have four tripods active and each has a Hardwood Snow LegCoat on it to help prevent further damage to my tender shoulders 🙂
Gitzo GT3530LS Tripod. This one will last you a lifetime.
Mongoose M3.6 Tripod Head. Right now this is the best tripod head around for use with lenses that weigh less than 9 pounds. For heavier lenses, check out the Wimberley V2 head.
CR-80 Replacement Foot for Canon 800. When using the 800 on a Mongoose as I do, replacing the lens foot with this accessory lets the lens sit like a dog whether pointed up or down and prevents wind-blown spinning of your lens on breezy days by centering the lens directly over the tripod.
Double Bubble Level. You will find one in my camera’s hot shoe whenever I am not using flash.
Be sure to check out our camera body User’s Guides here.
The Lens Align Mark II. I use the Lens Align Mark II pretty much religiously to micro-adjust all of my gear an average of once a month and always before a major trip. Enjoy our free comprehensive tutorial here.
Canon EOS-1D Mark IV User’s Guide. Learn to use your Mark IV the way that I use mine. Also available for the 7D and the Mark III here.
December 20th, 2011
|
|
|
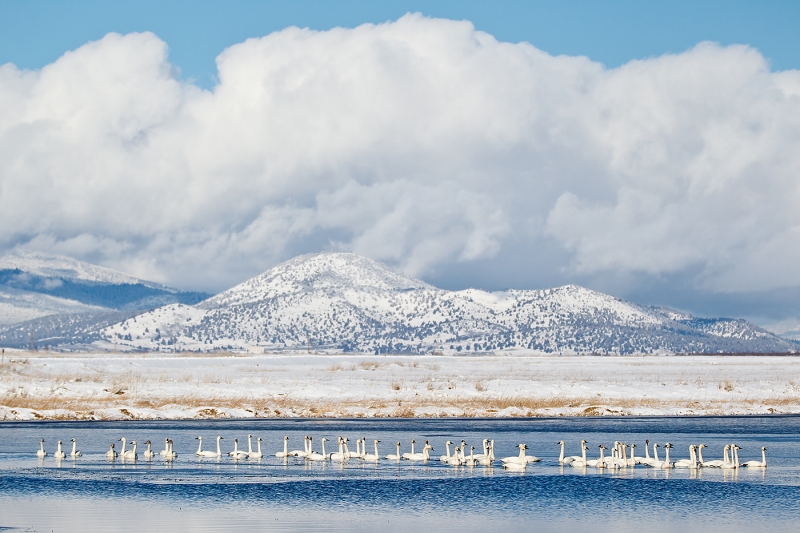
Tundra Swans, Lower Klamath NWR, CA. This image was created was created with the Canon 70-200mm f/2.8L IS II lens, the 2X III teleconverter (hand held at 140mm) with the Canon EOS-1D Mark IV. ISO 400. Evaluative metering +1 stop: 1/4000 sec. at f/5.6 in Av Mode.
Central Sensor/Rear Focus/AI Servo AF and re-compose. Click here if you missed the Rear Focus Tutorial. To enjoy viewing a larger sized image, click on the photo. Then click on the enlarged version to close it.
|
My Comments on: For Your Critique: Image #2
On July 1, 2011, I posted the image above here as #2 in the “For Your Critique” series. It was entered in the WPOTY category: Animals in Their Environment. It proved to be a popular post as it prompted 30 comments. On the whole it proved more popular than #1 in the series, the image that was honored in the Creative Visions of Nature category of the 2011 WPOTY competition; see here for details.
With Image #2 I was pretty much baffled by the comments on the composition. To my eye, this motif (as my friend, the late, great German nature photographer Fritz Pölking called the design of his images) is perfect. That is one of the main reasons that I included this image in my 20-photo WPOTY submission. 🙂
The Comments
There were many positive comments, some of which mentioned things that I did not even know that I liked about the image. 🙂 Here is one of the many: Big fan. I really like the scene as it has a lot of depth. The wave, the swans, the shoreline, the fields, the hills, cloud shadow, clouds, and finally sky. A definite keeper in my opinion. I’d have to agree.
Many folks suggested a variety of crops, mostly cropping from the top, some from below, and some from both top and bottom. While creating a different version or two would surely an option I do love the image exactly as cropped. Including the entire cloud yields a powerful and complete image with a nicely balanced composition. That of course IMHO. As I write often, “If an element is worth including in the frame I almost always want to include the whole thing with at least a small border around it.” One poster summed it up perfectly by writing, “I’d keep the towering clouds as they give a feeling of depth and the expanse of the scene.”
I would have been OK with a sliver of a crop from the bottom to eliminate the small dark area in the lower left corner but I did not mind that bit of dark blue so I left it. (Covering it with a Quick Mask for entry into the WPOTY and many other competitions would not be permitted; doing so would be fine in the BAA 1st International Bird Photography Competition.)
As for the lack of a clear subject, for me the cold and the blue are the main subject. And finally, this poster wrote a fine conclusion for today’s offering: I like the image as is. It looks … like a wonderful winter wonderland. Thanks to all who commented either positively or negatively and to all who offered suggestions.
Lesson
With images like this folks often ask, “Why did you have the 2X on when you used a focal length of 140mm?” You could have removed the 2X, worked at 140mm, and produced a sharper image. They are of course correct. I was, however, trying to photograph small groups of the swans in flight as they departed so I needed to be able to zoom in tight to 400mm. Then I looked up, saw all the swans in a row with that big, beautiful cloud above the pond and the mountains, and zoomed out. When I saw that I could include all of the elements that I wanted for the image I rear-focused on the closest swan, re-composed, and pressed the shutter button. By the time I began to remove the TC the perfect grouping no longer existed….
The tale above also explains why I was at 1/4000 sec. at f/5.6 (rather than at 1/1000 sec. at f/11 for more depth-of-field….)
B&H Photo Free Overnight Holiday Shipping on Selected Canon Lenses
BAA sponsor B&H Photo is offering free overnight shipping on selected Canon lenses (including many of my favorites) from now only until Thursday Dec.22, 4:00pm EST. Any lenses ordered via this link only will be received in time to be placed under the X-mas tree (or under the Hanukkah bush).
The selection includes two versions of the 70-200 IS, my current favorite, the 70-200 f/2.8L IS II, and my old favorite, the 70-200 f/4L IS. (Click here to learn about the 70-200 IS L II with the 2X III TC.) Also included are the EF 16-35mm f/2.8L II USM lens (the wide angle zoom that I am taking to Antarctica) and the EF 100mm f/2.8L Macro IS USM lens. Also on the list is Denise Ippolito‘s favorite Canon intermediate telephoto zoom, the EF 100-400mm f/4.5-5.6L IS (Image Stabilizer) USM lens; lord, I made a zillion great images with that lens. In addition, there are five other shorter Canon lenses on the list. Again, you can view the entire list here.
Click on the logo-link below for free overnight shipping on Canon Powershot Cameras; they make great gifts!
Earn Free Contest Entries and Support both the Bulletins and the Blog by making all your B & H purchases here.
More and more folks are earning multiple contest entries with their B & H purchases. See here for details on that. Eleven great categories, 34 winning and honored images, and prize pools valued in excess of $20,000. Click here to visit the competition home page.
Shopper’s Guide
Below is a list of the gear used to create the image in today’s blog post. Thanks a stack to all who have used the Shopper’s Guide links to purchase their gear as a thank you for all the free information that we bring you on the Blog and in the Bulletins. Before you purchase anything be sure to check out the advice in our Shopper’s Guide.
Canon 70-200mm f/2.8L IS II lens. Man, I am loving this lens on my shoulder with the 2X III teleconverter. I also use it a lot with the 1.4X III TC.
Canon 1.4X III Teleconverter. Designed to work best with the new Series II super-telephoto lenses.
Canon EOS-1D Mark IV professional digital camera body. My two Mark IVs are my workhorse digital camera bodies.
And from the BAA On-line Store:
The Lens Align Mark II. I use the Lens Align Mark II pretty much religiously to micro-adjust all of my gear an average of once a month and always before a major trip. Enjoy our free comprehensive tutorial here.
Canon EOS-1D Mark IV User’s Guide. Learn to use your Mark IV the way that I use mine. Also available for the 7D and the Mark III here.
December 18th, 2011
NIK Color Efex Pro 4 Tip
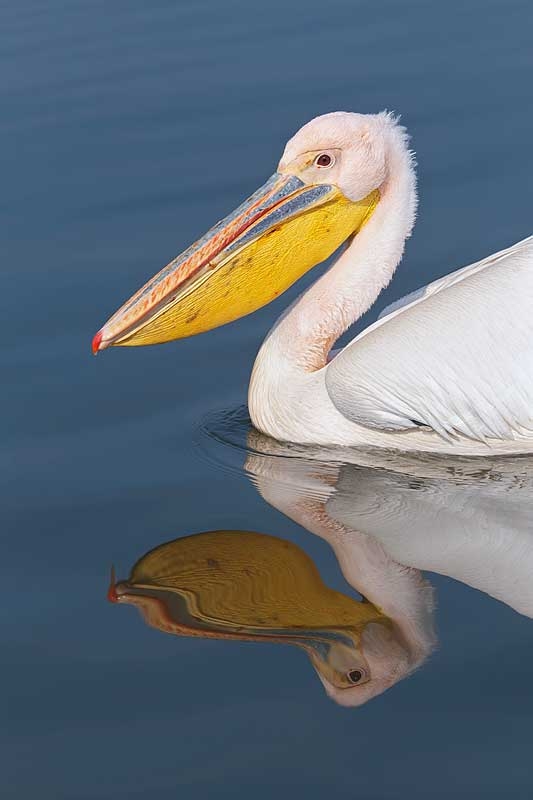
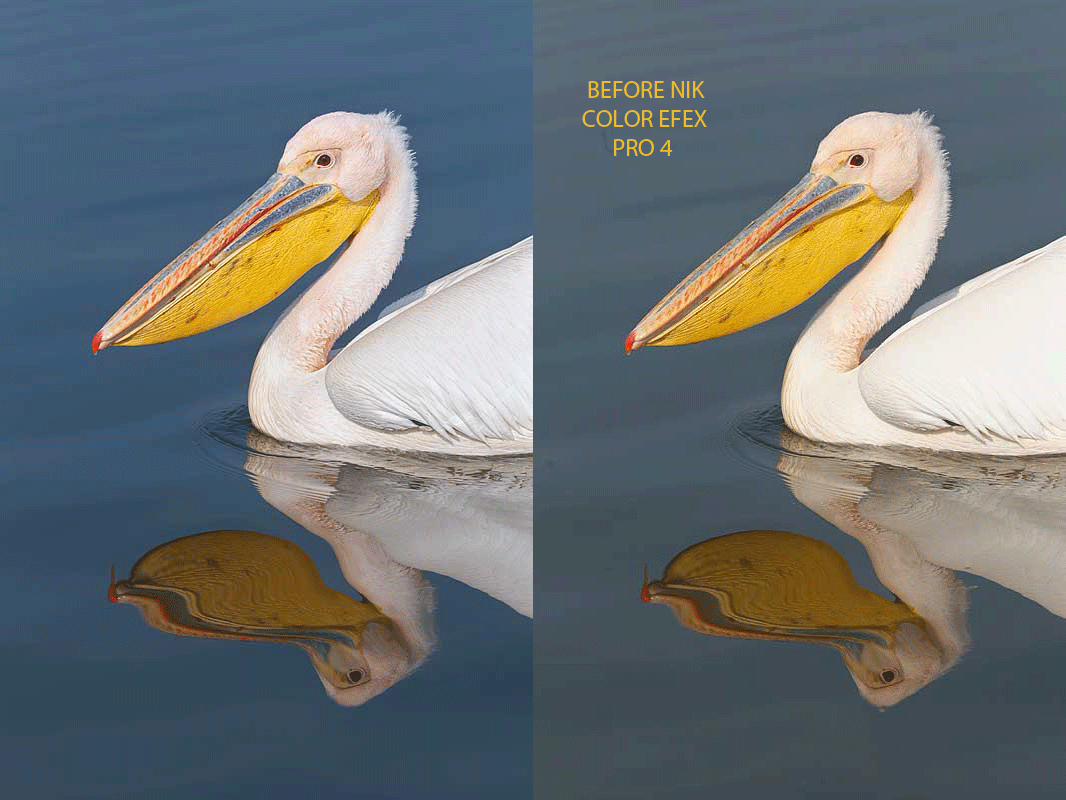
As stated in Capture and Beyond Workflow Lessons That You Cannot Afford to Miss, it is important to take care of your RAW files so that when you learn new techniques or learn to work with new software you can go back and re-work some of your favorites. Though I had never optimized this image before the other day it surely benefited from a visit to Color Efex as you can see by viewing the animated GIF below.
In the before and after images above note that 50% Tonal Contrast has given the image some pop, White Neutralizer has eliminated the sickly color cast, and Detail Extractor has restored density and detail to the white feathers. I just love the way that White Neutralizer makes the BLUEs in an image sing. As I have been saying, NIK Color Efex Pro has made huge changes in my workflow, made my life easier, and vastly improved the quality of my images.
Working more and more each day with the plug-in, I have been making some neat and time-saving discoveries. Recently I came up with a great way to run Tonal Contrast at 50% and White Neutralizer at 100% in one fell swoop (thanks to Denise Ippolito for the Save Recipe revelation) and to follow that up with Details Extractor as needed. It is a real time saver. Here is how I do it:
- With your cleaned-up image open in Photoshop, hit Filter/NIK Software/Color Efex Pro 4.
- Click on Tonal Contrast; move the Highlights slider back to 12%, the Midtones slider back to 25%, and the Shadows slider to 12%.
- Click on the + sign by Add Filter and select White Neutralizer. Leave the sliders at the default settings.
- Now click on Save Recipe and create a name; I used 50% TC + WH NEUTR. Hit OK after you save your named recipe.
- Now when I open an image in Color Efex I click on Recipes/Custom and then click on the icon for 50% TC + WH NEUTR. A dialog box will appear and say: “Adding a Recipe will replace all filters currently applied to your image. Would you like to continue?” Before clicking Yes I would suggest checking the “Do not show again” box.
- If I wish to run Detail Extractor or experiment with any other filters on the list I simply hit the + sign by Add Filer and continue. Details Extractor is great for restoring detail in various areas of an image especially the bright WHITEs. If you wish to tone down the effects I would recommend moving the Detail Extractor to the left.
Note: If you want to apply Detail Extractor only to part of your image you will need to apply your Recipe first, reopen the image in Color Efex Pro 4, run Detail Extractor, apply it, and then add either a Hide-All or a Layer Mask to the new NIK layer once the image opens in Photoshop. You can learn to use both types of Layer Masks in the Layer Masking for Dummies section of Digital Basics.
You can see spectacular before and after Color Efex recipe images here.
NIK 15% Discount
You can save 15% on all NIK products by clicking here and entering BAA in the Promo Code box at check-out. Then hit Apply to see your savings. You can download a trial copy that will work for 15 days and allow you to create full sized images.
NIK Creative Efex Collection
NIK recently announced the availability of a special limited production bundle of 3 of their most popular products, Color Efex Pro 4, Silver Efex Pro 2, and HDR Efex Pro. You can save more than $200 on the bundle which is available only through NIK affiliates. If you would like additional info, please e-mail with the words “Creative Efex Collection” in the Subject line. If you have been on the fence about purchasing the plug-ins mentioned above this is a great chance to save some significant bucks.
Earn Free Contest Entries and Support both the Bulletins and the Blog by making all your B & H purchases here.
More and more folks are earning multiple contest entries with their B & H purchases. See here for details on that. Eleven great categories, 34 winning and honored images, and prize pools valued in excess of $20,000. Click here to visit the competition home page.
Shopper’s Guide
Below is a list of the gear used to create the images in today’s blog post. Thanks a stack to all who have used the Shopper’s Guide links to purchase their gear as a thank you for all the free information that we bring you on the Blog and in the Bulletins. Before you purchase anything be sure to check out the advice in our Shopper’s Guide.
Canon 70-200mm f/2.8L IS II lens. Man, I am loving this lens on my shoulder with the 2X III teleconverter. I also use it a lot with the 1.4X III TC.
Canon 1.4X III Teleconverter. Designed to work best with the new Series II super-telephoto lenses.
Canon EOS-1D Mark IV professional digital camera body. My two Mark IVs are my workhorse digital camera bodies.
And from the BAA On-line Store:
The Lens Align Mark II. I use the Lens Align Mark II pretty much religiously to micro-adjust all of my gear an average of once a month and always before a major trip. Enjoy our free comprehensive tutorial here.
Canon EOS-1D Mark IV User’s Guide. Learn to use your Mark IV the way that I use mine. Also available for the 7D and the Mark III here.
December 17th, 2011
|
|
|
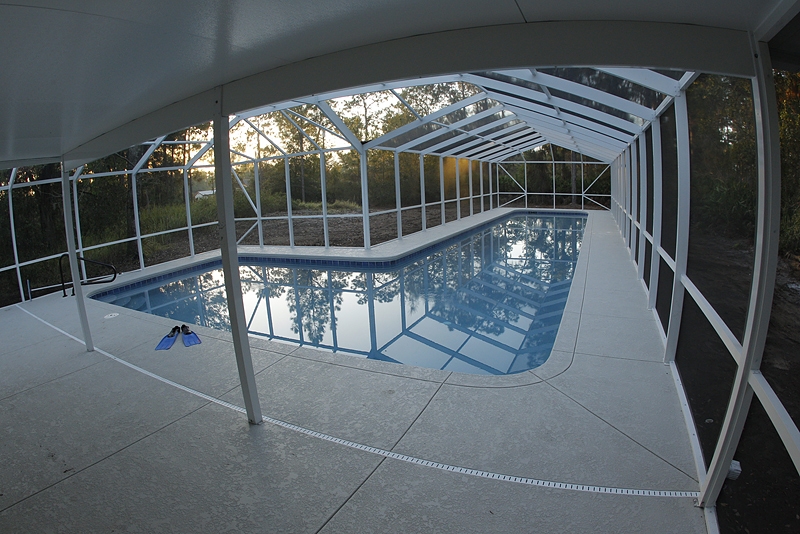
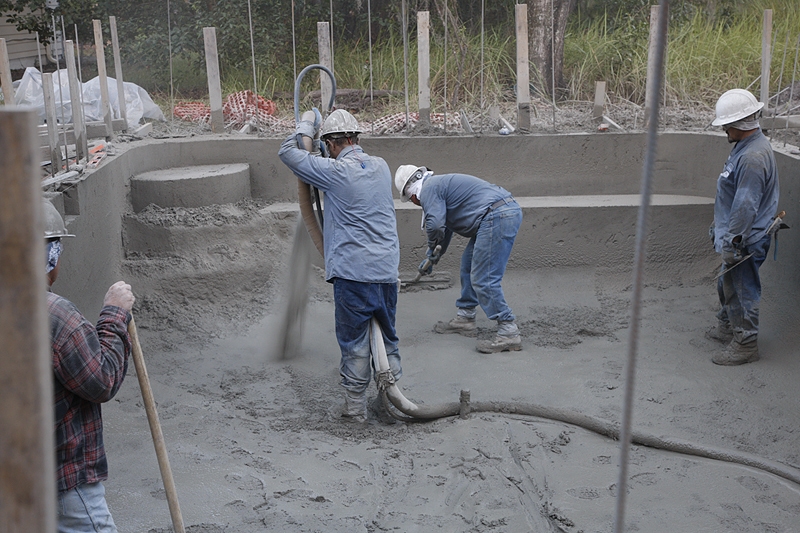
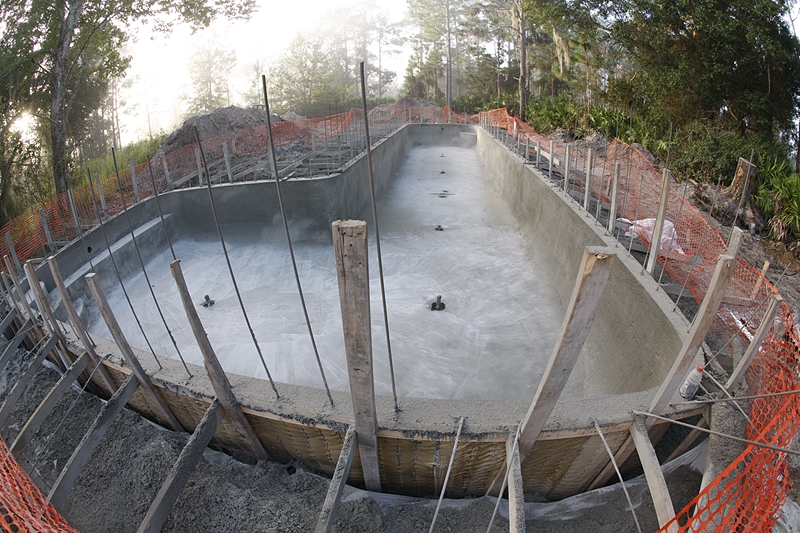
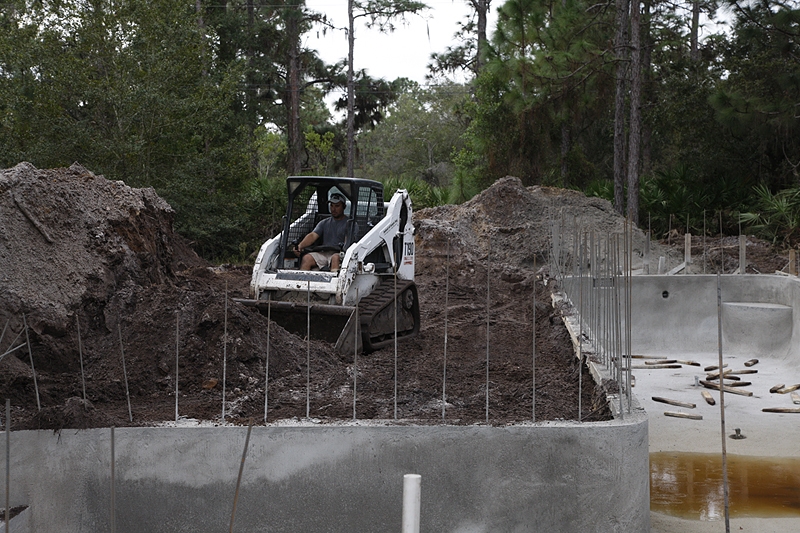
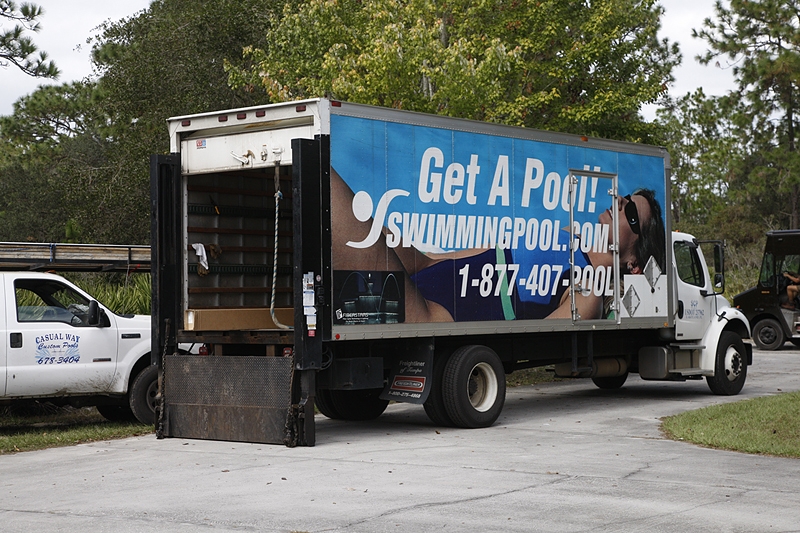
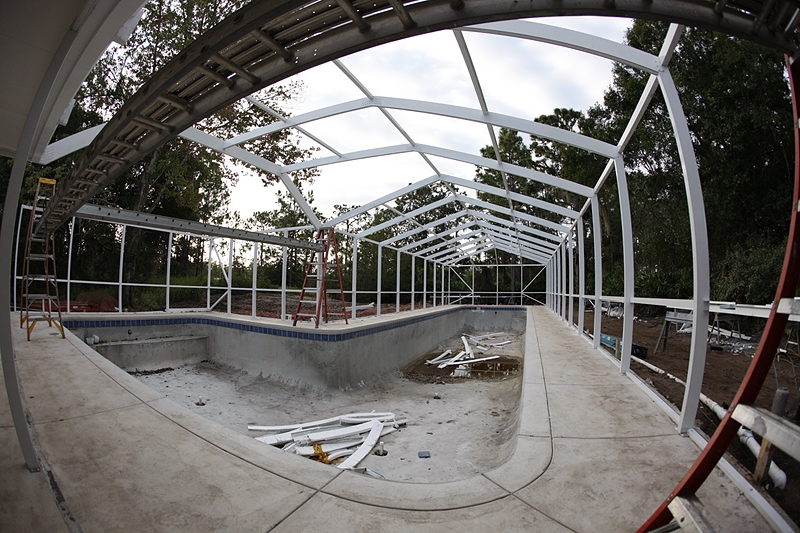
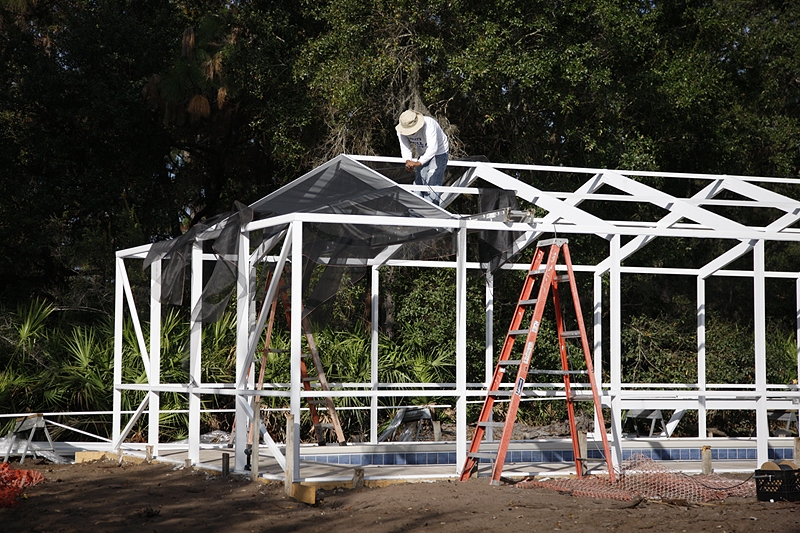
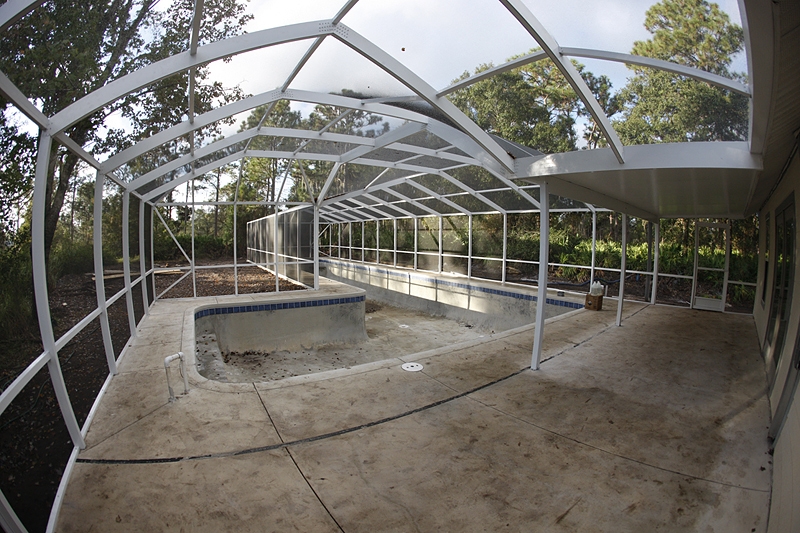
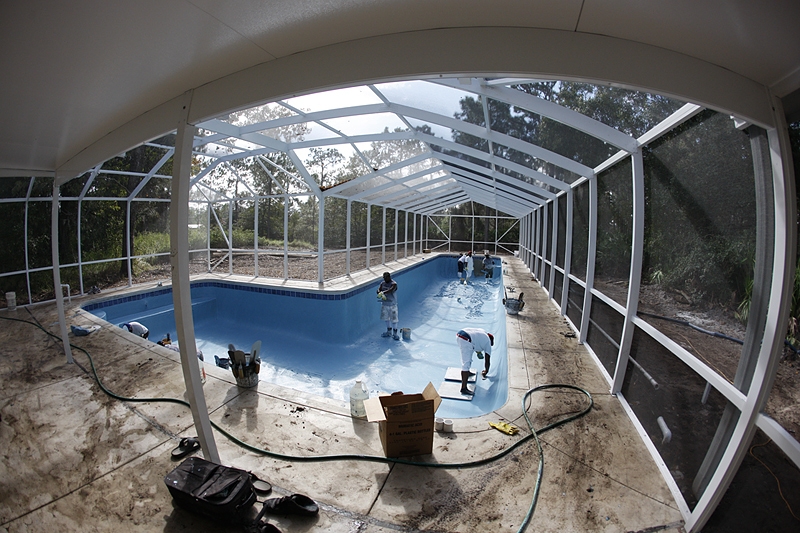
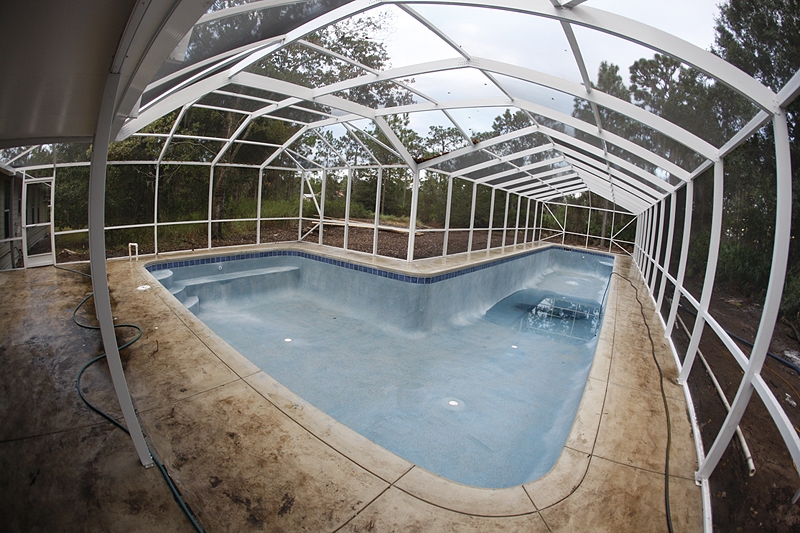
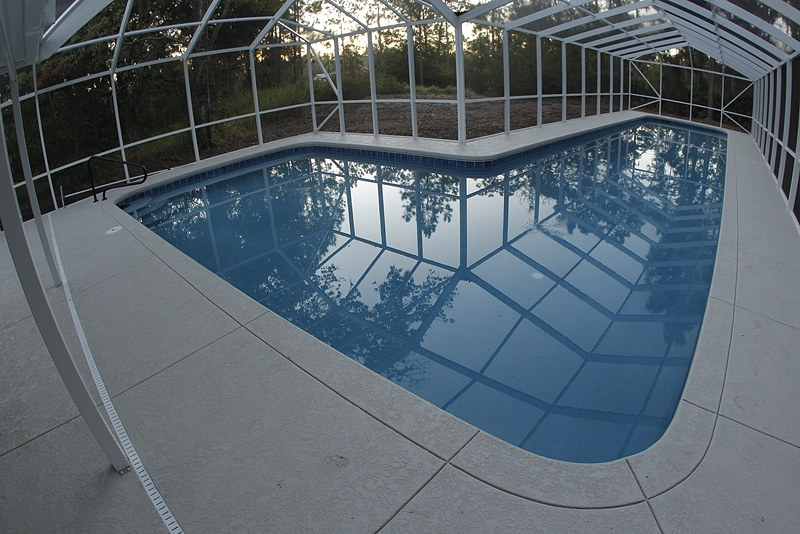
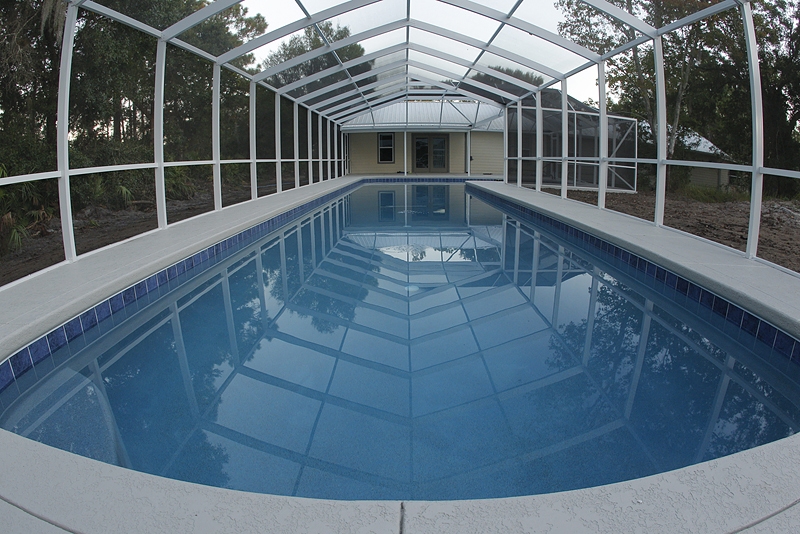
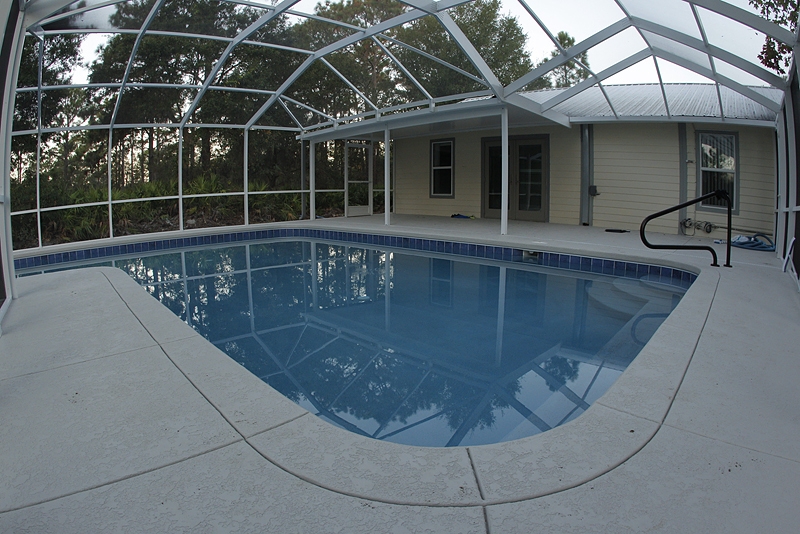
This is my recently finished pool. Below some will enjoy the construction sequence. Thanks to Jim Litzenberg who created about half of the images below in my absence.
|
My New Lap/Kiddie Pool is Named Digital Basics….
When I was younger I loved to play three-man basketball. Fifteen or twenty hours a week in college and beyond. Thanks to my bad left knee and more, those days are long gone. In my thirties I jogged six days a week, up to six miles. Very, very slowly. The knee and a bad back put an end to that. In my forties long health walks were pretty much my only exercise. In my fifties, then living in Florida as I do now, I purchased a Stairmaster for my home and used it often when I was not traveling. Now in my sixties the walking has been about it. If I jog as few as 25 steps my left knee comes a calling, and three days on the Stairmaster has the same result.
When I was at my Mom’s on Long Island in August I started swimming laps in the community pool at Timber Ridge in Holbrook. (I had loved to swim as a kid.) It was fun, it provided some much needed cardio-vascular exercise, and it lowered my blood sugar levels a lot. And swimming does not stress the joints like basketball, jogging, and the Stairmaster. Unless you over-do it which of course I did. But I switched from the crawl to an easy breast stroke and within a week my shoulders were fine.
When I got home I began to consider building a lap pool in my backyard. Once I made the decision things moved quickly. (I quickly rejected the idea of a “small swim against the current” pool.) I hired Ron Sullins of Casual Way Pools in nearby Lake Wales despite the fact that others offered to build the “same” pool for $10,000 less… I was 100% confident in Ron from the moment that I met him. My plans for a lap pool with a kiddie pool sidecar were unique; Ron listened carefully, assured me that he could build it, and wrote up a quote. Within days a signed contract was in place. For the largest backyard pool that Ron had built in his 30 years in the business. I had thought that the pool of my dreams would cost about $35,000. The price tag for the finished pool that you see above was $67,000. Thus the name “Digital Basics.” At the time of construction we had sold about 3,350 copies of Digital Basics at (only) $20 each. Do the math… Here’s a huge thank you to all who have purchased Digital Basics (and of course to all who regularly visit the BAA On-Line store and to those who attend IPTs and seminars).
The pool was ready for swimming when I got back from Bosque. As you might guess, I dove right in and started swimming a half mile twice a day. By the fourth day I had trashed my shoulders again. When I was 12, my Mom, who is sitting beside me as I type, said, “This child does not know the meaning of the word moderation.” I guess that some things never change….
|
|
|
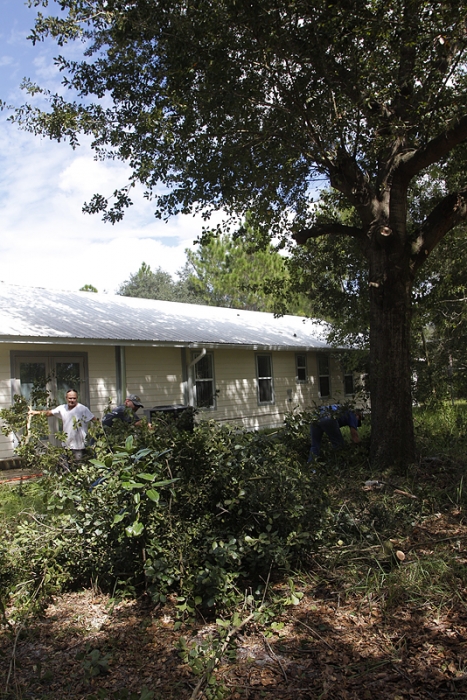
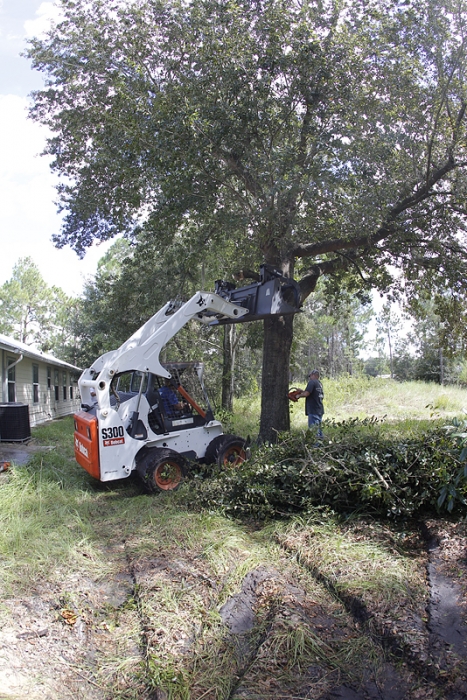
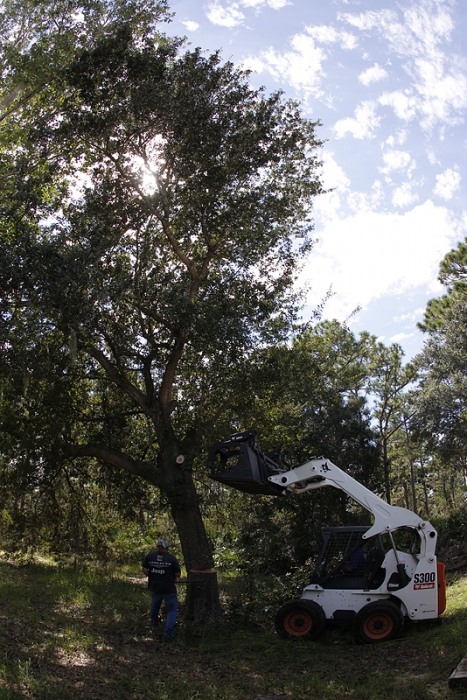
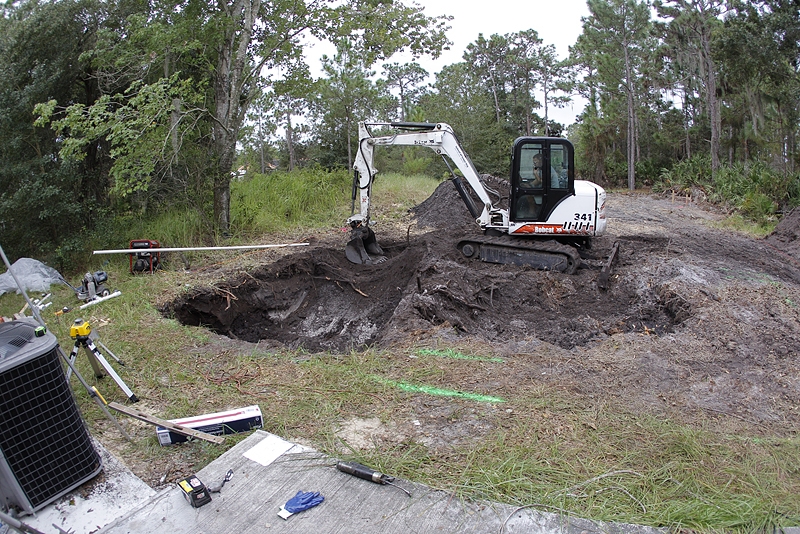
Above: trimming the one oak tree that needed to be sacrificed…
|
|
|
|
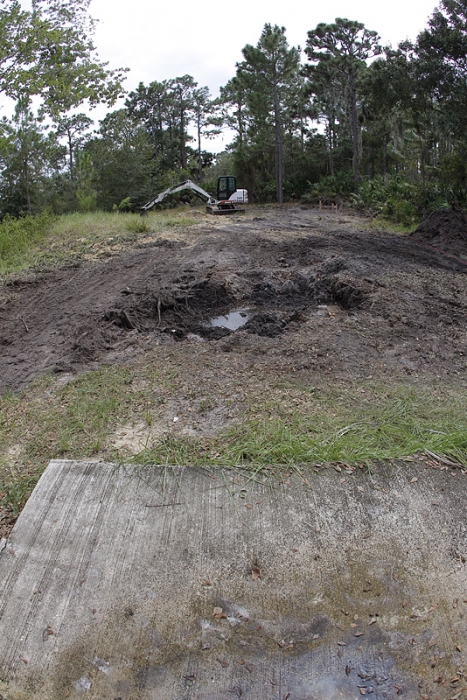
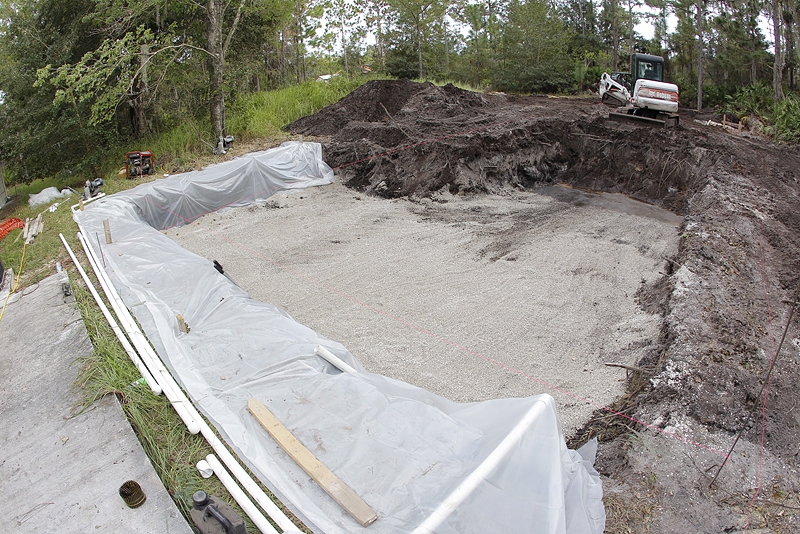
The gravel allowed them to work around the ground water; we had had record huge rains just before they began…
|
|
|
|
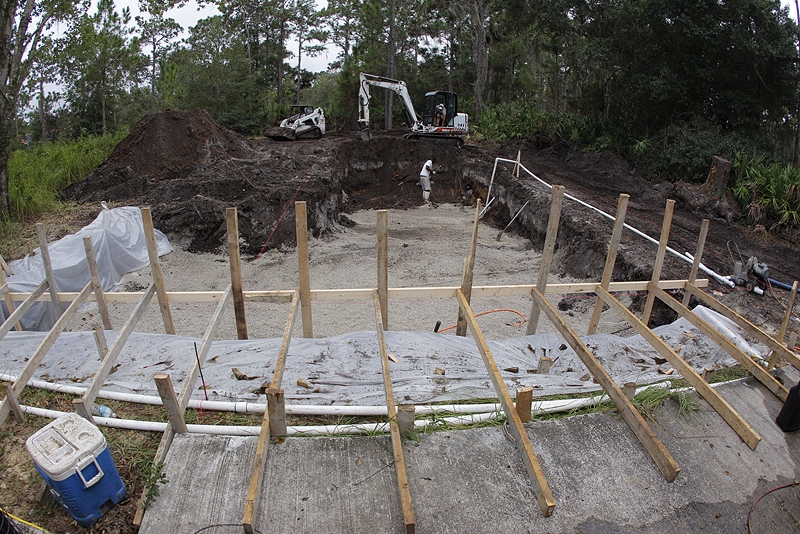
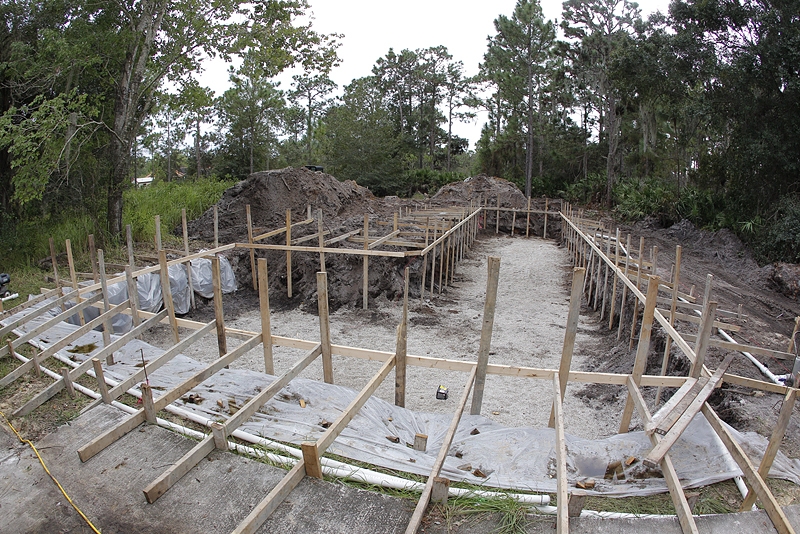
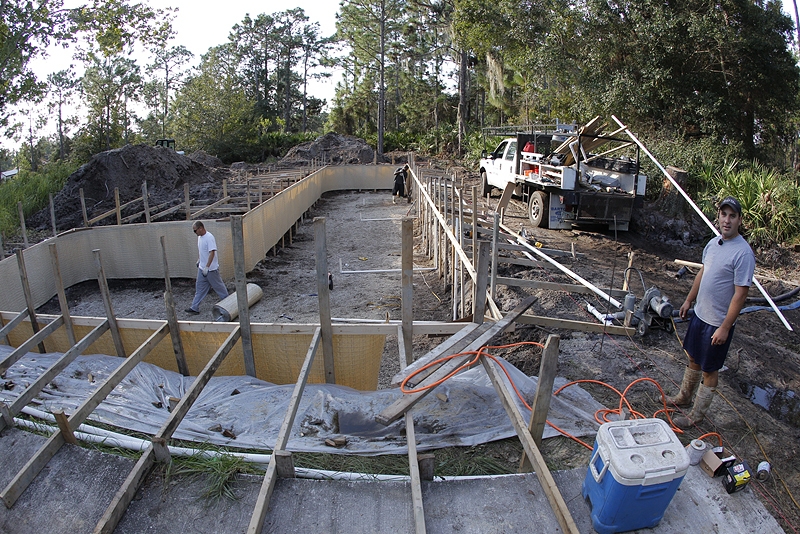
Beginning the framing work.
|
|
|
|
Foreman Patrick and crew building the side support walls. That’s Glenn on the left and Piggy in the back.
|
|
|
|
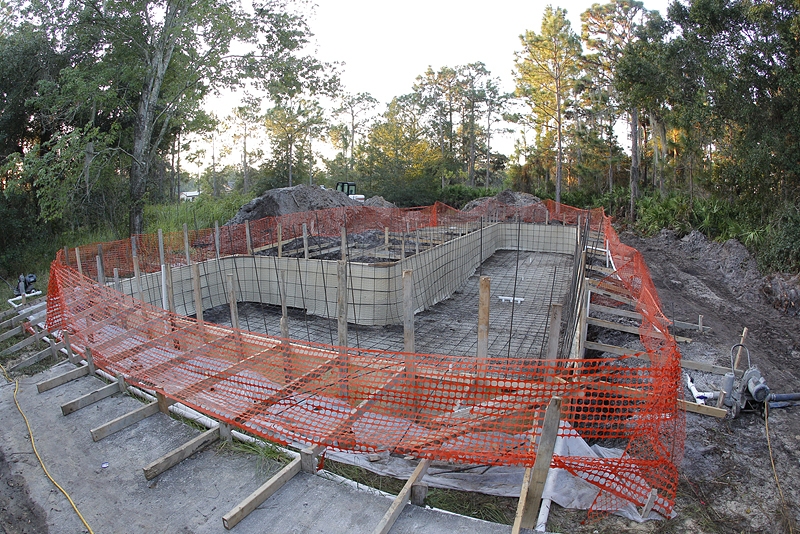
Side support walls and reinforced steel grid in place.
|
|
|
|
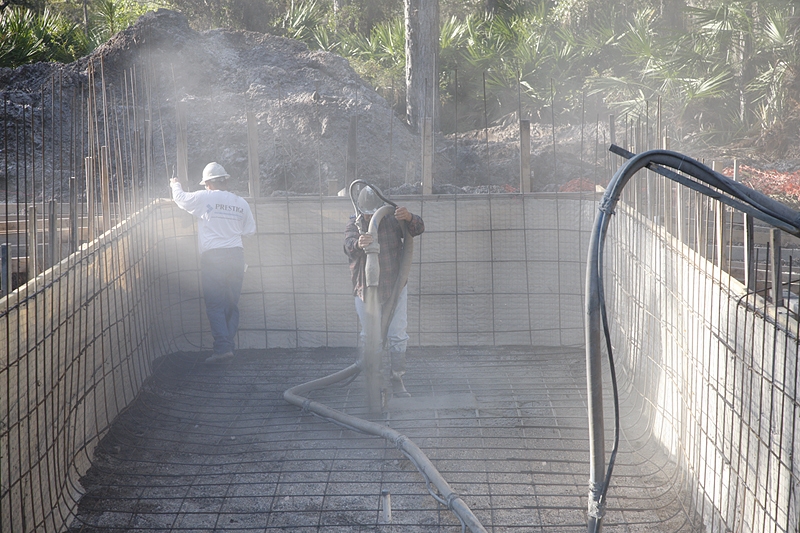
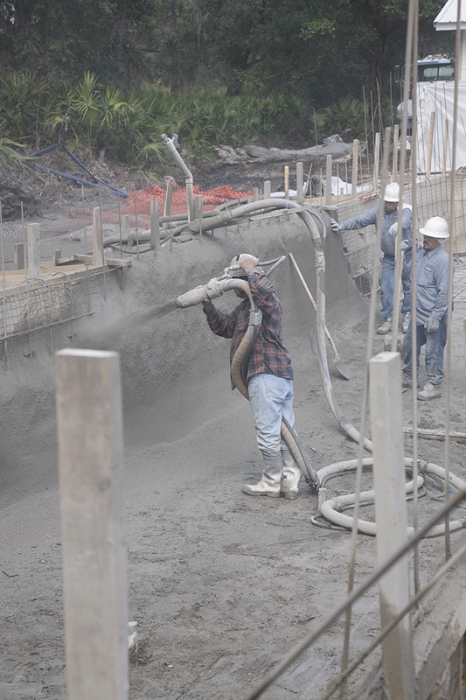
Applying gunnite to the bottom of the pool.
|
|
|
|
More floor work; note the roughed out steps in the kiddie pool corner.
|
|
|
|
Working towards perfection…
|
|
|
|
The supply truck hauled just about everything to the job site.
|
|
|
|
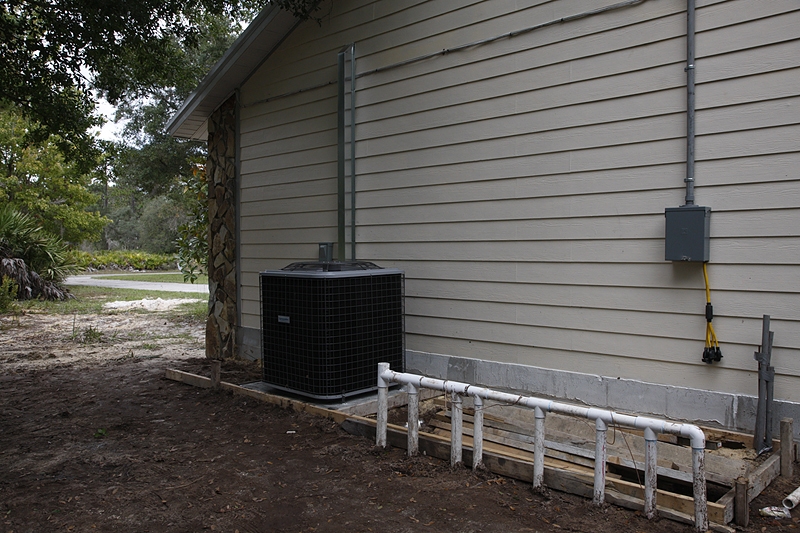
Relocating the home air conditioner compressor/condenser unit.
|
|
|
|
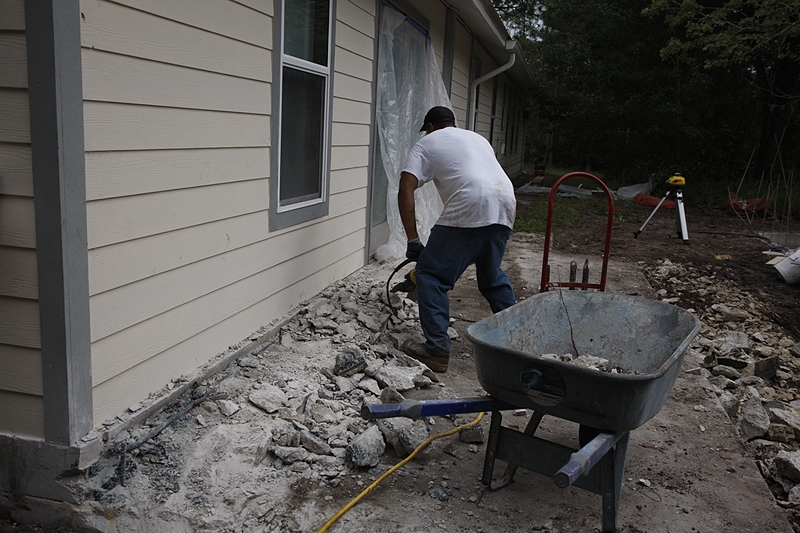
Destroying the old “new” patio. (I added two large rooms to my home last year, my new large office with the 60 inch flat screen and a large gallery room.)
|
|
|
|
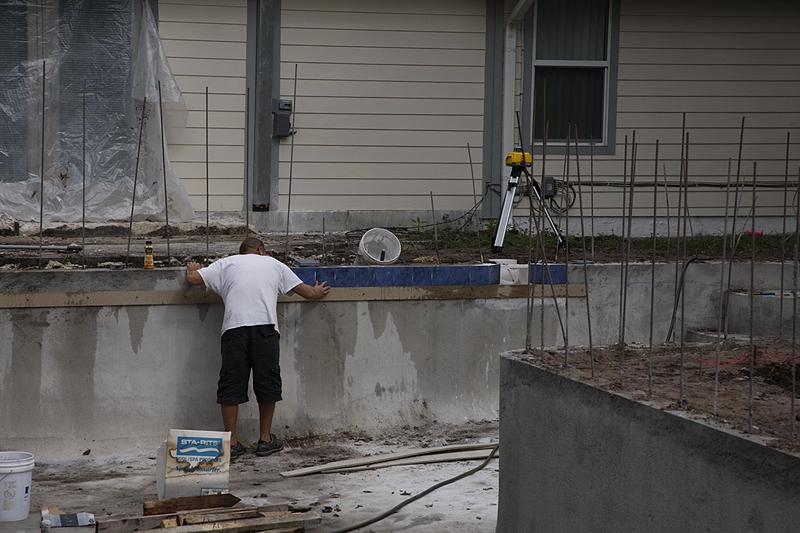
Installing the decorative blue tiling.
|
|
|
|
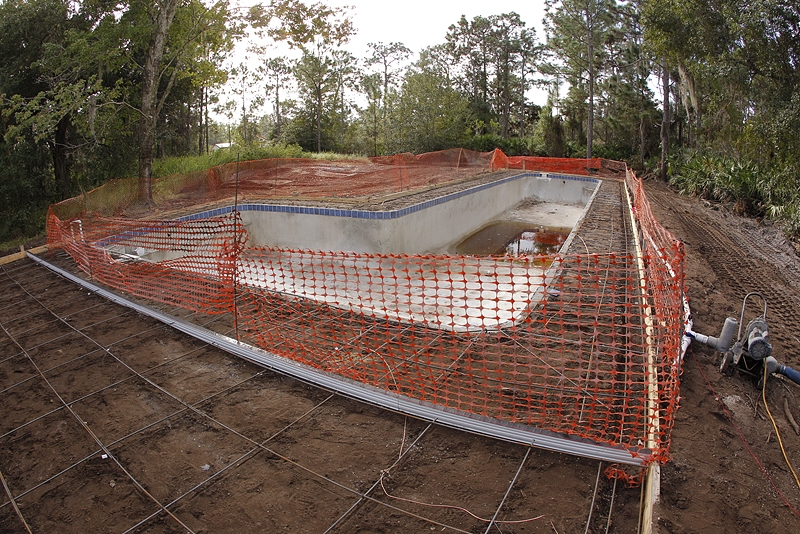
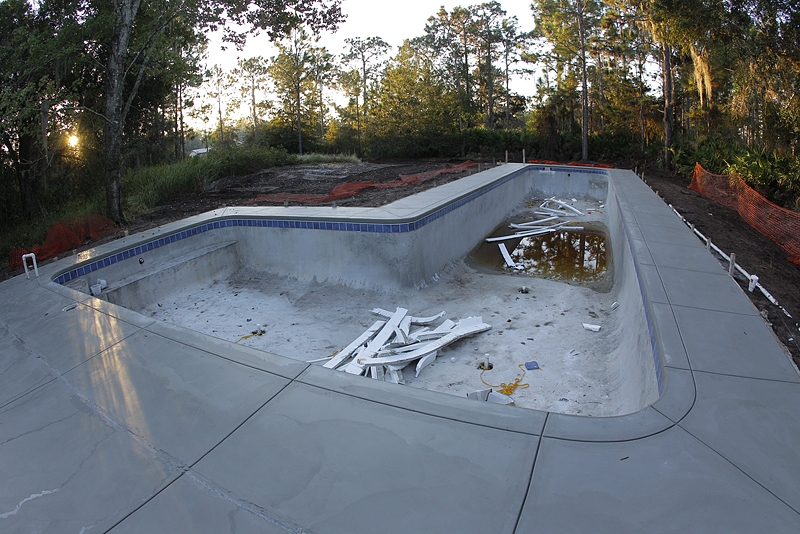
The completed, tiled pool shell ready for the deck to be poured.
|
|
|
|
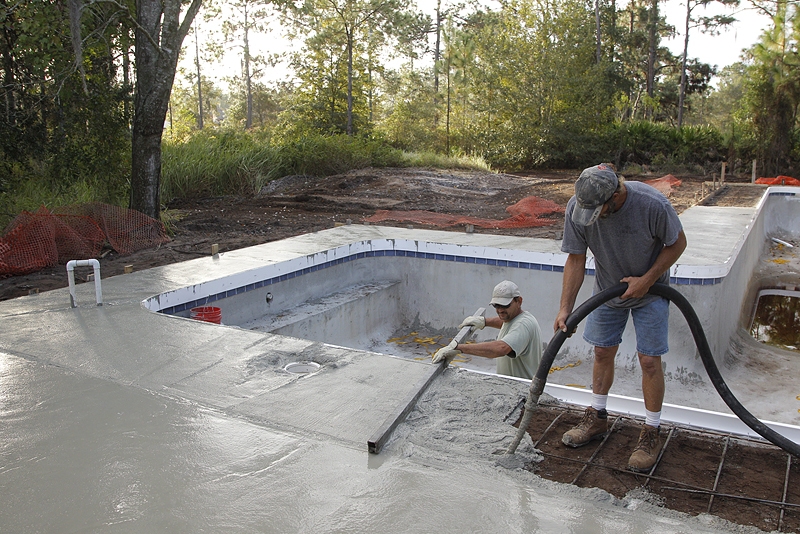
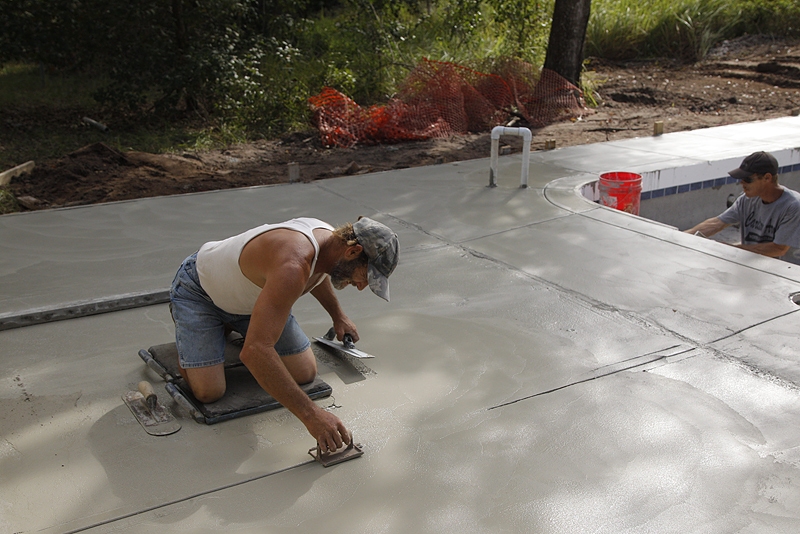
Finishing the deck. This crew–like the crews of all the other sub-contractors, settled only for perfection.
|
|
|
|
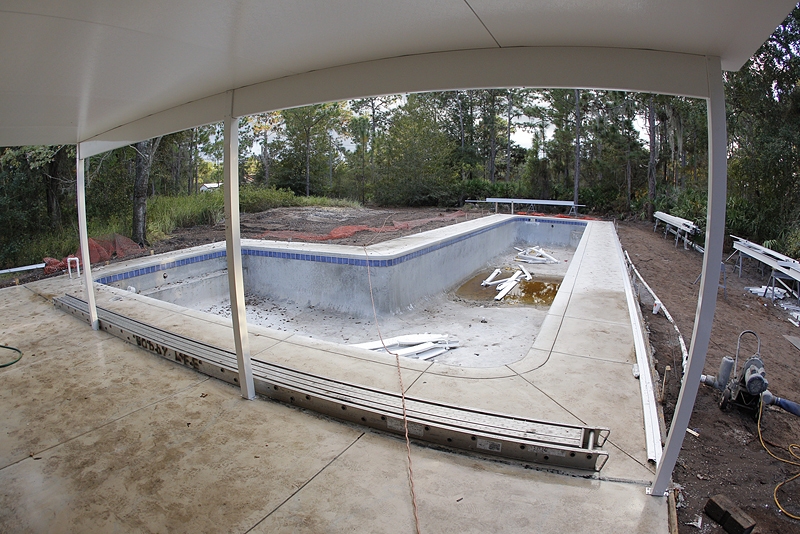
Framing for the screened-in pool enclosure completed.
|
|
|
|
The completed pool enclosure (with screening).
|
|
|
|
Applying the final blue plaster finish.
|
|
|
|
Pretty much complete but for the pool machinery and lots of clean-up work.
|
|
|
|
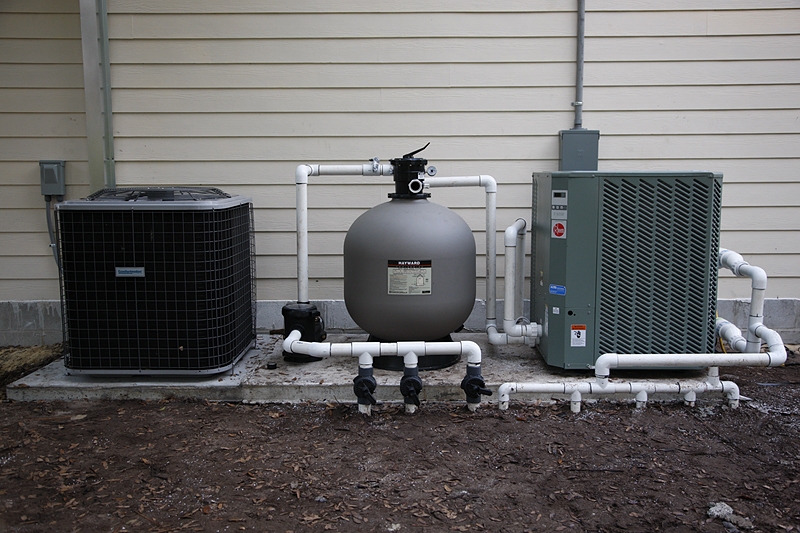
Heater/Chiller on the right, (saltwater) filtration system in the center.
|
|
|
|
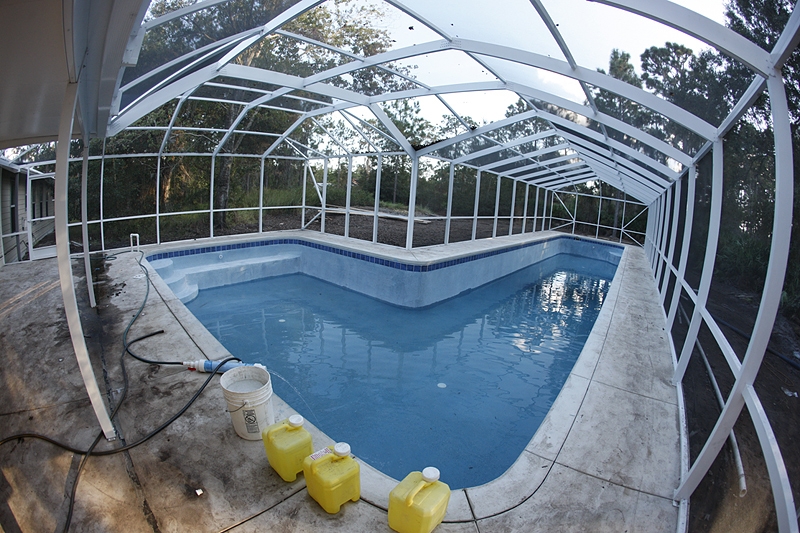
Adding that most necessary component: water.
|
|
|
|
The filled pool after clean-up with the non-skid decorative finish applied to the deck.
|
|
|
|
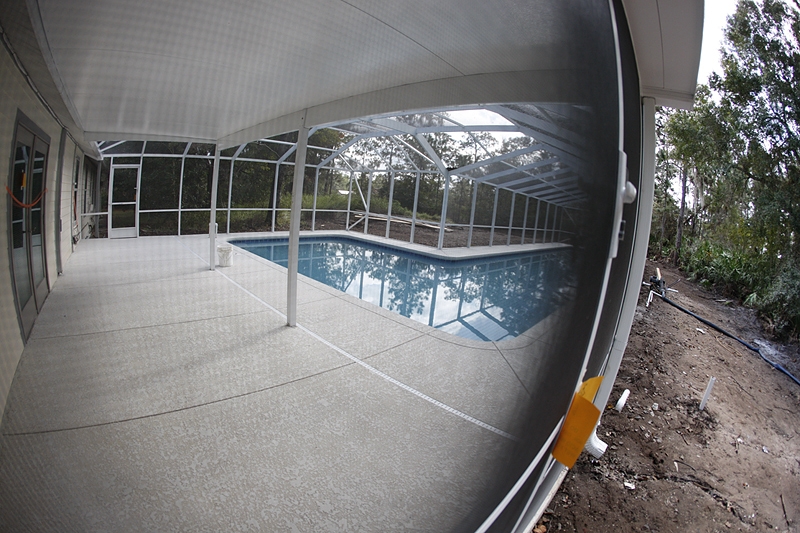
A view of the completed pool from just outside my office. The lap section is 60 feet long by 12 feet wide, 4 1/2 to five feet deep in the center of the lane. The shallower kiddie pool section for my four grandkids is 15 feet by 15 feet.
|
|
|
|
Looking back down the swim lane towards my home. My office is just inside the French doors that were suggested by Denise Ippoltio before the pool was even a dream.
|
|
|
|
A view of the kiddie pool section.
|
|
|
|
A fabulous job well done by all.
|
December 16th, 2011
|
|
|
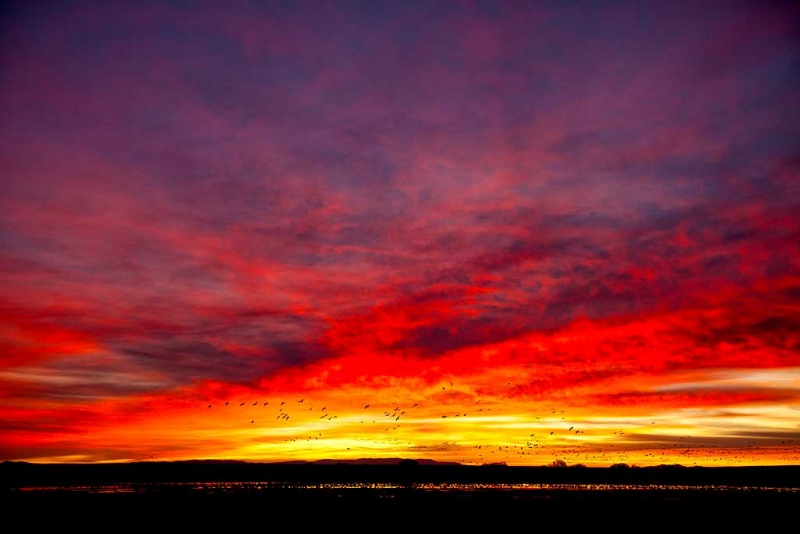
Snow Geese and pre-dawn sunrise colors: 6:41 am on 11/29/2011, Bosque del Apache NWR, San Antonio, NM. This image was created with the tripod-mounted Canon EF 16-35mm f/2.8L II USM Autofocus Lens (see the $170 Instant Rebate on this lens in Item 2 below) and the Canon EOS 5D Mark II Digital Camera. ISO 400. Center-weighted Average metering -1/3 stop: 1/200 sec. at f/4 in Av Mode.
The camera body was mounted on the Giottos MH 1302-655 (Tiny) BallHead via a Wimberley P-5 camera body plate. The ballhead sat atop the lightweight tripod that I have been looking for all of my life: the Gitzo GT1542T. A Double Bubble Level in the hot shoe ensured that the camera was square to the world. Rear Focus AI Servo AF release and recompose. (Rear focus is great for birdscapes and for landscapes.) Click here if you missed the Rear Focus Tutorial. For a greater appreciation of the image, click on the photo. Then click on the enlarged version to close it.
|
The Skinny on the Lightweight GITZO GT1542T 4-Section Traveler Tripod
For years folks who will never own a big lens have been begging for a stable lightweight tripod that will support their intermediate telephoto lenses and short zooms. Many simply opt to go with the 4.06 pound GT3530LS Tripod that I use every day with both my 800 and my 70-200 (or with one of the similar alternatives). For years I searched and searched without success for a lightweight tripod. I have just finished field testing the four section, 2.2 pound Gitzo GT 1542T Traveler tripod. The first time I set it up I was astounded at how stable it was (primarily due to the stiffness of the legs).
At present we have three in stock. They sell for $679.99, the MSRP, the manufacturer’s minimum suggested retail price. (We are not permitted to price them any lower at risk of losing our Gitzo dealership.) Shipping on phone orders is $15 by UPS Ground (signature required). The shipping rate on orders through the BAA On-Line Store varies depending on your choice of shipping method. Note: there is a $40 rebate in the form of a prepaid VISA card until Jan. 15, 2012 – U.S. only. Fill out the form that we include with each order, fill it out and mail it to Gitzo. You will receive your pre-paid VISA card in the mail.
$80 Instant Rebate
This just in!: there is an $80 instant rebate good only from now through 12/25/2011.
Two Uses for the GT1542T
I see two uses for the GT1542T:
One: For folks with intermediate telephoto lenses or those photographers who love macro and or scenic photography I see this lightweight gem as their everyday tripod (but only if they need the very light weight and pretty much only if they are sure they will never go to a big lens like one of the 400 f/2.8s or one of the 500 or 600mm f/4 lenses). For those folks I recommend the 3530 LS or one of the alternative models suggested here. Before purchasing a GT 1542T for any of the purposes mentioned above please read the important information below.
Two: For serious photographers who already own a 4 pound plus Gitzo tripod for their super-telephoto lenses the 1542 makes sense as a great second tripod for landscapes and macro and a great travel tripod. I first used mine on the 2011 Bosque IPT as a second tripod with the Giottos MH 1302-655 (“Tiny”) BallHead for landscapes with either the Canon 16-35mm f/2.8L IS II wide angle zoom lens or the circle/fisheye lens, the Canon EF 8-15mm f/4L Fisheye USM Fisheye Ultra-Wide Zoom Lens. I will be taking the tripod and the tiny ball head along on my two upcoming Southern Ocean trips: Antarctica, South Georgia, and the Falkland Islands. My plan is to carry the rig in (it is that small) or attached to my vest to use for landscape and circle images made at slow shutter speeds. I am gonna get back to the top of Salisbury Plains! BTW, I use a Wimberley P-5 camera body plate to mount the camera body (with a short lens attached) to the tiny ball head. It will also make a great macro trip as it goes so low. BTW, the 1542 is so stable that I could envision using it–with the Mongoose M3.6 on top–for a super-telephoto lens like the Canon 800mm or any of the 400 f/2.8s or one of the 500 or 600mm f/4 lenses in an emergency situation should a tripod disaster strike while you are traveling….
More about the GT1542T Tripod
As noted above, this 4-section tripod weighs only 2.2 pounds. Folded with the legs reversed the closed length of the 1542 is a bit less than 16 3/4 inches. This is amazing by any standard. The tripod comes with a center post. With the tripod legs spread normally and the center post fully extended the height is 58 1/2 inches. With the center post gone–see more on this great feature below–and the legs spread normally the height is 45 11/16th inches. With the center post gone and the legs spread to the low level setting the height of the tripod is 8 5/8ths inches. As you can see, the 1542 is quite versatile. The maximum rated load is 17.6 pounds so as I suggested above even a pro body and a super-telephoto lens will not get you over the max (that only in a pinch of course….)
The 1542 features G-locks. G-Lock is the new Gitzo leg locking system. The locking mechanism was completely redesigned in order to achieve a 20% increase in rigidity, faster operation and stronger, safer locking. G-Lock’s special design also provides a ‘gravity lock’ effect: the higher the load applied vertically to the leg, the stronger the lock. The Anti-Leg Rotation system allows the tripod to be opened in less than 15 seconds; simply loosen all of the twist locks at the same time and then pull the leg down and tighten the locks individually.
The rapid center column (centerpost) incorporates several great features. The locking collar makes it easy to adjust the column quickly and the post features an anti-rotation groove for improved stability. And the center column can easily be inverted for an alternative shooting angle or for low level macro work. (I’ve got to figure that one out….) There is a hook on the bottom of the centerpost; this built-in accessory allows you to hang a stabilizing weight (e.g. a full camera bag or a sandbag) from the bottom of the center column. This is great for stabilizing longer, heavier lenses or doing the same on uneven ground or in windy conditions.
Here is the deal with the eliminating the centerpost: a new feature allows you to remove the center column either to save weight or to get the camera closer to the ground. You use only the existing components; the upper disc with reversible 1/4′ – 3/8′ bolt and the column hook assembly. Remove the center post and fix the disk directly to the upper casting using the column hook. No tools are needed. I figured out how to do it without instructions in about 30 seconds….
There are two click-stop settings that you access via the leg lock tabs. There are stops for normal operation and for ground level work. Here’s a tip; it you try to pull out the leg tab and are unable too simple pull the leg in a fraction to release the tension on the stop.
Gitzo 6X is the most advanced carbon fiber tube in the market and guarantees structural strength, flexion rigidity and great vibration absorption properties. Despite the claims of other manufacturers, the performance of this multilayer design is unique and inimitable thanks to the advanced aerospace production technology and the exclusive inner structure. It is the highest density tube made of 100% top quality ultra thin (7μm) carbon fibers (a 28mm tube contains 1,500,000 carbon fibers).
Important Information
By now many of you have a question: Why buy a 3530 LS (or one of the similar alternatives) if the lightweight 1542 can support an 800mm lens with a Mark ? Easy answer. Though the 1542 is great for intermediate telephoto lenses (and workable with big glass in an absolute emergency) the smaller lighter GT 1542T simply does not offer the strength and rigidity that is needed for every day super-telephoto photography. In addition and most importantly there are tripod height issues in spite of the accurately stated “with the tripod legs spread normally and the center post fully extended the height is 58 1/2 inches.” As you might have already figured out it is the “and the center post fully extended” that is the catch, the tradeoff for those almost 2 full missing pounds. Let’s take a look at some images of the tripod and you will quickly get the picture.
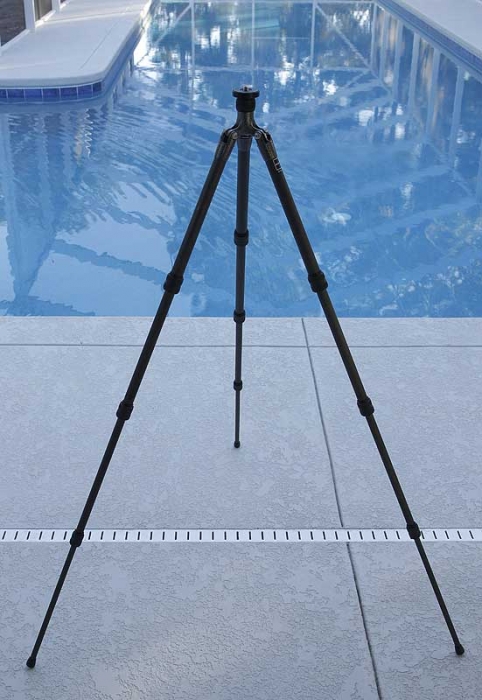
Above is the 1542 with the centerpost eliminated. The distance from the ground to the top of the tripod’s support platform is 45 11/16th inches. That is about 3 feet, 8 5/8ths inches. In other words, not very tall. If I ever needed to put a big lens on the 1542 I would never extend the centerpost a single inch, in fact, I would almost always work with the tripod lowered considerably.
For folks who purchase the 1542 as their workaday tripod for intermediate telephoto lenses, I would recommend that they do not extend the centerpost as a matter of course and that they lower the tripod for greater stability whenever possibly. Now here is some great news; for folks with “only” intermediate telephoto lenses for bird and wildlife photography getting as low as possible is a huge plus as it reduces the angle of declination to the subject (see in ABPII). This will yield more intimate images that feature more pleasing backgrounds (because the background is effectively moved farther from the subject by getting lower). All good.
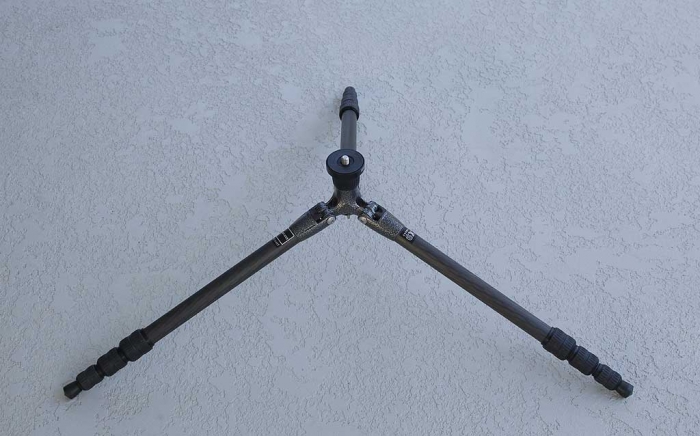
Above is the tripod set up for ground level work. As shown the distance from the ground to the top of the tripod’s support platform is 8 5/8ths inches. By releasing two of the three legs tabs it is possible to get several inches lower than that. I wish that they had added a third leg lock that would allow you to position the legs in the nearly-flat position. Remember that your tripod head will–depending on your choice–add considerably to the height of the tripod (however you have it set up).
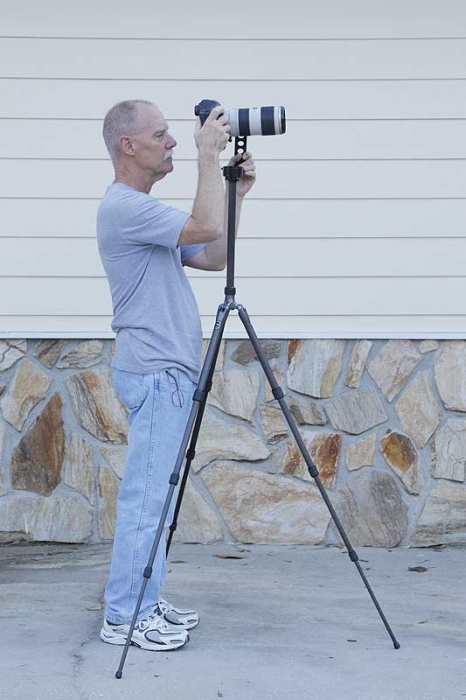
Above is the GT 1542T with the legs extended and locked in the normal position, the centerpost fully extended, and a Mongoose M3.6 atop it. Jim Litzenberg, my trusty right-hand man, is behind the tripod. My 70-200mm f/2.8L IS lens with the EOS 1D Mark IV is mounted via the Wimberley P-20 plate. Jim is about 5 feet, 8 inches tall. As you can see, the tripod as set up is a bit too tall for Jim. I am 5 feet, 11 inches tall (used to be six feet even…) and the 1542 as shown above is a bit too tall for me also.
Now here’s the rub and you’d best read this carefully: with the centerpost fully extended stability is greatly reduced; you have turned a tripod into a top-heavy monopod. There will be hell to pay in a breeze and as implied above, I would almost never work with the centerpost extended when using lenses of three or more pounds. Furthermore and most importantly, the huge drawback of all lightweight tripods is–as mentioned above–that in many situations they will be terribly top heavy. Before I continue let’s examine some basic tripod information: if you leave your tripod unattended with a rig mounted on it it will topple over at some point. It is never a matter of if but of when…. Even if you leave your rig for just a few seconds there is a good chance that a moderate breeze might knock it over. And if someone in the vicinity just brushes against it it will hit the ground. Unless you are working on soft ground or are extremely lucky your camera or lens or both will be damaged. On several occasions I have seen both a lens and a camera body totaled as a result of a single mishap.
The rig as seen in the image immediately above is hugely top heavy. And even with lighter gear mounted it will always be top heavy. Especially so with the centerpost extended. It will be plenty top-heavy even with the centerpost lowered or eliminated. This information goes for everyone in all situations whether they are using the 1542 as their main tripod for an intermediate telephoto lens or as a second, macro, or scenic tripod. The only exceptions would be when the tripod is set up for low level or for ground level operation. When standing or kneeling always remember to spread the legs of the tripod until you hit the stops; this provides maximum stability.
If you purchase this tripod for any purpose never leave it unattended. If you must walk away it is best to have a friend keep a hand on it or to simply squeeze the legs together and place the tripod carefully on the ground. It cannot fall from there. Here is what I tell IPT folks: if you leave your tripod unattended and someone knocks it over it is 100% your fault. Period. Now and forever.
Don’t get me wrong, the GITZO GT1542T 4-Section Traveler Tripod is a fabulous piece of gear. It weighs almost two pounds less than the 3530 LS that I use every day. And whether or not your shoulders feel like mine do right now–I swam too, too much and too often in my new pool, two pounds is a ton. If after reading the important material above you would like to purchase one we would be more than glad to take your order and get it to you quickly.
Remember
The BAA On-Line Store sells only items that I use and those that I have field tested. We do sell a few items that have been used and recommended by friends (like the Gitzo GT3541 XLS tripod for super-tall folks like Todd Gustafson). And we do–by popular demand –carry a very few items that I do not use or recommend (but those are always of the highest quality). We will not sell you junk and as above, we will honestly and accurately evaluate every product and we will teach you how best to use it. Do let me know if you find the information above at any other on-line store…..
December 15th, 2011
|
|
|
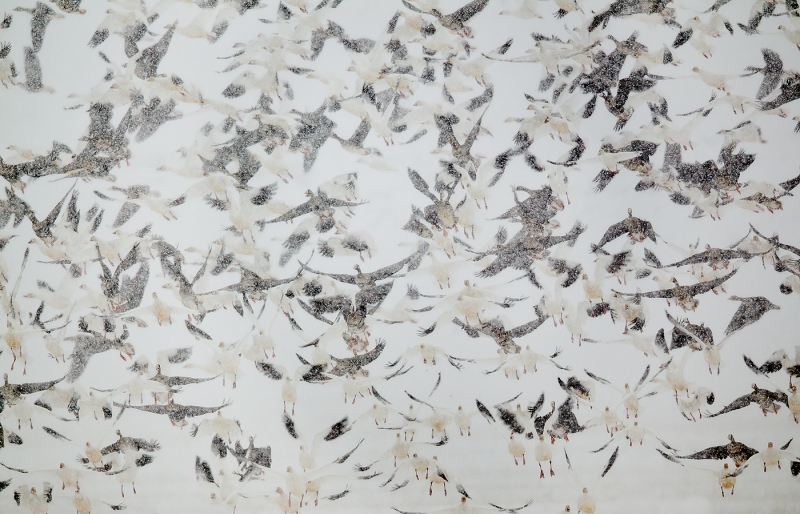
“Salt and Pepper Snow Geese.” This image of both light and dark (White-fronted) geese blasting off was created at Klamath NWR, OR with the Canon 800mm f/5.L IS lens and the Canon EOS-1D Mark IV professional digital camera body. ISO 400. Evaluative metering +2 1/3 stops: 1/640 sec. at f/6.3 in Tv Mode. For a greater appreciation of the image above, click on the photo to view a larger version. Then click on the image or the X in the corner to close it.
|
“Images for Your Critique” Revelations
On June 16, 2011 I posted “For Your Critique: Image #1.” It proved to be a popular post as it garnered 46 comments. (I followed that post up the next day with “My Comments on Your Comments/Image #1.”) In all there were 20 images in the series that ended just the other day with the Northern Gannet image in “For Your Critique: Image #20.”
Each image in the series included language to this effect: This image is presented for your critique; feel free to praise it or rip it to shreds. Would you keep it or delete it? Let us know why either way, what you like or what you hate. What would you have done differently?
This was always followed by the promise to post two major revelations when the series was complete. That time is now.
Revelation #1
Despite the fact that virtually every image in the series was trashed by someone, and often by many, the twenty images in the series were my entries into the 2011 Veolia BBC Wildlife Photographer of the Year (WPOTY) Competition. I felt that each had contest-winning potential. I will be sharing my thoughts on the 19 remaining images in future blog posts.
Revelation #2
When I posted the first image in the series, Image #1 above, “Salt and Pepper Snowstorm,” I had just learned that the image was Highly Commended in the Creative Visions category of the competition. I was thrilled and honored. (Click here for proof :))
A Sampling of the Positive Comments
“It reminds me of prehistoric cave art. Beautiful, in an abstract way.”
“I think it is very special and it reminds me of a Japanese print. I agree with David P that it is a beautiful abstract.”
“I like this one because it doesn’t look like a photograph. I looks almost like it’s done with rubber stamps.Or ink strokes. Amazing what can be done with just a camera and a lens.”
“I really like it, tho’ I’ll have to study it a bit longer to figure out exactly why. One thing seems obvious to me: It’s not a blur; look at the well-defined snow flakes, some of the wing tips, and legs; and all the birds in lower right corner are sharp. The blurry effect seems to come from the snow obscuring the bodies behind it. At least part of the appeal is the muted color, which accents the black-&-white impression. Photography works in many different ways, and a “painterly” photo isn’t bad just because it doesn’t look like what we normally think of as a photo.”
“There is a balance in this image between chaos and order that’s very visually intriguing, and that makes the image work on multiple levels. Interesting chaos such as this is hard to come by.”
The Negative Comments
Not everyone who commented on the image agreed with the judges; here–in part–are excerpts from some of the comments that were posted:
“I might not delete it but neither would I call it one I would want to showcase.”
(Note: I am glad that I like the image enough not to follow that advice!)
“Personally I would delete it… This photo just seems washed out and almost looks like …. something that I tried to clean off a wall. I get the pattern and repitition but think that it’s too irregular to work well in this instance. I like nearly every photo you post, but this one just doesn’t do it for me.”
(Note: it is important that folks form there own opinions. But I am glad that I did not scrape this one off of my wall.)
“I’m also not a big fan of blurs, although I do find some of them visually pleasing. For this shot, it would be an instant decision to delete.”
(Note: this is not a blur. I like folks that are decisive as in “insta-delete!”)
“I would probably delete or modify. There isn’t anything contrasty to catch my eye or hold my eye.”
(Note: well, it caught the eyes of a few influential folks at least.)
“… but to me it is not photography.”
(Note: Well, that comments leaves me quite confused as I can assure all that it is a digital photograph….)
“Can’t find order out of such Chaos. Delete it.”
(Note: I find the somewhat ordered Chaos to be a big plus.)
“I don’t like it. I feel it is so busy, it makes me feel nervous. Someone, a very well known and talented bird photographer, once told me that you should never have wings that cross one another. Since then I have tried never to have that happen. This image definitely breaks that rule. Sorry that I dislike this image but that’s the way it is.”
(Note: No need to be sorry if you do not like an image. But you gotta love being mis-quoted and misunderstood at the same time.)
“I would probably delete image. Actually I would never have taken it except by accident.
(Note: it was not an accident :))
And finally, “I would DELETE. It does nothing for me. Just a boring image. Nothing to get excited about.”
(Note: If only the judges had realized that….)
My Thoughts
First off, I always get excited when one of my images is chosen to be honored by WPOTY judges. 🙂 Was I insulted by so many negative comments? Not at all. Amused would be a better word. I am a lover of what is (see The Work of Byron Katie here.) And I strive to never take things personally. Of the 46 comments there were many positive comments. I strive not to get too excited by those either. All of the comments are appreciated. I am fine with those who hate non-traditional nature photography images, out of the box if you would, and I am fine with those who love them as I do.
Are there any lessons to be learned? Probably the most important would be: “If you decide to enter a contest it is a good idea to study the results of previous competitions very carefully.” In recent years the BBC has moved away from what we used to think of as traditional nature photography towards images that many would consider way out of the box. Like “Salt and Pepper Snowstorm.”
A comment made by Linda Jones seemed a perfect way to end this blog post:
“It is interesting to see the different views of this photo! I guess that beauty lies in the eyes of the beholder. From the artist side of me, I see a workable abstract; on a very large textured canvas it would be very provacative! I like subtle. Not everything has to be glowing, oversaturated and perfect. Breaking the rules is pure bravery, with excellent results! It means you have a brain that can think and create. Photography becomes pretty boring if you choose to go by all the rules.”
Wildlife Photographer of the Year: Portfolio 21
I must say that this year’s Portfolio is the most stunning edition ever. Though they are understandably out of stock, you can order a copy here from Amazon. You will be helping support the Blog and the Bulletins to the tune of a few pennies and will be getting to see some amazing photographs a lot larger and more dramatically than on the web where they are pretty much presented tiny…. Once the book is back in stock I will be discussing various images on the blog (as promised previously).
Shopper’s Guide
Below is a list of the gear used to create the image above. Thanks a stack to all who have used the Shopper’s Guide links to purchase their gear as a thank you for all the free information that we bring you on the Blog and in the Bulletins. Before you purchase anything be sure to check out the advice in our Shopper’s Guide.
Canon 800mm f/5.L IS lens. Right now this is my all time favorite super-telephoto lens.
Canon EOS-1D Mark IV professional digital camera body. My two Mark IVs are my workhorse digital camera bodies.
And from the BAA On-line Store:
LensCoats. I have a LensCoat on each of my big lenses to protect them from nicks and thus increase their re-sales value. All my big lens LensCoat stuff is in Hardwood Snow pattern.
LegCoat Tripod Leg Covers. I have four tripods active and each has a Hardwood Snow LegCoat on it to help prevent further damage to my tender shoulders 🙂
Gitzo GT3530LS Tripod. This one will last you a lifetime.
Mongoose M3.6 Tripod Head. Right now this is the best tripod head around for use with lenses that weigh less than 9 pounds. For heavier lenses, check out the Wimberley V2 head.
4th Generation Design CR-80 Low Replacement foot for the Canon 800.. When using the 800 on a Mongoose as I do, replacing the lens foot with this accessory lets the lens sit like a dog whether pointed up or down and prevents wind-blown spinning of your lens on breezy days by centering the lens directly over the tripod.
Double Bubble Level. You will find one in my camera’s hot shoe whenever I am not using flash.
Be sure to check out our camera body User’s Guides here.
The Lens Align Mark II. I use the Lens Align Mark II pretty much religiously to micro-adjust all of my gear an average of once a month and always before a major trip. Enjoy our free comprehensive tutorial here.
Canon EOS-1D Mark IV User’s Guide. Learn to use your Mark IV the way that I use mine. Also available for the 7D and the Mark III here.
December 13th, 2011
|
|
|
Red-tailed Hawk, immature perched in cottonwood tree, Bosque del Apache NWR, San Antonio, NM. From the recently concluded Bosque IPT. This image was created with the tripod-mounted Canon 800mm f/5.6L IS lens, the 1.4X III TC, and the EOS-1D Mark IV. ISO 400. Evaluative metering +1 2/3 stops: 1/125 sec. at f/9 in Av Mode.
Central Sensor (by necessity) Rear Focus/AI Servo AF and recompose. Click here if you missed the Rear Focus Tutorial. Lens/TC/camera body Micro-adjustment: +4.
For a greater appreciation of the image, click on the photo. Then click on the enlarged version to close it.
|
My Thoughts on the Red-tailed Hawk Images
In comments on the December 8th post, Sun or No Sun: Which Red-tail Image Do You Prefer? , the reactions were about as I expected: by a margin of about two to one folks preferred the light in the image created when a cloud covered the sun. Me too. I addition I liked the composition in that image as the bird was tucked a bit more into the corner of the frame. And I liked the head angle better on that one too. All that in spite of the nice dark cloud background in the image made while the sun was out and the higher contrast.
I hope that folks realized the importance of choosing the perfect perspective for this image, first by positioning my rental car and then by positioning my tripod. Had I moved either left or right the bird’s head would not have been placed so nicely between the small twigs that serve as a frame.
I am usually a fan of sweet, low angled sunlight. But in this case, with the light slightly off-angle, the shaded parts of the bird–as many folks noted in their comments–were rendered without detail. (Remember, my choice of perspective was made in an effort to frame the bird’s head with the twigs; I could not simply choose to work right down sun angle….) I am, however, 100% positive that I could create a very nice optimized file from the image made with the sun on the bird. But so far I have optimized only my favorite, the one made while the sun was obscured. See more on the image optimization process below.
|
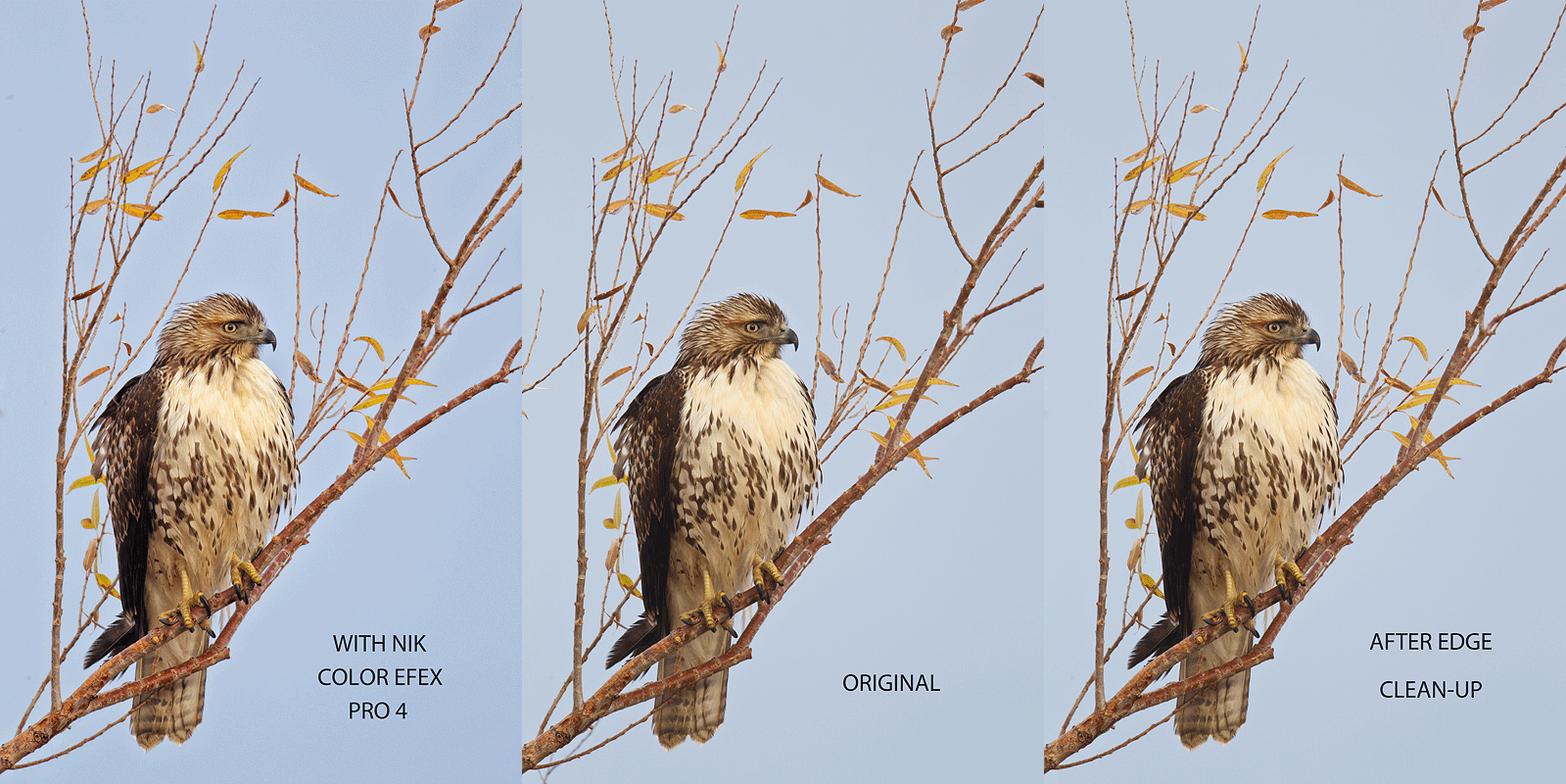
I eliminated the twigs on the left frame edge using a variety of techniques described in detail in Digital Basics (including Protect and Defend Cloning, the Clone Stamp Tool, the Patch Tool, and a series of small Quick Masks). In NIK Color Efex Pro 4 I used the Tonal Contrast filter at about 60% opacity and the White Neutralizer filter at about 80% Opacity. Remember, you can save 15% on all NIK products by clicking here and entering BAA in the Promo Code box at check-out. Then hit Apply to see your savings. If you doubt me (could that be possible :)?), you can download a trial copy that will work for 15 days and allow you to create full sized images.
NIK Creative Efex Collection
NIK recently announced the availability of a special limited production bundle of 3 of their most popular products, Color Efex Pro 4, Silver Efex Pro 2, and HDR Efex Pro. You can save more than $200 on the bundle which is available only through NIK affiliates. If you would like additional info, please e-mail with the words “Creative Efex Collection” in the Subject line. If you have been on the fence about purchasing the plug-ins mentioned above this is a great chance to save some significant bucks.
Shopper’s Guide
Below is a list of the gear used to create the images talked about in this blog post. Thanks a stack to all who have used the Shopper’s Guide links to purchase their gear as a thank you for all the free information that we bring you on the Blog and in the Bulletins. Before you purchase anything be sure to check out the advice in our Shopper’s Guide.
Canon 800mm f/5.L IS lens. Right now this is my all time favorite super-telephoto lens.
Canon 1.4X III Teleconverter. Designed to work best with the new Series II super-telephoto lenses.
Canon EOS-1D Mark IV professional digital camera body. My two Mark IVs are my workhorse digital camera bodies.
And from the BAA On-line Store:
LensCoats. I have a LensCoat on each of my big lenses to protect them from nicks and thus increase their re-sales value. All my big lens LensCoat stuff is in Hardwood Snow pattern.
LegCoat Tripod Leg Covers. I have four tripods active and each has a Hardwood Snow LegCoat on it to help prevent further damage to my tender shoulders 🙂
Gitzo GT3530LS Tripod. This one will last you a lifetime.
Mongoose M3.6 Tripod Head. Right now this is the best tripod head around for use with lenses that weigh less than 9 pounds. For heavier lenses, check out the Wimberley V2 head.
CR-80 Replacement Foot for Canon 800. When using the 800 on a Mongoose as I do, replacing the lens foot with this accessory lets the lens sit like a dog whether pointed up or down and prevents wind-blown spinning of your lens on breezy days by centering the lens directly over the tripod.
Double Bubble Level. You will find one in my camera’s hot shoe whenever I am not using flash.
Be sure to check out our camera body User’s Guides here.
BLUBB. I personally designed the Big Lens Ultimate BeanBag and have it made in the good old US of A. This large beanbag is ideal when working with super-telephoto lenses from your vehicle. Beware of cheaper and much inferior copycat rip-offs; you get what you pay for just like your Daddy said.
The Lens Align Mark II. I use the Lens Align Mark II pretty much religiously to micro-adjust all of my gear an average of once a month and always before a major trip. Enjoy our free comprehensive tutorial here.
Canon EOS-1D Mark IV User’s Guide. Learn to use your Mark IV the way that I use mine. Also available for the 7D and the Mark III here.
December 11th, 2011 Thanks to BPN Member Melissa Groo for Her Question on Inspirational Websites
In the comments on the “For Your Critique: Image #19 blog post here, BPN member Melissa Groo wrote, “I really like the abstract quality of this photo, and the colors together are wonderful. By the way, you know how you write above how one of the best ways to learn and to grow are to, among other things, visit the web sites of the world’s best photographers? Would love it if you would take a moment to list your top 5 or so. Thanks for all you do and share, Artie.”
Thank you Melissa for your excellent question. You really got me thinking…. Here goes:
If you pick the name of a photographer that you know or know of and do a Google search, you will likely find a website with their images on it. It can be as simple as that. Some sites, however, are more conducive to viewing great images than others. Many–especially bird and wildlife photographers–have websites that serve as stock photography sites that are designed to facilitate image sales. You might have to search through thousands of images to find a few gems. Others have poorly designed web sites that feature outstanding images that are hard to enjoy because of the surroundings.
Prompted by Melissa’s question I scouted around a bit and came up with a few of my many favorites. Those are listed below in no particular order. But do not be fooled or limited by my list: there are tons of great images out there waiting to inspire you; all that you need to do is find them!
Inspirational Photography Websites
|
|
|
Flowers floating on water. Image copyright and courtesy of John Shaw.
|
John Shaw
The soft-spoken John Shaw is both a colleague and a friend. You can find a link to his galleries here. His “Variety” gallery contains a diversified collection of great images. Recently I have been perusing his Antarctica and Japan galleries as inspiration for my upcoming trips. John was an early inspiration and though he does fewer birds and flowers now than he used to, most every one of his images features the clean look that has served as the basis for my style for nearly three decades now. In addition, the man is a master of composition and image design and understands and uses light as well as anyone. Thanks John!
|
|
|
Water level Common Eider drake. Image copyright and courtesy of Ben Hall.
|
Ben Hall
Ben is a young British professional photographer who is not very well known on this side of the pond. For shame. You can see some of his best work here: There are lots of absolutely killer images in every gallery. My favorites are Animal Portraits, Animals in Motion, and Landscapes. He has some amazing duck images and some superb blurred tree photos. Ben’s galleries are representative of the dozens if not hundreds of extremely skilled but largely unheralded pro photographers who share their work on the web. If you find any gems like Ben let me know via e-mail; I am always looking to learn and be inspired.
|
|
|
Velvet-fronted Nuthatch. Image copyright and courtesy of BPN member Kiran Poonacha. Kiran is a skilled nature photographer from India. You can see his post of this image in BPN’s Avian forum here.
|
BirdPhotographer’s.Net
I spend lots of time in the Avian and the Out-of-the-Box forums at BPN. And on occasion I visit the Macro and Flora, the Wildlife, and the Landscapes, Cityscapes, and Travel forums. On average two or three of every twenty images in every forum have contest winning potential. I have spent thousands of hours on BPN critiquing the images of both members and participants (though I tend to concentrate on the work posted by our members). If you think that thousands of hours is an exaggeration consider the fact that I have posted about 850 of my images and made an additional 20,000 comments, most of those to images posted by others. Most of my comments are lengthy and often include reposts. My point is that by looking at and considering the work of others I am always learning and often being inspired.
|
|
|
Image copyright and courtesy of Clemens van der Werf. I was asleep at the swtich (looking for my 77mm circular polarizer) when Clemens created this one….
|
Clemens van der Werf
Clemens is a both an IPT client and a good friend. He is representative of the many folks who have improved their skills to professional levels by attending multiple IPTs, by applying what they have learned, and by working very hard. (This list also includes L. F. Van Landingham, Alejandro Furman, Jean-Luc Vaillant, Jim Heupel, Patrick Sparkman, and James Fuller among others.) You can see Clemens’ work here. Hold your cursor over the word “Portfolio” and choose a gallery from the drop-down menu. Be warned: except for Clemens’ Travel, Golden Retrievers, and Sailing galleries all of his collections are IPT advertisements. You will quickly see that though Clemens has been inspired by my style he often uses the principles that he has learned to create work that is new and different. And in doing so he often inspires his mentor.
Andy Rouse
Andy Rouse is different; he often gets his cameras and lenses in spots where others have feared to go. He has an eye for dramatic light, new perspectives, and unique image designs. With many BBC-honored images he is one of the five prestigious judges in the BIRDS AS ART 1st International Bird Photography Competition. You can learn more about Andy here and check out many of his great images by clicking on the Gallery Navigation links here.
|
|
|
Jeffrey Pine, Lundy Canyon, Inyo National Forest, CA. Image copyright and courtesy of Michael Frye.
|
Micheal Frye
Michael is a friend and professional photographer specializing in landscapes and nature. You can see some of his best work here. My favorite Michael Frye portfolios are New Work, Yosemite, Eastern Sierra, and High Key. Be sure to read his “Artist’s Statement” here; he has lots of interesting things to say about photography and light. As Michael photographs few if any birds you might be wondering why I am including him here; photography is about light and personal vision and image design and those concepts are not restricted to a single genre of our craft or our art. One of the things that I like best about visiting Michael’s site is that each image is accompanied by an educational caption.
|
|
|
“The Last Supper.” Amazingly, this scene was photographed underwater. Yes, underwater. Image copyright and courtesy of Howard Schatz.
|
Howard Schatz
Howard Schatz has been a hero of mine since the day I met him and was introduced to his work. To learn about his remarkable accomplishments in photography, click here. Click here to visit his portfolio page and then prepare to be stunned by the diversity of subject matter and techniques, by the colors and shapes, and by Howard’s great vision, creativity, and execution.
A Few More
In the lists above and below I am sure that I have slighted more than a few friends and professional colleagues by their omission. But the list is only intended to open your eyes to all the great photography available on the web and give you a clue as to how you can access and be inspired by it. The short list that follows barely scratches the suface:
Todd Gustafson: galleries. Todd is one of the premier safari photographers of our time; his fast reflexes and quick eye allow him to create images of animals and birds in action that others can only dream of.
Jon Conforth: images. You’ve likely never heard of this natural history generalist; his landscapes are the strength of his collection.
Tim Fitzharris (website) and Rod Planck (galleries) both inspired me early on. Both have moved away from wildlife and birds towards landscapes in recent years.
For both Art Wolfe (print gallery) and Frans Lanting (fine art prints) no introductory remarks are needed.
Denise Ippolito (home page). An informational blog packed with soft colors, flowers and birds, filters and effects, Photoshop, and unbridled creativity.
Carl R Sams II & Jean Stoick (home page) of “Stranger in the Woods” fame are a professional photographer team who sold countless prints at art shows over the past decades. All of the eagles in Carl’s spectacular gallery were made when he came to Homer as my guest years ago.
George Lepp (home page). Though know for his technical expertise you will find plenty of inspiration in George’s images.
Paul Mckenzie (website). Paul (along with wife Paveena) are aspiring professionals who travel extensively. Paul is equally skilled above and below the water. You will marvel at the images in his galleries and on his blog.
The List is Never-Ending
An internet connection and a Google search will bring you countless treasures. Those treasures can thrill you, motivate you, educate you, and inspire you. Any of these names will work: Joe and Mary Ann McDonald, Stephen Johnson, Gary Braasch, James Shadle, Darrell Gulin, James Nachtwey, David Doubilet, Walter Iooss, Tony Sweet, Moose Peterson, Anup Shah, Tom Mangelsen, Lewis Kemper, Jack Dykinga, Jim Zipp, Eric Meola, Brutus Östling, Robert O’Toole, Jari Peltomäki, Jim Brandenburg, Paul Bowen, Norbert Rosing, Jennifer, Wu, Adam Jones, the late Fritz Pölking, Rick Sammon, and Bence Máté to name a few. This list is nowhere near complete; rest assured that I have left out the names of some very talented friends and some of the world’s best and best known nature photographers. Please feel free leave a comment suggesting a name (along with a website if you wish) of any folks whose work inspires you. And let us know if you have been inspired by any of those on my list.
Earn Free Contest Entries and Support both the Bulletins and the Blog by making all your B & H purchases here.
More and more folks are earning multiple contest entries with their B & H purchases. See here for details on that. Eleven great categories, 34 winning and honored images, and prize pools valued in excess of $20,000. Click here to visit the competition home page.
Shopper’s Guide
Thanks a stack to all who have used the B&H product links to purchase their gear as a thank you for all the free information that we bring you on the Blog and in the Bulletins. Before you purchase anything be sure to check out the advice in our Shopper’s Guide.
December 9th, 2011
|
|
|
Northern Gannet landing with nesting material, Quebec, Canada. Created with the handheld Canon 400mm f/4 IS DO lens and the EOS-1D Mark III (since replaced by the EOS-1D Mark IV). ISO 400. Evaluative metering +2 1/3 stops off the grey sky: 1/1600 sec. at f/8 set manually.
Central Sensor AI Servo AF on the shutter button; this image was made before I switched to rear focus full time. Click here if you missed the Rear Focus Tutorial. Lens/TC/camera body Micro-adjustment: +4. For a greater appreciation of the image, click on the photo. Then click on the enlarged version to close it.
|
For Your Critique: Image #20
The image is presented for your critique; feel free to praise it or rip it to shreds. Would you keep it or delete it? Is the clipped tail a deal breaker for you? Let us know why either way, what you like or what you hate. What would you have done differently?
This is the last in the 20-image series. In a few days I will post the two major revelations.
One of the very best ways to grow as a photographer is to look at as many good images as possible. I do that often in books, by checking out contest result web sites, by critiquing images on Bird Photographers.Net (BPN), by visiting the web sites of the world’s best photographers, and during image critiques and by encouraging image sharing on our BAA Instructional Photo-Tours (IPTs). More on this subject soon.
Earn Free Contest Entries and Support both the Bulletins and the Blog by making all your B & H purchases here.
More and more folks are earning multiple contest entries with their B & H purchases. See here for details on that. Eleven great categories, 34 winning and honored images, and prize pools valued in excess of $20,000. Click here to visit the competition home page.
Shopper’s Guide
Below is a list of the gear that James used to create the images in today’s blog post. Thanks a stack to all who have used the Shopper’s Guide links to purchase their gear as a thank you for all the free information that we bring you on the Blog and in the Bulletins. Before you purchase anything be sure to check out the advice in our Shopper’s Guide.
Canon 400mm f/4 IS DO lens. This fantastic, relatively light 400mm f/4 lens that can be hand held is ideal for birds in flight and when photographing from all types of water craft.
Canon EOS-1D Mark IV professional digital camera body. My two Mark IVs are my workhorse digital camera bodies.
And from the BAA On-line Store:
LensCoats. I have a LensCoat on each of my big lenses to protect them from nicks and thus increase their re-sales value. All my big lens LensCoat stuff is in Hardwood Snow pattern.
The Lens Align Mark II. I use the Lens Align Mark II pretty much religiously to micro-adjust all of my gear an average of once a month and always before a major trip. Enjoy our free comprehensive tutorial here.
Canon EOS-1D Mark IV User’s Guide. Learn to use your Mark IV the way that I use mine. Also available for the 7D and the Mark III here.
|
|
|
Cropped to a square as suggested in various comments. I believe that the image is stronger this way. Thanks Patty et al.
|
December 8th, 2011
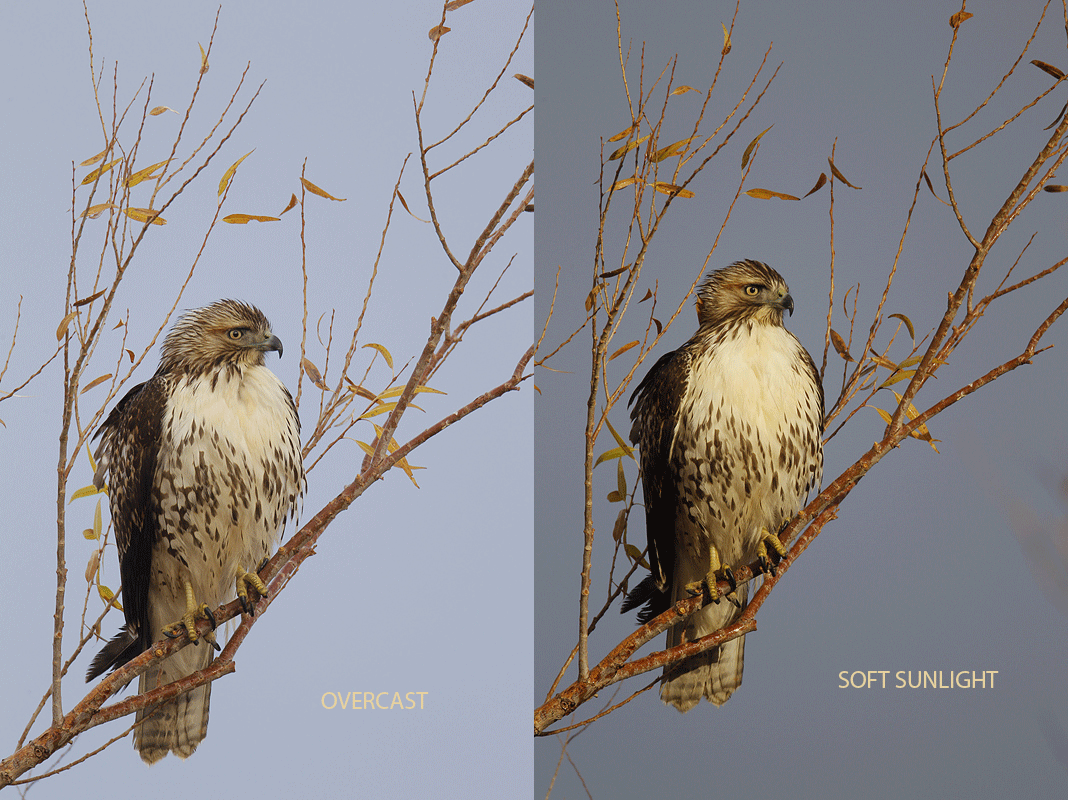
Red-tailed Hawk, immature perched in cottonwood tree, Bosque del Apache NWR, San Antonio, NM. From the recently concluded Bosque IPT.
The in the sun image was created with the Canon 800mm f/5.6L IS lens, the 1.4X III TC, and the EOS-1D Mark IV with the lens resting on the car window. (I did not have a BLUBB on the trip. :() ISO 400. Evaluative metering +2/3 stop: 1/400 sec. at f/8 in Tv mode (to guarantee a minimum shutter speed of 1/400 sec. with the lens balanced somewhat precariously on the car window.)
The overcast image was created with the tripod-mounted Canon 800mm f/5.6L IS lens, the 1.4X III TC, and the EOS-1D Mark IV. ISO 400. Evaluative metering +1 2/3 stops: 1/125 sec. at f/9 in Av Mode.
For each: Central Sensor (by necessity) Rear Focus/AI Servo AF and recompose. Click here if you missed the Rear Focus Tutorial. Lens/TC/camera body Micro-adjustment: +4.
|
Sun or No Sun: Which Red-tail Image Do You Prefer?
I can thank an upset stomach for this image. Heck, you gotta learn to love what is. (Byron Katie: TheWork.com–who would you be without your story?) I needed a porta-potti so I left Robert with the group and made my way around the Farm Loop Road. Several porta-potties were removed from their traditional locations at the Chupadera and Farm Decks this year…. In any case, as I headed back to the north end of the refuge I noticed some crows hassling a raptor, the young red-tail in the images above. I carefully positioned the car, raised the window a bit, positioned the lens, and made a few images. The bird seemed relaxed in spite of the crows so I got out of the vehicle and set the lens up on the 3530 LS tripod with the Mongoose M3.6 on it to reduce the angle of inclination just a bit. The bird sat for a while and then flew off for to look for an early lunch.
Do note the difference in exposure compensation settings in the two images. If you do not understand them, see the Exposure Simplified section in ABP II; remember, your meter is smarter when the sun is out than when the sun is in. Note also that I felt more comfortable stopping down a bit with the lens on the tripod then I did with the lens resting on the raised window. If the lens had been on the much more stable BLUBB I would have confidently stopped down for the sunny image.
Which Do You Prefer?
Which light do you prefer, the sun peeking through or the complete overcast? Please indicate “sunny” or “overcast.” And be sure to let us know what you like abou the light. Please remember that the JPEGs in the GIF represent the unprocessed images and that I am not asking which image you prefer, but which light you prefer. In the follow-up blog post I will share the optimized version of my favorite. Sorry, no clues. 🙂
BAA On-Line Store Issues Continue
The problems with the new server and the BAA On-Line Store continue today, 12/8/11. You can learn more here. (BTW, I arrived safely on Long Island just after noon thanks to the great folks at Southwest Airlines.) The store was up for a while this morning and then crashed again. Jim was able to get into the back end but was unable to process the orders. We are working hard to rectify the problem and apologize for any inconvenience. Obviously we too wish that we were not having these unavoidable problems. 🙂
Earn Free Contest Entries and Support both the Bulletins and the Blog by making all your B & H purchases here.
More and more folks are earning multiple contest entries with their B & H purchases. See here for details on that. Eleven great categories, 34 winning and honored images, and prize pools valued in excess of $20,000. Click here to visit the competition home page.
If you have problems when you try to place an order you have the option of calling Jim at 863-692-0906 or trying again in a few hours. Thanks all for your patience.
Shopper’s Guide
Below is a list of the gear used to create the images in today’s blog post. Thanks a stack to all who have used the Shopper’s Guide links to purchase their gear as a thank you for all the free information that we bring you on the Blog and in the Bulletins. Before you purchase anything be sure to check out the advice in our Shopper’s Guide.
Canon 800mm f/5.L IS lens. Right now this is my all time favorite super-telephoto lens.
Canon 1.4X III Teleconverter. Designed to work best with the new Series II super-telephoto lenses.
Canon EOS-1D Mark IV professional digital camera body. My two Mark IVs are my workhorse digital camera bodies.
And from the BAA On-line Store:
LensCoats. I have a LensCoat on each of my big lenses to protect them from nicks and thus increase their re-sales value. All my big lens LensCoat stuff is in Hardwood Snow pattern.
LegCoat Tripod Leg Covers. I have four tripods active and each has a Hardwood Snow LegCoat on it to help prevent further damage to my tender shoulders 🙂
Gitzo GT3530LS Tripod. This one will last you a lifetime.
Mongoose M3.6 Tripod Head. Right now this is the best tripod head around for use with lenses that weigh less than 9 pounds. For heavier lenses, check out the Wimberley V2 head.
CR-80 Replacement Foot for Canon 800. When using the 800 on a Mongoose as I do, replacing the lens foot with this accessory lets the lens sit like a dog whether pointed up or down and prevents wind-blown spinning of your lens on breezy days by centering the lens directly over the tripod.
Double Bubble Level. You will find one in my camera’s hot shoe whenever I am not using flash.
Be sure to check out our camera body User’s Guides here.
BLUBB. I personally designed the Big Lens Ultimate BeanBag and have it made in the good old US of A. This large beanbag is ideal when working with super-telephoto lenses from your vehicle. Beware of cheaper and much inferior copycat rip-offs; you get what you pay for just like your Daddy said.
The Lens Align Mark II. I use the Lens Align Mark II pretty much religiously to micro-adjust all of my gear an average of once a month and always before a major trip. Enjoy our free comprehensive tutorial here.
Canon EOS-1D Mark IV User’s Guide. Learn to use your Mark IV the way that I use mine. Also available for the 7D and the Mark III here.
December 7th, 2011
|
|
|
This Snow Goose pre-dawn fly-out image was created on the morning of 11/24/11 at 6:37 am on the recently concluded Bosque IPT with the Canon 70-200mm f/2.8L IS II lens, the 1.4X III TC (handheld at 160mm) with the Canon EOS-1D Mark IV. ISO 100. Evaluative metering +1 stop: 1/13 sec. at f/13 set manually. Lens/TC/camera body Micro-adjustment: -8.
Central Sensor/Rear Focus/AI Servo AF active at the moment of exposure. To enjoy viewing a larger sized image, click on the photo. Then click on the enlarged version to close it.
|
BAA ON-LINE STORE ISSUES
In an effort to provide even better service to our customers, that would be you thanks, we recently moved to an upgraded server. Things have not gone as smoothly as we had hoped. There are compatibility issues involving the check-out procedures and the new server. We have been working hard for three days to resolve these issues and do appreciate your patience. Many have been frustrated by being unable to check out. Others more recently have simply found the store inaccessible. We are sorry for any inconvenience we may have caused.
We would be more than glad to process your phone orders and to apply any BAA “On-Line Store only” discounts. If you would like to place a phone order, please call us at 863-692-0906. If the line is busy or if there is no answer, please leave your name, a call back number, and the best time to call. Thanks to the many who have called to place their orders for either the Nikon dSLR Guide or the Bosque Site Guide.
|
|
|
This Snow Goose pre-dawn fly-in image was created on the morning of 11/23/11 at 6:34 am on the recently concluded Bosque IPT with the Canon 70-200mm f/2.8L IS II lens, the 1.4X III TC (handheld at 110mm) with the Canon EOS-1D Mark IV. ISO 50. Evaluative metering +2/3 stop: 1/8 sec. at f/11 set manually. Lens/TC/camera body Micro-adjustment: -8.
Central Sensor/Rear Focus/AI Servo AF active at the moment of exposure. To enjoy viewing a larger sized image, click on the photo. Then click on the enlarged version to close it.
|
Shopper’s Guide
Below is a list of the gear used to create the images in today’s blog post. Thanks a stack to all who have used the Shopper’s Guide links to purchase their gear as a thank you for all the free information that we bring you on the Blog and in the Bulletins. Before you purchase anything be sure to check out the advice in our Shopper’s Guide.
Canon 70-200mm f/2.8L IS II lens. Man, I am loving this lens on my shoulder with the 2X III teleconverter. I also use it a lot with the 1.4X III TC.
Canon 1.4X III Teleconverter. Designed to work best with the new Series II super-telephoto lenses.
Canon EOS-1D Mark IV professional digital camera body. My two Mark IVs are my workhorse digital camera bodies.
And from the BAA On-line Store:
The Lens Align Mark II. I use the Lens Align Mark II pretty much religiously to micro-adjust all of my gear an average of once a month and always before a major trip. Enjoy our free comprehensive tutorial here.
Canon EOS-1D Mark IV User’s Guide. Learn to use your Mark IV the way that I use mine. Also available for the 7D and the Mark III here.
December 6th, 2011
|
|
|
Sandhill Crane in flight, Bosque del Apache NWR, San Antonio, NM Image copyright 2010: Robert O’Toole Photography. This image was created with the Nikon AF-S Nikkor 500mm f/4G ED VR lens, the Nikon TC-14E 1.4x II and the Nikon D300S. ISO 400. Manual metering at zero: 1/1250 sec. at f/5.6 in Manual mode.
In Robert O’Toole’s Nikon DSLR User’s Guide for the D300s/D700/D3S/d3x he shares with you the AF and metering settings that he uses to create sharp, perfectly exposed images like the one above! In addition he details his entire camera set-up from soup to nuts. Learn to use your Nikon camera like a top professional.
|
Nikon DSLR User’s Guide for the D300s/D700/D3S/d3x
(Note: Most of what is in the Guide applies also to the D80, the D90, and the D300.)
Well, it took long enough–at least two years from concept to the final PDF–but Robert O’Toole has out-done himself by creating a masterpiece user’s guide for Nikon dSLR cameras. When I took my first look at the finished document all that I could say was “Wow! Many Nikon folks show up on IPTs knowing little about properly setting up their cameras. “How do you see the histogram?’ “Don’t know….” “Can you set your camera so that we see the RGB histogram and blinkies in the same frame? “I once saw it done but don’t know how….” For me, it has long seemed that operating a Nikon camera required degrees in Physics, Language, and Logic. With Robert’s new guide those days are over.
You will learn when, how, and why to work in Manual mode and when, why, and how to work in one of the auto-modes (by setting exposure compensation). You will learn the various camera control options and custom settings so that you can fine-tune your camera to suit your shooting style. You will learn how and why many top pros works at higher ISOs than the regular Joes. And you will learn how Robert uses both Auto-ISO Control and Exposure Compensation while working in Manual Mode to routinely create perfectly exposed action photographs. He explains exactly how he sets the important camera controls. And why. Those include Release Mode, Focus Mode, and Rear Button Focus. You will learn how to set your camera and your flash to create flash blurs. You will learn which AF Mode Robert uses 90% of the time and how he sets it up using Menu/Custom Settings Menu.
He will teach you how and why to set a variety of buttons and dials. How and why to use Live View. About the only metering mode he uses. How, why, and when to switch AF points with the Multi-Selector. How and why to use the often-overlooked Info Button and the often over-looked My Menu feature. Then he takes you through the Camera Menus while dealing with the hows and whys of how he sets up the important items.
If you use Nikon gear then you simply cannot live without Robert’s great new guide. You owe it to yourself to make your life easier, to learn to make better images, and to learn exactly how a top professional does things. The Nikon DSLR User’s Guide is a comprehensive 45-page PDF that is sent by e-mail. There are dozens and dozens of diagrams and screen captures and even a few photos to illustrate key points. Your best bet is to save $2 by ordering your Nikon dSLR User’s Guide through the BAA On-line Store here for only $30. Or you can purchase your copy for $32 by calling BIRDS AS ART at 863-692-0906 with your credit card in hand, by sending a PayPal for $32 to us at birdsasart@att.net, or by sending a check for $32 made out to “Arthur Morris” to us at Arthur Morris/BIRDS AS ART, PO Box 7245, Indian Lake Estates, FL. If by check be sure to include your e-mail address. (Please remember: no sharing digital files please :))
COMMENTS ON THE NIKON dSLR USER’S GUIDE
By e-mail from Andy Hays, Chicago, IL: Robert, Your Nikon treatise was a revelation to me. I am a life-long and fanatic birder, but a notoriously inept, point and shoot photographer; you have moved me to new plateau. Nikon should buy your work product. Not only that the company should make you a board member and a Japanese citizen! I could not have learned from their instruction manual what I learned from your Nikon dSLR Guide. Well done. Andy Hays
By e-mail from Edward Delaney, Ireland: Dear Robert, I can honestly say that I have learned more from your Nikon guide than from all of my other books on the Nikon system put together. Thanks for a wonderful guide. Edward
By e-mail from Yannick Bulicaut: Robert, Your Nikon dSLR Guide is truly useful; even though I’ve been using using SLR’s for almost 40 years–and probably because of that–I never took the time to check all the cool controls that Robert highlights with precision, the view finder focus for instance. The guide is well worth the 30 dollars since I know I could never have sat through the entire Nikon D3S camera body manual! Thanks, Yannick
By e-mail from Dennis Kirland: Hi Robert, I just finished going through your Nikon dSLR User’s Guide and wanted to thank you. It is very well written, clear and concise. I learned more than I thought I would. Excellent job! I mostly photograph static scenes, but I will try your suggestions on 51 point 3D Dynamic AF and see how I like it. I also changed the settings to activate the AF-ON button for AF instead of the shutter button. That’s going to take some getting used to!
Anyway, the guide has lots of great tips! Thanks, Dennis
By e-mail from Raleigh & Beret Harmon: Robert, Thank you for writing the “Nikon DSLR User’s Guide,” It is well written, clear and in a word… great! It has made me rethink my entire approach to my camera. I have long been an admirer of your colleagues Art Morris and recently Dennise Ippolito and have often thought, how great it would be to have someone like them who was a Nikon person and who would have a web site with great information focused on Nikon. Please send me the link to your site. Thank you again and keep up the great work. Raleigh & Beret Harmon
You can learn more about Robert here.
|
|
|
Bald Eagle Striking, near Homer, AK. Image courtesy of and copyright 2010: Robert O’Toole Photography. Sigma 150-500mm f/5-6.3 DG OS HSM APO Autofocus Lens for Nikon handheld at 350mm with the Nikon D700. ISO 400. Evaluative metering at zero: 1/1600 sec. at f/8 in Manual mode.
Image copyright Robert O’Toole Photography. Purchasing Robert’s new Nikon DSLR User’s Guide will not guarantee that you will make images as good as the one above but you will learn how to get the most out of your gear for nature and action photography. (Sports photographers take note.) Or, purchase the guide and join us on most IPTs to get personal lessons from Robert!
|
Earn Free Contest Entries and Support both the Bulletins and the Blog by making all your B & H purchases here.
More and more folks are earning multiple contest entries with their B & H purchases. See here for details on that. Eleven great categories, 34 winning and honored images, and prize pools valued in excess of $20,000. Click here to visit the competition home page.
Shopper’s Guide
Below is a list of the gear mentioned in this blog post. Thanks a stack to all who have used the Shopper’s Guide links to purchase their gear as a thank you for all the free information that we bring you on the Blog and in the Bulletins. Before you purchase anything be sure to check out the advice in our Shopper’s Guide.
Nikon AF-S Nikkor 500mm f/4G ED VR lensThis is Robert’s workhorse telephoto lens. It is rare that they are in stock anywhere….
Sigma 150-500mm f/5-6.3 DG OS HSM APO Autofocus Lens for Canon. This is the Canon version of one of Robert’s favorite Sigma lenses.
Nikon TC-14E 1.4x II A very sharp 1.4X teleconverter and again, an item that can be very hard to find in stock.
Nikon D700. Robert travels with both a D700 body and a D300S body. The D700 is Robert’s full frame format (FX) Nikon digital camera body.
Nikon D300S. Robert travels with both a D700 body and a D300S body. The D300S is Robert’s 1.5x crop factor (DX) Nikon digital camera body.
December 5th, 2011
|
|
|
Sandhill Crane in flight, Bosque del Apache NWR, San Antonio, NM. From the recently concluded Bosque IPT. This image was created with the tripod-mounted Canon 800mm f/5.6L IS lens, the 1.4X III TC, and the EOS-1D Mark IV. ISO 400. Evaluative metering +1/3 stop off the grasses: 1/800 sec. at f/8 set manually.
Central Sensor (by necessity) Rear Focus/AI Servo AF active at the moment of exposure. Click here if you missed the Rear Focus Tutorial. Lens/TC/camera body Micro-adjustment: +4. For a greater appreciation of the image, click on the photo. Then click on the enlarged version to close it.
|
(Unusual?) Flight Photography Cropping Options
Most times when I clip off the end of a wing or wings so severely that repairing the missing primaries is impossible, I simply delete the images. But there are times when I think, “Jeez, that is so sharp with so much detail, there must be a way to do something with it.” So following the principles detailed in the Advanced Composition and Image Design section in The Art of Bird Photography II (ABP: 916 pages on CD only), and following my own advice from the same source: “cut don’t clip,” I hit C for the Crop Tool for all of the images presented in this post and went to work. For the image above a quasi pano-crop worked best. Note that rather than clipping the primaries I chose to cut them dramatically while cropping from the top and the bottom. Having the eye wind up in the upper right corner worked very well.
|
|
|
Snow Goose, adult braking hard, Bosque del Apache NWR, San Antonio, NM. From the recently concluded Bosque IPT. This image was created with the tripod-mounted Canon 800mm f/5.6L IS lens, the 1.4X III TC, and the EOS-1D Mark IV. ISO 400. Evaluative metering +1/3 stop off the grasses: 1/1600 sec. at f/8 set manually.
Central Sensor (by necessity) Rear Focus/AI Servo AF active at the moment of exposure. Click here if you missed the Rear Focus Tutorial. Lens/TC/camera body Micro-adjustment: +4. For a greater appreciation of the image, click on the photo. Then click on the enlarged version to close it.
|
With the image above it would have been possible to repair the wing tips as I barely clipped the primaries top and left. That, however, would have been a lot of work and adding the needed canvas would have made the task that much more difficult and time consuming. So I opted to crop from all sides in order to wind up with a balanced image that showed more detail. Again, note that “cut don’t clip” was the best road to follow.
|
|
|
Sandhill Crane, immature landing, Bosque del Apache NWR, San Antonio, NW. From the recently concluded Bosque IPT. This image was created on the morning of 11/23/2011 with the tripod-mounted Canon 800mm f/5.6L IS lens and the EOS-1D Mark IV. ISO 400. Evaluative metering +1/3 stop off the grasses: 1/1600 sec. at f/6.3 set manually.
Central Sensor/AI Servo Rear Focus active at the moment of exposure. Click here if you missed the Rear Focus Tutorial. Lens/camera body Micro-adjustment: +2. For a greater appreciation of the image, click on the photo. Then click on the enlarged version to close it.
|
With the legs well forward and the great sharpness in the image above there was no way I was deleting this one because of the clipped primaries on the far wing so I took a bit off the top, cropped from the bottom, and then Quick Masked out the backs of the two birds in the bottom of the frame.
|
|
|
Snow Goose, immature landing, Bosque del Apache NWR, San Antonio, NW. From the recently concluded Bosque IPT. This image was created on the morning of 11/18/2011 with the tripod-mounted Canon 800mm f/5.6L IS lens and the EOS-1D Mark IV. ISO 640. Evaluative metering +1 1/3 stops off the low blue sky: 1/1000 sec. at f/5.6 set manually.
Central Sensor/AI Servo Rear Focus active at the moment of exposure. Click here if you missed the Rear Focus Tutorial. Lens/camera body Micro-adjustment: +2. For a greater appreciation of the image, click on the photo. Then click on the enlarged version to close it.
|
In the image above I loved the sharpness and the super detail afforded by the tight framing. By checking out the original capture below you can better understand the thought processes that go into making these unusual crops successfully.
Share Your Thoughts
I invite you to leave a comment and to share your thoughts on these unusual crops. Do they all work for you? Do you have a faveorite? Would you have done anything different? I do like all of them :).
BOSQUE del APACHE 2012 IPT DATES ANNOUNCED
BOSQUE del APACHE 2012 IPT: “The Complete Bosque Experience.” NOV 21-27, 2012. 7-FULL DAYS: $3299. Introductory Slide program: 6:30 pm on 11/20. Limit: 12/Openings: 10.
Tens of thousand of Snow Geese, 10,000 Sandhill Cranes, ducks including point-blank American Wigeon and Wood Duck, amazing sunrises, sunsets, and blast-offs. Live, eat, and breathe photography with one of (if not the) world’s premier photographic educators at one of his very favorite locations on the planet. Top-notch Photoshop instruction. Next year will make 18 consecutive Novembers at Bosque for me. Nobody knows the place better than I do. Join us to learn to think like a pro, to recognize situations and to anticipate them based on the weather, especially the light and the wind direction. Every time we make a move we will let you know why. When you head home applying what you learned will prove to be invaluable.
Earn Free Contest Entries and Support both the Bulletins and the Blog by making all your B & H purchases here.
More and more folks are earning multiple contest entries with their B & H purchases. See here for details on that. Eleven great categories, 34 winning and honored images, and prize pools valued in excess of $20,000. Click here to visit the competition home page.
Shopper’s Guide
Below is a list of the gear used to create the image in today’s blog post. Thanks a stack to all who have used the Shopper’s Guide links to purchase their gear as a thank you for all the free information that we bring you on the Blog and in the Bulletins. Before you purchase anything be sure to check out the advice in our Shopper’s Guide.
Canon 800mm f/5.L IS lens. Right now this is my all time favorite super-telephoto lens.
Canon 1.4X III Teleconverter. Designed to work best with the new Series II super-telephoto lenses.
Canon EOS-1D Mark IV professional digital camera body. My two Mark IVs are my workhorse digital camera bodies.
And from the BAA On-line Store:
LensCoats. I have a LensCoat on each of my big lenses to protect them from nicks and thus increase their re-sales value. All my big lens LensCoat stuff is in Hardwood Snow pattern.
LegCoat Tripod Leg Covers. I have four tripods active and each has a Hardwood Snow LegCoat on it to help prevent further damage to my tender shoulders 🙂
Gitzo GT3530LS Tripod. This one will last you a lifetime.
Mongoose M3.6 Tripod Head. Right now this is the best tripod head around for use with lenses that weigh less than 9 pounds. For heavier lenses, check out the Wimberley V2 head.
CR-80 Replacement Foot for Canon 800. When using the 800 on a Mongoose as I do, replacing the lens foot with this accessory lets the lens sit like a dog whether pointed up or down and prevents wind-blown spinning of your lens on breezy days by centering the lens directly over the tripod.
Double Bubble Level. You will find one in my camera’s hot shoe whenever I am not using flash.
Be sure to check out our camera body User’s Guides here.
The Lens Align Mark II. I use the Lens Align Mark II pretty much religiously to micro-adjust all of my gear an average of once a month and always before a major trip. Enjoy our free comprehensive tutorial here.
Canon EOS-1D Mark IV User’s Guide. Learn to use your Mark IV the way that I use mine. Also available for the 7D and the Mark III here.
December 3rd, 2011
|
|
|
Snow Goose landing, early morning light, Bosque del Apache NWR, San Antonio, NW. From the recently concluded Bosque IPT. This image was created on the morning of 11/18/2011 with the tripod-mounted Canon 800mm f/5.6L IS lens and the EOS-1D Mark IV. ISO 640. Evaluative metering +1 1/3 stops off the low blue sky: 1/1000 sec. at f/5.6 set manually.
Central Sensor/AI Servo Rear Focus active at the moment of exposure. Click here if you missed the Rear Focus Tutorial. Lens/camera body Micro-adjustment: +2. For a greater appreciation of the image, click on the photo. Then click on the enlarged version to close it.
|
Photoshop CS 5 Twilight Zone?
About halfway through the Bosque IPT Photoshop CS-5 started acting strangely. The first thing that I noticed was that when I brought an image into CS-5 to convert it in ACR (Adobe Camera RAW) it looked hazy, dull, and flat and the color looked way off. Some images looked so bad that I simply went started over and converted them in BreezeBrowser. With others I spent 10 minutes adjusting the sliders in an effort to get the image to look right…. That process (as described in detail in Digital Basics) usually takes 10 seconds…. I soon noticed that all of my keyboard shortcuts, both Tools and Applications, had disappeared. One by one I re-keyed each of them. But the problem with the ACR conversions persisted. Robert O’Toole took a crack at it on the IPT to no avail….
Mystery Solved!
Last night I called old friend and Photoshop expert Ellen Anon. She spent 30 minutes with me trying to solve the problem. Also without success. Finally she said, “CS-5 somehow became corrupted; you need to delete all of your preferences and start from scratch. Here’s how you do that:
- Hold three fingers of your left hand over the Shift, Ctrl, and Alt keys.
- Double left-click on the Photoshop CS-5 icon on your desktop; the instant the program starts to open push and hold down the Shift, Ctrl, and Alt keys with those same three fingers of your left hand; note: put one finger on each of the three keys.
- When the dialogue box below opens, click Yes.
- Now you have the fun task of re-keying all of your Photoshop preferences and keyboard shortcuts. That whole process took me all of three minutes (though I might have missed one or two.
Well, I guess that you have figured out by now that the fix worked! Each image that I open in ACR now looks great at my default settings. Tanks a stack Ellen! The next time that your copy of Photoshop starts acting strangely consider deleting your preferences and getting back to ground zero.
ELLEN ANON
Ellen Anon, a former BIRDS AS ART IPT co-leader, is an award winning photographer, an author, a Photoshop and digital imaging expert, and a good friend. She has co-authored a series of best selling books including Photoshop CS5 for Nature Photographers; A Workshop in a Book and Aperture3; Portable Genius along with several video series. She and her son Josh are very excited about being in the process of creating a new book (and workshops) that will help people develop their photographic eye via visual intensity.
You can learn more about Ellen and see lots of her great images here She asked me to let you know that she needs to update her workshop and public appearances pages as life sometimes gets in the way of photography and career.
Earn Free Contest Entries and Support both the Bulletins and the Blog by making all your B & H purchases here.
More and more folks are earning multiple contest entries with their B & H purchases. See here for details on that. Eleven great categories, 34 winning and honored images, and prize pools valued in excess of $20,000. Click here to visit the competition home page.
Shopper’s Guide
Below is a list of the gear used to create the images in today’s blog post. Thanks a stack to all who have used the Shopper’s Guide links to purchase their gear as a thank you for all the free information that we bring you on the Blog and in the Bulletins. Before you purchase anything be sure to check out the advice in our Shopper’s Guide.
Canon 800mm f/5.L IS lens. Right now this is my all time favorite super-telephoto lens.
Canon EOS-1D Mark IV professional digital camera body. My two Mark IVs are my workhorse digital camera bodies.
And from the BAA On-line Store:
LensCoats. I have a LensCoat on each of my big lenses to protect them from nicks and thus increase their re-sales value. All my big lens LensCoat stuff is in Hardwood Snow pattern.
LegCoat Tripod Leg Covers. I have four tripods active and each has a Hardwood Snow LegCoat on it to help prevent further damage to my tender shoulders 🙂
Gitzo GT3530LS Tripod. This one will last you a lifetime.
Mongoose M3.6 Tripod Head. Right now this is the best tripod head around for use with lenses that weigh less than 9 pounds. For heavier lenses, check out the Wimberley V2 head.
CR-80 Replacement Foot for Canon 800. When using the 800 on a Mongoose as I do, replacing the lens foot with this accessory lets the lens sit like a dog whether pointed up or down and prevents wind-blown spinning of your lens on breezy days by centering the lens directly over the tripod.
Double Bubble Level. You will find one in my camera’s hot shoe whenever I am not using flash.
Be sure to check out our camera body User’s Guides here.
The Lens Align Mark II. I use the Lens Align Mark II pretty much religiously to micro-adjust all of my gear an average of once a month and always before a major trip. Enjoy our free comprehensive tutorial here.
Canon EOS-1D Mark IV User’s Guide. Learn to use your Mark IV the way that I use mine. Also available for the 7D and the Mark III here.
December 1st, 2011
|
|
|
This image was created with the Canon 24-105 IS L zoom lens (hand held at 60mm) and the Canon EOS-1D Mark IV. ISO 400. Evaluative metering +2/3 stop: 1/50 sec. at f/22 in Av Mode.
This image was created in LaJolla, CA on the 2011 San Diego IPT. One-Shot AF and recompose. For a greater appreciation of the image, click on the photo. Then click on the enlarged version to close it.
|
For Your Critique: Image #19
The image is presented for your critique; feel free to praise it or rip it to shreds. Would you keep it or delete it? Let us know why either way, what you like or what you hate. What would you have done differently?
In a few days I will present one additional image for a total of twenty in all in this series. That will be followed by several revelations including two major ones.
One of the very best ways to grow as a photographer is to look at as many good images as possible. I do that often in books, by checking out contest result web sites, by critiquing images on Bird Photographers.Net (BPN), by visiting the web sites of the world’s best photographers, and during image critiques and by encouraging image sharing on our BAA Instructional Photo-Tours (IPTs).
BIRDS AS ART BULLETIN #390
BIRDS AS ART Bulletin #390 is on line and can be accessed here in spectacular white on black format. Here are the features:
- BOSQUE END OF NOVEMBER REPORT
- CANON REBATES!
- THE BLOG IS THE BOMB
- NIK COLOR EFEX PRO 4.1
- IPT UPDATES
Earn Free Contest Entries and Support both the Bulletins and the Blog by making all your B & H purchases here.
More and more folks are earning multiple contest entries with their B & H purchases. See here for details on that. Eleven great categories, 34 winning and honored images, and prize pools valued in excess of $20,000. Click here to visit the competition home page.
Shopper’s Guide
Below is a list of the gear used to create the image in today’s blog post. Thanks a stack to all who have used the Shopper’s Guide links to purchase their gear as a thank you for all the free information that we bring you on the Blog and in the Bulletins. Before you purchase anything be sure to check out the advice in our Shopper’s Guide.
Canon 24-105 IS L zoom lens. This is my everyday B-roll lens. It is always in my vest for grab shots, birdscapes, scenic images, close ups, and 100 other types of images.
Canon EOS-1D Mark IV professional digital camera body. My two Mark IVs are my workhorse digital camera bodies.
And from the BAA On-line Store:
Canon EOS-1D Mark IV User’s Guide. Learn to use your Mark IV the way that I use mine. Also available for the 7D and the Mark III here.
A Guide to Pleasing Blurs. Denise Ippolito and yours truly share dozens of the techniques that they use to create pleasingly blurred images of a great variety of natural history subjects.
November 28th, 2011
All My Life’s a Circle
All My Life’s a Circle. One of my very favorite Harry Chapin songs. Hear it here. The song is also titled a more simple, “Circle.” And now circle is one of my very favorite lenses….
I knew that I would be heading to White Sands with Robert O’Toole for a day or two so I asked to borrow the relatively new (and amazing) Canon EF 8-15mm f/4L Fisheye USM Fisheye Ultra-Wide Zoom Lens. Thanks a stack to the kindness of Yechiel Orgel of B&H for the loan. When you use this lens with a full frame camera (as I did above) you can zoom between true 8mm circle and a 15 mm fisheye focal lengths; be sure to zoom out to the 8mm setting and remove the lens hood to prevent vignetting. With a 1.6 crop factor camera like the Canon EOS-7D you get a full frame fish eye image at the 8mm setting.
Note: Click on the link for the circle lens to enjoy $50 instant savings (expires 11/31/2011).
In the image above I worked in the soft pre-dawn light to avoid problems with either the sun or my shadow. With the 180 degree view you need to tilt the tripod forward to avoid getting the tripod legs in the frame…. It takes a bit of practice to learn to use this lens, but wow, it is great fun and the results as you see above can be spectacular. If you enjoy landscape photography and like getting up early or staying in the field after sunset you will love this lens. Here are a few of the features:
- L-Series Optics
- 180° Diagonal Angle of View
- Produces Circular & Full Frame Images
- Fast Ultra-Sonic Motor (USM) Autofocus
- Ultra-Low Dispersion (UD) Glass
- Floating Focus System
- Close Focus – 6.2″ / 0.16 m
- Rear Gel Holder Up to 3 Pre-Cut Filters
- Subwavelength Structure Coating
- Protective Fluorine Lens Coating<
To learn more about this lens check out the customer reviews by clicking on the appropriate tab here.
If you purchase this lens using our B&H link: Canon EF 8-15mm f/4L Fisheye USM Fisheye Ultra-Wide Zoom Lens you will earn a free contest entry and in addition, I would be glad to send you a short tutorial on how to crop your circle images to a perfect circle. (Please request the tutorial via e-mail along with a copy of your B&H receipt.
Earn Free Contest Entries and Support both the Bulletins and the Blog by making all your B & H purchases here.
More and more folks are earning multiple contest entries with their B & H purchases. See here for details on that. Eleven great categories, 34 winning and honored images, and prize pools valued in excess of $20,000. Click here to visit the competition home page.
Comments and Questions Welcome
Please feel free to leave a comment on either the image or Harry Chapin or ask a question about the lens.
Shopper’s Guide
Below is a list of the gear used to create the image in today’s blog post. Thanks a stack to all who have used the Shopper’s Guide links to purchase their gear as a thank you for all the free information that we bring you on the Blog and in the Bulletins. Before you purchase anything be sure to check out the advice in our Shopper’s Guide.
Canon EF 8-15mm f/4L Fisheye USM Fisheye Ultra-Wide Zoom Lens An amazing piece of lens technology that is both a challenge and great fun to use.
Canon EOS 5D Mark II Digital Camera. Canon’s lightweight full frame body is perfect for serious landscape photography.
And from the BAA On-line Store:
LegCoat Tripod Leg Covers. I have four tripods active and each has a Hardwood Snow LegCoat on it to help prevent further damage to my tender shoulders :). And you will love them in mega-cold weather….
Gitzo GT3530LS Tripod. This one will last you a lifetime.
Giottos MH 1302-655 (Tiny) BallHead. I spin off my Mongoose M3.6 Tripod Head and mount the tiny ballhead whenever I need to use a short lens on the tripod. The camera goes in the clamp via the Wimberley P-5 camera body plate.
Double Bubble Level. You will find one in my camera’s hot shoe whenever I am not using flash.
|
|

