This Just In!
Steve Elkins of Bedfords texted me with great news. He has a Sony 400mm f/2.8 GM lens and a Sony 600mm f/4 GM lens in stock. Remember to use the BIRDS AS ART code at check-outland get 3% back on your credit card and free second day air shipping. Hurry.
For those looking for The Sony 400 f/2.8 there is good new and bad news. The bad news is that I just bought the one in stock. The good news is that Steve is getting another one next week. Have at it. If you are seriously interested in either lens it would best to e-mail Steve at selkins@bedfords.com or text him at 1-479-381-2592.
What’s Up?
On Wednesday I enjoyed yet another beautiful and interesting morning. I marked the Killdeer nest to protect it from the ruthless mowers and e-mailed the folks at ILE to let them know. There was another big mayfly hatch. Even the Mottled Ducks were partaking! I made some nice images of the rapidly growing baby crane, a Cattle Egret atop a bush catching mayflies, and the duck pair catching mayflies. I had another good chance on one of the fledged and flying Killdeer in the small field to the south of the pier. Then, the Limpkin family showed up next to the pier again so I spent some quality time with them. Then, I decided to make one last swing around the North Field. I saw a brown form in the grass at a distance and was unsure of what it was. As I got closer, I identified it easily; it is quite a distinctive creature. I spent ten intimate minutes with it before it headed slowly back to the marsh. I made some wonderful images and will share my favorite with you here tomorrow.
Today is Thursday 19 May 2022. The forecast for this morning at ILE is again calling for sunny and still (with a light breeze from the SW developing by 9am). I will be heading down to the lake early again. Wherever you are and whatever you are doing, I hope that you too have a great day. This blog post took about three hours to prepare and makes sixty-nine days in a row with a new one.
Enjoy today’s new YouTube video. As a late registration enticement, I will include the ride with me for free for the first two folks to sign up for each Jacksonville IPT. Please get in touch via e-mail with any questions.
Please remember to use the B&H and Amazon links that are found on most blog pages and to use the BIRDSASART discount code at checkout when purchasing your new gear from Bedfords. Please, also, consider joining a BAA IPT. You will be amazed at how much you will learn!
BIRDS AS ART Image Optimization Service (BAA IOS)
Send a PayPal for $62.00 to birdsasart@verizon.net or call Jim at 863-692-0906 and put $62.00 on your credit card. Pick one of your best images and upload the raw file using a large file sending service like Hightail or DropBox and then send me the link via e-mail. I will download and save your raw file, evaluate the exposure and sharpness, and optimize the image as if it were my own after converting the raw file in Adobe Camera Raw. Best of all, I will make a screen recording of the entire process and send you a link to the video to download, save and study.
Wanting a Nikon Z9?
The best way to get your hands on a Z9 is to join NPS (Nikon Professional Services) and then send your member number to Steve Elkins at Bedford via e-mail. Nikon insists that Z9s (and other hard to get stuff) go to NPS members. You can get one from B&H, but they have a huge wait list …
And Please Remember
You can find some great photo accessories (and necessities, like surf booties!) on Amazon by clicking on the Stuff tab on the orange/yellow menu bar above. On a related note, it would be extremely helpful if blog-folks who, like me, spend too much money on Amazon, would get in the habit of clicking on the Amazon logo link on the right side of each blog post when they shop online. As you might expect, doing so will not cost you a single penny, but would be appreciated tremendously by yours truly. And doing so works seamlessly with your Amazon Prime account.
Please remember that if an item — a Delkin flash card, or a tripod head — for example, that is available from B&H and/or Bedfords, is also available in the BAA Online Store, it would be great, and greatly appreciated, if you would opt to purchase from us. We will match any price. Please remember also to use my B&H affiliate links or to earn 3% cash back at Bedfords by using the BIRDSASART discount code at checkout for your major gear purchases. Doing either often earns you free guides and/or discounts. And always earns my great appreciation.
Brand-New and As-Good-As-Ever Bedfords BAA Discount Policy
Folks who have fallen in love with Bedfords can now use the BIRDSASART coupon code at checkout to enjoy a post-purchase, 3% off-statement credit (excluding taxes and shipping charges) on orders paid with a credit card. The 3% credit will be refunded to the card you used for your purchase. Be sure, also, to check the box for free shipping to enjoy free Second Day Air Fed-Ex. This offer does not apply to purchases of Classes, Gift Cards, or to any prior purchases.
Money Saving Reminder
Many have learned that if you need a hot photo item that is out of stock at B&H and would like to enjoy getting 3% back on your credit card along with free 2nd Day Air Fed-Ex Air shipping, your best bet is to click here, place an order with Bedfords, and enter the coupon code BIRDSASART at checkout. If an item is out of stock, contact Steve Elkins via e-mail or on his cell phone at (479) 381-2592 (Central time). Be sure to mention the BIRDSASART coupon code and check the box for Free Shipping. That will automatically upgrade to free 2nd Day Air Fed-Ex. Steve has been great at getting folks the hot items that are out of stock at B&H and everywhere else. The waitlists at the big stores can be a year or longer for the hard-to-get items. Steve will surely get you your gear long before that. For the past year, he has been helping BAA Blog folks get their hands on items like the SONY a 1, the SONY 200-600 G OSS lens, the Canon EOS R5, the Canon RF 100-500mm lens, and the Nikon 500mm PF. Steve is personable, helpful, and eager to please.
Important Note
As an Amazon Associate, I earn a small percentage when you purchase from Amazon after using any of the Amazon links on the blog (including the logo-link immediately above). My link works with Amazon Prime and using it will not cost you a single cent. Huge thanks, BTW 🙂
Please Remember Also
Please, if you enjoy and learn from the blog, remember to use one of my two affiliate programs when purchasing new gear. Doing so just might make it possible for me to avoid having to try to get a job as a Walmart greeter and will not cost you a single penny more. And if you use Bedfords and remember to enter the BIRDSASART code at checkout, you will (still!) save 3% on every order and enjoy free second-day air shipping. In these crazy times — I lost about fifty thousand dollars in income due to COVID 19 — remembering to use my B&H link or to shop at Bedfords will help me out a ton and be greatly appreciated. Overseas folks who cannot order from the US because of import fees, duties, and taxes, are invited to help out by clicking here to leave a blog thank you gift if they see fit.


Gear Questions and Advice
Too many folks attending BAA IPTs and dozens of photographers whom I see in the field and on BPN, are–out of ignorance–using the wrong gear, especially when it comes to tripods and more especially, tripod heads… Please know that I am always glad to answer your gear questions via e-mail. If you are desperate, you can try me on my cell at 863-221-2372. Please leave a message and shoot me a text if I do not pick up.
Cute & Beautiful: Photographing Chicks in Jacksonville, FL
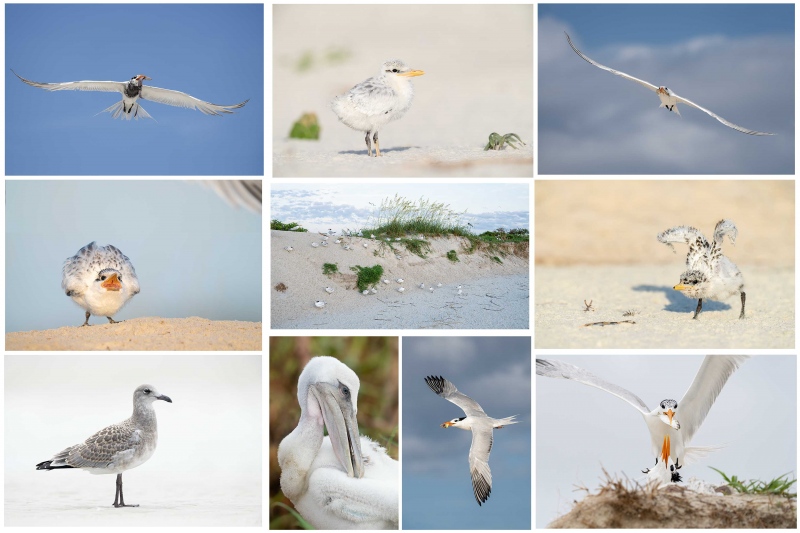
There is an amazing beach near Jacksonville, FL where 8,000 pairs of Royal Terns and 12,000 pairs of Laughing Gulls (along with a few other species) breed each year. As this video shows, photographing the chicks is relatively easy in the summer. And there is tons of great flight photography as well.
|
|
|
Click on the composite image to enjoy the incredible quality of the hi-res JPEG. Clockwise from upper left clockwise and back around to the center: Royal Tern in flight with squid for chick; Royal Tern chick on beach; Royal Tern in flight with shrimp for young; Royal Tern chick — double overhead wing stretch; Royal Tern landing with greenback for chick; Royal Tern in flight with juvenile mahi mahi for chick; Brown Pelican — large chick preening; Laughing Gull in fresh juvenal plumage; Royal Tern chick begging; Many Royal Terns with many chicks on face of dune. |
Jacksonville IPT: #1: 4 FULL DAYS — the afternoon of 16 June thru the morning of MON 20 June 2022: $2,099.00. (Limit 6 photographers)
Jacksonville IPT #2: 4 FULL DAYS — the afternoon of FRI 1 JULY thru the morning of TUES 5 July 2022: $2099.00 (Limit 6 photographers)
Jacksonville IPT #3: 4 FULL DAYS — the afternoon of FRI 15 JULY thru the morning of TUES 19 July 2022: $2099.00 (Limit 6 photographers/Openings: 5)
Ride with me: add $200.00. I do not like to disappoint: each trip will run with one participant. If necessary.
I first visited the breeding bird colony at Jacksonville in late June 2021. I was astounded. There were many thousands of pairs of Royal Terns nesting along with about 10,000 pairs of Laughing Gulls. In addition to the royals, there were some Sandwich Terns nesting. And there are several dozen pairs of Brown Pelicans nesting on the ground. Flight photography was non-stop astounding. And photographing the tern chicks was relatively easy. Folks could do the whole trip with the Sony 200-600, the Canon 100-500 RF, or the Nikon 500 PF or 200-500 VR. With a TC in your pocket for use on sunny days. Most of the action is within 100 yards of where we park (on the beach). As with all bird photography, there are times when a super-telephoto lens with either TC is the best tool for the job.
Morning sessions will average about three hours, afternoon sessions about 1 1/2 hours. On cloudy mornings with favorable winds, we may opt to stay out for one long session and skip the afternoon, especially when the afternoon forecast is poor. Lunch is included on the first three days of the IPT and will be served at my AirBnB. After the first lunch there will be an introductory program. On days two and three we will do image review and Photoshop after lunch.
We will be based somewhere west and a bit north of Jacksonville where there are many AirBnB possibilities. The deposit is $599.00. Call Jim at the office any weekday at 863-692-0906 to pay by credit card. Balances must be paid by check.
What You Will Learn on a Jacksonville IPT
- 1- First and foremast you will learn to become a better flight photographer. Much better.
- 2-You will learn the basics and fine points of digital exposure. Nikon and Canon folks will learn to get the right exposure every time after making a single test exposure, and SONY folks will learn to use Zebras so that they can be sure of making excellent exposures before pressing the shutter button.
- 3- You will learn to work in Manual exposure mode even if you fear it.
- 4- You will learn to evaluate wind and sky conditions and understand how they affect bird photography, especially the photography of birds in flight.
- 5- You will learn several pro secrets (for each system) that will help you to become a better flight photographer.
- 6- You will learn to zoom out in advance (because the birds are so close!) 🙂
- 7- You will learn how to approach free and wild birds without disturbing them.
- 8- You will learn to spot the good and the great situations.
- 9- You will learn to understand and predict bird behavior.
- 10- You will learn to design pleasing images by mastering your camera’s AF system.
- 11- You will learn to choose the best perspective.
- 12- You will learn to see and control your backgrounds.
- 13- You will learn to see and understand the light.
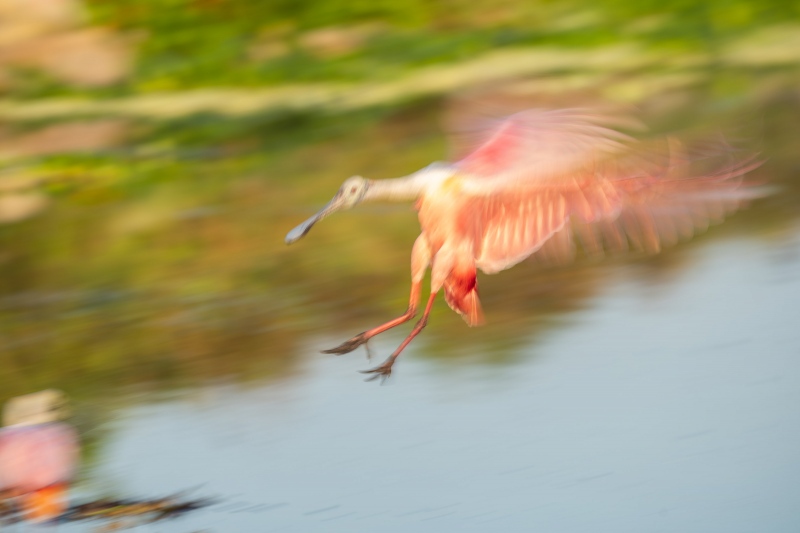
- 14- You will learn to see and create pleasing blurs in pre-dawn situations.
- 15- You will learn to be ready for the most likely event.
And the best news is that you will be able to take everything you learn home with you so that you will be a better photographer wherever you are and whenever you photograph.
Typos
With all blog posts, feel free to e-mail or to leave a comment regarding any typos or errors.


