May 10th, 2022 What’s Up?
Monday morning down by the lake was quite interesting. Several of the Osprey nests are overflowing with three large chicks. I tried to photograph at the best one and failed. The newest crane baby is already about half as large as its parent. For the past few days, I have not seen one of the two parent birds with the two large colts. I did see the eagle family flying around together for the first time. And a pair of Black-necked Stilts showed up just to the left of the pier.
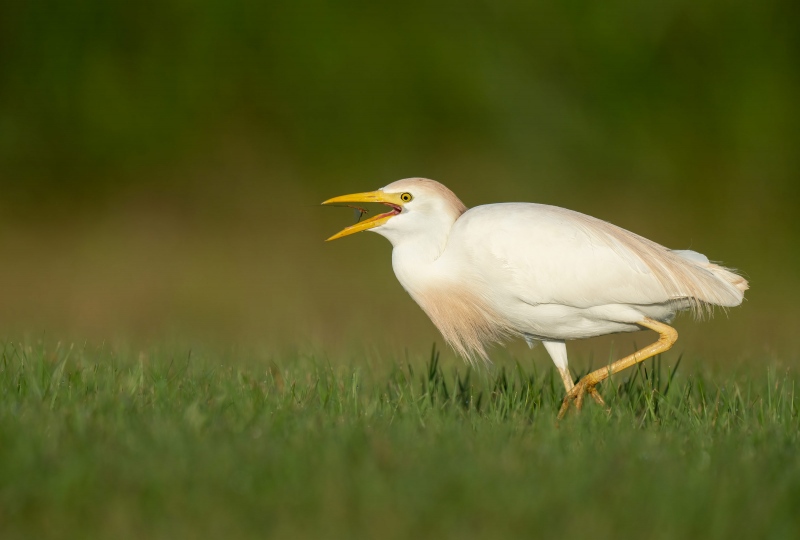
There was a big hatch of the large mayflies overnight. I was surprised that only a single Cattle Egret was partaking of the feast. It was soon joined by the large crane colt family of three. I shot the whole gang. On what seemed like a slow morning for photography I created more than 1700 images. Why? I was trying to get head portraits of the crane colts with a mayfly in their bill at 1200mm and was taking full advantage of the 30 frames/second frame rate of the Sony a1. Then I got out of my SUV and tried the same with the hand held 200-600. Last was a Great Blue Heron standing on a dock at 1200mm.
The feeding Sandhill Cranes were moving quickly in all directions and as a result, about 90% of the images were badly mis-framed. I have no idea if I got even a single keeper … But you can’t win if you don’t play!
Today is Tuesday 10 May. As of Monday evening, I was not sure if I was going to Stick Marsh or down to the lake on Tuesday morning … Wherever you are and whatever you are doing, I hope that you too have a great day. This blog post took about an hour to prepare and makes sixty days in a row with a new one.
Please remember to use the B&H and Amazon links that are found on most blog pages and to use the BIRDSASART discount code at checkout when purchasing your new gear from Bedfords. Please, also, consider joining a BAA IPT. You will be amazed at how much you will learn!
This Just In!
I kept 61 of 1703 images from Monday morning. If you are counting, that is a keeper rate of only .0358, less than 4%. I told you it was difficult. I did get a few decent ones of a crane with a mayfly, but the Cattle Egret images were far stronger. The two best of those with a mayfly are featured in today’s blog. In addition, I kept 18 vertical images of the Cattle Egret ruffling.
Your Favorite?
Which of today’s two very excellent images do you like best. I think that that is a tough call. If you leave a comment, please be sure to let us know why you made your choice.
Selling Your Used Photo Gear Through BIRDS AS ART
Selling your used (or like-new) photo gear through the BAA Blog is a great idea. We charge only a 5% commission on items priced at $1,000 or more. With items less than $1000, there is a $50 flat-fee. One of the more popular used gear for sale sites charged a minimum of 20%. Plus assorted fees! Yikes. They went out of business. And e-Bay fees are now up to 13%. If you are interested, please click here, read everything carefully, and do what it says. To avoid any misunderstandings, please read the whole thing very carefully. If you agree to the terms, please state so clearly via e-mail and include the template or templates, one for each item you wish to sell. Then we can work together to get your stuff priced and listed.
Stuff that is priced fairly — I offer pricing advice only to those who agree to the terms — usually sells in no time flat. Over the past years, we have sold many hundreds of items. Do know that prices for used gear only go in one direction. Down. You can always see the current listings by clicking here or on the Used Photo Gear tab on the orange-yellow menu bar near the top of each blog post page.
New Listings
Canon EF 100-400mm f/4.5-5.6L IS II USM Lens with great extras!
Ted Keltz is offering a Canon EF 100-400mm f/4.5-5.6L IS II USM lens (with extras) in excellent condition for $1488.00. The sale includes the rear lens cap, the front lens cap, the lens hood, the tough fabric ens case, the original product box and manual, a LensCoat, a Canon Extender EF 1.4x II in like new-condition $429.00 new), a Canon 25 mm Extension Tube EF 25mm II in like new-condition ($144.95 new), and insured ground shipping via major courier to lower-48 US addresses only. (Both accessories include the front and rear lens caps and the lens pouches.) Your item will not ship until your check clears unless other arrangements are made.
Please contact Ted via e-mail.
This incredibly versatile zoom lens — with its amazing .98 meter close focus — was my favorite Canon telephoto zoom lens ever. By far. It is easy to hand hold, great for tight portraits, for birds in flight, for quasi-macro stuff, and lots more. For flight, it is fabulous with an R5! This package sells new of $2972.95 so you can save an amazing $1584.95 by grabbing Ted’s lens with the great extras now. artie
Canon Extender EF 2X III
Sale Pending first day of listing
Ted Keltz is offering a is offering a Canon Extender EF 2X III (teleconverter) in like-new condition for $259.00. The sale includes the front and rear caps, the soft case, the original product box, and insured ground shipping via major courier to lower-48 US addresses only. Your item will not ship until your check clears unless other arrangements are made.
Please contact Ted via e-mail.
As regular readers know, TCs are so important to what I do that I always travel with three 1.4X teleconverters and two 2X teleconverters. (Note: they do fail on occasion …) The 2X III sells new for $429.00. artie
|
|
|
This image was created on 9 May 2022 on the South Peninsula down by the lake near my home at Indian Lake Estates. Working from the front seat of my SUV, I used the BLUBB-supported Sony FE 600mm f/4 GM OSS lens, the Sony FE 2.0x Teleconverter, and The One, the Sony Alpha 1 Mirrorless Digital Camera). The exposure was determined via Zebras technology with ISO on the Thumb Dial. ISO 800: 1/1600 sec. at f/8 (wide open) in Manual mode. The exposure was dead solid perfect when evaluated in RawDigger. AWB at 7:43:46am on a sunny morning.
Tracking: Upper Left Zone/AF-C with Bird Face/Eye detection enabled performed to perfection. Be sure to click on the image to enjoy a high-res version.
Image #1: Cattle Egret ready to swallow mayfly
|
Multiple Choice Quiz
Which of the following contributed most to the artistic success of Image #1?
a- it is razor-sharp on the bird’s eye
b- the exposure and processing are spot-on.
c- the light was sweet.
d- the bird was near the edge of a drop-off to the marsh below.
There was a bit of motion blur on the bird’s eye. I painted a Quick Mask of the eye and as expected, Topaz Sharpen AI rendered it much sharper at 80% without making a mess of things.
Great Topaz News!
As regular readers know, I run DeNoise on virtually every image that I process immediately after executing the crop with the Delete Cropped Pixels box checked. For images made in sunny conditions, I used Standard. For images made in low light, I use Low Light. You can check all four methods by using the Comparison View but I rarely do that any more as I am confident as noted above.
Folks who use the BAA Topaz link to purchase Sharpen AI, DeNoise AI, or the Utility Bundle (or any other Topaz plug-ins), will receive a 15% discount by entering the ARTHUR15 code at checkout. If the stuff is on sale (as it usually is), you save 15% off of the sale price! To get the discount you must use my link and you must enter the discount code. Be sure to start with this link.
Those who purchase Sharpen AI, DeNoise AI, or any other Topaz plug-ins using my link and then entering the ARTHUR15 code at checkout can e-mail to request a short Getting Started with Topaz e-Guide. Please include a copy of your Topaz receipt that shows the discount. Aside from the basics, the guide explains how to install the plug-ins so that they appear in the Photoshop Filter Menu.
|
|
|
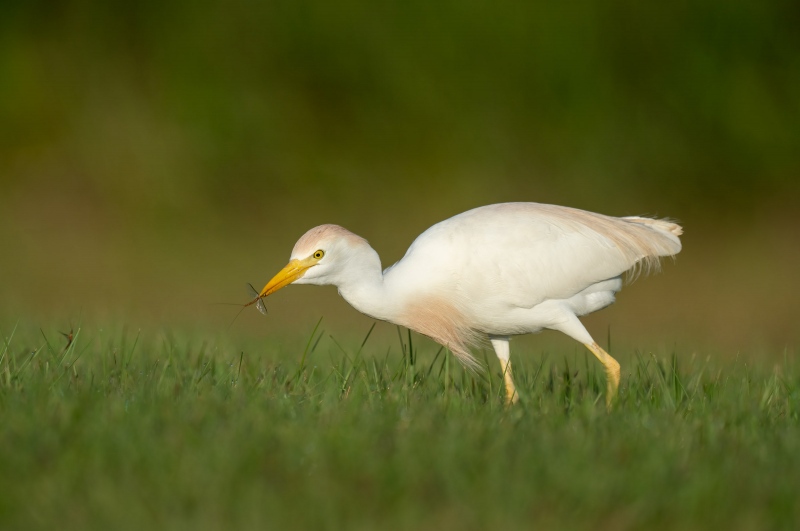
This image was created on 9 May 2022 on the South Peninsula down by the lake near my home at Indian Lake Estates. Working from the front seat of my SUV, I used the BLUBB-supported Sony FE 600mm f/4 GM OSS lens, the Sony FE 2.0x Teleconverter, and The One, the Sony Alpha 1 Mirrorless Digital Camera). The exposure was determined via Zebras technology with ISO on the Thumb Dial. ISO 800: 1/1600 sec. at f/8 (wide open) in Manual mode. The exposure was dead solid perfect when evaluated in RawDigger. AWB at 7:43:49 am on a sunny morning.
Tracking: Upper Left Zone/AF-C with Bird Face/Eye detection enabled performed to perfection. Be sure to click on the image to enjoy a high-res version.
Image #2: Cattle Egret holding mayfly in bill tip
|
Three Seconds Later
Image #2 was made three seconds after Image #1. It would have made a nice sequence if the order had been reversed, but the background would have been a mismatch as the bird had walked to my left. In both images the sharpness of The Sony rig at 1200mm is astounding. I cannot believe that the mayfly posed so perfectly right before it became breakfast.
|
|
|
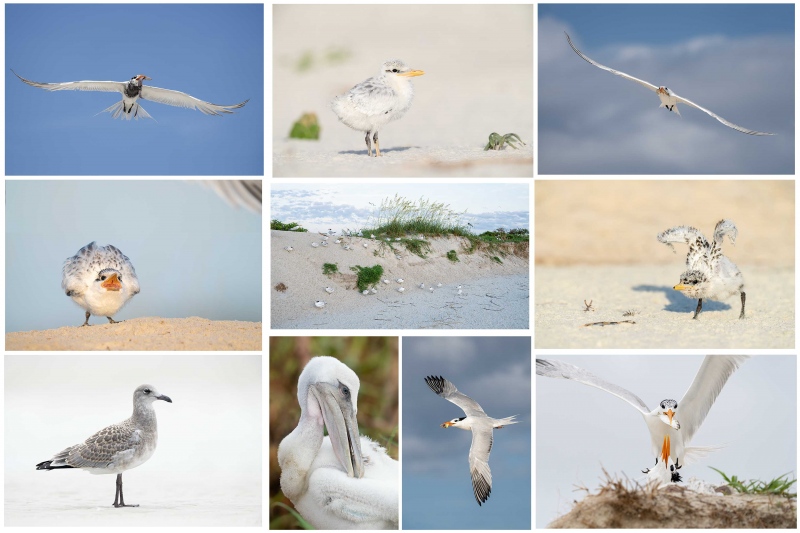
Click on the composite image to enjoy the incredible quality of the hi-res JPEG.
Clockwise from upper left clockwise and back around to the center: Royal Tern in flight with squid for chick; Royal Tern chick on beach; Royal Tern in flight with shrimp for young; Royal Tern chick — double overhead wing stretch; Royal Tern landing with greenback for chick; Royal Tern in flight with juvenile mahi mahi for chick; Brown Pelican — large chick preening; Laughing Gull in fresh juvenal plumage; Royal Tern chick begging; Many Royal Terns with many chicks on face of dune.
|
Jacksonville IPT: #1: 4 FULL DAYS — the afternoon of 16 June thru the morning of MON 20 June 2022: $2,099.00. (Limit 6 photographers)
Jacksonville IPT #2: the afternoon of FRI 1 JULY thru the morning of TUES 5 July 2022: $2099.00 (Limit 6 photographers)
Jacksonville IPT #3: the afternoon of FRI 15 JULY thru the morning of TUES 19 July 2022: $2099.00 (Limit 6 photographers)
Ride with me: add $200.00. I do not like to disappoint: each trip will run with one participant. If necessary.
I first visited the breeding bird colony at Jacksonville in late June 2021. I was astounded. There were many thousands of pairs of Royal Terns nesting along with about 10,000 pairs of Laughing Gulls. In addition to the royals, there were some Sandwich Terns nesting. And there are several dozen pairs of Brown Pelicans nesting on the ground. Flight photography was non-stop astounding. And photographing the tern chicks was relatively easy. Folks could do the whole trip with the Sony 200-600, the Canon 100-500 RF, or the Nikon 500 PF or 200-500 VR. With a TC in your pocket for use on sunny days. Most of the action is within 100 yards of where we park (on the beach). As with all bird photography, there are times when a super-telephoto lens with either TC is the best tool for the job.
Morning sessions will average about three hours, afternoon sessions about 1 1/2 hours. On cloudy mornings with favorable winds, we may opt to stay out for one long session and skip the afternoon, especially when the afternoon forecast is poor. Lunch is included on the first three days of the IPT and will be served at my AirBnB. After the first lunch there will be an introductory program. On days two and three we will do image review and Photoshop after lunch.
We will be based somewhere west and a bit north of Jacksonville where there are many AirBnB possibilities. The deposit is $599.00. Call Jim at the office any weekday at 863-692-0906 to pay by credit card. Balances must be paid by check.
What You Will Learn on a Jacksonville IPT
- 1- First and foremast you will learn to become a better flight photographer. Much better.
- 2-You will learn the basics and fine points of digital exposure. Nikon and Canon folks will learn to get the right exposure every time after making a single test exposure, and SONY folks will learn to use Zebras so that they can be sure of making excellent exposures before pressing the shutter button.
- 3- You will learn to work in Manual exposure mode even if you fear it.
- 4- You will learn to evaluate wind and sky conditions and understand how they affect bird photography, especially the photography of birds in flight.
- 5- You will learn several pro secrets (for each system) that will help you to become a better flight photographer.
- 6- You will learn to zoom out in advance (because the birds are so close!) 🙂
- 7- You will learn how to approach free and wild birds without disturbing them.
- 8- You will learn to spot the good and the great situations.
- 9- You will learn to understand and predict bird behavior.
- 10- You will learn to design pleasing images by mastering your camera’s AF system.
- 11- You will learn to choose the best perspective.
- 12- You will learn to see and control your backgrounds.
- 13- You will learn to see and understand the light.
- 14- You will learn to see and create pleasing blurs in pre-dawn situations.
- 15- You will learn to be ready for the most likely event.
And the best news is that you will be able to take everything you learn home with you so that you will be a better photographer wherever you are and whenever you photograph.
Typos
With all blog posts, feel free to e-mail or to leave a comment regarding any typos or errors.
May 9th, 2022 Which of Today’s Two Featured Images Do You Like Best?
Why?
|
|
|
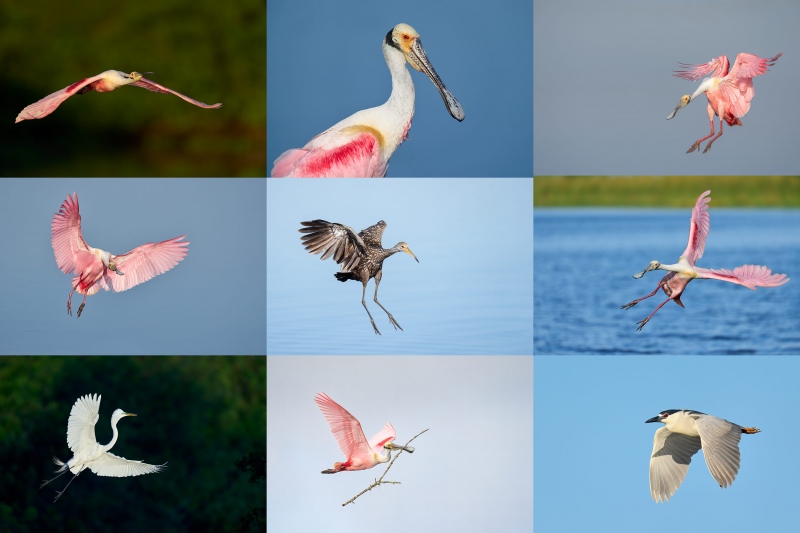
Click on the composite image to enjoy the incredible quality of the hi-res JPEG.
Clockwise from upper left back around to the center: spoonbill with mangrove background; spoonbill head and shoulders portrait; spoonbill braking to land; spoonbill dramatic landing pose; adult Black-crowned Night-Heron; spoonbill with nesting material; Great Egret returning to nest; incoming spoonbill; and Limpkin landing.
|
Last Chance for Stick Marsh In-the-Field Instruction
Tuesday 10 May: 6:45 to 9:15am. $250.00/person
Two 1/2 hours of intensive flight photography instruction: $250/person. Cheap! If you are interested, please contact me ASAP via e-mail and we can set up a session or two based on the weather forecast. The weather is looking fine for tomorrow.
From Anar Daswani via unsolicited e-mail:
Thanks so much for the two In-the-Field sessions. I appreciate all the knowledge and the guidance that you shared. I certainly feel like I am far better equipped to make stronger photos. Of course, there is always more to learn, and I definitely need a ton of practice. I learned a lot more from you in the two classes than I did in other, more expensive workshops. I truly appreciate your patience and kindness. I am excited about getting started with videos on a correct footing. And I can’t wait to go out and practice the pleasing blurs using all the techniques you have taught me. Not to mention getting the right exposure!
What’s Up?
Same old, same old at Gatorland on Sunday morning. Few photographable nests, few photographers, and some really good opportunities. There were more than a few fledged Tricolored Herons around; none cooperated for me. It kept threatening to cloud over, but the sun prevailed so I was on my way to the car by 8:30am. I took an early nap, did my bursts and a 44-length swim, had an early dinner, and took a one-mile walk. Use it or lose it 🙂
On my Friday walk, I missed the turtle laying eggs. On Saturday afternoon, I had a Swallow-tailed Kite and the young eagle flight right over my head. So from now on, I will walk with The Sony 70-200 II, the 2X TC, and an a1. On Sunday afternoon I created a lot of Osprey images on my walk. As the lens is very light I will take it every day and see if I get lucky.
Today is Monday 9 May 2022. The forecast for the morning is for sunny with a northeast breeze. I will surely head down to the lake for a bit. Wherever you are and whatever you are doing, I hope that you too have a great day. This blog post took about an hour to prepare and makes fifty-nine days in a row with a new one.
Please remember to use the B&H and Amazon links that are found on most blog pages and to use the BIRDSASART discount code at checkout when purchasing your new gear from Bedfords. Please, also, consider joining a BAA IPT. You will be amazed at how much you will learn!
Gatorland In-the-Field Session
Saturday 14 May & Saturday 21 May 2022. 7:00 to 9:00am: $200.00/person
Two hours of intensive instruction. Cheap! You need to have a season photo pass or purchase one for that date to enter. If you are interested, please contact me via e-mail. You can also learn exactly to make the better photographs at Gatorland in The BAA Middle of Florida Site Guide here .
BIRDS AS ART Image Optimization Service (BAA IOS)
Send a PayPal for $62.00 to birdsasart@verizon.net or call Jim at 863-692-0906 and put $62.00 on your credit card. Pick one of your best images and upload the raw file using a large file sending service like Hightail or DropBox and then send me the link via e-mail. I will download and save your raw file, evaluate the exposure and sharpness, and optimize the image as if it were my own after converting the raw file in Adobe Camera Raw. Best of all, I will make a screen recording of the entire process and send you a link to the video to download, save and study.
And Please Remember
You can find some great photo accessories (and necessities, like surf booties!) on Amazon by clicking on the Stuff tab on the orange/yellow menu bar above. On a related note, it would be extremely helpful if blog-folks who, like me, spend too much money on Amazon, would get in the habit of clicking on the Amazon logo link on the right side of each blog post when they shop online. As you might expect, doing so will not cost you a single penny, but would be appreciated tremendously by yours truly. And doing so works seamlessly with your Amazon Prime account.
Please remember that if an item — a Delkin flash card, or a tripod head — for example, that is available from B&H and/or Bedfords, is also available in the BAA Online Store, it would be great, and greatly appreciated, if you would opt to purchase from us. We will match any price. Please remember also to use my B&H affiliate links or to earn 3% cash back at Bedfords by using the BIRDSASART discount code at checkout for your major gear purchases. Doing either often earns you free guides and/or discounts. And always earns my great appreciation.
Brand-New and As-Good-As-Ever Bedfords BAA Discount Policy
Folks who have fallen in love with Bedfords can now use the BIRDSASART coupon code at checkout to enjoy a post-purchase, 3% off-statement credit (excluding taxes and shipping charges) on orders paid with a credit card. The 3% credit will be refunded to the card you used for your purchase. Be sure, also, to check the box for free shipping to enjoy free Second Day Air Fed-Ex. This offer does not apply to purchases of Classes, Gift Cards, or to any prior purchases.
Money Saving Reminder
Many have learned that if you need a hot photo item that is out of stock at B&H and would like to enjoy getting 3% back on your credit card along with free 2nd Day Air Fed-Ex Air shipping, your best bet is to click here, place an order with Bedfords, and enter the coupon code BIRDSASART at checkout. If an item is out of stock, contact Steve Elkins via e-mail or on his cell phone at (479) 381-2592 (Central time). Be sure to mention the BIRDSASART coupon code and check the box for Free Shipping. That will automatically upgrade to free 2nd Day Air Fed-Ex. Steve has been great at getting folks the hot items that are out of stock at B&H and everywhere else. The waitlists at the big stores can be a year or longer for the hard-to-get items. Steve will surely get you your gear long before that. For the past year, he has been helping BAA Blog folks get their hands on items like the SONY a 1, the SONY 200-600 G OSS lens, the Canon EOS R5, the Canon RF 100-500mm lens, and the Nikon 500mm PF. Steve is personable, helpful, and eager to please.
Important Note
As an Amazon Associate, I earn a small percentage when you purchase from Amazon after using any of the Amazon links on the blog (including the logo-link immediately above). My link works with Amazon Prime and using it will not cost you a single cent. Huge thanks, BTW 🙂
Please Remember Also
Please, if you enjoy and learn from the blog, remember to use one of my two affiliate programs when purchasing new gear. Doing so just might make it possible for me to avoid having to try to get a job as a Walmart greeter and will not cost you a single penny more. And if you use Bedfords and remember to enter the BIRDSASART code at checkout, you will (still!) save 3% on every order and enjoy free second-day air shipping. In these crazy times — I lost about fifty thousand dollars in income due to COVID 19 — remembering to use my B&H link or to shop at Bedfords will help me out a ton and be greatly appreciated. Overseas folks who cannot order from the US because of import fees, duties, and taxes, are invited to help out by clicking here to leave a blog thank you gift if they see fit.


Gear Questions and Advice
Too many folks attending BAA IPTs and dozens of photographers whom I see in the field and on BPN, are–out of ignorance–using the wrong gear, especially when it comes to tripods and more especially, tripod heads… Please know that I am always glad to answer your gear questions via e-mail. If you are desperate, you can try me on my cell at 863-221-2372. Please leave a message and shoot me a text if I do not pick up.
|
|
|
This image was created on 8 May 2022 at Gatorland. Standing at full height, I used the no-longer available Induro GIT304L Stealth Carbon Fiber Tripod/Levered-Clamp FlexShooter Pro-mounted-Sony FE 600mm f/4 GM OSS lens with the Sony FE 1.4x Teleconverter, and The One, the Sony Alpha 1 Mirrorless Digital Camera.. ISO 1000. The exposure was determined using Zebra technology with ISO on the rear wheel: 1/160 sec. at f/5.6 (wide open) in Manual mode. RawDigger showed that the raw file was dead-solid perfect. AWB at 7:22:29am on a sunny morning in the shade of a shelter.
Tracking: Spot-S with Bird-Eye/Face Detection performed perfectly. Click on the image to enjoy the high-res version.
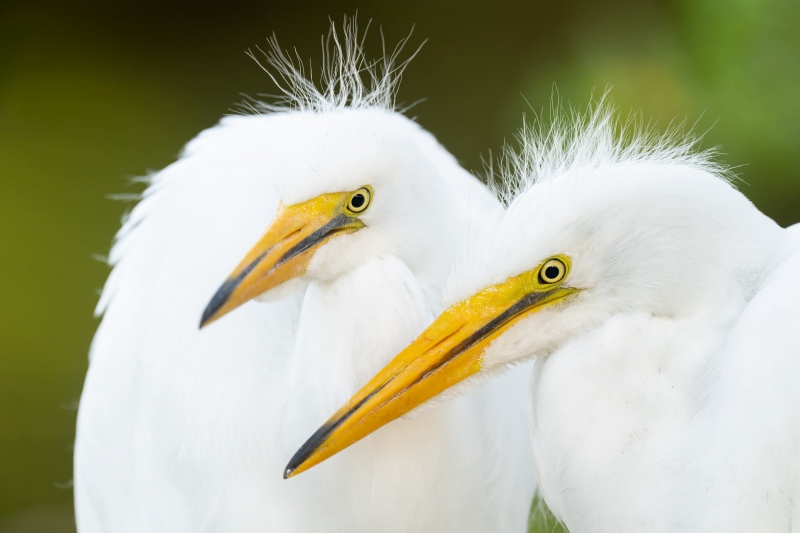
Image #2: Great Egret, large chick resting
|
Made in the Shade!
Folks often ask “What’s the best strategy for photographing birds on a bright sunny day? Many folks think that I am kidding when I answer, “Find some birds in the shade.” Fortunately, at Gatorland there are several wooden structures that provide varying degrees of shade on sunny mornings. Both of today’s images were of large Great Egret chicks in a well-shaded nest. I have been photographing the chicks in this very accessible nest for almost two months.
When I saw this nice juxtaposition, I put the tripod down in a spot that I thought might put the visible eye of each bird on the same plane. As this image was created at the wide-open aperture, I’d say that I hit that nail squarely on the head!
|
|
|
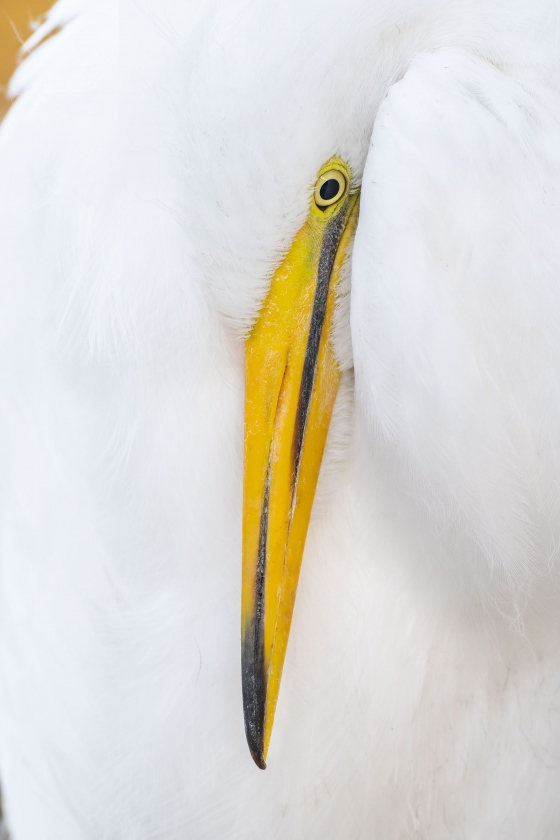
This image was also created on 8 May 2022 at Gatorland. Standing at full height, I again used the no-longer available Induro GIT304L Stealth Carbon Fiber Tripod/Levered-Clamp FlexShooter Pro-mounted-Sony FE 600mm f/4 GM OSS lens with the Sony FE 1.4x Teleconverter, and The One, the Sony Alpha 1 Mirrorless Digital Camera.. ISO 1000. The exposure was determined using Zebra technology with ISO on the rear wheel: 1/160 sec. at f/7.1 (stopped down 2/3-stop) in Manual mode. RawDigger showed that the raw file was about 1/3 stop too dark. AWB at 7:32:14am on a sunny morning in the shade of a shelter.
Tracking: Spot-S with Bird-Eye/Face Detection performed perfectly. Click on the image to enjoy the high-res version.
Image #2: Great Egret, large chick resting
|
Working It …
When I first saw this neat pose, I was working with the big lens and the 1.4X TC. I fired off a single frame and then the bird woke up from its rest. I switched the1.4X for the 2X and waited for the bird to assume the position. It did. I had about forty images made with the 2X and just one with the 1.4X. I liked the extra room. I brightened the image by moving the Exposure slider to +0.25 during the raw conversion, warmed it up by moving the Temperature slider to 7000 to eliminate a BLUE cast, and took a bit off the left. The last steps were a bit of crud clean-up and selectively brightening the bill. It pays to create varied image designs.
Would you have eliminated the little buff triangle in the upper left corner? Why or why not? What words would you use to describe (the mood of) this image?
I believe that the bird in Image #2 is the bird on the left in Image #1. By the time these two chicks got fed, the nest was partially lit by bright sun. I will only very rarely make an image a bird or birds in that are both lit by the sun with parts of them in the shade …
Typos
With all blog posts, feel free to e-mail or to leave a comment regarding any typos or errors.
May 8th, 2022 Before You Scroll Down …
Before you scroll down, click on the original image immediately below to view the high-res JPEG that represents the TIF file that was created from the converted raw file. Take a good look at it. Then leave a comment and let us know how you might have optimized it. Then you can scroll down and see what I did with the too-tight flight shot.
|
|
|
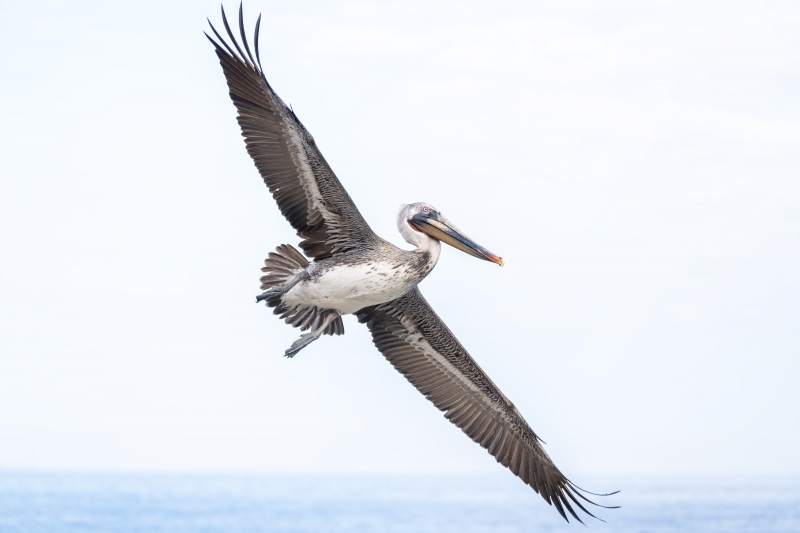
This image was created on a San Diego IPT on 19 January 2022 at La Jolla, CA. I used the hand held Sony FE 70-200mm f/2.8 GM OSS II lens (at 112mm) and The One, the Sony Alpha 1 Mirrorless Digital Camera.. The exposure was determined via Zebras with Exposure Compensation on the thumb dial. ISO 800: 1/2000 sec. at f/4 (stopped down one stop) in Manual mode. AWB at 12:09:47am on a cloudy morning.
Tracking: Zone AF/C with Bird-Eye/Face Detection performed perfectly. Click on the image to enjoy a high-res version.
Image #1: Image #1: Brown Pelican 2-year-old in flight
|
112mm Full Frame Flight!
With the right wind, the absolutely amazing Sony FE 70-200mm f/2.8 GM OSS II lens can be used without a teleconverter to photograph the incoming pelicans at La Jolla. I will most often use the 1.4X TC for incoming flight, and go with the 2X TC when trying for the elusive head throws.
The variations in the plumage of both adult and sub-adult Pacific-race Brown Pelicans always amazes me. Every season, we see a several unique birds wearing plumage combinations that we have never seen before.
You zoomed out enough to avoid clipping any wings, but just barely. Before you scroll down, think about how you would process this image. Even if you do not leave a comment, you can learn a ton by just thinking it through.
What’s Up?
It was cloudy black at dawn, so I went down to the lake to check things out at 7:30am. I was glad to see that the Softshell Turtle nest appeared to be undisturbed. Then the sun came out. With a stiff SW wind, I headed home early. I watched and videoed some Honeybees tearing the stamens off a Magnolia blossom in my driveway. I watched lots of NBA and NHL playoff games while working on images and answering e-mails. Today is Sunday 8 May and I am headed to Gatorland to photograph Great Egret and Tricolored Heron chicks. Wherever you are and whatever you are doing, I hope that you too have a great day. This blog post took about 90 minutes to prepare and makes fifty-eight days in a row with a new one.
Please remember to use the B&H and Amazon links that are found on most blog pages and to use the BIRDSASART discount code at checkout when purchasing your new gear from Bedfords. Please, also, consider joining a BAA IPT. You will be amazed at how much you will learn!
Wanted to Buy
If you have a Canon EF 600mm f/4L IS III lens or an RF 600mm f/4 that you would like to unload for a good price, please get in touch via e-mail.
Selling Your Used Photo Gear Through BIRDS AS ART
Selling your used (or like-new) photo gear through the BAA Blog is a great idea. We charge only a 5% commission on items priced at $1,000 or more. With items less than $1000, there is a $50 flat-fee. One of the more popular used gear for sale sites charged a minimum of 20%. Plus assorted fees! Yikes. They went out of business. And e-Bay fees are now up to 13%. If you are interested, please click here, read everything carefully, and do what it says. To avoid any misunderstandings, please read the whole thing very carefully. If you agree to the terms, please state so clearly via e-mail and include the template or templates, one for each item you wish to sell. Then we can work together to get your stuff priced and listed.
Stuff that is priced fairly — I offer pricing advice only to those who agree to the terms — usually sells in no time flat. Over the past years, we have sold many hundreds of items. Do know that prices for used gear only go in one direction. Down. You can always see the current listings by clicking here or on the Used Photo Gear tab on the orange-yellow menu bar near the top of each blog post page.
New Listings
Canon EOS 7D Mark II with a great extra!
IPT veteran Sandra Calderbank is offering a Canon EOS 7D Mark II in like-new condition with only 4504 shutter actuations for a very low $649.00. The sale includes one battery and the charger, the strap, the original product box, and everything that came in it, a Really Right Stuff Modular Sliding L-Plate (RTS B702-L Set — a $150.00 value), and insured ground shipping via major courier to lower-48 US addresses only. Your item will not ship until your check clears unless other arrangements are made.
Please contact Sandra via e-mail or by phone at 1-828-412-1047 Eastern time zone.
If you are looking to get started with a Canon dSLR, Sandy’s 7DII is for you. Both Patrick Sparkman and I used and loved the 7D Mark II until about two years ago when we both committed to using full-frame Canon bodies. We both made some truly great images with it. Two of my three 2016 Nature’s Best honored entries were created with the 7D II, one still, and one video. The 7D Mark II is one of the greatest-ever values in a digital camera body. artie
Canon Extender EF 1.4X III
IPT veteran Sandra Calderbank is offering a Canon Extender EF 1.4X III (teleconverter) in like-new condition for $249.00. The sale includes the front and rear caps, soft case, original product box and insured ground shipping via major courier to lower-48 US addresses only. Your item will not ship until your check clears unless other arrangements are made.
Please contact Sandra via e-mail or by phone at 1-828-412-1047 Eastern time zone.
As regular readers know, TCs are so important to what I do that I always travel with three 1.4X teleconverters and two 2X teleconverters. (Note: they do fail on occasion …) artie
Canon Extender EF 2X III
IPT veteran Sandra Calderbank is offering a Canon Extender EF 2X III (teleconverter) in like-new condition for $259.00. The sale includes the front and rear caps, soft case, original product box and insured ground shipping via major courier to lower-48 US addresses only. Your item will not ship until your check clears unless other arrangements are made.
Please contact Sandra via e-mail or by phone at 1-828-412-1047 Eastern time zone.
As regular readers know, TCs are so important to what I do that I always travel with three 1.4X teleconverters and two 2X teleconverters. (Note: they do fail on occasion …) artie
Canon EF 24-105 f/4L IS USM Lens
IPT veteran Sandra Calderbank is offering a Canon EF 24-105 f/4L IS USM lens (the original version) in like-new condition for a silly-low $249.00. The sale includes the front and rear caps, the soft case, the lens hood, the original product box, and insured ground shipping via major courier to lower-48 US addresses only. Your item will not ship until your check clears unless other arrangements are made.
Please contact Sandra via e-mail or by phone at 1-828-412-1047 Eastern time zone.
When I shot Canon, the original version of this lens was my never-leave-home-without-it all purpose zoom lens. Whenever I would leave it in the car, I would get 50 yards away and wished that I had it with me. It sells new for $1299.00 and is backordered in most places. artie
Two Canon 580 EX II Speedlights (flashes)
IPT veteran Sandra Calderbank is offering a pair of Canon 580 EX II Speedlights (flashes) in near-mint condition for a ridiculously low $249.00 (or $149.00 for one). The sale includes the soft cases, the stands, the original product boxes, and insured ground shipping via major courier to lower-48 US addresses only. Your item will not ship until your check clears unless other arrangements are made.
Please contact Sandra via e-mail or by phone at 1-828-412-1047 Eastern time zone.
Anyone looking to create a Canon multi-flash set-up for hummingbirds will want to grab both of Sandy’s 580 EX flashes ASAP. I think that I paid something like $600 apiece for mine when I shot Canon. artie
B&H Mother’s Day Specials
Click here or on the logo-link above to see a changing line-up of Mother’s Day Specials. You do not have to be a mother to click or to make a purchase!
BIRDS AS ART Image Optimization Service (BAA IOS)
Send a PayPal for $62.00 to birdsasart@verizon.net or call Jim at 863-692-0906 and put $62.00 on your credit card. Pick one of your best images and upload the raw file using a large file sending service like Hightail or DropBox and then send me the link via e-mail. I will download and save your raw file, evaluate the exposure and sharpness, and optimize the image as if it were my own after converting the raw file in Adobe Camera Raw. Best of all, I will make a screen recording of the entire process and send you a link to the video to download, save and study.
|
|
|
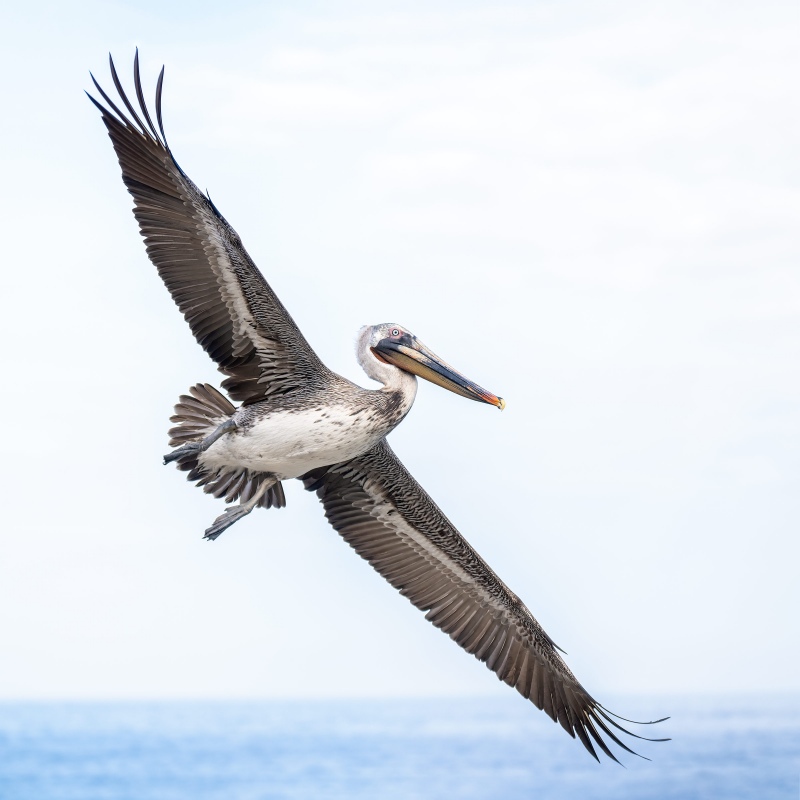
This image was created on a San Diego IPT on 19 January 2022 at La Jolla, CA. I used the hand held Sony FE 70-200mm f/2.8 GM OSS II lens (at 112mm) and The One, the Sony Alpha 1 Mirrorless Digital Camera.. The exposure was determined via Zebras with Exposure Compensation on the thumb dial. ISO 800: 1/2000 sec. at f/4 (stopped down one stop) in Manual mode. AWB at 12:09:47am on a cloudy morning.
Tracking: Zone AF/C with Bird-Eye/Face Detection performed perfectly. Click on the image to enjoy a high-res version.
Image #1: The optimized version of the Brown Pelican 2-year-old in flight image
|
The Image Optimization
For me, images like this with the bird steeply angled and tight in the frame scream for a square (or at least for a boxy) crop. I went with a perfect square.
1- I leveled the image and added canvas above and below in one fell swoop by using the Content-Aware Crop Tool. Tip: put the cursor outside of the crop mark and rotate the image as needed using the love handles.
2- I repaired the hole in one of the secondary feathers on the bird’s right wing using Content-Aware Fill.
3- I darkened the Pacific via the Color Mixer tab of the Camera Raw Filter. And yes, all the tabs and sliders in the Camera Raw Filter are available in Photoshop after the raw conversion.
|
|
|
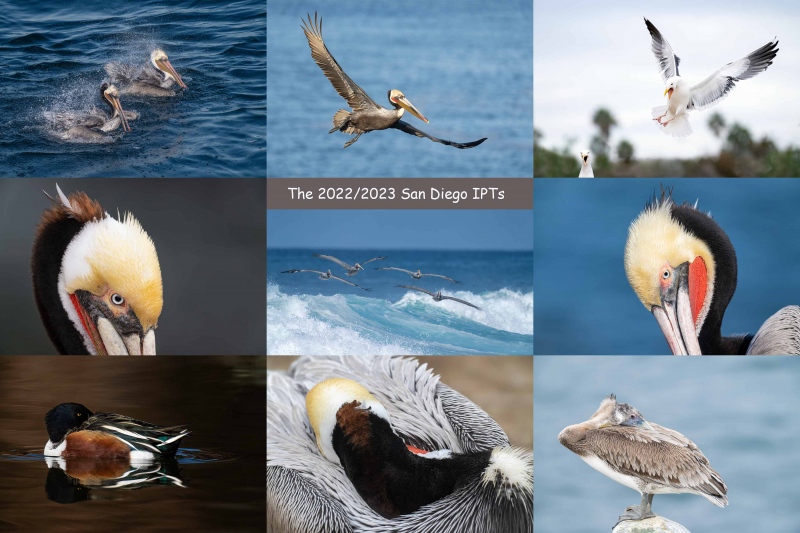
This all-new card includes images created on my JAN 2022 visit to San Diego. Click on the composite to enjoy a larger version.
|
The 2022/23 San Diego Brown Pelicans (and more!) IPTs
San Diego IPT #1. 3 1/2 DAYS: WED 21 DEC thru the morning session on Saturday 24 DEC 2022. $2099.00. Deposit: $699.00. Limit: 6 photographers.
San Diego IPT #2. 4 1/2 DAYS: SAT 7 JAN thru the morning session on WED 11 JAN 2023: $2699.00. Deposit: $699.00. Limit: 6 photographers/Openings: 4.
San Diego IPT #3: 3 1/2 DAYS: FRI 20 JAN thru the morning session on MON 23 JAN 2023: $2099.00. Deposit: $699.00.
Please e-mail for information on personalized pre- and post-IPT sessions.
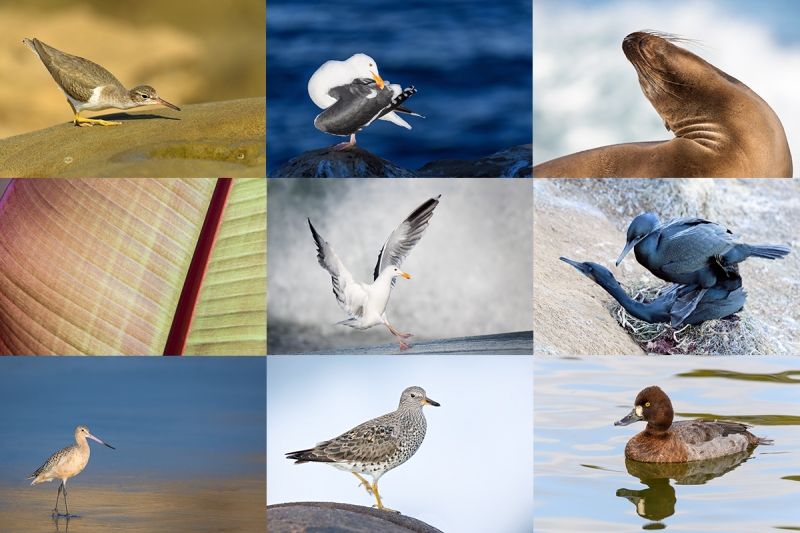
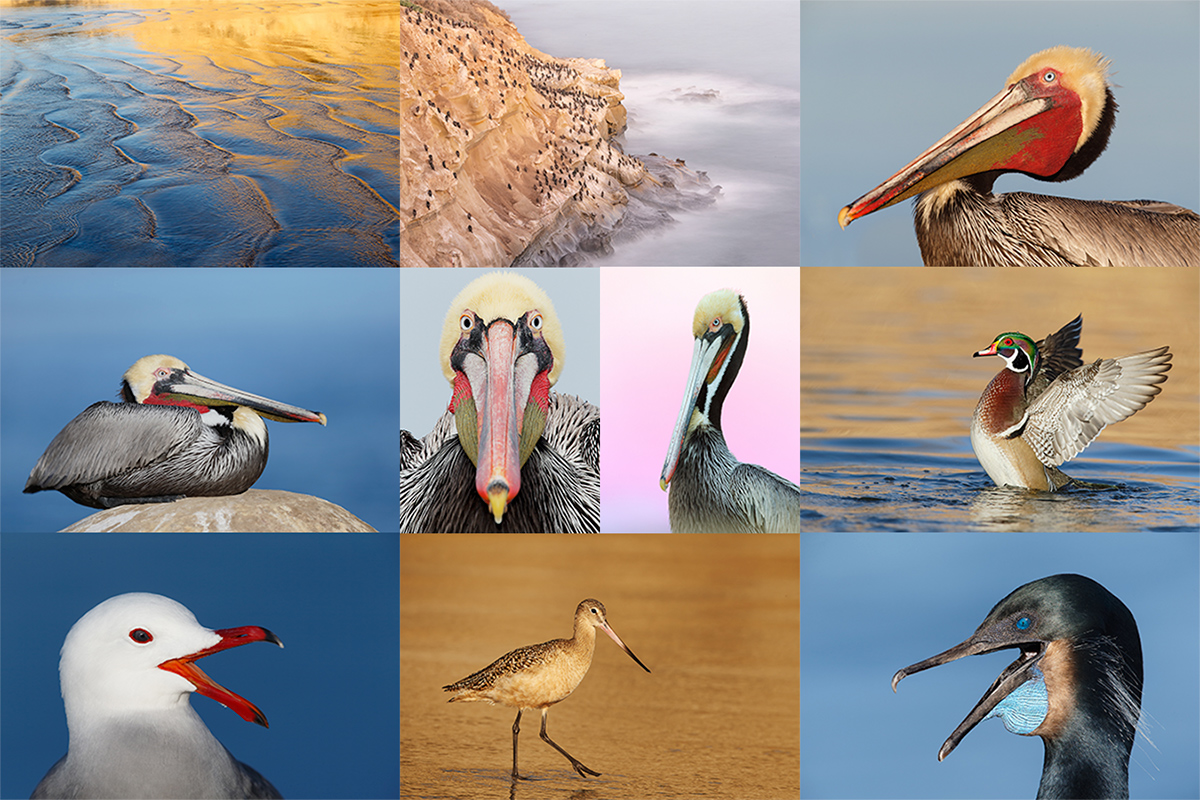
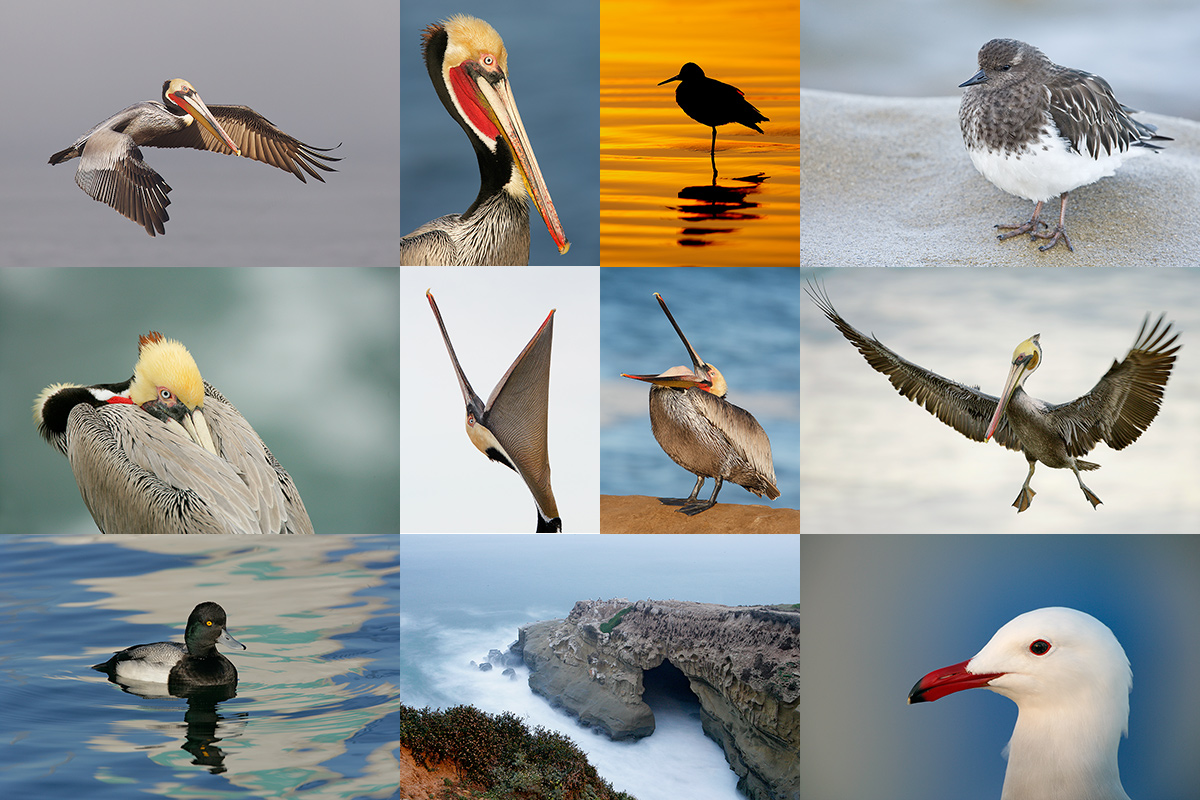
Join me in San Diego to photograph the spectacular breeding plumage Brown Pelicans with their fire-engine red and olive green bill pouches; Brandt’s (nesting) and Double-crested Cormorants; breeding plumage Wood and Ring-necked Ducks; other duck species possible including Lesser Scaup, Redhead, Northern Shoveler and Surf Scoter; a variety of gulls including Western, California, and the gorgeous Heermann’s, all in full breeding plumage; shorebirds including Marbled Godwit, Willet, Sanderling and Black-bellied Plover; many others are possible including Least, Western, and Spotted Sandpiper, Whimbrel, Black and Ruddy Turnstone, Semipalmated Plover, and Surfbird; Harbor Seals and California Sea Lions (both depending on the current regulations and restrictions). And as you can see by studying the IPT cards, there are some nice bird-scape and landscape opportunities as well. Not to mention a ton of excellent flight photography opportunities and instruction.
Please note: where permitted and on occasion, ducks and gulls may be attracted (or re-located) with offerings of grains or healthy bread.
|
|
|
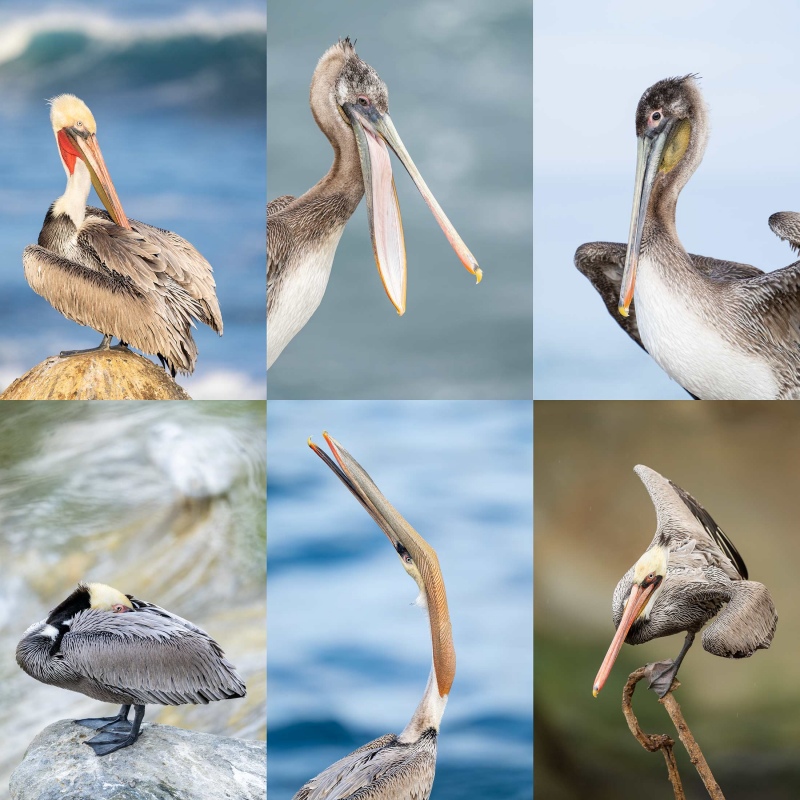
San Diego offers a wealth of very attractive natural history subjects, including and especially the Pacific race of California Brown Pelican. With annual visits spanning more than four decades, I have lots of photographic experience there … Click on the composite to enjoy a larger version.
|
Learning Exposure, Whether You Like It Or Not
Whether you like it or not, we will be beating the subject of exposure like a dead horse. In every new situation, you will hear my thoughts on exposure along with my thoughts on both Nikon and Canon histograms and SONY Zebras. Whether you like it or not, you will learn to work in manual mode so that you can get the right exposure every time (as long as a bird gives you ten seconds with the light constant). Or two seconds with SONY zebras … And you will learn what to do when the light is changing constantly. What you learn about exposure will be one of the great takeaways on every IPT.
|
|
|
Though the pelicans will be the stars of the show on this IPT, there will be many other handsome and captivating subjects in wonderful settings. Click on the composite to enjoy a larger version.
|
It Ain’t Just Pelicans
With gorgeous subjects just sitting there waiting to have their pictures taken, photographing the pelicans on the cliffs is about as easy as nature photography gets. With the winds from the east almost every morning there is usually some excellent flight photography as well, often with 70-200mm lenses! And the pelicans are almost always doing something interesting: preening, scratching, bill pouch cleaning, or squabbling. And then there are those crazy head throws that are thought to be a form of intra-flock communication. You will be guided as to how to make the best of those opportunities. Depending on the weather, the local conditions, and the tides, there are a variety of other fabulous photo chances available in and around San Diego.
|
|
|
Did I mention that there are lots of great birds and natural history subjects in San Diego in winter? Click on the composite to enjoy a larger version.
|
The San Diego Details
These IPTs will include four or five 3-hour morning photo sessions, three or four 1 1/2-hour afternoon photo sessions, and three or four working brunches that will include image review and Photoshop sessions. On rare cloudy days, we may — at the leader’s discretion, stay out in the morning for a long session and skip that afternoon. To ensure early starts, breakfasts will be your responsibility. And so that we can get some sleep, dinners will be on your own as well. In the extremely unlikely event that Goldfish Point is closed due to local ordinance (or whimsy) — that has never happened in the past fifty years, I will of course do my very best to maximize our photographic opportunities.
A $599 deposit is required to hold your slot for one of the 2022/23 San Diego IPTs. You can send a check (made out to “BIRDS AS ART”) to us here: BIRDS AS ART, PO Box 7245, Indian Lake Estates, FL, 3385, or call Jim or Jennifer at the office with a credit card at 863-692-0906. Your balance, payable only by check, is due three months before the trip.
|
|
|
San Diego offers a wealth of very attractive natural history subjects, including and especially the Pacific race of California Brown Pelican. With annual visits spanning more than four decades, I have lots of photographic experience there … Click on the composite to enjoy a larger version.
|
Travel Insurance
Travel insurance for both big international trips and US-based IPTs is highly recommended as we never know what life has in store for us. I strongly recommend that you purchase quality travel insurance. Travel Insurance Services offers a variety of plans and options. Included with the Elite Option or available as an upgrade to the Basic & Plus Options you can also purchase Cancel for Any Reason Coverage that expands the list of reasons for your canceling to include things such as sudden work or family obligation and even a simple change of mind. My family and I use and depend on the great policies offered by TIS whenever we travel. You can learn more here: Travel Insurance Services. Do note that many plans require that you purchase your travel insurance within 14 days of our cashing your deposit check or running your credit card. Whenever purchasing travel insurance, be sure to read the fine print carefully even when dealing with reputable firms like TSI.
|
|
|
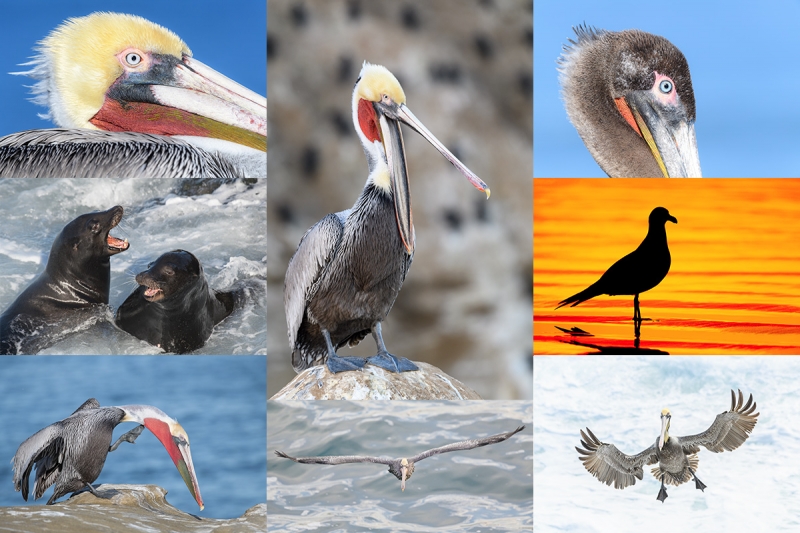
Variety is surely the spice of life in San Diego. Click on the composite to enjoy a larger version.
|
Getting Up Early and Staying Out Late
On all BIRDS AS ART IPTS including and especially the San Diego IPT, we get into the field early to take advantage of unique and often spectacular lighting conditions and we stay out late to maximize the chances of killer light and glorious sunset silhouette situations. We often arrive at the cliffs a full hour before anyone else shows up to check out the landscape and seascape opportunities.
Typos
With all blog posts, feel free to e-mail or to leave a comment regarding any typos or errors.
|
|

