April 17th, 2022 Which is the Stronger Image?
Why?
What’s Up?
I felt much better on Saturday morning. When I woke, I was not coughing at all. As the day progressed, I coughed a bit but nothing like the horrific hacking I experienced on Friday. I spent lots of time on the nebulizer. My pulse Ox again ranged from 93 to 96. All in all, things continue to improve.
Today is Sunday 17 April 2022. I am feeling great at 7:24am. We will see how the day progresses. Again, no worries, I will be taking it easy. I will start my edit of the Nikon Z9 Camera User’s Guide that was written by Warren Hatch, an excellent bird photographer who has been using the Z9 since Christmas. Beyond his extensive field experience with the camera, Warren has a unique knowledge of the camera’s capabilities. He decoded the Z9 EXIF information for Nikon. It is available in ExifTool – the preeminent utility for displaying the metadata information embedded in NEF image files. Wherever you are and whatever you are doing, I hope that you too have a great day. This blog post took about 40 minutes to prepare and makes thirty-seven days in a row with a new one.
Please remember to use the B&H and Amazon links that are found on most blog pages and to use the BIRDSASART discount code at checkout when purchasing your new gear from Bedfords. Please, also, consider joining a BAA IPT. You will be amazed at how much you will learn!
BIRDS AS ART Image Optimization Service (BAA IOS)
Send a PayPal for $62.00 to birdsasart@verizon.net or call Jim at 863-692-0906 and put $62.00 on your credit card. Pick one of your best images and upload the raw file using a large file sending service like Hightail or DropBox and then send me the link via e-mail. I will download and save your raw file, evaluate the exposure and sharpness, and optimize the image as if it were my own after converting the raw file in Adobe Camera Raw. Best of all, I will make a screen recording of the entire process and send you a link to the video to download, save and study.
|
|
|
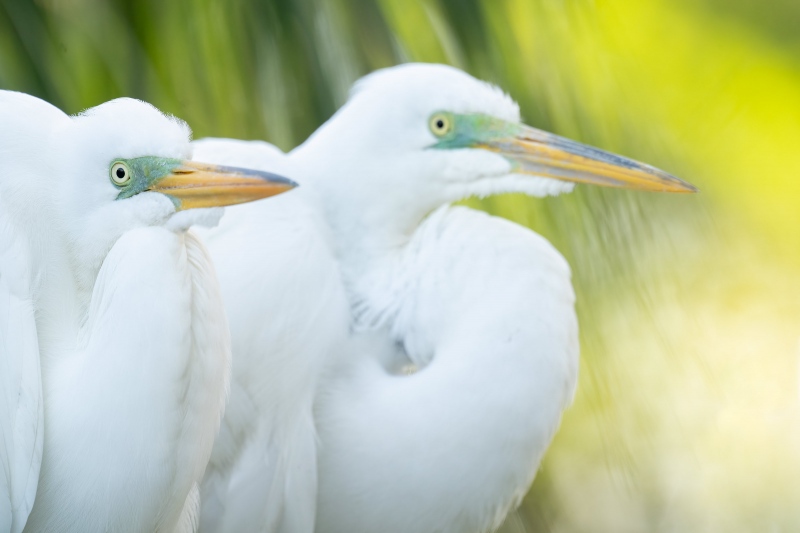
This image was created on 13 April 2022 at the St. Augustine Alligator Farm. I used the no-longer available Induro GIT304L Stealth Carbon Fiber Tripod/Levered-Clamp FlexShooter Pro-mounted-Sony FE 600mm f/4 GM OSS lens, the Sony FE 2.0x Teleconverter, and The One, the Sony Alpha 1 Mirrorless Digital Camera). the exposure was determined via Zebras technology with ISO on the Thumb Dial. ISO 1600. 1/160 sec. at f/8 (wide open) in Manual mode. The raw file brightness was perfect when evaluated in RawDigger. AWB at 8:35:32am in the shade on a mostly sunny morning.
Tracking: Spot S AF-C with Bird Face/Eye detection enabled performed to perfection. Be sure to click on the image to enjoy a high-res version.
Image #1: Great Egrets at their under-construction nest
|
St. Augustine Alligator Farm (SAAF) Photo Pass INFO (and my comments)
You can find all the details on the St. Augustine Alligator Farm Photo Pass here. If you plan on going this season, please read everything carefully. Here are the highlights along with my comments.
There are two types of SAAF photo passes, an Annual Photo Pass for $119.95 and a 2-Day Photo Pass for $74.95. The latter is good only on two consecutive days. The former is an amazing value. It gets you in early every single day from February 26 – June 26, 2022. The extended hours benefits include early entry at 8 am and weather-dependent late-stay until sunset. The length of the season is exceedingly generous and the daily entry with late stay is astounding. Compare those with Gatorland in Kissimmee where there are only ten days to the season with no late stay and you can see where I am coming from.
The only advantage to the Gatorland Pass is that you can enter at 7:00am rather than 8:00am. Standing on the line by the red door for 45 minutes at St. Augustine knowing that the sun rose before 7:00am and that the golden light is shining on the birds to the left of the long boardwalk is pure agony, at least for me. If they opened the doors at seven, they would have things perfected. I’d gladly pay a substantially increased price that included 7:00am entry. Hey, a guy can dream, can’t he?
As for conditions at both places this year, there are probably ten times as many nests at SAAF this year than at GL. As you have seen on the blog, there have been some very accessible Great Egret nests with small chicks at GL. As far as potential for the rest of the season, I believe that SAAF has a huge edge. Do understand that creating good photographs is a very difficult thing to do at both places. I wouldn’t mind spending a week at St. Augustine in early May …
I forgot to mention that you do not need to get a pass in advance. Show up, get on the line, and hand over your driver’s license and a credit card to the staff member at the gate and pick up your pass in the gift shop on your way out. Be sure to specify Annual or Two Day. And have fun.
If you live near either place, getting an Annual Pass is surely the way to go. If you will be coming from out of state, the Alligator Farm Annual Pass would make St. Augustine the obvious choice with daily extended entry, late stay, and lots of birds.
|
|
|
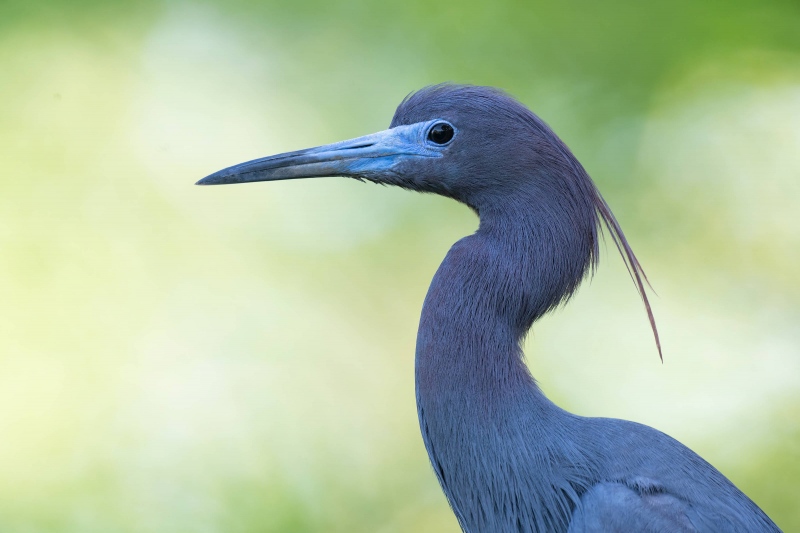
This image was also created on 13 April 2022 at the St. Augustine Alligator Farm. Again, I used the no-longer available Induro GIT304L Stealth Carbon Fiber Tripod/Levered-Clamp FlexShooter Pro-mounted-Sony FE 600mm f/4 GM OSS lens, the Sony FE 2.0x Teleconverter, and The One, the Sony Alpha 1 Mirrorless Digital Camera). the exposure was determined via Zebras technology with ISO on the Thumb Dial. ISO 1600. 1/125 sec. at f/8 (wide open) in Manual mode. The raw file brightness was about 1/6 stop too dark when evaluated in RawDigger. AWB at 8:47:13am in the shade on a mostly sunny morning.
Tracking: Spot S AF-C with Bird Face/Eye detection enabled performed to perfection. Be sure to click on the image to enjoy a high-res version.
Image #2: Little Blue Heron in breeding plumage
|
Tips on Making Good Images at SAAF in the Morning
As I have written a thousand times, rookeries are cluttered places. It is easy to make several thousand bad images in a single session without even trying. Whenever you are working at a rookery, you will do best by moving almost constantly, by being on the lookout for momentarily good situations, and by looking for clear shooting slots to a nest or a perched bird. Longer focal lengths will enable you to better isolate a bird or a nest. On sunny days, working wide and/or off sun angle will yield images with lots of harsh, unpleasant shadows. As it was sunny when I visited, I went to the 600 lens with a 2X teleconverter and only photographed birds in the shade. Those were often very gently backlit. On sunny mornings, the birds, and the nests on the right side of the boardwalk for the first sixty yards, are shaded for well more than an hour.
On sunny mornings with any decent wind from the south or the east, standing on the ramp with either a hand held or a tripod-mounted a flight lens can pay dividends. In retrospect, I should have tried that on my last visit, but I was in a hurry to get home and discover that I had COVID 🙂
The Image Clean-up
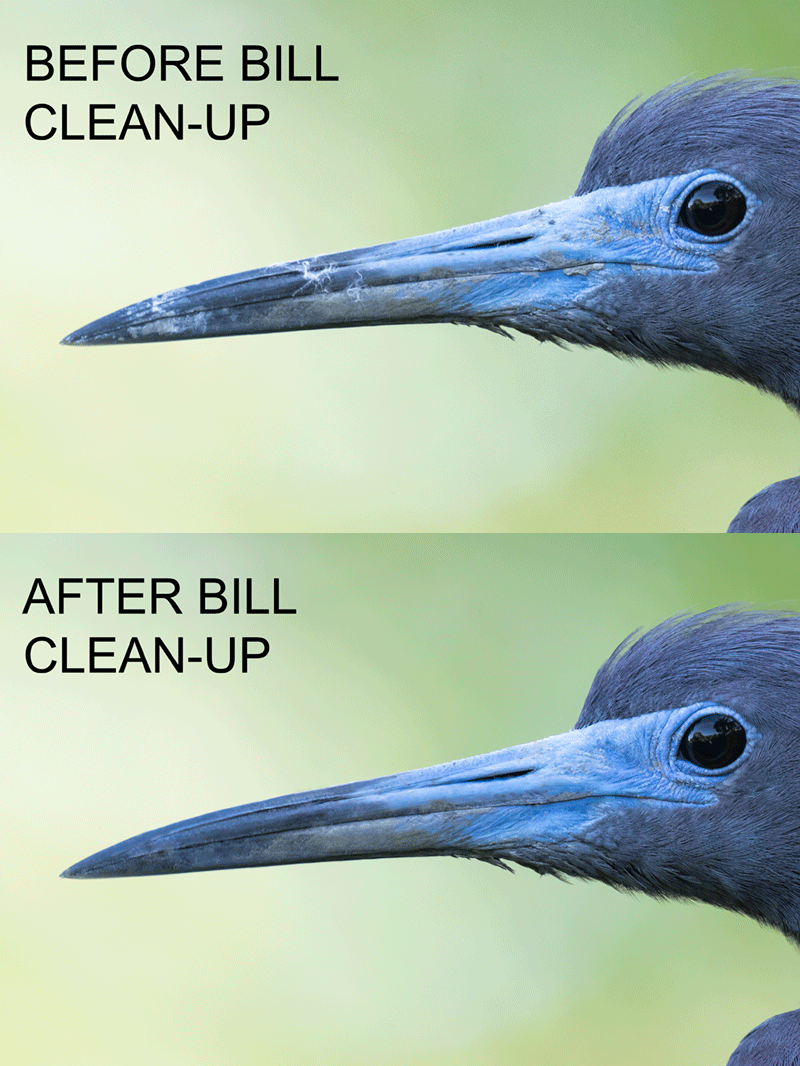
The habitat is not the only messy thing at the wading bird rookeries (especially after the chicks hatch). The beautiful breeding plumages of the adults is often spoiled by regurgitant, fish scales, goo, poop, and pretended body feathers. And the chicks, pristine at hatching, usually wind up an even worse mess. The bird in Image #2 was quite handsome but its bill had seen better days. I knew that to execute a successful clean-up I would need to work large, work slowly, and work carefully. So I did. I used my usual cadre of clean-up tools and techniques — the Spot Healing Brush, the Patch Tool, Content-Aware Fill, the Clone Stamp Tool, Divide and Conquer, and a series of small Quick Masks refined by Regular Layer Masks. Lastly, I used Select/Color Range to select the lightest tones on the base of the bill. I just those on their own layer and ran a Linear Burn at 30%.
I love the clean-up job — it took about 25 minutes in all. I also loved the clean plumage, the perfect head angle — about 1° toward us, the breeding plumes, and the un-cropped image design.
|
|
The BIRDS AS ART Current Workflow e-Guide (Digital Basics II).
You can order your copy from the BAA Online Store here, by sending a PayPal for $40 here, or by calling Jim or Jennifer weekdays at 863-692-0906 with your credit card in hand. Be sure to specify Digital Basics II.
|
The BIRDS AS ART Current Workflow e-Guide (Digital Basics II)
The tools and techniques mentioned above and tons more great Photoshop tips and techniques — along with all of my personalized Keyboard Shortcuts — are covered in detail in the BIRDS AS ART Current Workflow e-Guide (Digital Basics II), an instructional PDF that is sent via e-mail. Learn more and check out the free excerpt in the blog post here. While the new e-Guide reflects my MacBook Pro/Photo Mechanic/DPP 4/Photoshop workflow, folks using a PC and/or BreezeBrowser will also benefit greatly by studying the material on DB II. Note: folks working on a PC and/or those who do not want to miss anything Photoshop may wish to purchase the original Digital Basics along with DB II while saving $15 by clicking here to buy the DB Bundle.
Folks who learn well by following along rather than by reading can check out the complete collection of MP 4 Photoshop Tutorial Videos by clicking here. Note: all the videos are now priced at an amazingly low $5.00 each.
You can learn how and why I converted all of my Canon digital RAW files in DPP 4 in the DPP 4 RAW Conversion Guide here. More recently, I became proficient at converting my Nikon RAW (NEF) files in Adobe Camera Raw. About three years ago I began converting my Nikon and Sony RAW files in Capture One and did that for two years. You can learn more about Capture One in the Capture One Pro 12 Simplified MP4 Video here. The next step would be to get a copy of Arash Hazeghi’s “The Nikon Photographers’ Guide to Phase One Capture One Pro e-Guide” in the blog post here.
You can learn advanced Quick Masking and advanced Layer Masking techniques in APTATS I & II. You can save $15 by purchasing the pair.
Typos
With all blog posts, feel free to e-mail or to leave a comment regarding any typos or errors.
April 16th, 2022 What’s Up?
On Friday I took things very easy, coughed a lot, nebulized a lot, did lots of face dips, napped, and worked on some images from my last photo outing before COVID: St. Augustine Alligator Farm. My pulse OX was a constant 94-95 all day long. I am keeping a close eye on that as if it tanks, I will need to take some serious measures. Aside from the dry cough, I am feeling quite good. The Alligator Farm has the best Photo Pass around. I will be sharing Alligator Farm photo tips, SAAF Photo Pass details, and a suggestion for improving the pass system in the next blog post.
Today is Saturday 16 April 2022. I slept well and woke feeling much better. Pulse ox: 95. And best of all, the dry, hacking, tickily cough was gone. I will, however, continue to take it easy. Wherever you are and whatever you are doing, I hope that you too have a great day. This blog post took about 40 minutes to prepare and makes thirty-six days in a row with a new one.
Please remember to use the B&H and Amazon links that are found on most blog pages and to use the BIRDSASART discount code at checkout when purchasing your new gear from Bedfords. Please, also, consider joining a BAA IPT. You will be amazed at how much you will learn!
BIRDS AS ART Image Optimization Service (BAA IOS)
Send a PayPal for $62.00 to birdsasart@verizon.net or call Jim at 863-692-0906 and put $62.00 on your credit card. Pick one of your best images and upload the raw file using a large file sending service like Hightail or DropBox and then send me the link via e-mail. I will download and save your raw file, evaluate the exposure and sharpness, and optimize the image as if it were my own after converting the raw file in Adobe Camera Raw. Best of all, I will make a screen recording of the entire process and send you a link to the video to download, save and study.
And Please Remember
You can find some great photo accessories (and necessities, like surf booties!) on Amazon by clicking on the Stuff tab on the orange/yellow menu bar above. On a related note, it would be extremely helpful if blog-folks who, like me, spend too much money on Amazon, would get in the habit of clicking on the Amazon logo link on the right side of each blog post when they shop online. As you might expect, doing so will not cost you a single penny, but would be appreciated tremendously by yours truly. And doing so works seamlessly with your Amazon Prime account.
Please remember that if an item — a Delkin flash card, or a tripod head — for example, that is available from B&H and/or Bedfords, is also available in the BAA Online Store, it would be great, and greatly appreciated, if you would opt to purchase from us. We will match any price. Please remember also to use my B&H affiliate links or to earn 3% cash back at Bedfords by using the BIRDSASART discount code at checkout for your major gear purchases. Doing either often earns you free guides and/or discounts. And always earns my great appreciation.
Brand-New and As-Good-As-Ever Bedfords BAA Discount Policy
Folks who have fallen in love with Bedfords can now use the BIRDSASART coupon code at checkout to enjoy a post-purchase, 3% off-statement credit (excluding taxes and shipping charges) on orders paid with a credit card. The 3% credit will be refunded to the card you used for your purchase. Be sure, also, to check the box for free shipping to enjoy free Second Day Air Fed-Ex. This offer does not apply to purchases of Classes, Gift Cards, or to any prior purchases.
Money Saving Reminder
Many have learned that if you need a hot photo item that is out of stock at B&H and would like to enjoy getting 3% back on your credit card along with free 2nd Day Air Fed-Ex Air shipping, your best bet is to click here, place an order with Bedfords, and enter the coupon code BIRDSASART at checkout. If an item is out of stock, contact Steve Elkins via e-mail or on his cell phone at (479) 381-2592 (Central time). Be sure to mention the BIRDSASART coupon code and check the box for Free Shipping. That will automatically upgrade to free 2nd Day Air Fed-Ex. Steve has been great at getting folks the hot items that are out of stock at B&H and everywhere else. The waitlists at the big stores can be a year or longer for the hard-to-get items. Steve will surely get you your gear long before that. For the past year, he has been helping BAA Blog folks get their hands on items like the SONY a 1, the SONY 200-600 G OSS lens, the Canon EOS R5, the Canon RF 100-500mm lens, and the Nikon 500mm PF. Steve is personable, helpful, and eager to please.
Important Note
As an Amazon Associate, I earn a small percentage when you purchase from Amazon after using any of the Amazon links on the blog (including the logo-link immediately above). My link works with Amazon Prime and using it will not cost you a single cent. Huge thanks, BTW 🙂
Please Remember Also
Please, if you enjoy and learn from the blog, remember to use one of my two affiliate programs when purchasing new gear. Doing so just might make it possible for me to avoid having to try to get a job as a Walmart greeter and will not cost you a single penny more. And if you use Bedfords and remember to enter the BIRDSASART code at checkout, you will (still!) save 3% on every order and enjoy free second-day air shipping. In these crazy times — I lost about fifty thousand dollars in income due to COVID 19 — remembering to use my B&H link or to shop at Bedfords will help me out a ton and be greatly appreciated. Overseas folks who cannot order from the US because of import fees, duties, and taxes, are invited to help out by clicking here to leave a blog thank you gift if they see fit.


Gear Questions and Advice
Too many folks attending BAA IPTs and dozens of photographers whom I see in the field and on BPN, are–out of ignorance–using the wrong gear, especially when it comes to tripods and more especially, tripod heads… Please know that I am always glad to answer your gear questions via e-mail. If you are desperate, you can try me on my cell at 863-221-2372. Please leave a message and shoot me a text if I do not pick up.
|
|
|
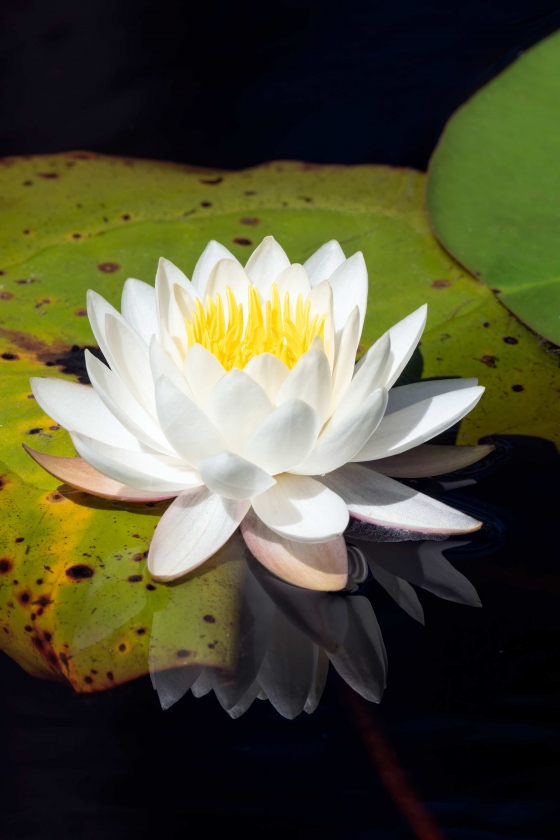
This image was created on 12 April 2022 at Okefenokee Swamp NWR during the BAA GNPA Post Expo IPT. I used the no-longer available Induro GIT304L Stealth Carbon Fiber Tripod/Levered-Clamp FlexShooter Pro-mounted-Sony FE 600mm f/4 GM OSS lens with the Sony FE 1.4x Teleconverter and The One, the Sony Alpha 1 Mirrorless digital camera body. ISO 400. The exposure was determined via Zebras with ISO on the rear dial: 1/200 sec. at f/16 (stopped down 2 2/3 stops) in Manual mode. AWB at 11:07:42am on a clear morning.
Manual focus with focus peaking worked perfectly as it showed that the edges of all the petals were sharply focused at f/16. Click on the image to see a larger version.
Image #1: American White Waterlily. (Nymphaeaceae– waterlily family)
|
True, False, or Ridiculous?
On my Wednesday morning visit to the St. Augustine Alligator Farm, there were more than 50 photographers and several 600mm f/4 lenses. As is usually the case at the gator rookeries, I seriously doubt that anyone but me made a single decent image. If you were there and would like to send me a JPEG of your best image via e-mail, I would be glad to apologize publicly if you send me a decent photo. As at Gatorland, everyone was working in the bright sun and most folks were working well off sun angle with their lenses pointed at extremely cluttered nests. Lastly, nobody but me was using a teleconverter (much less the 2X). Photos and lessons tomorrow.
I spoke with a woman on the entry line. I had given her my card. She had no idea who I was. She told me that she was having problems over-exposing the bright white Great Egrets in full sun. She said emphatically, “It is impossible to avoid over-exposing the whites in that situation. I said, You are wrong. It is easy to do so. Try 1/2500 sec. at f/8 at ISO 400 and you should be very close to a perfect exposure. She said, “I am self-taught, and you are wrong. It is impossible. I said, Please trust me, you are self-confused. I’d be glad to help you when we get inside. That was the last of our conversation.
I retrospect, I had heard that argument before. Was I confused or was the lady way off base?
Photographing American White Waterlily in Bright Midday Sun
When we got off the boat on Tuesday morning, Erik Bowles guided us along the refuge drive in search of baby gators, turtles, and flowers. Most of the creek was lit by off-angled bright sun. Photographing the baby gators in the black, backlit water was an exercise in futility. I rested in the car for a bit, unaware that I was coming down with COVID. Anyhoo, I walked around a curve in the road and found a single water lily blossom in full sun not too far from the road. I started with the 2x but quickly dropped down to 840mm and moved a bit closer to the subject.
As a general rule, folks are advised not to photograph bright white subjects in full sun near midday. Should I have followed that advice with regards to Image #1? Why or why not?
Finally, what does this image have to do with my conversation with the woman on the Alligator Farm entry line?
Typos
With all blog posts, feel free to e-mail or to leave a comment regarding any typos or errors.
April 15th, 2022 What’s Up?
The fever and exhaustion of Wednesday afternoon are long gone. My breathing is fine despite nasal and throat congestion and my pulse ox remains relatively constant at about 94-95. I spent all day yesterday with the dry, stickily cough experienced by many with COVID. And I have a slight eyeball headache (for the lack of a better term). I have been in contact with my family doctor and with several highly skilled personal health advisors. I am following the I-Mask+ Protocol from the Front Line COVID Critical Care Alliance. Learn more at the links here. Thanks to all for their get-well wishes.
Today is Friday 15 April 2022. Again, I will be taking it easy. Wherever you are and whatever you are doing, I hope that you too have a great day. This blog post took about 45 minutes to prepare and makes thirty-five days in a row with a new one.
Please remember to use the B&H and Amazon links that are found on most blog pages and to use the BIRDSASART discount code at checkout when purchasing your new gear from Bedfords. Please, also, consider joining a BAA IPT. You will be amazed at how much you will learn!
BIRDS AS ART Image Optimization Service (BAA IOS)
Send a PayPal for $62.00 to birdsasart@verizon.net or call Jim at 863-692-0906 and put $62.00 on your credit card. Then use a large file sending service link Hightail or DropBox and send me the raw file for one of you very best (preferably sharp) images. I will download and save the file, evaluative the exposure and sharpness, and optimize the image as if it were my own after converting the raw file in Adobe Camera Raw. Best of all, I will make a screen recording of the whole process and send you a link to the file.
|
|
|
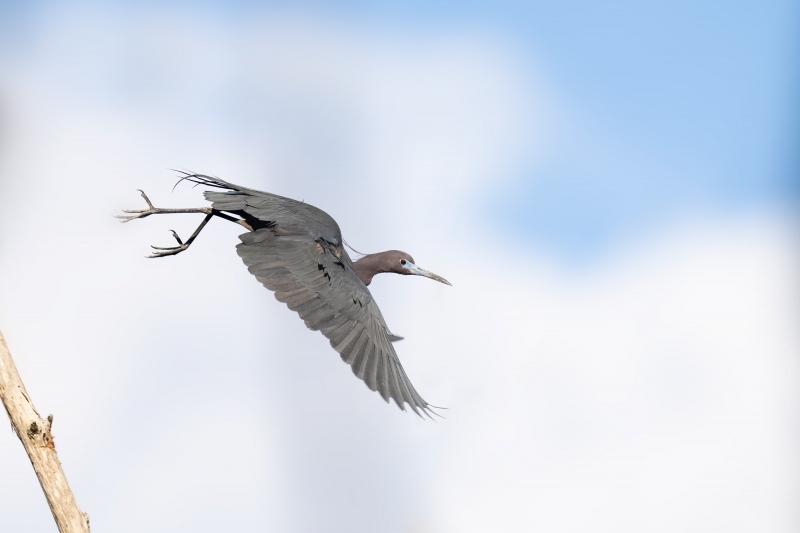
This image was created on 12 April 2022 from a tour boat at Okefenokee Swamp NWR, GA. I used the hand held Sony FE 600mm f/4 GM OSS lens and The One, the Sony Alpha 1 Mirrorless Digital Camera. Multi Metering +1.7 stops. Auto ISO set ISO 160. The exposure was determined via Zebras with Exposure Compensation on the rear wheel: 1/1000 sec. at f/4 (wide open) in Shutter Priority (S or Tv) mode. AWB at 8:23:14am on a sunny morning.
Tracking: Zone with Bird Face/Eye detection enabled produced a sharp-on-the-eye image despite that fact that active AF point was on the sky behind the bird! Be sure to click on the image to enjoy a high-res version.
Image #1: Little Blue Heron taking flight
|
Screwing Up and Getting Lucky!
So, why was I in Shutter Priority mode? We had some subjects in deep shade and others in bright sun. We had light sky and dark green vegetations backgrounds. Experienced folks can do well by dialing in the correct Exposure Compensation (EC) while letting the camera determine the ISO automatically. Note: this approach is recommended in similar situations only for experienced photographers who have mastered Exposure Theory (as detailed in the original The Art of Bird Photography).
I was using the best mode for the situation and set the EC correctly to +1.7 stops. So how exactly did I screw up? The shutter speed that I set was far less than ideal for a flight shot. Notice the ISO, a ridiculously low 160. Has I gone to a shutter speed of 1/4000 second, the camera would have set the ISO to 640. A faster shutter speed would have been much better for several reasons:
1- The boat was moving.
2- I was shooting flight.
3- I was hand holding a large, heavy lens, the 600mm f/4 GM OSS.
I screwed up because I was excited to be in a boat tooling by a wading bird rookery where Little Blue Heron was the predominate species and because there were lots of very different photo opportunities. In short, I was excited that I was not thinking clearly.
Today’s featured image, one of a series of eleven, was the sharpest of the lot. In addition, it had the best wing position along with a head turn toward me. Lucky indeed!
Does Anything Bug You?
If yes, please do share.
|
|
|
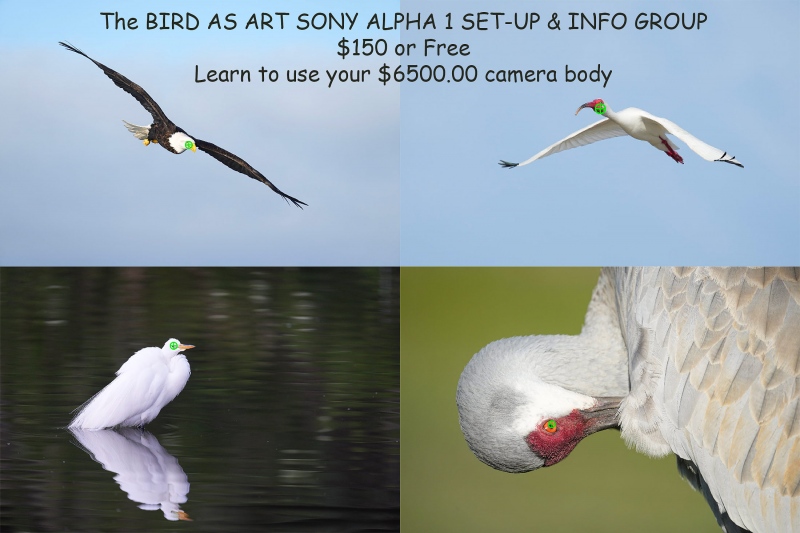
Click on the image to better see the green eye-AF boxes in action.
Sony Alpha 1 Flight Photography AF Points!
|
The SONY Alpha a1 Set-up Guide and Info Group: $150.00 (or Free)
The SONY Alpha a1 Set-up Guide and Info Group is going great guns as more and more folks chime in with thoughtful questions and experience-based answers. As the a1 is becoming more readily available, more and more folks are getting their hands on this amazing body. By early April, the group was up to an astounding 113 lucky and blessed folks. Early on, we discussed the myriad AF options. I gave my opinion as to the best one for flight and general bird photography. The best news is that everyone in the group receives an e-mail that includes a .DAT file with my a1 settings on it, and explicit directions on how to load my settings onto your a1; talk about convenience! I am now offering a .DAT file compatible with firmware update 1.20. Your entry into the group includes a consolidated Sony a1 CAMSETA2 INFO & GUIDE. New a1 folks will now receive three e-mails instead of the previous 28! You will see new e-mails as they are published. Simply put, this e-mail guide is an incredible resource for anyone with an a1.
All who purchased their Alpha 1 bodies via a BAA affiliate link — B&H or Bedfords — will receive a free Sony Alpha a1 Set-Up Guide and free entry into the Info Updates group after shooting me their receipts via e-mail. (Note: it may take me several days to confirm B&H orders.). Others can purchase their guide here in the BAA Online Store.
Typos
With all blog posts, feel free to e-mail or to leave a comment regarding any typos or errors.
|
|
