August 20th, 2021 Your Call?
Which of today’s two featured avian images is best? All are invited to leave a comment and let us know why they made their choice.
Canon RF 24-70mm f/2.8L IS USM Lenses in Stock at Bedfords!
The personable, helpful, and always eager-to-please Steve Elkins let me know yesterday that Bedfords just received more than a few Canon RF 24-70mm f/2.8L IS USM lenses. Grab yours here right now to secure one. Remember that if you spend more than $7500.00 and use the BIRDS AS ART code at checkout, you earn a free copy of the R5/R6 Camera User’s Guide. Spend less and shoot me an e-mail to learn of your discount. The R5 and R6 are Canon’s best-ever bodies for flight photography and the RF 100-500 lens is a great all-around lens for bird photography. The 24-70 is the landscape photographers dream lens.
By e-Mail From Hawaii’s Best Best Photographer
Aloha Artie,
It’s been a while. I always enjoy your blog; it’s the first thing I read each morning! Better than all of the sad Covid news that’s going around.
I sold almost all my EOS cameras and lenses (except for the 500mm f/4 that I bought from you years ago 🙂 and switched to the Canon R5. I bought it through Bedfords and used the BIRDSASART code to get a great discount. Steve Elkins was wonderful to work with. Many thanks for all of this. I’m ready to order the R5 Camera Users Guide from you. Somehow I didn’t know you were giving discounts on the Guide for purchases from Bedford’s. So, what do you need as proof of purchase? I spent $7577 for my new gear at Bedfords Order #45765.
Hope to see you out here one of the days.
All the best,
Jack Jeffrey
Pepeekeo, Hawaii
(Note: Jack received his R5 Guide for free.)
What’s Up?
I spent most of Thursday packing up for my upcoming four-morning trip to Jamaica Bay. Today is Friday 20 August and I will be headed west very early. Wherever you are, and whatever you are doing, I hope that you too have a great day.
Please note that it is best to click on each blog image to view it larger. For unknown reasons, the images — even the verticals that are not rendered larger, look sharper once they’ve been clicked on.
Remember that you can find some great photo accessories (and necessities!) on Amazon by clicking on the Stuff tab on the orange/yellow menu bar above. On a related note, it would be extremely helpful if blog-folks like me, who spend too much money on Amazon, would get in the habit of clicking on the Amazon logo link on the right side of each blog post when they shop online. As you might expect, doing so will not cost you a single penny, but would be appreciated tremendously by yours truly. And doing so works seamlessly with your Amazon Prime account.
This blog post took about 90 minutes to prepare and makes 232 consecutive days with a new one. Please remember that if an item — a Delkin flash card, or a tripod head — for example, that is available from B&H and/or Bedfords, is also available in the BAA Online Store, it would be great, and greatly appreciated, if you would opt to purchase from us. We will match any price. Please remember also to use my B&H affiliate links or to save 3% at Bedfords by using the BIRDSASART discount code at checkout. Doing either often earns you free guides and/or discounts. And doing so always earns my great appreciation.
Please Remember
With income from IPTs now close to zero, please, if you enjoy and learn from the blog, remember to use one of my two affiliate programs when purchasing new gear. Doing so just might make it possible for me to avoid having to try to get a job as a Walmart greeter and will not cost you a single penny more. And if you use Bedfords and remember to enter the BIRDSASART code at checkout, you will save 3% on every order and enjoy free second-day air shipping. In these crazy times — I am out at least forty to sixty thousand dollars so far due to COVID 19 (with lots more to come) — remembering to use my B&H link or to shop at Bedfords will help me out a ton and be greatly appreciated. Overseas folks who cannot order from the US because of import fees, duties, and taxes, are invited to help out by clicking here to leave a blog thank you gift if they see fit.
New and Better Bedfords Discount Policy!
You can now save 3% on all of your Bedfords photo gear purchases by entering the BIRDSASART coupon code at checkout. Your discount will be applied to your pre-tax total. In addition, by using the code you will get 2nd day air shipping via Fed Ex.
Grab a Nikon AF-S Teleconverter TC-14E III and save $14.99. Purchase a Canon EOS R5 and your discount will be $116.97. Purchase a Sony FE 600mm f/4 GM OSS lens and save a remarkable $389.94! Your Bedford’s purchase no longer needs to be greater than $1,000.00 for you to receive a discount. The more you spend, the more you save.
Money Saving Reminder
Many have learned that if you need a hot photo item that is out of stock at B&H and would enjoy free second-day air shipping, your best bet is to click here, place an order with Bedfords, and enter the coupon code BIRDSASART at checkout. If an item is out of stock, contact Steve Elkins via e-mail or on his cell phone at (479) 381-2592 (Central time). Be sure to mention the BIRDSASART coupon code and use it for your online order to save 3% and enjoy free 2nd-day air shipping. Steve has been great at getting folks the hot items that are out of stock at B&H and everywhere else. The wait lists at the big stores can be a year or longer for the hard to get items. Steve will surely get you your gear long before that. For the past year, he has been helping BAA Blog folks get their hands on items like the SONY a9 ii, the SONY 200-600 G OSS lens, the Canon EOS R5, the Canon RF 100-500mm lens, and the Nikon 500mm PF. Steve is personable, helpful, and eager to please.


Gear Questions and Advice
Too many folks attending BAA IPTs (remember those?) and dozens of photographers whom I see in the field and on BPN, are–out of ignorance–using the wrong gear, especially when it comes to tripods and more especially, tripod heads… Please know that I am always glad to answer your gear questions via e-mail.
|
|
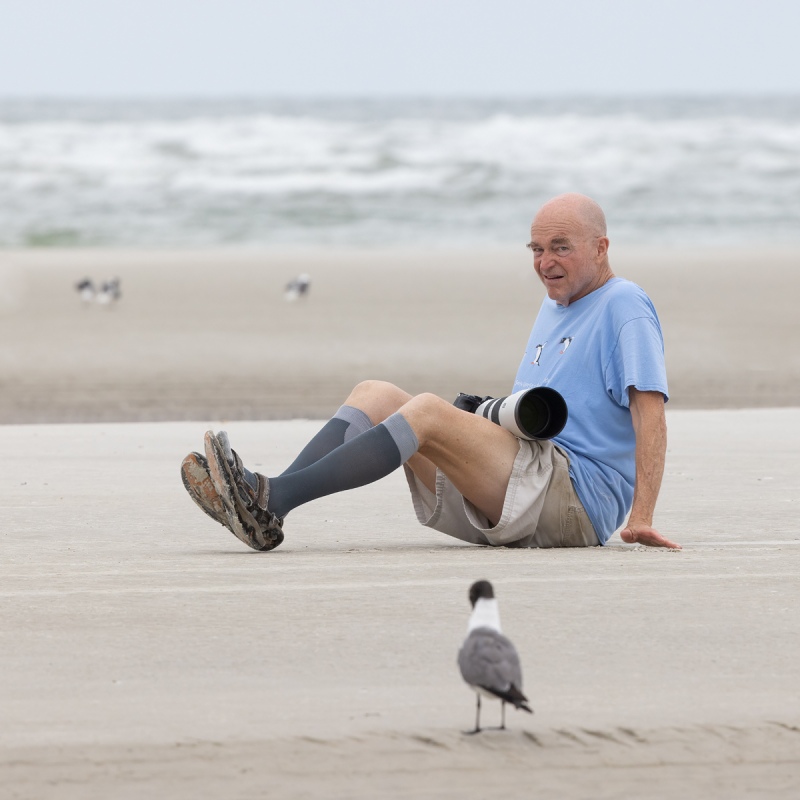
Image #1: Butt-advancing image
Image courteous and copyright 2021: Clemens Van der Werf
|
Beach Butt-Advancing
Advancing on your butt with the lens resting across your thighs is not as difficult as the look on my face might indicate 🙁
As detailed in yesterday’s blog post:
It is always best to get on the ground sooner rather than later. Flushing a flock of birds as you approach will not help your chances. Then set the lowest shutter speed that will enable you to make sharp images and have a chance to freeze slow-developing action … For me that is 1/500 sec. or thereabouts. Next for me with my Sony gear is to dial the ISO until I see faint Zebras on the subject. With your Zebras set properly as noted in the a1 SONY Alpha a1 Set-up and Info Group e-mails and in the SONY Camera User’s Guide, getting consistently excellent exposures is child’s play. (Note: a1 Group members receive a free copy of the SONY User’s Guide for reference.)
Next I set my AF method. For both of today’s images I went to Tracking: Spot S/AF-C. E-mail #23 to the a1 Group — coming soon — will detail recent changes I have made to further simplify how I used the AF system. Next I place the lens on my thighs and push myself forward with both of my hands (made into fists). You need to be careful that the lens does not fall off into the sand. With practice it becomes easy. One of my main goals is to isolate a single bird or a feeding situation. Such situations are most often found on the edges of the flock, so I go left or right as needed, often to stay on sun angle. On cloudy days like 15 August, you are not restricted by sun angle. Once I get into position, I brush the sand off my hands on my long-sleeved shirt.
Thanks to Clemens for allowing me to share this image with you here.
|
|
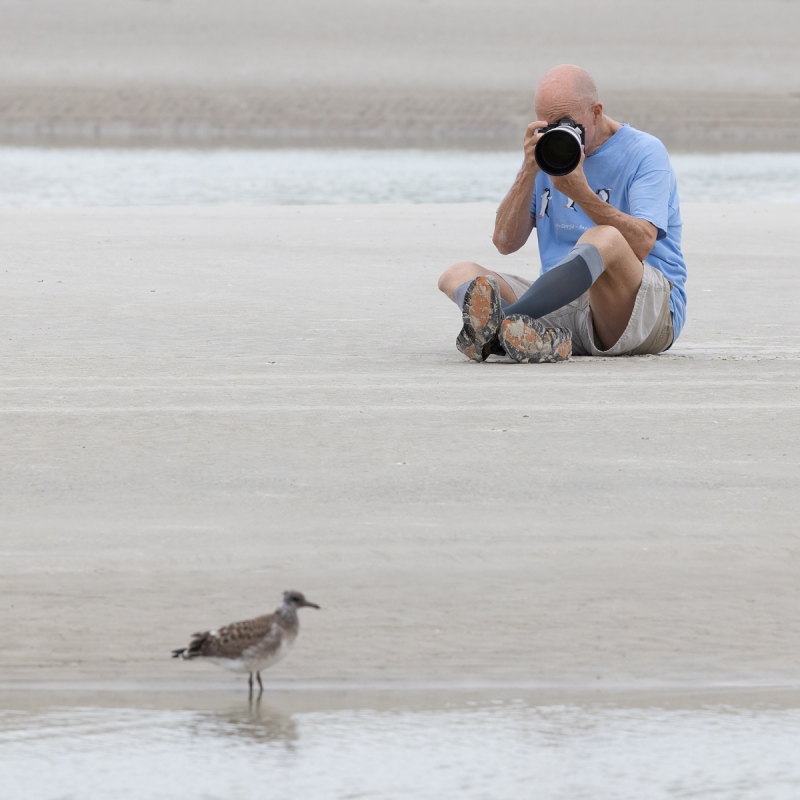
Image #2: artie Knee-podding image
Image courteous and copyright 2021: Clemens Van der Werf
|
Knee-podding
I use this technique often. I rest the proximal underside of my left forearm on the back of my left knee and the distal upper portion of my left thigh. It yields a relatively low perspective while enabling me to eliminate potentially distracting elements in the background that would come into play if you worked with the lens on or near the ground. And it allows for the use of shutter speeds as slow as 1/60 second as long as the subject is still.
Thanks again to Clemens for allowing me to share this image with you here.
|
|
|
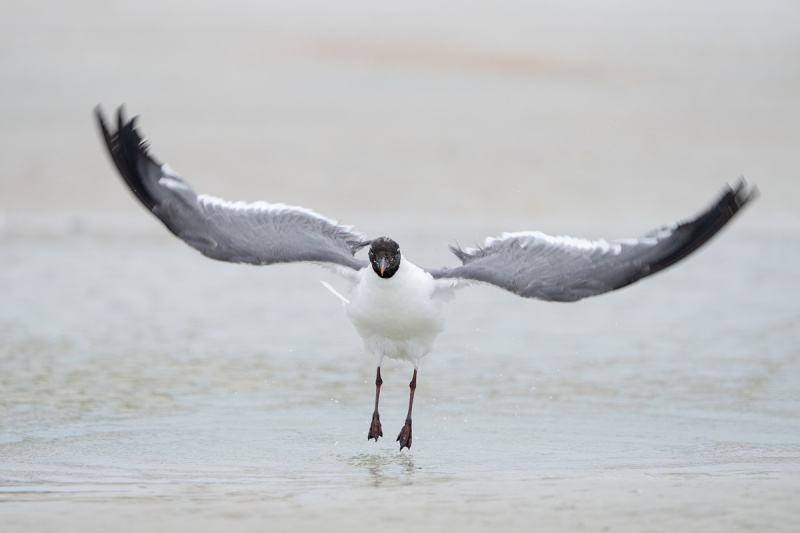
This image was created on 29 July on one of the Jacksonville IPTs. While seated on wet sand using the knee pod technique, I used the hand held Sony FE 200-600mm f/5.6-6.3 G OSS lens (at 452mm) and The One, the Sony Alpha 1 Mirrorless digital camera. ISO 1600. Exposure determined via Zebras with ISO on the rear dial: 1/1600 sec. at f/6.3 (wide open) in Manual mode. AWB at 6:25pm on a cloudy afternoon.
Center Zone/AF-C Bird/Eye Detection AF was active at the moment exposure and created a sharp-on-the-eye image.
Be sure to click on the image to enjoy a larger, often inexplicably sharper version.
Image #3: Laughing Gull, adult flapping after bath
|
Bathing Gull (and Tern) Tips
When you see a bird dipping its breast and head into shallow water, it will almost always flap at some point. Get closer or zoom in to create dramatic images of the splashing water, or move back and zoom out to create images of the after-bath flapping. It is best to move back or zoom out more than you think is necessary to avoid clipping the wings. I kept ten of 13 sharp images from this series with only one tiny primary tip clipped. There were so many interesting images that choosing just one was difficult.
|
|
|
This image was created on 29 July on one of the Jacksonville IPTs. While seated on wet sand using the knee pod technique, I used the hand held Sony FE 200-600mm f/5.6-6.3 G OSS lens (at 535mm) and The One, the Sony Alpha 1 Mirrorless digital camera. ISO 1600. Exposure determined via Zebras with ISO on the rear dial: 1/1000 sec. at f/6.3 (wide open) in Manual mode. AWB at 6:31pm on a cloudy afternoon.
Tracking: Flexible Spot/AF-C Bird/Eye Detection AF was active at the moment exposure and created a sharp-on-the-eye image.
Be sure to click on the image to enjoy a larger, often inexplicably sharper version.
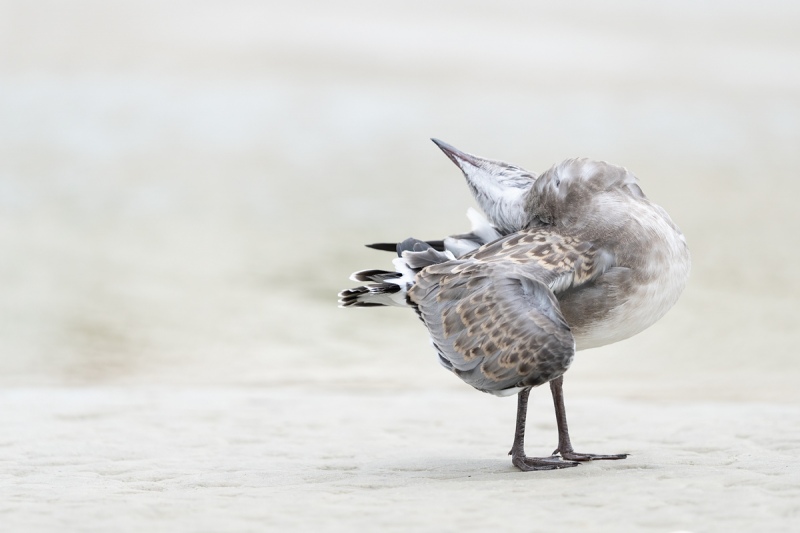
Image #4: Laughing Gull, juvenile preening after bath
|
After Bath Preening
Do you need to see a bird’s eye or eyes in order to have a successful image?
Typos
With all blog posts, feel free to e-mail or to leave a comment regarding any typos or errors.
August 19th, 2021 Your Call?
Which of today’s two featured images is more endearing? Which one do you like best? All are invited to leave a comment and let us know why they made their choice or choices.
What’s Up?
Not much. I spent most of the day e-mailing and texting. Late in the day, I attempted to check up on the three credit cards that I lost recently in one fell swoop about ten days ago 🙁 Have you ever been in phone system menu hell? Rarely speaking to a human, I spent 1 1/2 hours on the phone dealing with just two of the lost cards. Today is Thursday 18 August 2021. It took me three minutes this morning to request a new card from Citi-AA Advantage … I will be packing for my four-morning JBWR outing. I have been receiving glowing reports about the great conditions and great birds on the East Pond. It is not too late to join me on Saturday or Sunday. Wherever you are, and whatever you are doing, I hope that you too have a great day.
I just realized that August 7 passed last week without notice. It marked 38 years since I bought my SLR and my first telephoto lens: the Canon AE1 and the Canon 400mm f/4.5 FD — all film and manual focus. And boy oh boy, I did not have a clue!
Please note that it is best to click on each blog image to view it larger. For unknown reasons, the images — even the verticals that are not rendered larger, look sharper once they’ve been clicked on.
Remember that you can find some great photo accessories (and necessities!) on Amazon by clicking on the Stuff tab on the orange/yellow menu bar above. On a related note, it would be extremely helpful if blog-folks like me, who spend too much money on Amazon, would get in the habit of clicking on the Amazon logo link on the right side of each blog post when they shop online. As you might expect, doing so will not cost you a single penny, but would be appreciated tremendously by yours truly. And doing so works seamlessly with your Amazon Prime account.
This blog post took about 90 minutes to prepare and makes 231 consecutive days with a new one. Please remember that if an item — a Delkin flash card, or a tripod head — for example, that is available from B&H and/or Bedfords, is also available in the BAA Online Store, it would be great, and greatly appreciated, if you would opt to purchase from us. We will match any price. Please remember also to use my B&H affiliate links or to save 3% at Bedfords by using the BIRDSASART discount code at checkout. Doing either often earns you free guides and/or discounts. And doing so always earns my great appreciation.
German Bird Photography Help Needed
If anyone has any bird photography contacts for folks around Karslruhe or Baden-Baden, please get in touch via e-mail.
|
|
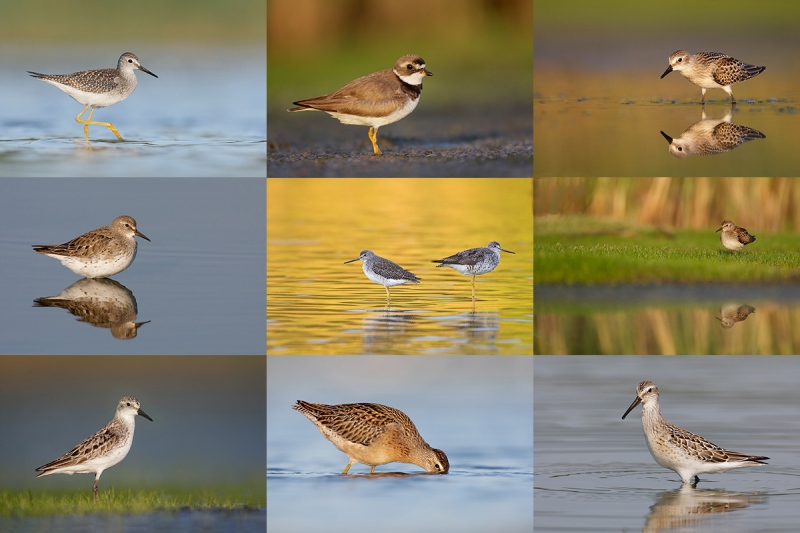
All from the East Pond at JBWR in August
|
Jamaica Bay Wildlife Refuge/East Pond Shorebird In-the-Field Workshops
Saturday 21 August 2021. Morning session: 6:00 until 9:00am (Limit: 6/Openings: 3)
Sunday 22 August 2021. Morning session: 6:00 until 9:00am (Limit 6/Openings 4)
For many decades, the East Pond at JBWR was the premier spot in North America to photograph southbound migrant shorebirds: small sandpipers (known affectionately as “peeps”), plovers, godwits, dowitchers, yellowlegs, and lots more. The pond, the spot where I would like my ashes to be scattered (in about two decades), has not been good for many years because of gate valve malfunction and mismanagement of the resource. Combined, these resulted in water levels that were too high; the mudflats that normally would provide roosting and feeding locations for large flocks of shorebirds were covered.
The refuge staff finally seems to have things under control this year. Water levels at the south end are reported as the best in a decade. The young birds usually arrive around 15 AUG. They are much, much tamer than the skittish adults that begin arriving around 1 July each year. The tides are perfect for 21-22 AUG. That weekend will potentially offer the best juvenile shorebird photography in many, many years. Weather and migratory patterns permitting. You will need to get your butt muddy as you cannot do the shorebirds while standing.
Consider joining me to learn the history of the pond, to learn to identify and age a variety of shorebird species, to learn how to approach the birds, and to improve your photography. I am expecting to have some very good chances for creating images of single birds in flight.
In-the-Field morning session alone: $350/session. With brunch and image review: $425/per session.
An option would be to stay over, grab a motel room, and do both morning sessions. In addition, you might want to add in a 6pm till sunset session at Nickerson Beach for only $250.00. To learn more or too register, please shoot me an e-mail.
Please Remember
With income from IPTs now close to zero, please, if you enjoy and learn from the blog, remember to use one of my two affiliate programs when purchasing new gear. Doing so just might make it possible for me to avoid having to try to get a job as a Walmart greeter and will not cost you a single penny more. And if you use Bedfords and remember to enter the BIRDSASART code at checkout, you will save 3% on every order and enjoy free second-day air shipping. In these crazy times — I am out at least forty to sixty thousand dollars so far due to COVID 19 (with lots more to come) — remembering to use my B&H link or to shop at Bedfords will help me out a ton and be greatly appreciated. Overseas folks who cannot order from the US because of import fees, duties, and taxes, are invited to help out by clicking here to leave a blog thank you gift if they see fit.
New and Better Bedfords Discount Policy!
You can now save 3% on all of your Bedfords photo gear purchases by entering the BIRDSASART coupon code at checkout. Your discount will be applied to your pre-tax total. In addition, by using the code you will get 2nd day air shipping via Fed Ex.
Grab a Nikon AF-S Teleconverter TC-14E III and save $14.99. Purchase a Canon EOS R5 and your discount will be $116.97. Purchase a Sony FE 600mm f/4 GM OSS lens and save a remarkable $389.94! Your Bedford’s purchase no longer needs to be greater than $1,000.00 for you to receive a discount. The more you spend, the more you save.
Money Saving Reminder
Many have learned that if you need a hot photo item that is out of stock at B&H and would enjoy free second-day air shipping, your best bet is to click here, place an order with Bedfords, and enter the coupon code BIRDSASART at checkout. If an item is out of stock, contact Steve Elkins via e-mail or on his cell phone at (479) 381-2592 (Central time). Be sure to mention the BIRDSASART coupon code and use it for your online order to save 3% and enjoy free 2nd-day air shipping. Steve has been great at getting folks the hot items that are out of stock at B&H and everywhere else. The wait lists at the big stores can be a year or longer for the hard to get items. Steve will surely get you your gear long before that. For the past year, he has been helping BAA Blog folks get their hands on items like the SONY a9 ii, the SONY 200-600 G OSS lens, the Canon EOS R5, the Canon RF 100-500mm lens, and the Nikon 500mm PF. Steve is personable, helpful, and eager to please.


Gear Questions and Advice
Too many folks attending BAA IPTs (remember those?) and dozens of photographers whom I see in the field and on BPN, are–out of ignorance–using the wrong gear, especially when it comes to tripods and more especially, tripod heads… Please know that I am always glad to answer your gear questions via e-mail.
|
|
|
This image was created on 15 August 2021 at Nickerson Beach, Long Island, NY. While seated on dry sand using the knee pod technique, I used the hand held I used the hand held Sony FE 200-600mm f/5.6-6.3 G OSS lens with the Sony FE 1.4x Teleconverter (at 840mm) with the One, the Sony a1 Mirrorless Camera. ISO 1600. Exposure determined via Zebras with ISO on the Thumb Wheel: RawDigger showed that the raw file brightness was dead solid perfect: 1/500 sec. at f/9 (wide open) in Manual mode. AWB at 7:11am on a cloudy morning.
Tracking: Spot S/AF-C with Bird-Eye/Face Detection performed perfectly by tracking and nailing the bird’s eye.
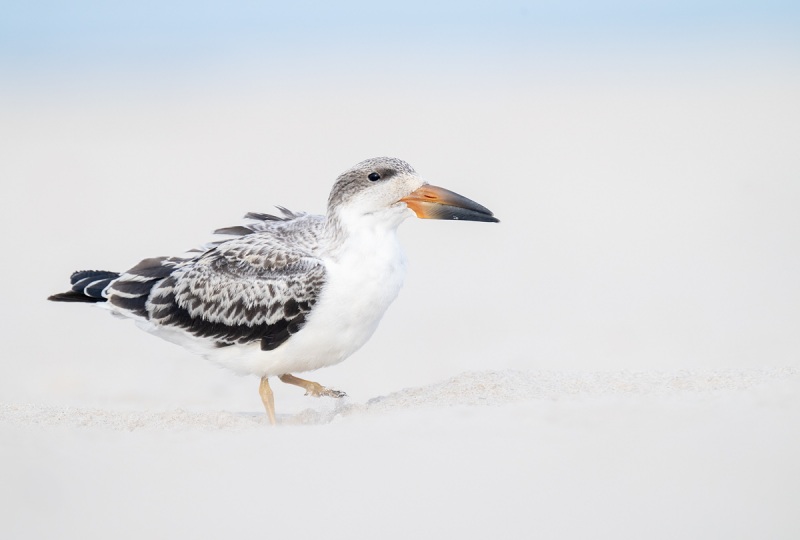
Image #1: Black Skimmer fledgling about four weeks old
|
Butt-crawling on the Beach Strategies
It is always best to get on the ground sooner rather than later. Flushing a flock of birds as you approach will not help your chances. Then set the lowest shutter speed that will enable you to make sharp images and have a chance to freeze slow-developing action … For me that is 1/500 sec. or thereabouts. Next for me with my Sony gear is to dial the ISO until I see faint Zebras on the subject. With your Zebras set properly as noted in the a1 SONY Alpha a1 Set-up and Info Group e-mails and in the SONY Camera User’s Guide, getting consistently excellent exposures is child’s play. (Note: a1 Group members receive a free copy of the SONY User’s Guide for reference.)
Next I set my AF method. For both of today’s images I went to Tracking: Spot S/AF-C. E-mail #23 to the a1 Group will detail recent changes I have made to further simplify how I used the AF system. Next I place the lens on my thighs and push myself forward with both of my hands (made into fists). You need to be careful that the lens does not fall off into the sand. With practice it becomes easy. One of my main goals is to isolate a single bird or a feeding situation. Such situations are most often found on the edges of the flock, so I go left or right as needed, often to stay on sun angle. On cloudy days like 15 August, you are not restricted by sun angle. Once I get into position, I brush the sand off my hands on my long-sleeved shirt.
I will usually go to the knee-pod technique first. In some situations, I will put the lens on the ground by building a small sand mound to support the lens hood. Or, I can put the lens either right on the ground or on my left ankle. When working low, I toggle the level to On (of course as detailed in the a Group e-mails). And I make sure to put on my reading glasses so that I can see the AF system in action and better view the level. Once everything is good, I start pushing the shutter button. With the 1.4X TC in place when working at f/9 in low light situations, I am dead in the water as far as flight and fast action is concerned.
|
|
|
This image was created on 15 August 2021 at Nickerson Beach, Long Island, NY. While seated on dry sand using the knee pod technique, I used the hand held I used the hand held Sony FE 200-600mm f/5.6-6.3 G OSS lens with the Sony FE 1.4x Teleconverter (at 840mm) with the One, the Sony a1 Mirrorless Camera. ISO 1600. Exposure determined via Zebras with ISO on the Thumb Wheel: RawDigger showed that the raw file brightness was dead solid perfect: 1/640 sec. at f/9 (wide open) in Manual mode. AWB at 7:33am on a cloudy morning.
Tracking: Spot S/AF-C with Bird-Eye/Face Detection performed perfectly by tracking and nailing the bird’s eye.
Image #2: Black Skimmer chick about three weeks old
|
Skimmer Chicks Getting Bigger
Though there are still some small and medium-sized Black Skimmer chicks about, most are quite large. The bird in Image #1 is about a week older than the large chick in Image #2. Note the longer primary (and tertian ?) feathers of the bird in Image #1. That bird is likely capable of flight. I have loved watching and learning about the growth and development of the Least Tern chicks in South Florida, the Royal Tern and Laughing Gull chicks at Jacksonville, and now, the Black Skimmer chicks at Nickerson Beach.
|
|
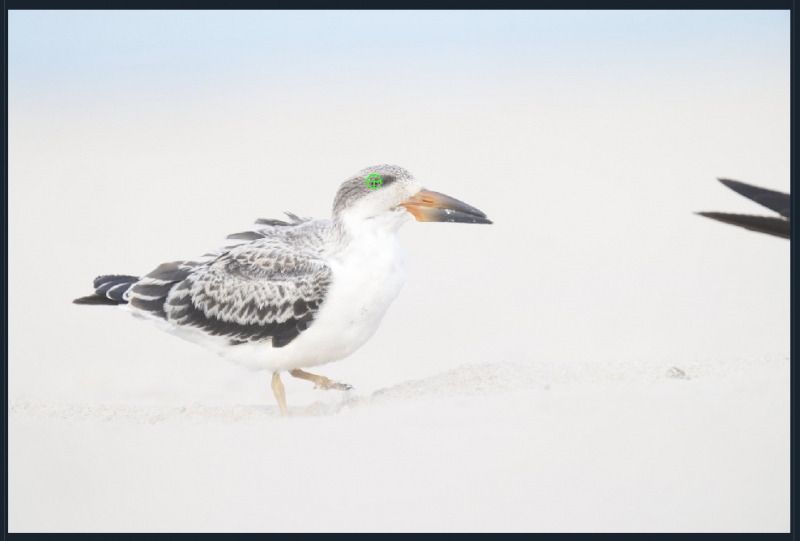
Image #2A: AF Point for the Black Skimmer chick about three weeks old image
|
SONY a1 AF: Beyond Belief …
a1 Bird-Eye/Face Detection has gotten much better since the V1.10 firmware update that completely eliminated the EVF Blackout problems. It has become easier to trust the AF system whether working birds perched or on the ground, when doing flight photography, or when working off the tilted rear screen with the tripod almost at ground level. In short, thee a1 AF system is amazing.
SONY and artie
Switching to SONY, first with the a9 and the a9 II, and then to the remarkable a1, has enabled me (and others, like Mike De Rosa as seen a while ago in the blog post here), to create images of birds in flight and in action that I could not have even dreamed of when using Canon for 33 years and then Nikon for more than two. Most of the time I am using one of two AF methods that together, cover about 99% of the commonly-encountered bird photography situations. At present, I am experimenting beyond those … Learn more by joining the group!
From Long-ago IPT veteran Keith Kennedy via e-mail
Absolutely great information. I am calling Jim in a few minutes to order a couple of Delkin 128GB UHS-II cards. Your timely email has saved me a ton of money! Many thanks
In the same vein, via e-mail from John LeClair
Well, e-mail #21 alone was worth the price of admission!
From Pamela Viale, after receiving artie’s a1 settings along with detailed instructions on how to copy them to her SONY a1 via e-mail
This e-mail group has been an incredible boon to me! Thank you so much!
From Joe Barranco via e-Mail
Thanks for your great ideas on the A1 set up. I have been getting MANY more keepers doing things your way!
From Barbara White via e-Mail
Wow, I just gotta say – I learn so much from the SONY Alpha a1 Set-up and Info group! My camera is on my desk, and I’m always picking it up and changing something that I’ve read about in the e-mails.
Thanks, Barbara
From Janet Horton via e-Mail
Hi Artie, Mystery solved. Yes, I was able to replicate what you did. I forgot that you have to set self-timer using the upper dial. I am used to that being a MENU selection.
Thanks much, Janet
SONY Alpha a1 Set-up and Info Group
The SONY Alpha a1 Set-up and Info Group is going great guns as more and more folks chime in with thoughtful questions and experience-based answers. As the a1 is becoming more readily available, more and more folks are getting their hands on this amazing body. With two folks joining yesterday, we are now up to an astounding 67 lucky and blessed photographers! Early on, we discussed the myriad AF options. I gave my opinion as to the best one for flight and general bird photography. More recently, we have been in contact with folks at SONY sharing our thoughts, experiences, and frustrations with the EVF blackout problem.
All who purchased their Alpha a1 bodies via a BAA affiliate link will receive a free subscription to the Sony Alpha a1 Set-Up and Info Updates after shooting me their receipts via e-mail. (Note: it may take me several days to confirm B&H orders.) This same service may be purchased by anyone with an a1 body via a $150.00 PayPal sent to birdsasart@verizon.net indicating payment for Alpha a1 Info Updates. Alternatively, folks can call Jim weekdays at 1-863-692-0906 to pay via credit card. New members will receive composite e-mails that summarize all previous discussions.
Typos
With all blog posts, feel free to e-mail or to leave a comment regarding any typos or errors.
August 18th, 2021 What’s Up?
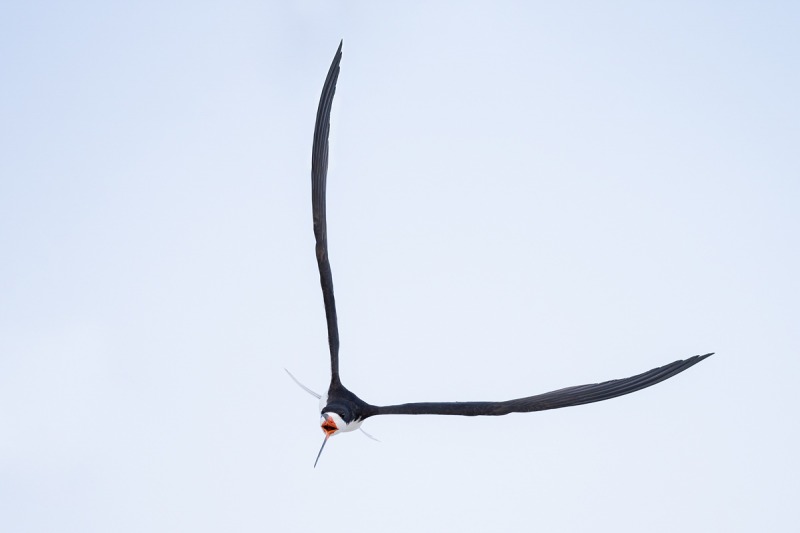
Yesterday, we enjoyed one last morning (for now) at Nickerson Beach. Grey skies and a stiff wind off the ocean led to some great opportunities for skimmer flight and midair fights. We saw the first flying young skimmers of the season, and even managed a few good frames. Be sure to scroll down to the tight face crop and see if you can figure out what bugs me about today’s featured image.
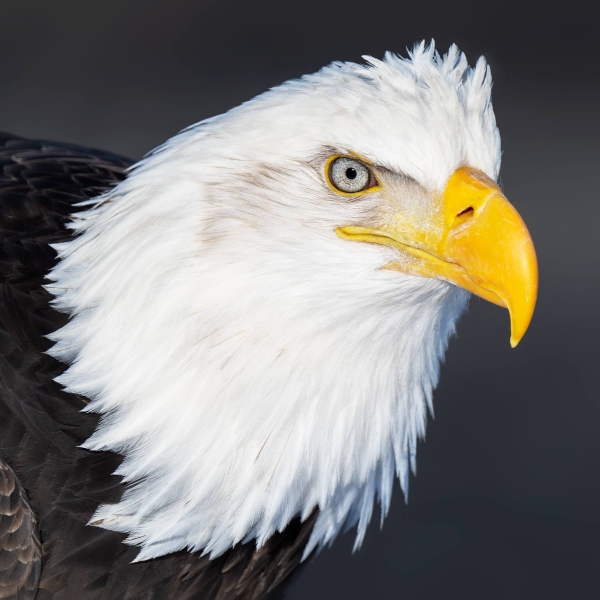
Today is Wednesday 18 August 2021. I have lots of work to catch up on and lots of laundry to do to get ready for my JBWR weekend. I am thrilled that the Homer Bald Eagle IPT is now a go as there are now just two spots left, one on each segment. Wherever you are, and whatever you are doing, I hope that you too have a great day.
Please note that it is best to click on each blog image to view it larger. For unknown reasons, the images — even the verticals that are not rendered larger, look sharper once they’ve been clicked on.
Remember that you can find some great photo accessories (and necessities!) on Amazon by clicking on the Stuff tab on the orange/yellow menu bar above. On a related note, it would be extremely helpful if blog-folks like me, who spend too much money on Amazon, would get in the habit of clicking on the Amazon logo link on the right side of each blog post when they shop online. As you might expect, doing so will not cost you a single penny, but would be appreciated tremendously by yours truly. And doing so works seamlessly with your Amazon Prime account.
This blog post took about two hours to prepare and makes 230 consecutive days with a new one. Please remember that if an item — a Delkin flash card, or a tripod head — for example, that is available from B&H and/or Bedfords, is also available in the BAA Online Store, it would be great, and greatly appreciated, if you would opt to purchase from us. We will match any price. Please remember also to use my B&H affiliate links or to save 3% at Bedfords by using the BIRDSASART discount code at checkout. Doing either often earns you free guides and/or discounts. And doing so always earns my great appreciation.
|
|
|
This image was created on 10 August 2021 at Nickerson Beach. I used the hand held Sony FE 200-600mm f/5.6-6.3 G OSS lens (at 280mm) and The One, the Sony Alpha 1 Mirrorless digital camera. ISO 3200. Exposure determined via Zebras with ISO on the rear dial: 1/3200 sec. at f/6.3 (wide open) in Manual mode. AWB at 6:35pm on a cloudy afternoon.
Tracking: Center Zone/AF-C Bird/Eye Detection AF was active at the moment exposure and created a sharp-on-the-eye image.
Be sure to click on the image to enjoy the larger version.
Image #1: Black Skimmer screaming in flight
In the original — see below, the primaries of the right (upper) wing were completely clipped
|
Flight Photography at Nickerson Beach
Not counting my scouting walk in the rain on the afternoon of July 29, I have visited the east skimmer colony at Nickerson eleven times. During those outings, I have created somewhere between 10,000 and 20,000 flight images. Though I have made many thousands of sharp flight images, my keeper rate has hovered between two and five percent. Of those, I will process only a handful of the very best, all for the primary purpose of being featured in a blog post. As detailed here previously you need to edit stringently if you are using a high frame-rate camera with a science-fiction-like AF system. If not, your storage capacity will be maxed out quite soon. Razor sharp on the eye with the whole bird (usually :)) in the frame, are just the tip of the iceberg. In addition you are looking at the light, the sky, the subject-to-sensor plane juxtapositions, and the flight poses and wing positions, along with the intangibles: the It factor. As always, different is good and really different is great. For me, today’s featured image has the It factor.
Anyhoo, when I saw the clipped wing on this one, I knew that I would get to it eventually and that it would be featured on the blog. Today is the day.
Dead-Solid Perfect?
RawDigger showed that the raw file brightness for today’s featured image was about 1/3-stop under. As you learn in the RawDigger e-Guide, under-exposing a bit with ISOs greater than 800 will not hurt you very much if at all.
The G channel here made it only 1/3 of the way from the 8000 line to the 16000 line. Images where the G channel gets 2/3rds of the way from the 8000 to the 16000 line are perfect exposures. Images where the G channel gets right up to the line are dead-solid perfect. So we can call the exposure for today’s image very good to excellent.
RawDigger — not for the faint of heart …
Nothing has ever helped me learn to create consistently perfect exposures the way that RawDigger has. I think that many folks are reluctant to learn that most of their images are underexposed by one or more full stops and that highlight warnings in Photoshop, Lightroom, Capture One, and your in-camera histogram are completely bogus as they are based on the embedded JPEGs. Only your raw files tell the truth all the time. Heck, I resisted RawDigger for several years … Once you get over that feeling, RawDigger can become your very best exposure friend no matter what system you are using. On the recent IPTs and In-the-Field sessions, we have demonstrated that fact. Convincingly.
The RawDigger (pink) Adapted Histogram
In the RawDigger e-Guide, you will learn exactly how to set up the Adapted “pink” RawDigger Histogram and how to use it to quickly and easily evaluate the exposure or raw file brightness of images from all digital cameras currently in use. RawDigger was especially helpful to me when I struggled with R5 exposures and when learned my new camera body, the Sony Alpha a1.
|
|
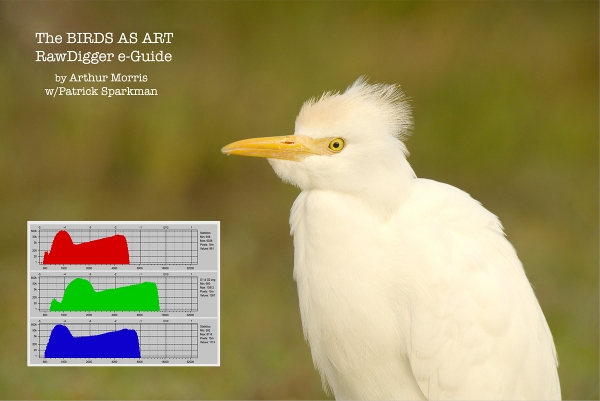
RawDigger e-Guide with Two Videos
|
The RawDigger e-Guide with Two Videos
by Arthur Morris with Patrick Sparkman
The RawDigger e-Guide was created only for serious photographers who wish to get the absolute most out of their raw files.
Patrick and I began work on the guide in July 2020. At first we struggled. We asked questions. We learned about Max-G values. We could not figure out why the Max G values varied by camera system. IPT veteran Bart Deamer asked lots of questions that we could not answer. We got help from RawDigger creator Iliah Borg. We learned. In December, Patrick came up with an Adapted Histogram that allows us to evaluate the exposures and raw file brightness for all images created with all digital camera bodies from the last two decades. What we learned each time prompted three complete beginning to end re-writes.
The point of the guide is to teach you to truly expose to the mega-Expose-to-the-Right so that you will minimize noise, maximize image quality, best utilize your camera’s dynamic range, and attain the highest possible level of shadow detail in your RAW files in every situation. In addition, your properly exposed RAW files will contain more tonal information and feature the smoothest possible transitions between tones. And your optimized images will feature rich, accurate color.
We teach you why the GREEN channel is almost always the first to over-expose. We save you money by advising you which version of RawDigger you need. We teach you how to interpret the Max G values for your Canon, Nikon, and SONY camera bodies. It is very likely that the Shock-your-World section will shock you. And lastly — thanks to the technical and practical brilliance of Patrick Sparkman — we teach you a simple way to quickly and easily evaluate your exposures and raw file brightness using an Adapted RawDigger histogram.
The flower video takes you through a session where artie edits a folder of images in Capture One while checking the exposures and Max-G values in RawDigger. The Adapted Histogram video examines a series of recent images with the pink histograms and covers lots of fine points including and especially how to deal with specular highlights. The directions for setting up the Adapted Histogram are in the text.
If we priced this guide based on how much effort we put into it, it would sell it for $999.00. But as this guide will be purchased only by a limited number of serious photographers, we have priced it at $51.00. You can order yours here in the BAA Online Store.
|
|
AF Point screen capture for the Black Skimmer screaming in flight image
|
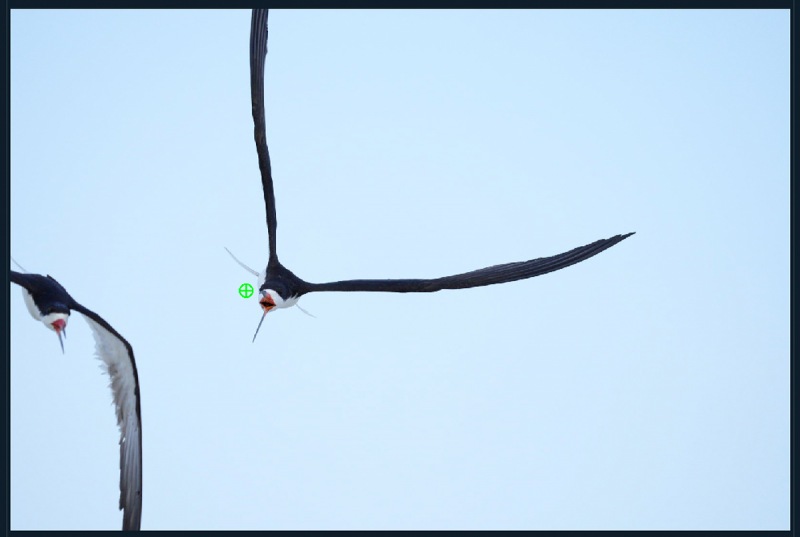
The AF Point Screen Capture
As with the Canon R5, you will run across many a1 images where the AF point is not squarely on the bird’s eye, yet the image is razor-sharp (on the eye). Sometimes the AF point is in the middle of the sky, yet your flight image is more than sharp enough. These two bodies feature fabulous eye tracking AF systems. My thoughts are that although the AF system is fast enough to track the bird’s face or eye but that the system that records the AF system is not quite fast enough to keep up with the real time AF. Perhaps …
See the screen capture below to see how well the AF tracking worked with today’s image.
|
|
An unsharpened tight crop of the face from the Black Skimmer screaming in flight image
|
Sharp Enough for You?
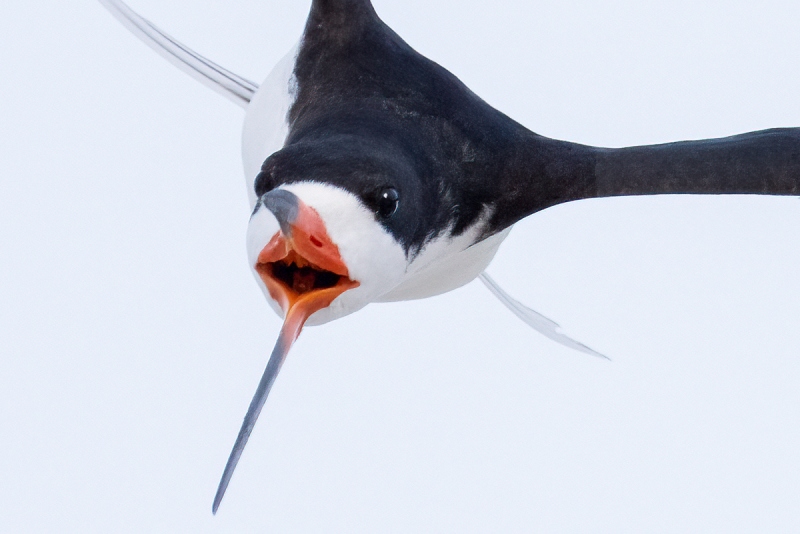
Is this image sharp enough for you? Folks who routinely view their images by zooming in to 100% and beyond will can answer this question from a good perspective. It is well more than sharp enough for me.
Eye Doctor Work
Note the neat Eye Doctor work on an image made on a dreary day. I added a catchlight and lightened the light crescent at the back of the bird’s left eye. The trick is to blow the eye up so that you can get a good idea of where the natural reflections are, and work from there. All and tons more as detailed in Digital Basics II.
What Bugs Me?
In this extreme close-up, you can see the only thing about this image that bugs me. And no, it is not the white sky. The flaw is the result of a bit of bad luck. If you think that you know what it is, please leave a comment and share your thoughts.
SONY a1 AF: Beyond Belief …
As Bird-Eye/Face Detection has gotten much better since the V1.10 firmware update that completely eliminated the EVF Blackout problems, it has become easier to trust the AF system whether doing flight photography or when working off the tilted rear screen with the tripod almost at ground level.
SONY and artie
Switching to SONY, first with the a9 and the a9 II, and then to the remarkable a1, has enabled me (and others, like Mike De Rosa as seen a while ago in the blog post here), to create images of birds in flight and in action that I could not have even dreamed of when using Canon for 33 years and then Nikon for more than two. Most of the time I am using one of two AF methods that together, cover about 99% of the commonly-encountered bird photography situations. At present, I am experimenting beyond those … Learn more by joining the group!
From Long-ago IPT veteran Keith Kennedy via e-mail
Absolutely great information. I am calling Jim in a few minutes to order a couple of Delkin 128GB UHS-II cards. Your timely email has saved me a ton of money! Many thanks
In the same vein, via e-mail from John LeClair
Well, e-mail #21 alone was worth the price of admission!
From Pamela Viale, after receiving artie’s a1 settings along with detailed instructions on how to copy them to her SONY a1 via e-mail
This e-mail group has been an incredible boon to me! Thank you so much!
From Joe Barranco via e-Mail
Thanks for your great ideas on the A1 set up. I have been getting MANY more keepers doing things your way!
From Barbara White via e-Mail
Wow, I just gotta say – I learn so much from the SONY Alpha a1 Set-up and Info group! My camera is on my desk, and I’m always picking it up and changing something that I’ve read about in the e-mails.
Thanks, Barbara
From Janet Horton via e-Mail
Hi Artie, Mystery solved. Yes, I was able to replicate what you did. I forgot that you have to set self-timer using the upper dial. I am used to that being a MENU selection.
Thanks much, Janet
SONY Alpha a1 Set-up and Info Group
The SONY Alpha a1 Set-up and Info Group is going great guns as more and more folks chime in with thoughtful questions and experience-based answers. As the a1 is becoming more readily available, more and more folks are getting their hands on this amazing body. With two folks joining yesterday, we are now up to an astounding 67 lucky and blessed photographers! Early on, we discussed the myriad AF options. I gave my opinion as to the best one for flight and general bird photography. More recently, we have been in contact with folks at SONY sharing our thoughts, experiences, and frustrations with the EVF blackout problem.
All who purchased their Alpha a1 bodies via a BAA affiliate link will receive a free subscription to the Sony Alpha a1 Set-Up and Info Updates after shooting me their receipts via e-mail. (Note: it may take me several days to confirm B&H orders.) This same service may be purchased by anyone with an a1 body via a $150.00 PayPal sent to birdsasart@verizon.net indicating payment for Alpha a1 Info Updates. Alternatively, folks can call Jim weekdays at 1-863-692-0906 to pay via credit card. New members will receive composite e-mails that summarize all previous discussions.
Typos
With all blog posts, feel free to e-mail or to leave a comment regarding any typos or errors.
|
|


