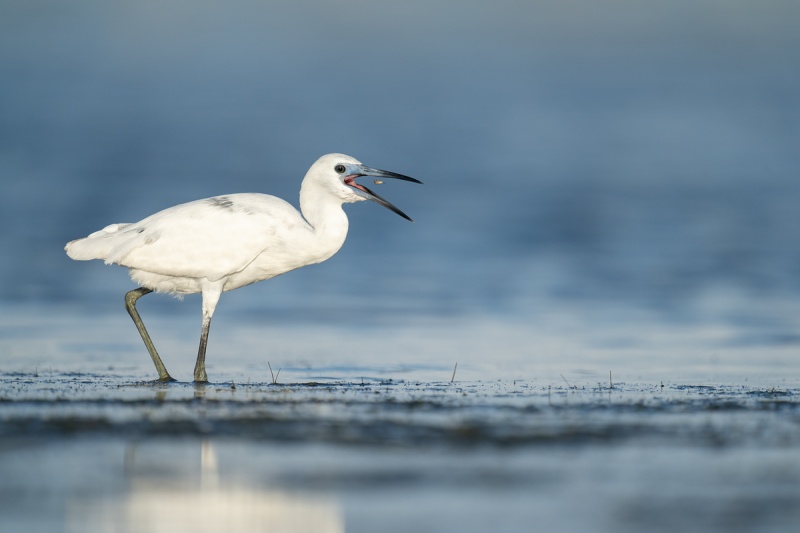
June 12th, 2021 What’s Up?
I did drive down to the lake for a short visit, but there was not much going on so I headed back home and did some flowers from our butterfly garden. I pretty much finished the Nikonians webinar program and spent an hour critiquing images in the Avian Forum at Bird Photographer’s.Net. BPN, where honest critiques are done gently. It ain’t just birds. If you want to learn about dealing with over-saturated REDs, check out the learning that occurred in the Eric Patdu Macaw post here.
Today is Saturday 12 June 2021. The forecast for today is for partly sunny turning cloudy early with scattered thunderstorms this afternoon and a high of only 89 degrees. I’ll be heading out without any great expectations as soon as I hit the Publish button. Wherever you are, and whatever you are doing, I hope that you too have a great day.
If you are interested in four (two 1/2 and three full) days of In-the-Field Instruction at a great new spot in the Jacksonville, FL area — the afternoon of Sunday 27 June through the morning session on Thursday 1 July 2021, please get in touch ASAP via e-mail for details, or call me on my cell at 863-221-2372. If you have a four-wheel drive truck or an SUV that would do well on the beach, that would be an amazing plus. Inexpensive lodging at a gorgeous AirBnB just 25 minutes from our shooting location is available. We only have room for one more in the 4 bedroom home.
This blog post took more than an hour to prepare, and makes 168 consecutive days with a new one. Please remember that if an item — a Delkin flash card, or a tripod head — for example, that is available from B&H and/or Bedfords and is also available in the BAA Online Store, it would be great if you opt to purchase from us. We will match any price. Please remember also to use my B&H affiliate links or to save 3% at Bedfords by using the BIRDSASART discount code at checkout. Doing either often earns you free guides and/or discounts. And doing so always earns my great appreciation.
Please Remember
With income from IPTs now close to zero, please, if you enjoy and learn from the blog, remember to use one of my two affiliate programs when purchasing new gear. Doing so just might make it possible for me to avoid having to try to get a job as a Walmart greeter and will not cost you a single penny more. And if you use Bedfords and remember to enter the BIRDSASART code at checkout, you will save 3% on every order and enjoy free second-day air shipping. In these crazy times — I am out at least forty to sixty thousand dollars so far due to COVID 19 (with lots more to come) — remembering to use my B&H link or to shop at Bedfords will help me out a ton and be greatly appreciated. Overseas folks who cannot order from the US because of import fees, duties, and taxes, are invited to help out by clicking here to leave a blog thank you gift if they see fit.
New and Better Bedfords Discount Policy!
You can now save 3% on all of your Bedfords photo gear purchases by entering the BIRDSASART coupon code at checkout. Your discount will be applied to your pre-tax total. In addition, by using the code you will get 2nd day air shipping via Fed Ex.
Grab a Nikon AF-S Teleconverter TC-14E III and save $14.99. Purchase a Canon EOS R5 and your discount will be $116.97. Purchase a Sony FE 600mm f/4 GM OSS lens and save a remarkable $389.94! Your Bedford’s purchase no longer needs to be greater than $1,000.00 for you to receive a discount. The more you spend, the more you save.
Money Saving Reminder
Many have learned that if you need a hot photo item that is out of stock at B&H and would enjoy free second-day air shipping, your best bet is to click here, place an order with Bedfords, and enter the coupon code BIRDSASART at checkout. If an item is out of stock, contact Steve Elkins via e-mail or on his cell phone at (479) 381-2592 (Central time). Be sure to mention the BIRDSASART coupon code and use it for your online order to save 3% and enjoy free 2nd-day air shipping. Steve has been great at getting folks the hot items that are out of stock at B&H and everywhere else. The wait lists at the big stores can be a year or longer for the hard to get items. Steve will surely get you your gear long before that. For the past year, he has been helping BAA Blog folks get their hands on items like the SONY a9 ii, the SONY 200-600 G OSS lens, the Canon EOS R5, the Canon RF 100-500mm lens, and the Nikon 500mm PF. Steve is personable, helpful, and eager to please.


Gear Questions and Advice
Too many folks attending BAA IPTs (remember those?) and dozens of photographers whom I see in the field and on BPN, are–out of ignorance–using the wrong gear especially when it comes to tripods and more especially, tripod heads… Please know that I am always glad to answer your gear questions via e-mail.
|
|
Lucky Strike Means Fine Tobacco
|
LSMFT
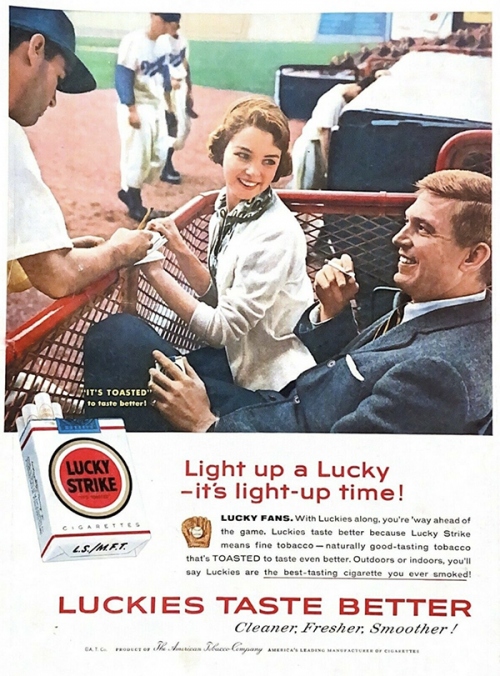
Lucky Strikes were the popular cigarette brand of my childhood. They, along with Schaefer Beer, were the main sponsors of the Brooklyn Dodgers, my favorite team. My late-Dad, Private First Class Robert Edward Morris, picked up the smoking habit in WW II while serving in the Aleutians. It was cold and the troops did not have proper gloves or boots, so they took up smoking in part to keep warm. Ironically, the Red Cross supplied smokes by the boatload. My Dad became a four-pack a day man for several decades after he returned home less his right arm. He survived the smoker’s daily double: throat cancer and lung cancer. Even more ironically, my late-Mom, Hazel Louise Morris, died at 94 of COPD. From second-hand smoke.
To learn more about baseball and beer, read the very interesting and nostalgic Ballpark Digest article by Kevin Reichard here.
When I was about ten years old, my Dad said to me, “You wanna try a puff?” I said sure. I put the cigarette to my lips and sucked in. Then I almost choked to death. I never even thought about taking a second puff. It was one of the best things my Dad ever did for me. To learn a lot more about the amazing life of Bob Morris, check out the Honoring My Dad, Private First-Class Robert Edward Morris. And the rest, in the blog post here.
In any case, when I thought about how lucky I was with the shrike (as detailed below), the phrase from my childhood came to mind and I couldn’t shake it. LSMFT indeed! And thus, the very confusing title of today’s blog post…
|
|
North Beach story board map
|
It’s Much Better to Try and Fail Than Not to Try at All…
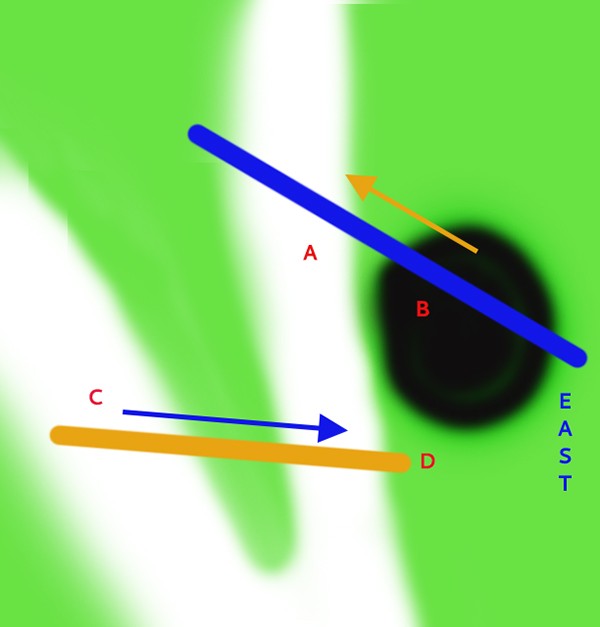
It had been a pretty good morning at DeSoto. Though I had taken things fairly easily, I had walked about two miles and was tired and hot as I made my way back to the parking lot at North Beach. I was walking roughly east with the sun in my face. The broad sand paths are shown in white. When I got to C, I spotted a Loggerhead Shrike in the middle of the hard sand road at A. I’ve seen a zillion shrikes in Florida, but have never come close to making a good photograph of even one of them. They are usually quite shy. So when I saw this bird, I thought, “I’ll try, but my chances of getting close and on sun angle are less than one in a hundred.”
I needed to get to B, but rather than heading directly there, I continued straight ahead to D and stopped to set the exposure. Then I put tripod down and moved slowly towards B. On the way in, I noticed that the shrike was trying to dig up a prey item. I raised my chances success to one in ten. The best news was that the black circle was a depression from a small seasonal pond that fills after heavy rains; it was totally dry but more than a foot deep. When I got to B, I was getting excited but still managed to sit down slowly without scaring the bird away. Using the knee-pod technique, I bent my left knee, placed my left forearm atop the distal portion of my thigh, and went to work. I never saw the beetle until I looked at the images.
So yes, it’s far better to try even when the odds are against you. And who knows? You just might succeed.
|
|
|
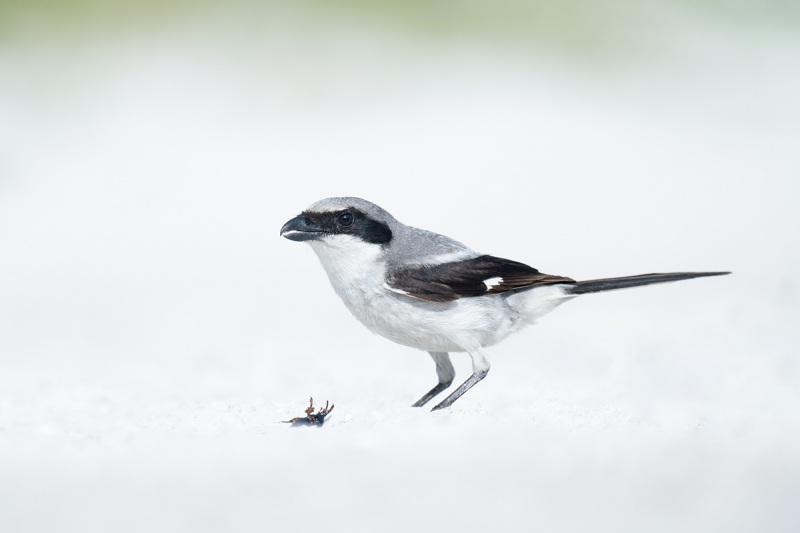
This image was created on 4 June 2021 at Fort DeSoto Park. While seated in a depression (as detailed above), I used the hand held Sony FE 600mm f/4 GM OSS lens with the Sony FE 1.4x Teleconverter and The One, the Sony Alpha 1 Mirrorless digital camera. ISO 800. Exposure determined via Zebras with ISO on the rear dial: 1/2500 sec. at f/5.6 (wide open) in Manual mode. AWB at 9:22am on a clear sunny morning.
Wide/AF-C was active at the moment of exposure and performed perfectly by nailing and tracking the shrike’s eye. Click on the image to see a larger version.
Loggerhead Shrike with beetle
|
The Optimized Image
Like all of my current a1 images, this raw file was converted in Adobe Camera Raw. The optimized image is a relatively small crop from the left and from above, and a bit of canvas was added behind the bird. I did some beach clean-up using my usual cadre of Photoshop tools: the Patch Tool, the Spot Healing Brush, and Content Aware Fill. I created about 70 images of this bird before it flew off. I kept nine of those after the first edit, and just deleted six more, leaving me with three.
Could the beetle be a cockroach?
The short story is that I am very glad that I tried.
|
|
The BIRDS AS ART Current Workflow e-Guide (Digital Basics II).
You can order your copy from the BAA Online Store here, by sending a PayPal for $40 here, or by calling Jim or Jennifer weekdays at 863-692-0906 with your credit card in hand. Be sure to specify Digital Basics II.
|
The BIRDS AS ART Current Workflow e-Guide (Digital Basics II)
The clean-up techniques mentioned above and tons more great Photoshop tips and techniques — along with all of my personalized Keyboard Shortcuts — are covered in detail in the BIRDS AS ART Current Workflow e-Guide (Digital Basics II), an instructional PDF that is sent via e-mail. Learn more and check out the free excerpt in the blog post here. While the new e-Guide reflects my MacBook Pro/Photo Mechanic/DPP 4/Photoshop workflow, folks using a PC and/or BreezeBrowser will also benefit greatly by studying the material on DB II. Note: folks working on a PC and/or those who do not want to miss anything Photoshop may wish to purchase the original Digital Basics along with DB II while saving $15 by clicking here to buy the DB Bundle.
Folks who learn well by following along rather than by reading can check out the complete collection of MP 4 Photoshop Tutorial Videos by clicking here. Note: all of the videos are now priced at an amazingly low $5.00 each.
You can learn how and why I converted all of my Canon digital RAW files in DPP 4 in the DPP 4 RAW Conversion Guide here. More recently, I became proficient at converting my Nikon RAW (NEF) files in Adobe Camera Raw. About two years ago I began converting my Nikon and Sony RAW files in Capture One Pro 12 and continue to do so today.
To purchase Capture One, please use this link. Then you can learn more about Capture One in the Capture One Pro 12 Simplified MP4 Video here. The next step would be to get a copy of Arash Hazeghi’s “The Nikon Photographers’ Guide to Phase One Capture One Pro e-Guide” in the blog post here.
You can learn advanced Quick Masking and advanced Layer Masking techniques in APTATS I & II. You can save $15 by purchasing the pair.
Typos
With all blog posts, feel free to e-mail or to leave a comment regarding any typos or errors.
June 11th, 2021 What’s Up
Thursday morning was another beauty at ILE. I took an exploratory walk along the edge of the marsh and took some pretty bad images of White Ibis. And I fanned on a micro-second chance on two river otters as well. I am sure that a third pair of stilts has a nest, this one somewhere close to the boardwalk. I could not find it, but they were acting very nesty — yipping and yapping at my distant approach so I stayed well back. When a Fish Crow flew by, both adults rose into the air to drive it away. One stilt at the pretty nest — still with only two eggs, has been on its nest incubating for the past week. The nest is now high and dry as the water levels continue to drop.
Today is Friday 11 June 2021. It will be clear in the morning with the wind out of the southwest for the first time in weeks. I will be out early looking for more flowers (or buds). Wherever you are, and whatever you are doing, I hope that you too have a great day.
If you are interested in four (two 1/2 and three full) days of In-the-Field Instruction at a great new spot in the Jacksonville, FL area — the afternoon of Sunday 27 June through the morning session on Thursday 1 July 2021, please get in touch ASAP via e-mail for details, or call me on my cell at 863-221-2372. If you have a four-wheel drive truck or an SUV that would do well on the beach, that would be an amazing plus. Inexpensive lodging at a gorgeous AirBnB just 25 minutes from our shooting location is available. We only have room for one more in the 4 bedroom home.
This blog post took more than an hour to prepare, and makes 167 consecutive days with a new one. Please remember that if an item — a Delkin flash card, or a tripod head — for example, that is available from B&H and/or Bedfords and is also available in the BAA Online Store, it would be great if you opt to purchase from us. We will match any price. Please remember also to use my B&H affiliate links or to save 3% at Bedfords by using the BIRDSASART discount code at checkout. Doing either often earns you free guides and/or discounts. And doing so always earns my great appreciation.
Please Remember
With income from IPTs now close to zero, please, if you enjoy and learn from the blog, remember to use one of my two affiliate programs when purchasing new gear. Doing so just might make it possible for me to avoid having to try to get a job as a Walmart greeter and will not cost you a single penny more. And if you use Bedfords and remember to enter the BIRDSASART code at checkout, you will save 3% on every order and enjoy free second-day air shipping. In these crazy times — I am out at least forty to sixty thousand dollars so far due to COVID 19 (with lots more to come) — remembering to use my B&H link or to shop at Bedfords will help me out a ton and be greatly appreciated. Overseas folks who cannot order from the US because of import fees, duties, and taxes, are invited to help out by clicking here to leave a blog thank you gift if they see fit.
New and Better Bedfords Discount Policy!
You can now save 3% on all of your Bedfords photo gear purchases by entering the BIRDSASART coupon code at checkout. Your discount will be applied to your pre-tax total. In addition, by using the code you will get 2nd day air shipping via Fed Ex.
Grab a Nikon AF-S Teleconverter TC-14E III and save $14.99. Purchase a Canon EOS R5 and your discount will be $116.97. Purchase a Sony FE 600mm f/4 GM OSS lens and save a remarkable $389.94! Your Bedford’s purchase no longer needs to be greater than $1,000.00 for you to receive a discount. The more you spend, the more you save.
Money Saving Reminder
Many have learned that if you need a hot photo item that is out of stock at B&H and would enjoy free second-day air shipping, your best bet is to click here, place an order with Bedfords, and enter the coupon code BIRDSASART at checkout. If an item is out of stock, contact Steve Elkins via e-mail or on his cell phone at (479) 381-2592 (Central time). Be sure to mention the BIRDSASART coupon code and use it for your online order to save 3% and enjoy free 2nd-day air shipping. Steve has been great at getting folks the hot items that are out of stock at B&H and everywhere else. The wait lists at the big stores can be a year or longer for the hard to get items. Steve will surely get you your gear long before that. For the past year, he has been helping BAA Blog folks get their hands on items like the SONY a9 ii, the SONY 200-600 G OSS lens, the Canon EOS R5, the Canon RF 100-500mm lens, and the Nikon 500mm PF. Steve is personable, helpful, and eager to please.


Gear Questions and Advice
Too many folks attending BAA IPTs (remember those?) and dozens of photographers whom I see in the field and on BPN, are–out of ignorance–using the wrong gear especially when it comes to tripods and more especially, tripod heads… Please know that I am always glad to answer your gear questions via e-mail.
Washed Out Raw Files
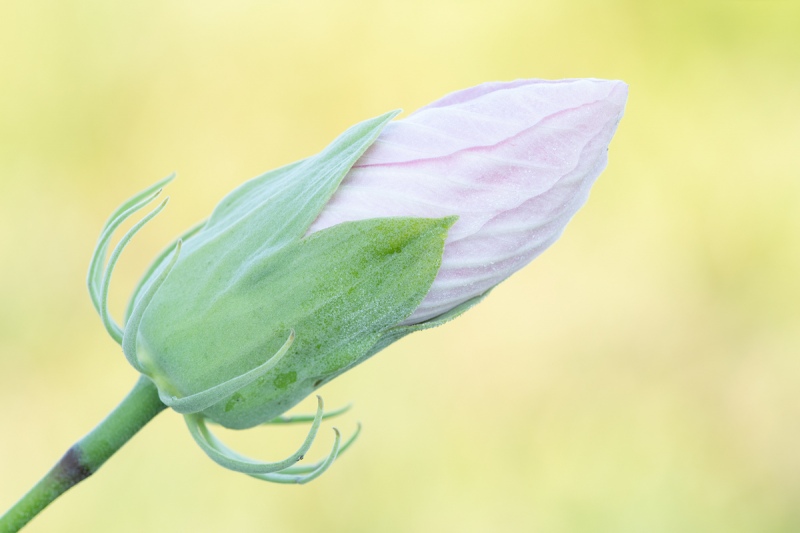
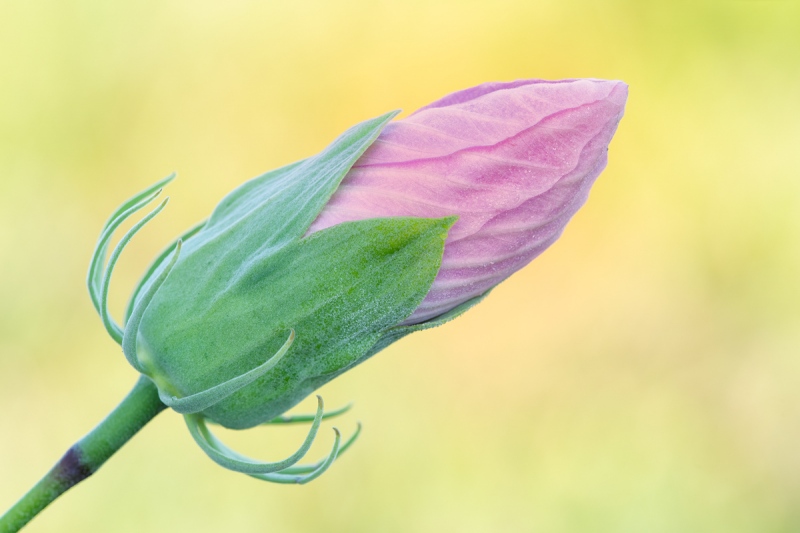
Even before I began learning from RawDigger, I advised often that your properly exposed-to-the-right raw files should look washed out and lousy on the back of your camera and on your computer monitor, just like Image #1 above. If your images look great with rich color as captured, that means that nearly all of them are seriously under-exposed. Once I began using RawDigger I learned how to truly expose-to-the-right; now most of my raw files look even worse and look completely washed out. Keep reading to see what you can do with a crappy looking raw file.
o use
|
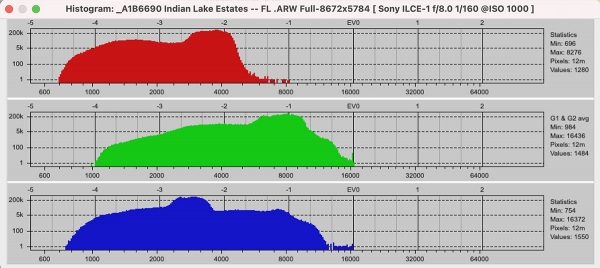
Image #1A: The RawDigger adapted histogram for the Swamp Rosemallow Hibiscus grandiflorus image.
|
Getting Perfect Exposures with Flowers
Getting dead-solid perfect exposures — like the one above — every time, is child’s play once you learn to use RawDigger. Why? You bracket your exposures in 1/3 stop increments and examine the raw files after-the-fact with Raw Digger. Note that a good deal of the G channel data goes right up to the 16000 line. There are actually a total of 157 OvExp pixels out of 51,000,000. All of those are in the specular highlights of the moisture on the bud. We take you through the entire process in the flower video that is included with the RawDigger e-Guide.
Via e-Mail from Geri George
Hi Artie, Thanks for the RawDigger e-Guide. With many of my flower images, DPP 4 shows lots of over-exposure on the petals, but RawDigger shows only a smattering (less than a hundred). They all converted perfectly in DPP 4 simply by pulling down the Highlight slider a bit. RawDigger has some really cool stuff!
Thanks and best, Geri
|
|
RawDigger e-Guide with Two Videos
|
The RawDigger e-Guide with Two Videos
by Arthur Morris with Patrick Sparkman
The RawDigger e-Guide was created only for serious photographers who wish to get the absolute most out of their raw files. It is not for the faint-of-heart who are happy to go through life under-exposing every raw file they create.
Patrick and I began work on the guide in July 2020. At first we struggled. We asked questions. We learned about Max-G values. We puzzled as to why the Max G values for different cameras were different. IPT veteran Bart Deamer asked lots of questions that we could not answer. We got help from RawDigger creator Iliah Borg. We learned. In December, Patrick came up with an Adapted Histogram that allows us to evaluate the exposures and raw file brightness for all images created with all digital camera bodies from the last two decades. What we learned prompted three complete beginning to end re-writes.
The point of the guide is to teach you to truly mega-Expose-to-the-Right so that you will minimize noise, maximize image quality, best utilize your camera’s dynamic range, and attain the highest possible level of shadow detail in your RAW files in every situation. In addition, your properly exposed RAW files will contain more tonal information and feature the smoothest possible transitions between tones. And your optimized images will feature rich, accurate color.
We teach you why the GREEN channel is almost always the first to over-expose. We save you money by advising you which version of RawDigger you need. We teach you how to interpret the Max G values for your Canon, Nikon, and SONY camera bodies. It is very likely that the Shock-your-World section will shock you. And lastly — thanks to the technical and practical brilliance of Patrick Sparkman — we teach you a simple way to quickly and easily evaluate your exposures and raw file brightness using an Adapted RawDigger histogram.
The flower video takes you through a session where artie edits a folder of images in Capture One while checking the exposures and Max-G values in RawDigger. The Adapted Histogram video examines a series of recent images with the pink histograms and covers lots of fine points including and especially how to deal with specular highlights. The directions for setting up the Adapted Histogram are in the text.
If we priced this guide based on how much effort we put into it, it would sell it for $999.00. But as this guide will be purchased only by a limited number of serious photographers, we have priced it at $51.00. You can order yours here in the BAA Online Store.
The Optimized Master File
The washed out, seemingly faded Image #1, was — as compared to the untouched raw file, actually darkened during the raw conversion, and the color was juiced up a bit as well. But the converted .TIF file that I opened in Photoshop looked nothing like the beautiful, richly colored bud that I photographed. So I brought it into Nik Color Efex Pro’s Viveza plug-in and went to work. Thanks to several lessons from Clemens Van der Werf and lots of practice, I am getting comfortable with using Viveza. In this great plug-in, you are easily able to make targeted adjustments based on color. It as easy to jazz up the pinks and greens of the bud while leaving the lovely yellow background unchanged. Note: subject in shade/background in sun works great for flowers as well as it does for birds.
Today’s blog photo will be one of the featured images in the Viveza Basics tutorial video that I will create soon after mid-month; I will be working on the Nikonians webinar presentation until then.
Typos
With all blog posts, feel free to e-mail or to leave a comment regarding any typos or errors.
June 10th, 2021 Your Fave?
Which of today’s featured images is your favorite? Please leave a comment and let us know why you made your choice.
What’s Up?
Conditions were perfect on Tuesday morning, but again, there were few birds around but for two of the three crane families. So I made a long series of images of a (picked and Plamped) false foxglove flower. I was home early, finished Wednesday’s blog post, had a nice brunch, and spent lots of time working on the Nikonians webinar presentation. I did my swim and my bursts in the afternoon.
Today is Thursday 10 June 2021. The weather for the morning is once again looking perfect so it is likely that I will be looking for some wildflowers in bloom. Wherever you are, and whatever you are doing, I hope that you have a great day.
This blog post took more than an hour to prepare, and makes 166 consecutive days with a new one. Please remember that if an item — a Delkin flash card, or a tripod head — for example, that is available from B&H and/or Bedfords and is also available in the BAA Online Store, it would be great if you opt to purchase from us. We will match any price. Please remember also to use my B&H affiliate links or to save 3% at Bedfords by using the BIRDSASART discount code at checkout. Doing either often earns you free guides and/or discounts. And doing so always earns my great appreciation.
FlexShooter Pro News
Along with the FlexShooter Pro and the FlexShooter Mini, the Levered-Clamp FlexShooter Pro is finally back in stock. Here. Tomorrow the brand new Levered-Clamp FlexShooter Mini will, by popular demand, be in the BAA Online Store. We only have six Levered-Clamp FlexShooter Minis in stock. To be sure of getting one, it would be best to order yours right now by calling Jim in the office at 863-692-0906. They will sell for $669.00. The Levered-Clamp Mini will be perfect for all mid-range telephotos and telephoto zoom lenses, and the levered-clamp is a huge improvement over the original versions with a knob.
Please Remember
With income from IPTs now close to zero, please, if you enjoy and learn from the blog, remember to use one of my two affiliate programs when purchasing new gear. Doing so just might make it possible for me to avoid having to try to get a job as a Walmart greeter and will not cost you a single penny more. And if you use Bedfords and remember to enter the BIRDSASART code at checkout, you will save 3% on every order and enjoy free second-day air shipping. In these crazy times — I am out at least forty to sixty thousand dollars so far due to COVID 19 (with lots more to come) — remembering to use my B&H link or to shop at Bedfords will help me out a ton and be greatly appreciated. Overseas folks who cannot order from the US because of import fees, duties, and taxes, are invited to help out by clicking here to leave a blog thank you gift if they see fit.
New and Better Bedfords Discount Policy!
You can now save 3% on all of your Bedfords photo gear purchases by entering the BIRDSASART coupon code at checkout. Your discount will be applied to your pre-tax total. In addition, by using the code you will get 2nd day air shipping via Fed Ex.
Grab a Nikon AF-S Teleconverter TC-14E III and save $14.99. Purchase a Canon EOS R5 and your discount will be $116.97. Purchase a Sony FE 600mm f/4 GM OSS lens and save a remarkable $389.94! Your Bedford’s purchase no longer needs to be greater than $1,000.00 for you to receive a discount. The more you spend, the more you save.
Money Saving Reminder
Many have learned that if you need a hot photo item that is out of stock at B&H and would enjoy free second-day air shipping, your best bet is to click here, place an order with Bedfords, and enter the coupon code BIRDSASART at checkout. If an item is out of stock, contact Steve Elkins via e-mail or on his cell phone at (479) 381-2592 (Central time). Be sure to mention the BIRDSASART coupon code and use it for your online order to save 3% and enjoy free 2nd-day air shipping. Steve has been great at getting folks the hot items that are out of stock at B&H and everywhere else. The wait lists at the big stores can be a year or longer for the hard to get items. Steve will surely get you your gear long before that. For the past year, he has been helping BAA Blog folks get their hands on items like the SONY a9 ii, the SONY 200-600 G OSS lens, the Canon EOS R5, the Canon RF 100-500mm lens, and the Nikon 500mm PF. Steve is personable, helpful, and eager to please.


Gear Questions and Advice
Too many folks attending BAA IPTs (remember those?) and dozens of photographers whom I see in the field and on BPN, are–out of ignorance–using the wrong gear especially when it comes to tripods and more especially, tripod heads… Please know that I am always glad to answer your gear questions via e-mail.
|
|
|
This image was created while seated at my favorite afternoon spot at Fort DeSoto. I used the versatile, hand held 200-600 (at 535mm) and the a1.
Image #1: 600 GM & 2X TC with the SONY a1 on the Panning Ground-Pod
|
Getting Sand and Mud on Your Expensive Camera Body
Yes, when working at ground level I routinely get sand and mud on my camera bodies, expensive and otherwise. When I am at the beach, I always have a soft paint brush in my fanny pack for quick but effective clean-ups. Getting your camera dirty is included in the price of admission for those wishing to create intimate, ultra-low perspective images of birds on the ground (or in the water). You can always keep your gear clean by standing up and shooting down at your subjects …
How Low Can You Go?
On a flat beach, nothing beats the Panning Ground-Pod for getting low. The ground pod is not more than 1 1/2 inches tall and as its name implies, you can pan (smoothly and easily) with a moving subject.
Now you have two options:
- 1: Lying flat on the ground or the mud or the sand, allows you the greatest control as you have your eye to the viewfinder. For some — like me, this involves back and neck muscle strain. And you will get dirty for sure.
- 2- Sitting, and working on the tilted rear screen does not involve much strain or pain and the only thing getting dirty will be your butt unless you are sitting on some sort of pad or a plastic sheet. If you are sitting on something, it will be much more difficult to change your position either to follow the birds or to get on sun angle. I do not recommend sitting on a milk crate when using the Panning Ground-Pod (as opposed to when working off a fully-splayed, flattened tripod. Why? It will be a long way down to the camera body and it will thus be difficult to see the rear screen.)
Sitting and working off the tilted rear screen has opened up whole new worlds for me. Wearing my reading glasses makes it a lot easier to see the rear monitor well. That said, you need to be able to trust your AF system. Panning with a moving subject and properly framing the image takes practice. Lots of practice. But the rewards are well worth it.
Note: as detailed in our SONY e-Guide and in the a1 Info and Updates e-mails, the high-end SONY body’s allow you to toggle the electronic level off and on. I do that quite often when working super-low to try and ensure that my images are square-to-the-world.
Working a Subject
While following this bird as it fed, I must have gotten up and down at least half a dozen times in an effort to stay relatively square to the subject and to stay on sun angle. My strategy involves sitting down a few yards in front of sun angle and then letting the bird come to me. Once the bird is past sun angle it is up and down again. There is sometimes a lot of work to be done when working a subject.
It requires lots of practice panning to keep the bird back in the frame. In addition, I am constantly toggling the level on and off to ensure that I am square to the word. Sometimes I rotate the lens in the tripod collar to get level, and sometimes I re-seat the ground pod in the muck to get level. Heck, I did not even mention that finding the bird in the viewfinder can be quite difficult, especially when working at 1200mm, and especially considering that one of the disadvantages of working off the ground pod is that there is no up and down panning; you control the elevation of the lens when you set the ground pod on the beach.
That said, I made more than 200 images of this bird in just over six minutes. I kept 14 after the first edit.
Less Work!
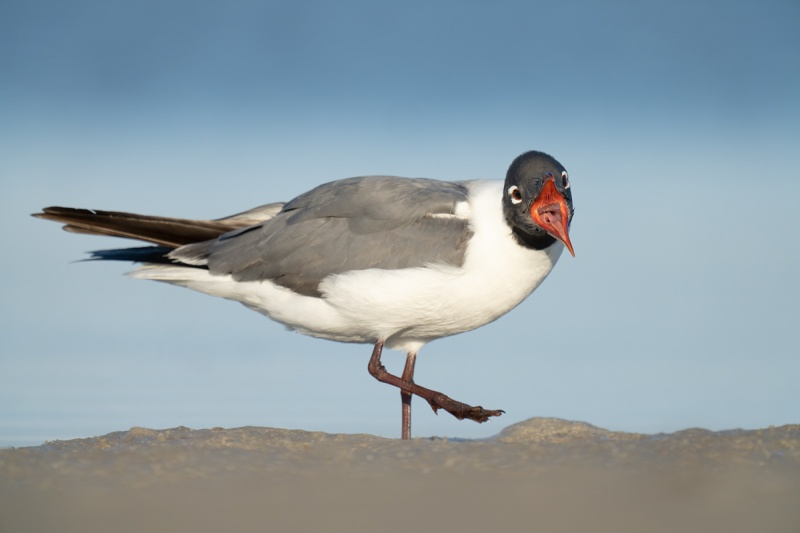
As this bird stood in the same spot for five minutes after bathing, I made more than 300 images as it scratched, preened, flapped, and eventually yawned (if indeed birds actually do yawn). I kept 25. The yawning began after a short scratching sequence and comprised of 12 frames. There were three fabulous yawning frames; I had a very tough time picking the best one. I went with this one in part because of the still raised foot and in part because we can see both eyes before it turned away. For me, there are no negatives with the 30 fps frame rate of the Alpha a1. Sure, I have lots of work to do when picking my keepers, but with the viewing speed of Photo Mechanic and almost 39 years of looking at photos, I am able to fly through the images at break-neck speed. And each instant created during action and behavioral sequences is potentially priceless. With bird photography, more is always more.
Typos
With all blog posts, feel free to e-mail or to leave a comment regarding any typos or errors.
|
|


