April 30th, 2021 What’s Up?
On the final morning of the second Fort DeSoto IPT we enjoyed yet another great session. The tern/skimmer flock was nowhere to be seen so we quickly made our way to the large pool and set to work photographing yet another very active feeding aggregation.
With Jake Levin and Jim Miller having headed home, Anita North, Shelley Lake, Donna Bourdon and I met at Anita’s AirBnB to polish off the remaining smoked salmon and cold (previously grilled) tuna. Yummy. After we said our goodbyes, Donna and I headed back to ILE stopping in Lake Wales to do a few errands. I took a quick swim. After dinner, we worked on two of Donnas images from the IPT.
Today is Friday 30 April 2021. Donna and I will head down to the lake early to try for the crane chicks/now small colts. At about 10am, Jim and I will take Donna to MCO for her flight back to Chattanooga. Then Jim and I will be off to the Apple Store in Brandon where I have a Genius Bar appointment as my MacBook Pro is having some battery/power issues. Then we will meet Anita North who will be transferring a bunch of her stuff to my SUV and returning her rental vehicle to TPA. The the three of us will have an early dinner in Brandon and photograph at the rookery, probably getting back to ILE between 8 and 9pm. Wherever you are, and whatever you are doing, I hope that you have a great day.
This blog post took about two hours to prepare and makes 127 consecutive days with a new one. Please remember that if an item — a Delkin flash card, or a tripod head, for example, that is available from B&H and/or Bedfords and is also available in the BAA Online Store, it would be great if you opt to purchase from us. We will match any price. Please remember also to use my B&H affiliate links or to save 3% at Bedfords by using the BIRDSASART discount code at checkout. Doing either often earns you free guides and/or discounts. And doing so always earns my great appreciation.
Symbiotic Relationships
sym·bi·ot·ic (/simbīˈädik/) adjective: BIOLOGY
Involving interaction between two different organisms living in close physical association.
On the wintering grounds, the relationship between Snowy Egret and Red-breasted Merganser is a symbiotic one. In Florida, we often see feeding sprees consisting primarily of these two species. The snowies usual follow the mergansers as they rush through the shallows in pursuit of small baitfish, landing near them to pick up a baitfish scattered by their feeding partners. In the same manner, it is likely that a dip-feeding Snowy Egret will drive bait right into the serrated bills of the mergs.
For each of the past four IPT mornings, we enjoyed a feeding spree that was made up of two to five mergansers and as many as a dozen Snowy Egrets. Other wading bird species including Great and Reddish Egret and Great and Little Blue Blue Heron often joined in, with the latter two species usually hanging on the periphery while the snowies especially are right in the heaviest action with the mergansers.
|
|
|
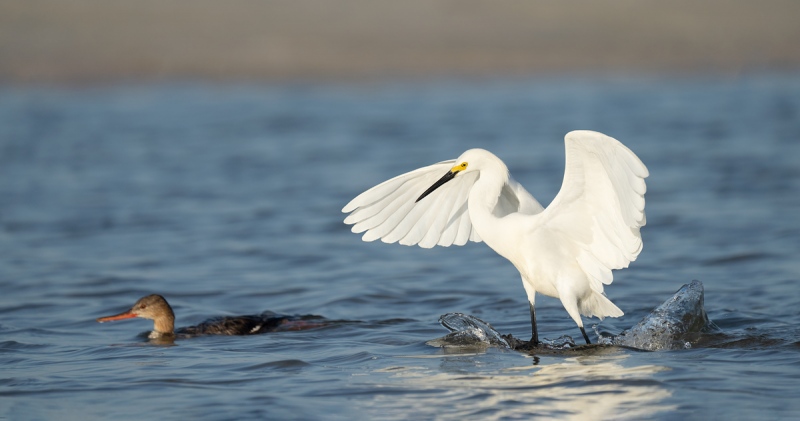
This image was created on 29 April 2021, the last morning of the second DeSoto IPT. While seated, I used the hand held Sony FE 200-600mm f/5.6-6.3 G OSS lens (at 582mm) and The One, the Sony Alpha 1 Mirrorless digital camera. ISO 640. Exposure determined via Zebras with ISO on the rear dial: 1/3200 sec. at f/6.3 (wide open) in Manual mode. The exposure was confirmed as dead-solid perfect by RawDigger. AWB at 7:54am on a clear, sunny morning.
Wide/AF-C was active at the moment of exposure and performed perfectly. Click on the image to see a larger version.
Image #1: Snowy Egret landing near Red-breasted Merganser
|
The Serendipitous Image
On our last morning the wind was strong from the south/southeast. I constantly advised the group to move to the south, to our left, to stay ahead of the birds so that we would have them them flying toward us, into the wind, and into the light. We were constantly on the move as the feeding aggregation moved from north to south the length of the long pool.
By the end of the morning everyone in the group was exhausted as not only were we moving with the birds but every time that we got ahead of the feeding flock we would sit down to throw the choppy water and the far shoreline pleasingly out of focus. And then we had to get up. Down and up, move to the left, and down and up again. Repeat. And repeat some more. But as you can see with today’s featured image, the rewards can be quite pleasing.
I did my job by setting a perfect exposure for the white birds, getting ahead of the birds, getting low, acquiring focus while panning with the Snowy Egrets in flight, and firing away at 30 fps. Please don’t think that I saw either the merganser or the Snowy Egret’s amazing landing-splash in the viewfinder. The fortuitous juxtaposition of the two birds could not have been more perfect if I had painted the scene. The rest was pure luck. Thus, the serendipitous image.
|
|
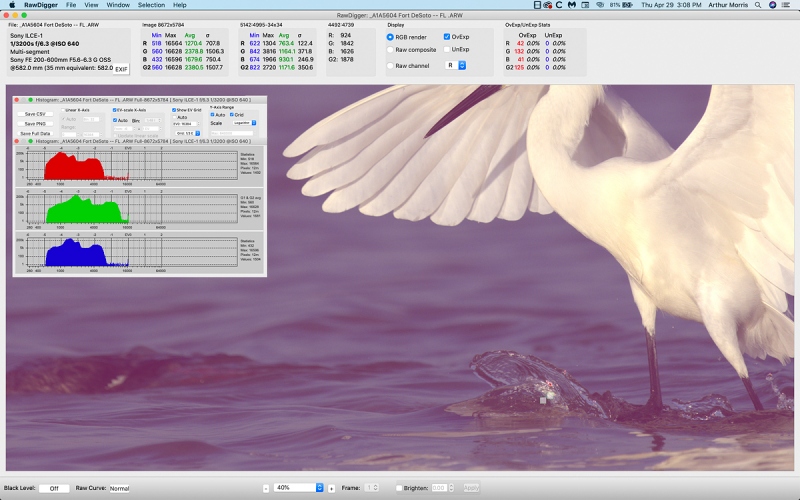
Image #1A: RawDigger screen capture of the (pink) Adapted Histogram for the Snowy Egret landing near Red-breasted Merganser image image
|
RawDigger
It would be impossible to overstate how much I have learned by studying RawDigger and how much better my exposures have become since I started with the program almost a year ago. The raw file brightness for Image #1 is dead solid perfect with the great bulk of the G channel just inside the 16000 line. The 340 OvExp pixels (out of 51,000,000) are all in the specular highlights in the splash. You can see the RED OvExp warnings in the big splash in front of the snowies right leg.
RawDigger — not for the faint of heart …
Nothing has ever helped me learn to create perfect exposures to the degree that RawDigger has. I think that many folks are reluctant to learn that most of their images are underexposed by one or more full stops and that highlight warnings in Photoshop, Lightroom, Capture One, and your in-camera histogram are usually way off (as they are based on the embedded JPEGs). Only your raw files tell the truth all the time. Heck, I resisted RawDigger for several years … Once you get over this feeling, RawDigger can become your very best exposure friend no matter what system you are using. On the recent IPTs and In-the-Field sessions, we have demonstrated that fact. Convincingly.
The RawDigger (pink) Adapted Histogram
In the RawDigger e-Guide, you will learn exactly how to set up the Adapted “pink” RawDigger Histogram and how to use it to quickly and easily evaluate the exposure or raw file brightness of images from all digital cameras currently in use. RawDigger was especially helpful to me as I struggled with R5 exposures and learned my new camera body, the Sony Alpha a1.
|
|
RawDigger e-Guide with Two Videos
|
The RawDigger e-Guide with Two Videos
by Arthur Morris with Patrick Sparkman
The RawDigger e-Guide was created only for serious photographers who wish to get the absolute most out of their raw files.
Patrick and I began work on the guide in July 2020. At first we struggled. We asked questions. We learned about Max-G values. We puzzled as to why the Max G values for different cameras were different. IPT veteran Bart Deamer asked lots of questions that we could not answer. We got help from RawDigger creator Iliah Borg. We learned. In December, Patrick came up with an Adapted Histogram that allows us to evaluate the exposures and raw file brightness for all images created with all digital camera bodies from the last two decades. What we learned each time prompted three complete beginning to end re-writes.
The point of the guide is to teach you to truly expose to the mega-Expose-to-the-Right so that you will minimize noise, maximize image quality, best utilize your camera’s dynamic range, and attain the highest possible level of shadow detail in your RAW files in every situation. In addition, your properly exposed RAW files will contain more tonal information and feature the smoothest possible transitions between tones. And your optimized images will feature rich, accurate color.
We teach you why the GREEN channel is almost always the first to over-expose. We save you money by advising you which version of RawDigger you need. We teach you how to interpret the Max G values for your Canon, Nikon, and SONY camera bodies. It is very likely that the Shock-your-World section will shock you. And lastly — thanks to the technical and practical brilliance of Patrick Sparkman — we teach you a simple way to quickly and easily evaluate your exposures and raw file brightness using an Adapted RawDigger histogram.
The flower video takes you through a session where artie edits a folder of images in Capture One while checking the exposures and Max-G values in RawDigger. The Adapted Histogram video examines a series of recent images with the pink histograms and covers lots of fine points including and especially how to deal with specular highlights. The directions for setting up the Adapted Histogram are in the text.
If we priced this guide based on how much effort we put into it, it would sell it for $999.00. But as this guide will be purchased only by a limited number of serious photographers, we have priced it at $51.00. You can order yours here in the BAA Online Store.
|
|
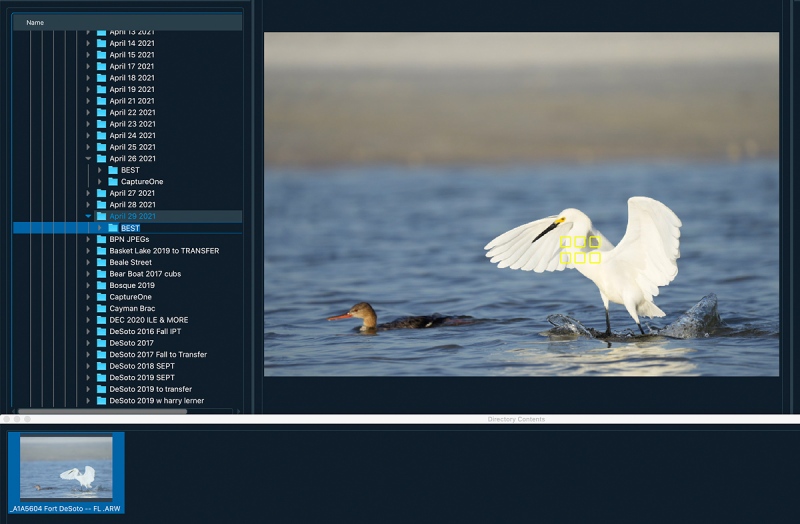
Image #1B: AF points screen capture for the Snowy Egret landing near Red-breasted Merganser image.
|
Sony Alpha a1 AF
The performance of the SONY AF system at any focal length (when the a1 is set up properly as detailed in the in e-mails to the Sony Alpha a1 Info & Updates group), continues to amaze me. Early on, there was lots of discussion within the group with many preferring multiple back button approaches. For me a simple shutter button approach with the right AF settings that yield 99% sharp-on-the-eye images is best. By far. It is super-simple and mega-effective. In the next SONY Alpha a1 Set-up and Info Group e-mail, I will be sharing what I have learned as to when and it what situations it is best to abandon Zone. We have already learned to limit the AF Area choices and to switch AF Areas quickly and conveniently. The default method of switching AF points with the C2 button is both slow and cumbersome.
SONY Alpha a1 Set-up and Info Group
The SONY Alpha a1 Set-up and Info Group is going great guns as folks chime in with thoughtful questions and experience-based advice. We are now up to an astounding 39 folks. Early on, we discussed the myriad AF options. I gave my opinion as to the best one for flight and general bird photography. More recently, we have been in contact with folks at SONY sharing our thoughts, experiences, and frustrations with the EVF blackout problem.
All who purchased their Alpha a1 bodies via a BAA affiliate link will receive a free subscription to the Sony Alpha a1 Set-Up and Info Updates after shooting me their receipts via e-mail. (Note: it may take me several days to confirm B&H orders.) This same service may be purchased by anyone with an a1 body via a $150.00 PayPal sent to birdsasart@verizon.net indicating payment for Alpha a1 Info Updates. Alternatively, they can call Jim weekday afternoons at 1-863-692-0906 to pay via credit card. New members will receive composite e-mails that summarize all previous discussions.
Typos
With all blog posts, feel free to e-mail or to leave a comment regarding any typos or errors.
April 29th, 2021 Whats Up?
Though I did not create as many images on Wednesday morning as I had on Monday, the 3rd morning of the second DeSoto IPT was fantastic. The terns and skimmers were great right at sunrise but all the birds took flight and left without explanation. So we headed for the calmest pool to see what was up. We started with a gorgeous Marbled Godwit and its mirror image reflection. Next was a feeding spree with a half-dozen each of Snowy Egrets and Red-breasted Mergansers. We followed the birds along to stay on sun angle as much as possible. We had lots of great chances with the flying and landing snowies. As usual, Donna Bourdon opted to stay with a frantically dancing Reddish Egret. Shelley Lake and I worked some nice feeding Dunlins at ground level. All in all, it was a truly great morning. And when Shelley saw her images, she was astounded by their beauty and intimacy.
After our second delicious smoked salmon brunch in three days, we recorded a Camtasia video during which I edited a single folder with 2586 images from both sessions on 27 April. I wound up with 248 keepers after the first edit. It had been a very good morning. The video will be offered for sale soon for those who wish to learn to quickly pick their keepers from large files from the super-high frame rate bodies.
On Wednesday afternoon, we headed to a rookery in Brandon, FL. We arrived way too early to find the harsh light on a very warm — make that hot, afternoon. We found some good chow right nearby to kill some time. With tons of clutter, nests right next to each other, and too many branches everywhere, rookeries are difficult places to photograph. We hung in till the light was sweet and were rewarded when the two large chicks in the accessible Great Blue Blue Heron nest at the very top of the south colony island were fed. We were not headed back to Gulfport until 8:00pm. It was a long and rewarding day.
Today is Thursday 28 April, the last morning of the DeSoto IPT. The forecast for St. Pete is for test another perfect morning: clear and sunny with a southeast wind at 11mph. Wherever you are, and whatever you are doing, I hope that you have a great day.
This blog post took about two hours to prepare and makes 126 consecutive days with a new one. Please remember that if an item — a Delkin flash card, or a tripod head, for example, is available from B&H and/or Bedfords and is also available in the BAA Online Store, it would be great if you opt to purchase from us. We will match any price. Please remember also to use my B&H affiliate links or to save money at Bedfords by using the BIRDSASART discount code at checkout. Doing either often earns you free guides and/or discounts. And doing so always earns my great appreciation.
Hard to Figure …
After more than 20 folks left insightful comments on the Whole Catfish blog post, it is hard to figure out why only a single person left a comment in yesterdays A Catch-up Learning Day on the BIRDS AS ART Blog post here when asked to pick their favorite of four very strong images.
I really did enjoy Steve’s quite clever comment:
April 28, 2021 at 8:23 pm · Reply · Edit
In image #3 above, the Osprey forms a spectacular hood ornament for the flying catfish.
Thanks for dputting a smile on my face Steve.
Great Topaz News!
Folks who use the BAA Topaz link to purchase Sharpen AI, DeNoise AI, or the Utility Bundle (or any other Topaz plug-ins), will receive a 15% discount by entering the ARTHUR15 code at checkout. If the stuff is on sale (as it usually is), you save 15% off of the sale price! To get the discount you must use my link and you must enter the discount code. Be sure to start with this link.
Those who purchase Sharpen AI, DeNoise AI, or any other Topaz plug-ins using my link and then entering the ARTHUR15 code at checkout can e-mail to request a short Getting Started with Topaz e-Guide. Please include a copy of your Topaz receipt that shows the discount. Aside from the basics, the guide explains how to install the plug-ins so that they appear in the Photoshop Filter Menu.
Please Remember
With income from IPTs now at zero, please, if you enjoy and learn from the blog, remember to use one of my two affiliate programs when purchasing new gear. Doing so just might make it possible for me to avoid having to try to get a job as a Walmart greeter and will not cost you a single penny more. And if you use Bedfords and remember to enter the BIRDSASART code at checkout, you will save 3% on every order and enjoy free second-day air shipping. In these crazy times — I am out at least forty to sixty thousand dollars so far due to COVID 19 (with lots more to come) — remembering to use my B&H link or to shop at Bedfords will help me out a ton and be greatly appreciated. Overseas folks who cannot order from the US because of import fees, duties, and taxes, are invited to help out by clicking here to leave a blog thank you gift if they see fit.
New and Better Bedfords Discount Policy!
You can now save 3% on all of your Bedfords photo gear purchases by entering the BIRDSASART coupon code at checkout. Your discount will be applied to your pre-tax total. In addition, by using the code you will get 2nd day air shipping via Fed Ex.
Grab a Nikon AF-S Teleconverter TC-14E III and save $14.99. Purchase a Canon EOS R5 and your discount will be $116.97. Purchase a Sony FE 600mm f/4 GM OSS lens and save a remarkable $389.94! Your Bedford’s purchase no longer needs to be greater than $1,000.00 for you to receive a discount. The more you spend, the more you save.
Money Saving Reminder
Many have learned that if you need a hot photo item that is out of stock at B&H and would enjoy free second-day air shipping, your best bet is to click here, place an order with Bedfords, and enter the coupon code BIRDSASART at checkout. If an item is out of stock, contact Steve Elkins via e-mail or on his cell phone at (479) 381-2592 (Central time). Be sure to mention the BIRDSASART coupon code and use it for your online order to save 3% and enjoy free 2nd-day air shipping. Steve has been great at getting folks the hot items that are out of stock at B&H and everywhere else. The wait lists at the big stores can be a year or longer for the hard to get items. Steve will surely get you your gear long before that. For the past year, he has been helping BAA Blog folks get their hands on items like the SONY a9 ii, the SONY 200-600 G OSS lens, the Canon EOS R5, the Canon RF 100-500mm lens, and the Nikon 500mm PF. Steve is personable, helpful, and eager to please.


Gear Questions and Advice
Too many folks attending BAA IPTs (remember those?) and dozens of photographers whom I see in the field and on BPN, are–out of ignorance–using the wrong gear especially when it comes to tripods and more especially, tripod heads… Please know that I am always glad to answer your gear questions via e-mail
|
|
|
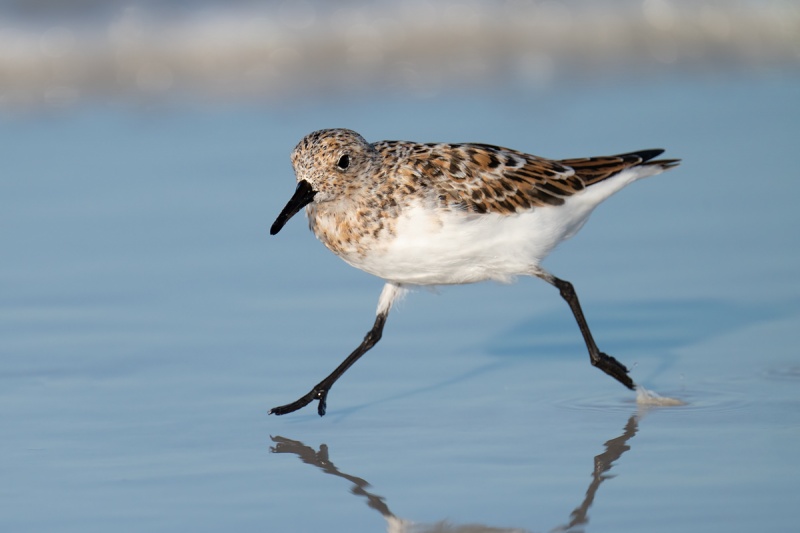
This image was also created on 26 April 2021, yet another from the great first morning of the second DeSoto IPT. Lying flat on my belly in the wet sand, I used the handheld Sony FE 200-600mm f/5.6-6.3 G OSS lens with the Sony FE 1.4x Teleconverter (at 840mm) and The One, the Sony Alpha 1 Mirrorless digital camera. ISO 800. Exposure determined via Zebras with ISO on the rear dial: 1/2500 sec. at f/9 (wide open) in Manual mode. AWB at 8:17am on a clear, sunny morning.
Wide/AF-C was active at the moment of exposure and performed to perfection. Click on the image to see a larger version.
Image #1: Sanderling running
|
The Series
This running Sanderling image was made while I was seated. It is one of a series of five, all nicely framed. Hand holding the 200-60, even with the 1.4X TC, is a dream. The first four were razor-sharp on the eye, the last one, todays featured image, showed some motion blur on the face so it needed some special post processing care. See the Topaz Sharpen AI item below. I chose to optimize this one because the bird had both feet off the ground.
The bird is pretty much getting close to breeding plumage. The upperparts may become more orange over the next few weeks, but this species — even in full breeding plumage — shows lots of variation in color.
|
|
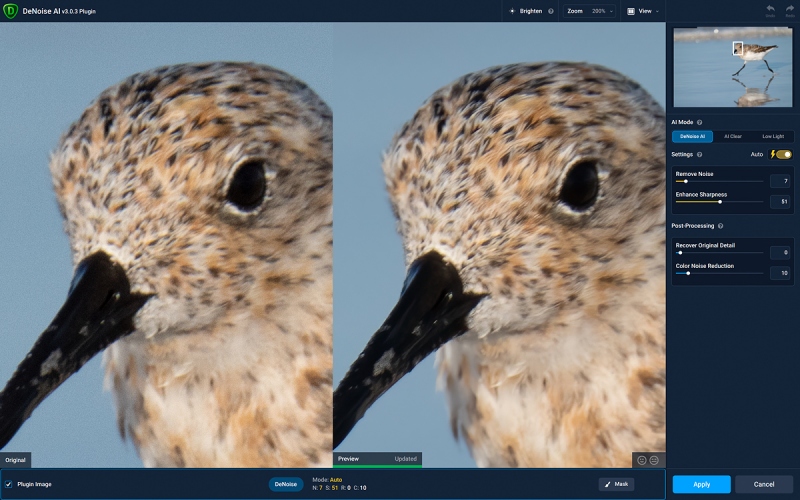
Image #1B: Topaz Denoise AI on the Sanderling running image
|
Topaz Denoise AI
With images made in full sun, I will generally go with DeNoise on Auto, rarely changing any of the sliders. With higher ISO images made in low light, I will always go to the Comparison view and often find that either Low Light or AI Clear does a better job. In many cases, increasing the magnification to 200 or 400% makes it easier to see the differences in the three options. Note the complete elimination of background noise in this ISO 800 image. Remember that when the WHITEs are properly exposed, the middle tones are one stop too dark. Confused by that? See the section on Exposure Theory in the original (soft cover) The Art of Bird Photography.
|
|
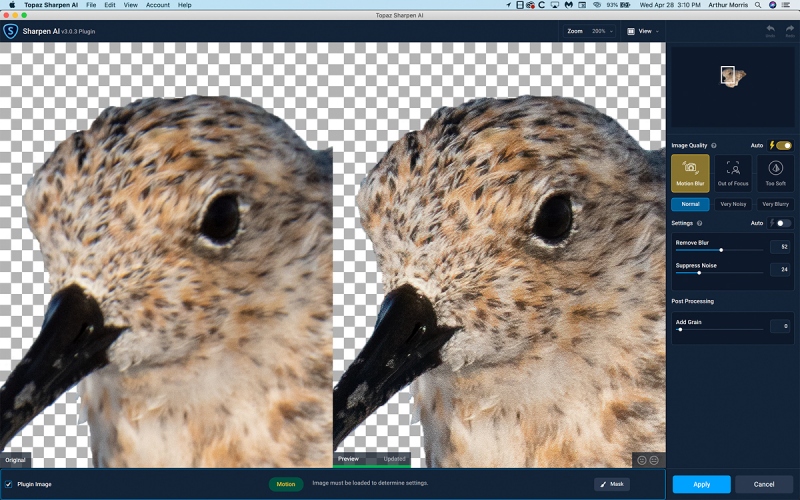
Image #1B: Topaz Sharpen AI on the Sanderling running image
|
Topaz Sharpen AI
So why might the fifth image in the series showed more motion blur than the first four? That likely occurred because I did not pan as smoothly with the last image as I had with the first four; the bird was higher in the frame than it was in the four sharp frames. To me, that shows that I jerked the lens a bit at the end. Or not.
In any case, the ability of Sharpen AI to re-align pixels to correct motion blur is nothing short of remarkable. Click on the screen capture above to better see the remarkable difference in the before image on our right and the after image on our left.
You can see that I applied Sharpen AI to a rough selection of the birds head (on a layer). As I have a hard time telling if that layer is over sharpened, I run Sharpen AI at full strength, go back to Photoshop, magnify the image, and click the visibility eyeball on and off. If it looks too crispy I will simply reduce the Opacity to taste. With this image, I reduced the Opacity to 60%.
Typos
With all blog posts, feel free to e-mail or to leave a comment regarding any typos or errors.
April 28th, 2021 What’s Up?
Tuesday morning was good, but nowhere as good as Monday morning on the second DeSoto IPT had been. With our best pair of copulating Royal Terns — in the very shallow water on the edge fo the Gulf in sweet early light, we got photo bombed as a tern with a dirty breast landed in front and just to the right of the copulating pair. The two gorgeous birds went at it enthusiastically for about 8 minutes! We had several pairs of copulating Sandwich Terns as well, but none ever offered a clean chance. The morning back-up location paid off nicely with lots of flying Brown Pelicans. Jake Levin concentrated on the Ruddy Turnstones catching clam spat.
We enjoyed a great brunch of fresh grilled tuna and a big salad. That was followed by a photoshop session where we discussed creating and using Regular and Inverse Layer Masks, Expanding canvas with the Content-Aware Fill Crop Tool method, and bringing up detail in properly exposed, sunlit WHITEs. For the latter we used both Linear Burn and Color EFEX Pro and compared results by turning the layers on and off with an eyeball click. That after teaching the group to make Color Range selections.
Despite the east wind, Tuesday afternoon was fantastic, much better than Monday afternoon had been. We began and ended at my favorite afternoon location with a gorgeous, breeding plumage, dark morph Reddish Egret. After that bird departed, we worked several Great Blue Herons and Great Egrets and fewer shorebirds than had been present the previous day. Jake noted that a large flock of shorebirds had landed several hundred yards to our right; the star of that show was a bathing Wilson’s Plover. Then Jim Miller spotted a lovely and cooperative immature Little Blue Heron fishing in still blue water and that is how we ended our day.
Ah, I almost forgot, I came up with an astoundingly easy and effective way to shoot using the tilted rear screen of the monitor. I will be sharing that with your hear soon.
Today is Wednesday 28 April. The forecast for this morning is perfect: sunny with a southeast breeze. Wherever you are, and whatever you are doing, I hope that you have a great day.
This blog post took about two hours to prepare and makes 126 consecutive days with a new one. Please remember that if an item — a Delkin flash card, or a tripod head, for example, is available from B&H and/or Bedfords and is also available in the BAA Online Store, it would be great if you opt to purchase from us. We will match any price. Please remember also to use my B&H affiliate links or to save money at Bedfords by using the BIRDSASART discount code at checkout. Doing either often earns you free guides and/or discounts. And doing so always earns my great appreciation.
|
|
The BIRDS AS ART Current Workflow e-Guide (Digital Basics II).
You can order your copy from the BAA Online Store here, by sending a PayPal for $40 here, or by calling Jim or Jennifer weekdays at 863-692-0906 with your credit card in hand. Be sure to specify Digital Basics II.
|
The BIRDS AS ART Current Workflow e-Guide (Digital Basics II)
All of the techniques mentioned above, and tons more great Photoshop tips and techniques (with the exception of Capture One RAW Conversions) — along with all of my personalized Keyboard Shortcuts — are covered in detail in the BIRDS AS ART Current Workflow e-Guide (Digital Basics II), an instructional PDF that is sent via e-mail. Learn more and check out the free excerpt in the blog post here. While the new e-Guide reflects my MacBook Pro/Photo Mechanic/DPP 4/Photoshop workflow, folks using a PC and/or BreezeBrowser will also benefit greatly by studying the material on DB II. Note: folks working on a PC and/or those who do not want to miss anything Photoshop may wish to purchase the original Digital Basics along with DB II while saving $15 by clicking here to buy the DB Bundle.
Folks who learn well by following along rather than by reading can check out the complete collection of MP 4 Photoshop Tutorial Videos by clicking here. Note: all of the videos are now priced at an amazingly low $5.00 each.
You can learn how and why I converted all of my Canon digital RAW files in DPP 4 in the DPP 4 RAW Conversion Guide here. More recently, I became proficient at converting my Nikon RAW (NEF) files in Adobe Camera Raw. About two years ago I began converting my Nikon and Sony RAW files in Capture One Pro 12 and continue to do so today.
To purchase Capture One, please use this link. Then you can learn more about Capture One in the Capture One Pro 12 Simplified MP4 Video here. The next step would be to get a copy of Arash Hazeghi’s “The Nikon Photographers’ Guide to Phase One Capture One Pro e-Guide” in the blog post here.
You can learn advanced Quick Masking and advanced Layer Masking techniques in APTATS I & II. You can save $15 by purchasing the pair. Folks can learn sophisticated sharpening and (NeatImage) Noise Reduction techniques in The Professional Post Processing Guide by Arash Hazeghi and edited by yours truly. Please use this link to purchase NeatImage.
|
|
|
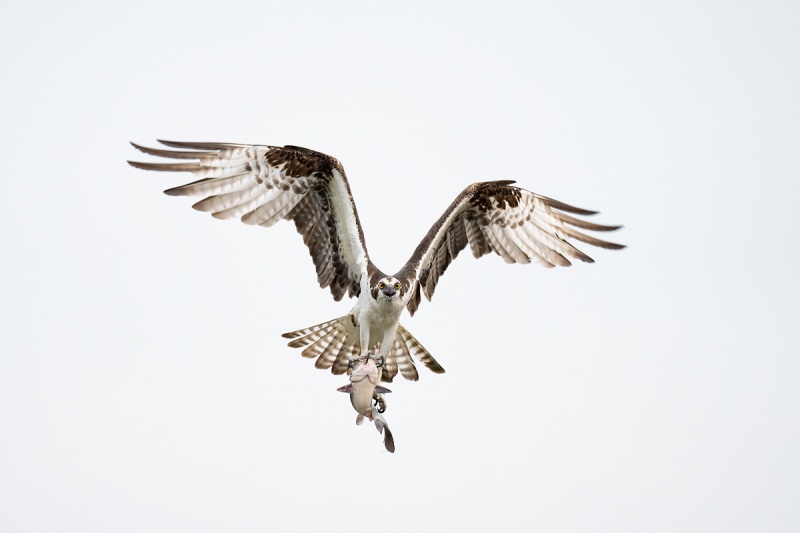
This image was created on 24 April 2021 on Lake Blue Cypress working from Clemens Van der Werf’s flats boat. I used the hand held Sony FE 600mm f/4 GM OSS lens and The One, the Sony Alpha 1 Mirrorless digital camera. ISO 3200. Exposure determined via Zebras with ISO on the rear dial: 1/6000 sec. at f/4 (wide open) in Manual mode. AWB at 7:23:25am on an overcast morning.
Wide/AF-C was active at the moment of exposure and performed perfectly. Click on the image to see a larger version.
Image #3: Osprey with whole catfish
|
#3 For Me
In the Whole Catfish! blog post here, I asked which of the four images was best. The responses — as expected — were all over the place with no clear favorite. Everyone who commented did a great job and explained why they made their picks. In such an exercise, there is no right or wrong. The idea as always is to get folks thinking and analyzing.
Honestly, I like all four of them. If I had to choose a favorite, it would be #3, the image without a trace of the nest tree in the frame. Why? I love the direct stare and the fully flared wings. #4 would be a close second. Thanks again to the many who left thoughtful comments.
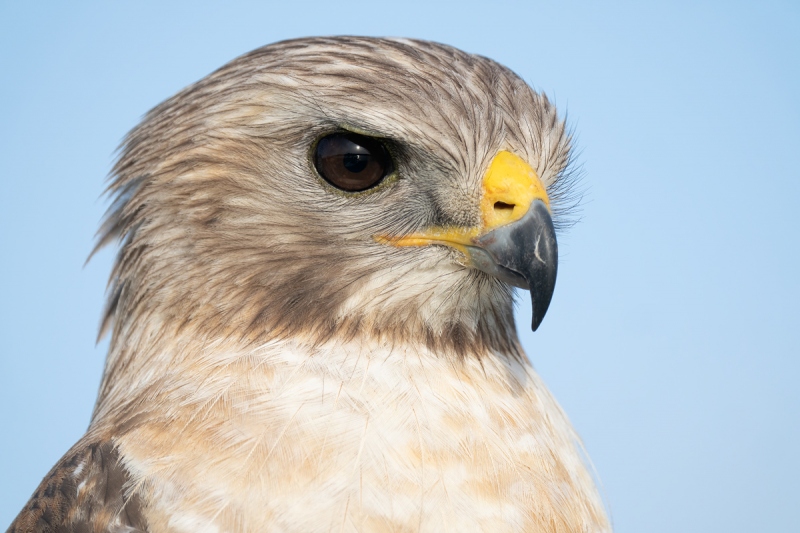
Silly-Tame Red-shouldered Hawk. And Focal Length Quiz
In the Silly-Tame Red-shouldered Hawk. And Focal Length Quiz blog post here, I wrote, After clicking on the image to see the larger version and checking out the 100% crop of the bird’s eyeball below, I’d love for you to guess (or figure out — there is a single clue …) the lens and TC that I used along with the focal length.
BPN-friend Joseph J. Przybyla played the role of spoiler by being the first to answer:
April 25, 2021 at 6:44am
Hey Artie, good morning… nice tight image of a Red-shouldered Hawk. I say you used your 200-600mm with the 2x Teleconverter. Have a wonderful day.
In an effort to throw folks off the right track, I replied as below
April 25, 2021 at 6:50am
Thanks, Joe. Good try! with love, a
Byron Prinzmetal left an insightful comment:
April 25, 2021 at 12:51 pm · Reply · Edit
F/13 should have more depth of field but some feathers on left side in the back are not sharp, but on right they are really sharp so I’m guessing the 200-600 with the 1.4 extender at 840mm, maybe even the 2x extender to explain the narrow depth of field. The f/13 should have more depth of field though so don’t understand the feathers on the back left side not looking real sharp, but the ones on the right sharper than the left. Suppose you used Topaz Sharpen AI and applied more on the right side? Topaz works wonders even on the best of best images in my opinion. Glad you put me onto the software and it get better with each update. Bp
The image above was created with the handheld 200-600, the 2X teleconverter, and the Alpha a1 at 1200mm. The clue was the f/13. I would rarely if ever stop down to f/13, but in this case, that was the wide open aperture. And the depth-of-field wide open at 1200mm at less than ten feet from the subject is razor thin. So with the birds head angled well toward us, the feathers on the back of the head are beyond the range of sharp focus. Thus, Byron’s analysis was pretty much spot-on. And so was Joe’s.
Warning: Stay Away!
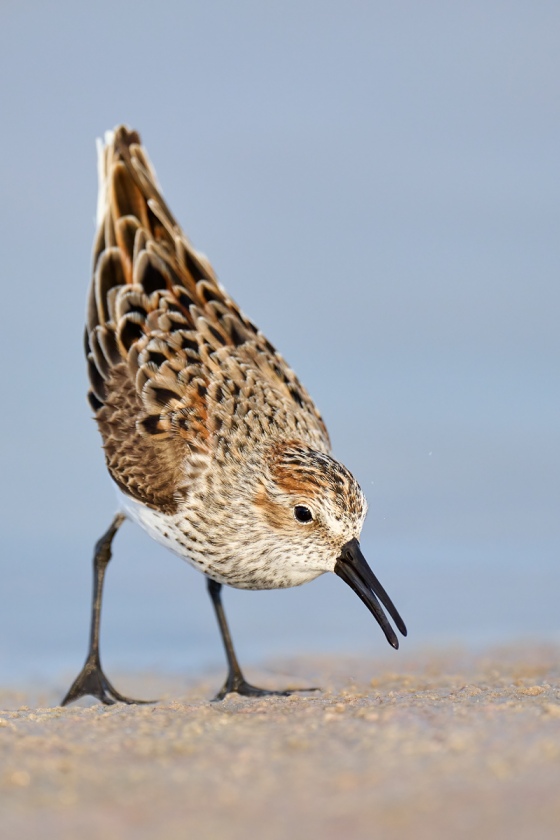
In the Shorebird Behavior Quiz. SONY Alpha a1 Crop-ability! blog post here, everyone including me loved the image, but nobody took a crack at identifying the head down/tail up behavior. The posture seen in the image above is an aggressive one that is often used by sandpipers and other shorebirds when defending a feeding territory. If the intruding bird does not move away, a tussle often ensues.
Shorebirds; Beautiful Beachcombers
My My Shorebirds: Beautiful Beachcombers, written for naturalists and birders, will teach you everything you’ve always wanted to know about the aging, identification, behavior, feeding habits and strategies, and the timing and routes of migration of North America’s sandpipers, godwits, yellowlegs, phalaropes, plovers, avocets, stilts, and oystercatchers. It was written especially for you.
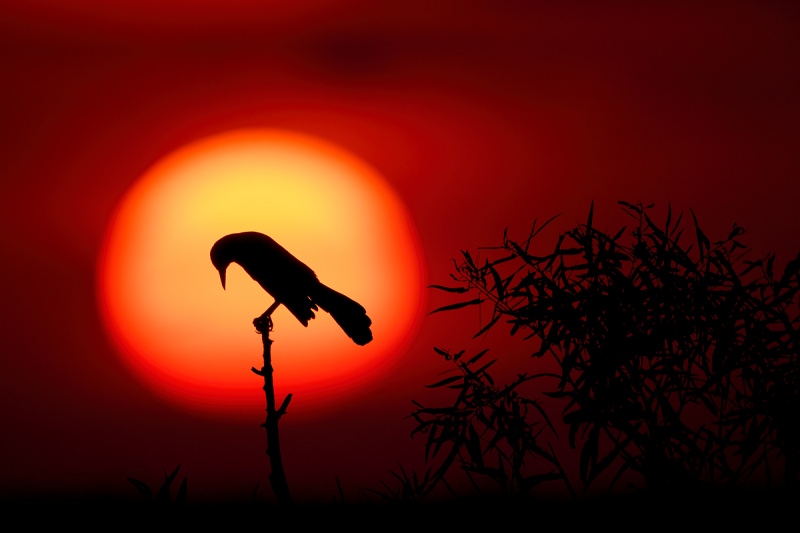
The image above was featured in the A Short But Great Move Pays Off! Can a Big Over-exposure Be Best? blog post here. There was not, as some folks assumed, anything distracting to the left of the sun. I placed the bird on the left side of the frame so as to include the vegetation that to balance the sun ball on the left side of the frame and because it added to the motif.
Ted Willcox hit the nail on the head on April 16, 2021 at 11:28am when he commented as below:
You placed the bird on the left side to show more of the vegetation on the right which I believe makes the image that much better!
Well said, Ted.
|
|
|
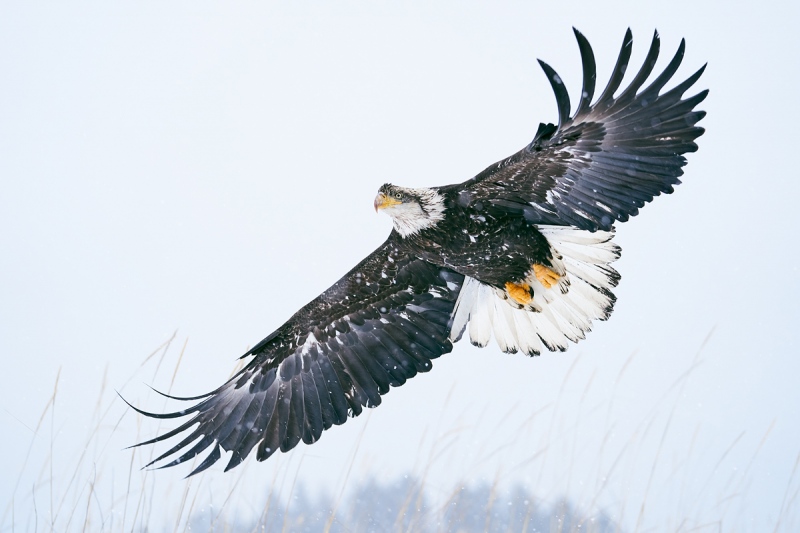
This image was created in Katchemak Bay, Homer, AK. I used the hand held Sony FE 70-200mm f/2.8 GM OSS lens (at 112mm!) and the AF King, the Sony Alpha a9 II Mirrorless Digital Camera body.. ISO 1000. Exposure determined via blinkies with ISO on the Thumb Dial: 1/2000 sec. at f/3.2 in Manual mode.
Center Zone AF-C performed perfectly. Click on the image to view a larger version
Sub-adult Bald Eagle in flight on snowy day
|
In the 112 millimeters? Surely You Jest ! Depth-of-Field Question blog post here, I asked, Would stopping down one full stop here to f/4.5 have been a good idea? Why are why not?
The two Warrens commented most accurately:
Warren Hatch/April 7, 2021 at 7:55pm ·
If you went to f/4.5 (and kept the same ISO), your shutter speed would have been 1/1000 for the equivalent exposure. You had plenty of depth of field (so there was) no reason so sacrifice the extra sharpness you achieved at 1/2000.
Warren Howe/April 6, 2021 at 9:25am
No, I don’t think stopping down would have been a good idea. At that focal range, you already had plenty of depth of field. The entire eagle is sharp and even the tall grass behind the subject is fairly sharp. Even the distant trees are fairly sharp. Stopping down would have made them more in focus and therefore, more distracting. Also, and importantly, it would have increased the ISO or resulted in a slower shutter, (none of) which would have helped …
To my eye, the entire subject is more than sharp enough as it was pretty much covered by the depth-of-field at 112mm. FYI, the total depth of field at f/3.2 at approximately 30 feet is 2.82 feet, 1.34 feet in front of the point of focus.
Typos
With all blog posts, feel free to e-mail or to leave a comment regarding any typos or errors.
|
|

