Arthur Morris/BIRDS AS ART
January 23rd, 2021

2 Sunset Family Jewels. Was Luck the Residue of Design?

What’s Up?

Friday morning down by the lake began clear and still. With no birds. No vultures. No cranes. No Cattle Egrets. No Red-shouldered Hawks. I scouted around a bit without any luck. Using the SONY 600 GM/1.4X TC/a9 ii set up on the tripod in the car with the Levered-clamp FlexShooter Pro of course, I took some bracketed images of a palm tree and another bracketed series of the top of the new perch. Just to learn more about fine-tuning my SONY exposures. What degree of Zebras will yield a perfect exposure in this light or that?

Just before quitting I decided to take one last peek at the Vulture Tree at the end of the South Field. A bird or two had flown in since my first visit, so I got out of the car and set up the Induro 404L with the SONY 600 GM as above at 840mm. I enjoyed virtually non-stop flight action — mostly with Black Vultures — as the wind picked up first from the south (good), before switching to west/southwest (bad). So I headed home for brunch.

With the warmer days this week, the pool was up to a very pleasant 82 degrees today. I love swimming without my wet suit top.

On Friday evening there was a clear sunset with the wind from the west; that is not good at all for the birds flying in to roost in the reeds. So I hung out by the three perches and had a ton of fun. After three weeks of zilch, an Osprey has fallen in love with the repaired perch. And the new large tall perch has some singing Boat-tailed Grackles. All in all it was not bad despite the less than ideal wind direction.

When I first found the new sunset location (since have named the Reed Roost), I knew that the possibility of making some really good images existed. I was right! 🙂 If you feel that one of today’s featured images is stronger than the other, please leave a comment letting us know which one and why you made your choice. You can also comment on any problems that you have with either image.

Today is Saturday 23 January 2021. The forecast is for partly cloudy and still with west/northwest winds developing as the day goes on. With a high of 77 degrees. 🙂 If it is not too foggy, I will be heading out early this morning.

This blog past makes thirty-four days in a row with a new blog post. This one took more than 3 hours to prepare. Please remember …

Please Remember

With income from IPTs now at zero, please, if you enjoy and learn from the blog, remember to use one of my two affiliate programs when purchasing new gear. Doing so just might make it possible for me to avoid having to try to get a job as a Walmart greeter and will not cost you a single penny more. And if you use Bedfords and remember to enter the BIRDSASART code at checkout, you will save 3% on every order and enjoy free second-day air shipping. In these crazy times — I am out at least forty to sixty thousand dollars so far due to COVID 19 (with lots more to come) — remembering to use my B&H link or to shop at Bedfords will help me out a ton and be greatly appreciated. Overseas folks who cannot order from the US because of import fees, duties, and taxes can always help out by clicking here if they see fit.

Levered-Clamp FlexShooter Pro

We have just one Induro GIT 404L/Levered-Clamp FlexShooter Pro in stock. Two dozen are being shipped from Hungary this coming Tuesday. The ballhead that acts like a (but is much lighter than) a gimbal-head, and serves all purposes, is — as I predicted when I first used a FlexShooter — indeed taking the world of nature photography over by storm. And it’s all on the level too!

RawDigger e-Guide pre-publication version

RawDigger e-Guide and Video Advance Copy Still Available — but not for long …

Save $10 Now

The RawDigger e-Guide and Video is almost finished. It will sell for $51.00. If you are anxious to get started with RawDigger, learn to mega-Expose to the Right, and wind up with the highest quality image files, you can save $10.00 and have a chance to review a recently updated pre-publication version of the guide by sending a PayPal for $41.00 to birdsasart@verizon.net with the words RawDigger e-Guide and Video Pre-publication Copy cut and pasted into the Subject line. The recent delay is the result of my recent conversations with Iliah Borg, the brains behind RawDigger. It is very likely that the Shock-your-World section will shock you.

In the new guide, we teach you why the GREEN channel is almost always the first to over-expose. We teach you how to interpret the Max G values. And most recently, we teach you a simple way to evaluate your exposures using an adapted RawDigger histogram. And tons more, of course. I am planning on having the completed RawDigger e-Guide ready for sale by this coming Wednesday. Folks who saved $10.00 by pre-ordering will of course receive a link to the final PDF.

134 sold to rave reviews.

The SONY e-Guide by Patrick Sparkman and Arthur Morris

The Sony Camera User’s e-Guide (and Videos)

Click here to purchase the guide with one Camera Set-up Video. Be sure to e-mail us by clicking here to specify your camera body so that we can send you a link for the correct video.

Click here to purchase the guide with two Camera Set-up Videos. Be sure to e-mail us by clicking here to specify your two camera bodies so that we can send you links for the correct videos.

Click here to learn more about the SONY e-Guide.

Folks who have used my B&H affiliate links or purchased their SONY gear are invited to e-mail for discount information.

Great Topaz News!

Folks who use the BAA Topaz link to purchase Sharpen AI, DeNoise AI, or the Utility Bundle (or any other Topaz plugins) will receive a 15% discount by entering the ARTHUR15 code at checkout. To get the discount you must use my link and you must enter the discount code. Be sure to start with this link.

Topaz Stuff

As I said just a while back and have said often many times before, I should have listened sooner. If you, like me, are new to the Topaz party, please use this link to purchase. Right now I can wholeheartedly recommend both Topaz Sharpen AI and Topaz DeNoise AI. Though I have not yet worked with JPEGtoRAW AI or Gigapixel AI, I have installed both of these plug-ins and look forward to trying them on some I-Phone 11 images fairly soon. If you are thinking like me, consider the Utility Bundle that includes all four plug-ins mentioned above at a money-saving price.

Again, those who purchase Sharpen AI or DeNoise AI using my link, can e-mail to request a short Getting Started with Topaz e-Guide. I had a bit of trouble getting the two plug-ins installed and having them appear in the Photoshop Filter Menu. In addition, I will explain how to best learn about the two plug-ins by applying them on a Layer (in Photoshop).

New and Better Bedfords Discount Policy!

You can now save 3% on all of your Bedfords photo gear purchases by entering the BIRDSASART coupon code at checkout. Your discount will be applied to your pre-tax total. In addition, by using the code you will get 2nd day air shipping via Fed Ex.

Grab a Nikon AF-S Teleconverter TC-14E III and save $14.99. Purchase a Canon EOS R5 and your discount will be $116.97. Purchase a Sony FE 600mm f/4 GM OSS lens and save a remarkable $389.94! Your Bedford’s purchase no longer needs to be greater than $1,000.00 for you to receive a discount. The more you spend, the more you save.

Money Saving Reminder

Many have learned that if you need a hot photo item that is out of stock at B&H and would enjoy free overnight shipping, your best bet is to click here, place an order with Bedfords, and enter the coupon code BIRDSASART at checkout. If an item is out of stock, contact Steve Elkins via e-mail or on his cell phone at (479) 381-2592 (Central time). Be sure to mention the BIRDSASART coupon code and use it for your online order to save 3% and enjoy free 2nd-day air shipping. Steve has been great at getting folks the hot items that are out of stock at B&H and everywhere else. The wait lists at the big stores can be a year or longer for the hard to get items. Steve will surely get you your gear long before that. For the past year, he has been helping BAA Blog folks get their hands on items like the SONY a9 ii, the SONY 200-600 G OSS lens, the Canon EOS R5, the Canon RF 100-500mm lens, and the Nikon 500mm PF. Steve is personable, helpful, and eager to please.


The BAA Used Gear Page

The Used Gear page continues to be very active. The BAA Used Gear Page is the place to sell your used photographic equipment. We will help you to get your gear sold quickly for 20 to 60% or more than what the big guys are offering … Doubt me? Check out the Recent Sales list for the past eleven months at the bottom of the page.

This image was created on 20 JAN 2021 down by the lake at ILE. I used the Induro GIT 404L/Induro GIT 404L/Levered-Clamp FlexShooter Pro-mounted Sony FE 600mm f/4 GM OSS lens, the Sony FE 2.0x Teleconverter, and the blazingly fast AF King, the Sony Alpha a9 II Mirrorless Digital camera body). AUTO ISO set 640. Multi-metering +1.7 stops: 1/2000 sec. at f/8 (wide open) in Shutter Priority (Tv or S) mode. AWB at 6:45pm right at sunset with some haze on the southwestern horizon.

Bottom Center Zone AF-C got very lucky, in part by design …

Click on the image to enjoy a larger version.

Image #1: Little Blue Heron landing above reeds at evening roost

A New Approach to Sunrise/Sunset Exposures

As explained previously, if you are shooting sunrise or sunset silhouettes in Manual mode your exposure will be perfect only for a small section of the sky. Usually, that is the brightest part of the sky next to the muted sun but without the sun in the frame. As you point the lens away from the sun, your images will become more and more under-exposed. So I have switched from Manual mode to Shutter Priority (Tv or S) mode with Auto ISO and the Exposure Compensation (EC) set to +1.7. That approach turned out to be a very nice compromise. Keep reading to learn what I mean by a “very nice compromise.” I may experiment with +2 EC.

The camera set-up for working seamlessly in Shutter Priority mode is covered in detail in the SONY e-Guide and will also be detailed in the BAA EOS R5 Camera User’s e-Guide (currently in production).

Click on the image to see a larger version.

Image #1A: the RawDigger screen capture for the Little Blue Heron landing above reeds at evening roost image

The RawDigger Screen Capture

There is a lot to learn here. With 564,000 over-exposed pixels, you might ask, What kind of good exposure is this? Actually, this is a perfect exposure. With the sun barely muted by thin clouds, the highlights in this type of image must be over-exposed. If you were able to expose for the highlights in the disk of the sun, the rest of the image would be black. You would not even seen a hint of the flying bird. So we give up the highlights in order to create a very pleasing image. Compare Image #1A with Image #1 and you will see that I added some canvas above the sun. I did that easily with the Crop Tool/Content-Aware Fill method that is detailed in ABP II (along with many dozens more great Photoshop tips).

Click on the image to see a larger version.

Image #1B: the RawDigger histogram for the Little Blue Heron landing above reeds at evening roost image

The RawDigger Histogram

That all three channels are pegged against the 16000 line indicates the complete over-exposure (“toasting”) of the highlights in the disk of the sun as well as some lesser degree of over-exposure in the most brightly lit water.

This image was also created on 20 JAN 2021 down by the lake at ILE. Again, I used the Induro GIT 404L/Induro GIT 404L/Levered-Clamp FlexShooter Pro-mounted Sony FE 600mm f/4 GM OSS lens, the Sony FE 2.0x Teleconverter, and the blazingly fast AF King, the Sony Alpha a9 II Mirrorless Digital camera body). AUTO ISO set 1000. Multi-metering +1.7 stops: 1/1600 sec. at f/8 (wide open) in Shutter Priority (Tv or S) mode. AWB at 6:47pm right at sunset with some haze on the southwestern horizon.

Bottom Center Zone AF-C got very lucky, in part by design …

Click on the image to enjoy a larger version.

Image #2: Cattle Egret landing above reeds at evening roost

Another Good One at 1200mm

Working the Reed Roost at 1200mm does not leave much room for error. The trick is to include a decent amount of reeds in the foreground and a decent amount of sky above the far shoreline to balance the composition. In addition, it is quite difficult to silhouette the incoming birds against a water-only background. If the bird or birds merge with the black of the far shoreline the image is simply not gonna work … And the same is true if the bird or birds get well down into the reeds!

So that I would have a better chance to include a decent-sized strip of sky above the far shoreline, I selected Bottom Center Zone rather than Center Zone. You can see how that worked out immediately below. You will see exactly how that worked out in item last below.

Do You Like the Subject on the Wrong Side of the Frame?

Why or why not?

Click on the image to see a larger version.

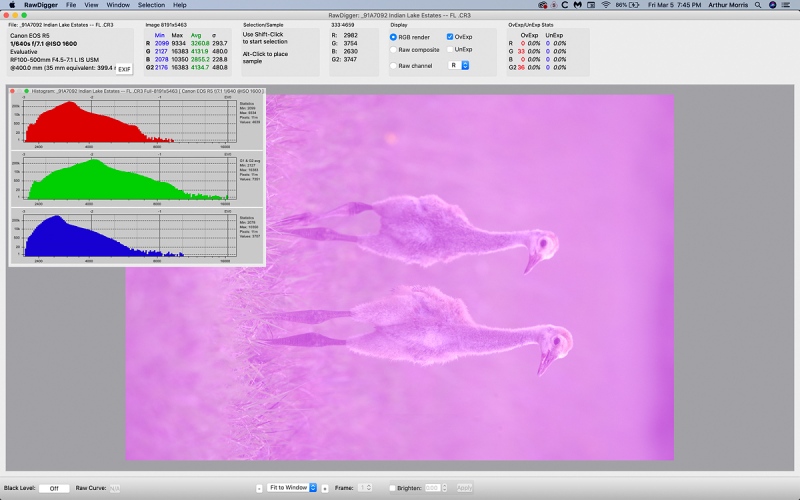
Image #2A: the RawDigger screen capture for the Cattle Egret landing above reeds at evening roost image

The RawDigger Screen Capture

Serious folks who have read this far should look at the thirds lines in the last box, the 8000 to 16000 (one full stop) box, you can see that the data in the RED channel made it to the first thirds line. The ideal target is the second thirds line or beyond (without going over the actual retail value …) So this image is about 1/3 stop too dark. Such images will process beautifully with very low levels of noise. Note that I ran Topaz DeNoise AI on both of today’s featured images. In the RawDigger e-Guide you will likely learn that you have been under-exposing all of your sunrise/sunset silhouettes (without the sun in the frame) by from one to two stops.

While preparing this blog post I just realized why that occurs: the RED channel on the camera histograms is way too sensitive to the rich reds in a richly-colored sky.

From where I sit, the compromise of going to Shutter Priority +1 2/3 stops with Auto ISO worked out quite well. Note that in the image with the setting sun in the frame the ISO dropped to 640. In Image #2– much darker overall — it rose to 1000. Had I set the EC to +2 Image #2 would have been perfect and Image #1 would have been more than satisfactory.

SONY AF Points

Was Luck the Residue of Design?

In a perfect world, the AF system would grab and track the incoming bird as it is set against a water-only background. And that is what I was trying to do. It is obvious by looking at both screen captures above that I failed: the system grabbed the reeds. I did have lots of images where that happened where the bird was not on the same plane as the reeds and thus was not sharp. But with many of the images, the birds were on the exact same plane as the reeds and were rendered sharp. I had considered that possibility during the session. So while a bit of luck was involved in getting two great poses sharp with no merges, my thinking had been spot on.

Typos

In all blog posts and Bulletins, feel free to e-mail or to leave a comment regarding any typos or errors.

January 22nd, 2021

R5 American Coot Large Crop + Topaz Gigapixel AI = Tons of Great Detail! More on the RawDigger Adapted Histogram

What’s Up?

I had my teeth cleaned at 7am yesterday and was done by 7:22am. Jim drove me to Lakeland where my first morning stop had zero American White Pelicans. In previous years there had always been dozens of the huge, beautiful, easy-to-approach pelicans resting on the bulkheads around the lake … Things were better at my back-up morning lake with lots of Lesser Scaup and a few Ring-necked drakes as well. I used my SONY 200-600 with the a9 ii while my brand new Canon rig remains in the product boxes on the dining room table …

We stopped at Mickey D’s for breakfast and headed back to Lake Wales for my appointment with TJ. I arrived about 15 minutes early only to learn that I was 24 hours and 15 minutes early. My appointment was for the next day, Friday 🙁

Jim and I headed down to the lake at about 1pm and we erected the largest, tallest-ever perch. It has a rather pointed top and I am wondering if the birds will take to it …

There was some nice sunset color on Thursday evening but with the wind from the west the birds coming to roost were landing away from me so I never even set up my lens. I did get some great sunset stuff on Wednesday evening and will share two of those along with my new sunrise/sunset exposure methodology with you there.

After posting this:

The exposures are very tough when you work in manual mode as you need to avoid over-exposure when the bird or birds are set against the brightest areas of the sky, those right next to the setting sun. But as the birds get away from those brightly colored skies, away from the sun or the spot where it just set, you will wind up with too-dark raw files.

If you can think of a solution to this problem, please, please pretty please leave a comment. And please be specific. What exposure mode? What Exposure Compensation?

in yesterday’s blog post here, I was surprised that nobody took a crack at a better way to work exposure-wise when dealing with richly-colored skies at sunrise or sunset.

This blog past makes thirty-three days in a row with a new blog post. This one took about 2 hours to prepare. Please remember …

Levered-Clamp FlexShooter Pro

We have just one Induro GIT 404L/Levered-Clamp FlexShooter Pro in stock. Two dozen are being shipped from Hungary on Tuesday. The ballhead that acts like a gimbal and serves all purposes, is indeed taking the world of nature photography over by storm. And it’s all on the level too!

Please Remember

With income from IPTs approaching zero, please, if you enjoy and learn from the blog, remember to use one of my two affiliate programs when purchasing new gear. Doing so just might make it possible for me to avoid having to try to get a job as a Walmart greeter and will not cost you a single penny more. And if you use Bedfords and remember to enter the BIRDSASART code at checkout, you will save 3% on every order and enjoy free second-day air shipping. In these crazy times — I am out at least forty to sixty thousand dollars so far due to COVID 19 (with lots more to come) — remembering to use my B&H link or to shop at Bedfords will help me out a ton and be greatly appreciated. Overseas folks who cannot order from the US because of import fees, duties, and taxes can always help out by clicking here if they see fit.

RawDigger e-Guide pre-publication version

RawDigger e-Guide and Video Advance Copy Still Available — but not for long …

Save $10 Now

The RawDigger e-Guide and Video is almost finished. It will sell for $51.00. If you are anxious to get started with RawDigger, learn to mega-Expose to the Right, and wind up with the highest quality image files, you can save $10.00 and have a chance to review a recently updated pre-publication version of the guide by sending a PayPal for $41.00 to birdsasart@verizon.net with the words RawDigger e-Guide and Video Pre-publication Copy cut and pasted into the Subject line. The recent delay is the result of my recent conversations with Iliah Borg, the brains behind RawDigger. It is very likely that the Shock-your-World section will shock you.

In the new guide, we teach you why the GREEN channel is almost always the first to over-expose. We teach you how to interpret the Max G values. And most recently, we teach you a simple way to evaluate your exposures using an adapted RawDigger histogram. And tons more, of course. I am planning on having the completed RawDigger e-Guide ready for sale by this coming Wednesday. Folks who saved $10.00 by pre-ordering will of course receive a link to the final PDF.

The BAA Used Gear Page

The Used Gear page continues to be very active. The BAA Used Gear Page is the place to sell your used photographic equipment. We will help you to get your gear sold quickly for 20 to 60% or more than what the big guys are offering … Doubt me? Check out the Recent Sales list for the past eleven months at the bottom of the page.

Canon R5/R6 AF e-Guide Info

So far, 70 folks have sent PayPals for their copy of the Canon R5/R6 AF e-Guide. And 28 who used my affiliate links to purchase their R5 have e-mailed for and received their free copy of the guide. If you e-mailed or sent a PayPal and did not receive your guide, please LMK immediately via e-mail.

Feedback has been overwhelmingly positive so far. Three folks wrote stating that they had a better way of setting up AF on their R5s. When I wrote back explaining why they were in error, two of them back-tracked. One stubborn guy is still doing it his way — less efficiently. Be sure to scroll down to read about my plans for a Canon R5/R6 User’s e-Guide. Understand that the info in the BAA Canon R5/R6 Autofocus e-Guide is so important that I opted to publish the AF guide immediately as the R5/R6 User’s Guide will take at least a month to finish.

BAA Canon R5/R6 Autofocus e-Guide

BAA Canon R5/R6 Autofocus e-Guide

Twenty-one pages. 3,452 words. 28-DPP4 screen captures showing the R5’s vaunted AF system in action. Note: the AF system of the R5 is identical to the AF system of the R6.

You will learn:

1- The two most useful AF Methods for general bird photography and for birds in flight.

2- How to set up your R5/R6 AF Menus.

3- What boxes to check (and un-check) under Limit AF Methods.

4- How to change the AF Method quickly, easily, and efficiently. Note: the default way of doing this is clunky, cumbersome, and inefficient at best. One person replied that this tip alone was worth the price of admission.

5- The only setting that should be used for Initial Servo AF pt for Face Detection + Tracking.

I you are currently using multiple back buttons either for general bird photography or for birds in flight, what you learn in this guide will change your life. For the better.

Here are the first three paragraphs of this e-Guide:

From the moment I learned about the new Canon mirrorless bodies, I read about using two or three back-buttons to focus using different AF methods. The word on the street said that the way to go for birds in flight was to use one button to acquire focus with Zone AF or with Large Zone: Horizontal AF and then switch to another button to activate Face Detection + Tracking AF and then use the shutter button to make an image. My immediate thought was, “This is insanity! There has got to be a better way.” In short, there is a far superior way to set up AF on your R5 or R6.

Remember that I got away from any form of back-button or rear focusing many years ago after finally realizing that it is always easier to do one thing (press the shutter button), than it is to do two things (press a back button and then press the shutter button).

The default method of switching AF Methods with the R5/R6 bodies is cumbersome at best. It involves first pressing the grid button (my name) on the upper right back of the camera and then pressing the hard-to-access M-Fn button to toggle through the AF Methods. This method is so bad that it will not be mentioned again in this guide.

The guide is free to all who have ordered an R5 or an R6 using my B&H affiliate link or from Steve Elkins/Bedfords using the BIRDSASART coupon code at checkout. Please send your receipt to me via e-mail. It will take me a few days to a week to verify the B&H purchases. Bedfords folks should expect their free e-Guides fairly quickly.

To purchase your copy of the e-Guide, please click here or send a PayPal for $25.00 to birdsasart@verizon.net and be sure to include the words R5/R6 AF Guide in your PayPal e-mail.

Everyone who gets the guide will receive a free update no later than the first week in February.

Canon R5/R6 User’s e-Guide

As regular readers know, I am working on a complete Canon R5/R6 User’s e-Guide. This will require a lot of research, a lot of time, and a lot of effort. I am hoping to have it complete by mid- to late February. As always, folks who use the BAA affiliate links to purchase their Canon gear will receive a substantial discount.

Understand that the info in the BAA Canon R5/R6 Autofocus e-Guide is so important that I opted to publish the AF guide right off the bat to help folks get started with their new camera bodies. I may soon offer a pre-publication version of the User’s e-Guide … At a discount, of course.

Great Topaz News!

Folks who use the BAA Topaz link to purchase Sharpen AI, DeNoise AI, or the Utility Bundle (or any other Topaz plugins) will receive a 15% discount by entering the ARTHUR15 code at checkout. To get the discount you must use my link and you must enter the discount code. Be sure to start with this link.

Topaz Stuff

As I said just a while back and have said often many times before, I should have listened sooner. If you, like me, are new to the Topaz party, please use this link to purchase. Right now I can wholeheartedly recommend both Topaz Sharpen AI and Topaz DeNoise AI. Though I have not yet worked with JPEGtoRAW AI or Gigapixel AI, I have installed both of these plug-ins and look forward to trying them on some I-Phone 11 images fairly soon. If you are thinking like me, consider the Utility Bundle that includes all four plug-ins mentioned above at a money-saving price.

Again, those who purchase Sharpen AI or DeNoise AI using my link, can e-mail to request a short Getting Started with Topaz e-Guide. I had a bit of trouble getting the two plug-ins installed and having them appear in the Photoshop Filter Menu. In addition, I will explain how to best learn about the two plug-ins by applying them on a Layer (in Photoshop).

New and Better Bedfords Discount Policy!

You can now save 3% on all of your Bedfords photo gear purchases by entering the BIRDSASART coupon code at checkout. Your discount will be applied to your pre-tax total. In addition, by using the code you will get 2nd day air shipping via Fed Ex.

Grab a Nikon AF-S Teleconverter TC-14E III and save $14.99. Purchase a Canon EOS R5 and your discount will be $116.97. Purchase a Sony FE 600mm f/4 GM OSS lens and save a remarkable $389.94! Your Bedford’s purchase no longer needs to be greater than $1,000.00 for you to receive a discount. The more you spend, the more you save.

Money Saving Reminder

Many have learned that if you need a hot photo item that is out of stock at B&H and would enjoy free overnight shipping, your best bet is to click here, place an order with Bedfords, and enter the coupon code BIRDSASART at checkout. If an item is out of stock, contact Steve Elkins via e-mail or on his cell phone at (479) 381-2592 (Central time). Be sure to mention the BIRDSASART coupon code and use it for your online order to save 3% and enjoy free 2nd-day air shipping. Steve has been great at getting folks the hot items that are out of stock at B&H and everywhere else. The wait lists at the big stores can be a year or longer for the hard to get items. Steve will surely get you your gear long before that. For the past year, he has been helping BAA Blog folks get their hands on items like the SONY a9 ii, the SONY 200-600 G OSS lens, the Canon EOS R5, the Canon RF 100-500mm lens, and the Nikon 500mm PF. Steve is personable, helpful, and eager to please.


Gear Questions and Advice

Too many folks attending BAA IPTs (remember those?) and dozens of photographers whom I see in the field and on BPN, are–out of ignorance–using the wrong gear especially when it comes to tripods and more especially, tripod heads… Please know that I am always glad to answer your gear questions via e-mail. Those questions might deal with systems, camera bodies, accessories, and/or lens choices and decisions.

This image was created on 29 December 2020 at Lakeland, FL. I used the handheld Canon RF 100-500mm f/4.5-7.1L IS USM lens with the Canon Extender RF 1.4x (at 700mm) and the highly touted 45MP Canon EOS R5 Mirrorless Digital camera body. ISO 800. Exposure determined by experience and luck and confirmed as perfect by RawDigger: 1/800 sec. at f/14 (stopped down one full stop from f/10 which is wide open at 500mm) in Manual mode. AWB at 7:51am on sunny morning.

Face detection + Tracking/AI Servo AF was active at the moment of exposure and performed perfectly as seen below. Click the image to see a larger version.

Image #1: American Coot head portrait

Canon EOS R5 Crop-ability

It goes without saying that sharp R5 images can stand up to healthy crops. I have not done the math with today’s featured image, Image #1 above, but would estimate that about 50% of the original pixels were cropped away. I did that in part to eliminate the yellow, out-of-focus grasses in the lower right corner. While the image quality and sharpness held up well to the large crop, I improved that by running the image through Topaz Gigapixel AI at 2X. Image quality improved as the file size doubled.

How to use Topaz Gigapixel AI

I convert both my SONY and Canon images in Capture One and bring the TIFs into Photoshop. First I crop with Delete Cropped Pixels. Next, I run Topaz DeNoise AI (as I did with today’s featured image as seen below). Then I do my clean-up work and make any other Photoshop adjustments. Then I save the image with the prefix “For Giga.” Finally, I open Gigapixel and drag the saved image into the GP window, select 2X, and hit “Save Image.” After rendering — it takes a few minutes — the image is saved to the folder from which it was opened. Then I return to Photo Mechanic and delete the converted TIF and the “For Giga” file to save space. I open the Gigapixeled image in Photoshop, rename it, and create a 1200px JPEG for the blog via an action in Photoshop.

I have had great success in up-rezzing large crops and with cell phone images as well. The up-rezzed images are not only larger, but they are sharper as well.

Why f/14?

It is important to stop down when working close to the minimum focusing distances of a lens where depth-of-field is razor-thin at best.

Image #1A: DPP 4 screen capture for American Coot head portrait

The DPP 4 Screen Capture

“Edit Image” mode in DPP 4 shows the active AF point or points as long as you have the AF Points box under Preview checked. You can toggle AF points on and off using the Command + J keyboard shortcut. I always leave the box checked. Command I toggles the EXIF information box on an off. Note here that Face detection + Tracking/AI Servo AF worked perfectly with this image. Note also that the DPP 4 histogram pales in comparison to the RawDigger adapted histogram (as seen below for this image), especially at the highlight end.

Image #1B: RawDigger screen capture for American Coot head portrait

The RawDigger Adapted Histogram for Today’s Featured Image

In the nearly completed RawDigger e-Guide, you will learn what causes the tiny over-exposed tiny spikes at the highlight end of the histogram in all three color channels. You will — of course — learn how to set up the Adapted Histogram and use it to evaluate the exposures and raw file brightness for files from pretty much every dSLR and Mirrorless camera body in use today. It performs perfectly with my Canon CR.2 files from 2001, and with all of my Nikon NEF files as well. Like me, you will probably find that you were severely under-exposing everything, especially overall light-toned images that were created in low light. RawDigger has been a game-changer for me.

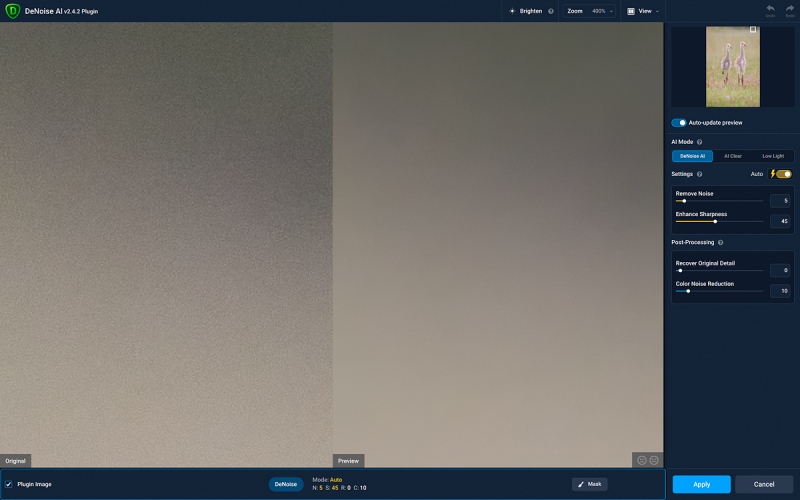
Image #1C: Topaz DeNoise AI screen capture for American Coot head portrait

Topaz DeNoise AI Continues to Amaze

As WHITEs require one stop less light to be properly exposed than middle-tones do, the blue water background is one stop under-exposed despite the perfect exposure for the image overall. Why is that? Because we always need to expose as far to the right as possible while maintaining highlight detail.

Note that a clean coot’s bill is about as white as white can be. Having exposed perfectly to the right, as noted above, the blue water background is at least one full stop under-exposed. Thus the noise. Of note for R5 user’s is the hint of color noise visible in the before image on the left. I have yet to see any color noise in a SONY image no matter the exposure. IAC, Topaz DeNoise cleaned it up beautifully and thus would seem to be a mandatory part of the workflow for all Canon R5 user’s.

Oh, BTW, this is an absolutely dead-solid perfect exposure.

Image #1D: American Coot head portrait fine detail

You Want Detail?

It is a given that sharp R5 files are incredibly detailed. With the large crop of the original image followed by Gigapixel AI at 2X, the fine detail here should please just about anyone. Note also that whenever you add a teleconverter sharpness is decreased by about 14% …

Typos

In all blog posts and Bulletins, feel free to e-mail or to leave a comment regarding any typos or errors.
January 21st, 2021

But Sometimes ... A Photo Illustration is the Only Answer!

What’s Up?

I did half-way decent with Cattle Egrets and vultures on a very still Wednesday morning. And yesterday evening was quite good. I spent most of the day selecting images for the second RawDigger video, this one on the Adapted Histogram that Patrick Sparkman came up with to make everyone’s life easier, no matter what camera body or system they are using.

I am headed into town in the dark to have my teeth cleaned. After that I am headed to Lakeland to check out the White Pelicans and friends. On the way home, I will stop in Lake Wales for an Active Release Therapy (ART) session with chiropractor and good friend, TJ McKeon.

I will be creating the Adapted Histogram video very soon. Today is Thursday 21 January 2021. The forecast for Lakeland this morning is for clear skies early with no wind. Not bad.

This blog past makes thirty-two days in a row with a new blog post. This one took about 2 hours to prepare. Please remember …

Please Remember

With income from IPTs approaching zero, please, if you enjoy and learn from the blog, remember to use one of my two affiliate programs when purchasing new gear. Doing so just might make it possible for me to avoid having to try to get a job as a Walmart greeter and will not cost you a single penny more. And if you use Bedfords and remember to enter the BIRDSASART code at checkout, you will save 3% on every order and enjoy free second-day air shipping. In these crazy times — I am out at least forty to sixty thousand dollars so far due to COVID 19 (with lots more to come) — remembering to use my B&H link or to shop at Bedfords will help me out a ton and be greatly appreciated. Overseas folks who cannot order from the US because of import fees, duties, and taxes can always help out by clicking here if they see fit.

RawDigger e-Guide pre-publication version

RawDigger e-Guide and Video Advance Copy Still Available — but not for long …

Save $10 Now

The RawDigger e-Guide and Video is almost finished. It will sell for $51.00. If you are anxious to get started with RawDigger, learn to mega-Expose to the Right, and wind up with the highest quality image files, you can save $10.00 and have a chance to review a recently updated pre-publication version of the guide by sending a PayPal for $41.00 to birdsasart@verizon.net with the words RawDigger e-Guide and Video Pre-publication Copy cut and pasted into the Subject line. The recent delay is the result of my recent conversations with Iliah Borg, the brains behind RawDigger. It is very likely that the Shock-your-World section will shock you.

In the new guide, we teach you why the GREEN channel is almost always the first to over-expose. We teach you how to interpret the Max G values. And most recently, we teach you a simple way to evaluate your exposures using an adapted RawDigger histogram. And tons more, of course. I am planning on having the completed RawDigger e-Guide ready for sale by this coming Wednesday. Folks who saved $10.00 by pre-ordering will of course receive a link to the final PDF.

The BAA Used Gear Page

The Used Gear page continues to be very active. The BAA Used Gear Page is the place to sell your used photographic equipment. We will help you to get your gear sold quickly for 20 to 60% or more than what the big guys are offering … Doubt me? Check out the Recent Sales list for the past eleven months at the bottom of the page.

134 sold to rave reviews.

The SONY e-Guide by Patrick Sparkman and Arthur Morris

The Sony Camera User’s e-Guide (and Videos)

Click here to purchase the guide with one Camera Set-up Video. Be sure to e-mail us by clicking here to specify your camera body so that we can send you a link for the correct video.

Click here to purchase the guide with two Camera Set-up Videos. Be sure to e-mail us by clicking here to specify your two camera bodies so that we can send you links for the correct videos.

Click here to learn more about the SONY e-Guide.

Folks who have used my B&H affiliate links or purchased their SONY gear are invited to e-mail for discount information.

Great Topaz News!

Folks who use the BAA Topaz link to purchase Sharpen AI, DeNoise AI, or the Utility Bundle (or any other Topaz plugins) will receive a 15% discount by entering the ARTHUR15 code at checkout. To get the discount you must use my link and you must enter the discount code. Be sure to start with this link.

Topaz Stuff

As I said just a while back and have said often many times before, I should have listened sooner. If you, like me, are new to the Topaz party, please use this link to purchase. Right now I can wholeheartedly recommend both Topaz Sharpen AI and Topaz DeNoise AI. Though I have not yet worked with JPEGtoRAW AI or Gigapixel AI, I have installed both of these plug-ins and look forward to trying them on some I-Phone 11 images fairly soon. If you are thinking like me, consider the Utility Bundle that includes all four plug-ins mentioned above at a money-saving price.

Again, those who purchase Sharpen AI or DeNoise AI using my link, can e-mail to request a short Getting Started with Topaz e-Guide. I had a bit of trouble getting the two plug-ins installed and having them appear in the Photoshop Filter Menu. In addition, I will explain how to best learn about the two plug-ins by applying them on a Layer (in Photoshop).

New and Better Bedfords Discount Policy!

You can now save 3% on all of your Bedfords photo gear purchases by entering the BIRDSASART coupon code at checkout. Your discount will be applied to your pre-tax total. In addition, by using the code you will get 2nd day air shipping via Fed Ex.

Grab a Nikon AF-S Teleconverter TC-14E III and save $14.99. Purchase a Canon EOS R5 and your discount will be $116.97. Purchase a Sony FE 600mm f/4 GM OSS lens and save a remarkable $389.94! Your Bedford’s purchase no longer needs to be greater than $1,000.00 for you to receive a discount. The more you spend, the more you save.

Money Saving Reminder

Many have learned that if you need a hot photo item that is out of stock at B&H and would enjoy free overnight shipping, your best bet is to click here, place an order with Bedfords, and enter the coupon code BIRDSASART at checkout. If an item is out of stock, contact Steve Elkins via e-mail or on his cell phone at (479) 381-2592 (Central time). Be sure to mention the BIRDSASART coupon code and use it for your online order to save 3% and enjoy free 2nd-day air shipping. Steve has been great at getting folks the hot items that are out of stock at B&H and everywhere else. The wait lists at the big stores can be a year or longer for the hard to get items. Steve will surely get you your gear long before that. For the past year, he has been helping BAA Blog folks get their hands on items like the SONY a9 ii, the SONY 200-600 G OSS lens, the Canon EOS R5, the Canon RF 100-500mm lens, and the Nikon 500mm PF. Steve is personable, helpful, and eager to please.


Gear Questions and Advice

Too many folks attending BAA IPTs (remember those?) and dozens of photographers whom I see in the field and on BPN, are–out of ignorance–using the wrong gear especially when it comes to tripods and more especially, tripod heads… Please know that I am always glad to answer your gear questions via e-mail. Those questions might deal with systems, camera bodies, accessories, and/or lens choices and decisions.

This image was created on 19 January 2021 at my new evening sunset spot. I used the Induro GIT 404L/Levered-Clamp FlexShooter Pro-mounted Sony FE 600mm f/4 GM OSS lens, Sony FE 1.4x teleconverter, and the blazingly fast AF King, the Sony Alpha a9 II Mirrorless Digital Camera Body. ISO 1600: 1/1250 sec. at f/5.6 (wide open) in Manual mode. AWB at 6:49pm a few minutes after sunset.

Center Zone AF-C was active at the moment of exposure and performed to perfection. Click the image to see a larger version.

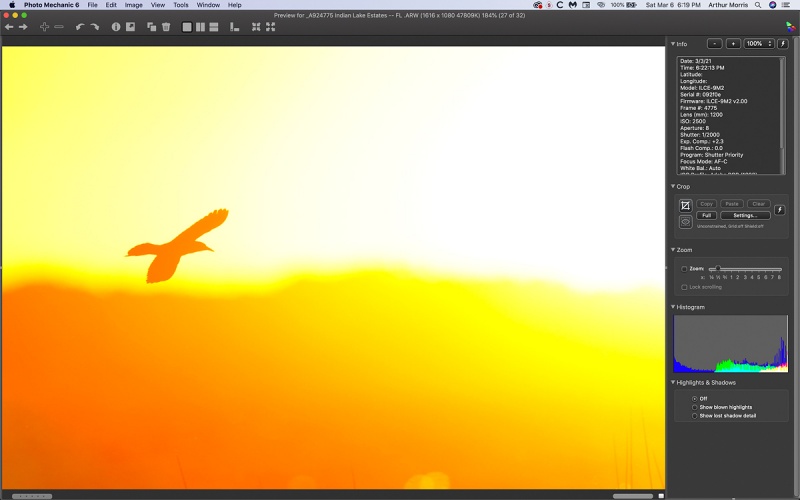
Image #1: Photo Mechanic screen capture showing the original image

But Sometimes …

In yesterday’s blog post, I wrote, I headed back down to the lake at 5:40pm, right before sunset and was very glad that I did. I had some light clouds on the western horizon and the wind was from the northeast. Since I was shooting silhouettes, the wind against sun conditions were perfect. I worked some single birds and small groups coming in just over the reeds. Just as the sun disappeared below the horizon, all hell broke lose: about 80 roosting birds took flight at once, flushed by one of the local Bald Eagles they swirled around frantically in front of the still-richly-colored sky. Though I have not edited those images yet, I glanced at them and I did get a few very good frames. Some with the silhouetted eagle in the frame.

But sometimes in really exciting situations when you think that you did really well, it turns out that you did not … Such was the case when I took a closer look at Tuesday evening’s images. I kept 21 silhouetted images after the first edit. I will likely have less than five left after the second edit. The exposures are very tough when you work in manual mode as you need to avoid over-exposure when the bird or birds are set against the brightest areas of the sky, those right next to the setting sun. But as the birds get away from those brightly colored skies, away from the sun or the spot where it just set, you will wind up with too-dark raw files.

If you can think of a solution to this problem, please, please pretty please leave a comment. And please be specific. What exposure mode? What Exposure Compensation ?

Last night, I did get one family jewel at 1200mm using my newly-thought-out exposure methodology. For sure. I will share the solution and the image with you here soon.

The second problem even with the best images, was that there was no flow to the image design. The patterns made by the birds as they blasted off at the eagle’s approach had no flow to them, no balance; they were hodgepodge at best. As with Image #1 above. With the groups, there were too many merges. And many were too tight at 840mm. So I re-thought my approach. There was a decent sunset on Wednesday evening so I set up the 600 GM with the 2X TC and an a9 ii on the Induro 404L, and the 200-600 on my shoulder with the other a9 ii via a Black Rapid Curve Breathe Strap.As it turned out there were no heron/egret blast-offs and no big flocks of Boat-tailed Grackles in flight last night. But at least I was ready. As I set up in one spot I might try the TwinShooter so that I will not have to be concerned about keeping the horizon level with either the big lens or the zoom lens. Another thought is that I might drop down from the 200-600 to the 100-400 …

Image #1A: the RawDigger Adapted Histogram

The RawDigger Adapted Histogram

Note that the histogram in Image #1, the Photo Mechanic screen capture showing the original, indicates that the RED channel is totally over-exposed. Looking carefully at the RawDigger Adapted Histogram on the other hand, we see that the RED channel is actually very close to 1 2/3 stops too dark. In the guide we teach you how to set up the adapted histogram, and how to interpret the data. Here is a hint: from the 8000 line to the 16000 line is one full stop …

As noted yesterday, the illustrated text portion of the RawDigger e-Guide is pretty much complete. On Wednesday, I e-mailed the link to the last pre-publication copy of the RawDigger e-Guide for review. If you purchased an advance copy and did not receive your new link, please let me know via e-mail.

Image #1B: SONY AF Points

SONY AF Points!

As noted recently I learned of an amazing new program that shows the SONY AF points. Patrick and I have pretty much figured it out but we still have some work to do. I plan on e-mailing the creator of the program today and ask for help. The SONY EXIF does not make things easy … We will soon be sharing the link at no cost while offering an inexpensive e-guide.

As you can see above, Center Zone AF performed absolutely perfectly with today’s featured image.

This image was created on 19 January 2021 at my new evening sunset spot. I used the Induro GIT 404L/Levered-Clamp FlexShooter Pro-mounted Sony FE 600mm f/4 GM OSS lens, Sony FE 1.4x teleconverter, and the blazingly fast AF King, the Sony Alpha a9 II Mirrorless Digital Camera Body. ISO 1600: 1/1250 sec. at f/5.6 (wide open) in Manual mode. AWB at 6:49pm a few minutes after sunset.

Center Zone AF-C was active at the moment of exposure and performed to perfection. Click the image to see a larger version.

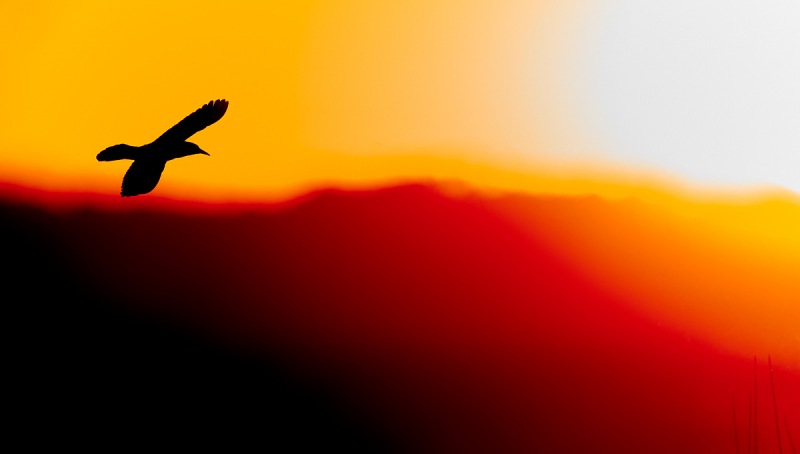
Image #2: Photo Illustration: Bald Eagle and Cattle Egrets at sunset

The Final Image: a Photo Illustration

In the original (under-exposed) image, there was too much empty space on the left side of the frame, no compositional balance at all, and no flow to the image. Two birds were cut off by the frame-edges. And the strip of vegetation at the bottom of the frame was too small. First I expanded canvas quickly and easily using the Crop-Tool method and Content-Aware Fill. (My bad: I had been too lazy to level the FlexShooter head.) Then, I leveled the image and cropped it to 3X2 while deleting the unwanted pixels. Topaz DeNoise AI on Auto took care of the noise.

Next, I eliminated the two clipped birds and the bird directly in front of the eagle using the Patch Tool, and at times, Content-Aware Fill. Then, using a single Quick Mask, I moved the group of three birds from the right side of the frame to the left side of the frame and then eliminated the upper bird in that group. I needed to do some fancy stepping to even out the tonality in the sky. Last, because I did not like the wing position of the front bird in the now-group of three, I grabbed the wing of another bird with a Quick Mask, transformed and re-shaped it so that it would not be recognizable, and then moved it into place on that front bird.

Yes. Dirty bumper pool. But I am pleased with the results; sometimes it is necessary to create a Photo Illustration in order to create something decent. As always, I left folks know what has been done to an image. Here is the caption: Bald Eagle silhouette w/wading birds PHOTO ILLUSTRATION _A9B6304 Indian Lake Estates — FL 1. I find that honesty is always the best policy.

Feel free to leave a comment revealing your thoughts on the image clean-up.

The BIRDS AS ART Current Workflow e-Guide (Digital Basics II).

You can order your copy from the BAA Online Store here, by sending a PayPal for $40 here, or by calling Jim or Jennifer weekdays at 863-692-0906 with your credit card in hand. Be sure to specify Digital Basics II.

The BIRDS AS ART Current Workflow e-Guide (Digital Basics II)

The clean-up techniques mentioned above and tons more great Photoshop tips and techniques (with the exception of Capture One RAW Conversions) — along with all of my personalized Keyboard Shortcuts — are covered in detail in the BIRDS AS ART Current Workflow e-Guide (Digital Basics II), an instructional PDF that is sent via e-mail. Learn more and check out the free excerpt in the blog post here. While the new e-Guide reflects my MacBook Pro/Photo Mechanic/DPP 4/Photoshop workflow, folks using a PC and/or BreezeBrowser will also benefit greatly by studying the material on DB II. Note: folks working on a PC and/or those who do not want to miss anything Photoshop may wish to purchase the original Digital Basics along with DB II while saving $15 by clicking here to buy the DB Bundle.

Folks who learn well by following along rather than by reading can check out the complete collection of MP 4 Photoshop Tutorial Videos by clicking here. Note: all of the videos are now priced at an amazingly low $5.00 each.

You can learn how and why I used to convert all of my Canon digital RAW files in DPP 4 in the DPP 4 RAW Conversion Guide here. More recently, I became proficient at converting my Nikon RAW (NEF) files in Adobe Camera Raw. About two years ago I began converting my Nikon and Sony RAW files in Capture One Pro 12 and continue to do so today (along with my R5 images).

To purchase Capture One, please use this link. Then you can learn more about Capture One in the Capture One Pro 12 Simplified MP4 Video here. The next step would be to get a copy of Arash Hazeghi’s “The Nikon Photographers’ Guide to Phase One Capture One Pro e-Guide” in the blog post here.

You can learn advanced Quick Masking and advanced Layer Masking techniques in APTATS I & II. You can save $15 by purchasing the pair. Folks can learn sophisticated sharpening and (NeatImage) Noise Reduction techniques in The Professional Post Processing Guide by Arash Hazeghi and edited by yours truly. Please use this link to purchase NeatImage.

Typos

In all blog posts and Bulletins, feel free to e-mail or to leave a comment regarding any typos or errors.