Arthur Morris/BIRDS AS ART
December 21st, 2020

The Work of Byron Katie. Working a Tame Subject. Topaz Sharpen AI Tips. And Polar Opposites: Abstracts versus setting the scene images ...

What’s Up?

Today is Monday 21 December 2020. I went down to the lake despite the clear skies with a brisk southwest wind. After creating a very few decent head portraits of some handsome Turkey Vultures from the car with the a7r iv at 1200mm, I headed home to finish this blog post and enjoy brunch.

I will be spending the bulk of my time today working on the RawDigger e-guide. I will be adding Patrick Sparkman’s brilliantly improved method for quickly and accurately using RawDigger no matter the camera system or model. I will likely be doing a second video detailing this new, much easier way of doing things.

I say it often here, There is a ton to be learned by re-visiting a given blog post and reading the comments. That has never been truer than in the last few weeks where I have learned an absolute ton about the R5 and a whole bunch of other stuff as well. I have decided to start a new streak; today’s blog post — that took more than five hours to create including the time spent on the six image optimizations — makes six straight days with a new blog post. I hope that you enjoy the post and learn something.

If you have a moment, please leave a comment and let us know which — if any — of today’s six featured images you think is the strongest, and why you made your choice. See also the question below Image #3. If you think that I should have deleted all of them feel free to say so.

Whether or not you are at all feeling sorry for yourself in these times of COVID, I’d suggest that you view the one minute, 45-second video immediately below. It is quite moving and well done. While watching it I thought a lot about my late-Dad and my late-Mom. You probably will too. Then you might want to visit The Work, learn to do The Work of Byron Katie, and find peace.

A Simple Yet Powerful Practice

As we do The Work of Byron Katie, not only do we remain alert to our stressful thoughts—the ones that cause all the anger, sadness, and frustration in our world—but we question them, and through that questioning the thoughts lose their power over us. Great spiritual texts describe the what—what it means to be free. The Work is the how. It shows you exactly how to identify and question any thought that would keep you from that freedom.

A few words from Katie/Welcome to The Work

I discovered that when I believed my thoughts I suffered, but when I didn’t believe them I didn’t suffer, and that this is true for every human being. Freedom is as simple as that. I found that suffering is optional. I found a joy within me that has never disappeared, not for a single moment. That joy is in everyone, always. And I invite you not to believe me. I invite you to test it for yourself.

Canon R5/R6 AF e-Guide Info

So far, 40 folks have sent PayPals for their copy of the Canon R5/R6 AF e-Guide. And 21 who used my affiliate links to purchase their R5 have e-mailed for and received their free copy of the guide. If you e-mailed or sent a PayPal and did not receive your guide, please LMK immediately via e-mail.

Feedback has been overwhelmingly positive so far. Three folks wrote stating that they had a better way of setting up AF on their R5s. When I wrote back explaining why they were in error, two of them back-tracked. One stubborn guy is still doing it his way — less efficiently. Be sure to scroll down to read about my plans for a Canon R5/R6 User’s e-Guide. Understand that the info in the BAA Canon R5/R6 Autofocus e-Guide is so important that I opted to publish the AF guide immediately as the R5/R6 User’s Guide will take at least a month to finish.

BAA Canon R5/R6 Autofocus e-Guide

Twenty-one pages. 3,452 words. 28-DPP4 screen captures showing the R5’s vaunted AF system in action. Note: the AF system of the R5 is identical to the AF system of the R6.

You will learn:

1- The two most useful AF Methods for general bird photography and for birds in flight.

2- How to set up your R5/R6 AF Menus.

3- What boxes to check (and un-check) under Limit AF Methods.

4- How to change the AF Method quickly, easily, and efficiently. Note: the default way of doing this is clunky, cumbersome, and inefficient at best. One person replied that this tip alone was worth the price of admission.

5- The only setting that should be used for Initial Servo AF pt for Face Detection + Tracking.

I you are currently using multiple back buttons either for general bird photography or for birds in flight, what you learn in this guide will change your life. For the better.

Here are the first three paragraphs of this e-Guide:

From the moment I learned about the new Canon mirrorless bodies, I read about using two or three back-buttons to focus using different AF methods. The word on the street said that the way to go for birds in flight was to use one button to acquire focus with Zone AF or with Large Zone: Horizontal AF and then switch to another button to activate Face Detection + Tracking AF and then use the shutter button to make an image. My immediate thought was, “This is insanity! There has got to be a better way.” In short, there is a far superior way to set up AF on your R5 or R6.

Remember that I got away from any form of back-button or rear focusing many years ago after finally realizing that it is always easier to do one thing (press the shutter button), than it is to do two things (press a back button and then press the shutter button).

The default method of switching AF Methods with the R5/R6 bodies is cumbersome at best. It involves first pressing the grid button (my name) on the upper right back of the camera and then pressing the hard-to-access M-Fn button to toggle through the AF Methods. This method is so bad that it will not be mentioned again in this guide.

The guide is free to all who have ordered an R5 or an R6 using my B&H affiliate link or from Steve Elkins/Bedfords using the BIRDSASART coupon code at checkout. Please send your receipt to me via e-mail. It will take me a few days to a week to verify the B&H purchases. Bedfords folks should expect their free e-Guides fairly quickly.

To purchase your copy of the e-Guide, please send a PayPal for $25.00 to birdsasart@verizon.net and be sure to include the words R5/R6 AF Guide in your PayPal e-mail.

Everyone who gets the guide will receive a free update no later than the first week in January.

Canon R5/R6 User’s e-Guide

I am planning on doing a complete Canon R5/R6 User’s e-Guide. This will require a lot of research, a lot of time, and a lot of effort. I am hoping to have it complete by mid- to late January. As always, folks who use the BAA affiliate links to purchase their Canon gear will receive a substantial discount.

Understand that the info in the BAA Canon R5/R6 Autofocus e-Guide is so important that I opted to publish the AF guide ASAP.

Please Remember

With income from IPTs approaching zero, please, if you enjoy and learn from the blog, remember to use one of my two affiliate programs when purchasing new gear. Doing so just might make it possible for me to avoid having to try to get a job as a Walmart greeter and will not cost you a single penny more. And if you use Bedfords and remember to enter the BIRDSASART code at checkout, you will save 3% on every order and enjoy free second-day air shipping. In these crazy times — I am out at least forty to sixty thousand dollars so far due to COVID 19 (with lots more to come) — remembering to use my B&H link or to shop at Bedfords will help me out a ton and be greatly appreciated. Overseas folks who cannot order from the US because of import fees, duties, and taxes can always help out by clicking here if they see fit.

Great Topaz News!

Folks who use the BAA Topaz link to purchase Sharpen AI, DeNoise AI, or the Utility Bundle (or any other Topaz plugins) will receive a 15% discount by entering the ARTHUR15 code at checkout. To get the discount you must use my link and you must enter the discount code. Be sure to start with this link.

Topaz Stuff

As I said just a while back and have said often many times before, I should have listened sooner. If you, like me, are new to the Topaz party, please use this link to purchase. Right now I can wholeheartedly recommend both Topaz Sharpen AI and Topaz DeNoise AI. Though I have not yet worked with JPEGtoRAW AI or Gigapixel AI, I have installed both of these plug-ins and look forward to trying them on some I-Phone 11 images fairly soon. If you are thinking like me, consider the Utility Bundle that includes all four plug-ins mentioned above at a money-saving price.

Again, those who purchase Sharpen AI or DeNoise AI using my link, can e-mail to request a short Getting Started with Topaz e-Guide. I had a bit of trouble getting the two plug-ins installed and having them appear in the Photoshop Filter Menu. In addition, I will explain how to best learn about the two plug-ins by applying them on a Layer (in Photoshop).

New and Better Bedfords Discount Policy!

You can now save 3% on all of your Bedfords photo gear purchases by entering the BIRDSASART coupon code at checkout. Your discount will be applied to your pre-tax total. In addition, by using the code you will get 2nd day air shipping via Fed Ex.

Grab a Nikon AF-S Teleconverter TC-14E III and save $14.99. Purchase a Canon EOS R5 and your discount will be $116.97. Purchase a Sony FE 600mm f/4 GM OSS lens and save a remarkable $389.94! Your Bedford’s purchase no longer needs to be greater than $1,000.00 for you to receive a discount. The more you spend, the more you save.

Money Saving Reminder

Many have learned that if you need a hot photo item that is out of stock at B&H and would enjoy free overnight shipping, your best bet is to click here, place an order with Bedfords, and enter the coupon code BIRDSASART at checkout. If an item is out of stock, contact Steve Elkins via e-mail or on his cell phone at (479) 381-2592 (Central time). Be sure to mention the BIRDSASART coupon code and use it for your online order to save 3% and enjoy free 2nd-day air shipping. Steve has been great at getting folks the hot items that are out of stock at B&H and everywhere else. The wait lists at the big stores can be a year or longer for the hard to get items. Steve will surely get you your gear long before that. For the past year, he has been helping BAA Blog folks get their hands on items like the SONY a9 ii, the SONY 200-600 G OSS lens, the Canon EOS R5, the Canon RF 100-500mm lens, and the Nikon 500mm PF. Steve is personable, helpful, and eager to please.


Gear Questions and Advice

Too many folks attending BAA IPTs and dozens of photographers whom I see in the field and on BPN, are–out of ignorance–using the wrong gear especially when it comes to tripods and more especially, tripod heads… Please know that I am always glad to answer your gear questions via e-mail. Those questions might deal with systems, camera bodies, accessories, and/or lens choices and decisions.

This image was created on 18 December 2020 about 20 minutes from Fort DeSoto at my tertiary morning backup location. I used the handheld Canon RF 100-500mm f/4.5-7.1L IS USM lens (at 500mm) and the highly touted 45MP Canon EOS R5 Mirrorless Digital camera body. ISO 1000. Exposure determined with test exposures using the in-camera histogram and confirmed as perfect by RawDigger: 1/125 sec. at f/9 (stopped down 2/3-stop) in Manual mode. AWB at 8:08am on mostly cloudy morning.

Face detection + Tracking/AI Servo AF was active at the moment of exposure and performed perfectly. Click the image to see a larger version.

Image #1: Immature Brown Pelican head and face portrait

A Cold, Windy, Almost Bird-less Morning

It was a cold, windy, almost bird-less morning. I abandoned DeSoto early hoping to find some pelicans and terns diving for bait at one of my favorite out-of-the-park locations. Not. I did find a single you Brown Pelican sitting on the concrete pier railing. Since it was the only game in town, I stayed with it for about 45 minutes. I tried to be creative and learn more about the Canon loaner gear. This horizontal head and face portrait was the obvious way to start.

Image #1A: Topaz Sharpen AI on the Immature Brown Pelican head and face portrait image

Topaz Sharpen AI

First I ran Topaz DeNoise AI on Auto on the whole image (as I do with most every photo that I process). Though DeNoise provides a nice dose of sharpening, this image still did not look really sharp to me. I brought it into Topaz Sharpen AI and hit Auto. Auto chose Focus but those settings made the image looked over-sharpened, and in addition, it seemed that the pixels were just not lined up properly. So I switched from Focus to Stabilize and reduced the suggested Noise Suppression by 2/3. The result was far better. Note that you can see me and a light pole in the bird’s eye. I removed both in post.

This image was created on 18 December 2020 about 20 minutes from Fort DeSoto at my tertiary morning backup location. I used the handheld Canon RF 100-500mm f/4.5-7.1L IS USM lens (at 500mm) and the highly touted 45MP Canon EOS R5 Mirrorless Digital camera body. ISO 1000. Exposure determined with test exposures using the in-camera histogram and confirmed as perfect by RawDigger:: 1/125 sec. at f/9 (stopped down 2/3-stop) in Manual mode. AWB at 8:09am on mostly cloudy morning.

Face detection + Tracking/AI Servo AF was active at the moment of exposure and performed surprisingly well — it selected a series of AF points that fell on the upper left third of the frame. Click the image to see a larger version.

Image #2: Immature Brown Pelican side of breast, folded wing, and bill detail

Working a Subject

When working a ridiculously tame subject, you will want to vary your image designs by using different focal lengths and choosing different perspectives. For Image #2 I simply approached the subject slowly and got within 50 inches without hardly trying. The close focusing ability of the RF 100-500 (MFD = 3.94 feet at 500mm) is a huge plus.

Image #2A: Topaz Sharpen AI on the Immature Brown Pelican side of breast, folded wing, and bill detail image

Not So Sharp …

Several of the images from this series both with and without the TC turned out to be not as sharp as I might have expected. With the slower shutter speeds, the wind blowing the feathers might have contributed to the softness. In addition, working with relatively long focal lengths while being very close to the MFD reduces depth-of-field to practically nothing. Perhaps I should have been on a tripod using smaller apertures.

In any cases, Sharpen AI on Auto worked superbly here as you can see by clicking on the image to enlarge it; the increase in sharpness is remarkable.

This image was created on 18 December 2020 about 20 minutes from Fort DeSoto at my tertiary morning backup location. For this one, I used the handheld Canon RF 100-500mm f/4.5-7.1L IS USM lens with the Canon Extender RF 1.4x (at 700mm) and the highly touted 45MP Canon EOS R5 Mirrorless Digital camera body. ISO 800. Exposure determined with test exposures using the in-camera histogram and confirmed as perfect by RawDigger: 1/640 sec. at f/11 (stopped down 1/3-stop) in Manual mode. AWB at 8:21am on then cloudy-bright morning.

1-Point (center)/AI Servo AF was active at the moment of exposure. Click the image to see a larger version.

Image #3: Immature Brown Pelican side of breast feather detail.

Going Abstract

To get in even tighter and create some feather detail abstracts, I added the RF 1.4X TC. What gave this image a warmer look than the other images in today’s blog post? There are clues in the EXIF.

This image was also created on 18 December 2020 about 20 minutes from Fort DeSoto at my tertiary morning backup location. Again, I used the handheld Canon RF 100-500mm f/4.5-7.1L IS USM lens with the Canon Extender RF 1.4x (at 700mm) and the highly touted 45MP Canon EOS R5 Mirrorless Digital camera body. ISO 1600. Exposure determined with test exposures using the in-camera histogram and confirmed as perfect by RawDigger: 1/500 sec. at f/11 (stopped down 2/3-stop) in Manual mode. AWB at 8:23am on then cloudy-bright morning.

1-Point (just right of center)/AI Servo AF was active at the moment of exposure. Click the image to see a larger version.

Image #4: Immature Brown Pelican distal end of bill detail.

Bill Clean-up

Apparently, this bird had been playing in the dirt; the distal end of its bill was a mess. I used the Patch Tool and Content-Aware Fill for the clean-up work. Note that I rarely use the Clone Stamp Tool for clean-up work. All that, along with dozens of great Photoshop tips and tons more including all of my personalized Keyboard Shortcuts — are covered in detail in the BIRDS AS ART Current Workflow e-Guide (Digital Basics II), an instructional PDF that is sent via e-mail.

This image was also created on 18 December 2020 about 20 minutes from Fort DeSoto at my tertiary morning backup location. Again, I used the handheld Canon RF 100-500mm f/4.5-7.1L IS USM lens with the Canon Extender RF 1.4x (at 508mm) and the highly touted 45MP Canon EOS R5 Mirrorless Digital camera body. ISO 2500. Exposure determined with test exposures using the in-camera histogram and confirmed as perfect by RawDigger: 1/250 sec. at f/13 (stopped down about 1-stop) in Manual mode. AWB at 8:23am on then cloudy morning.

1-Point (below center)/AI Servo AF was active at the moment of exposure. Click the image to see a larger version.

Image #5: Immature Brown Pelican back, folded wing, and bill detail.

A Variation on the Theme

For this one, I got really close, zoomed out, and got as tall as possible to shoot down on the subject. In addition, stopping down about one full stop to f/11 helped a bit.

This image was of course also created on 18 December 2020 about 20 minutes from Fort DeSoto at my tertiary morning backup location. I used the handheld Canon RF 100-500mm f/4.5-7.1L IS USM lens (at 151mm) and the highly touted 45MP Canon EOS R5 Mirrorless Digital camera body. ISO 1250. Exposure determined with test exposures using the in-camera histogram and confirmed as perfect by RawDigger: 1/640 sec. at f/7.1 wide open) in Manual mode. AWB at 8:53am on mostly cloudy morning.

Face detection + Tracking/AI Servo AF was active at the moment of exposure and performed perfectly. Click the image to see a larger version.

Image #6: Immature Brown Pelican on railing next to fishing gear

Setting the Scene

When working tight on a subject, many folks (and editors as well — back in the days when it was actually possible to sell images to magazines), enjoy seeing an establishing image, a photo that tells the story in a single image. I loved the addition of the many bright colors, the fluorescent blue of the fishing line, and the red and green of the strap. Note that the bird had been a dozen feet to my left before cozying up to the fishing gear.

Image #6A: The DPP4 screen capture for the Immature Brown Pelican on railing next to fishing gear showing the active AF point.

DPP4 Screen Capture

Even with the small-in-the-frame subject, note the red square right on the bird’s eye. With Face Detection + Tracking AF and relatively static subjects, successful image designs are the attained with lots of practice by careful and careful framing. The in-the-viewfinder histogram which is a necessity because of the lack of Zebras, hinders the latter. In addition, it is easy to be sloppy and mis-frame an image … I will be doing a blog post soon showing lots of those.

Typos

Feel free to e-mail or to leave a comment regarding any typos or errors. Just be right :). with love, artie

December 20th, 2020

Re-visiting An Exercise in Thinking Part II. An R5 Negative: Color Noise. I Generally Do Not Study-Use-Understand the Scientific-Theoretical Mumbo-Jumbo and Charts. But ...

What’s Up?

On Friday morning, I had a tough time deciding whether to head to Lakeland or return to DeSoto. As things turned out, I should have gone to Lakeland and checked on the Great Blue Heron nest and on the American White Pelicans. That said, I created more than 900 images at DeSoto and had a chance to do lots of Brown Pelican flight photography with the R5/RF 1.4XTC, and the RF 100-500. I learned a lot, so all was not lost 🙂

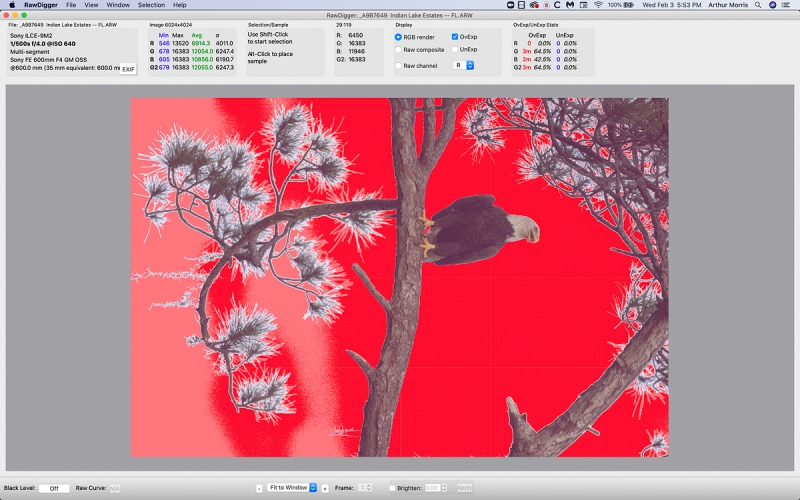
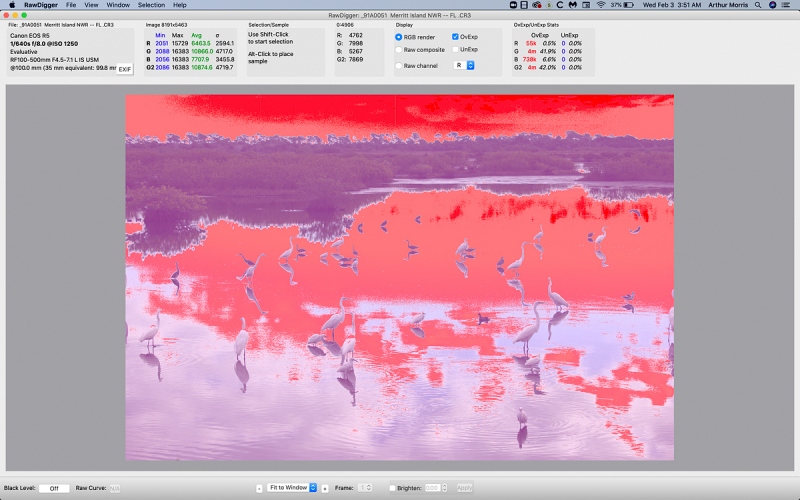
Patrick Sparkman has done it again. We’ve worked together on the RawDigger e-guide for far too long. But along the way, we have learned a ton, in part with help from Iliah Borg, the brains behind RawDigger and the owner of LibRaw, LLC. On Thursday past, Patrick told me that he had come up with a new way to use RawDigger. A way that simplified the process no matter the camera. A way that is fast and easy to understand. He shared his new method with me in an hour-long Zoom screen-sharing meeting yesterday.

Needless to say, when I add this information the RawDigger e-Guide it will be finished at last. While RawDigger is an important tool for all photographers, it will prove to be very important to folks using the Canon R5 (or R6). You will learn why by reading today’s blog post.

Today is Sunday 20 December 2020. I will be heading down to the lake in a bit. This blog post took about three hours to create. Please use the affiliate links or get in touch with Steve Elkins at Bedfords 🙂

Canon R5/R6 AF e-Guide Info

So far, 40 folks have sent PayPals for their copy of the Canon R5/R6 AF e-Guide. And 21 who used my affiliate links to purchase their R5 have e-mailed for and received their free copy of the guide. If you e-mailed or sent a PayPal and did not receive your guide, please LMK immediately via e-mail.

Feedback has been overwhelmingly positive so far. Three folks wrote stating that they had a better way of setting up AF on their R5s. When I wrote back explaining why they were in error, two of them back-tracked. One stubborn guy is still doing it his way — less efficiently. Be sure to scroll down to read about my plans for a Canon R5/R6 User’s e-Guide. Understand that the info in the BAA Canon R5/R6 Autofocus e-Guide is so important that I opted to publish the AF guide immediately as the R5/R6 User’s Guide will take at least a month to finish.

BAA Canon R5/R6 Autofocus e-Guide

Twenty-one pages. 3,452 words. 28-DPP4 screen captures showing the R5’s vaunted AF system in action. Note: the AF system of the R5 is identical to the AF system of the R6.

You will learn:

1- The two most useful AF Methods for general bird photography and for birds in flight.

2- How to set up your R5/R6 AF Menus.

3- What boxes to check (and un-check) under Limit AF Methods.

4- How to change the AF Method quickly, easily, and efficiently. Note: the default way of doing this is clunky, cumbersome, and inefficient at best. One person replied that this tip alone was worth the price of admission.

5- The only setting that should be used for Initial Servo AF pt for Face Detection + Tracking.

I you are currently using multiple back buttons either for general bird photography or for birds in flight, what you learn in this guide will change your life. For the better.

Here are the first three paragraphs of this e-Guide:

From the moment I learned about the new Canon mirrorless bodies, I read about using two or three back-buttons to focus using different AF methods. The word on the street said that the way to go for birds in flight was to use one button to acquire focus with Zone AF or with Large Zone: Horizontal AF and then switch to another button to activate Face Detection + Tracking AF and then use the shutter button to make an image. My immediate thought was, “This is insanity! There has got to be a better way.” In short, there is a far superior way to set up AF on your R5 or R6.

Remember that I got away from any form of back-button or rear focusing many years ago after finally realizing that it is always easier to do one thing (press the shutter button), than it is to do two things (press a back button and then press the shutter button).

The default method of switching AF Methods with the R5/R6 bodies is cumbersome at best. It involves first pressing the grid button (my name) on the upper right back of the camera and then pressing the hard-to-access M-Fn button to toggle through the AF Methods. This method is so bad that it will not be mentioned again in this guide.

The guide is free to all who have ordered an R5 or an R6 using my B&H affiliate link or from Steve Elkins/Bedfords using the BIRDSASART coupon code at checkout. Please send your receipt to me via e-mail. It will take me a few days to a week to verify the B&H purchases. Bedfords folks should expect their free e-Guides fairly quickly.

To purchase your copy of the e-Guide, please send a PayPal for $25.00 to birdsasart@verizon.net and be sure to include the words R5/R6 AF Guide in your PayPal e-mail.

Everyone who gets the guide will receive a free update no later than the first week in January.

Canon R5/R6 User’s e-Guide

I am planning on doing a complete Canon R5/R6 User’s e-Guide. This will require a lot of research, a lot of time, and a lot of effort. I am hoping to have it complete by mid- to late January. As always, folks who use the BAA affiliate links to purchase their Canon gear will receive a substantial discount.

Understand that the info in the BAA Canon R5/R6 Autofocus e-Guide is so important that I opted to publish the AF guide ASAP.

Please Remember

With income from IPTs approaching zero, please, if you enjoy and learn from the blog, remember to use one of my two affiliate programs when purchasing new gear. Doing so just might make it possible for me to avoid having to try to get a job as a Walmart greeter and will not cost you a single penny more. And if you use Bedfords and remember to enter the BIRDSASART code at checkout, you will save 3% on every order and enjoy free second-day air shipping. In these crazy times — I am out at least forty to sixty thousand dollars so far due to COVID 19 (with lots more to come) — remembering to use my B&H link or to shop at Bedfords will help me out a ton and be greatly appreciated. Overseas folks who cannot order from the US because of import fees, duties, and taxes can always help out by clicking here if they see fit.

Great Topaz News!

Folks who use the BAA Topaz link to purchase Sharpen AI, DeNoise AI, or the Utility Bundle (or any other Topaz plugins) will receive a 15% discount by entering the ARTHUR15 code at checkout. To get the discount you must use my link and you must enter the discount code. Be sure to start with this link.

Topaz Stuff

As I said just a while back and have said often many times before, I should have listened sooner. If you, like me, are new to the Topaz party, please use this link to purchase. Right now I can wholeheartedly recommend both Topaz Sharpen AI and Topaz DeNoise AI. Though I have not yet worked with JPEGtoRAW AI or Gigapixel AI, I have installed both of these plug-ins and look forward to trying them on some I-Phone 11 images fairly soon. If you are thinking like me, consider the Utility Bundle that includes all four plug-ins mentioned above at a money-saving price.

Again, those who purchase Sharpen AI or DeNoise AI using my link, can e-mail to request a short Getting Started with Topaz e-Guide. I had a bit of trouble getting the two plug-ins installed and having them appear in the Photoshop Filter Menu. In addition, I will explain how to best learn about the two plug-ins by applying them on a Layer (in Photoshop).

New and Better Bedfords Discount Policy!

You can now save 3% on all of your Bedfords photo gear purchases by entering the BIRDSASART coupon code at checkout. Your discount will be applied to your pre-tax total. In addition, by using the code you will get 2nd day air shipping via Fed Ex.

Grab a Nikon AF-S Teleconverter TC-14E III and save $14.99. Purchase a Canon EOS R5 and your discount will be $116.97. Purchase a Sony FE 600mm f/4 GM OSS lens and save a remarkable $389.94! Your Bedford’s purchase no longer needs to be greater than $1,000.00 for you to receive a discount. The more you spend, the more you save.

Money Saving Reminder

Many have learned that if you need a hot photo item that is out of stock at B&H and would enjoy free overnight shipping, your best bet is to click here, place an order with Bedfords, and enter the coupon code BIRDSASART at checkout. If an item is out of stock, contact Steve Elkins via e-mail or on his cell phone at (479) 381-2592 (Central time). Be sure to mention the BIRDSASART coupon code and use it for your online order to save 3% and enjoy free 2nd-day air shipping. Steve has been great at getting folks the hot items that are out of stock at B&H and everywhere else. The wait lists at the big stores can be a year or longer for the hard to get items. Steve will surely get you your gear long before that. For the past year, he has been helping BAA Blog folks get their hands on items like the SONY a9 ii, the SONY 200-600 G OSS lens, the Canon EOS R5, the Canon RF 100-500mm lens, and the Nikon 500mm PF. Steve is personable, helpful, and eager to please.


Gear Questions and Advice

Too many folks attending BAA IPTs and dozens of photographers whom I see in the field and on BPN, are–out of ignorance–using the wrong gear especially when it comes to tripods and more especially, tripod heads… Please know that I am always glad to answer your gear questions via e-mail. Those questions might deal with systems, camera bodies, accessories, and/or lens choices and decisions.

This image was created on 4 December 2020 at Indian Lake Estates, FL. I used the handheld Canon RF 100-500mm f/4.5-7.1L IS USM lens (at 500mm) and the highly touted 45MP Canon EOS R5 Mirrorless Digital camera body. ISO ???. Exposure determined using the in-camera histogram: 1/1000 sec. at f/7.1 (wide open!) in Manual mode. AWB at 7:53am on cloudy very dark morning.

Face detection + Tracking/AI Servo AF was active at the moment of exposure and performed well.

Click the image to see a larger version.

Image #2: Black Vulture in B&W

Revisiting …

The A Two-part Exercise in Thinking blog post here, included this:

An Exercise in Thinking Part II

Please feel free to share your thoughts on this image. Can you guess the ISO? How would you rate the sharpness of this image? How did I get so close to this bird? Can you detect any Photoshop trickery in Image #2? Any and all comments are welcome.

The Answers

1-The ISO was 6400.

2- To my eye, the image sharpness is superb. I ran DeNoise AI on this image but not Sharpen AI.

3- I was in my SUV. Kudos to old friend Cliff Beittel who pointed out the reflection of my vehicle in the vulture’s eye.

Note: the optimized image file was converted to black and white using the Dynamic Smooth preset in NIK’s Silver EFEX Pro. Kee reading to learn why I had to create a black and white version of this image.

I Generally Do Not Study-Use-Understand the Scientific-Theoretical Mumbo-Jumbo and Charts

I rarely if ever study/use/understand the scientific/theoretical charts and theories relating to photography. Folks often send links to such material. For one, I have never looked at an MTF chart. May great preference is to head into the field with a given camera or lens, create images of birds, and evaluate the results.

But …

In the comments section of the Operator Error, a Great AF System — but …, a large Crop, and not too bad an image. And a variable aperture zoom lens tip! post here, blog regular Adam Rubenstein wrote in part:

Perfect exposure is even more important with the R5 than the Sony as it is less forgiving with shadow recovery for under exposure compared to the a9(ii). See the chart here.

I pushed back a bit when I replied:

Thanks for the links. I am not comfortable with the scientific side of photography, but I think that I understand it. Don’t forget (see lots of threads on BPN) that I am the guy that believes black shadows should be black 🙂

But, because Adam is quite knowledgeable and an all-around good guy, I clicked on the link, studied it for a bit, and came away with an important understanding … The chart that Adam linked me to compares the R5 to the SONY a9 ii.

Click on the image to see a larger version.

Image #2A: color noise in the converted Black Vulture image

The Color Noise

RawDigger showed that the raw file for today’s Black Vulture image was only 1/3 to 1/2 stop under-exposed. After converting the file in Capture One, I was stunned to see the horrific color noise on the bird’s shadowed breast. In Topaz DeNoise AI. I moved the Color Noise Reduction slider to 100. It did not help. Why such horrible color noise?

In part, the noise was a result of the black bird’s breast was in “shadow” even on what was a cloudy-dark day. But there had to be more to it than that …

Click on the image to see better read the fine print.

Adapted from the Photons to Photos website here

Photographic Dynamic Range Shadow Improvement versus ISO Setting

By going here, you can create your own chart by picking your camera body from the very extensive list on the right. I did that for most of the cameras I have used over the past seven or so years. The higher the point on the graph for a given camera body at a given ISO, the better that camera will handle shadow detail. I adapted the chart above by restricting it to the normally useable ISOs.

In the 800-6400 ISO range, the Nikon D5 (and the D6 — not shown), show the best performance by far in this area. The Canon EOS R5 (and R6 — not shown) ranks last. I was surprised that the SONY a7r IV was not very much better than the R5 as I have not had similar color noise problems with 7r iv images.

Click here to see the complete chart.

An R5 Negative

In any case, after studying the charts, I realized that the R5 simply does not handle under-exposed dark tones very well at all. Amazingly, it is at its absolute worst at ISO 318!

It is possible that because SONY offers live-in-the-viewfinder Zebras that enable me to mega-expose to the right every time, I have not encountered any similar problems with a7r IV images. I will readily admit that I have not used ISO 6400 with that body very much if at all.

In doing my R5 testing, I have pushed the camera to places I usually do not visit. Now don’t get me wrong, the R5 is a superb body that offers a great AF system; at this point I firmly believe that folks who have stuck with Canon through the lean years (in terms of AF performance) should be using the R5. They should, however, do their best not to underexpose. Ever. But especially with images of dark birds made in low light at high ISOs 🙂

Thanks, Adam!

Thanks, Adam for pointing me to the Photons to Photos website

. When visiting the home page, I saw more than a few charts that I might want to check out 🙁

🙂

with love, artie

Typos

Feel free to e-mail or to leave a comment regarding any typos or errors. Just be right :). with love, artie
December 19th, 2020

Impressive Sharpness at 1-8 second handheld at 254mm?

What’s Up?

It was really cold on Thursday morning. And cloudy-dark early. There was one Willet on the sandbar. I left. There were three distant diving pelicans at my favorite back-up location. I left. I was glad that I did not have a client with me. Then it was off to back-up location #2 where there are usually lots of diving terns and pelicans. There was no bait in the water and thus no diving birds. At the end of the structure, I found a single, cold, immature Brown Pelican sitting on the railing. Taking advantage of the great IS systems of the Canon loaner gear (IS on the lens, and IBIS with the camera) and the outstanding close-focusing of the RF 100-500, I spent an hour doing pelican body-parts quasi-macro stuff. Trying to be creative. The good news is that I did not get my feet wet on a very cold for-Florida morning. I was done before 9am and then I headed back to my AirBNB to start work on the BAA Canon R5/R6 User’s e-Guide. I have lots of research to do on that. With wind again sun and clear skies, Thursday afternoon would have been a complete dud but for a single Reddish Egret photographed in very sweet light with the SONY 600 GM, the 1.4X TC, and the a7r IV. After two weeks with the Canon loaner gear it took me a few minutes to get comfortable with the SONY body.

R5s are really hard to get right now; Steve Elkins filled dozens of orders but the bodies from that shipment are all gone. Bedfords, however, is still the best place to get one. Many folks who had been on waiting lists at the big camera stores for many months were able to get an R5 from Steve last week and cancel their long-standing orders with the big guys. And everyone has been thrilled with Bedford’s service, the 3% discount, and the free second-day air shipping.

Canon R5/R6 AF e-Guide Info

So far, 40 folks have sent PayPals for their copy of the Canon R5/R6 AF e-Guide. And 21 who used my affiliate links to purchase their R5 have e-mailed for and received their free copy of the guide. If you e-mailed or sent a PayPal and did not receive your guide, please LMK immediately via e-mail.

Feedback has been overwhelmingly positive so far. Three folks wrote stating that they had a better way of setting up AF on their R5s. When I wrote back explaining why they were in error, two of them back-tracked. One stubborn guy is still doing it his way — less efficiently. Be sure to scroll down to read about my plans for a Canon R5/R6 User’s e-Guide. Understand that the info in the BAA Canon R5/R6 Autofocus e-Guide is so important that I opted to publish the AF guide immediately as the R5/R6 User’s Guide will take at least a month to finish.

BAA Canon R5/R6 Autofocus e-Guide

Twenty-one pages. 3,452 words. 28-DPP4 screen captures showing the R5’s vaunted AF system in action. Note: the AF system of the R5 is identical to the AF system of the R6.

You will learn:

1- The two most useful AF Methods for general bird photography and for birds in flight.

2- How to set up your R5/R6 AF Menus.

3- What boxes to check (and un-check) under Limit AF Methods.

4- How to change the AF Method quickly, easily, and efficiently. Note: the default way of doing this is clunky, cumbersome, and inefficient at best. One person replied that this tip alone was worth the price of admission.

5- The only setting that should be used for Initial Servo AF pt for Face Detection + Tracking.

I you are currently using multiple back buttons either for general bird photography or for birds in flight, what you learn in this guide will change your life. For the better.

Here are the first three paragraphs of this e-Guide:

From the moment I learned about the new Canon mirrorless bodies, I read about using two or three back-buttons to focus using different AF methods. The word on the street said that the way to go for birds in flight was to use one button to acquire focus with Zone AF or with Large Zone: Horizontal AF and then switch to another button to activate Face Detection + Tracking AF and then use the shutter button to make an image. My immediate thought was, “This is insanity! There has got to be a better way.” In short, there is a far superior way to set up AF on your R5 or R6.

Remember that I got away from any form of back-button or rear focusing many years ago after finally realizing that it is always easier to do one thing (press the shutter button), than it is to do two things (press a back button and then press the shutter button).

The default method of switching AF Methods with the R5/R6 bodies is cumbersome at best. It involves first pressing the grid button (my name) on the upper right back of the camera and then pressing the hard-to-access M-Fn button to toggle through the AF Methods. This method is so bad that it will not be mentioned again in this guide.

The guide is free to all who have ordered an R5 or an R6 using my B&H affiliate link or from Steve Elkins/Bedfords using the BIRDSASART coupon code at checkout. Please send your receipt to me via e-mail. It will take me a few days to a week to verify the B&H purchases. Bedfords folks should expect their free e-Guides fairly quickly.

To purchase your copy of the e-Guide, please send a PayPal for $25.00 to birdsasart@verizon.net and be sure to include the words R5/R6 AF Guide in your PayPal e-mail.

Everyone who gets the guide will receive a free update no later than the first week in January.

Canon R5/R6 User’s e-Guide

I am planning on doing a complete Canon R5/R6 User’s e-Guide. This will require a lot of research, a lot of time, and a lot of effort. I am hoping to have it complete by mid- to late January. As always, folks who use the BAA affiliate links to purchase their Canon gear will receive a substantial discount.

Understand that the info in the BAA Canon R5/R6 Autofocus e-Guide is so important that I opted to publish the AF guide ASAP.

Please Remember

With income from IPTs approaching zero, please, if you enjoy and learn from the blog, remember to use one of my two affiliate programs when purchasing new gear. Doing so just might make it possible for me to avoid having to try to get a job as a Walmart greeter and will not cost you a single penny more. And if you use Bedfords and remember to enter the BIRDSASART code at checkout, you will save 3% on every order and enjoy free second-day air shipping. In these crazy times — I am out at least forty to sixty thousand dollars so far due to COVID 19 (with lots more to come) — remembering to use my B&H link or to shop at Bedfords will help me out a ton and be greatly appreciated. Overseas folks who cannot order from the US because of import fees, duties, and taxes can always help out by clicking here if they see fit.

Great Topaz News!

Folks who use the BAA Topaz link to purchase Sharpen AI, DeNoise AI, or the Utility Bundle (or any other Topaz plugins) will receive a 15% discount by entering the ARTHUR15 code at checkout. To get the discount you must use my link and you must enter the discount code. Be sure to start with this link.

Topaz Stuff

As I said just a while back and have said often many times before, I should have listened sooner. If you, like me, are new to the Topaz party, please use this link to purchase. Right now I can wholeheartedly recommend both Topaz Sharpen AI and Topaz DeNoise AI. Though I have not yet worked with JPEGtoRAW AI or Gigapixel AI, I have installed both of these plug-ins and look forward to trying them on some I-Phone 11 images fairly soon. If you are thinking like me, consider the Utility Bundle that includes all four plug-ins mentioned above at a money-saving price.

Again, those who purchase Sharpen AI or DeNoise AI using my link, can e-mail to request a short Getting Started with Topaz e-Guide. I had a bit of trouble getting the two plug-ins installed and having them appear in the Photoshop Filter Menu. In addition, I will explain how to best learn about the two plug-ins by applying them on a Layer (in Photoshop).

New and Better Bedfords Discount Policy!

You can now save 3% on all of your Bedfords photo gear purchases by entering the BIRDSASART coupon code at checkout. Your discount will be applied to your pre-tax total. In addition, by using the code you will get 2nd day air shipping via Fed Ex.

Grab a Nikon AF-S Teleconverter TC-14E III and save $14.99. Purchase a Canon EOS R5 and your discount will be $116.97. Purchase a Sony FE 600mm f/4 GM OSS lens and save a remarkable $389.94! Your Bedford’s purchase no longer needs to be greater than $1,000.00 for you to receive a discount. The more you spend, the more you save.

Money Saving Reminder

Many have learned that if you need a hot photo item that is out of stock at B&H and would enjoy free overnight shipping, your best bet is to click here, place an order with Bedfords, and enter the coupon code BIRDSASART at checkout. If an item is out of stock, contact Steve Elkins via e-mail or on his cell phone at (479) 381-2592 (Central time). Be sure to mention the BIRDSASART coupon code and use it for your online order o save 3% and enjoy free 2nd-day air shipping. Steve has been great at getting folks the hot items that are out of stock at B&H and everywhere else. The wait lists at the big stores can be a year or longer for the hard to get items. Steve will surely get you your gear long before that. For the past year, he has been helping BAA Blog folks get their hands on items like the SONY a9 ii, the SONY 200-600 G OSS lens, the Canon EOS R5, the Canon RF 100-500mm lens, and the Nikon 500mm PF. Steve is personable, helpful, and eager to please.


Gear Questions and Advice

Too many folks attending BAA IPTs and dozens of photographers whom I see in the field and on BPN, are–out of ignorance–using the wrong gear especially when it comes to tripods and more especially, tripod heads… Please know that I am always glad to answer your gear questions via e-mail. Those questions might deal with systems, camera bodies, accessories, and/or lens choices and decisions.

This image was created on 17 December 2020 near Fort DeSoto Park. I used the handheld Canon RF 100-500mm f/4.5-7.1L IS USM lens (at 254mm) and the highly touted 45MP Canon EOS R5 Mirrorless Digital camera body. ISO 250. Exposure determined by the histogram, experience, and luck, and confirmed as perfect by RawDigger: 1/8 sec. at f/10 in Manual mode. AWB at 5:25pm on a cloudy-dark afternoon.

Face Detection + Tracking/AI Servo AF was active at the moment of exposure and performed to perfection; the active AF point tracked and nailed the bird’s eye. Click on the image to see a larger version.

Image #1: Great Blue Heron and gently moving wavelets

5-stops of Image Stabilization (IS)

Traditionally, if you want to try to blur slowly moving water, you need to be on a tripod. But I love the light weight of the R5/100-500 RF rig and tremendously enjoy the freedom that comes with handholding. So with this somewhat drab subject, I tried working first at 1/15 sec. and then at 1/8 second. The first few images looked pretty sharp on the back of the camera … Scroll down to check out the sharpness in Images 1C and 1D.

I was seated with this bird using the knee-pod technique. I stayed with the bird for nearly an hour hoping that the sun would appear in the narrow light window just above the horizon and yield a spectacular red sunset. But alas, the dark heat clouds lowered and put an end to my hopes. With Image #1, I do like the effect of the gently moving water created with the very slow shutter speed of 1/8 second.

The rule for handholding (before IS) was to use a fraction of one over the lens length to figure the minimum shutter speed needed to create a sharp image. For this image that would be 1/254 which rounds off nicely to 1/250 sec. Starting at 1/8 second the math looks like this: 1/8, 1/15, 1/30, 1/60, 1/125, 1/250. From 1/8 to 1/250 is five stops. The RF 100-500 is supposed to offer five stop of image stabilization and the additional IS provided by the R5’s IBIS(in-body image stabilization) system surely did not hurt.

I am getting better with R5 exposures; RawDigger showed this one to be slightly less than 1/3 stop under-exposed. Image #1 above depicts the optimized image pretty much as it looked in camera. After converting the image in Capture One the only thing that I did in post was to run Topaz DeNoise AI on the whole image. See below for more on that.

This image was created on 17 December 2020 near Fort DeSoto Park. I used the handheld Canon RF 100-500mm f/4.5-7.1L IS USM lens (at 254mm) and the highly touted 45MP Canon EOS R5 Mirrorless Digital camera body. ISO 250. Exposure determined by the histogram, experience, and luck, and confirmed as perfect by RawDigger: 1/8 sec. at f/10 in Manual mode. AWB at 5:25pm on a cloudy-dark afternoon.

Face Detection + Tracking/AI Servo AF was active at the moment of exposure and performed to perfection; the active AF point tracked and nailed the bird’s eye. Click on the image to see a larger version.

Image #1A: Great Blue Heron and gently moving wavelets — juiced-up version

Hoping for a Great Sunset

Since my hopes for a great sunset had been dashed, I decided to create a juiced up version with more color in the water and a bit more contrast.

Please leave a comment and let us know which of the two versions you prefer and why you made your choice.

Image #1C: Capture One screen capture

Capture One Screen Capture (C-1)

I was quite surprised when I put the C-1 loupe on the bird’s eye and found that virtually every horizontal image made at 1/8 second was very sharp on the eye (as long as the bird was not moving). The wind on Thursday evening was from the west. So when the bird turned away from the wind, the crest feathers fluffed up a bit. Working at 1/8 second, I knew that the crest feathers would be slightly blurred. And they were. And their is a slight moving water blur above the raised far-foot. Who would have ever thought that you could consistently create sharp-on-the eye images at 1/8 second with a super-telephoto zoom lens?

When I created some verticals, very few of the images were sharp, possibly because holding the lens still is more difficult with the camera turned on end (without a vertical grip), or possibly because I was working at somewhat longer focal lengths of from 300 to 350mms on average. My suspicion is that the former reason was the main cause as I remember having trouble keeping the lens still when creating the verticals.

Be sure to click on the image to view it larger.

Image #1D: Topaz DeNoise AI on Auto on the Great Blue Heron and gently moving wavelets image at 100%

Topaz DeNoise AI on the Great Blue Heron and gently moving wavelets image

With this image, Topaz DeNoise AI on Auto has taken a pretty much perfect, nearly noise-free image and made it just a little bit cleaner and a good bit sharper. Notice the super-low Reduce Noise value of 1. And enlarge the image to see the additional sharpness. I run DeNoise on virtually every image that I process.

Typos

Feel free to e-mail or to leave a comment regarding any typos or errors. Just be right :). with love, artie