August 8th, 2021 Whats Up?
Private client Anke Frohlich and I enjoyed another long day at Nickerson Beach on Saturday. The morning was pretty much a bust with the sky clearing much too early and a brisk wind from the west. As always, wind against sun is a very tough situation. I took a great, short, early nap on the sand. After I awoke, we got fairly close to some young terns and a pair of oystercatchers. Working from a very low perspective, I thought that we had gotten some great stuff. Anke kept telling me that her images were not sharp. As I almost never enlarge my images in the field, I did not realize until seeing the images on the laptop that she had been 100% right; we both had been victimized by heat shimmer on a seemingly clear morning …
I have never run into a person who has learned so much so quickly. Anke has been working with an a1 and the SONY 200-600 for only a few months. She was looking for a more optimal setup of her a1 so, on the first morning, I copied my settings to her a1 and taught her to use the camera for bird photography with the new settings. I showed her how to get an excellent exposure using different Zebra settings than she had been working with. She took to the instruction like the proverbial duck to water … (Note: my a1 settings are available to all those in the Sony Alpha a1 Setup and Info group.)
As it was beginning to cloud over at 3:00pm on Saturday, we headed out to the beach earlier than usual. We wound up with a strong wind from the southwest and — for the most part, cloudy-bright skies. At times the wind was so strong that any exposed skin on our arms (or faces if we glanced to the south) was being stung by tiny sand bullets.
We took a zillion Black Skimmer flight shots and even more Black Skimmer midair fight shots. My chore for today is to choose my keepers from the August 7 2021 folder. Speaking of which, Anke is one of many frustrated by having to edit so many images from high frame rate camera bodies. At my suggestion, she had called Jim on Friday to purchase a copy of Photo Mechanic Yesterday, we got her up and running. She cannot believe how fast and easy it is to pick your keepers in this amazing browsing program. From now on, she will keep her a1 set to 30 fps …
Anyhoo, it got very dark late in the afternoon so we left a bit early. Thus, I only I tied my long-stay Nickerson Beach record of 13 hours. With rain forecast for all of today, Sunday 8 August 2021, I will be doing lots of catching up. Wherever you are, and whatever you are doing, I hope that you too have a great day.
Remember that you can find some great photo accessories (and necessities!) on Amazon by clicking on the Stuff tab on the orange/yellow menu bar above. On a related note, it would be extremely helpful if blog-folks like me, who spend too much money on Amazon, would get in the habit of clicking on the Amazon logo link on the right side of each blog post when they shop online. As you might expect, doing so will not cost you a single penny, but would be appreciated tremendously by yours truly. And doing so works seamlessly with your Amazon Prime account.
This blog post took a bit less than an hour to prepare, and makes 222 consecutive days with a new one. Please remember that if an item — a Delkin flash card, or a tripod head — for example, that is available from B&H and/or Bedfords, and is also available in the BAA Online Store, it would be great, and greatly appreciated if you would opt to purchase from us. We will match any price. Please remember also to use my B&H affiliate links or to save 3% at Bedfords by using the BIRDSASART discount code at checkout. Doing either often earns you free guides and/or discounts. And doing so always earns my great appreciation.
|
|
|
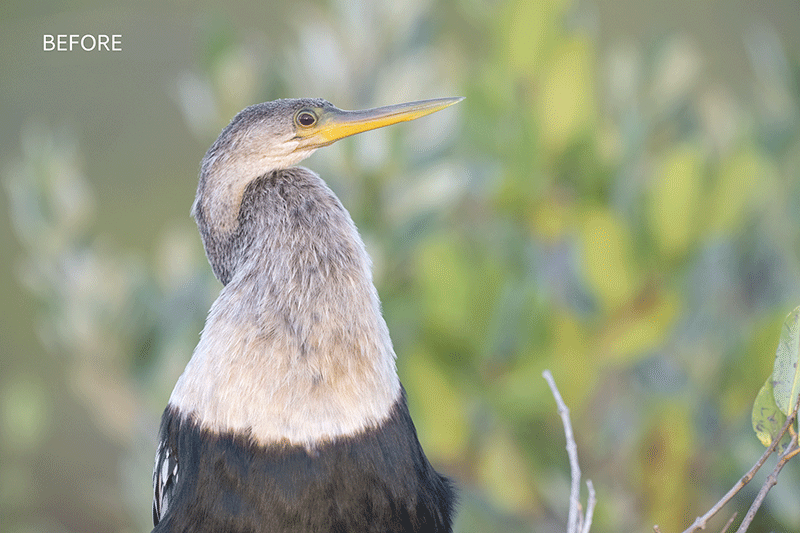
This image was created by Anke Frohlich in Central Park in NYC on October 11, 2020. While resting the lens on a railing for support, she used the hand held Sony FE 100-400mm f/4.5-5.6 GM OSS lens (at 400mm) with the super-high megapixel Sony Alpha a7R IV Mirrorless Digital camera body. Exposure data: 1/800 sec. at f/5.6 (wide open) in Manual mode. AWB at 1:27pm in the shade on a dark, cloudy afternoon.
Image courtesy of and copyright 2020: Anke Frohlich Photography/Crop, raw conversion, and cleanup by BIRDS AS ART.
You can see more of Anke’s bird photography here.
Image #1: Barry, the beloved Central Park Barred Owl
|
ISO Question …
Thanks to Anke Frohlich for sharing the story (along with her fine image) of Barry, the beloved Central Park Barred Owl that recently met an untimely and unfortunate end. Anke was just starting to photograph birds when she created today’s featured image.
All are invited to leave a comment and take a stab at the ISO.
|
|
|
From the Central Park Conservancy Twitter account
|
Barred Owl Tragedy in NYC’s Central Park …
Anke texted me the above on Friday afternoon. She wrote, I am heartbroken. She gave us so much joy and it was so special to have her for so long.
In a later e-mail, she wrote:
I was incredibly fortunate to be able to capture my favorite image of her on October 11, 2020, shortly after she first arrived in Manhattan in the north woods of Central Park. Quickly crowds gathered and she became a celebrity, featured in news programs and articles all over the world. She had a great personality, beautiful eyes and was very special in many ways. In the past nine months, I visited her often and watched her preen and defend her perch against head butting birds. In the evenings, her devoted followers gathered almost every night to see her fly out and to observe her hunting skills. It is a huge heartbreak to hear the news of her death. She was hit by a park’s department vehicle last night while flying low to hunt. She lives on in our hearts as she brought us great joy. How fortunate to have had this wild beauty in our midst. Thank you so much, Barry, for your presence and for having chosen Central Park as your home for so long.
I had heard of this Owl, named Barry by the hordes of Central Park birders who had loved and been inspired by this young bird. It was discovered last fall at the north end of the park. The bird was thought to be a female because of her relatively large size. While this species visits the park fairly often, it was very unusual that it stayed so long. To say that the bird was very tame would be an understatement; it would often land five to ten feet from observers and would frequently swooped down to grab a mouse or a rat or some other prey item. Barred Owls are diurnal, active both during the day and night. Their diet is quite varied.
The story has been covered by dozens of newspapers and online new outlets. It even made the New York Times and the UK’s Daily Mail.
I am sending love, strength, and energy along with my sincere condolences to Anke, and to all the Central Park folks who loved and adored this very special bird.
Typos
With all blog posts, feel free to e-mail or to leave a comment regarding any typos or errors.
August 7th, 2021 Your Call …
Which of today’s four featured images is your favorite? Why?
What’s Up?
I swam for the third straight day, did some shopping, and prepared a picnic basket for today, Saturday 7 August. I am aiming to break my record of 13 hours at Nickerson Beach. Again, I will be photographing with private In-the-Field client Anke Frohlich. We are hoping for more clouds than sun, especially with a southwest and forecast for this morning … Wherever you are, and whatever you are doing, I hope that you too have a great day.
Remember that you can find some great photo accessories (and necessities!) on Amazon by clicking on the Stuff tab on the orange/yellow menu bar above. On a related note, it would be extremely helpful if blog-folks like me, who spend too much money on Amazon, would get in the habit of clicking on the Amazon logo link on the right side of each blog post when they shop online. As you might expect, doing so will not cost you a single penny, but would be appreciated tremendously by yours truly. And doing so works seamlessly with your Amazon Prime account.
This blog post took a bit less than an hour to prepare, and makes 222 consecutive days with a new one. Please remember that if an item — a Delkin flash card, or a tripod head — for example, that is available from B&H and/or Bedfords, and is also available in the BAA Online Store, it would be great, and greatly appreciated if you would opt to purchase from us. We will match any price. Please remember also to use my B&H affiliate links or to save 3% at Bedfords by using the BIRDSASART discount code at checkout. Doing either often earns you free guides and/or discounts. And doing so always earns my great appreciation.
|
|
|
Click on the composite to view a larger version.
The Homer 2020 IPTs image
|
Homer Bald Eagles Winter 2022
The photography on this trip of a lifetime is beyond amazing. You can do the whole trip with either the Canon 100-500 or the SONY 200-600 along with any 70-200mm lens. Flight photography until you cannot raise your arms, creative set-ups, lots of snow we hope (earlier in the season is best for that), and lots of opportunities for point-blank head portraits and talon shots. All in a variety of spectacular settings. This is an expensive (but competitively priced) trip. If you are seriously interested in joining me for the world’s best Homer/Kachemak Bay Bald Eagle trip(s) — mid-FEB thru early MARCH 2022, please contact me immediately via e-mail for dates and details. I am looking for a roommate who will be doing all eleven days.
Please Remember
With income from IPTs now close to zero, please, if you enjoy and learn from the blog, remember to use one of my two affiliate programs when purchasing new gear. Doing so just might make it possible for me to avoid having to try to get a job as a Walmart greeter and will not cost you a single penny more. And if you use Bedfords and remember to enter the BIRDSASART code at checkout, you will save 3% on every order and enjoy free second-day air shipping. In these crazy times — I am out at least forty to sixty thousand dollars so far due to COVID 19 (with lots more to come) — remembering to use my B&H link or to shop at Bedfords will help me out a ton and be greatly appreciated. Overseas folks who cannot order from the US because of import fees, duties, and taxes, are invited to help out by clicking here to leave a blog thank you gift if they see fit.
New and Better Bedfords Discount Policy!
You can now save 3% on all of your Bedfords photo gear purchases by entering the BIRDSASART coupon code at checkout. Your discount will be applied to your pre-tax total. In addition, by using the code you will get 2nd day air shipping via Fed Ex.
Grab a Nikon AF-S Teleconverter TC-14E III and save $14.99. Purchase a Canon EOS R5 and your discount will be $116.97. Purchase a Sony FE 600mm f/4 GM OSS lens and save a remarkable $389.94! Your Bedford’s purchase no longer needs to be greater than $1,000.00 for you to receive a discount. The more you spend, the more you save.
Money Saving Reminder
Many have learned that if you need a hot photo item that is out of stock at B&H and would enjoy free second-day air shipping, your best bet is to click here, place an order with Bedfords, and enter the coupon code BIRDSASART at checkout. If an item is out of stock, contact Steve Elkins via e-mail or on his cell phone at (479) 381-2592 (Central time). Be sure to mention the BIRDSASART coupon code and use it for your online order to save 3% and enjoy free 2nd-day air shipping. Steve has been great at getting folks the hot items that are out of stock at B&H and everywhere else. The wait lists at the big stores can be a year or longer for the hard to get items. Steve will surely get you your gear long before that. For the past year, he has been helping BAA Blog folks get their hands on items like the SONY a9 ii, the SONY 200-600 G OSS lens, the Canon EOS R5, the Canon RF 100-500mm lens, and the Nikon 500mm PF. Steve is personable, helpful, and eager to please.


Gear Questions and Advice
Too many folks attending BAA IPTs (remember those?) and dozens of photographers whom I see in the field and on BPN, are–out of ignorance–using the wrong gear, especially when it comes to tripods and more especially, tripod heads… Please know that I am always glad to answer your gear questions via e-mail.
SONY a1 AF: Beyond Belief …
With practice, I am getting better at following moving subjects while working off the up-tilted rear monitor with my reading glasses on. When I know that I will be sitting in the same spot for a while — I have been doing a lot of that recently,
As Bird-Eye/Face Detection has gotten much better since the V1.10 firmware update that completely eliminated the EVF Blackout problems, it has become easier to trust the AF system when working off the tilted rear screen with the tripod almost at ground level.
AF performance for this eleven-frame sequence was science-fiction-like. It either nailed the chick’s eye or tracked the forehead even as the bird charged toward me. All eleven images were sharp on the eye. I had been working at ISO with a lower shutter speed when I remembered that I had lost lots of similar images to motion blur so I doubled the shutter speed and doubled the ISO. With excellent results. I remember making dozens of images like this with my Canon gear. All were sharp. On the bird’s feet …
Thursday’s Stats
For the day, I created 3359 images. After the first edit, I deleted 3190 of those. In other words, 94.9% were put in the trash. A large percentage of those I kept will follow on the second edit. I kept 143 image out of the 2287 from the cloudy morning session, a 6.25% keeper rate. With wind against sun in the afternoon, I kept only 26 out of 1010 image, a paltry 2 1/2% keeper ratio …
SONY and artie
Switching to SONY, first with the a9 and the a9 II, and then with the remarkable a1, has enabled me (and others, like Mike De Rosa as seen recently in the blog post here), to create images of birds in flight and in action that I could not have even dreamed of when using Canon for 33 years and then Nikon for more than two. Most of the time I am using one of two AF methods that together, cover about 99% of the commonly-encountered bird photography situations. At present, I am experimenting beyond those … Learn more by joining the group!
From Long-ago IPT veteran Keith Kennedy via e-mail
Absolutely great information. I am calling Jim in a few minutes to order a couple of Delkin 128GB UHS-II cards. Your timely email has saved me a ton of money! Many thanks
In the same vein, via e-mail from John LeClair
Well, e-mail #21 alone was worth the price of admission!
From Pamela Viale, after receiving artie’s a1 settings along with detailed instructions on how to copy them to her SONY a1 via e-mail
This e-mail group has been an incredible boon to me! Thank you so much!
From Joe Barranco via e-Mail
Thanks for your great ideas on the A1 set up. I have been getting MANY more keepers doing things your way!
From Barbara White via e-Mail
Wow, I just gotta say – I learn so much from the SONY Alpha a1 Set-up and Info group! My camera is on my desk, and I’m always picking it up and changing something that I’ve read about in the e-mails.
Thanks, Barbara
From Janet Horton via e-Mail
Hi Artie, Mystery solved. Yes, I was able to replicate what you did. I forgot that you have to set self-timer using the upper dial. I am used to that being a MENU selection.
Thanks much, Janet
SONY Alpha a1 Set-up and Info Group
The SONY Alpha a1 Set-up and Info Group is going great guns as more and more folks chime in with thoughtful questions and experience-based answers. As the a1 is becoming more readily available, more and more folks are getting their hands on this amazing body. With two folks joining yesterday, we are now up to an astounding 67 lucky and blessed photographers! Early on, we discussed the myriad AF options. I gave my opinion as to the best one for flight and general bird photography. More recently, we have been in contact with folks at SONY sharing our thoughts, experiences, and frustrations with the EVF blackout problem.
All who purchased their Alpha a1 bodies via a BAA affiliate link will receive a free subscription to the Sony Alpha a1 Set-Up and Info Updates after shooting me their receipts via e-mail. (Note: it may take me several days to confirm B&H orders.) This same service may be purchased by anyone with an a1 body via a $150.00 PayPal sent to birdsasart@verizon.net indicating payment for Alpha a1 Info Updates. Alternatively, folks can call Jim weekdays at 1-863-692-0906 to pay via credit card. New members will receive composite e-mails that summarize all previous discussions.
Typos
With all blog posts, feel free to e-mail or to leave a comment regarding any typos or errors.
August 6th, 2021 Your Call?
According to you, which is the stronger image (by far)? Why?
What’s Up?
For the first time ever, I spent 13 hours at the beach. With the delayed entry time at Nickerson Beach, I had been thinking about staying all day to avoid having to re-enter at 6pm. So when private In-the-Field client Anke Frohlich suggested that we do just that, we did. With perfect cloudy/fairly bright conditions and a northwest wind, we enjoyed an incredible session (by being in the exact right spot …) We photographed until 12:15 before heading for a picnic lunch. The afternoon was far more challenging as the sun came out and the wind switched to the southeast. Not good. Our best chances were with skimmers battling in midair. With some decent sunset color late in the day, we opted to try for some sunset silhouettes. The wind switched to the southwest. Again, not good.
I created 3357 images; I will be picking my keepers after I hit Publish. When we took a peek at my morning folder during Image Review, we came across today’s featured images. To make sure that I did not accidentally screw up and delete them, I tagged them in Photo Mechanic and placed them in a TEMP sub-folder. I am not yet positive that one of them will be my very favorite image from a great day, but that is likely. Finding one that I like better would be a huge thrill.
With another sign-up and lots of interested folks, the 2022 Homer/Kachemak Bay Bald Eagle IPTs are looking good. Each trip needs four to run. I am still hoping to find a roommate who signs up for all 11 days. I was glad to learn of the sale of Ron Horn’s Canon EOS-1DX Mark II.
Today is Friday 6 August 2021. With clear skies and a west wind, staying in this morning was the obvious choice. Wherever you are, and whatever you are doing, I hope that you too have a great day.
Remember that you can find some great photo accessories (and necessities!) on Amazon by clicking on the Stuff tab on the orange/yellow menu bar above. On a related note, it would be extremely helpful if blog-folks like me, who spend too much money on Amazon, would get in the habit of clicking on the Amazon logo link on the right side of each blog post when they shop online. As you might expect, doing so will not cost you a single penny, but would be appreciated tremendously by yours truly. And doing so works seamlessly with your Amazon Prime account.
This blog post took a bit more than an hour to prepare, and makes 221 consecutive days with a new one. Please remember that if an item — a Delkin flash card, or a tripod head — for example, that is available from B&H and/or Bedfords, and is also available in the BAA Online Store, it would be great, and greatly appreciated if you would opt to purchase from us. We will match any price. Please remember also to use my B&H affiliate links or to save 3% at Bedfords by using the BIRDSASART discount code at checkout. Doing either often earns you free guides and/or discounts. And doing so always earns my great appreciation.
|
|
|
Click on the composite to view a larger version.
Homer 2020 IPT Images
|
Homer Bald Eagles Winter 2022
The photography on this trip of a lifetime is beyond amazing. You can do the whole trip with either the Canon 100-500 or the SONY 200-600 along with any 70-200mm lens. Flight photography until you cannot raise your arms, creative set-ups, lots of snow we hope (earlier in the season is best for that), and lots of opportunities for point-blank head portraits and talon shots. All in a variety of spectacular settings. This is an expensive (but competitively priced) trip. If you are seriously interested in joining me for the world’s best Homer/Kachemak Bay Bald Eagle trip(s) — mid-FEB thru early MARCH 2022, please contact me immediately via e-mail for dates and details. I am looking for a roommate who will be doing all eleven days.
|
|
|
This image was created on 5 August 2021 at Nickerson Beach. While standing at full height, I used the Induro GIT304L Grand Series 3 Stealth Carbon Fiber Tripod/Levered-Clamp FlexShooter Pro-mounted-Sony FE 600mm f/4 GM OSS lens and The One, the Sony Alpha 1 Mirrorless digital camera. ISO 800. Exposure determined via Zebras with ISO on the rear dial: 1/3200 sec. at f/4 (wide open). RawDigger showed that the raw file was almost perfect, about 1/6 stop under-exposed. AWB at 11:33:40am on a cloudy morning.
Tracking: Center Zone/AF-C resulted in a sharp image. As Image #1 is a substantial crop, it was the distance to the subject that provided sufficient depth of field. At a given aperture, in this case f/4, the greater the distance to the subject, the greater the depth of field.
Be sure to click on the image to enjoy the larger version.
Image #1: Common Terns battling in midair
|
Loving White Sky Days
These images were created after 11:30am. If it had been a clear sunny day, I would have quit hours before regardless of the wind direction. The soft light on cloudy-bright days allow you to photograph in any direction — staying on “sun” angle becomes a moot point. In such conditions, you will not get the dark shadows on the bird that plague flight images made on clear, blue-sky days and decent wing positions will reveal superb underwing detail.
To drive home my point, here is more of the same from yesterday’s blog post:
I chuckle also when I think of my first decade of photography; I would not head out to do photography unless it was sunny. Such were the limitations of Velvia 50 push processed one stop to ISO 100. Cloudy-bright days are ideal as there is enough light to work at reasonable ISOs with decent shutter speeds and no shadows at all. And best of all, the “wrong” wind direction is never a problem when you are photographing when the world is a soft-box.
|
|
|
This image was created on 5 August 2021 at Nickerson Beach. While standing at full height, I used the Induro GIT304L Grand Series 3 Stealth Carbon Fiber Tripod/Levered-Clamp FlexShooter Pro-mounted-Sony FE 600mm f/4 GM OSS lens and The One, the Sony Alpha 1 Mirrorless digital camera. ISO 800. Exposure determined via Zebras with ISO on the rear dial: 1/3200 sec. at f/4 (wide open). RawDigger showed that the raw file was almost perfect, about 1/6 stop under-exposed. AWB at 11:33:40am on a cloudy morning.
Tracking: Center Zone/AF-C resulted in a sharp image. As Image #2 is a substantial crop, it was the distance to the subject that provided sufficient depth of field. At a given aperture, in this case f/4, the greater the distance to the subject, the greater the depth of field.
Be sure to click on the image to enjoy the larger version.
Image #2: Common Terns battling in midair
|
The Realities of 30 Frames per Second
With your a1 set up properly, you will be able to take full advantage of 30 frames per second. Please do not be misled into thinking that you will capture every possible moment (or pose). Let’s divide one second into 4000 tiny increments. There will be 4000 different poses in one second. So when you are working 30 fps with a shutter speed of 1/4000 second, you will capture 30 of those moments. Thus, you are missing 3970 of those moments. That means that you will be missing 99.25% of the poses.
The good news is that when working at 30 fps, you will get to pick from 50% more “moments” than when working at 20 fps, and three times as many moments (or poses or frames) than you would if you had been working with a 10 fps camera body.
How Fast is a Blink?
Today’s two featured images were created consecutively in a short burst in the same second. They represent two of the thirty moments (or poses or frames) captured in that same second. Though it is difficult to see in the 1200 pixel wide JPEGs here, the bird’s nictitating membrane is covering the eye in Image #2, but the eye is fully open in Image #1. Aside from giving us 30 moments (or poses or frames) every second, we get some excellent insurance protecting against nictitating membranes. This can become very important when shooting larger-in-the-frame portraits of static subjects.
SONY and artie
Switching to SONY, first with the a9 and the a9 II, and then with the remarkable a1, has enabled me (and others, like Mike De Rosa as seen recently in the blog post here), to create images of birds in flight and in action that I could not have even dreamed of when using Canon for 33 years and then Nikon for more than two. Most of the time I am using one of two AF methods that together, cover about 99% of the commonly-encountered bird photography situations. At present, I am experimenting beyond those … Learn more by joining the group!
From Long-ago IPT veteran Keith Kennedy via e-mail
Absolutely great information. I am calling Jim in a few minutes to order a couple of Delkin 128GB UHS-II cards. Your timely email has saved me a ton of money! Many thanks
In the same vein, via e-mail from John LeClair
Well, e-mail #21 alone was worth the price of admission!
From Pamela Viale, after receiving artie’s a1 settings along with detailed instructions on how to copy them to her SONY a1 via e-mail
This e-mail group has been an incredible boon to me! Thank you so much!
From Joe Barranco via e-Mail
Thanks for your great ideas on the A1 set up. I have been getting MANY more keepers doing things your way!
From Barbara White via e-Mail
Wow, I just gotta say – I learn so much from the SONY Alpha a1 Set-up and Info group! My camera is on my desk, and I’m always picking it up and changing something that I’ve read about in the e-mails.
Thanks, Barbara
From Janet Horton via e-Mail
Hi Artie, Mystery solved. Yes, I was able to replicate what you did. I forgot that you have to set self-timer using the upper dial. I am used to that being a MENU selection.
Thanks much, Janet
SONY Alpha a1 Set-up and Info Group
The SONY Alpha a1 Set-up and Info Group is going great guns as more and more folks chime in with thoughtful questions and experience-based answers. As the a1 is becoming more readily available, more and more folks are getting their hands on this amazing body. With two folks joining yesterday, we are now up to an astounding 67 lucky and blessed photographers! Early on, we discussed the myriad AF options. I gave my opinion as to the best one for flight and general bird photography. More recently, we have been in contact with folks at SONY sharing our thoughts, experiences, and frustrations with the EVF blackout problem.
All who purchased their Alpha a1 bodies via a BAA affiliate link will receive a free subscription to the Sony Alpha a1 Set-Up and Info Updates after shooting me their receipts via e-mail. (Note: it may take me several days to confirm B&H orders.) This same service may be purchased by anyone with an a1 body via a $150.00 PayPal sent to birdsasart@verizon.net indicating payment for Alpha a1 Info Updates. Alternatively, folks can call Jim weekdays at 1-863-692-0906 to pay via credit card. New members will receive composite e-mails that summarize all previous discussions.
Typos
With all blog posts, feel free to e-mail or to leave a comment regarding any typos or errors.
August 5th, 2021 Your Call
Which of today’s two featured images is the strongest? Which is the cutest? Please let us know why you made your choices. Also, would you lose the dark smudge in the upper left corner of Image #2? Why or why not?
What’s Up?
I had a great, still, soft-box of a morning at Nickerson Beach on Wednesday. Since it was cloudy, I headed out with 600 f/4 GM (to take advantage of its f/4 speed) along with both TCs. I started doing skimmers on nests and then headed down to the shore to photograph a Common Tern feeding spree and a single un-banded adult American Oystercatcher. Then I sat by the corner of the colony for about and hour and got some nice stuff on skimmer chicks and Common Terns in fresh juvenal plumage.
I was glad to learn that Greg Ferguson will be joining us again in Homer. He was on the last trip in 2020. And loved it so much that he is re-upping. Both trips are filling nicely. Today is Thursday 5 August 2021. I am not sure whether or not I will be headed back to the beach today; I will check the forecast in the morning. Wherever you are, and whatever you are doing, I hope that you too have a great day.
Remember that you can find some great photo accessories (and necessities!) on Amazon by clicking on the Stuff tab on the orange/yellow menu bar above. On a related note, it would be extremely helpful if blog-folks like me, who spend too much money on Amazon, would get in the habit of clicking on the Amazon logo link on the right side of each blog post when they shop online. As you might expect, doing so will not cost you a single penny, but would be appreciated tremendously by yours truly. And doing so works seamlessly with your Amazon Prime account.
This blog post took more than an hour to prepare, and makes 220 consecutive days with a new one. Please remember that if an item — a Delkin flash card, or a tripod head — for example, that is available from B&H and/or Bedfords, and is also available in the BAA Online Store, it would be great, and greatly appreciated if you would opt to purchase from us. We will match any price. Please remember also to use my B&H affiliate links or to save 3% at Bedfords by using the BIRDSASART discount code at checkout. Doing either often earns you free guides and/or discounts. And doing so always earns my great appreciation.
|
|
|
Click on the composite to view a larger version.
The Homer 2020 IPTs image
|
Homer Bald Eagles Winter 2022
The photography on this trip of a lifetime is beyond amazing. You can do the whole trip with either the Canon 100-500 or the SONY 200-600 along with any 70-200mm lens. Flight photography until you cannot raise your arms, creative set-ups, lots of snow we hope (earlier in the season is best for that), and lots of opportunities for point-blank head portraits and talon shots. All in a variety of spectacular settings. This is an expensive (but competitively priced) trip. If you are seriously interested in joining me for the world’s best Homer/Kachemak Bay Bald Eagle trip(s) — mid-FEB thru early MARCH 2022, please contact me immediately via e-mail for dates and details. I am looking for a roommate who will be doing all eleven days.
Please Remember
With income from IPTs now close to zero, please, if you enjoy and learn from the blog, remember to use one of my two affiliate programs when purchasing new gear. Doing so just might make it possible for me to avoid having to try to get a job as a Walmart greeter and will not cost you a single penny more. And if you use Bedfords and remember to enter the BIRDSASART code at checkout, you will save 3% on every order and enjoy free second-day air shipping. In these crazy times — I am out at least forty to sixty thousand dollars so far due to COVID 19 (with lots more to come) — remembering to use my B&H link or to shop at Bedfords will help me out a ton and be greatly appreciated. Overseas folks who cannot order from the US because of import fees, duties, and taxes, are invited to help out by clicking here to leave a blog thank you gift if they see fit.
New and Better Bedfords Discount Policy!
You can now save 3% on all of your Bedfords photo gear purchases by entering the BIRDSASART coupon code at checkout. Your discount will be applied to your pre-tax total. In addition, by using the code you will get 2nd day air shipping via Fed Ex.
Grab a Nikon AF-S Teleconverter TC-14E III and save $14.99. Purchase a Canon EOS R5 and your discount will be $116.97. Purchase a Sony FE 600mm f/4 GM OSS lens and save a remarkable $389.94! Your Bedford’s purchase no longer needs to be greater than $1,000.00 for you to receive a discount. The more you spend, the more you save.
Money Saving Reminder
Many have learned that if you need a hot photo item that is out of stock at B&H and would enjoy free second-day air shipping, your best bet is to click here, place an order with Bedfords, and enter the coupon code BIRDSASART at checkout. If an item is out of stock, contact Steve Elkins via e-mail or on his cell phone at (479) 381-2592 (Central time). Be sure to mention the BIRDSASART coupon code and use it for your online order to save 3% and enjoy free 2nd-day air shipping. Steve has been great at getting folks the hot items that are out of stock at B&H and everywhere else. The wait lists at the big stores can be a year or longer for the hard to get items. Steve will surely get you your gear long before that. For the past year, he has been helping BAA Blog folks get their hands on items like the SONY a9 ii, the SONY 200-600 G OSS lens, the Canon EOS R5, the Canon RF 100-500mm lens, and the Nikon 500mm PF. Steve is personable, helpful, and eager to please.
Gear Questions and Advice
Too many folks attending BAA IPTs (remember those?) and dozens of photographers whom I see in the field and on BPN, are–out of ignorance–using the wrong gear, especially when it comes to tripods and more especially, tripod heads… Please know that I am always glad to answer your gear questions via e-mail
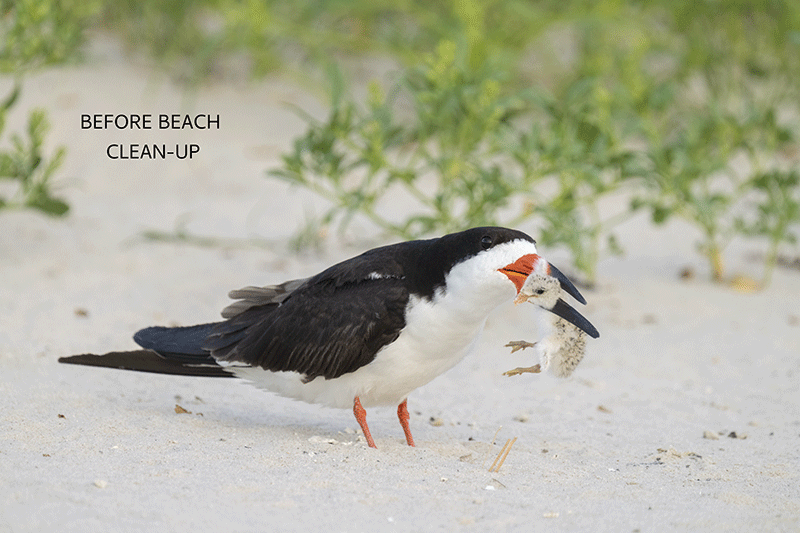
Hungry Beach Babies!
Here I worked off the rear monitor with the legs of the tripod splayed completely flat. I would get focus on an isolated chick and wait patiently until one of the parent birds landed nearby with a fish. Getting a good image of the hand-off is a huge challenge as bedlam breaks loose when the feeding takes place. I always chuckle when the young bird that just got fed continues to beg.
Loving Cloudy Days
I chuckle also when I think of my first decade of photography; I would not head out to do photography unless it was sunny. Such were the limitations of Velvia 50 push processed one stop to ISO 100. Cloudy-bright days are ideal as there is enough light to work at reasonable ISOs with decent shutter speeds and no shadows at all. And best of all, the “wrong” wind direction is never a problem when you are photographing when the world is a soft-box.
Typos
With all blog posts, feel free to e-mail or to leave a comment regarding any typos or errors.
August 4th, 2021 This Just In
I began work on this blog post on Tuesday evening and almost finished it, but decided to hit the sack. Then I looked at the weather for Lido Beach — cloudy with light and variable winds. I set the alarm for 5am but woke at 4:39. I headed for Nickerson Beach and when I arrived there was no sign of sunrise color so I finished this blog post. And forgot to hit Publish 🙂 I am doing that now at 9:43am after an amazingly wonderful, still, soft-box of a morning at the beach. Images and details soon.
What’s Up?
There was not much doing on Tuesday as I returned to relaxation mode. I did get over to my sister Ilene’s house late in the day for my half-mile away-from-home swim. I chose my keepers from my Monday afternoon East Pond and Nickerson Beach sessions and was quite happy. My very favorite image is featured in today’s blog post. I am anxious to get back out, but the weather for the next few days is looking less than ideal.
Today is Wednesday 4 August 2021. Wherever you are, and whatever you are doing, I hope that you too have a great day.
Remember that you can find some great photo accessories (and necessities!) on Amazon by clicking on the Stuff tab on the orange/yellow menu bar above. On a related note, it would be extremely helpful if blog-folks like me, who spend too much money on Amazon, would get in the habit of clicking on the Amazon logo link on the right side of each blog post when they shop online. As you might expect, doing so will not cost you a single penny, but would be appreciated tremendously by yours truly. And doing so works seamlessly with your Amazon Prime account.
This blog post took about two hours to prepare, and makes 219 consecutive days with a new one. Please remember that if an item — a Delkin flash card, or a tripod head — for example, that is available from B&H and/or Bedfords, and is also available in the BAA Online Store, it would be great, and greatly appreciated if you would opt to purchase from us. We will match any price. Please remember also to use my B&H affiliate links or to save 3% at Bedfords by using the BIRDSASART discount code at checkout. Doing either often earns you free guides and/or discounts. And doing so always earns my great appreciation.
Please Remember
With income from IPTs now close to zero, please, if you enjoy and learn from the blog, remember to use one of my two affiliate programs when purchasing new gear. Doing so just might make it possible for me to avoid having to try to get a job as a Walmart greeter and will not cost you a single penny more. And if you use Bedfords and remember to enter the BIRDSASART code at checkout, you will save 3% on every order and enjoy free second-day air shipping. In these crazy times — I am out at least forty to sixty thousand dollars so far due to COVID 19 (with lots more to come) — remembering to use my B&H link or to shop at Bedfords will help me out a ton and be greatly appreciated. Overseas folks who cannot order from the US because of import fees, duties, and taxes, are invited to help out by clicking here to leave a blog thank you gift if they see fit.
New and Better Bedfords Discount Policy!
You can now save 3% on all of your Bedfords photo gear purchases by entering the BIRDSASART coupon code at checkout. Your discount will be applied to your pre-tax total. In addition, by using the code you will get 2nd day air shipping via Fed Ex.
Grab a Nikon AF-S Teleconverter TC-14E III and save $14.99. Purchase a Canon EOS R5 and your discount will be $116.97. Purchase a Sony FE 600mm f/4 GM OSS lens and save a remarkable $389.94! Your Bedford’s purchase no longer needs to be greater than $1,000.00 for you to receive a discount. The more you spend, the more you save.
Money Saving Reminder
Many have learned that if you need a hot photo item that is out of stock at B&H and would enjoy free second-day air shipping, your best bet is to click here, place an order with Bedfords, and enter the coupon code BIRDSASART at checkout. If an item is out of stock, contact Steve Elkins via e-mail or on his cell phone at (479) 381-2592 (Central time). Be sure to mention the BIRDSASART coupon code and use it for your online order to save 3% and enjoy free 2nd-day air shipping. Steve has been great at getting folks the hot items that are out of stock at B&H and everywhere else. The wait lists at the big stores can be a year or longer for the hard to get items. Steve will surely get you your gear long before that. For the past year, he has been helping BAA Blog folks get their hands on items like the SONY a9 ii, the SONY 200-600 G OSS lens, the Canon EOS R5, the Canon RF 100-500mm lens, and the Nikon 500mm PF. Steve is personable, helpful, and eager to please.
Gear Questions and Advice
Too many folks attending BAA IPTs (remember those?) and dozens of photographers whom I see in the field and on BPN, are–out of ignorance–using the wrong gear, especially when it comes to tripods and more especially, tripod heads… Please know that I am always glad to answer your gear questions via e-mail
|
|
|
This image was created on 2 August 2021 on my first trip this season to Nickerson Beach. While seated on dry sand using the knee-pod technique, I used the hand held Sony FE 200-600mm f/5.6-6.3 G OSS lens with the Sony FE 1.4x Teleconverter (at 799mm) and The One, the Sony Alpha 1 Mirrorless digital camera. ISO 3200. Exposure determined via Zebras with ISO on the rear dial: 1/800 sec. at f/9 (wide open) in Manual mode. AWB at 7:04pm on a then-cloudy afternoon.
Tracking: Wide AF-C/Bird-Eye/Face Detection AF was active at the moment of exposure and performed just about perfectly (as below) by grabbing and tracking the chick’s eye. Click on the image to view a larger version
Image #1: Black Skimmer killing chick from another nest
|
Murder on the Beach, This Time for Real
Unlike the large Laughing Gull chick that survived a vicious attack by a Herring Gull (in the blog post here), this tiny skimmer chick was pretty much doomed a few moments after it was grabbed by an adult. It is common to see adult skimmers whack small chicks from other nests on fly-by attacks, possibly because they have intruded on their nesting territory, and possibly to eliminate competitors for the available food. This attack took that to the next step. The victim in this case might have wandered very near the nest of the attacking bird.
The entire episode lasted about six minutes; the adult bird grabbed, shook, dropped, and picked up the tiny skimmer repeatedly, most often simply holding the chick in its bill. The chick stopped struggling within half a minute. What happened next was even stranger. The adult walked back to its nest and offered the dead chick to its two chicks. Though its chicks were no more than ten days old (if that), one of them grabbed the tiny chick and attempted to swallow it for several minutes. We lost sight of that chick in the thick beach vegetation. Ten minutes later, an adult Laughing Gull swooped down and grabbed the dead chick. It happened so suddenly that none of the many photographers even had a chance to raise their lenses …
Glad That I Brought the 1.4X TC. Or Not?
When the attack occurred, I had been shooting flight with the bare 200-600. Alerted by the screams of several distraught women — sorry, I always root for the predators — I moved about five yards to my right to get into better position. I made the first hundred frames at 600mm. Then I decided to add the 1.4X TC to the mix and made an additional 700 images of the action. I kept only 13. As is usually the case, a single image from about 800 frames stood out as the cream of the crop.
So why not add the 1.4X teleconverter?
#1: By being too greedy, I clipped the tail of the adult skimmer on about 50 frames. Those included a few really good ones. The position of the chick and the head angles of the chick and the adult were important factors when it came to choosing keep or delete.
#2: In the relatively low light, working at f/9 (rather than at f/6.3) necessitated the use of either a higher ISO or a slower shutter speed. By being at 1/640 or 1/800 second rather than at 1/1250 or 1/1600 second, I lost quite a few excellent images to motion blur as the adult bird pecked at the chick or threw it up or down …
In the field when the action is hot, making the right decision — TC or no TC?, is often tough.
|
|
|
Click on the image to view a larger version.
Image #1A: Topaz DeNoise on the Black Skimmer killing chick from another nest image
|
DeNoise at 400% at ISO 3200
Be sure to click on the image to see the fabulous job of noise reduction on Low Light. Understand that exposing properly for the whites leaves the blacks well under-exposed. Here, I cut the suggested Remove Noise value from 10 on Auto in half to 5. If you think that the blacks are detail-less after the NR, understand that what you are seeing in before image is noise, not detail. Blacks in soft light will never have a ton of detail at the higher ISOs.
As regular readers know, I run DeNoise on virtually every image that I process immediately after executing the crop with the Delete Cropped Pixels box checked. For images made in sunny conditions, I used Standard. For images made in low light, like this one, I use Low Light. You can check all four methods by using the Comparison View but I rarely do that any more as I am confident as noted above.
Great Topaz News!
Folks who use the BAA Topaz link to purchase Sharpen AI, DeNoise AI, or the Utility Bundle (or any other Topaz plug-ins), will receive a 15% discount by entering the ARTHUR15 code at checkout. If the stuff is on sale (as it usually is), you save 15% off of the sale price! To get the discount you must use my link and you must enter the discount code. Be sure to start with this link.
Those who purchase Sharpen AI, DeNoise AI, or any other Topaz plug-ins using my link and then entering the ARTHUR15 code at checkout can e-mail to request a short Getting Started with Topaz e-Guide. Please include a copy of your Topaz receipt that shows the discount. Aside from the basics, the guide explains how to install the plug-ins so that they appear in the Photoshop Filter Menu.
|
|
|
Click on the image to view a larger version.
Image #1b: The RawDigger screen capture for the Black Skimmer killing chick from another nest image
|
Ho-Hum, Another Perfect Plus Exposure
Nothing has ever helped me learn to create perfect exposures to the degree that RawDigger has. I think that many folks are reluctant to learn that most of their images are underexposed by one or more full stops and that highlight warnings in Photoshop, Lightroom, Capture One, and your in-camera histogram are completely bogus as they are based on the embedded JPEGs. Only your raw files tell the truth all the time. Heck, I resisted RawDigger for several years … Once you get over that feeling, RawDigger can become your very best exposure friend no matter what system you are using. On the recent IPTs and In-the-Field sessions, we have demonstrated that fact. Convincingly.
The RawDigger (pink) Adapted Histogram
In the RawDigger e-Guide, you will learn exactly how to set up the Adapted “pink” RawDigger Histogram and how to use it to quickly and easily evaluate the exposure or raw file brightness of images from all digital cameras currently in use. RawDigger was especially helpful to me when I struggled with R5 exposures and when learned my new camera body, the Sony Alpha a1.
|
|
RawDigger e-Guide with Two Videos
|
The RawDigger e-Guide with Two Videos
by Arthur Morris with Patrick Sparkman
The RawDigger e-Guide was created only for serious photographers who wish to get the absolute most out of their raw files.
Patrick and I began work on the guide in July 2020. At first we struggled. We asked questions. We learned about Max-G values. We could not figure out why the Max G values varied by camera system. IPT veteran Bart Deamer asked lots of questions that we could not answer. We got help from RawDigger creator Iliah Borg. We learned. In December, Patrick came up with an Adapted Histogram that allows us to evaluate the exposures and raw file brightness for all images created with all digital camera bodies from the last two decades. What we learned each time prompted three complete beginning to end re-writes.
The point of the guide is to teach you to truly expose to the mega-Expose-to-the-Right so that you will minimize noise, maximize image quality, best utilize your camera’s dynamic range, and attain the highest possible level of shadow detail in your RAW files in every situation. In addition, your properly exposed RAW files will contain more tonal information and feature the smoothest possible transitions between tones. And your optimized images will feature rich, accurate color.
We teach you why the GREEN channel is almost always the first to over-expose. We save you money by advising you which version of RawDigger you need. We teach you how to interpret the Max G values for your Canon, Nikon, and SONY camera bodies. It is very likely that the Shock-your-World section will shock you. And lastly — thanks to the technical and practical brilliance of Patrick Sparkman — we teach you a simple way to quickly and easily evaluate your exposures and raw file brightness using an Adapted RawDigger histogram.
The flower video takes you through a session where artie edits a folder of images in Capture One while checking the exposures and Max-G values in RawDigger. The Adapted Histogram video examines a series of recent images with the pink histograms and covers lots of fine points including and especially how to deal with specular highlights. The directions for setting up the Adapted Histogram are in the text.
If we priced this guide based on how much effort we put into it, it would sell it for $999.00. But as this guide will be purchased only by a limited number of serious photographers, we have priced it at $51.00. You can order yours here in the BAA Online Store.
Beach Clean-up
Here are some clean-up tips based on today’s featured image. I used the Patch Tool for nearly every step in the process. I did not use Content-Aware or the Clone Stamp Tool once. For the tiny specks, I used the Spot Healing Brush.
Do you think that I should have left some of the beach crud?
|
|
The BIRDS AS ART Current Workflow e-Guide (Digital Basics II).
You can order your copy from the BAA Online Store here, by sending a PayPal for $40 here, or by calling Jim or Jennifer weekdays at 863-692-0906 with your credit card in hand. Be sure to specify Digital Basics II.
|
The BIRDS AS ART Current Workflow e-Guide (Digital Basics II)
The Photoshop Tools used with all of my clean-up techniques along with dozens of other great Photoshop tips and techniques — along with all of my personalized Keyboard Shortcuts, are covered in detail in the BIRDS AS ART Current Workflow e-Guide (Digital Basics II), an instructional PDF that is sent via e-mail. Learn more and check out the free excerpt in the blog post here. While the new e-Guide reflects my MacBook Pro/Photo Mechanic/DPP 4/Photoshop workflow, folks using a PC and/or BreezeBrowser will also benefit greatly by studying the material on DB II. Note: folks working on a PC and/or those who do not want to miss anything Photoshop may wish to purchase the original Digital Basics along with DB II while saving $15 by clicking here to buy the DB Bundle.
Folks who learn well by following along rather than by reading can check out the complete collection of MP 4 Photoshop Tutorial Videos by clicking here. Note: all of the videos are now priced at an amazingly low $5.00 each.
You can learn how and why I converted all of my Canon digital RAW files in DPP 4 in the DPP 4 RAW Conversion Guide here. More recently, I became proficient at converting my Nikon RAW (NEF) files in Adobe Camera Raw. About two years ago I began converting my Nikon and Sony RAW files in Capture One Pro 12 and continue to do so today.
You can learn advanced Quick Masking and advanced Layer Masking techniques in APTATS I & II. You can save $15 by purchasing the pair.
Typos
With all blog posts, feel free to e-mail or to leave a comment regarding any typos or errors.
August 3rd, 2021 What’s Up?
Well, I finally got out to photograph on Monday afternoon. In spades! I left Ronkonkoma at 2:30pm and made it to JBWR in an hour with little traffic. I made my way to the northwest end of the East Pond to find very muddy conditions. I almost went down/got stuck in the dangerously soft muck, but survived. Heading south along the shoreline was out of the question. I had picked up an 18-inch square sort of mat on the way in, so I placed that on the mud, sat down, and waited at 1200mm. Over the course of the next hour, I had both yellowlegs fly in and land in front of me. Woo-hoo! Photos and details here soon.
When I was done, I headed south on Cross Bay Boulevard and knocked on Cristy Macrae’s door. This time she answered. At first she did not recognize me, but with recognition came a huge smile and a warm hug. (I was 30 pounds lighter than the last time I had seen her, and in addition, had shaved my head.) I learned the Denis had died only very recently (after a long illness). Their oldest son John-John was there. When I had last seen him he was about ten. He is now 39. It was great seeing them again!
Anyhoo, I drove through the Rockaways and got to Nickerson Beach at 6:10pm. I headed out with “only” an a1 on the 200-600. There were lots of photographers, lots of nesting Black Skimmers, lots of flight action with the skimmers and the Common Terns, and lots of chicks (of several types, including skimmers and humans; the latter, however, were all middle-aged). The highlight occurred when an adult skimmer grabbed a tiny chick and tossed it around for ten minutes. Right out in the open. Finally, it brought the dead-for-sure chick to its two, only slightly larger chicks, one of which attempted unsuccessfully to swallow it. Ten minutes later, an adult Laughing Gull swooped down out of nowhere, and grabbed the dead chick. Waste not, want not. (This proverbial saying was first recorded in 1772 but had an earlier, even more alliterative version: willful waste makes woeful want — 1576).
I was glad to learn yesterday of the sale of Wally Barkley’s near-mint Sony a9 II for a BAA record-low $2494.00 (was $2694.00). Not coincidentally, both of today’s featured images were created with an a9 ii; Scroll down for details on an amazing used a9 ii value.
Today is Tuesday 3 August. I will be downloading and editing the images from yesterday’s very busy afternoon. Wherever you are, and whatever you are doing, I hope that you too have a great day.
Remember that you can find some great photo accessories (and necessities!) on Amazon by clicking on the Stuff tab on the orange/yellow menu bar above. On a related note, it would be extremely helpful if blog-folks like me, who spend too much money on Amazon, would get in the habit of clicking on the Amazon logo link on the right side of each blog post when they shop online. As you might expect, doing so will not cost you a single penny, but would be appreciated tremendously by yours truly. And doing so works seamlessly with your Amazon Prime account.
This blog post took about 90 minutes to prepare, and makes 218 consecutive days with a new one. Please remember that if an item — a Delkin flash card, or a tripod head — for example, that is available from B&H and/or Bedfords, and is also available in the BAA Online Store, it would be great, and greatly appreciated if you would opt to purchase from us. We will match any price. Please remember also to use my B&H affiliate links or to save 3% at Bedfords by using the BIRDSASART discount code at checkout. Doing either often earns you free guides and/or discounts. And doing so always earns my great appreciation.
Please Remember
With income from IPTs now close to zero, please, if you enjoy and learn from the blog, remember to use one of my two affiliate programs when purchasing new gear. Doing so just might make it possible for me to avoid having to try to get a job as a Walmart greeter and will not cost you a single penny more. And if you use Bedfords and remember to enter the BIRDSASART code at checkout, you will save 3% on every order and enjoy free second-day air shipping. In these crazy times — I am out at least forty to sixty thousand dollars so far due to COVID 19 (with lots more to come) — remembering to use my B&H link or to shop at Bedfords will help me out a ton and be greatly appreciated. Overseas folks who cannot order from the US because of import fees, duties, and taxes, are invited to help out by clicking here to leave a blog thank you gift if they see fit.
New and Better Bedfords Discount Policy!
You can now save 3% on all of your Bedfords photo gear purchases by entering the BIRDSASART coupon code at checkout. Your discount will be applied to your pre-tax total. In addition, by using the code you will get 2nd day air shipping via Fed Ex.
Grab a Nikon AF-S Teleconverter TC-14E III and save $14.99. Purchase a Canon EOS R5 and your discount will be $116.97. Purchase a Sony FE 600mm f/4 GM OSS lens and save a remarkable $389.94! Your Bedford’s purchase no longer needs to be greater than $1,000.00 for you to receive a discount. The more you spend, the more you save.
Money Saving Reminder
Many have learned that if you need a hot photo item that is out of stock at B&H and would enjoy free second-day air shipping, your best bet is to click here, place an order with Bedfords, and enter the coupon code BIRDSASART at checkout. If an item is out of stock, contact Steve Elkins via e-mail or on his cell phone at (479) 381-2592 (Central time). Be sure to mention the BIRDSASART coupon code and use it for your online order to save 3% and enjoy free 2nd-day air shipping. Steve has been great at getting folks the hot items that are out of stock at B&H and everywhere else. The wait lists at the big stores can be a year or longer for the hard to get items. Steve will surely get you your gear long before that. For the past year, he has been helping BAA Blog folks get their hands on items like the SONY a9 ii, the SONY 200-600 G OSS lens, the Canon EOS R5, the Canon RF 100-500mm lens, and the Nikon 500mm PF. Steve is personable, helpful, and eager to please.
Gear Questions and Advice
Too many folks attending BAA IPTs (remember those?) and dozens of photographers whom I see in the field and on BPN, are–out of ignorance–using the wrong gear, especially when it comes to tripods and more especially, tripod heads… Please know that I am always glad to answer your gear questions via e-mail.
|
|
|
This image was created at Kachemak Bay, AK on 22 FEB 2020. I used the hand held Sony FE 70-200mm f/2.8 GM OSS lens (at 101mm) with the blazingly fast AF King, the Sony Alpha a9 II Mirrorless Digital camera body) that features incredibly accurate AF. ISO 1600. Exposure determined via Zebras on the rear wheel: 1/2500 sec. at f/3.2. AWB at 3:30pm on a cloudy day.
Center Zone AF-C (Continuous) did just fine. See the screen capture below. Be sure to click on the image above to enjoy a spectacular larger version.
Image #1: Bald Eagle in flight in heavy snow
|
I Kid You Not; the 70-200mm f/2.8 for Bald Eagle Flight!
The 70-200 f/2.8s are vital tools when photographing Bald Eagles at Kachemak Bay, AK. And that is true when you were on foot or on the boat. ISO 1600 at f/3.2 tells you that there was not a lot of light. But there surely was a lot of snow that day. Photographing in falling snow is a big challenge. I can’t wait to see how the a1 does at tracking the eagle’s eyes in falling snow. Many AF systems grab the largest snowflake between you and the subject. Time will tell …
Homer Bald Eagles Winter 2022
The photography on this trip of a lifetime is beyond amazing. You can do the whole trip with either the Canon 100-500 or the SONY 200-600 along with any 70-200mm lens. Flight photography until you cannot raise your arms, creative set-ups, lots of snow we hope (earlier in the season is best for that), and lots of opportunities for point-blank head portraits and talon shots. All in a variety of spectacular settings. This is an expensive (but competitively priced) trip. If you are seriously interested in joining me for the world’s best Homer/Kachemak Bay Bald Eagle trip(s) — mid-FEB thru early MARCH 2022, please contact me immediately via e-mail for dates and details. I am looking for a roommate who will be doing all eleven days.
|
|
|
Click on the screen capture to view a larger version.
Image #1A: AF Points for the Bald Eagle in flight in heavy snow image
|
An Image Design Note
Note that I opted to place the eagle toward the top of the frame by cropping from the left and above to maximize the size of the darker area at the bottom of the frame. Sharp a9 ii files handle decent crops quite well.
SONY a9 ii AF
Don’t forget that before the a1, the a9 ii had the world’s best AF system for photographing birds in flight. With the a1 selling new for $6499.00, a used a9 ii is an attractive bargain.
SONY a9 II Mirrorless Digital Camera Body
Price Too Low to Publish!
BAA-friend and too-many-to-count IPT veteran Anita North is offering a Sony a9 II in excellent condition for a BAA record-low price that is too low to publish. The sale includes the original box, the front lens cap, the charger but no battery (it died), and insured ground shipping to Canadian addresses only. For price and details, please contact artie via e-mail. The camera is in my possession. Additional discount for Florida pick-up/cash payment.
As things worked out, the a9, and then the a9 ii, turned out to be life-changers for me. From the moment I tracked that first incoming Brandt’s Cormorant at LaJolla, I knew that at that time, the SONY a9 series bodies featured the world’ best AF. I upgraded to the a9 ii as soon as it was released for the slightly larger body size. At one point I owned two a9 ii bodies. A new a9 ii sells for $4,498.00 so you can save a ton of money by grabbing Anita’s a9 ii ASAP. Not to mention that the new Sony A1 sells for $6498.00 … artie
|
|
|
This image was created at Kachemak Bay, AK on 25 FEB 2020. I used the hand held Sony FE 70-200mm f/2.8 GM OSS lens (at 200mm) with the blazingly fast AF King, the Sony Alpha a9 II Mirrorless Digital camera body) that features incredibly accurate AF. ISO 500. Exposure determined via Zebras on the rear wheel: 1/3200 sec. at f/3.2. AWB at 9:20am on a cloudy-bright day.
Wide Continuous (C) AF performed beautifully. Click on the image to see a larger version. Uncropped.
Image #2: Bald Eagle braking to land
|
Pre-visualizing
Note that fairly fresh snow makes a great reflector; here, it lit up the underwings of this adult Bald Eagle beautifully. Another reason that I love this image is that I described it in detail to the group before I made the image. The soft light, the delicate beach grasses, and the lead-blue sky along with the strip of snow, combined to create a very powerful (pre-visualized) image.
|
|
|
154 sold to rave reviews.
The SONY e-Guide by Patrick Sparkman and Arthur Morris
|
The Sony Camera User’s e-Guide (and Videos)
Click here to purchase the guide with one Camera Set-up Video. Be sure to e-mail us by clicking here to specify your camera body so that we can send you a link for the correct video.
Click here to purchase the guide with two Camera Set-up Videos. Be sure to e-mail us by clicking here to specify your two camera bodies so that we can send you links for the correct videos.
Click here to learn more about the SONY e-Guide.
In this guide, we explain virtually every pre-a1 SONY menu item that might be useful in bird, nature, or wildlife photography in detail. And then we explain your options and state clearly which setting we use in different situations and why we go that route. This invaluable advice is based on many hundreds of hours in the field photographing birds and other natural history subjects.
In short, the SONY e-Guide is incredible. While I am proud of all the previously published Camera User’s Guides, my feelings about the SONY guide go far beyond that. The stuff on using Zebras with ISO on the Rear Wheel to get the right exposure every time is all Patrick Sparkman. Without his technical brilliance, this guide would not be nearly as valuable as it is. And like my good friend Dr. Cliff Oliver, Patrick is a superb researcher — if he does not know something, he will find it online very quickly, check it out, and draw his own conclusions. Not only are the SONY menus complex, but they offer a zillion options, many of which are hidden in sub-menus and Custom Settings. Patrick figured many of those out, I discovered a few, and blog regular Craig Elson came up with some incredibly helpful little menu tricks, tricks that solved some thorny problems. Thanks also to the eagle-eyed Dane Johnson who spotted a zillion typos and type-setting errors.
The longer and harder we worked on the guide, the more I wanted to price it at $200.00. But I did not want anyone to faint. The cost of the SONY Guide is $100.00. Your purchase includes the e-Guide itself and one of the four camera-specific videos. Extra camera videos cost $25.00 each. In each video, Patrick and I take you through all the relevant menu items. We urge you to follow along with your camera in hand. Here is short and timely excerpt from the guide:
Before You Begin
With the a7r iv, the a9, and the a9 ii, the last page of My Menu allows you to turn Display From My Menu on and off as needed. It is best to keep this On so that whenever you hit the Menu button on the camera, the last-viewed My Menu page will display. When you are setting up a new camera or working on your settings while following along with this guide, you should turn Display From My Menu to Off so that you do not have to scroll through endless menu items to find what you are looking for. With My Menu Off, hitting the Menu button will return you to the last viewed Menu screen.
Once you have read this far, we urge that you watch the video for your SONY body with the camera in hand while following all the instructions before consulting the remainder of this guide.
The e-Guide itself is 103 pages. It contains 11 sections:
The Introduction — This section contains a bit of the back-story on how the guide came to be.
Important Stuff — This section contains some important stuff. Go figure …
SONY Help Guides — Here you will find active links to the Help Guides for each camera body. Note: the Camera Manuals are pretty much useless.
Points of Emphasis — In this section, we reinforce and expand upon many of the important concepts that are covered in the video.
Additional Info — Here we cover tons of new stuff that we discovered in the 3 1/2 months after we created the four videos.
Clarifications In this section we detail nineteen fine points and sticky situations.
SONY Workflow In this very short section we outline our SONY workflow. No great shock there!
SONY Image Gallery with Educational Captions (77 images.) This collection of stunning images is meant to inspire, educate, and show folks what is possible with SONY gear. There is tons of AF info in the captions. And lots more.
SONY Zebras Coaching Gallery (14 images.) Here we explain exactly what we did with the Zebras to come up with a perfect exposure.
Tracking Flexible Spot Gallery 8 images.) The images here demonstrate the use of SONY’s most valuable AF Area Mode.
Thanks! Here we thank the many folks who helped us to improve the guide.
So What Does the SONY Guide Cover?
Under Points of Emphasis
Note: items without comment are self-explanatory.
Using Zebras to Get the Right Exposure in Manual Mode Patrick’s technique allows you to make perfect or near-perfect exposures quickly and consistently.
Using Zebras to Get the Right Exposure in Manual Mode Illustrated Thanks to an amazingly cooperative crane, this item shows how Zebras are set in an actual shooting situation.
A Final Word on Zebras We explain the fine points of using Zebras in bright sun versus using Zebras in the shade.
Using Zebras to Get the Right Exposure in Shutter (or Aperture) Priority This technique is used by artie at times when creating pleasing blurs.
Mechanical vs Electronic Shutter It is important to know which to use with each camera …
Silent Shooting Silent Shooting is closely linked to Mechanical vs Electronic Shutter.
Slots 1 & 2
Auto Review Really valuable info here.
Focus Areas and Focus Area Limit Along with Zebras, the info here is the meat of the guide.
a7r iv vs. a9 ii Comparing these two great bodies.
My Menu Learning how and what to place on your My Menus helps folks operate their SONY bodies more efficiently.
Additional Info
Enlarge Initial Position Explains how to see the area of sharpest focus in an image; it only works before the images are downloaded.
Telephoto Lens Focus Range Limiter Switch Explains how and why to set this important switch.
Initial Focus Acquisition Problems With Telephoto Lenses The tips here and in DMF below might be worth the price of the entire guide.
Pre-AF The jury is still out on this one but artie likes it.
Direct Manual Focus (DMF)
Camera Direct Manual Focus (DMF)
An Important AF Note for a9 ii Users Learn about a problematic dial on the a9 ii.
Optical Steady Shot (OSS)
Optical Steady Shot (OSS) on Telephoto Lenses
Diopter-adjustment Dial
Firmware Updates
Touch OperationNaming Your Camera Bodies Can save you lots of hassles.
Saving/Loading Settings
Sensor Cleaning
Anti-dust Function New to the a9 ii only.
Reg. Custom Shoot Set
Function Menu Set & the Fn Button Learn to customize the screen that comes up after pushing the Fn button.
More on Face/Eye Priority in AF Super-important if you want to use the fabulous Tracking Flexible Spot (M).
The SONY Histogram Our comments here will likely surprise you.
Display Quality/a7 Series Bodies
Saving Settings to the Mode Dial
Compressed vs. Uncompressed
Image Review with the Control Wheel This was a “duh” moment for artie.
When to Turn Off Zebras. Super-important.
SONY US Repair Advice Also super-important.
Vertical Grip
Under Clarifications
Power Save Start Time
AEL Button
Using SONY with an Adapter
The Eye Sensor (Tiny Window Above the Viewfinder). Valuable stuff here …
The Mysterious Viewfinder Blackout Problem Dealing with SONY’s most annoying problem.
Assigning Finder/Monitor to a Custom Button
Another Possible Finder/Monitor Solution
Return to Center
Bright Monitoring A must for astrophotography.
e-Front Curtain Shutter
Manual Focus Toggle A fabulous tip for macro photographers (often combined with Focus Magnifier below).
The Top Wheels
If You Use Rear Button Focus
Focus Magnifier Fabulous tips for macro photographers (combined with Manual Focus Toggle above).
The Viewfinder Level
Changing the Focus and Drive Modes
AF Illuminator
AF Sensitivity
Focus Peaking
Shutter Priority for Video
Typos
With all blog posts, feel free to e-mail or to leave a comment regarding any typos or errors.
August 2nd, 2021 What’s Up?
With the unusually cool August weather here on Long Island I have been leading the league in relaxing, and sleeping nine to ten hours every night. I have been taking a nice walk and doing my bursts every day, and will be hitting the community pool at my sister Ilene’s home soon.
Today is Monday 2 August 2021. It has been clear and sunny every morning since I arrived on Long Island, with a northwest wind every morning as well. With yet another wind-against-sun morning forecast, I opted to stay in again today. Wherever you are, and whatever you are doing, I hope that you too have a great day.
Remember that you can find some great photo accessories (and necessities!) on Amazon by clicking on the Stuff tab on the orange/yellow menu bar above. On a related note, it would be extremely helpful if blog-folks like me, who spend too much money on Amazon, would get in the habit of clicking on the Amazon logo link on the right side of each blog post when they shop online. As you might expect, doing so will not cost you a single penny, but would be appreciated tremendously by yours truly. And doing so works seamlessly with your Amazon Prime account.
This blog post took about two hours to prepare and makes 217 consecutive days with a new one. Please remember that if an item — a Delkin flash card, or a tripod head — for example, that is available from B&H and/or Bedfords, and is also available in the BAA Online Store, it would be great, and greatly appreciated if you would opt to purchase from us. We will match any price. Please remember also to use my B&H affiliate links or to save 3% at Bedfords by using the BIRDSASART discount code at checkout. Doing either often earns you free guides and/or discounts. And doing so always earns my great appreciation.
Homer Bald Eagles Winter 2022
The photography on this trip of a lifetime is beyond amazing. You can do the whole trip with either the Canon 100-500 or the SONY 200-600 along with any 70-200mm lens. Flight photography until you cannot raise your arms, creative set-ups, lots of snow we hope (earlier in the season is best for that), and lots of opportunities for point-blank head portraits and talon shots. All in a variety of spectacular settings. This is an expensive (but competitively priced) trip. If you are seriously interested in joining me for the world’s best Homer/Kachemak Bay Bald Eagle trip(s) — mid-FEB thru early MARCH 2022, please contact me immediately via e-mail for dates and details. I am looking for a roommate who will be doing all eleven days.
The East Pond
The East Pond at Jamaica Bay Wildlife Refuge, Queens, NY was the place to observe and photograph North America’s southbound migrant shorebirds. It shined from 1975 through about 2010. Then, for reasons noted in the blog post here, the place pretty much went down the tubes due to high water levels. At present, it seems that the folks at Gateway have gotten their act together; conditions at the pond are reported to be excellent this season. I have a strong connection to the East Pond. I photographed my first shorebird — a Semipalmated Sandpiper, there in August of 1983. I’ve been visiting for 45 years and have spent thousands of hours on the pond.
If you would like to learn to identify more than a dozen species of shorebirds and photograph some of them on an In-the-Field Workshop in August, please shoot me an e-mail to learn the dates and details. The East Pond is best for photography for just three specific days in a calendar year … I will be there then. Here’s hoping that the East Pond will return to its former crown-jewel glory.
Selling Your Used Photo Gear Through BIRDS AS ART
Selling your used (or like-new) photo gear through the BAA Blog is a great idea. We charge only a 5% commission. One of the more popular used gear for sale sites charged a minimum of 20%. Plus assorted fees! Yikes. They went out of business. And e-Bay fees are now up to 13%. The minimum item price here is $500 (or less for a $25 fee). If you are interested please scroll down here or shoot us an e-mail with the words Items for Sale Info Request cut and pasted into the Subject line :). Stuff that is priced fairly — I offer pricing advice to those who agree to the terms — usually sells in no time flat. Over the past year, we have sold many dozens of items. Do know that prices on some items like the EOS-1D Mark IV, the old Canon 100-400, the old 500mm, the EOS-7D and 7D Mark II and the original 400mm DO lens have been dropping steadily. Most recently the price of used Canon 600mm f/L IS II lenses have been dropping like a rock with the introduction of the 600 III. You can always see the current listings by clicking here or on the Used Photo Gear tab on the orange-yellow menu bar near the top of each blog post page.
As used gear sales have slowed just a bit in recent months — especially with dSLR bodies, there are lots of great buys right now both below and on the Used Gear Page.
Canon EF 500m f/4L IS II USM Lens with lots of great extras!
Long-time-ago South Georgia shipmate Asta Tobiassen is offering a Canon EF 500m f/4 L IS II USM lens in excellent condition for a very low $4999.00. The sale includes both of the original shipping box, both of the original lens feet, the lens strap, the rear lens cap, the lens hood, the lens trunk, a LensCoat, a LensCoat TravelCoat, a LensCoat Hoodie, a LensCoat RainCoat Pro w/pouch, and insured ground shipping via major courier to lower-48 US addresses only. Your item will not ship until your check clears unless other arrangements are made.
Please contact Asta via e-mail
With the success of the Canon EOS R5 and R6 mirrorless bodies, the series II super-teles are in high demand. The 500 f/4 super-telephotos have long been the world’s most popular lenses for birds, nature, wildlife, and sports for many decades. Canon’s Series II version is light, fast, super-sharp, and produces amazing images with both the 1.4X and 2X III TCs. The 500 II is relatively small, easily hand-holdable for some folks, and is much easier to travel with, focuses closer than, and costs a lot less than the 600 II!. Lastly, and you might find this amazing, the magnification for the 500 II is the same as it is for the 600 II: .15X. How is that possible? Magnification is calculated at the minimum focusing distance of the lens — 12.14 feet (3.7 meters) for the 500 II and 14.77 feet (4.5 meters) for the 600 II. Simply put, the 500 II focuses more than two feet closer than the 600 II. This lens sells new right now for $8999.00; you can save $4000.00 by purchasing Asta’s lens (with lots of extras) now: if you are seriously interested, please do not tarry. artie
Canon EF 100-400m f/4.5-5.6L IS II USM Zoom Lens
Long-time-ago South Georgia shipmate Asta Tobiassen is offering a Canon EF 100-400m f/4.5-5.6L IS II USM zoom lens in excellent condition for $1399.00. The sale includes the original box, the carrying case, the front and rear lens caps, the lens hood, a LensCoat, a LensCoat TravelCoat, a LensCoat Hoodie, and insured ground shipping via major courier to lower-48 US addresses only. Your item will not ship until your check clears unless other arrangements are made.
Please contact Asta via e-mail
This incredibly versatile zoom lens — with its amazing .98 meter close focus — was my favorite Canon telephoto zoom lens ever. By far. It is easy to hand hold, great for tight portraits, birds in flight, quasi-macro stuff, and lots more. For flight, it is even better with an R5! The lens sells new for $2399.00 so you can save some hard cash by grabbing Asta’s zoom lens now. artie
Canon EOS 5D Mark IV w/BG-E20 Battery Grip
Long-time-ago South Georgia shipmate Asta Tobiassen is offering a Canon EOS 5D Mark IV with the BG-E20 Battery Grip, both in like-new condition, for just $1749.00. The sale includes the original box and everything that came in it, the battery grip (a $299.95 value), one extra battery, and insured ground shipping via major courier to lower-48 US addresses only. Your item will not ship until your check clears unless other arrangements are made.
Please contact Asta via e-mail
What can I say? The 5D IV was my favorite ever Canon digital dSLR. I owned and used three of them while my 1DX II sat on the shelf in my garage for the most part. A new 5D Mark IV, with its 30.4MP full-frame CMOS sensor, sell new for $2499.00. If you have been dreaming of a 5D IV (with the grip), grab Asta’s body right now with the grip and save just about $1,000.00! artie
Canon EOS 7D Mark II w/BG-E16 Battery Grip & L-Plate
Long-time-ago South Georgia shipmate Asta Tobiassen is offering a Canon EOS 7D Mark II in Very Good to Excellent condition with a like-new BG-E16 Battery Grip for $599.00. The sale includes the original box, the front cap, the strap, a RRS L-Plate, one extra battery, the charger, the BG-16 battery grip, and insured ground shipping via major courier to lower-48 US addresses only. Your item will not ship until your check clears unless other arrangements are made.
Please contact Asta via e-mail
Years ago, both Patrick Sparkman and I used and loved the 7D Mark II until we both committed to using full-frame Canon bodies. And we both made some truly great images with it. Two of my three 2016 Nature’s Best honored entries were created with the 7D II, one still, and one video. One thing is for sure: the 7D Mark II is the greatest value ever dSLR. artie
Canon EF 100mm f/2.8 USM Macro Lens with the Canon Tripod Mount Ring B with extras
Long-time-ago South Georgia shipmate Asta Tobiassen is offering a Canon EF 100mm f/2.8 USM Macro Lens with the Canon Tripod Mount Ring B (a $149.95 value) in near-mint condition for the very low price of $299.00. The sale includes the front and rear lens caps, the lens hood, the Canon Tripod Mount Ring B, a B+W circular polarizer, a B+W UV haze filter, and insured ground shipping via major courier to lower-48 US addresses only. Your item will not ship until your check clears unless other arrangements are made.
Please contact Asta via e-mail
This, the original non-IS version of this hugely popular, very sharp macro lens, was Denise Ippolito’s favorite for many years. It is great for flowers and bugs large and small. The tripod collar for this lens normally requires a separate purchase, but is included with this sale. Still in production, this lens sells new at B&H for $599.00 (though it is currently back-ordered). The IS L version II sells for $1299.00. artie
Canon EF 1.4X II Teleconverter
Long-time-ago South Georgia shipmate Asta Tobiassen is offering a Canon EF 1.4X II teleconverter for a very low $129.00. The sale includes the front and rear caps, the pouch, and insured ground shipping via major courier to lower-48 US addresses only. Your item will not ship until your check clears unless other arrangements are made.
Please contact Asta via e-mail
As regular readers know, I depended so much on TCs when I shot Canon that I always traveled with two spare 1.4X-s and one spare 2X TC. The Series II TCs perform perfectly with Series II or earlier lenses. he Series III TCs are better for series III lenses like the 600mm f4L IS III lens. artie
Canon EF 2X III Teleconverter
Long-time-ago South Georgia shipmate Asta Tobiassen is offering a Canon EF 2X III teleconverter for a very low $429.00. The sale includes the front and rear caps, the pouch, and insured ground shipping via major courier to lower-48 US addresses only. Your item will not ship until your check clears unless other arrangements are made.
Please contact Asta via e-mail
As regular readers know, I depended so much on TCs when I shot Canon that I always traveled with two spare 1.4X-s and one spare 2X TC. The Series III TCs perform well with all Canon EF lenses. This item sells new for $429.99. artie
|
|
|
This image was created on 16 July on the 2nd JAX IPT. I used the hand held Sony FE 200-600mm f/5.6-6.3 G OSS lens (at 452mm) and The One, the Sony Alpha 1 Mirrorless digital camera. ISO 500. Exposure determined via Zebras with ISO on the rear dial: 1/4000 sec. at f/7.1 (stopped down 1/3-stop) in Manual mode. RawDigger showed that this was a perfect exposure. AWB at 6:12pm on a sunny afternoon
Wide/AF-C Bird/Eye Detection AF was active at the moment exposure and performed well enough in a difficult situation by creating a sharp-on-the-eye image.
Image #1: Royal Tern blacklit against the shadowed face of the tall dune
|
Discovering New Situations
One of the constant themes here on the blog is that when the wind is blowing hard right at the sun on clear days, bird photography will be very challenging at best. Unless you like butt shots. Decades ago Max and Nellie Larsen taught me that when you are birding, you should always look behind you. Not to see what’s gaining on you, just to see what is there. So I have long made it a habit of glancing behind me, especially when things are tough. With the sun at our backs, the wind direction was not quite right for banking flight shots. When I took a quick glance behind me, looking to the west, I saw a Royal Tern fly in to join a scattered group of adults on the beach. When it landed, it was in the sun, but as it approached and flared to land, it was briefly in the shadow of the tall dune; its white feathers were lit strikingly from behind. So, I walked up next to the colony rope, and photographed the bird flaring to land in Image #1. I call this a “blacklit situation; a brilliant bird set against a shadowed background. Birds with white feathers generally work quite well. See the Blacklit Map below.
Anyhoo, I checked the very few frames that I had made, including Image #1, and knew that I had struck gold. I called the rest of the group over to join me, explained what we were looking for, and talked about the difficult exposure. In fact, however, SONY’s Zebra technology made getting these perfect child’s play. The end result: everyone got some very nice images.
Learning to discover and see new and different situations is one of the huge advantages of joining an IPT or an In-the-Field Workshop. I take great satisfaction from discovering the best situations and sharing them with others.
|
|
|
This image was created on 16 July on the 2nd JAX IPT by Clemens Van der Werf. He used the hand held Canon 600mm f/4L IS II lens (that he has since replaced by the Canon EF 600mm f/4L IS III USM lens) and the highly vaunted Canon EOS R5 Mirrorless Digital Camera Body. ISO 500: 1/4000 sec. at f/7.1 (stopped down 1 2/3-stops) in Manual mode. AWB at 6:26pm on a sunny afternoon..
Face Detection + Tracking/AF-C was active at the moment of exposure and performed perfectly. Click on the image to see a larger version.
Image #2: Royal Tern blacklit against the shadowed face of the tall dune
Image Courtesy of and copyright 2021: Clemens Van der Werf
|
Listen to the Leader!
I am often amazed that at times, when I call out a fabulous, newly-discovered situation, some folks hesitate to join me. Here two members of the group came over, listened carefully as I explained what we were looking to do, went to work, and made some great images. As Clemens had not yet received his 600 III or an RF 100-500 (both are still hard to come by), he went with the hand held 600 II. As you can see above, he did quite well. I love the light coming through the tern’s orange bill in his image.
|
|
Image #3: Blacklit Situation Map
|
Blacklit Situation Map
The red ball is the sun in the western sky. We stood as close as possible to the colony rope to have the birds coming at us as much as possible. As dark backgrounds are a necessity when attempting blacklit shots, we ignored the birds that flew in too high with sky backgrounds. The trick was to anticipate which birds would fly against the shadowed dune while still backlit by the sun. Birds that flew in while completely in the shadow of the dune were not dramatically lit, and thus, were miles under-exposed.
Both Clemens and I used Viveza as the final step in our post-processing. It is superb at darkening the dark tones and brightening the WHITEs to taste. Thanks to Clemens both for letting me share his image with you here today and for his continued Viveza tutoring. I am just about ready to do a Viveza video.
|
|
|
Cover Image courtesy of and Copyright 2021 Brian Sump (Sump scores!)
|
The BIRDS AS ART Canon EOS R5 Camera User’s e-Guide: $75.00
The guide is 82 pages long: 21,458 words. More than 50 DPP 4 Autofocus-depicting screen captures. And a 31 minute 44 second educational video. This guide took three and a half months of hard work and a ton of help from at least seventeen very helpful and generous folks.
The guide covers — in great detail — all Menu Items that are relevant to bird, nature, and wildlife photography. It does not cover video. The section on AF methods and the AF Gallery has been expanded from the R5/R6 AF e-guide. It remains the one of the great strengths of this guide. I share my thoughts on what I am sure is the single best AF Method for photographing birds in flight. As most of you know, the guide includes a simple and easy way to change AF Methods that was introduced to me by Geoff Newhouse. In the AF Gallery you will see exactly how Face Detection plus Tracking AF works. In the Educational R5 Gallery video, I share my favorite R5 images along with dozens of bird photography tips and techniques.
In addition, I teach you how to get the best exposures with your R5. Detailed instructions on using the great In-camera HDR and Multiple Exposure features will be appreciated by creative folks who like to have fun. The three shutter modes are explained in detail as well. Bruce Dudek solved the can’t-get-to-Auto ISO problem that had stumped everyone at Canon. This information is of course shared in the guide. You will learn how to set up your EVF (Electronic Viewfinder) and Screen toggle options. Not to mention that the mysterious performance of the Q Button is revealed and simplified. Brian Sump’s images reveal how well you can do when using the R5 with EF lenses using one of the three Canon EF-EOS R Mount Adapters (as Donna did with Image #1 below). You will learn how I use Customize Dials to put either ISO or EC on the Thumb Dial and how to set up and save Custom Shooting Modes (C1-C3) that can remember both your Customize Dial and Customize Button settings! That is something that none of the SONY bodies do. 🙁 Near the end of the guide I share my all-important MY MENU items with you.
Like all BAA educational materials, the R5 guide is written in my informal, easy-to-follow style. I am quite proud of this guide and look forward to hearing your thoughts on our hard work.
You can purchase your copy of the BIRDS AS ART Canon EOS R5 Camera User’s e-Guide for $75.00 here in the BAA Online Store or by calling Jim in the office weekday afternoons at 863-692-0906 with your credit card in hand.
Typos
With all blog posts, feel free to e-mail or to leave a comment regarding any typos or errors.
August 1st, 2021 Telling the Story
Which of today’s three featured images best tells the story on its own? Please leave a comment and let us know why you made your choice.
What’s Up?
On Saturday 31 July (can you believe it?), younger daughter Alissa, her husband, Ajiniyaz, and I drove up to the Anderson Center for Autism in Hyde Park, NY, to visit my 15-year old grandson, Ilyas. It had been a long time, so it was good to see him. We had lunch together and took a nice walk in the woods. We spent more than six hours in the car, but traffic on the way home was not as bad as had been expected. Ilyas’ brother Idris, is away at camp, and will be home mid-month.
Today is Sunday 1 August 2021. I have not headed out to photograph on Long Island yet and it is supposed to rain this afternoon. I will get out soon, I hope. Wherever you are, and whatever you are doing, I hope that you too have a great day.
Remember that you can find some great photo accessories (and necessities!) on Amazon by clicking on the Stuff tab on the orange/yellow menu bar above. On a related note, it would be extremely helpful if blog-folks like me, who spend too much money on Amazon, would get in the habit of clicking on the Amazon logo link on the right side of each blog post. As you might expect, doing so will not cost you a single penny, but would be appreciated tremendously by yours truly. And it works seamlessly with your Amazon Prime account.
This blog post took more than two hours to prepare and makes 216 consecutive days with a new one. Please remember that if an item — a Delkin flash card, or a tripod head — for example, that is available from B&H and/or Bedfords, and is also available in the BAA Online Store, it would be great, and greatly appreciated if you would opt to purchase from us. We will match any price. Please remember also to use my B&H affiliate links or to save 3% at Bedfords by using the BIRDSASART discount code at checkout. Doing either often earns you free guides and/or discounts. And doing so always earns my great appreciation.
Homer Bald Eagles Winter 2022
The photography on this trip of a lifetime is beyond amazing. You can do the whole trip with either the Canon 100-500 or the SONY 200-600 along with any 70-200mm lens. Flight photography until you cannot raise your arms, creative set-ups, lots of snow we hope (earlier in the season is best for that), and lots of opportunities for point-blank head portraits and talon shots. All in a variety of spectacular settings. This is an expensive (but competitively priced) trip. If you are seriously interested in joining me for the world’s best Homer/Kachemak Bay Bald Eagle trip(s) — mid-FEB thru early MARCH 2022, please contact me immediately via e-mail for dates and details. I am looking for a roommate who will be doing all eleven days.
The East Pond
The East Pond at Jamaica Bay Wildlife Refuge, Queens, NY was the place to observe and photograph North America’s southbound migrant shorebirds. It shined from 1975 through about 2010. Then, for reasons noted in the blog post here, the place pretty much went down the tubes due to high water levels. At present, it seems that the folks at Gateway have gotten their act together; conditions at the pond are reported to be excellent this season. I have a strong connection to the East Pond. I photographed my first shorebird — a Semipalmated Sandpiper, there in August of 1983. I’ve been visiting for 45 years and have spent thousands of hours on the pond.
If you would like to learn to identify more than a dozen species of shorebirds and photograph some of them on an In-the-Field Workshop in August, please shoot me an e-mail to learn the dates and details. The East Pond is best for photography for just three specific days in a calendar year … I will be there then. Here’s hoping that the East Pond will return to its former crown-jewel glory.
|
|
|
This image was created on 30 June on the JAX IPT. I used the hand held Sony FE 200-600mm f/5.6-6.3 G OSS lens (at 600mm) and The One, the Sony Alpha 1 Mirrorless digital camera. ISO 1600. Exposure determined via Zebras with ISO on the rear dial: 1/1000 sec. at f/7.1 (stopped down 1/3-stop) in Manual mode. RawDigger showed that the raw file brightness to be dead-solid perfect. AWB at 5:54pm on a cloudy afternoon.
Unable to detect the Herring Gull’s eye, Wide/AF-C reverted to a zone-like AF and painted the large gull’s face and upper breast with dancing aF points. The raw file was sharp where it needed to be sharp.
Image #1: Herring Gull attacking large Laughing Gull chick
|
Never Settle …
The entire group was on the beach in front of the tall dunes and behind the colony ropes when we spotted a very worn, first-summer Herring Gull attacking a large but unfledged Laughing Gull chick to our left. Relying on instinct, I knew that we needed to get the east wind behind us, so I called to the group to move well to our left. Knowing that such attacks usually last only a few seconds, everyone stayed put and would up with butt shots only and not a single useable image …
My philosophy is to always go for the best image, even at the risk of completely missing out on the action. In this situation, I was able to create only three frames of the attack and wound up with today’s featured Image #1.
Right after I created my very short burst, the large gull dropped its prey. The chick lay motionless in a small depression in the sand. Everyone, including me, assumed that the young Laughing Gull was dead. I was puzzled as to why the gull did not at least attempt to swallow its victim whole.
On Getting Lower …
Had I been been sitting on the ground rather than standing, how would Image #1 have been improved?
|
|
|
This image was also created on 30 June on the JAX IPT. For this image, I sat on the sand and employed the knee-pod technique with the hand held Sony FE 200-600mm f/5.6-6.3 G OSS lens (at 600mm) and The One, the Sony Alpha 1 Mirrorless digital camera. ISO 2000. Exposure determined via Zebras with ISO on the rear dial: 1/1000 sec. at f/7.1 (stopped down 1/3-stop) in Manual mode. RawDigger showed that the raw file brightness to be dead-solid perfect. AWB at 5:56pm on a cloudy afternoon.
Tracking: Flexible Spot/AF-C with Bird-Eye Detection performed well. With the bird’s eye pretty much shut, the AF point grabbed the cheek just below and right on the same plane as the bird’s eye.
Image #2: Large Laughing Gull chick after attack by Herring Gull
|
The “Dead” Laughing Gull Chick
This time, when I suggested that the rest of the group join me to photograph the “dead” Laughing Gull chick, everyone did. We were all stunned when the well-beaten-up bird raised its head just two minutes after it had been left for dead by the Herring Gull. It seemed as shocked as we were when it realized that it was alive. Note the blood on the chick’s head where it had been battered by the larger gull.
|
|
|
This image was also created on 30 June on the JAX IPT. Sitting on the beach using the knee-pod technique, I used the hand held Sony FE 600mm f/4 GM OSS lens and The One, the Sony Alpha 1 Mirrorless digital camera. ISO 500. Exposure determined via Zebras with ISO on the rear dial: 1/800 sec. at f/4 (wide open). RawDigger showed that the raw file brightness to be perfect.AWB at 6:04pm on a cloudy afternoon.
Tracking Flexible Spot/AF-C with Bird-Eye Detection performed perfectly
Image #3: The Laughing Gull chick back on its feet after the attack
|
Exposure and Zebras Notes
We all cheered when the unfledged Laughing Gull stood up. Note that in the space of about ten minutes, the exposure parameters changed significantly. Though just two minutes separated Image #1 to Image #2, I added 1/3 stop of light by rising the ISO from 1600 to 2000. And with that, the raw file for #2 was still a bit darker than with #1 (dead-solid-perfect vs. perfect). The exposure for Image #3 was identical to the exposure for Image #2 (despite large differences in all three parameters).
So how is it possible with SONY to pretty much nail the exposures every time in changing light while significantly varying the exposure settings? The answer is a simple one: Zebras. By setting up Zebras correctly and learning to use them properly as detailed in the SONY Camera User’s Guide, it is a simple matter of dialing the ISO up or down using the Thumb Wheel until you see faint Zebras on the highlights. The result: a perfect or a dead-solid perfect exposure every time. Note that folks in the SONY a1 Setup and Info group receive a free copy of the SONY Camera User’s Guide upon request.
Those using the SONY a7r iii, a7r iv, a9, or a9 ii who do not own the SONY Camera User’s Guide, are — simply put — living in the Dark Ages.
|
|
|
120 sold to rave reviews.
The SONY e-Guide by Patrick Sparkman and Arthur Morris
|
The Sony Camera User’s e-Guide (and Videos)
Click here to purchase the guide with one Camera Set-up Video. Be sure to e-mail us by clicking here to specify your camera body so that we can send you a link for the correct video.
Click here to purchase the guide with two Camera Set-up Videos. Be sure to e-mail us by clicking here to specify your two camera bodies so that we can send you links for the correct videos.
Click here to learn more about the SONY e-Guide.
Typos
With all blog posts, feel free to e-mail or to leave a comment regarding any typos or errors.
July 31st, 2021 What’s Up?
I got to younger daughter Alissa’s home in Lake Ronkonkoma at about 9am and spent the day relaxing. Once the storm passed, it was a dry, beautiful, sunny, cool day, quite unusual for August on Long Island. At about 3:30pm, we headed to Cedar Beach for a nice swim in the Sound. Then Lissy made a great dinner of barbecued skirt steak and asparagus with killer-good sautéed mushrooms!
There are lots of Photoshop tips in today’s blog post. Be sure to scroll all the way down to read the new and improved Divide and Conquer tutorial and learn to remove unwanted branches. Today is Saturday 31 July and we are taking a ride up to New Hyde Park. It is an amazingly low 61 degrees this morning on Long Island! Wherever you are, and whatever you are doing, I hope that you too have a great day.
Remember that you can find some great photo accessories (and necessities!) on Amazon by clicking on the Stuff tab on the orange/yellow menu bar above. On a related note, it would be extremely helpful if blog-folks like me, who spend too much money on Amazon, would get in the habit of clicking on the Amazon logo link on the right side of each blog post. As you might expect, doing so will not cost you a single penny, but would be appreciated tremendously by yours truly. And it works seamlessly with your Amazon Prime account.
This blog post took about two hours to prepare and makes 215 consecutive days with a new one. Please remember that if an item — a Delkin flash card, or a tripod head — for example, that is available from B&H and/or Bedfords, and is also available in the BAA Online Store, it would be great, and greatly appreciated if you would opt to purchase from us. We will match any price. Please remember also to use my B&H affiliate links or to save 3% at Bedfords by using the BIRDSASART discount code at checkout. Doing either often earns you free guides and/or discounts. And doing so always earns my great appreciation.
Homer Bald Eagles Winter 2022
Yes, this is an expensive (but competitively priced) trip. The price of the boat and the price of the fish have risen astronomically since my last visit in 2020. The photography on this trip of a lifetime is beyond amazing. You can do the whole trip with either the Canon 100-500 or the SONY 200-600 along with any 70-200mm lens. Flight photography until you cannot raise your arms, creative set-ups, lots of snow we hope (earlier in the season is best for that), and lots of opportunities for point-blank head portraits and talon shots. All in a variety of spectacular settings. If you are seriously interested in joining me for the world’s best Homer/Kachemak Bay Bald Eagle trip(s) — mid-FEB thru early MARCH 2022, please contact me immediately via e-mail for dates and details. I am looking for a roommate who will be doing all eleven days.
The East Pond
The East Pond at Jamaica Bay Wildlife Refuge, Queens, NY was the place to observe and photograph North America’s southbound migrant shorebirds. It shined from 1975 through about 2010. Then, for reasons noted in the blog post here, the place pretty much went down the tubes due to high water levels. At present, it seems that the folks at Gateway have gotten their act together; conditions at the pond are reported to be excellent this season. I have a strong connection to the East Pond. I photographed my first shorebird — a Semipalmated Sandpiper, there in August of 1983. I’ve been visiting for 45 years and have spent thousands of hours on the pond.
If you would like to learn to identify more than a dozen species of shorebirds and photograph some of them on an In-the-Field Workshop in August, please shoot me an e-mail to learn the dates and details. The East Pond is best for photography for just three specific days in a calendar year … I will be there then. Here’s hoping that the East Pond will return to its former crown-jewel glory. See some good news below.
Please Remember
With income from IPTs now close to zero, please, if you enjoy and learn from the blog, remember to use one of my two affiliate programs when purchasing new gear. Doing so just might make it possible for me to avoid having to try to get a job as a Walmart greeter and will not cost you a single penny more. And if you use Bedfords and remember to enter the BIRDSASART code at checkout, you will save 3% on every order and enjoy free second-day air shipping. In these crazy times — I am out at least forty to sixty thousand dollars so far due to COVID 19 (with lots more to come) — remembering to use my B&H link or to shop at Bedfords will help me out a ton and be greatly appreciated. Overseas folks who cannot order from the US because of import fees, duties, and taxes, are invited to help out by clicking here to leave a blog thank you gift if they see fit.
New and Better Bedfords Discount Policy!
You can now save 3% on all of your Bedfords photo gear purchases by entering the BIRDSASART coupon code at checkout. Your discount will be applied to your pre-tax total. In addition, by using the code you will get 2nd day air shipping via Fed Ex.
Grab a Nikon AF-S Teleconverter TC-14E III and save $14.99. Purchase a Canon EOS R5 and your discount will be $116.97. Purchase a Sony FE 600mm f/4 GM OSS lens and save a remarkable $389.94! Your Bedford’s purchase no longer needs to be greater than $1,000.00 for you to receive a discount. The more you spend, the more you save.
Money Saving Reminder
Many have learned that if you need a hot photo item that is out of stock at B&H and would enjoy free second-day air shipping, your best bet is to click here, place an order with Bedfords, and enter the coupon code BIRDSASART at checkout. If an item is out of stock, contact Steve Elkins via e-mail or on his cell phone at (479) 381-2592 (Central time). Be sure to mention the BIRDSASART coupon code and use it for your online order to save 3% and enjoy free 2nd-day air shipping. Steve has been great at getting folks the hot items that are out of stock at B&H and everywhere else. The wait lists at the big stores can be a year or longer for the hard to get items. Steve will surely get you your gear long before that. For the past year, he has been helping BAA Blog folks get their hands on items like the SONY a9 ii, the SONY 200-600 G OSS lens, the Canon EOS R5, the Canon RF 100-500mm lens, and the Nikon 500mm PF. Steve is personable, helpful, and eager to please.
Gear Questions and Advice
Too many folks attending BAA IPTs (remember those?) and dozens of photographers whom I see in the field and on BPN, are–out of ignorance–using the wrong gear, especially when it comes to tripods and more especially, tripod heads… Please know that I am always glad to answer your gear questions via e-mail
The Best Available Subject
With hopes of a nice sunset, we set up with a clear view of the western sky. The color developed nicely, but few birds flew by our chosen location. What to do? A nice female Anhinga had been sitting behind us for about twenty minutes, so I put the 2X TC on the big lens and went to work, despite the very low light levels. I love the mottled green, brown, and grey background, especially to our right of the bird.
|
|
Image #1A: AF Point for the Anhinga female perched on mangrove image
|
SONY a1 AF at 1200mm
One of the many amazing things about the a1 is that the AF system performs incredibly well at 1200mm. The initial focusing acquisition is — of course — a bit slower (as that it a function of aperture) but it is still very fast; it detects the bird’s eye, acquires focus and locks on, and tracks as accurately as if you were using the bare lens alone. In short, it is astounding.
In addition, the OSS (Optical Stabilization System) on the 600 GM works incredibly well: 1/200 second here at 1200mm, and still super sharp. (OSS = IS with Canon and VR with Nikon). I’ve made some neat discoveries with regards to the OSS Mode settings on the lens and will be sharing that information with the SONY a1 Set-up and Info Group this weekend in e-mail #22.
SONY and artie
Switching to SONY, first with the a9 and the a9 II, and then with the remarkable a1, has enabled me (and others, like Mike De Rosa as seen recently in the blog post here), to create images of birds in flight and in action that I could not have even dreamed of when using Canon for 33 years and then Nikon for more than two. Most of the time I am using one of two AF methods that together, cover about 99% of the commonly-encountered bird photography situations. At present, I am experimenting beyond those … Learn more by joining the group!
From Long-ago IPT veteran Keith Kennedy via e-mail
Absolutely great information. I am calling Jim in a few minutes to order a couple of Delkin 128GB UHS-II cards. Your timely email has saved me a ton of money! Many thanks
In the same vein, via e-mail from John LeClair
Well, e-mail #21 alone was worth the price of admission!
From Pamela Viale, after receiving artie’s a1 settings along with detailed instructions on how to copy them to her SONY a1 via e-mail
This e-mail group has been an incredible boon to me! Thank you so much!
From Joe Barranco via e-Mail
Thanks for your great ideas on the A1 set up. I have been getting MANY more keepers doing things your way!
From Barbara White via e-Mail
Wow, I just gotta say – I learn so much from the SONY Alpha a1 Set-up and Info group! My camera is on my desk, and I’m always picking it up and changing something that I’ve read about in the e-mails.
Thanks, Barbara
From Janet Horton via e-Mail
Hi Artie, Mystery solved. Yes, I was able to replicate what you did. I forgot that you have to set self-timer using the upper dial. I am used to that being a MENU selection.
Thanks much, Janet
SONY Alpha a1 Set-up and Info Group
The SONY Alpha a1 Set-up and Info Group is going great guns as more and more folks chime in with thoughtful questions and experience-based answers. As the a1 is becoming more readily available, more and more folks are getting their hands on this amazing body. With two folks joining yesterday, we are now up to an astounding 67 lucky and blessed photographers! Early on, we discussed the myriad AF options. I gave my opinion as to the best one for flight and general bird photography. More recently, we have been in contact with folks at SONY sharing our thoughts, experiences, and frustrations with the EVF blackout problem.
All who purchased their Alpha a1 bodies via a BAA affiliate link will receive a free subscription to the Sony Alpha a1 Set-Up and Info Updates after shooting me their receipts via e-mail. (Note: it may take me several days to confirm B&H orders.) This same service may be purchased by anyone with an a1 body via a $150.00 PayPal sent to birdsasart@verizon.net indicating payment for Alpha a1 Info Updates. Alternatively, folks can call Jim weekdays at 1-863-692-0906 to pay via credit card. New members will receive composite e-mails that summarize all previous discussions.
The Leaf Removal
Why remove the leaves? Because out-of-focus elements in front of the subject are exceedingly distracting.
When I pushed the shutter button, I knew that the leaves in the lower right corner would have to go. To eliminate them, I used the Divide and Conquer technique, along with either the Patch Tool or Content-Aware Fill. That was followed by a Gaussian Blur on the whole image. Next, I used an Inverse Layer Mask to hide the blur that was then painted in with a large soft brush (Hardness = 10%) on the background. I’ve recently added a new trick to this procedure. After I have painted in the blur, I hit X, reduce the size of the brush, increase the hardness to 60%, and paint the edges of the bird to make sure that none of the Gaussian Blur had bled over to the edges of the bird. You can note the softening of the background by comparing the BEFORE and AFTER views in the Animated GIF above.
Background Question
What are your thoughts on the background? Feel free to leave a comment.
|
|
The BIRDS AS ART Current Workflow e-Guide (Digital Basics II).
You can order your copy from the BAA Online Store here, by sending a PayPal for $40 here, or by calling Jim or Jennifer weekdays at 863-692-0906 with your credit card in hand. Be sure to specify Digital Basics II.
|
The BIRDS AS ART Current Workflow e-Guide (Digital Basics II)
The Photoshop Tools used with all of my clean-up techniques along with dozens of other great Photoshop tips and techniques — along with all of my personalized Keyboard Shortcuts, are covered in detail in the BIRDS AS ART Current Workflow e-Guide (Digital Basics II), an instructional PDF that is sent via e-mail. Learn more and check out the free excerpt in the blog post here. While the new e-Guide reflects my MacBook Pro/Photo Mechanic/DPP 4/Photoshop workflow, folks using a PC and/or BreezeBrowser will also benefit greatly by studying the material on DB II. Note: folks working on a PC and/or those who do not want to miss anything Photoshop may wish to purchase the original Digital Basics along with DB II while saving $15 by clicking here to buy the DB Bundle.
Folks who learn well by following along rather than by reading can check out the complete collection of MP 4 Photoshop Tutorial Videos by clicking here. Note: all of the videos are now priced at an amazingly low $5.00 each.
You can learn how and why I converted all of my Canon digital RAW files in DPP 4 in the DPP 4 RAW Conversion Guide here. More recently, I became proficient at converting my Nikon RAW (NEF) files in Adobe Camera Raw. About two years ago I began converting my Nikon and Sony RAW files in Capture One Pro 12 and continue to do so today.
You can learn advanced Quick Masking and advanced Layer Masking techniques in APTATS I & II. You can save $15 by purchasing the pair.
Divide and Conquer Tutorial
I recently discovered that contrary to what I had thought for years, Divide and Conquer is not included in DB II, I am sharing this technique below, adapted from the last update to the original Digital Basics.
Let’s say that you have a long branch in the background that needs to be removed. Best would be to use a Quick Mask, but in many instances there is simply not enough matching background material with which to cover the distracting branch. The Patch Tool is greatly preferred to the Clone Stamp as the Patch Tool blends texture while the Clone Stamp copies texture-less color. When it is impossible to patch a long branch in one fell swoop. If you try the Patch Tool on a small section of the branch, the result will be terrible smudging. What to do? Divide and Conquer. By cutting the offending branch into two or more parts as needed, you can create manageable sections. Loggers cut a big tree trunk into sections that can be much more easily handled than the entire trunk. To cut up your distracting branch, use the Clone Stamp at 20% Hardness. Note: if the tonality on one side of the branch is of a slightly different tonality or color than the other, be sure to work from both sides. Once you have cut the branch into manageable sections, you can use the Patch Tool (or Content-Aware Fill), to eliminate the remaining sections. My great preference is to use the former as the latter often leaves discernible edge-marks. The same technique can also be used if the offending branch covers part of the subject.
Typos
With all blog posts, feel free to e-mail or to leave a comment regarding any typos or errors.
July 30th, 2021 What’s Up?
Today is Friday 30 July 2021. Keep reading to learn about my very long Thursday that ended very wet.
I was glad to learn that BPN friend Kevin Hice was the third to sign up for Homer. Wherever you are, and whatever you are doing, I hope that you too have a great day.
Remember that you can find some great photo accessories (and necessities!) on Amazon by clicking on the Stuff tab on the orange/yellow menu bar above. On a related note, it would be extremely helpful if blog-folks like me, who spend too much money on Amazon, would get in the habit of clicking on the Amazon logo link on the right side of each blog post. As you might expect, doing so will not cost you a single penny, but would be appreciated tremendously by yours truly. And it works seamlessly with your Amazon Prime account.
This blog post took about less than an hour to prepare and makes 214 consecutive days with a new one. Please remember that if an item — a Delkin flash card, or a tripod head — for example, that is available from B&H and/or Bedfords, and is also available in the BAA Online Store, it would be great, and greatly appreciated if you would opt to purchase from us. We will match any price. Please remember also to use my B&H affiliate links or to save 3% at Bedfords by using the BIRDSASART discount code at checkout. Doing either often earns you free guides and/or discounts. And doing so always earns my great appreciation.
Homer Bald Eagles Winter 2022
Yes, this is an expensive (but competitively priced) trip. The price of the boat and the price of the fish have risen astronomically since my last visit in 2020. The photography on this trip of a lifetime is beyond amazing. You can do the whole trip with either the Canon 100-500 or the SONY 200-600 along with any 70-200mm lens. Flight photography until you cannot raise your arms, creative set-ups, lots of snow we hope (earlier in the season is best for that), and lots of opportunities for point-blank head portraits and talon shots. All in a variety of spectacular settings. If you are seriously interested in joining me for the world’s best Homer/Kachemak Bay Bald Eagle trip(s) — mid-FEB thru early MARCH 2022, please contact me immediately via e-mail for dates and details. I am looking for a roommate who will be doing all eleven days.
The East Pond
The East Pond at Jamaica Bay Wildlife Refuge, Queens, NY was the place to observe and photograph North America’s southbound migrant shorebirds. It shined from 1975 through about 2010. Then, for reasons noted in the blog post here, the place pretty much went down the tubes due to high water levels. At present, it seems that the folks at Gateway have gotten their act together; conditions at the pond are reported to be excellent this season. I have a strong connection to the East Pond. I photographed my first shorebird — a Semipalmated Sandpiper, there in August of 1983. I’ve been visiting for 45 years and have spent thousands of hours on the pond.
If you would like to learn to identify more than a dozen species of shorebirds and photograph some of them on an In-the-Field Workshop in August, please shoot me an e-mail to learn the dates and details. The East Pond is best for photography for just three specific days in a calendar year … I will be there then. Here’s hoping that the East Pond will return to its former crown-jewel glory. See some good news below.
Selling Your Used Photo Gear Through BIRDS AS ART
Selling your used (or like-new) photo gear through the BAA Blog is a great idea. We charge only a 5% commission. One of the more popular used gear for sale sites charged a minimum of 20%. Plus assorted fees! Yikes. They went out of business. And e-Bay fees are now up to 13%. The minimum item price here is $500 (or less for a $25 fee). If you are interested please scroll down here or shoot us an e-mail with the words Items for Sale Info Request cut and pasted into the Subject line :). Stuff that is priced fairly — I offer pricing advice to those who agree to the terms — usually sells in no time flat. Over the past year, we have sold many dozens of items. Do know that prices on some items like the EOS-1D Mark IV, the old Canon 100-400, the old 500mm, the EOS-7D and 7D Mark II and the original 400mm DO lens have been dropping steadily. Most recently the price of used Canon 600mm f/L IS II lenses have been dropping like a rock with the introduction of the 600 III. You can always see the current listings by clicking here or on the Used Photo Gear tab on the orange-yellow menu bar near the top of each blog post page.
As used gear sales have slowed just a bit in recent months — especially with dSLR bodies, there are lots of great buys right now both below and on the Used Gear Page.
Price Drop
SONY a9 II Mirrorless Digital Camera Body
Price reduced $200.00 28 July 2021
Wally Barkley is offering a Sony a9 II in near-mint condition for a BAA record-low $2494.00 (was $2694.00). The sale includes the original box and everything that came in it including one battery and the charger, strap. Insured ground shipping via major courier to lower-48 US addresses only is also included. Your item will not ship until your check clears unless other arrangements are made.
Please contact Wally via e-mail or by phone at 1-231-675-6546 Eastern time zone.
As things worked out, the a9, and then the a9 ii, turned out to be life-changers for me. From the moment I tracked that first incoming Brandt’s Cormorant at LaJolla, I knew that at that time, the SONY a9 series bodies featured the world’ best AF. I upgraded to the a9 ii as soon as it was released for the slightly larger body size. At one point I owned two a9 ii bodies. A new a9 ii sells for $4,498.00 so you can save a very nice $2004.00 by grabbing Wally’s a9 ii ASAP. Not to mention that the new Sony A1 sells for $6498.00 … artie
|
|
|
i-Phone Image
Shorebirds at the East Pond on 29 July 2021
|
A Very Long Day …
I was glad that I paid $60 to add “First-30 Vehicles-Off-the-Auto-Train feature. (I once had to wait more than three hours for my Sequoia). My car just missed beating me to the pick-up area where folks are re-united with their cars. It was, however, the first one off in the second group. My total wait was about six minutes. With our early arrival, I was headed north at 9:10am. I made lots of pit-stops, a picnic-lunch-stop, and lots of stretch-my-legs-stops. The eastbound only toll on the Goethals Bridge is an astounding $16.00. But for my crossing of the Verrazano-Narrows Bridge (AKA the Very Narrow Zano’s Bridge), I had little traffic and my NAV system helped me get around one accident and one construction delay. The one-way pay by mail toll on the Verrazano is $10.17! Anyhoo I decided to stop at the East Pond at Jamaica Bay Wildlife Refuge.
Lots of memories surfaced as I drove down Cross Bay Boulevard. I lived there for several years with my late-wife Elaine Belsky Morris before we left for Florida in 1993. I was pleased to see that the water levels on the East Pond (above) were very good and that there were about 800 shorebirds present — mostly Short-billed Dowitchers and Semipalmated Sandpipers, despite the fact that the tide in the surround bays was halfway down. The largest numbers of shorebirds are almost always found an hour or two before and after the daily high tides.
I had heard years ago that my old friend Denis Macrae who lived in a ramshackle house right on the bay just south of the refuge was not doing well. I stopped by to see if I could recognize his house. Boy, had things changed. I rang the bell of a new home right on Cross Bay, but nobody answered. Not giving up, I walked down a path towards the bay when a guy in a pickup truck drove down his driveway to the right. “Fuzzy” had lived in Broad Channel for 74 years, since his birth in 1947. He told me that Denis had died a while back, but that his wife Chrissie, had bought the lovely new home just behind us. I went back, rang the bell again, and left a business card. I will try again when I visit the East Pond.
|
|
|
i-Phone Image
My X-5 in the parking lot at Nickerson Beach on a very stormy afternoon
|
That Ended Very Wet!
After visiting the pond, I headed to my motel in Rockville Centre. Despite the threatening skies, I headed out to Nickerson Beach. Not surprisingly, I was the only one in the parking lot. As I headed south (with only my i-Phone), a spitting rain in my face driven by a 25mph south wind made walking unpleasant despite the fact that I had put on a heavy hooded sweatshirt. It was obvious that the Common Terns had done very well this season as there were many dozens of fledged young on the beach. There were lots of Black Skimmers sitting on scrapes, but I did not see any chicks (though there might have been some or many being broods in the harsh weather).
When I got to the end of the East Colony, there were three vehicles on the beach facing west. The first two were small utility vehicles being driven by very young women. They drove off and waved as I approached. Next was a lady officer in a Town of Hempstead vehicle. She rolled down here window and said in an unpleasant voice, “The beach is closed. You must off of the beach now. A big storm is coming.” I was about 3/4 of a mile from the parking lot. She was so concerned about my safety, that she drove off to the west without offering me a ride. I did not ask for one as I wanted to swing by the west Colony.
When I got back to my hotel, my sweatshirt weighed about 10 pounds, my dungarees about five. I checked the forecast. It was calling for clearing skies with northwest winds to follow the departing storm. I got into bed early and fell asleep quickly. My plan was to get up way early and be on the beach well before sunrise. With wind against sun early, the best (and only) opportunities are for skimmers landing backlit against the beach grasses. I woke at 3am, almost got out of bed, and fell back to sleep. I figured that I would wake on my own by five, throw the stuff in the car, and head to the beach. I woke at six. Sunrise had been at 5:49am and the sky was — as predicted, dead-clear. Knowing that a NW wind on a clear morning is death on bird photography, I stayed in and worked on this blog post. As soon as I hit publish, I will be headed east to younger daughter Lissy’s home.
Typos
With all blog posts, feel free to e-mail or to leave a comment regarding any typos or errors.
July 29th, 2021 Your Fave?
Which of today’s three featured images is your favorite. Please leave a comment and let us know why you made your choice.
What’s Up?
I finished packing on Wednesday morning and left early, headed for the Auto Train station in Sanford, FL, figuring I could nap on the way down if need be. I spent an hour on the phone with Cliff Beittel and that really helped pass the time. I arrived way early, boarded the train at 2:30, and we pulled out right on time at 4pm.
I was glad to learn that two spots for the Homer trip have been filled, that several folks are interested in joining me at JBWR, and that several others are setting up dates for Nickerson Beach In-the-Field Instruction. Good friend Bill Schneider will be joining me for two private days on the beach there 10 & 11 August. He has recovered well from his fairly recent shoulder surgery.
Kudos to American swimmer Katie Ledecky for her Gold Medal in the first-ever Olympic swim of the woman’s 1500 meter freestyle. And love and support for world’s greatest-of-all-time woman gymnast, American Simone Biles for withdrawing from the the team and the individual all-around competitions citing stress and mental issues. She said that she felt lost in the air … No-one, probably including Simone, knows if she will compete in the Event finals that are scheduled to begin on Sunday night. Learn more about this situation and this amazing young woman here in the great Sports Illustrated article by Stephanie Apstein.
I met some fun folks last night and we spent two hours telling stories and laughing. Loudly! David, the barman, hung out with us as well. He is a delightful man who is often confused with Morgan Freeman. When I saw his long thin fingers I asked if he played piano. He does. Then I asked if he had ever dunked (a basketball). He said that the had but that his favorite sport was baseball. He was looking forward to playing at the University of Maryland but injured a knee working a construction job. He has a great smile.
I slept seven fitful hours — understandable as the Auto Train gets up to seventy mph. It is now 6:40 am and we passed by Richmond, VA at about 6:15. I had a nice chat with David the barman about Motown, the Temptations, the Four Tops, Marvin Gaye, and Hitsville, USA. We are — barring anything unforeseen — looking at an-ahead-of-schedule arrival in Lorton, VA no later than 8:30am. I will head toward Nickerson Beach despite the dire weather forecast. I have a hotel room in Rockville Center for tonight, will try to do some photography this afternoon and Friday morning, and then head to Alissa’s house in Ronkonkoma (on Long Island). Wherever you are, and whatever you are doing, I hope that you too have a great day.
Remember that you can find some great photo accessories (and necessities!) on Amazon by clicking on the Stuff tab on the orange/yellow menu bar above. On a related note, it would be extremely helpful if blog-folks like me, who spend too much money on Amazon, would get in the habit of clicking on the Amazon logo link on the right side of each blog post. As you might expect, doing so will not cost you a single penny, but would be appreciated tremendously by yours truly. And it works seamlessly with your Amazon Prime account.
This blog post took about 90 minutes to prepare and makes 213 consecutive days with a new one. Please remember that if an item — a Delkin flash card, or a tripod head — for example, that is available from B&H and/or Bedfords, and is also available in the BAA Online Store, it would be great, and greatly appreciated if you would opt to purchase from us. We will match any price. Please remember also to use my B&H affiliate links or to save 3% at Bedfords by using the BIRDSASART discount code at checkout. Doing either often earns you free guides and/or discounts. And doing so always earns my great appreciation.
Homer Bald Eagles Winter 2022
Yes, this is an expensive (but competitively priced) trip. The price of the boat and the price of the fish have risen astronomically since my last visit in 2020. But the photography is beyond amazing. You can do the whole trip with either the Canon 100-500 or the SONY 200-600 along with any 70-200mm lens. Flight photography until you cannot raise your arms, creative set-ups, lots of snow, we hope (earlier in the season is best for that), and lots of opportunities for point-blank head portraits and talon shots. All is a spectacular setting. If you are seriously interested in joining me for the world’s best Homer/Kachemak Bay Bald Eagle trip(s) — mid-FEB thru early MARCH 2022, please contact me immediately via e-mail for dates and details. I am looking for a roommate who will be doing all eleven days.
The East Pond
The East Pond at Jamaica Bay Wildlife Refuge, Queens, NY was the place to observe and photograph North America’s southbound migrant shorebirds. It shined from 1975 through about 2010. Then, for reasons noted in the blog post here, the place pretty much went down the tubes due to high water levels. At present, it seems that the folks at Gateway have gotten their act together; conditions at the pond are reported to be excellent this season. I have a strong connection to the East Pond. I photographed my first shorebird — a Semipalmated Sandpiper, there in August of 1983. I’ve been visiting for 45 years and have spent thousands of hours on the pond.
If you would like to learn to identify and photograph more than a dozen species of shorebirds on an In-the-Field Workshop in August, please shoot me an e-mail to learn the dates and details. The East Pond is best for photography for just three specific days in a calendar year … I will be there then. Here’s hoping that the East Pond will return to its former crown-jewel glory.
SONY a9 II Mirrorless Digital Camera Body
Super-Low Price!/Canadian Sale Only
BAA-friend and many multiple IPT veteran Anita North is offering a a Sony a9 II in excellent condition for a BAA record-low price in USD. The sale includes one battery and the charger, and insured ground shipping to Canadian addresses only. For price, and to get in touch with Anita, please contact artie via e-mail. The sooner the better, as she is leaving for Africa in mid-August.
As things worked out, the a9, and then the a9 ii, turned out to be life-changers for me. From the moment I tracked that first incoming Brandt’s Cormorant at LaJolla, I knew that at that time, the SONY a9 series bodies featured the world’ best AF. I upgraded to the a9 ii as soon as it was released for the slightly larger body size. At one point I owned two a9 ii bodies. A new a9 ii sells for $4,498.00 so you can save a very nice $2004.00 by grabbing Anita’s a9 ii ASAP. Not to mention that the new Sony A1 sells for $6498.00 … artie
Please Remember
With income from IPTs now close to zero, please, if you enjoy and learn from the blog, remember to use one of my two affiliate programs when purchasing new gear. Doing so just might make it possible for me to avoid having to try to get a job as a Walmart greeter and will not cost you a single penny more. And if you use Bedfords and remember to enter the BIRDSASART code at checkout, you will save 3% on every order and enjoy free second-day air shipping. In these crazy times — I am out at least forty to sixty thousand dollars so far due to COVID 19 (with lots more to come) — remembering to use my B&H link or to shop at Bedfords will help me out a ton and be greatly appreciated. Overseas folks who cannot order from the US because of import fees, duties, and taxes, are invited to help out by clicking here to leave a blog thank you gift if they see fit.
New and Better Bedfords Discount Policy!
You can now save 3% on all of your Bedfords photo gear purchases by entering the BIRDSASART coupon code at checkout. Your discount will be applied to your pre-tax total. In addition, by using the code you will get 2nd day air shipping via Fed Ex.
Grab a Nikon AF-S Teleconverter TC-14E III and save $14.99. Purchase a Canon EOS R5 and your discount will be $116.97. Purchase a Sony FE 600mm f/4 GM OSS lens and save a remarkable $389.94! Your Bedford’s purchase no longer needs to be greater than $1,000.00 for you to receive a discount. The more you spend, the more you save.
Money Saving Reminder
Many have learned that if you need a hot photo item that is out of stock at B&H and would enjoy free second-day air shipping, your best bet is to click here, place an order with Bedfords, and enter the coupon code BIRDSASART at checkout. If an item is out of stock, contact Steve Elkins via e-mail or on his cell phone at (479) 381-2592 (Central time). Be sure to mention the BIRDSASART coupon code and use it for your online order to save 3% and enjoy free 2nd-day air shipping. Steve has been great at getting folks the hot items that are out of stock at B&H and everywhere else. The wait lists at the big stores can be a year or longer for the hard to get items. Steve will surely get you your gear long before that. For the past year, he has been helping BAA Blog folks get their hands on items like the SONY a9 ii, the SONY 200-600 G OSS lens, the Canon EOS R5, the Canon RF 100-500mm lens, and the Nikon 500mm PF. Steve is personable, helpful, and eager to please.
Gear Questions and Advice
Too many folks attending BAA IPTs (remember those?) and dozens of photographers whom I see in the field and on BPN, are–out of ignorance–using the wrong gear, especially when it comes to tripods and more especially, tripod heads… Please know that I am always glad to answer your gear questions via e-mail
|
|
|
This image was created on 28 May 2021 at a rookery in North Tampa. Standing, I used the hand held Sony FE 600mm f/4 GM OSS lens and The One, the Sony Alpha 1 Mirrorless digital camera. ISO 1000. Exposure determined via Zebras with ISO on the rear dial: 1/6400 sec. at f/5.6 (stopped down one-stop). AWB at 6:11pm on a cloudy bright afternoon.
Wide AF-C performed perfectly. Click on the image to enjoy a larger version.
Image #1: Little Blue Heron feeding fledged young
|
600mm Alone
I’d had only one chance to photograph young Little Blue Herons near their nests in 38 years, that at St. Augustine Alligator Farm on film with flash about 25 years ago. So not often. But there were several nesting pairs at rookery in North Tampa. This image was made on my second visit. The visible eye of the young bird is a huge plus.
And the Question Is …
The question is, why was I at such a high shutter speed with a correspondingly high ISO?
Note: RawDigger showed a dead-solid perfect exposure for Image #1, a near-perfect exposure for Image #2, and a perfect exposure for Image #3.
600mm and the 1.4X TC
I mentioned this rocky limestone point in the 800+ Images of the Same Bird … Right Down the Barrel. Practice Fishing. And the Rocky Point blog post here. I was thrilled when this bird, just a few days out of the nest, landed and posed. Working at a good distance, I made lots of verticals. This one, nicely framed and with a perfect head angle, was the best of the lot. One thing that I need to do on rainy days on Long Island is to do final edits on many, many files and lose many thousands of images …
Images #2 and #3 of the same bird were created on my third and last visit to this great rookery.
600mm and the 2X TC
With birds that I have lots of images of, I will usually go for head shots right off the bat. But I refrained from doing that until I was sure that I had a nice vertical portrait of this handsome youngster. That done, I added the 2X, approached very slowly, and made the kill. Here again, the dead solid perfect head angle made this image the pick of the litter.
Controlling the BKGR via Perspective Choice
Image #2 and Image #3 are of the very same bird on the very same rock. For Image #2 I went for a green background by moving a bit to my right and getting a bit lower by pulling out the front leg of the tripod. I saw the chance for a grey, matte background for image #3 so I moved left and got as tall as possible. The background for that image is simply still water reflecting the lead-grey sky.
Typos
With all blog posts, feel free to e-mail or to leave a comment regarding any typos or errors.
July 28th, 2021 The East Pond
The East Pond at Jamaica Bay Wildlife Refuge, Queens, NY was the place to observe and photograph North America’s southbound migrant shorebirds from 1975 through about 2010. Then, for reasons noted below, the place pretty much went down the tubes due to high water levels. At present, it seems that the folks at Gateway have gotten their act together; conditions at the pond are reported to be excellent this season. As detailed below, I have a strong connection to the East Pond. I photographed my first shorebird — a Semipalmated Sandpiper, there in August of 1983. I’ve been visiting for 45 years and have spent thousands of hours on the pond.
If you would like to learn to identify and photograph more than a dozen species of shorebirds on an In-the-Field Workshop in August, please shoot me an e-mail to learn the dates and details. The East Pond is best for photography for just three specific days in a calendar year … I will be there then. Here’s hoping that the East Pond will return to its former crown-jewel glory.
Homer Bald Eagles Winter 2021
Yes, this is an expensive (but competitively priced) trip. The price of the boat and the price of the fish have risen astronomically since my last visit in 2020. But the photography is beyond amazing. Flight photography with any lens till you cannot raise your arms, creative set-ups, lots of snow, we hope (earlier in the season is best for that), and lots of opportunities for point-blank head portraits and talon shots. If you are seriously interested in joining me for the world’s best Homer/Kachemak Bay Bald Eagle trip(s) — mid-FEB thru early MARCH 2022, please contact me immediately via e-mail for dates and details.
What’s Up?
Thanks to the many who left kind comments on yesterday’s East Pond/JBWR history lesson. By Tuesday evening, I had all of my photo gear packed.
Today is Wednesday 28 July 2021. I still have lots of packing to do. I will be leaving ILE no later than 11:15 for the drive up to Sanford. You need to be checked in by 2:30. The train pulls out at 4pm and is scheduled to arrive in Lorton, Virginia at 9:00am on Thursday morning. Wherever you are, and whatever you are doing, I hope that you too have a great day.
Remember that you can find some great photo accessories (and necessities!) on Amazon by clicking on the Stuff tab on the orange/yellow menu bar above. On a related note, it would be extremely helpful if blog-folks like me, who spend too much money on Amazon, would get in the habit of clicking on the Amazon logo link on the right side of each blog post. As you might expect, doing so will not cost you a single penny, but would be appreciated tremendously by yours truly. And it works seamlessly with your Amazon Prime account.
This blog post took about 90 minutes to prepare and makes 212 consecutive days with a new one. Please remember that if an item — a Delkin flash card, or a tripod head — for example, that is available from B&H and/or Bedfords, and is also available in the BAA Online Store, it would be great, and greatly appreciated if you would opt to purchase from us. We will match any price. Please remember also to use my B&H affiliate links or to save 3% at Bedfords by using the BIRDSASART discount code at checkout. Doing either often earns you free guides and/or discounts. And doing so always earns my great appreciation.
Please Remember
With income from IPTs now close to zero, please, if you enjoy and learn from the blog, remember to use one of my two affiliate programs when purchasing new gear. Doing so just might make it possible for me to avoid having to try to get a job as a Walmart greeter and will not cost you a single penny more. And if you use Bedfords and remember to enter the BIRDSASART code at checkout, you will save 3% on every order and enjoy free second-day air shipping. In these crazy times — I am out at least forty to sixty thousand dollars so far due to COVID 19 (with lots more to come) — remembering to use my B&H link or to shop at Bedfords will help me out a ton and be greatly appreciated. Overseas folks who cannot order from the US because of import fees, duties, and taxes, are invited to help out by clicking here to leave a blog thank you gift if they see fit.
New and Better Bedfords Discount Policy!
You can now save 3% on all of your Bedfords photo gear purchases by entering the BIRDSASART coupon code at checkout. Your discount will be applied to your pre-tax total. In addition, by using the code you will get 2nd day air shipping via Fed Ex.
Grab a Nikon AF-S Teleconverter TC-14E III and save $14.99. Purchase a Canon EOS R5 and your discount will be $116.97. Purchase a Sony FE 600mm f/4 GM OSS lens and save a remarkable $389.94! Your Bedford’s purchase no longer needs to be greater than $1,000.00 for you to receive a discount. The more you spend, the more you save.
Money Saving Reminder
Many have learned that if you need a hot photo item that is out of stock at B&H and would enjoy free second-day air shipping, your best bet is to click here, place an order with Bedfords, and enter the coupon code BIRDSASART at checkout. If an item is out of stock, contact Steve Elkins via e-mail or on his cell phone at (479) 381-2592 (Central time). Be sure to mention the BIRDSASART coupon code and use it for your online order to save 3% and enjoy free 2nd-day air shipping. Steve has been great at getting folks the hot items that are out of stock at B&H and everywhere else. The wait lists at the big stores can be a year or longer for the hard to get items. Steve will surely get you your gear long before that. For the past year, he has been helping BAA Blog folks get their hands on items like the SONY a9 ii, the SONY 200-600 G OSS lens, the Canon EOS R5, the Canon RF 100-500mm lens, and the Nikon 500mm PF. Steve is personable, helpful, and eager to please.
Gear Questions and Advice
Too many folks attending BAA IPTs (remember those?) and dozens of photographers whom I see in the field and on BPN, are–out of ignorance–using the wrong gear, especially when it comes to tripods and more especially, tripod heads… Please know that I am always glad to answer your gear questions via e-mail
Abstract Flower Center: Any Better?
My last attempt at an abstract flower center image was universally scorned 🙂 You can see that image in the blog post here and below.
Even I like this one a lot better. These plants grow to more than three feet tall. The biggest one in our garden is more than four feet tall. On our recent trip to Lake Woodruff for the Swallow-tailed Kites we saw lots of these blooming in very wet woods along the canals. As the pool cage was in the background I got in really tight — these are large flowers, and angled in from one side to keep the tip of the stamen (the tall thing in the middle) out of the image …
What Do You Think of Image #1 (above) ?
What do you like about it?
What don’t you like?
Trashed!
Nearly all who commented on this image trashed it, perhaps rightly so. I was not thrilled with the overall look of the image, but … See below for But …
Cliff Beittel left this insightful comment:
I’ve never had much success myself with shallow DOF on flowers, but I’ve seen many such images that were beautiful, even at f/2.8. The problem here, for me, is that the sharp stigma are surrounded by the very soft stamen of similar color. The out-of-focus pink petal I like. So perhaps one frame of the stigma and stamen at f22 or f32 blended with another of the petal at f14 or even wider?
Love this species. Had one in our backyard at our old house.
When Cliff mentioned that the sharp stigma was surrounded by the soft stamens of similar color, I realized that he hit the nail on the head. Some rosemallows have darker stigma … Had I found one of those species, a similar image might work a lot better …
|
|
|
Click on the image to view a larger, seemingly even sharper version.
Image #2A: a tight crop of the Swamp Rosemallow Hibiscus grandiflorus blossom
|
But …
Several folks commented that the image was not sharp. A quick look at the Image 2A, a tight crop of the stigma (I think), reveals that it is sharp where I wanted to be sharp. To me, it looks exceptionally sharp, especially considering the shutter speed: 1/3 second! One commenter stated that the highlights were blown out. The brightest part of the image was the lower left corner. There was nothing even close to being over-exposed. That said, I did not like the glare on the petal in that corner of the image.
Typos
With all blog posts, feel free to e-mail or to leave a comment regarding any typos or errors.
July 27th, 2021 The East Pond
The East Pond at Jamaica Bay Wildlife Refuge, Queens, NY was the place to observe and photograph North America’s southbound migrant shorebirds from 1975 through about 2010. Then, for reasons noted below, the place pretty much went down the tubes due to high water levels. At present, it seems that the folks at Gateway have gotten their act together; conditions at the pond are reported to be excellent this season. As detailed below, I have a strong connection to the East Pond. I photographed my first shorebird — a Semipalmated Sandpiper, there in August of 1983. I’ve been visiting for 45 years and have spent thousands of hours on the pond.
If you would like to learn to identify and photograph more than a dozen species of shorebirds on an In-the-Field Workshop in August, please shoot me an e-mail to learn the dates and details. The East Pond is best for photography for just three specific days in a calendar year … I will be there then. Here’s hoping that the East Pond will return to its former crown-jewel glory.
Homer Bald Eagles Winter 2021
Yes, this is an expensive (but competitively priced) trip. The price of the boat and the price of the fish have risen astronomically since my last visit in 2020. But the photography is beyond amazing. Flight photography with any lens till you cannot raise your arms, creative set-ups, lots of snow, we hope (earlier in the season is best for that), and lots of opportunities for point-blank head portraits and talon shots. If you are seriously interested in joining me for the world’s best Homer/Kachemak Bay Bald Eagle trip(s) — mid-FEB thru early MARCH 2022, please contact me immediately via e-mail for dates and details.
What’s Up?
I need to do a bit more laundry, charge camera batteries, and begin packing for Wednesday afternoon’s trip on the Auto Train. Next will be a seven hour drive to Ronkonkoma on Long Island where I will be staying with daughter Alissa and her husband, Ajiniyaz. I will probably stop for the night at a Staten Island chain hotel to avoid the BQE and the LIE during rush hour! I will be photographing often at Nickerson Beach and at Jamaica Bay Wildlife Refuge.
Today is Tuesday 27 July 2021 and I have lots of work to do. Wherever you are, and whatever you are doing, I hope that you too have a great day.
Remember that you can find some great photo accessories (and necessities!) on Amazon by clicking on the Stuff tab on the orange/yellow menu bar above. On a related note, it would be extremely helpful if blog-folks like me, who spend too much money on Amazon, would get in the habit of clicking on the Amazon logo link on the right side of each blog post. As you might expect, doing so will not cost you a single penny, but would be appreciated tremendously by yours truly. And it works seamlessly with your Amazon Prime account.
This blog post took about three hours to prepare and makes 211 consecutive days with a new one. Please remember that if an item — a Delkin flash card, or a tripod head — for example, that is available from B&H and/or Bedfords, and is also available in the BAA Online Store, it would be great, and greatly appreciated if you would opt to purchase from us. We will match any price. Please remember also to use my B&H affiliate links or to save 3% at Bedfords by using the BIRDSASART discount code at checkout. Doing either often earns you free guides and/or discounts. And doing so always earns my great appreciation.
Getting Started Birding at JBWR
In May of probably 1977, I went birding, really for the first time, with my then and now former wife Dana, and my two daughters, Jennifer and Alissa. I had along a copy of the Golden Field Guide, Guide to Birds of North America by Chandler S. Robbins and Bertel Bruun. I learned years later that it had been a wave day as dozens of Myrtle (now Yellow-rumped) Warblers in breeding plumage flitted about in the trees and shrubs. I can remember being thrilled when I was able to match the color and patterns of the tiny birds in the tall bushes with the painting in the book. I had a pair of lousy binoculars that my Dad had gotten sometime in WW II. They were terrible at best.
That August I visited the refuge on my own and checked the log. One of the entries listed American Kestrel, male in the log. I found the bird in my now trust companion, the Golden Guide. A blue and orange falcon in New York City? You gotta be kidding me. I walked around the West Pond, saw a male American Kestrel, and followed it blindly when it flew between two rows of tall trees halfway around the pond. I got a better look at the bird when I was startled by a horn honking. A ranger, who later became a good friend — Bob Cook, called me over and explained that I had gone past a Do Not Enter sign. I apologized and we chatted. He said to me, “If you want to get close to the birds, check out the East Pond across Cross Bay Boulevard. There are no restrictions there.”
The next morning I was on the pond early and spotted a large, cinnamon-colored shorebird, a Marbled Godwit. As I wrote in Shorebirds; Beautiful Beachcombers and elsewhere, I had no idea that seeing that single bird would change the course of the remainder of my adult life, but that is exactly what happened. I had been captivated by the godwit’s long, upturned bill with an alabaster pink base. Shorebirds would quickly become my favorite bird family and I wound up spending several thousand hours on the East Pond over the next two plus decades.
|
|
The late Thomas H. Davis Jr. and Suzanne Kleinbaum at a Guy Tudor Christmas party in 1974.
Photo courtesy of Peter W. Post
|
My Shorebird Mentor, the late Tom Davis
As a beginning birder, Tom Davis was a mysterious, mythical figure to me. All 6 foot seven inches and 145 pounds of him. He was an extremely knowledgeable top-notch birder, and served as the voice of the New York Rare Bird Alert. For several years I walked by him on the shores of the drawn-down East Pond looking for and studying shorebirds. He never once glanced at me. Tom often had a huge Novoflex telephoto lens with him. It had two pistol-like handle grips that were used to focus. Anyhoo, one day, for no reason at all, I walked by him and he said, “Hey, Artie, how’s it going?” I almost fainted. Within minutes he was down in the mud drawing stick figures of Baird’s Sandpiper for me and giving me lots of birding tips. When we got back to the parking lot, he shared his baby picture album with me. His babies were the juvenile shorebirds that visit the pond beginning in mid-August each year.
High as a kite, I went home and excitedly told Dana that Tom Davis had talked to me. The next week when I saw him he walked by me without saying a word. Over time, we talked a lot and Tom taught me everything that I know about aging shorebirds, separating juveniles from adult and breeding and winter plumage. Sometime in early 1984, I believe, Tom suffered a crippling cerebral aneurism in a doctor’s office. He became hemiplegic, completely paralyzed on one side. I visited him often at his care facility in Far Rockaway. In 1985, I was blessed to find and identify New York State’s first Red-necked (then Rufous-necked) Stint on the East Pond in July of 1985. Several of Tom’s friends took him by stretcher to the East Pond to see the bird. On his first attempt, the bird could not be located. He returned soon afterwards and saw the bird.
I was in California during the summer of 1986. I called the Rare Bird Alert to make sure that I was not missing any rare birds at the East Pond. Birding friend Tom Burke had taken over the alert when Tom Davis was stricken. As soon as I heard Tom intone in a very sad voice, “This is the New York Rare Bird Alert for July 20 …’ I knew that Tom had died. The stint had been his last life bird.
|
|
artie in the mud at the East Pond, Jamaica Bay Wildlife Refuge, Queens, NY
Original film image (slide) courtesy of the late Max Larsen
|
The East Pond and artie
Inspired by Tom Davis’s baby shorebird images and moved to action when I attended a Tony Manzoni slide show at South Shore Audubon Society, I began photographing birds at the East Pond in the later summer of 1983. I had no clue. The late Max and Nellie Larsen were very kind to me when I was a beginning birder. Max was quite a handsome man with a shock of Roger-Tory-Peterson-like white hair. Max took this image of me at the East Pond and kindly shared the slide with me. I spoke to Nellie at least five years ago. Max had been gone for a few years and she was well into her nineties.
In the photo above I am using my first telephoto lens, the Canon 400mm f/4.5 FD manual focus lens. The only way to get close enough for a decent image was to crawl through the mud. Tom had been doing a shorebird survey at JBWR for about five years when he was stricken. The results were published each year in The Kingbird, the journal of the then Federation of New York State Bird Clubs (now the more prestigious New York State Ornithological Association). Here is a link to Tom’s 1983 article. I took over the survey, done for the then-Manomet Bird Observatory, in 1984. I did the survey each fall through the 1990 season, the last several years with help from good friend and now professional ornithologist David Mizrahi. By 1991, I was totally obsessed with bird photography and stepped away from the many hundreds of hours needed to do the survey. I needed more time for photography. For the curious, here is a link to the 1986 survey.
Beginning in 1983, I photographed regularly at the East Pond with friends Kevin Karlson, Rob Villani, the late Tom Vezo, and Johann Schumacher. Those, as they say, were the days. While you would never think of the NYC metropolitan area as a hotbed of nature photography, everyone above and yours truly went on to become noted, oft-published bird photographers. I would be remiss at this point to not give a shout-out to former refuge manager Don Riepe. So thanks for everything, Don! And the same could be said of the late Bob Elliot Kutner, founding member and past President of the South Shore Audobon Society. I just learned that Elliot was an heroic WWII veteran who was awarded the Distinguished Flying Cross. Bob led countless birding field trips with boundless and infectious enthusiasm. And he hooked countless folks — including me, on birding. He showed me my first Snowy Owl. At a desolate Jones Beach on winter days, I used to say that you could tell that Elliot was leading a bird walk when you felt the ground shake from the hundred or so folks that he had enticed into the field despite the frigid weather. The man had the most wonderful smile you could ever hope to encounter. Bob lived to 88. This from his obituary that I found this morning:
He was a special, kind, charitable, man deeply connected to his Jewish roots. He will be missed by the many lives he touched and loved in his 88 years. His enthusiasm for life was exceptional and contagious. Our lives will never be the same without him. I was blessed to know have known him.
Back to the subject of rare shorebirds at JBWR. In 1981 Tom Davis found New York State’s first Sharp-tailed Sandpiper, an adult, on the East Pond. Two summers later he sighted what he believed to be the same bird! In 1983, Tom found a strange sandpiper that was definitively identified by noted Avian artist John Yrizarry as New York State’s first Little Stint. There was confusion at the time as to whether the bird was a Rufous-necked Stint or a Little Stint. I was there when John spoke to Tom after reviewing study skins of the two species at the American Museum of Natural History. He said, in his heavy Eastern-European accent, “It’s a shtint, alright, but is a Little Shtint.” I saw that bird several time but never had a chance to photograph it.
By chance, I was visiting Long Island in the late summer of 1998 and was privileged to see and photograph a juvenile Broad-billed Sandpiper. The bird, a real North American rarity, was found on the East Pond by William Brenner. It was the first record of that species in the lower 48 states. Tom Davis used to say that if you lived long enough every migrant shorebird in the world would wind up being seen at the East Pond …
It was on a Jamaica Bay Wildlife Refuge IPT that I first met Patrick Sparkman, now a dear friend.
Over the past decade, I have visited the East Pond in August several times. But because of problems with the water control valve at the north end of the pond, combined with management indifference, the pond was almost always completely flooded; there was usually no place for any shorebirds to land. My understanding is that this year the valve has been repaired and conditions should be ideal for the entire southbound shorebird migration season.
While doing the research for this blog post I found a searchable archive for the Kingbird (1950-2018) here on the website of the New York State Ornithological Association. Each mouse-click brought back memories of old friends from my NYC birding days: Paul A. Buckley, Joe Di Costanzo, Thomas W. Burke, Manny Levine, Robert Villani, Kevin and Dale Karlson, Tom Hook, Georges Dremeaux, Rick Cech, Stephen B. Dempsey, Arthur Berland, Steve Walters, R. J. Kurtz, Tony Leukering, and too many more to list. It was a real trip down memory lane.
Scroll to What’s Up (above) if you would like to explore the possibility of joining me on the East Pond this August for some In-the-Field photographic and shorebirding instruction.
Typos
With all blog posts, feel free to e-mail or to leave a comment regarding any typos or errors.
July 26th, 2021 The East Pond
Homer Bald Eagles Winter 2021
Yes, this is an expensive (but competitively priced) trip. The price of the boat and the price of the fish have risen astronomically since my last visit in 2020. But the photography is beyond amazing. Flight photography with any lens till you cannot raise your arms, creative set-ups, lots of snow, we hope (earlier in the season is best for that), and lots of opportunities for point-blank head portraits and talon shots. If you are seriously interested in joining me for the world’s best Homer/Katchemak Bay Bald Eagle trip(s) — mid-FEB thru early MARCH 2022, please contact me immediately via e-mail for dates and details.
What’s Up?
One IPT veteran has signed up for Homer and several other folks are interested. Today, Monday 26 July 2021, I will be doing preliminary packing (and laundry) for my trip to Long Island. I will be on the Amtrak Auto Train with my X5 on Wednesday afternoon. I will be spending lots of time at Nickerson Beach and hopefully, if the water levels are low (for the first time in many years), at the East Pond at Jamaica Bay Wildlife Refuge in Queens, NY. The latter is back where my amazing life’s journey began. Wherever you are, and whatever you are doing, we hope that you too have a great day.
Kudos to Great Britain’s Men’s 100M Breaststroker Adam Peaty who won his second straight Olympic Gold medal last night. He is undefeated in this event for eight years and holds the 16 fastest times in history. Talk about total domination!
Remember that you can find some great photo accessories (and necessities!) on Amazon by clicking on the Stuff tab on the orange/yellow menu bar above. On a related note, it would be extremely helpful if blog-folks like me, who spend too much money on Amazon, would get in the habit of clicking on the Amazon logo link on the right side of each blog post. As you might expect, doing so will not cost you a single penny, but would be appreciated tremendously by yours truly. And it works seamlessly with your Amazon Prime account.
This blog post took about 90 minutes to prepare and makes 210 consecutive days with a new one. Please remember that if an item — a Delkin flash card, or a tripod head — for example, that is available from B&H and/or Bedfords, and is also available in the BAA Online Store, it would be great, and greatly appreciated if you would opt to purchase from us. We will match any price. Please remember also to use my B&H affiliate links or to save 3% at Bedfords by using the BIRDSASART discount code at checkout. Doing either often earns you free guides and/or discounts. And doing so always earns my great appreciation.
Selling Your Used Photo Gear Through BIRDS AS ART
Selling your used (or like-new) photo gear through the BAA Blog is a great idea. We charge only a 5% commission. One of the more popular used gear for sale sites charged a minimum of 20%. Plus assorted fees! Yikes. They went out of business. And e-Bay fees are now up to 13%. The minimum item price here is $500 (or less for a $25 fee). If you are interested please scroll down here or shoot us an e-mail with the words Items for Sale Info Request cut and pasted into the Subject line :). Stuff that is priced fairly — I offer pricing advice to those who agree to the terms — usually sells in no time flat. Over the past year, we have sold many dozens of items. Do know that prices on some items like the EOS-1D Mark IV, the old Canon 100-400, the old 500mm, the EOS-7D and 7D Mark II and the original 400mm DO lens have been dropping steadily. Most recently the price of used Canon 600mm f/L IS II lenses have been dropping like a rock with the introduction of the 600 III. You can always see the current listings by clicking here or on the Used Photo Gear tab on the orange-yellow menu bar near the top of each blog post page.
As used gear sales have slowed just a bit in recent months — especially with dSLR bodies, there are lots of great buys right now both below and on the Used Gear Page.
New Listings
Canon EOS-1DX Mark II Professional dSLR
IPT veteran Sheldon Goldstein is offering a Canon EOS-1DX Mark II camera body in like-new condition for $2,199.00. It was recently cleaned and checked by Canon Professional Services. The sale includes one extra battery, the dual battery charger, the front cap, the, DC Coupler, and insured ground shipping via major courier to lower-48 US addresses only. Your item will not ship until your check clears unless other arrangements are made.
Please contact Sheldon via e-mail or by phone at 646-423-0392 (Eastern time zone).
The 1DX Mark II is a rugged, fast Canon professional digital camera body. It features an excellent AF system and high quality image files with great dynamic range. When he used Canon, it was the first choice of Arash Hazeghi, the world’s premier photographer of birds in flight. This body is still in production and currently sells new for $4,499.00. Save a very sweet $2300.00 by grabbing Sheldon’s dSLR body ASAP. artie
Canon EF 100-400m f/4.5-5.6L IS II USM Zoom Lens
IPT veteran Sheldon Goldstein is offering a Canon EF 100-400m f/4.5-5.6L IS II USM zoom lens in excellent condition for $1499.00. The lens was recently cleaned and checked by Canon Professional Services. The sale includes a Wimberley P-20 lens plate (a $52.00 value), the rear lens cap, the front lens cap, the lens case and strap, and insured ground shipping via major courier to lower-48 US addresses only. Your item will not ship until your check clears unless other arrangements are made.
Please contact Sheldon via e-mail or by phone at 646-423-0392 (Eastern time zone).
This incredibly versatile zoom lens — with its amazing .98 meter close focus — was my favorite Canon telephoto zoom lens ever. By far. It is easy to hand hold, great for tight portraits, birds in flight, quasi-macro stuff, and lots more. For flight, it is even better with an R5! The lens sells new for $2399.00 so you can save some hard cash by grabbing Sheldon’s zoom lens now. artie
Please Remember
With income from IPTs now close to zero, please, if you enjoy and learn from the blog, remember to use one of my two affiliate programs when purchasing new gear. Doing so just might make it possible for me to avoid having to try to get a job as a Walmart greeter and will not cost you a single penny more. And if you use Bedfords and remember to enter the BIRDSASART code at checkout, you will save 3% on every order and enjoy free second-day air shipping. In these crazy times — I am out at least forty to sixty thousand dollars so far due to COVID 19 (with lots more to come) — remembering to use my B&H link or to shop at Bedfords will help me out a ton and be greatly appreciated. Overseas folks who cannot order from the US because of import fees, duties, and taxes, are invited to help out by clicking here to leave a blog thank you gift if they see fit.
New and Better Bedfords Discount Policy!
You can now save 3% on all of your Bedfords photo gear purchases by entering the BIRDSASART coupon code at checkout. Your discount will be applied to your pre-tax total. In addition, by using the code you will get 2nd day air shipping via Fed Ex.
Grab a Nikon AF-S Teleconverter TC-14E III and save $14.99. Purchase a Canon EOS R5 and your discount will be $116.97. Purchase a Sony FE 600mm f/4 GM OSS lens and save a remarkable $389.94! Your Bedford’s purchase no longer needs to be greater than $1,000.00 for you to receive a discount. The more you spend, the more you save.
Money Saving Reminder
Many have learned that if you need a hot photo item that is out of stock at B&H and would enjoy free second-day air shipping, your best bet is to click here, place an order with Bedfords, and enter the coupon code BIRDSASART at checkout. If an item is out of stock, contact Steve Elkins via e-mail or on his cell phone at (479) 381-2592 (Central time). Be sure to mention the BIRDSASART coupon code and use it for your online order to save 3% and enjoy free 2nd-day air shipping. Steve has been great at getting folks the hot items that are out of stock at B&H and everywhere else. The wait lists at the big stores can be a year or longer for the hard to get items. Steve will surely get you your gear long before that. For the past year, he has been helping BAA Blog folks get their hands on items like the SONY a9 ii, the SONY 200-600 G OSS lens, the Canon EOS R5, the Canon RF 100-500mm lens, and the Nikon 500mm PF. Steve is personable, helpful, and eager to please.
Gear Questions and Advice
Too many folks attending BAA IPTs (remember those?) and dozens of photographers whom I see in the field and on BPN, are–out of ignorance–using the wrong gear, especially when it comes to tripods and more especially, tripod heads… Please know that I am always glad to answer your gear questions via e-mail.
|
|
|
This image was created on Thursday, 23 July 2021 late while sitting on a deck chair on Clemens Van Der Werf’s flats boat. I used the hand held Sony FE 600mm f/4 GM OSS lens with the Sony FE 1.4x Teleconverter and The One, the Sony Alpha 1 Mirrorless digital camera. ISO 800. Exposure determined via Zebras with ISO on the Thumb Wheel: 1/4000 sec. at f/5.6 (wide open) in Manual mode. AWB at 9:04am on a sunny morning.
Center Zone AF-C with Bird-Eye/Face Detection grabbed the kites near-flank, fortunately, right on the same plane as the bird’s eye.
Swallow-tailed Kite right after taking a sip
|
Will the Real Swallow-tailed Kite Please Swoop Down For a Sip?
I did manage to come away with one decent drinking kite image on Thursday morning …
Mega-challenging Bird Photography …
Why so difficult? With the birds at a distance, you needed to be at 840 or 1200mm. Using a tripod while standing in a floating boat trying to photograph rapidly moving subjects is totally out of the question. That means that you need to hand hold a 600mm f/4 lens with a teleconverter. Why not the SONY 200-600? While this versatile, easily hand holdable lens does well with the 1.4X TC with slow-moving and static subjects at close range, it would struggle greatly with fast birds flying erratically.
When the kites are swooping down for a drink, they present mostly as a dark birds. When they are flying against a background of dark trees and semi-tropical vegetation, it is difficult to even see them. My SONY rig did well when I could keep the subject relatively centered in the frame. But hand holding at 840mm is not my forté. If I found the subject in the frame and kept the bird centered, the AF system tracked beautifully. But, as I state here often, that is very difficult for me to do. I just opened an e-mail from Clemens with 17 very fine JPEGs. Ten of the images were of drinking Swallow-tailed Kites.
The Realities of Hand Holding Super-telephotos Lenses …
As I write often when critiquing Arash Hazeghi’s amazing flight shots — many made hand held at 1200mm — in the Avian Gallery on BPN, Stronger (sometimes younger) folks who have fast reflexes, stamina, superb fine motor skills and hand-eye coordination, are in the best position to take advantage of the amazing AF systems in today’s best mirrorless camera bodies.
Clemens was using the Canon R5 with the 1.4X III TC and the EF 600mm f/4L IS III lens. I have no doubt that a1 AF system is more consistently accurate than the R5 AF system with any gear, and I am pretty sure that Clemens agrees. So why did he get so many more satisfactory drinking kite images? Because he is younger, stronger, has faster reflexes, more stamina, and far better fine motor skills and hand-eye coordination than me. In short, he is far better able to keep the birds in the middle of the frame when hand holding at 840mm than I am.
Typos
With all blog posts, feel free to e-mail or to leave a comment regarding any typos or errors.
July 25th, 2021 A Focus Stacking Question …
As far as I know, none of the SONY bodies feature auto focus-stacking. If I focus bracket manually — Focus Peaking would make that relatively easy, is there a program that will auto-assemble the focus-bracketed series? If yes, which one is easiest to use?
Homer Bald Eagles Winter 2021
This is an expensive trip. The price of the boat and the price of the fish have risen astronomically since my last visit in 2020. But the photography is beyond amazing. Flight photography with any lens till you cannot raise your arms, creative set-ups, lots of snow, we hope (earlier in the season is best for that), and lots of opportunities for point-blank head portraits and talon shots. If you are seriously interested in joining me for the world’s best Homer/Katchemak Bay Bald Eagle trip(s) — mid-FEB thru early MARCH 2022, please contact me immediately via e-mail for dates and details.
What’s Up?
As noted yesterday, we did not do too well with the Swallow-tailed Kites on Friday morning. Saturday was worse. Lots worse … It dawned totally foggy with a northwest wind. The sun broke through at about 8:30am and the wind dropped a bit. But with wind against sun conditions, every kite was flying away from us and from the light. The few birds that came down for a drink were flying directly away from us. So you would figure, not so bad, enjoying a peaceful morning in a beautiful canal lined with tropical vegetation and tall trees, many of which are topped by 20-50 roosting Swallow-tailed Kites. If but that had been true. As it was a weekend and there were about eight photo boats. The problem was that on the boats that were closest to us, there were several folks who would not shut up, jabbering away as loud as possible, mostly preaching ridiculous photography tenets. I did some cell phone videos of the kites circling upwards but good photo chances were close to zero … We did learn that Thursday had been the best day for photography in twenty years. 🙂 N.A.T.U.R.E photography: Not Always The Ultimate Recreational Experience …
Congrats to American Olympic swimmers Chase Kalisz (Gold) and Jay Litherland (Silver) for sweeping the Men’s 400 Meter Individual Medley in Tokyo last night (with GOAT Michael Phelps in the booth).
Today is Sunday 25 July 2021. I took my walk early to beat the heat and the afternoon thunderstorms. Wherever you are, and whatever you are doing, we hope that you too have a great day.
Remember that you can find some great photo accessories (and necessities!) on Amazon by clicking on the Stuff tab on the orange/yellow menu bar above. On a related note, it would be extremely helpful if blog-folks like me, who spend too much money on Amazon, would get in the habit of clicking on the Amazon logo link on the right side of each blog post. As you might expect, doing so will not cost you a single penny, but would be appreciated tremendously by yours truly. And it works seamlessly with your Amazon Prime account.
This blog post took about two hours to prepare and makes 209 consecutive days with a new one. Please remember that if an item — a Delkin flash card, or a tripod head — for example, that is available from B&H and/or Bedfords, and is also available in the BAA Online Store, it would be great, and greatly appreciated if you would opt to purchase from us. We will match any price. Please remember also to use my B&H affiliate links or to save 3% at Bedfords by using the BIRDSASART discount code at checkout. Doing either often earns you free guides and/or discounts. And doing so always earns my great appreciation.
Please Remember
With income from IPTs now close to zero, please, if you enjoy and learn from the blog, remember to use one of my two affiliate programs when purchasing new gear. Doing so just might make it possible for me to avoid having to try to get a job as a Walmart greeter and will not cost you a single penny more. And if you use Bedfords and remember to enter the BIRDSASART code at checkout, you will save 3% on every order and enjoy free second-day air shipping. In these crazy times — I am out at least forty to sixty thousand dollars so far due to COVID 19 (with lots more to come) — remembering to use my B&H link or to shop at Bedfords will help me out a ton and be greatly appreciated. Overseas folks who cannot order from the US because of import fees, duties, and taxes, are invited to help out by clicking here to leave a blog thank you gift if they see fit.
New and Better Bedfords Discount Policy!
You can now save 3% on all of your Bedfords photo gear purchases by entering the BIRDSASART coupon code at checkout. Your discount will be applied to your pre-tax total. In addition, by using the code you will get 2nd day air shipping via Fed Ex.
Grab a Nikon AF-S Teleconverter TC-14E III and save $14.99. Purchase a Canon EOS R5 and your discount will be $116.97. Purchase a Sony FE 600mm f/4 GM OSS lens and save a remarkable $389.94! Your Bedford’s purchase no longer needs to be greater than $1,000.00 for you to receive a discount. The more you spend, the more you save.
Money Saving Reminder
Many have learned that if you need a hot photo item that is out of stock at B&H and would enjoy free second-day air shipping, your best bet is to click here, place an order with Bedfords, and enter the coupon code BIRDSASART at checkout. If an item is out of stock, contact Steve Elkins via e-mail or on his cell phone at (479) 381-2592 (Central time). Be sure to mention the BIRDSASART coupon code and use it for your online order to save 3% and enjoy free 2nd-day air shipping. Steve has been great at getting folks the hot items that are out of stock at B&H and everywhere else. The wait lists at the big stores can be a year or longer for the hard to get items. Steve will surely get you your gear long before that. For the past year, he has been helping BAA Blog folks get their hands on items like the SONY a9 ii, the SONY 200-600 G OSS lens, the Canon EOS R5, the Canon RF 100-500mm lens, and the Nikon 500mm PF. Steve is personable, helpful, and eager to please.
Gear Questions and Advice
Too many folks attending BAA IPTs (remember those?) and dozens of photographers whom I see in the field and on BPN, are–out of ignorance–using the wrong gear, especially when it comes to tripods and more especially, tripod heads… Please know that I am always glad to answer your gear questions via e-mail
|
|
|
This image was created on 23 July 2021 aboard Clemens Van der Werf’s flats boat on Lake Woodruff in Deland, FL. While seated on a deck chair, I used the hand held Sony FE 600mm f/4 GM OSS lens and The One, the Sony Alpha 1 Mirrorless digital camera. ISO 2000. Exposure determined (poorly) via Zebras with ISO on the rear dial: 1/1000 sec. at f/4 (wide open). AWB at 7:40am on a still, then cloudy morning.
Tracking: Flexible Spot AF-C performed perfectly by nailing the gator’s eye.
Image #1: American Alligator floating on calm morning
|
The Swallow-tailed Kite Photo Story
From what I understand — and saw for two mornings, hundreds of Swallow-tailed Kites roost in the tall trees lining one very popular canal adjoining Lake Woodruff. At about 8 or 8:30am, they take flight in number. Many circle overhead on thermals as things warm up. A few swoop down to the water to drink. A wind from the southeast would be perfect. Despite a southwest wind on Friday morning, we had a very few chances to photograph the drinking kites. With early fog and a northwest wind, we had zero chances on Saturday morning.
In any case, today’s featured image was my favorite from our two morning adventure.
|
|
|
This image was created on 23 July 2021 aboard Clemens Van der Werf’s flats boat on Lake Woodruff in Deland, FL. I used the hand held Sony FE 600mm f/4 GM OSS lens and The One, the Sony Alpha 1 Mirrorless digital camera. ISO 2000. Exposure determined (poorly) via Zebras with ISO on the rear dial: 1/1000 sec. at f/4 (wide open). AWB at 7:40am on a still, then cloudy morning.
Tracking: Flexible Spot AF-C performed perfectly by nailing the gator’s eye.
Image #1A: Topaz DeNoise on the American Alligator floating on calm morning image
|
Under-Exposures Yield More Noise
Click on the image to enlarge it and see the unusually high levels of noise for an ISO 2000 a1 original. RawDigger showed that in the very low light levels, the raw file was almost one stop too dark. Now note the after image on our right and see how beautifully Topaz DeNoise Low Light on Auto cleaned up the noise without any destructive posterization and without effecting the edges while actually improving the sharpness.
Topaz DeNoise
Be sure to click on the screen capture to see the complete elimination of noise in the after image on our right. And note that if anything, the fine details are sharper than in the original.
As regular readers know, I run DeNoise on virtually every image that I process immediately after executing the crop with the Delete Cropped Pixels box checked. For images made in sunny conditions, I used Standard. For images made in low light, I use Low Light. You can check all four methods by using the Comparison View but I rarely do that any more as I am confident as noted above.
Great Topaz News!
Folks who use the BAA Topaz link to purchase Sharpen AI, DeNoise AI, or the Utility Bundle (or any other Topaz plug-ins), will receive a 15% discount by entering the ARTHUR15 code at checkout. If the stuff is on sale (as it usually is), you save 15% off of the sale price! To get the discount you must use my link and you must enter the discount code. Be sure to start with this link.
Those who purchase Sharpen AI, DeNoise AI, or any other Topaz plug-ins using my link and then entering the ARTHUR15 code at checkout can e-mail to request a short Getting Started with Topaz e-Guide. Please include a copy of your Topaz receipt that shows the discount. Aside from the basics, the guide explains how to install the plug-ins so that they appear in the Photoshop Filter Menu.
RawDigger e-Mail Conversation with Saul Furstein
am: Hi Saul,
Re:
SF: I have read your The RawDigger E-Guide and have watched the two accompanying videos. I understand the value of getting the correct exposure in camera.
am: Or not 🙂
SF: I am confused. There was no mention of adjusting exposure in post-proocessing using software. Is there a reason that adjusting exposure with software is to be avoided?
am: Not at all. Exposing properly to the right gives you files with minimal noise and the most information. Doing so also yields cleaner, more natural color. I am pretty sure that it mentions that your raw files will often and usually should look washed out. So yes, we adjust the tonality of the image during post processing. Setting the Black (and white) points brings the images to life. And the Highlight Slider can be used to restore detail in the whites and highlights in properly exposed images.
Please LMK if you have any more questions.
Thanks with love, artie
RawDigger — not for the faint of heart …
Nothing has ever helped me learn to create perfect exposures to the degree that RawDigger has. I think that many folks are reluctant to learn that most of their images are underexposed by one or more full stops and that highlight warnings in Photoshop, Lightroom, Capture One, and your in-camera histogram are completely bogus as they are based on the embedded JPEGs. Only your raw files tell the truth all the time. Heck, I resisted RawDigger for several years … Once you get over that feeling, RawDigger can become your very best exposure friend no matter what system you are using. On the recent IPTs and In-the-Field sessions, we have demonstrated that fact. Convincingly.
The RawDigger (pink) Adapted Histogram
In the RawDigger e-Guide, you will learn exactly how to set up the Adapted “pink” RawDigger Histogram and how to use it to quickly and easily evaluate the exposure or raw file brightness of images from all digital cameras currently in use. RawDigger was especially helpful to me when I struggled with R5 exposures and when learned my new camera body, the Sony Alpha a1.
|
|
RawDigger e-Guide with Two Videos
|
The RawDigger e-Guide with Two Videos
by Arthur Morris with Patrick Sparkman
The RawDigger e-Guide was created only for serious photographers who wish to get the absolute most out of their raw files.
Patrick and I began work on the guide in July 2020. At first we struggled. We asked questions. We learned about Max-G values. We could not figure out why the Max G values varied by camera system. IPT veteran Bart Deamer asked lots of questions that we could not answer. We got help from RawDigger creator Iliah Borg. We learned. In December, Patrick came up with an Adapted Histogram that allows us to evaluate the exposures and raw file brightness for all images created with all digital camera bodies from the last two decades. What we learned each time prompted three complete beginning to end re-writes.
The point of the guide is to teach you to truly expose to the mega-Expose-to-the-Right so that you will minimize noise, maximize image quality, best utilize your camera’s dynamic range, and attain the highest possible level of shadow detail in your RAW files in every situation. In addition, your properly exposed RAW files will contain more tonal information and feature the smoothest possible transitions between tones. And your optimized images will feature rich, accurate color.
We teach you why the GREEN channel is almost always the first to over-expose. We save you money by advising you which version of RawDigger you need. We teach you how to interpret the Max G values for your Canon, Nikon, and SONY camera bodies. It is very likely that the Shock-your-World section will shock you. And lastly — thanks to the technical and practical brilliance of Patrick Sparkman — we teach you a simple way to quickly and easily evaluate your exposures and raw file brightness using an Adapted RawDigger histogram.
The flower video takes you through a session where artie edits a folder of images in Capture One while checking the exposures and Max-G values in RawDigger. The Adapted Histogram video examines a series of recent images with the pink histograms and covers lots of fine points including and especially how to deal with specular highlights. The directions for setting up the Adapted Histogram are in the text.
If we priced this guide based on how much effort we put into it, it would sell it for $999.00. But as this guide will be purchased only by a limited number of serious photographers, we have priced it at $51.00. You can order yours here in the BAA Online Store.
Typos
With all blog posts, feel free to e-mail or to leave a comment regarding any typos or errors.
July 24th, 2021 What’s Up?
Several folks commented or e-mailed on the difficulty of photographing the Swallow-tailed Kites near Deland. They were 100% correct. It was my first time ever at this location. We have one more morning on Lake woodruff and I will use what I learned to do much better today than I did on Friday morning.
I forgot to mention yesterday that on Thursday evening I climbed into bed at 6:30pm anticipating a great night’s sleep and waking at 4:00am for the trip up to Deland. I have never ever have a problem falling asleep. I play one game of chess against a BOT on my i-phone, read for a bit, and then I am gone. Anyhoo, on Thursday night I simply could not fall asleep. Wide awake, I read for six hours before finally falling asleep at 12:30am. And I have no clue as to why …
If you are seriously interested in joining me for the world’s best Homer/Katchemak Bay Bald Eagle trip(s) in FEB/early MARCH 2022, please contact me immediately via e-mail for dates and details.
Today is Saturday 24 July 2021. The weather for Deland is looking less than ideal … Partly cloudy with a gentle northwest breeze. Clemens and I will be heading south after our morning session. Wherever you are, and whatever you are doing, we hope that you too have a great day.
Remember that you can find some great photo accessories (and necessities!) on Amazon by clicking on the Stuff tab on the orange/yellow menu bar above. On a related note, it would be extremely helpful if blog-folks like me, who spend too much money on Amazon, would get in the habit of clicking on the Amazon logo link on the right side of each blog post. As you might expect, doing so will not cost you a single penny, but would be appreciated tremendously by yours truly. And it works seamlessly with your Amazon Prime account.
This blog post took about two hours to prepare and makes 209 consecutive days with a new one. Please remember that if an item — a Delkin flash card, or a tripod head — for example, that is available from B&H and/or Bedfords, and is also available in the BAA Online Store, it would be great, and greatly appreciated if you would opt to purchase from us. We will match any price. Please remember also to use my B&H affiliate links or to save 3% at Bedfords by using the BIRDSASART discount code at checkout. Doing either often earns you free guides and/or discounts. And doing so always earns my great appreciation.
Please Remember
With income from IPTs now close to zero, please, if you enjoy and learn from the blog, remember to use one of my two affiliate programs when purchasing new gear. Doing so just might make it possible for me to avoid having to try to get a job as a Walmart greeter and will not cost you a single penny more. And if you use Bedfords and remember to enter the BIRDSASART code at checkout, you will save 3% on every order and enjoy free second-day air shipping. In these crazy times — I am out at least forty to sixty thousand dollars so far due to COVID 19 (with lots more to come) — remembering to use my B&H link or to shop at Bedfords will help me out a ton and be greatly appreciated. Overseas folks who cannot order from the US because of import fees, duties, and taxes, are invited to help out by clicking here to leave a blog thank you gift if they see fit.
New and Better Bedfords Discount Policy!
You can now save 3% on all of your Bedfords photo gear purchases by entering the BIRDSASART coupon code at checkout. Your discount will be applied to your pre-tax total. In addition, by using the code you will get 2nd day air shipping via Fed Ex.
Grab a Nikon AF-S Teleconverter TC-14E III and save $14.99. Purchase a Canon EOS R5 and your discount will be $116.97. Purchase a Sony FE 600mm f/4 GM OSS lens and save a remarkable $389.94! Your Bedford’s purchase no longer needs to be greater than $1,000.00 for you to receive a discount. The more you spend, the more you save.
Money Saving Reminder
Many have learned that if you need a hot photo item that is out of stock at B&H and would enjoy free second-day air shipping, your best bet is to click here, place an order with Bedfords, and enter the coupon code BIRDSASART at checkout. If an item is out of stock, contact Steve Elkins via e-mail or on his cell phone at (479) 381-2592 (Central time). Be sure to mention the BIRDSASART coupon code and use it for your online order to save 3% and enjoy free 2nd-day air shipping. Steve has been great at getting folks the hot items that are out of stock at B&H and everywhere else. The wait lists at the big stores can be a year or longer for the hard to get items. Steve will surely get you your gear long before that. For the past year, he has been helping BAA Blog folks get their hands on items like the SONY a9 ii, the SONY 200-600 G OSS lens, the Canon EOS R5, the Canon RF 100-500mm lens, and the Nikon 500mm PF. Steve is personable, helpful, and eager to please.
Gear Questions and Advice
Too many folks attending BAA IPTs (remember those?) and dozens of photographers whom I see in the field and on BPN, are–out of ignorance–using the wrong gear, especially when it comes to tripods and more especially, tripod heads… Please know that I am always glad to answer your gear questions via e-mail
|
|
|
This image was created on 15 July 2020 a few blocks from my home at ILE. I used the hand held Sony FE 100-400mm f/4.5-5.6 GM OSS lens with the Sony FE 1.4x Teleconverter (at 560mm) and the 61-MP Sony Alpha a7R IV Mirrorless Digital Camera Body. ISO 800. The exposure was determined by Zebras with ISO on the rear wheel: 1/1000 sec. at f/9 (wide open) in Manual mode. RawDigger showed this exposure to be dead-solid perfect (as seen in the screen capture below). AWB at 8:44am on a clear, sunny morning.
I screwed up the focus (by choosing the wrong AF Method) … Click on the image to view a larger version.
Image #1: Zebra Swallowtail on Carolina Red Root blossom
|
Accurate and Honest Comments
Of the 39,479 approved comments on the blog, those left at the A Zebra at ILE ??? Your Thoughts? Be Honest. Be Brutal blog post here, were among the most insightful ever. The boys and girls did some fine work. So fine, that I am posting my replies here rather than on that post so that lots of folks can learn.
|
|
Image #1A: AF point screen capture for the Zebra Swallowtail on Carolina Red Root blossom image
|
Byron Prinzmetal
July 21, 2021 at 7:42 pm
·
My guess is the af mode was not a spot mode but some wide Sony af mode that got the wing tips as they were the closest points. Hard to have everything right all the time especially when you might have also anticipated getting the butterfly in flight and then had the af mode set for capturing a wider af area for a moving object????? But fantastic image anyway you cut it … BP
Thanks, Byron. I wish that I liked it as much as you. I believe that I was using one of the tracking spot AF methods but they are not nearly as good on the 7r iv as they are on the a1. Even though I started on the butterfly’s head, the AF system drifted off the butterfly and grabbed a spot on the flower just to the left of the butterfly’s left hind wing — the bottom wing on our right. So the head and the antennae were well past the plane of focus … In a perfect world, however, I could have gotten the shot by going to a single point moved to the right center of the frame and placed on the butterfly’s head or at least on its thorax.
James Saxon
July 21, 2021 at 5:32 pm
Nice image. I want to comment on what you titled Raw Digger is not for the faint of heart. I have owned Raw Digger for a couple of months and still trying to wrap my arms around all the information in the guide. It takes looking at your histogram and exposure in a totally new light. I still don’t understand everything but the guide is a huge help when using the software. I am still learning to view my exposures in a different context. When I get it right it takes a lot less processing. I recommend the software but not without purchasing the guide to reduce the learning curve.
Hi Jim, It was great meeting you at Anahuac. And yes, exposing to the right does make post-processing a lot easier. You may be making things a bit too complicated. Once you have the Adapted (Pink) histogram set up, the only thing that matters is the G channel. In a perfect world, that will run right up to the 16000 line. If it makes its was up to the 2/3 mark between the 8000 line and the 16000 line, you have an excellent exposure. Oft times, we wind up only one third of the way from the 8000 line to the 16000 line. That is still a very good and very workable exposure. Many folks are making their lives difficult by not even reaching the 8000 line; their images are under-exposed by a stop or more, often by two stops. artie
Chris Davidson
July 21, 2021 at 2:17 pm
A nice Zebra Swallowtail image, Art! Looks to me like your focus point was around the middle of it’s right wing.
Catching this butterfly with it’s wings fully opened would most likely have given you the details you were looking for … That can be hard at times with some species, they seem to constantly flap their wings. Firing off a burst of images will often times give at least one frame with fully open wings. The out of focus plants in the background also detract a bit, a cleaner background would improve this as well. Of course it’s all easier said than done!!
Thanks, Chris. The AF point was actually on the flower to our left of the butterfly’s left hind wing. But you were at the right latitude. And yes, had the butterfly fully spread it wings and posed flat, the image would have been much sharper and much more striking. I don’t particularly mind the flower background but there are lots of nicer flowers. And yes, the difficultly here was that this delicate creature would land only for a brief moment … artie
Larry Master
July 21, 2021 at 2:10 pm
I like the image. It appears that your AF setting caused the camera to grab what it thought was an “eye” (the red spot). It would have been nice if the wings were more open and/or you had more depth of field with a lower f-stop and higher ISO. I had some success with a similar setup (A1 w/ 200-600 and 1.4) a week ago while leading a butterfly walk (here).
Thanks, Larry. I like it but do not love it; it is not critically sharp where it needs to be. I never set up Eye AF with the a7r iv. I am pretty sure that if I began AF with tracking: Flexible Spot with the a1 it would have locked on the insect’s head … artie
Mike Cristina
July 21, 2021 at 10:49 am
It’s a great shot. I wish the stem on the left wasn’t there but it was, so you had to keep it. The focus appears to be on the red spot and up the center of the right wing. Had he moved his left wing away from you, AND exposed his left antennae into view it might have been a better photo. But, alas, he didn’t know you were there.
Thanks, Mike. I am afraid that it does not work for me even though the butterfly is gorgeous and was a perfect specimen. See above for the actual location of the AF point … Good eye noticing that one antenna was partially hidden 🙁 artie
Adam
July 21, 2021 at 9:54 am
There are several things I like about the image including the composition with the butterfly canted to the right and the slight bend of the flowers to the left. As you observed, it’s an interesting specimen and one we don’t see around here. Obviously, you have little control over the background and flower so I won’t venture to comment on these issues. What would I have preferred to have seen? Both wings (L>R) are a bit oof (DOF v. motion?) and the head position is not optimal. Only one antenna is visible and the head is ever slightly shrouded by the wing. Also, the focus appears to be on the spots on the lower part of the wings so the head is not the focal point. The right tail flare (?) is lost in the shadow of the stem on the plant (from the butterfly?) Perhaps had you moved to the right a bit, all of these issues would have been obviated though with butterflies, they rarely pause but for a brief second.
Thanks for your insightful comment, Adam. Your analysis is spot on. Yes, I was pretty much dead on sun angle so that it the shadow of the butterfly on the stem. The image is badly front focused and the head is irrecoverably soft. I believe that you were referring to the tail when you mentioned the flare. I appreciate everyone’s honest and accurate comments. I thought that this image might make for some excellent educational fodder and it did.
|
|
Image #1B: A tight crop of the head of the Zebra Swallowtail on Carolina Red Root blossom image
|
Simply Not Sharp
Click on the image to enlarge it and you can easily see that the butterfly’s head is nowhere near sharp. It is well beyond the plane of sharp focus and in addition, only one of the antennae are visible. Paraphrasing the late Harry Chapin from Mr. Tanner:
The butterfly was beautiful, but unfortunately the presentation was not up to contemporary professional standards; full-time consideration of another endeavor might be in order.
If you are not familiar with the story songs of the late, great Harry Chapin, you might want to invest five minutes listening to this wonderful song here. The complete (and very touching) lyrics are available at the link.
Typos
With all blog posts, feel free to e-mail or to leave a comment regarding any typos or errors.
July 23rd, 2021 Your Call
After clicking on each image to enlarge it, please leave a comment and let us know which one you like the best and why you made your choice. Image #1 was made at the wide open aperture, Image #2 was made at f/8, and Image #3 was created at f/16.
What’s Up?
It is 5:35am and Clemens and I are headed up to Lake Woodruff in Volusia County in search of large numbers of Swallow-tailed Kites gathering before they head to South America for the winter. Wish us luck. For the most part it will be a big challenge for me as I will be hand holding the SONY 600mm f/4 GM with the 1.4X TC and the a1 body.
Today is Friday 23 July 2021. The weather for Deland is looking less than ideal … Wherever you are, and whatever you are doing, I hope that you too have a great day.
Thanks for all the comments on yesterday’s images. I will be sharing my thoughts on those with you here soon.
Remember that you can find some great photo accessories (and necessities!) on Amazon by clicking on the Stuff tab on the orange/yellow menu bar above. On a related note, it would be extremely helpful if blog-folks like me, who spend too much money on Amazon, would get in the habit of clicking on the Amazon logo link on the right side of each blog post. As you might expect, doing so will not cost you a single penny, but would be appreciated tremendously by yours truly. And it works seamlessly with your Amazon Prime account.
This blog post took well more than two hours to prepare and makes 208 consecutive days with a new one. Please remember that if an item — a Delkin flash card, or a tripod head — for example, that is available from B&H and/or Bedfords, and is also available in the BAA Online Store, it would be great, and greatly appreciated if you would opt to purchase from us. We will match any price. Please remember also to use my B&H affiliate links or to save 3% at Bedfords by using the BIRDSASART discount code at checkout. Doing either often earns you free guides and/or discounts. And doing so always earns my great appreciation.
Please Remember
With income from IPTs now close to zero, please, if you enjoy and learn from the blog, remember to use one of my two affiliate programs when purchasing new gear. Doing so just might make it possible for me to avoid having to try to get a job as a Walmart greeter and will not cost you a single penny more. And if you use Bedfords and remember to enter the BIRDSASART code at checkout, you will save 3% on every order and enjoy free second-day air shipping. In these crazy times — I am out at least forty to sixty thousand dollars so far due to COVID 19 (with lots more to come) — remembering to use my B&H link or to shop at Bedfords will help me out a ton and be greatly appreciated. Overseas folks who cannot order from the US because of import fees, duties, and taxes, are invited to help out by clicking here to leave a blog thank you gift if they see fit.
New and Better Bedfords Discount Policy!
You can now save 3% on all of your Bedfords photo gear purchases by entering the BIRDSASART coupon code at checkout. Your discount will be applied to your pre-tax total. In addition, by using the code you will get 2nd day air shipping via Fed Ex.
Grab a Nikon AF-S Teleconverter TC-14E III and save $14.99. Purchase a Canon EOS R5 and your discount will be $116.97. Purchase a Sony FE 600mm f/4 GM OSS lens and save a remarkable $389.94! Your Bedford’s purchase no longer needs to be greater than $1,000.00 for you to receive a discount. The more you spend, the more you save.
Money Saving Reminder
Many have learned that if you need a hot photo item that is out of stock at B&H and would enjoy free second-day air shipping, your best bet is to click here, place an order with Bedfords, and enter the coupon code BIRDSASART at checkout. If an item is out of stock, contact Steve Elkins via e-mail or on his cell phone at (479) 381-2592 (Central time). Be sure to mention the BIRDSASART coupon code and use it for your online order to save 3% and enjoy free 2nd-day air shipping. Steve has been great at getting folks the hot items that are out of stock at B&H and everywhere else. The wait lists at the big stores can be a year or longer for the hard to get items. Steve will surely get you your gear long before that. For the past year, he has been helping BAA Blog folks get their hands on items like the SONY a9 ii, the SONY 200-600 G OSS lens, the Canon EOS R5, the Canon RF 100-500mm lens, and the Nikon 500mm PF. Steve is personable, helpful, and eager to please.
Gear Questions and Advice
Too many folks attending BAA IPTs (remember those?) and dozens of photographers whom I see in the field and on BPN, are–out of ignorance–using the wrong gear, especially when it comes to tripods and more especially, tripod heads… Please know that I am always glad to answer your gear questions via e-mail
The Situation
We have a nice patch of Sunshine Mimosa growing in a small patch of dirt right next to the pool machinery. I’ve seen spent blossoms before. I checked for flowers on Wednesday morning but there were none, and no buds as well, at least that I saw. After my Thursday morning walk, I walked out onto the pool deck to put my boots in the sun to dry and decided to take a peek at the low-growing mimosas that had multiplied over the past three years. I was surprised to see two blossoms. One was a bit ragged and the other one was perfect. I picked the beautiful blossom and set up for a green background in the front yard. As it was rather late and a breeze was developing, I moved my setup into the lee of the big oak tree in front of my house. The good news in those situation is that the breeze comes and goes.
Note that working wide open with the Metabones Adapter resulted in severe vignetting that could not be completely eliminated via the Vignettting slider during the raw conversion in ACR; I had to use a very soft clone stamp to make the corners perfect.
Sensitive Brier
Sensitive Brier (Mimosa nuttallii), with its smaller prettier blossoms, is more common at ILE than Sunshine Mimosa. It is sometimes called Catclaw Sensitive Briar because of the multitude of tiny barbs on the stems. You can see a decent image of this mimosa in the the blog post here.
Variety is the Spice of Flower Photography
Once I have my gear set up on a still flower in calm conditions, and have focused sharply exactly where I want, the process becomes quite automated. For this flower, I started at f/8 and shot exposures from +.7 stops to + 2 stops. I guessed that +1.0 would have been best. Those were acceptable but when I evaluated the images in RawDigger it showed that +1.3 stops was best. Working in Av mode with Exposure Compensation enables me to work very quickly and to learn more about exposure once the images are downloaded by evaluating them in RawDigger. Then it is a simple matter of varying the aperture and shooting series of five images at different exposures. If you wish to change the size of the image in the frame or try a different image design, rinse and repeat.
Note that in Image #1 there were no dust spots. In Image #2 there were two. In Image #3, where I stopped down to f/16, I had to use the Spot Healing Brush to eliminate about 20 dust spots, many of them nasty. Note also in Image #3 that some background detail was brought up even though it was a good twenty feet to the grass background.
SONY and artie
Switching to SONY, first with the a9 and the a9 II, and then with the remarkable a1, has enabled me (and others, like Mike De Rosa as seen recently in the blog post here), to create images of birds in flight and in action that I could not have even dreamed of when using Canon for 33 years and then Nikon for more than two. Most of the time I am using one of two AF methods that together, cover about 99% of the commonly-encountered bird photography situations. Learn more by joining the group!
From Long-ago IPT veteran Keith Kennedy via e-mail
Absolutely great information. I am calling Jim in a few minutes to order a couple of Delkin 128GB UHS-II cards. Your timely email has saved me a ton of money! Many thanks
In the same vein, via e-mail from John LeClair
Well, e-mail #21 alone was worth the price of admission!
From Pamela Viale, after receiving my a1 settings along with detailed instructions on how to copy them to her SONY a1 via e-mail
This e-mail group has been an incredible boon to me! Thank you so much!
From Joe Barranco via e-Mail
Thanks for your great ideas on the A1 set up. I have been getting MANY more keepers doing things your way!
From Barbara White via e-Mail
Wow, I just gotta say – I learn so much from the SONY Alpha a1 Set-up and Info group! My camera is on my desk, and I’m always picking it up and changing something that I’ve read about in the e-mails.
Thanks, Barbara
From Janet Horton via e-Mail
Hi Artie, Mystery solved. Yes, I was able to replicate what you did. I forgot that you have to set self-timer using the upper dial. I am used to that being a MENU selection.
Thanks much, Janet
SONY Alpha a1 Set-up and Info Group
The SONY Alpha a1 Set-up and Info Group is going great guns as more and more folks chime in with thoughtful questions and experience-based answers. As the a1 is becoming more readily available, more and more folks are getting their hands on this amazing body. We are now up to an astounding 69 lucky and blessed photographers! Early on, we discussed the myriad AF options. I gave my opinion as to the best one for flight and general bird photography.
All who purchased their Alpha a1 bodies via a BAA affiliate link will receive a free subscription to the Sony Alpha a1 Set-Up and Info Updates after shooting me their receipts via e-mail. (Note: it may take me several days to confirm B&H orders.) This same service may be purchased by anyone with an a1 body via a $150.00 PayPal sent to birdsasart@verizon.net indicating payment for Alpha a1 Info Updates. Alternatively, folks can call Jim weekdays at 1-863-692-0906 to pay via credit card. New members will receive composite e-mails that summarize all previous discussions.
Typos
With all blog posts, feel free to e-mail or to leave a comment regarding any typos or errors.
July 22nd, 2021 Following Up
Everything below in today’s post has to do with questions raised in the recent blog post here. Wanna learn? Keep reading.
What’s Up?
I spent most of Wednesday morning watching the Milwaukee Bucks defeat the Phoenix Suns for the 2021 NBA Championship. After the game, I reveled for hours in the celebration and the commentary. When the Bucks were down 2-0 in the best of seven series, I was telling my friends that they would win. They proceeded to take the last four games. Congrats to the whole Bucks team, in particular to Final MVP Giannis Antetokounmpo. The tall, skinny teenager was the fifteenth pick in the 2013 NBA draft.
Adapted from the Wikipedia article here.
Giannis Adetokunbo was born in Athens, Greece, on December 6, 1994, the son of immigrants from Nigeria. Three years earlier, his parents had moved from Lagos, leaving their firstborn son, Francis, under the care of his grandparents. Although Adetokunbo and three of his four brothers were born in Greece, they did not automatically receive Greek citizenship. For the first 18 years of his life, Adetokunbo could not travel outside the country and was effectively stateless, having no papers from Greece or Nigeria. He was eventually issued Greek citizenship on May 9, 2013, less than two months before the 2013 NBA Draft. Adetokunbo grew up in the Athens neighborhood of Sepolia. His parents, as immigrants, could not easily find work, so Giannis and his older brother, Thanasis, helped by hawking watches, handbags and sunglasses in the streets. In 2007, Adetokunbo started playing basketball. After gaining Greek citizenship in 2013, his official surname became Αντετοκούνμπο, the Greek transcription of Adetokunbo, which was then transliterated letter-for-letter and officially spelled on his Greek passport as Antetokounmpo. Because many could not pronounce his surname, he quickly became known as the “Greek Freak.” Antetokounmpo obtained Nigerian citizenship in 2015.
Giannis is now 6′ 11″ tall, has filled out to a svelte 242 pounds, and earns $25 million a year. From humble beginnings, he sits atop the sports world with his teammates as NBA champions. I’d be remiss in not recognizing the contribution of forward Khris Middleton (as well as the rest of the team and the oft-maligned coach, Mike Budenholzer). Without Middleton’s clutch shooting the Suns would have won the series.
Thanks to the many who left insightful comments at yesterday’s A Zebra at ILE ??? Your Thoughts? Be Honest. Be Brutal blog post here. I will be sharing my thoughts on the Zebra Swallowtail image here soon. There is lots to learn.
Today is Thursday 22 July 2021. I will begin packing today for my Auto Train trip after which I will be spending all of August on Long Island. Wherever you are, and whatever you are doing, I hope that you too have a great day.
Thanks for all the comments on yesterday’s images. I will be sharing my thoughts on those with you here tomorrow.
Remember that you can find some great photo accessories (and necessities!) on Amazon by clicking on the Stuff tab on the orange/yellow menu bar above. On a related note, it would be extremely helpful if blog-folks like me, who spend too much money on Amazon, would get in the habit of clicking on the Amazon logo link on the right side of each blog post. As you might expect, doing so will not cost you a single penny, but would be appreciated tremendously by yours truly. And it works seamlessly with your Amazon Prime account.
This blog post took about 90 minutes to prepare and makes 207 consecutive days with a new one. Please remember that if an item — a Delkin flash card, or a tripod head — for example, that is available from B&H and/or Bedfords, and is also available in the BAA Online Store, it would be great, and greatly appreciated if you would opt to purchase from us. We will match any price. Please remember also to use my B&H affiliate links or to save 3% at Bedfords by using the BIRDSASART discount code at checkout. Doing either often earns you free guides and/or discounts. And doing so always earns my great appreciation.
Please Remember
With income from IPTs now close to zero, please, if you enjoy and learn from the blog, remember to use one of my two affiliate programs when purchasing new gear. Doing so just might make it possible for me to avoid having to try to get a job as a Walmart greeter and will not cost you a single penny more. And if you use Bedfords and remember to enter the BIRDSASART code at checkout, you will save 3% on every order and enjoy free second-day air shipping. In these crazy times — I am out at least forty to sixty thousand dollars so far due to COVID 19 (with lots more to come) — remembering to use my B&H link or to shop at Bedfords will help me out a ton and be greatly appreciated. Overseas folks who cannot order from the US because of import fees, duties, and taxes, are invited to help out by clicking here to leave a blog thank you gift if they see fit.
New and Better Bedfords Discount Policy!
You can now save 3% on all of your Bedfords photo gear purchases by entering the BIRDSASART coupon code at checkout. Your discount will be applied to your pre-tax total. In addition, by using the code you will get 2nd day air shipping via Fed Ex.
Grab a Nikon AF-S Teleconverter TC-14E III and save $14.99. Purchase a Canon EOS R5 and your discount will be $116.97. Purchase a Sony FE 600mm f/4 GM OSS lens and save a remarkable $389.94! Your Bedford’s purchase no longer needs to be greater than $1,000.00 for you to receive a discount. The more you spend, the more you save.
Money Saving Reminder
Many have learned that if you need a hot photo item that is out of stock at B&H and would enjoy free second-day air shipping, your best bet is to click here, place an order with Bedfords, and enter the coupon code BIRDSASART at checkout. If an item is out of stock, contact Steve Elkins via e-mail or on his cell phone at (479) 381-2592 (Central time). Be sure to mention the BIRDSASART coupon code and use it for your online order to save 3% and enjoy free 2nd-day air shipping. Steve has been great at getting folks the hot items that are out of stock at B&H and everywhere else. The wait lists at the big stores can be a year or longer for the hard to get items. Steve will surely get you your gear long before that. For the past year, he has been helping BAA Blog folks get their hands on items like the SONY a9 ii, the SONY 200-600 G OSS lens, the Canon EOS R5, the Canon RF 100-500mm lens, and the Nikon 500mm PF. Steve is personable, helpful, and eager to please.
Gear Questions and Advice
Too many folks attending BAA IPTs (remember those?) and dozens of photographers whom I see in the field and on BPN, are–out of ignorance–using the wrong gear, especially when it comes to tripods and more especially, tripod heads… Please know that I am always glad to answer your gear questions via e-mail
Wind Direction Question
Two days ago, I wrote:
Study the image and see if you can determine the wind direction on this clear sunny morning. Leave a comment if you figure it out.
Three folks took a stab at it. In reality, being able to read the wind the moment you get to the beach, or even before you leave your house, is a vitally important skill for bird photographers. In the cell phone image above, you needed to note the birds in the air. The one landing bird was angling slightly away from us. The other birds in the air were doing the same but angling a bit more to our left. Understand that when the birds on the ground are involved in doing this or that, especially when the wind is fairly light, they will often not be affected at all by the wind. On a windy day at the beach, most birds resting on the ground will be facing directly into the wind. On the other hand, birds taking flight, will always fly directly into the wind, even a fairly gentle wind. The sun comes up roughly in the east. Birds flying directly away from us would show that the wind was from the west. Above, they were angling away to our left; that clearly indicated that the wind was from the west/southwest. In the morning, that wind is not conducive to good flight photography. That’s why we were atop the ladder working at 1200mm photographing the chicks.
Wing or No Wing?
In the same post, I wrote:
Of the three tern chick images, which one is best, and why? Do you like the one with the wing in the upper left, the one with the wing in the upper right, or the one with the clear light-blue sky? Be sure to let us know why you made your choice.
Ten folks left a comment on the wing question. Seven of those folks liked Image #4 best, the one with the wing of the adult eliminated. The other three preferred Image #3, the one where I moved the wing from the upper left corner to the upper right corner. With regards to the wing versus no wing question. Please understand that I cannot tell you what to like and what not to like. But for me, either image with the wing of the adult is far stronger than the final, cleaner version with the wing dispatched. Why? The chick is reacting to the adult flying by. Heck, they react to any bird flying by whether or not it is their parent. The adults recognize the chicks by sight and by call. The chicks recognize the adults only by call.
The wing tells a story, and helps to move the viewer’s eye around the frame. Coming from “Mr. Clean, Tight, and Graphic, that may be a surprise to many. If anything, the ones with the wing are different. By leaving the wing in either corner, the viewer is forced to think: Why did the artist choose to leave the wing? What is the story being told?
You might try this on for size: Image #4, the sterile image, would have zero chance in any prestigious photo contest. #2 would at least have a chance. #3 would not be eligible for most contests because the wing was moved from one side of the frame to the other.
The always-creative Denise Ippolito wrote:
I like the wing in the upper right corner- number 4 looks a bit sterile to me 🙂 but it is a fabulous shot either way.
Then, the highly skilled (and former BAA student) Cliff Beittel wrote:
#3. I agree with Denise, and better with the wing than without. The wing creates tension (with the promise of release), tells a story, gives the eye and brain more to explore instead of just locking on the throat. I like the giant photographers too.
Now this might surprise you even more. I like Image #2 (above), the best — the original with the adult’s wing in the upper left corner. Why? Because that was the reality. I will admit, however, that the image design is better balanced with the wing flopped and placed in the upper right corner.
This Just In
At 10:11am, three hours after publishing this, I finally realized why I prefer the original image with the wing in the upper left corner. With the wind from the west/southwest, the adult was flying from right to left as I viewed the scene. We are seeing the dorsal part of the adult left wing. With the wing flopped, the bird would have had to have been flying in the opposite (wrong) direction … If that makes any sense.
Typos
With all blog posts, feel free to e-mail or to leave a comment regarding any typos or errors.
July 21st, 2021 What’s Up?
Most of the time, I know a day or two in advance what the subject of an upcoming blog will be. I woke this morning with no clue. So I decided to look at my ILE July 2020 file. I was surprised to see flowers, flowers, and more flowers. Along with a very few butterflies and cranes. Right now the fields are too soft and too wet to drive on safely, so no cranes. And there are just not many flowers around.
Anyhoo, I found today’s featured image, processed it, and prepared this blog post. Today is Wednesday 21 July. Wherever you are, and whatever you are doing, I hope that you too have a great day.
Thanks for all the comments on yesterday’s images. I will be sharing my thoughts on those with you here tomorrow.
Remember that you can find some great photo accessories (and necessities!) on Amazon by clicking on the Stuff tab on the orange/yellow menu bar above. On a related note, it would be extremely helpful if blog-folks like me, who spend too much money on Amazon, would get in the habit of clicking on the Amazon logo link on the right side of each blog post. As you might expect, doing so will not cost you a single penny, but would be appreciated tremendously by yours truly. And it works seamlessly with your Amazon Prime account.
This blog post took about one hour to prepare and makes 206 consecutive days with a new one. Please remember that if an item — a Delkin flash card, or a tripod head — for example, that is available from B&H and/or Bedfords, and is also available in the BAA Online Store, it would be great, and greatly appreciated if you would opt to purchase from us. We will match any price. Please remember also to use my B&H affiliate links or to save 3% at Bedfords by using the BIRDSASART discount code at checkout. Doing either often earns you free guides and/or discounts. And doing so always earns my great appreciation.
Please Remember
With income from IPTs now close to zero, please, if you enjoy and learn from the blog, remember to use one of my two affiliate programs when purchasing new gear. Doing so just might make it possible for me to avoid having to try to get a job as a Walmart greeter and will not cost you a single penny more. And if you use Bedfords and remember to enter the BIRDSASART code at checkout, you will save 3% on every order and enjoy free second-day air shipping. In these crazy times — I am out at least forty to sixty thousand dollars so far due to COVID 19 (with lots more to come) — remembering to use my B&H link or to shop at Bedfords will help me out a ton and be greatly appreciated. Overseas folks who cannot order from the US because of import fees, duties, and taxes, are invited to help out by clicking here to leave a blog thank you gift if they see fit.
New and Better Bedfords Discount Policy!
You can now save 3% on all of your Bedfords photo gear purchases by entering the BIRDSASART coupon code at checkout. Your discount will be applied to your pre-tax total. In addition, by using the code you will get 2nd day air shipping via Fed Ex.
Grab a Nikon AF-S Teleconverter TC-14E III and save $14.99. Purchase a Canon EOS R5 and your discount will be $116.97. Purchase a Sony FE 600mm f/4 GM OSS lens and save a remarkable $389.94! Your Bedford’s purchase no longer needs to be greater than $1,000.00 for you to receive a discount. The more you spend, the more you save.
Money Saving Reminder
Many have learned that if you need a hot photo item that is out of stock at B&H and would enjoy free second-day air shipping, your best bet is to click here, place an order with Bedfords, and enter the coupon code BIRDSASART at checkout. If an item is out of stock, contact Steve Elkins via e-mail or on his cell phone at (479) 381-2592 (Central time). Be sure to mention the BIRDSASART coupon code and use it for your online order to save 3% and enjoy free 2nd-day air shipping. Steve has been great at getting folks the hot items that are out of stock at B&H and everywhere else. The wait lists at the big stores can be a year or longer for the hard to get items. Steve will surely get you your gear long before that. For the past year, he has been helping BAA Blog folks get their hands on items like the SONY a9 ii, the SONY 200-600 G OSS lens, the Canon EOS R5, the Canon RF 100-500mm lens, and the Nikon 500mm PF. Steve is personable, helpful, and eager to please.
Gear Questions and Advice
Too many folks attending BAA IPTs (remember those?) and dozens of photographers whom I see in the field and on BPN, are–out of ignorance–using the wrong gear, especially when it comes to tripods and more especially, tripod heads… Please know that I am always glad to answer your gear questions via e-mail
|
|
|
This image was created on 15 July 2020 a few blocks from my home at ILE. I used the hand held Sony FE 100-400mm f/4.5-5.6 GM OSS lens with the Sony FE 1.4x Teleconverter (at 560mm) and the 61-MP Sony Alpha a7R IV Mirrorless Digital Camera Body. ISO 800. The exposure was determined by Zebras with ISO on the rear wheel: 1/1000 sec. at f/9 (wide open) in Manual mode. RawDigger showed this exposure to be dead-solid perfect (as seen in the screen capture below). AWB at 8:44am on a clear, sunny morning.
I screwed up the focus (by choosing the wrong AF Method) … Click on the image to view a larger version.
Image #1: Zebra Swallowtail on Carolina Red Root blossom
|
Your Thoughts?
Zebra Swallowtail is my favorite butterfly. This is a beautiful specimen. They are uncommon and skittish so getting a great image is a huge challenge.
Enlarge the image and examine it critically and ask yourself, what do I like about it? Then ask yourself, what don’t I like about it. Then share your thoughts by leaving a comment. Where do you think the focus was? What one thing could the butterfly have done that would have resulted in a perfect image?
|
|
Image #1A: RawDigger screen capture for the Zebra Swallowtail on Carolina Red Root blossom image
|
Dead-Solid Perfect!
Images where the G channel gets 2/3rds of the way from the 8000 to the 16000 line are perfect exposures. Images where the G channel gets right up to the line are dead-solid perfect. With 195 OvExp pixels out of 51,000,000 this is a dead-solid perfect exposure.
RawDigger — not for the faint of heart …
Nothing has ever helped me learn to create perfect exposures to the degree that RawDigger has. I think that many folks are reluctant to learn that most of their images are underexposed by one or more full stops and that highlight warnings in Photoshop, Lightroom, Capture One, and your in-camera histogram are completely bogus as they are based on the embedded JPEGs. Only your raw files tell the truth all the time. Heck, I resisted RawDigger for several years … Once you get over that feeling, RawDigger can become your very best exposure friend no matter what system you are using. On the recent IPTs and In-the-Field sessions, we have demonstrated that fact. Convincingly.
The RawDigger (pink) Adapted Histogram
In the RawDigger e-Guide, you will learn exactly how to set up the Adapted “pink” RawDigger Histogram and how to use it to quickly and easily evaluate the exposure or raw file brightness of images from all digital cameras currently in use. RawDigger was especially helpful to me when I struggled with R5 exposures and when learned my new camera body, the Sony Alpha a1.
|
|
RawDigger e-Guide with Two Videos
|
The RawDigger e-Guide with Two Videos
by Arthur Morris with Patrick Sparkman
The RawDigger e-Guide was created only for serious photographers who wish to get the absolute most out of their raw files.
Patrick and I began work on the guide in July 2020. At first we struggled. We asked questions. We learned about Max-G values. We could not figure out why the Max G values varied by camera system. IPT veteran Bart Deamer asked lots of questions that we could not answer. We got help from RawDigger creator Iliah Borg. We learned. In December, Patrick came up with an Adapted Histogram that allows us to evaluate the exposures and raw file brightness for all images created with all digital camera bodies from the last two decades. What we learned each time prompted three complete beginning to end re-writes.
The point of the guide is to teach you to truly expose to the mega-Expose-to-the-Right so that you will minimize noise, maximize image quality, best utilize your camera’s dynamic range, and attain the highest possible level of shadow detail in your RAW files in every situation. In addition, your properly exposed RAW files will contain more tonal information and feature the smoothest possible transitions between tones. And your optimized images will feature rich, accurate color.
We teach you why the GREEN channel is almost always the first to over-expose. We save you money by advising you which version of RawDigger you need. We teach you how to interpret the Max G values for your Canon, Nikon, and SONY camera bodies. It is very likely that the Shock-your-World section will shock you. And lastly — thanks to the technical and practical brilliance of Patrick Sparkman — we teach you a simple way to quickly and easily evaluate your exposures and raw file brightness using an Adapted RawDigger histogram.
The flower video takes you through a session where artie edits a folder of images in Capture One while checking the exposures and Max-G values in RawDigger. The Adapted Histogram video examines a series of recent images with the pink histograms and covers lots of fine points including and especially how to deal with specular highlights. The directions for setting up the Adapted Histogram are in the text.
If we priced this guide based on how much effort we put into it, it would sell it for $999.00. But as this guide will be purchased only by a limited number of serious photographers, we have priced it at $51.00. You can order yours here in the BAA Online Store.
Typos
With all blog posts, feel free to e-mail or to leave a comment regarding any typos or errors.
July 20th, 2021 Need Your Help
Of today’s four featured images, which one do you like best? Of the three tern chick images, which one is best, and why? Do you like the one with the wing in the upper left, the one with the wing in the upper right, or the one with the clear light-blue sky? Be sure to let us know why you made your choice. In addition, you can learn a ton by considering the Wind Direction question below.
Many thanks. Much love.
What’s Up?
I slept late (for me), and woke to a still, gorgeous morning here at ILE. After eight great sessions on the second JAX IPT, I did not even think about going out to photograph. That, in part, because the fields down by the lake are too wet to drive on. I did get lots of work done, did my bursts and a swim, and ate well. I made some progress on my 2020 tax return, answered lots of Used Gear Page e-mails, and added four folks to the Sony A1 Info and Updates group, a one-day record!
If you are looking for a Sony SEL 400mm f/2.8 GM OSS lens, get in touch with Steve Elkins at Bedford asap and be sure to use the BIRDSASART discount code at checkout to save 3% and enjoy free second-day air Fed-Ex shipping.
Today is Tuesday 20 July 2020. I am beginning to think about packing for my trip to Long Island. Wherever you are, and whatever you are doing, I hope that you too have a great day.
Remember that you can find some great photo accessories (and necessities!) on Amazon by clicking on the Stuff tab on the orange/yellow menu bar above. On a related note, it would be extremely helpful if blog-folks like me, who spend too much money on Amazon, would get in the habit of clicking on the Amazon logo link on the right side of each blog post. As you might expect, doing so will not cost you a single penny, but would be appreciated tremendously by yours truly. And it works seamlessly with your Amazon Prime account.
This blog post took about one hour to prepare and makes 205 consecutive days with a new one. Please remember that if an item — a Delkin flash card, or a tripod head — for example, that is available from B&H and/or Bedfords, and is also available in the BAA Online Store, it would be great, and greatly appreciated if you would opt to purchase from us. We will match any price. Please remember also to use my B&H affiliate links or to save 3% at Bedfords by using the BIRDSASART discount code at checkout. Doing either often earns you free guides and/or discounts. And doing so always earns my great appreciation.
Canon EOS-1DX Mark II Professional Digital Camera Body
BIRDS AS ART Record-low Price!
BAA friend Ron Horn is offering a Canon EOS-1DX II in excellent plus condition for the BAA record low price of $2199.00. The camera has only 44,000 shutter actuations (rated to 400,000). Both LCDs are pristine and there are a few very minor cosmetic marks on the body. The sale does not include the original box but does include everything that came in it along with an extra battery, a custom Kirk L-bracket (approximately a $175.00 value), and insured ground shipping to the lower 48 states. Your item will not ship until your check clears.
Please contact Ron via e-mail
The 1DX Mark II is a rugged, fast Canon professional digital camera body. It features an excellent AF system and high quality image files with great dynamic range. When he used Canon, it was the first choice of Arash Hazeghi, the world’s premier photographer of birds in flight. This body is still in production and currently sells new for $4,499.00. Save a very sweet $2300.00 by grabbing Ron’s dSLR ASAP. artie
Happiness Is …
Happiness is being very tall at sunrise at 1200mm with some tern chicks on the ridge. I am in the middle, Donna Bourdon is to my left, and Clemens Van der Werf is on my right. The ridge is dead center past the adults, the last bit of visible sand between the shadows of the two big lenses. It is a rare day when I am just about as tall as Clemens. We all took turns on the ladders. Being up on a ladder is also great for handheld flight as you can see the birds coming and you can get some nicer-than-sky backgrounds.
Wind Direction Question
Study the image and see if you can determine the wind direction on this clear sunny morning. Leave a comment if you figure it out.
|
|
The iPhone Photography e-Guide
To order your copy of the iPhone Photography e-Guide, please click here.
The PDF is sent link by e-mail for downloading: the file is relatively huge at 216 MB.
|
Hard to Believe
Yes, Cliff has a great eye and wonderfully creative vision. Yet it is still hard for me to believe that he can make so many great images with “just“ an i-phone. Almost more amazingly Cliff captures with his iPhone and does all of his post-processing on the phone! In this great new e-Guide written for BIRDS AS ART you will learn to set up your iPhone quickly and efficiently and how to use it. In addition, there are dozens and dozens of tips on Cliff’s favorite apps and his favorite gear. Scroll down to the bottom to see the Table of Contents.
The iPhone Photography e-Guide: $20.00.
To order your copy of the iPhone Photography e-Guide please click here.
Dr. Cliff Oliver
Dr. Cliff Oliver is an award-winning photographer, former photography instructor for the San Diego Natural History Museum, cutting-edge integrative health care professional, and international workshop leader. He created and taught the first 5-day immersion iPhone photography workshop at Hollyhock, Canada’s premier Leadership Learning Center. He teaches quarterly iPhone photography classes at the Athenaeum Music & Arts Library School of the Arts (these include Art on the iPhone, iPhoneography, Portraits and Selfies, and Practicing in the Field). His images have been on the cover of WildBird magazine, on display at Scripps Oceanography Institute, and been honored with multiple first-place finishes in the International Exhibition of Photography Del Mar. The San Diego Natural History Museum’s, “Birds of the World” centennial exhibit featured several of his images. One of his iPhone images received an honorable mention in the Athenaeum 23rd annual juried exhibition. He has displayed images at Art Speaks: Expressions of Hope and Healing and has produced a series of books, called Zen I, II, III, IV, V, VI and VII that feature original images that promote inner peace. The last 4 books feature only images taken on the iPhone. He teaches individuals and groups the skills of capturing iPhone/mobile photographs and then how to create personalized works of art.
To see some of Cliff’s iPhone images, click here. Learn more about Cliff and what he does on his Center for Balance website here. And don’t forget, if I had never met Cliff I would be pushing up daisies somewhere. To request my Health Basics File that contains the whole story, please shoot me an e-mail by clicking here..
Induro’s GIT505XXL Grand Series 5 Stealth Carbon Fiber Tripod
Optimized for the highest level of stability and utilizing a flat modular magnesium alloy platform, the Induro GIT505XXL Grand Series 5 Stealth Carbon Fiber Tripod reaches to 81.3″ tall with the legs fully splayed, and without a center column, can get you as low as 5.5″. With a maximum load of 88.2 lbs., it is strong and sturdy enough for all bird photography applications. Each leg is divided into 5 sections and features half-turn twist locks for fast adjustments. Portability is maintained as well with a folded length of 27.6″. I ordered mine from B&H last week and got it just in time for the second JAX IPT. It got me where I needed to be!
I Was Lucky Early
I had spotted some chicks on the sand ridge in these images the day before, so I positioned my ladder to be right on sun angle as soon as the sun cleared the ever-present cloud bank on the eastern horizon. I was very lucky early on as I had clear views of several chicks atop the ridge. After that, it was very difficult to find a slot through the numerous adults (and young) blocking line of sight to the birds on the ridge.
This is the original image with the wing of a fly-by adult in the upper left corner.
Flopped
For this version, I flopped the upper part of the sky so that the wing would be — as suggested by friend and colleague Denise Ippolito, in the upper right hand corner. I selected the upper part of the sky and then used techniques from APTATS to flop the selection horizontally. The whole process took about 30 seconds.
You can learn advanced Quick Masking and Layer Masking techniques in the APTATS I & II Bundle. Save $15 by purchasing the pair.
The Wing is Gone
For the third version, I eliminated the wing completely. This actually turned out to be a bit more work than flopping the wing from left to right. Why? When I grabbed the upper right corner, flopped it, and moved it into place over the wing in the upper left corner, there was a bit of a tonality mis-match. A bit of work with the Patch Tool and Content-Aware Fill eliminated the mismatched tones.
Typos
With all blog posts, feel free to e-mail or to leave a comment regarding any typos or errors.
|
|