April 30th, 2019 What’s Up?
I had planned to head down to the lake early this morning but had so much work to do that I opted out despite the perfect weather and a gentle northeast breeze.
Preparing this blog post took about six hours; writing good how-to is a painstaking exercise. If something below does not make sense or if you have any questions about any of the FlexShooter stuff, please leave a comment.
|
|
FlexShooter Pro
You can order your FlexShooter Pro from the BAA Online Store right now for $599.00 plus the shipping by clicking here, or by phone at 863-692-0906. We started with twenty units and expect the rest of those to be gone quickly as we have sold four already by word of mouth …
|
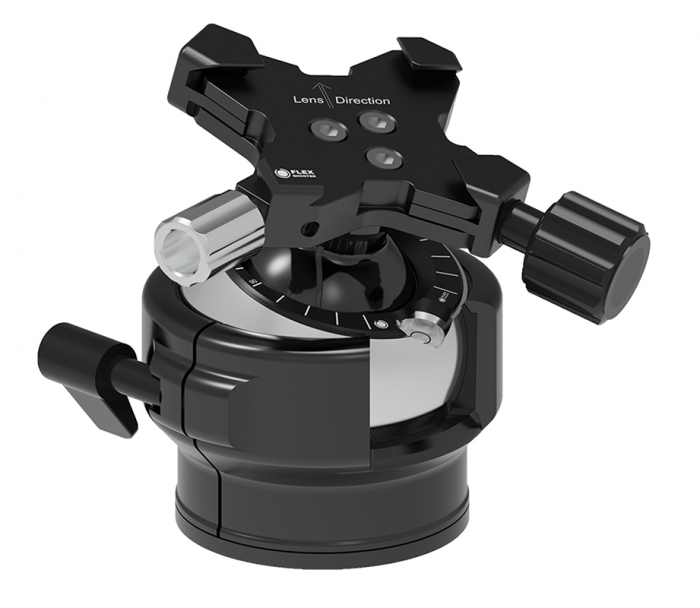
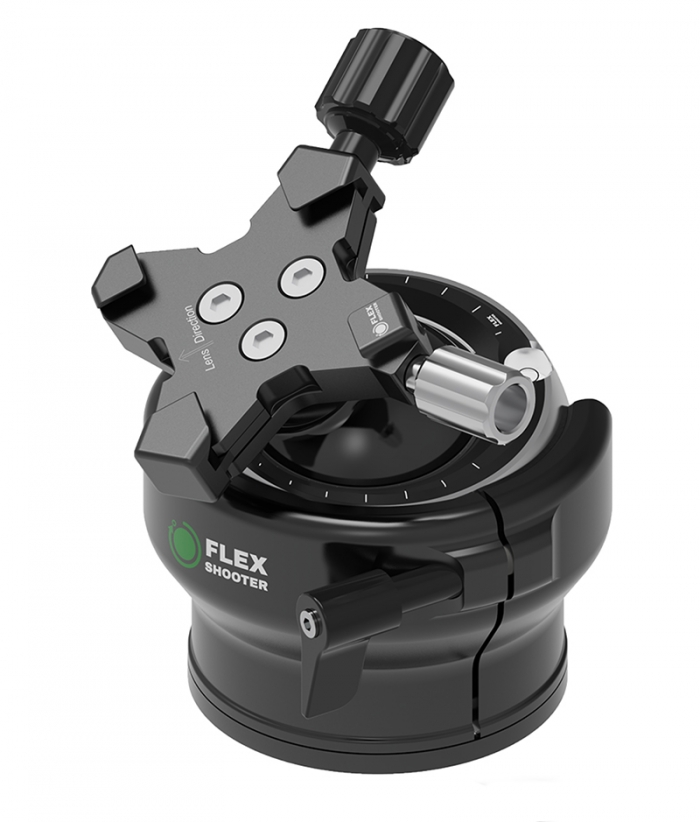
The FlexShooter Pro Tripod Head
$599.00 plus the shipping
Years ago I tried a double ballhead and was not at all impressed. About four months ago I got my hands on a FlexShooter Pro. The first thing that I did was to let the manufacturer know that in my opinion, the knob on the clamp was a bit too small. He instituted a design change. All but one of the heads we have in stock has the slightly larger knob. If you might be interested in the head with the smaller knob, please get in touch via e-mail.
With my heavy travel schedule and my newfound love of hand holding the 500 PF, I did not commit to using the FlexShooter Pro until recently. For the past two weeks I have been putting my FlexShooter Pro to work. As I’ve learned more about how to set up and use the FlexShooter Pro, to say that I was and am impressed would be an understatement. The head is amazing.
To begin, the FlexShooter Pro is a ballhead that acts like a gimbal head, only better. Why better? Once your rig is set up properly — see the tutorial below — the lens actually stays where you point it without your having to lock up the head! Where you point the lens is what you get. That thanks to the patented spring system design that is made from the most durable artificial rubber on earth, polyurethane. It was chosen because at a given volume it is capable of storing much more elastic energy than even steel springs. In short, your rig will be perfectly counter-balanced: point it and leave it. The FlexShooter Pro is designed to handle loads of up to 99 pounds so it will easily handle your longest telephoto lens with ease and with efficiency. No more ballhead flop, no more crushed fingers, and far fewer missed shots; you are always ready to go with the FlexShooter Pro. And once you center the bubble in the silver ball and level your camera body by rotating the lens in the tripod collar, you can point your telephoto lens anywhere and be assured that your rig is square to the world with level horizons. And the same is true when working with short lenses mounted via a plate on the camera body.
While the above is hard to believe, it gets even better: the FlexShooter Pro is far more versatile than any gimbal head — actually, it’s a no contest. As above, you can use your longest telephoto lens. And the same is true for your intermediate telephoto lenses, for your intermediate telephoto zooms, and for you short telephoto and macro lenses. And — and this is a huge plus — you can use your FlexShooter Pro for scenic photography with the camera body mounted — thanks to the amazing two-way Arca-Swiss compatible clamp. There is no longer a need to travel with and carry a small ballhead if you wish to do photography with short lenses that do not have a tripod collar. Only the FlexShooter Pro fits all!
Once you have set the desired tension for the rig you are using — less for big glass, a bit more for the shorter lenses — and you want to lock the head down, there is absolutely no ballhead creep. What you see is what you get. I have never seen or used any tripod head that eliminates ballhead creep the way that the FlexShooter Pro does. Frame it, tighten the Silver Bullet Knob and forget it. This is a Godsend especially for scenic and for macro photographers.
The FlexShooter Pro weighs one pound, 8.9 ounces, just 1.2 ounces more than my Mongoose m3.6 (that tips the scales at one pound, 7.7 ounces). Do compare both with the Wimberley V2 head at a hefty three pounds, 3.4 ounces.
|
|
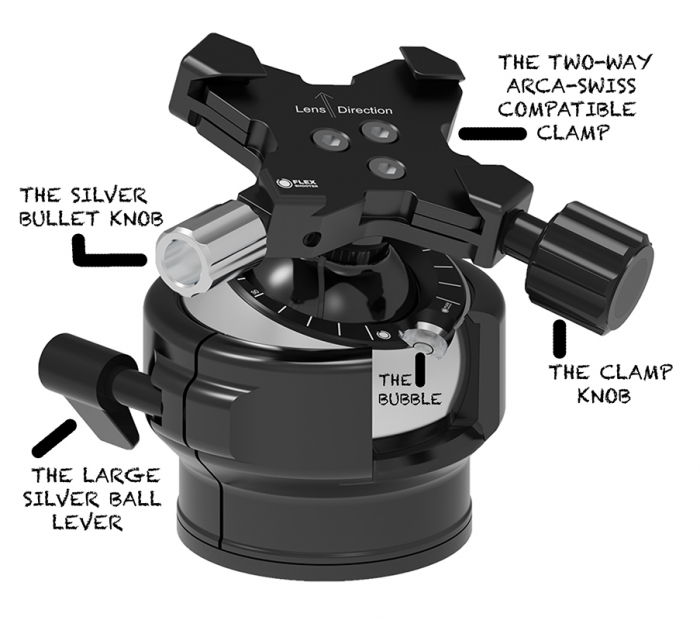
FlexShooter Pro labeled set-up diagram
|
How to Set-up and Use Your FlexShooter Pro Tripod Head
In Your Home — Learning the Set-up
- 1-First tighten (clockwise) the Large Silver Ball Lever (black) to lock the large silver ball. Note, the position of the Large Silver Ball Lever can be adjusted as needed by pulling the lever straight out and then rotating it as needed and then releasing it.
- 2-Screw the head onto your tripod. To tighten it securely, grasp the black housing firmly with both hands and rotate the head in a clockwise direction. (To remove the head from the tripod for travel, reverse the procedure.)
- 3-Stand behind your tripod with the front leg of your tripod pointing at your (imaginary) subject.
- 4-Loosen (counter-clockwise) the silver ball with the Large Silver Ball Lever (black) so that housing rotates on the tripod. Position the housing so that the Large Silver Ball Lever (black) is on your left with he seam pointed directly at you. Tighten (clockwise) the Large Silver Ball Lever (black) ever-so-slightly to put just a bit of tension on the large silver ball. Then, holding the housing in your left hand, rotate the silver ball with the fingertips of your right hand until the bubble level is at the 90 degree position, that is, on your right. This will enable you to see the bubble when your telephoto lens is mounted. (You may need to re-position the level when mounting a camera body on the head.)
- 5-With the Silver Bullet Knob loosened (couter-clockwise), rotate the clamp so that the Lens Direction Arrow that is inscribed on the base of the clamp is pointed directly away from you. Now grasp the clamp and — looking straight down at the bubble, center the bubble perfectly in the scribed circle (you might need your reading glasses!) and then tighten the silver ball in its now perfectly level position by rotating the the Large Silver Ball Lever (black) firmly clockwise.
- 6-Now it is time to mount your big telephoto lens very carefully. Be sure to finger-tighten (clockwise) the Silver Bullet Knob before mounting the lens. Because of the unique design of the two-way Arca-Swiss compatible clamp, it is easier to screw up when mounting the lens than it is with either a Mongoose or a Wimberley. And the stop-stud system on the Wimberley is not available on the FlexShooter Pro. Be absolutely sure to confirm visually that the lens plate (more on those below) is seated properly in the jaws of the clamp. . Balance the lens perfectly by moving the lens plate or low foot forward and backward in the clamp as needed and be sure to check both sides of the clamp before you tighten (clockwise) the clamp knob firmly.
- 7- Using either the click-mark on the lens barrel or better yet, your in-camera level, rotate the lens in the tripod collar until it shows perfectly level. Amazingly, if you have followed the instructions above perfectly, you can point your lens up or down or left or right and the back of the camera will be perfectly square to the world. All of your herons and egrets will be standing straight up and all of your ducks will be swimming on a level pond. I call this the the always-true-level feature.
- 8- Now it is time to learn to use the Silver Bullet Knob to set the desired tension. From completely locked down (clockwise) it only takes three full turns to loosen (counter-clockwise) the small black ball completely. And you will rarely want to lock down the head completely when using a big telephoto lens. I do most of my bird photography with the small black ball adjusted to loose. That makes it easy to follow moving subjects including birds in flight. When employing slower shutter speeds, I will often finger-tighten (clockwise) the Silver Bullet Knob . Whatever tension you set, if you point the lens up or down or left or right and let it go, it will not move. And best of all, the lens is rendered weightless.
In the Field — A Practical Guide to Getting the Most Out of Your FlexShooter Pro
After you mount your lens and are ready to go for a walk or to change your position in the field, I find it best to tighten (clockwise) the Silver Bullet Knob fairly firmly so that the lens does not move at all when you are in walking.
If you will be standing (or sitting) in the same spot for a while, you will surely want to take the time to center the bubble in the scribed circle as detailed in #5 above. Be sure, however, to spread all three legs of your tripod out firmly before doing so, or, if you are working on a soft surface such as sand or mud, be sure to push down on the upper tripod legs to set the tripod firmly in place. If you do not take those steps, perfect level will be thrown off if the tripod moves even a bit.
If you will be changing your position often — usually to stay right on sun angle, for example 🙂 — you might opt to center the bubble in the scribed circle each time, or you might simply loosen the Silver Bullet Knob, loosen the tripod collar, and rotate the lens in the tripod collar as you work. That will be your call. If you anticipate your subjects moving from side to side you might wish to center the bubble each time so that you can take advantage of the always-true-level feature. Wish practice, this can be done in a matter of seconds at most.
If you are working on a relatively flat surface such as a boardwalk for example, you might take a moment to center the bubble on the tripod itself in the scribed circle on the tripod plate (by adjusting the leg length) and then centering the the bubble in the scribed circle on the FlexShooter Pro. That way, whenever and wherever you put your rig down, you will be pretty darned close to true level.
When working in the field with a big lens and a FlexShooter Pro, you will quickly come to realize that the Silver Bullet Knob is your best friend as you can use it to lock the head when you move and to adjust the tension in fine increments depending on your needs and your personal taste.
Stuff
You can order your FlexShooter Pro from the BAA Online Store right now for $599.00 plus the shipping by clicking here, or by phone at 863-692-0906. We started with twenty units and expect the rest of those to be gone quickly as we have sold four already by word of mouth …
Note that the BIRDS AS ART FlexShooter item prices across the board are a bit less than the European prices (converted from USD to Euros).
Overseas Orders
Overseas folks (especially Europeans) who wish to have their heads and other FlexShooter product shipped from Hungary are asked — with thanks — to click here.
Bigfoot
When I first set up my FlexShooter Pro I was surprised to note the 4th Generation low foot that I have on my Nikon 600mm f/4 VR lens was not long enough to balance the lens atop the head. FlexShooter makes seven different long lens feet for most name brand super-telephoto lenses that are currently in use. We have placed an order for those and anticipate having them in stock within ten days. They will sell for $99 US plus shipping. At present, we are accepting phone orders only: 863-692-0906. I am looking forward to getting the BIGFOOT FCN-20 for my Nikon 600.
To enquire about the correct Bigfoot for your big lens, please contact me via e-mail.
In stock right now I have one FLC15 for the Canon 500mm f/4L IS II lens and an FLC-100 for the Canon 400mm f/2.8L IS II, the Canon 600mm f/4L IS II & III, and the Canon 800mm f/5.6L IS. This one also work for the first generation Canon 400mm f/2.8L IS and the the first generation Canon 600mm f/4L IS. At present, we are accepting phone orders only for these items: 863-692-0906.
|
|
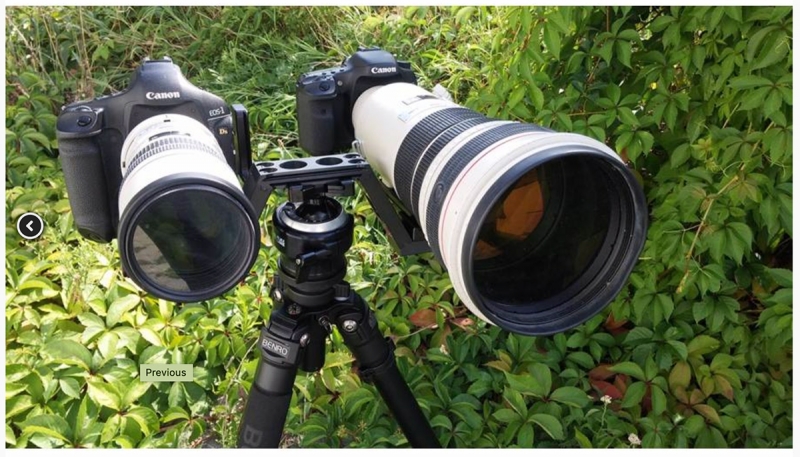
The TwinShooter in Action
|
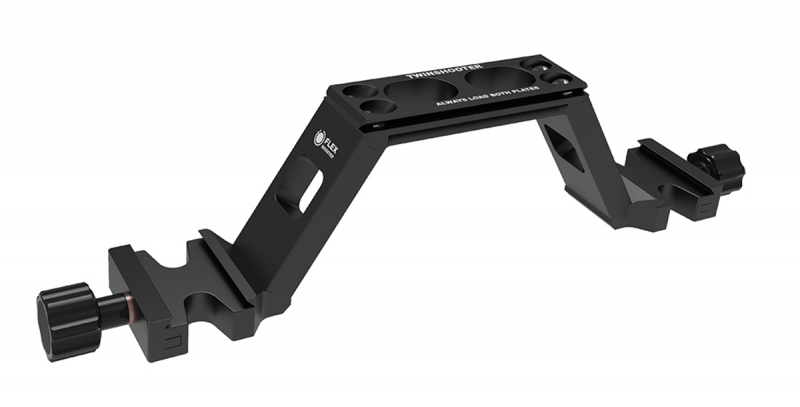
The TwinShooter
If you work in a situation where you are seated in a blind, under cover, or somewhere in the field where you need two tripod-mounted lenses side by side, always level, and instantly available, then the TwinShooter was made for you (but alas, not for me). 🙂
TwinShooter Product Shot
The TwinShooter sells for $209.00 US plus shipping. We have one in stock. At present, we are accepting phone orders only: 863-692-0906.
The FlexShooter Extreme
The FlexShooter Extreme is a FlexShooter Pro on steroids. It is of course larger and weighs in at 2 pounds, 9 ounces. If you are a rigidity-freak, or if you want the maximum stability when using a TwinShooter, you would like fall in love with the FlexShooter Extreme.
This item sells for $699.00 US plus shipping. We have one in stock. At present, we are accepting phone orders only: 863-692-0906.
April 29th, 2019 What’s Up?
I swam a mile on Saturday and Sunday. On Sunday morning I went to Gatorland without a client :). There were few birds and fewer photographers but I did fantastically well. The other photographers spent their morning photographing 90 degrees off sun angle. I had my Nikon 600 VR with me and my Nikon 500 PF. Early on I did well with the 600 VR and the TC-E14 on the tripod with the Flexshooter head. But as things turned out, my most valuable lens by far was the hand held Sony FE 100-400mm f/4.5-5.6 GM OSS (with the Alpha a9 Mirrorless Digital camera with and without the Sony FE 1.4x teleconverter). It absolutely kills in close quarters and in changing light — especially in low light as below.
I will share FlexShooter info in a short blog post tomorrow as too many folks can’t wait …
SONY A9 Getting Started Guide with Video
If you are just getting started with your SONY a9 body and would like to know how to set the menu items that are relevant to bird photography, please send a Paypal for $22.00 to e-mail with SONY Quick Start Guide in the Subject line or at least somewhere in the e-mail. The guide also includes the best Focus Areas to use for photographing birds both in flight and action and at rest. Along with my comments.
Get a Free Copy!
If you have used my B&H or Bedford affiliate link to purchase a SONY a9 or the Sony FE 100-400mm f/4.5-5.6 GM OSS Lens please shoot me your receipt via e-mail along with a request for your free copy of the SONY Quick Start Guide. Once I confirm that you have used the link correctly you will receive your guide with a link to the video via e-mail.
IPT Updates
- The 2019 Fort DeSoto Short-Notice Sandbar Secrets IPT/Sunday May 5 through the morning session on Wednesday May 8, 2019: 3 1/2 DAYS: $1649.00. Limit 4, openings: 2.
- The New, Expanded 2019 UK Puffins and Gannets IPT. Seahouses, Bempton Cliffs, and the Dunbar, Scotland Gannet boat to Bass Rock! Thursday June 27 (from EDI) through Tuesday, July 9, 2019 (on the ground; fly home on Wednesday July 10.): $9,999. Limit 5 photographers/Openings: 1
- The GALAPAGOS Photo Cruise of a Lifetime IPT/The Complete Galapagos Photographic Experience. July 23 to August 6, 2019 on the boat. 13 FULL and two half-days of photography: $14,499. Limit: 12 photographers/Openings: 2.
- The 2020 San Diego 4 1/2-DAY BIRDS AS ART Instructional Photo-Tour (IPT) WED JAN 8, 2020 thru and including the morning session on SUN JAN 12: 4 1/2 days: $2099.(Limit: 8/Openings: 7)
BIRDS AS ART
BIRDS AS ART is registered in the U.S. Patent and Trademark Office.
Mongooses
For the first time in months, we have Mongoose Action Heads in stock.
|
|
Lessons From the Field/BIRDS AS ART Style is a 1 hour, 15 minute, 314 image,
click and play MP4 video
|
Lessons From the Field/BIRDS AS ART Style: $10.00
Click here to order or see the Save $10 Bundle offer below.
Lessons From the Field/BIRDS AS ART Style is a 1 hour, 15 minute click and play MP4 video. It is available here in the BAA Online Store, by phone order, or by sending a Paypal for $10.00 to birdsasart@verizon.net. As the file is a large one, be sure to upload it when you have a good internet connection.
The video features 314 of artie’s best images, educational and otherwise. Based on his 35 years of in-the-field experience, it covers all the basics along with many fine points. Are you making mistakes that give you no chance to create a great image? Learning to avoid those and learning to think like a pro will make you a better photographer. If you purchase and study the video, it will surely prove to be the best ten dollars you’ve ever spent on photography.
|
|
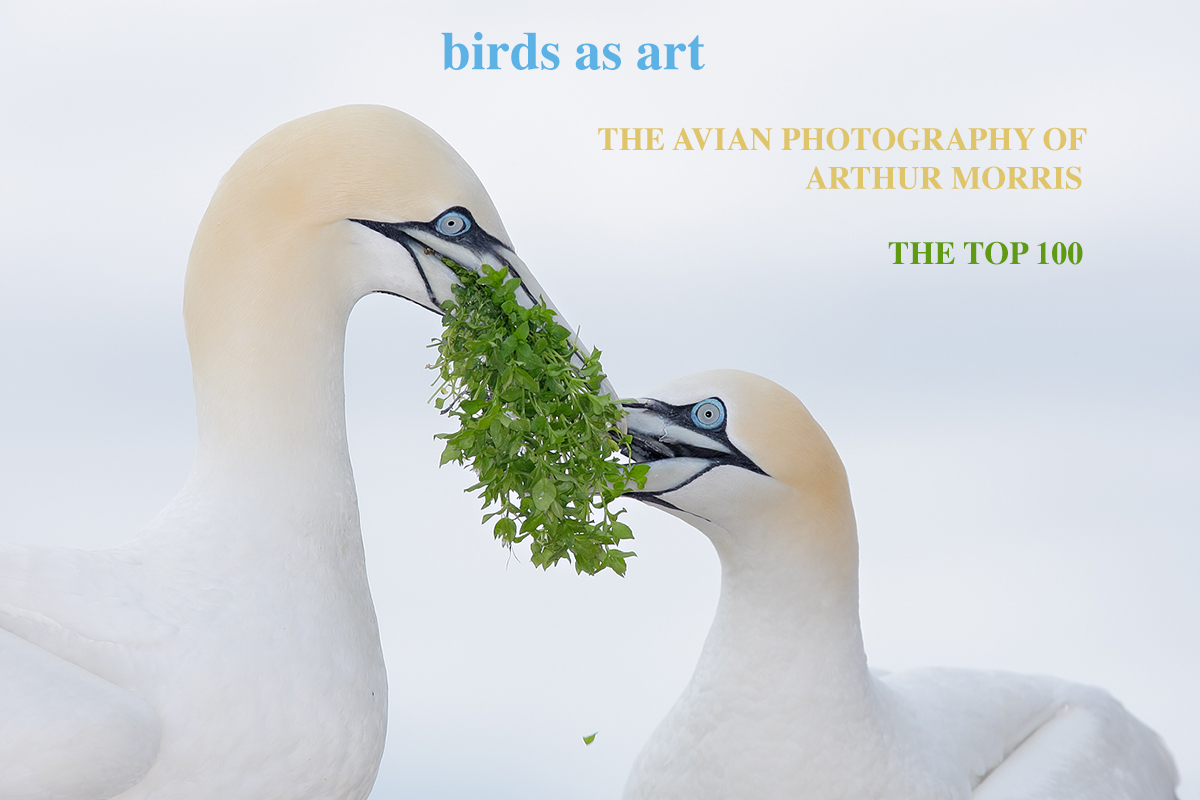
birds as art: The Avian Photography of Arthur Morris/The Top 100:
|
Save Ten Bucks!
Order the Lessons From the Field MP4 video and add a copy of the birds as art: The Avian Photography of Arthur Morris/The Top 100 (via convenient download — normally sells for $20.00) for an additional 10.00.
Order the bundle for $20.00 by clicking here.
Money Saving Reminder
If you need a hot photo item that is out of stock at B&H, would enjoy free overnight shipping, and would like a $50 discount on your first purchase, click here to order and enter the coupon code BIRDSASART at checkout. If you are looking to strike a deal on Canon or Nikon gear (including the big telephotos) or on a multiple item order, contact Steve Elkins via e-mail or on his cell at (479) 381-2592 (Eastern time) and be sure to mention your BIRDSASART coupon code and use it for your online order. Steve currently has several D850s in stock along with a Nikon 600mm f/4 VR. He is taking pre-orders for the new Nikon 500 P and the Nikon Z6 mirrorless camera body.
Booking.Com
Many IPT folks have been using the Booking.Com link below to get great rates and save a handsome $25.00 in the process. If you too would like to give Booking.Com a shot, click here and to earn a $25 reward on your first booking. Thanks to the many who have already tried and used this great service.
Airbnb
I have been using AirBNB for all of my travel lodging needs. Everyone on the Fort DeSoto IPT is staying at an AirBNB property in Gulfport. Airbnb lists more than 4.5 million homes across 200 countries; you’ll find spacious, affordable options for every occasion. With Airbnb you will travel with confidence as reviews from past guests help you find the right fit. Once you do, their secure messaging makes it easy to coordinate with your host. And Airbnb support teams are available 24/7. And this morning, I made a 17-day reservation for an Airbnb condo for San Diego, 2020. I am staying with Rick again: his place has lots of room, a full kitchen, two bedrooms, and great WiFi. All for a lot less than the price of a chain hotel.
Yikes. I almost forgot the best part: Airbnb rates average less than half of even the least expensive chain hotels and motels. If you would like to save $40 on your first booking sign up by using this link: Airbnb. Airbnb does charge clean-up and service fees that make short stays less attractive bargains than long stays.
Those who prefer to stay in a motel or hotel are invited to use the Booking.com link above to save $25.00.


Gear Questions and Advice
Too many folks attending BAA IPTs and dozens of photographers whom I see in the field and on BPN, are–out of ignorance–using the wrong gear especially when it comes to tripods and more especially, tripod heads… Please know that I am always glad to answer your gear questions via e-mail. Those questions might deal with systems, camera bodies, accessories, and/or lens choices and decisions.
I Was Thinking of Selling My Sony Gear …
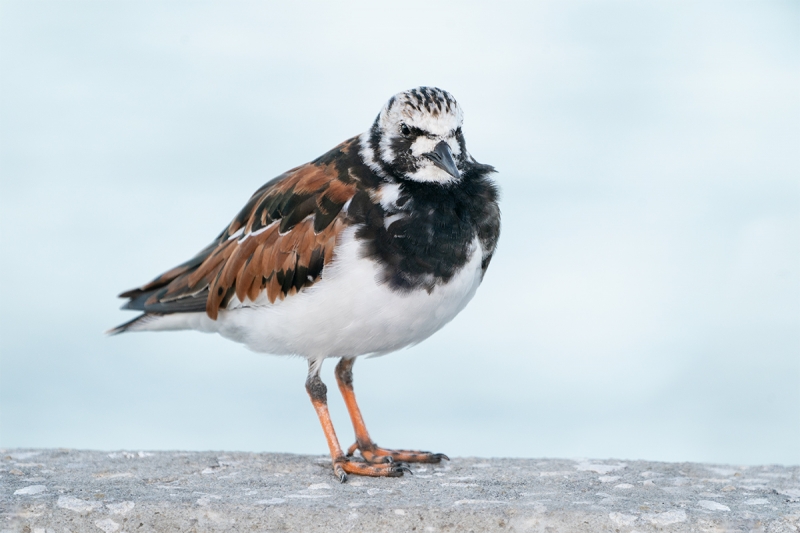
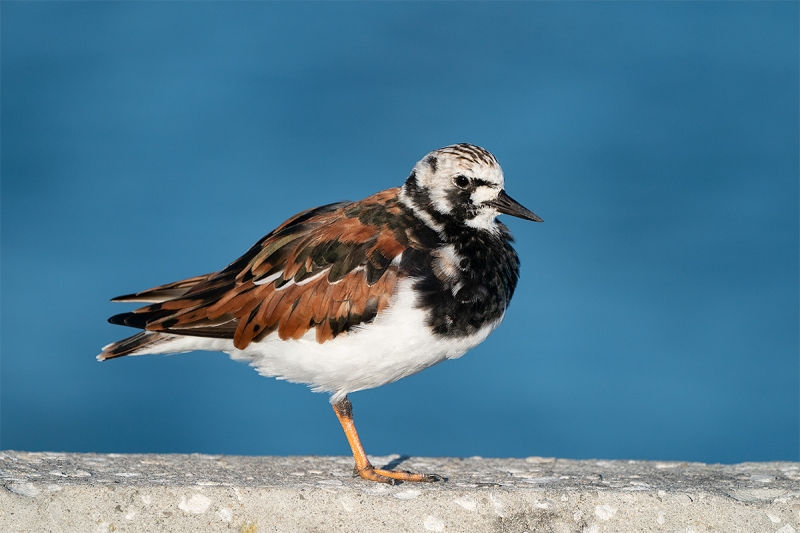
By the last day of the 2019 DeSoto Spring IPT, I was thinking seriously of selling all my SONY gear as in nearly all situations, I found myself reaching for my Nikon stuff. I am just not in love with the SONY image quality. But is it really fair compare 24.2MP RAW (ARW) files from the a9 with 45.7MP RAW (NEF) files from the D850? When we arrived at our last morning, out-of-the-park location, I grabbed the SONY 100-400/1.4X TC/a9 rig and went to work. The first subjects, turnstones on a concrete fence, reminded me of SONY’s strengths. The combo is light in weight and easy to handle. The 93% AF coverage allowed me to get a small AF point cluster on the bird’s eye no matter how large in the frame the bird was. But the huge advantage over both Nikon and Canon is the ease of getting the right exposure. I do not find the in-viewfinder live histogram to be a huge help, but by using the Zebra feature (essentially live in-the-viewfinder blinks), it is a simple matter of selecting the shutter speed and the aperture, raising the ISO until you see Zebras, and then backing off one click (1/3 stop). You never need to touch the pain in the _ _ _ exposure compensation wheel. Heck, you never even need to note the EC. And as you might have figured, the more I practice, the better I get at it.
Yesterday at Gatorland there was a situation with many nests — most with medium-sized or small chicks — at close range in a single large bush. The lighting ranged from total shade to bright sun. 560mm gave me more than enough reach and the exposure technique worked like a charm, enabling me to create very good to excellent exposures in one or two seconds. Thanks Patrick!
Speaking of Patrick you might remember that he tried an a7R iii and did not like it. He returned it to Bedford’s. Then he kept doing some research online, got the camera back, and began living it. The Sony Alpha a7R III Mirrorless Digital camera is now his main bird photography body! He uses the a9 only in pure flight or action situations … I will be sharing his revised thoughts on the a7R iii and some of Patrick’s images with you here soon. Today I will decide if I will borrow an a7R iii for the 2019 Fort DeSoto Short-Notice Sandbar Secrets IPT … (See the details on that trip below.)
Folks can see or re-visit my original thoughts on the SONY gear in the blog post here.
Same Subject in the Sun
The turnstones were very cooperative and everyone in the group enjoyed photographing them at close range when not doing the diving pelicans and terns. “This bird is in the sun so watch for blinkies. That one is in the shade so raise the ISO so that you do not underexpose. Be sure to put the bird back in the frame. Move slowly and get a bit closer.” As I love shorebirds, I was first on line.
Sun Angle Question
If you look carefully at the shadow cast by the bird’s legs, you will note that I was working about 10-15 degrees off sun angle. Why did I do that?
Your Opinion?
Which image do you like best? Why?
Which pose do you like best? Why?
Which light do you prefer, sun or shade? Why?
Shorebirds; Beautiful Beachcombers
My Shorebirds: Beautiful Beachcombers, written for naturalists and birders, will teach you everything you’ve always wanted to know about the aging, identification, behavior, feeding habits and strategies, and the timing and routes of migration of North America’s sandpipers, godwits, yellowlegs, phalaropes, plovers, avocets, stilts, and oystercatchers.
|
|
|
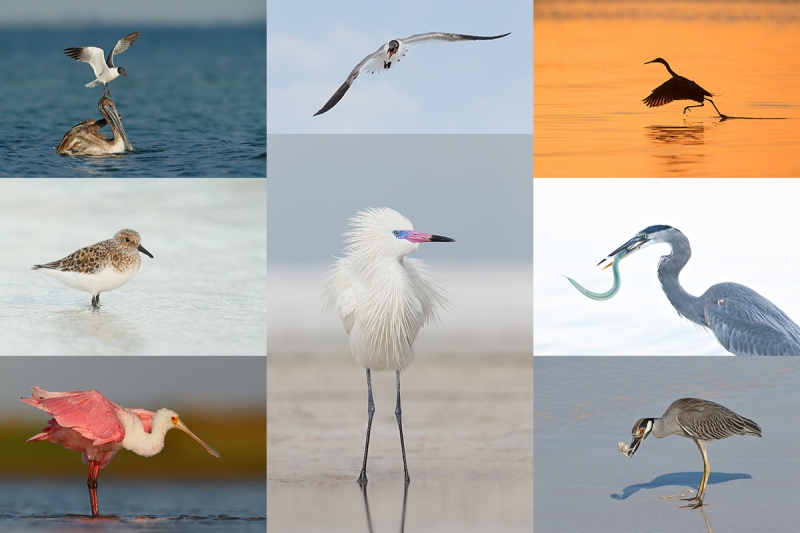
Fort DeSoto in spring is rife with tame birds, many in full breeding plumage. Click on the composite to enjoy a larger version.
Clockwise from upper left around to center: Laughing Gull landing on head of Brown Pelican, Laughing Gull in flight, Reddish Egret sunrise silhouette, Great Blue Heron with needlefish, Yellow-crowned Night Heron with ghost crab, Roseate Spoonbill, Sanderling in breeding plumage, and white morph Reddish Egret in glorious breeding plumage.
|
The 2019 Fort DeSoto Short-Notice Sandbar Secrets IPT/Sunday May 5 through the morning session on Wednesday May 8, 2019: 3 1/2 DAYS: $1649. Limit 4/Openings: 4. Meet and greet at 7PM on the evening of Saturday May 4.
I will run this with a single registrant. Airport pick-up might be available as is riding with the leader. Combine those to avoid having to rent a car.
Fort DeSoto, located just south of St. Petersburg, FL, is a mecca for a great variety of migrant shorebirds, gulls, terns, and passerines in Spring. Many of the gulls and terns will be courting and copulating. There the migrants join hundreds of Florida resident egrets, herons, night-herons, and pelicans on the T-shaped peninsula. We should get to photograph one of Florida’s most desirable shorebird species: Marbled Godwit. Black-bellied Plover and Willet are easy, American Oystercatcher almost guaranteed. Great Egret, Snowy Egret, Great Blue Heron, Tricolored Heron, and White Ibis are easy as well and many of those will be in their spectacular breeding plumages. Yellow-crowned Night-Heron is a strong possibility. We may get to see and photograph the amazing heron/egret hybrid that has been present for three years. And we should enjoy some great Brown Pelican flight photography. In addition, Royal, Sandwich, Forster’s, and Caspian Terns will likely provide us with some good flight opportunities as well. Though not guaranteed, Roseate Spoonbill and Wood Stork might well be expected. And we will be on the lookout for a migrant passerine fallout in the event of a thunderstorm or two. Yikes, I almost forgot to mention that nearly all of the birds are ridiculously tame!
|
|
|
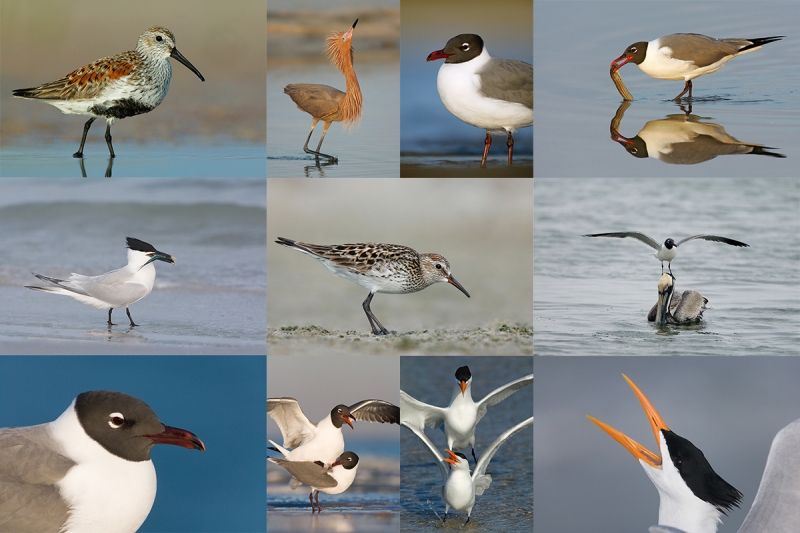
Yes, Fort DeSoto in spring is rife with tame birds, most in breeding plumage. Click on the composite to enjoy a larger version.
Clockwise from upper left around to center: breeding plumage Dunlin, dark morph Reddish Egret displaying, Laughing Gull vertical front-end portrait, Laughing Gull with prey item, landing on head of Brown Pelican, breeding plumage Royal Tern displaying, Royal Terns — pre-copulatory stance, Laughing Gulls copulating, Laughing Gull head portrait, breeding plumage Sandwich Tern with fish, and a rare treat, a breeding plumage White-rumped Sandpiper.
|
Just some of the stuff you will learn …
On the IPT you will learn basics and fine points of digital exposure and to get the right exposure every time after making a single test exposure, how to approach free and wild birds without disturbing them, to understand and predict bird behavior, to identify many species of shorebirds, to spot the good situations, to choose the best perspective, to see and understand the light, and to design pleasing images by mastering your camera’s AF system. Most importantly you will surely learn to evaluate wind and sky conditions and understand how they affect bird photography. And you will learn how and why to work in Manual mode (even if you’re scared of it).
|
|
|
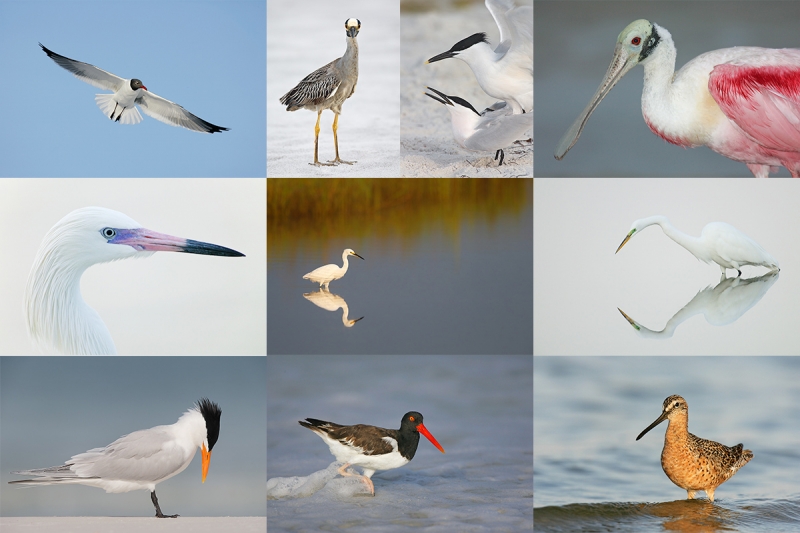
Again, Fort DeSoto in spring is rife with tame birds, most in breeding plumage. Click on the composite to enjoy a larger version.
Clockwise from upper left around to center: Laughing Gull in flight, Yellow-crowned Night-Heron, Sandwich Terns copulating, Roseate Spoonbill, Great Egret with reflection, breeding plumage Short-billed Dowitcher, American Oystercatcher, Royal Tern, white morph Reddish Egret, and Snowy Egret in marsh.
|
What we do
There will be seven shooting sessions in all: four 3+ hours morning session and three 2 1/2 hour afternoon sessions. There will be Photoshop/image review/critiquing sessions during lunch (lunch is included) on each of the three full days. That will be followed by Instructor Nap Time.
The best airport is Tampa (TPA). Once you register, you will receive an e-mail with the hotel/lodging information. Airport pick-up might be available as is riding with the leader. Combine those to avoid having to rent a car.
|
|
|
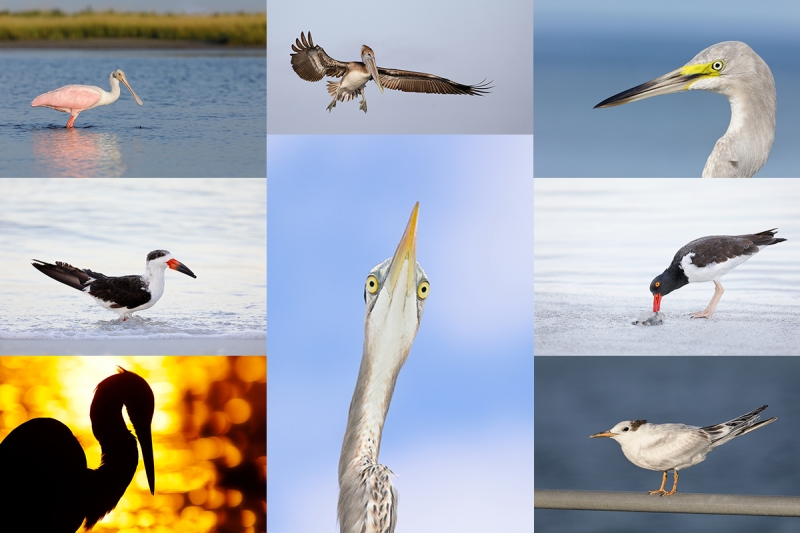
You got it, Fort DeSoto in spring is rife with tame birds, most in breeding plumage. Click on the composite to enjoy a larger version.
Clockwise from upper left around to center: Roseate Spoonbill, immature Brown Pelican in flight, the heron/egret hybrid, American Oystercatcher feeding, immature Royal Tern on railing, Great Egret morning silhouette, Black Skimmer in surf, and underside head portrait of Great Blue Heron.
|
Signing Up
A $500 deposit is due when you sign up and is payable by credit card. Balances must be paid by check after you register. Your deposit is non-refundable unless the IPT sells out with four folks so please check your plans carefully before committing. You can register by calling Jim or Jennifer during weekday business hours at 863-692-0906 with a credit card in hand or by sending a check as follows: make the check out to: BIRDS AS ART and send it via US mail here: BIRDS AS ART, PO BOX 7245, Indian Lake Estates, FL 33855. You will receive a confirmation e-mail with detailed instructions, clothing, and gear advice. Please remember that the meet and greet will take place on the evening of Saturday May 4. Please shoot me an e-mail if you plan to register or if you have any questions.
|
|
|
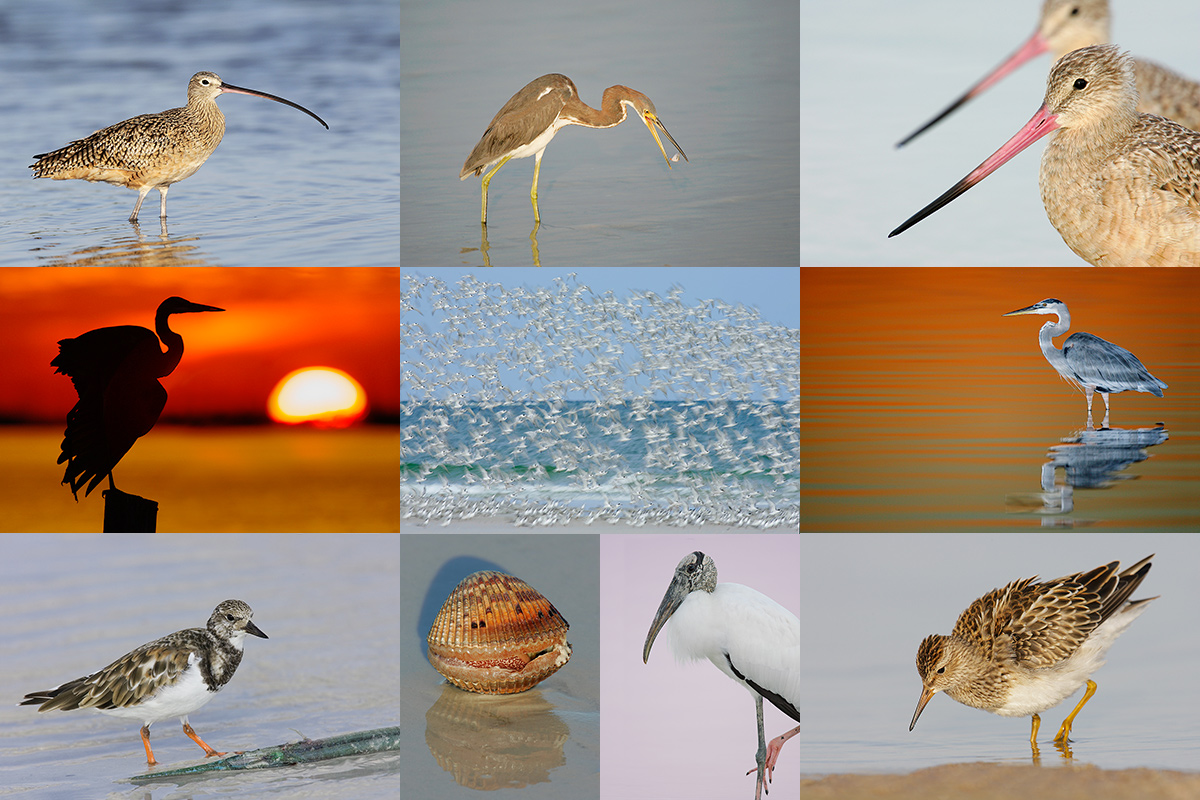
Folks attending this IPT will be out in the field early and stay late to take advantage of sunrise and sunset colors. Click on the composite to enjoy a larger version.
Clockwise from upper left to center: Long-billed Curlew, juvenile Tricolored Heron, Marbled Godwits, Great Blue Heron, juvenile Pectoral Sandpiper, Wood Stork, smiling Sea Scallop, Ruddy Turnstone scavenging needlefish, Great Blue Heron sunset silhouette at my secret spot, and southbound migrant tern flock blur.
|
Early and Late
Getting up early and staying out late is pretty much a staple on all BIRDS AS ART Instructional Photo-Tours; on this particular trip we will get lots of sleep as the days are short. Being in the field well before the sun comes up and staying out until sunset will often present unique photographic opportunities, opportunities that will be missed by those who need their beauty rest. I really love it when I am leaving the beach on a sunny morning after a great session just as a carful or two of well-rested photographers arrive.
If In Doubt …
If in doubt about using the BAA B&H affiliate link correctly, you can always start your search by clicking here. Please note that the tracking is invisible. Web orders only. Please, however, remember to shoot me your receipt via e-mail.


Please Remember to use my Affiliate Links and to Visit the New BAA Online Store 🙂
To show your appreciation for my continuing efforts here, we ask, as always, that you get in the habit of using my B&H affiliate links on the right side of the blog for all of your photo and electronics purchases. Please check the availability of all photographic accessories in the New BIRDS AS ART Online Store, especially the Mongoose M3.6 tripod head, Wimberley lens plates, Delkin flash cards and accessories, and LensCoat stuff.
As always, we sell only what I have used, have tested, and can depend on. We will not sell you junk. We know what you need to make creating great images easy and fun. And please remember that I am always glad to answer your gear questions via e-mail.
I would of course appreciate your using our B&H affiliate links for all of your major gear, video, and electronic purchases. For the photographic stuff mentioned in the paragraph above, and for everything else in the new store, we, meaning BAA, would of course greatly appreciate your business. Here is a huge thank you to the many who have been using our links on a regular basis and those who will be visiting the New BIRDS AS ART Online Store as well.
Facebook
Be sure to like and follow BAA on Facebook by clicking on the logo link upper right.
Typos
In all blog posts and Bulletins, feel free to e-mail or to leave a comment regarding any typos or errors. Just be right :).
April 27th, 2019 Stuff
With no takers for the Saturday Gatorland In-the-Field Session, I opted to sleep in. So I woke at 4:50am and continued working on this blog post; I had started it last night. Just after sunrise I went into Jim’s BAA butterfly garden to photograph some wildflowers with the Sigma APO Macro 150mm f/2.8 EX DG OS HSM lens for Nikon F on a tripod. I had tried yesterday hand held but wanted to see if I could do better with the lens on a tripod. I think that I did. I used the Flexshooter head for macro for the first time; it was amazing. Zero bullhead creep for macro (and for scenic) photography is a Godsend. Photos soon.
Then I went down to the lake and enjoyed an amazing hour. It started with a stretching/flapping crane colt and ended with some pretty spiffy Cattle Egrets enjoying a huge mayfly-hatch breakfast. I was back in the office to continue working on this blog post and hope to publish it at about 10 eastern time. Again I used the Flexshooter head on the tripod — yes it can be done! — from inside the vehicle with great success. Each day I learn more about this great new head. I will be sharing my findings with you here soon. Stretching crane colt and Cattle Egret photos soon.
Gatorland In-the-Field Session: Sunday 28 APR, 2019
Join me at Gatorland tomorrow and learn a ton. Right now is prime time for Cattle Egrets in breeding plumage. Check out Joe Przybyla’s killer Cattle Egret image from last week in his BPN post here. In addition, there will be some good opps with Great Egret chicks. Most folks who visit Gatorland simply have no clue. Join me to learn to see the shot at the easily accessible rookeries. An intermediate telephoto lens is all that you will need. Learn to think and see like a pro. Sunday’s weather looks very good. Contact me via e-mail or call me on my cell at 863-221-2372.
Morning Session — 7-10am: $200.00
Morning Session with a 90-minute working lunch including image review and Photoshop: $300.00.
BIRDS AS ART
BIRDS AS ART is registered in the U.S. Patent and Trademark Office.
|
|
Lessons From the Field/BIRDS AS ART Style is a 1 hour, 15 minute, 314 image,
click and play MP4 video
|
Lessons From the Field/BIRDS AS ART Style: $10.00
Click here to order or see the Save $10 Bundle offer below.
Lessons From the Field/BIRDS AS ART Style is a 1 hour, 15 minute click and play MP4 video. It is available here in the BAA Online Store, by phone order, or by sending a Paypal for $10.00 to birdsasart@verizon.net. As the file is a large one, be sure to upload it when you have a good internet connection.
The video features 314 of artie’s best images, educational and otherwise. Based on his 35 years of in-the-field experience, it covers all the basics along with many fine points. Are you making mistakes that give you no chance to create a great image? Learning to avoid those and learning to think like a pro will make you a better photographer. If you purchase and study the video, it will surely prove to be the best ten dollars you’ve ever spent on photography.
|

|
birds as art: The Avian Photography of Arthur Morris/The Top 100:
|
Save Ten Bucks!
Order the Lessons From the Field MP4 video and add a copy of the birds as art: The Avian Photography of Arthur Morris/The Top 100 (via convenient download — normally sells for $20.00) for an additional 10.00.
Order the bundle for $20.00 by clicking here.
Money Saving Reminder
If you need a hot photo item that is out of stock at B&H, would enjoy free overnight shipping, and would like a $50 discount on your first purchase, click here to order and enter the coupon code BIRDSASART at checkout. If you are looking to strike a deal on Canon or Nikon gear (including the big telephotos) or on a multiple item order, contact Steve Elkins via e-mail or on his cell at (479) 381-2592 (Eastern time) and be sure to mention your BIRDSASART coupon code and use it for your online order. Steve currently has several D850s in stock along with a Nikon 600mm f/4 VR. He is taking pre-orders for the new Nikon 500 P and the Nikon Z6 mirrorless camera body.
Booking.Com
Many IPT folks have been using the Booking.Com link below to get great rates and save a handsome $25.00 in the process. If you too would like to give Booking.Com a shot, click here and to earn a $25 reward on your first booking. Thanks to the many who have already tried and used this great service.
Airbnb
I have been using AirBNB for all of my travel lodging needs. Everyone on the Fort DeSoto IPT is staying at an AirBNB property in Gulfport. Airbnb lists more than 4.5 million homes across 200 countries; you’ll find spacious, affordable options for every occasion. With Airbnb you will travel with confidence as reviews from past guests help you find the right fit. Once you do, their secure messaging makes it easy to coordinate with your host. And Airbnb support teams are available 24/7. And this morning, I made a 17-day reservation for an Airbnb condo for San Diego, 2020. I am staying with Rick again: his place has lots of room, a full kitchen, two bedrooms, and great WiFi. All for a lot less than the price of a chain hotel.
Yikes. I almost forgot the best part: Airbnb rates average less than half of even the least expensive chain hotels and motels. If you would like to save $40 on your first booking sign up by using this link: Airbnb. Airbnb does charge clean-up and service fees that make short stays less attractive bargains than long stays.
Those who prefer to stay in a motel or hotel are invited to use the Booking.com link above to save $25.00.


Gear Questions and Advice
Too many folks attending BAA IPTs and dozens of photographers whom I see in the field and on BPN, are–out of ignorance–using the wrong gear especially when it comes to tripods and more especially, tripod heads… Please know that I am always glad to answer your gear questions via e-mail. Those questions might deal with systems, camera bodies, accessories, and/or lens choices and decisions.
|
|
|
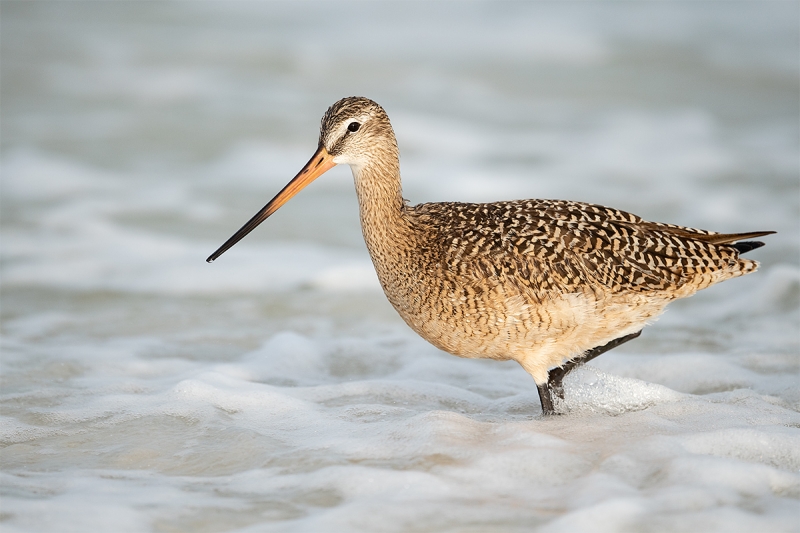
This image was created on April 19, 2019, DAY TWO of the DeSoto Spring IPT. I used the hand held Nikon AF-S NIKKOR 500mm f/5.6E PF ED VR lens and my souped-up Nikon D850. ISO 800 (I was set up for flight…) Matrix metering plus about 2/3 stop: 1/2500 sec. at f/6.3 was perfect. AUTO1 WB at 8:30am with some very light clouds in front of the sun.
Nikon Focus Peaking fine-tune value: +3. See the Nikon AF Fine-tune e-Guide here.
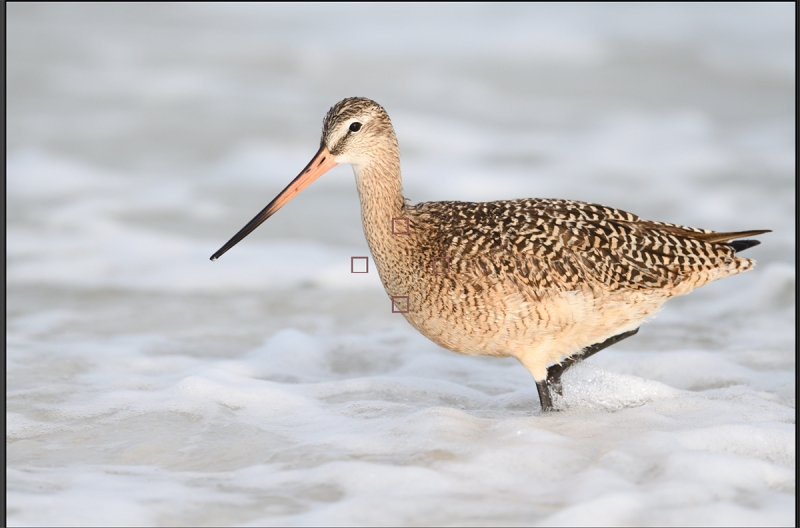
Center Group (grp) AF/Continuous (C in Nikon/AI Servo with Canon) was active at the moment of exposure. See the Nikon Capture NX-D screen capture below to learn a ton.
Image #1: Marbled Godwit in surf
Click on the image to enjoy a larger version.
|
Life-changing Lens
As you learned the other day, I never once took the Nikon AF-S NIKKOR 600mm f/4E FL ED VR lens out of my Sequoia during the Fort DeSoto Spring IPT. I used the 500mm PF 90% of the time (adding the TC-E14 only rarely) and my SONY gear on occasion.
The larger of the two Nikon PF lenses gives me 500mm of reach (10X) albeit with the loss of a single stop of light as compared to the Nikon AF-S NIKKOR 500mm f/4E FL ED VR lens. Few folks are able to hand hold the 500 f/4 for extended periods of time but hand holding the 500 PF is a sweet dream as the lens weighs only 3.21 pounds as compared to 6.81 pounds for the 500 f/4 VR.
Furthermore, I remove the lens foot when hand holding the 500 PF. With my back-up D850 the rig weighs in at a shade under 5 1/2 pounds. This makes it imminently hand holdable for most folks (including me). With its small size and light weight you can move about in the field much more freely than when using a tripod-mounted f/4 super-telephoto lens. It is much easier to get down on the ground when hand holding as there is no need to adjust the length of the tripod legs. When sitting I use the knee-pod technique. When lying flat, I can raise or lower the lens and inch or two here and there as needed — it is pretty much impossible to do that when working off the tripod with the legs splayed. When you get low with a tripod-mounted super-telephoto lens it is a cumbersome task to move closer to the bird and your efforts to do so will often flush the subjects. Handholding the 500 PF, getting low, and moving slowly has enabled me to get much closer to my beloved shorebirds than when working on a tripod with a big lens.
And as you have seen here often over the past year plus, the 500 PF is a deadly flight lens.
|
|
|
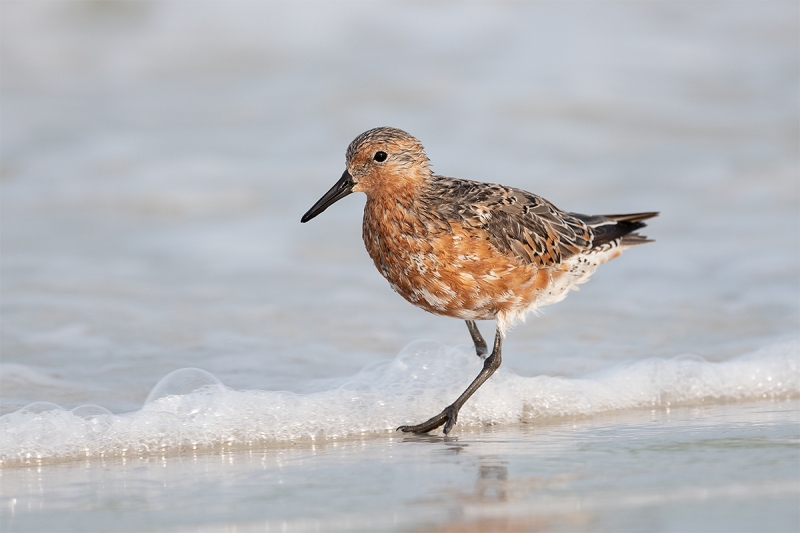
This image was created on April 19, 2019, DAY TWO of the DeSoto Spring IPT. I used the hand held Nikon AF-S NIKKOR 500mm f/5.6E PF ED VR lens with the Nikon AF-S Teleconverter TC-14E III and my souped-up Nikon D850. ISO 800 (I was set up for flight…) Matrix metering plus about 2/3 stop: 1/2500 sec. at f/6.3 was perfect. AUTO1 WB at 8:30am with some very light clouds in front of the sun.
Nikon Focus Peaking fine-tune value: +2. See the Nikon AF Fine-tune e-Guide here.
Center Group (grp) AF/Continuous (C in Nikon/AI Servo with Canon) was active at the moment of exposure. The array was on the side of the bird just forward of center. As this is a small crop, the bird was smaller in the original frame than the godwit above so there was enough depth of field to cover the bird’s head and face. That said, in an ideal world I would have centered the array on the bird’s upper breast, neck, or face.
Image #2: Red Knot in surf
Click on the image to enjoy a larger version.
|
Adding the TC-E14 to the 500 PF
Adding the the TC-E14 to the mix is effective and gives you 40% more reach (700mm as compared to 500mm) but can be a bit challenging as with he Nikon system there are times when the system struggles to focus (at f/8) especially if you move the selected AF point away from the center. A huge advantage goes to Canon in this area (and to SONY as well, at least with the a9). I did wind up getting close enough to the flock of knots so that I was able to remove the TC-E.
Note that this bird is molting into breeding plumage. When it is finished, the upperparts will be spangled with silver, black, white, and orange feathers. I am hoping to find a few on the 2019 Fort DeSoto Short-Notice Sandbar Secrets IPT. Also possible in spectacular breeding plumage on this trip will be Dunlin, Short-billed Dowitcher, and (rarely) Black-bellied Plover. See below for the details.
|
|
|
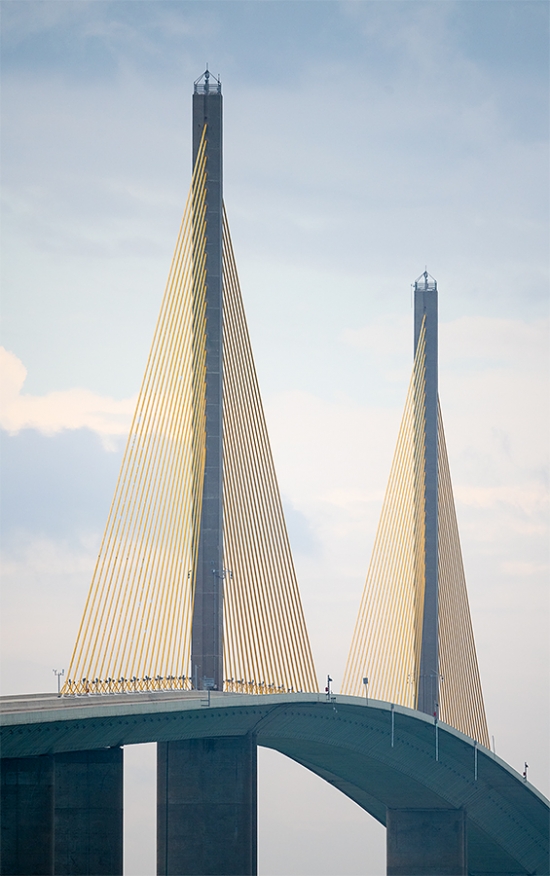
This image was also created on April 19, 2019, DAY TWO of the DeSoto Spring IPT. Again I used the hand held Nikon AF-S NIKKOR 500mm f/5.6E PF ED VR lens and my souped-up Nikon D850. ISO 800 (I was set up for flight…) Matrix metering plus about 2/3 stop: 1/1250 sec. at f/6 was perfect. AUTO1 WB at 12:52pm on a hazy day.
Nikon Focus Peaking fine-tune value: +3. See the Nikon AF Fine-tune e-Guide here.
Center Group (grp) AF/Continuous (C in Nikon/AI Servo with Canon) was active at the moment of exposure. See the Nikon Capture NX-D screen capture below to learn a ton.
Image #3: Sunshine Skyway Bridge
Click on the image to enjoy a larger version.
|
The 500 PF for Architectural Photography
I have long admired the beauty (and the history) of the Sunshine Skyway Bridge. I have tried and failed to make a decent image for several years. I finally succeeded on the IPT photographing the span from my favorite out-of-the-park location. We visited twice on the IPT and enjoyed some great flight photography. This image was made at the very end of the longest ever BAA IPT morning photo session: 6 1/2 hours. Conditions were good and a horrific storm was coming. The rain began on our way home and peaked with 50+ mph winds and torrential rains. We did a long Photoshop session that afternoon and followed that with the first-ever BAA Barbecue. A great time was had by all.
The Sunshine Skyway Bridge from Wikipedia
The Bob Graham Sunshine Skyway Bridge, often referred to as the Sunshine Skyway Bridge or simply the Skyway, is a cable-stayed bridge spanning the Lower Tampa Bay connecting St. Petersburg, Florida to Terra Ceia. The current Sunshine Skyway opened in 1987 and is the second bridge of that name on the site. It was designed by the Figg & Muller Engineering Group and built by the American Bridge Company and is considered a symbol of Florida. The four-lane bridge carries Interstate 275 and U.S. Route 19 traffic passing through Pinellas County, Hillsborough County, and Manatee County.
The original bridge opened in 1954 and was the site of two major maritime disasters within a few months in 1980. In January 1980, the United States Coast Guard Cutter Blackthorn collided with the tanker Capricorn near the bridge, resulting in the sinking of the cutter and the loss of 23 crew members. In May 1980, the freighter MV Summit Venture collided with a bridge support during a sudden squall, resulting in the structural collapse of the southbound span and the deaths of 35 people when vehicles plunged into Tampa Bay. Within a few years, the damaged span was demolished, the surviving span was partially demolished and converted into a long fishing pier, and the current bridge was built.
Learn more of the bridge’s amazing history in the Wikipedia article herehttps://en.wikipedia.org/wiki/Sunshine_Skyway_Bridge.
Comparing Apples and Oranges …
Which of today’s featured images is your favorite, the godwit, the knot, or the bridge. I have a clear favorite and will share it with you here soon.
|
|
Nikon Capture NX-D Screen Capture
|
A Vitally Important AF Technique
I mention this concept very often here on the blog: if there is no AF point available to get an AF point on the bird’s face as happens often with relatively large-in-the-frame subjects such as the Marbled Godwit in Image #1, place the selected AF point somewhere on the bird that is on the same plane as the bird’s eye or face. Furthermore, even when you can get an Af point on the bird’s head or face the head or face is often moving and holding acquiring and holding focus on a small part of the subject that is constantly moving is usually difficult to impossible.
In the Nikon Capture NX-D screen capture above, note that I placed the array on the side of the bird’s upper breast near the base of the neck, right on the same place as the bird’s face and eye. There is no AF point that could have been placed on the bird’s face as AF coverage in the frame is limited with Canon and Nikon. Note that with SONY you have coverage over 93% of the frame. If I had chosen the top center array and centered it on the bird’s face, I would have cut off its legs.
The Lesson
When it is difficult or impossible to get an AF point on the bird’s face or eye, place the selected AF point somewhere on the bird’s body that is on the same plane as the eye, face, or head.
I once did a whole blog post on this subject. If you can find it please share a link with us by leaving a comment.
|
|
|
Fort DeSoto in spring is rife with tame birds, many in full breeding plumage. Click on the composite to enjoy a larger version.
Clockwise from upper left around to center: Laughing Gull landing on head of Brown Pelican, Laughing Gull in flight, Reddish Egret sunrise silhouette, Great Blue Heron with needlefish, Yellow-crowned Night Heron with ghost crab, Roseate Spoonbill, Sanderling in breeding plumage, and white morph Reddish Egret in glorious breeding plumage.
|
The 2019 Fort DeSoto Short-Notice Sandbar Secrets IPT/Sunday May 5 through the morning session on Wednesday May 8, 2019: 3 1/2 DAYS: $1649. Limit 4/Openings: 4. Meet and greet at 7PM on the evening of Saturday May 4.
I will run this with a single registrant. Airport pick-up might be available as is riding with the leader. Combine those to avoid having to rent a car.
Fort DeSoto, located just south of St. Petersburg, FL, is a mecca for a great variety of migrant shorebirds, gulls, terns, and passerines in Spring. Many of the gulls and terns will be courting and copulating. There the migrants join hundreds of Florida resident egrets, herons, night-herons, and pelicans on the T-shaped peninsula. We should get to photograph one of Florida’s most desirable shorebird species: Marbled Godwit. Black-bellied Plover and Willet are easy, American Oystercatcher almost guaranteed. Great Egret, Snowy Egret, Great Blue Heron, Tricolored Heron, and White Ibis are easy as well and many of those will be in their spectacular breeding plumages. Yellow-crowned Night-Heron is a strong possibility. We may get to see and photograph the amazing heron/egret hybrid that has been present for three years. And we should enjoy some great Brown Pelican flight photography. In addition, Royal, Sandwich, Forster’s, and Caspian Terns will likely provide us with some good flight opportunities as well. Though not guaranteed, Roseate Spoonbill and Wood Stork might well be expected. And we will be on the lookout for a migrant passerine fallout in the event of a thunderstorm or two. Yikes, I almost forgot to mention that nearly all of the birds are ridiculously tame!
|
|
|
Yes, Fort DeSoto in spring is rife with tame birds, most in breeding plumage. Click on the composite to enjoy a larger version.
Clockwise from upper left around to center: breeding plumage Dunlin, dark morph Reddish Egret displaying, Laughing Gull vertical front-end portrait, Laughing Gull with prey item, landing on head of Brown Pelican, breeding plumage Royal Tern displaying, Royal Terns — pre-copulatory stance, Laughing Gulls copulating, Laughing Gull head portrait, breeding plumage Sandwich Tern with fish, and a rare treat, a breeding plumage White-rumped Sandpiper.
|
Just some of the stuff you will learn …
On the IPT you will learn basics and fine points of digital exposure and to get the right exposure every time after making a single test exposure, how to approach free and wild birds without disturbing them, to understand and predict bird behavior, to identify many species of shorebirds, to spot the good situations, to choose the best perspective, to see and understand the light, and to design pleasing images by mastering your camera’s AF system. Most importantly you will surely learn to evaluate wind and sky conditions and understand how they affect bird photography. And you will learn how and why to work in Manual mode (even if you’re scared of it).
|
|
|
Again, Fort DeSoto in spring is rife with tame birds, most in breeding plumage. Click on the composite to enjoy a larger version.
Clockwise from upper left around to center: Laughing Gull in flight, Yellow-crowned Night-Heron, Sandwich Terns copulating, Roseate Spoonbill, Great Egret with reflection, breeding plumage Short-billed Dowitcher, American Oystercatcher, Royal Tern, white morph Reddish Egret, and Snowy Egret in marsh.
|
What we do
There will be seven shooting sessions in all: four 3+ hours morning session and three 2 1/2 hour afternoon sessions. There will be Photoshop/image review/critiquing sessions during lunch (lunch is included) on each of the three full days. That will be followed by Instructor Nap Time.
The best airport is Tampa (TPA). Once you register, you will receive an e-mail with the hotel/lodging information. Airport pick-up might be available as is riding with the leader. Combine those to avoid having to rent a car.
|
|
|
You got it, Fort DeSoto in spring is rife with tame birds, most in breeding plumage. Click on the composite to enjoy a larger version.
Clockwise from upper left around to center: Roseate Spoonbill, immature Brown Pelican in flight, the heron/egret hybrid, American Oystercatcher feeding, immature Royal Tern on railing, Great Egret morning silhouette, Black Skimmer in surf, and underside head portrait of Great Blue Heron.
|
Signing Up
A $500 deposit is due when you sign up and is payable by credit card. Balances must be paid by check after you register. Your deposit is non-refundable unless the IPT sells out with four folks so please check your plans carefully before committing. You can register by calling Jim or Jennifer during weekday business hours at 863-692-0906 with a credit card in hand or by sending a check as follows: make the check out to: BIRDS AS ART and send it via US mail here: BIRDS AS ART, PO BOX 7245, Indian Lake Estates, FL 33855. You will receive a confirmation e-mail with detailed instructions, clothing, and gear advice. Please remember that the meet and greet will take place on the evening of Saturday May 4. Please shoot me an e-mail if you plan to register or if you have any questions.
|

|
|
Folks attending this IPT will be out in the field early and stay late to take advantage of sunrise and sunset colors. Click on the composite to enjoy a larger version.
Clockwise from upper left to center: Long-billed Curlew, juvenile Tricolored Heron, Marbled Godwits, Great Blue Heron, juvenile Pectoral Sandpiper, Wood Stork, smiling Sea Scallop, Ruddy Turnstone scavenging needlefish, Great Blue Heron sunset silhouette at my secret spot, and southbound migrant tern flock blur.
|
Early and Late
Getting up early and staying out late is pretty much a staple on all BIRDS AS ART Instructional Photo-Tours; on this particular trip we will get lots of sleep as the days are short. Being in the field well before the sun comes up and staying out until sunset will often present unique photographic opportunities, opportunities that will be missed by those who need their beauty rest. I really love it when I am leaving the beach on a sunny morning after a great session just as a carful or two of well-rested photographers arrive.
If In Doubt …
If in doubt about using the BAA B&H affiliate link correctly, you can always start your search by clicking here. Please note that the tracking is invisible. Web orders only. Please, however, remember to shoot me your receipt via e-mail.


Please Remember to use my Affiliate Links and to Visit the New BAA Online Store 🙂
To show your appreciation for my continuing efforts here, we ask, as always, that you get in the habit of using my B&H affiliate links on the right side of the blog for all of your photo and electronics purchases. Please check the availability of all photographic accessories in the New BIRDS AS ART Online Store, especially the Mongoose M3.6 tripod head, Wimberley lens plates, Delkin flash cards and accessories, and LensCoat stuff.
As always, we sell only what I have used, have tested, and can depend on. We will not sell you junk. We know what you need to make creating great images easy and fun. And please remember that I am always glad to answer your gear questions via e-mail.
I would of course appreciate your using our B&H affiliate links for all of your major gear, video, and electronic purchases. For the photographic stuff mentioned in the paragraph above, and for everything else in the new store, we, meaning BAA, would of course greatly appreciate your business. Here is a huge thank you to the many who have been using our links on a regular basis and those who will be visiting the New BIRDS AS ART Online Store as well.
Facebook
Be sure to like and follow BAA on Facebook by clicking on the logo link upper right.
Typos
In all blog posts and Bulletins, feel free to e-mail or to leave a comment regarding any typos or errors. Just be right :).
|
|

