On Saturday, I was photographing pelicans from the sidewalk and getting some really nice stuff on a lousy weather/great photography day in San Diego. A lady walked by and said, “There’s a male Allen’s Hummingbird up on the Coast Walk Trail.” “Thanks,” I said, “I have been photographing birds for 38 years and have never had any kind of chance on that species.” Thank you lady indeed.
What’s Up?
It was a drizzly morning in San Diego. There was little light at first. There were lots of pelicans and lots of tourists walking around on the cliffs scaring off first some and then all of the pelicans. I photographed hand held for two hours with the amazing Sony FE 70-200mm f/2.8 GM OSS II lens. You can learn more about why this lens is so much better than the original version and why it makes the Sony FE 100-400 GM lens obsolete in the blog post here. When the pelicans relocated, I did the same. Then I saw a nice pelican image in my mind and went back to the car to grab the 600 f/4 and the tripod. I was thrilled that the bird had not moved an inch when I got back to the spot.
Today is Sunday 16 January 2022. The forecast for this morning is for partly to mostly cloudy with a northeast breeze. Excellent. I am meeting long-ago shipmate Carolyn Johnson and her daughter Marni Nagy for a pre-IPT free morning. Carolyn is new to the Sony A1 and Marni is with my old friend, the Nikon D850. We are looking forward to a grand time. Wherever you are, and whatever you are doing, I hope that you too have a great day. This blog post took more than two hours to prepare and makes 67 consecutive days with a new one.
Please remember that you can find some great photo accessories (and necessities, like surf booties!) on Amazon by clicking on the Stuff tab on the orange/yellow menu bar above. On a related note, it would be extremely helpful if blog-folks who, like me, spend too much money on Amazon, would get in the habit of clicking on the Amazon logo link on the right side of each blog post when they shop online. As you might expect, doing so will not cost you a single penny, but would be appreciated tremendously by yours truly. And doing so works seamlessly with your Amazon Prime account.
Please remember that if an item — a Delkin flash card, or a tripod head — for example, that is available from B&H and/or Bedfords, is also available in the BAA Online Store, it would be great, and greatly appreciated, if you would opt to purchase from us. We will match any price. Please remember also to use my B&H affiliate links or to save 3% at Bedfords by using the BIRDSASART discount code at checkout for your major gear purchases. Doing either often earns you free guides and/or discounts. And always earns my great appreciation.
Sony Alpha 1 Bodies in Stock at Bedfords/free card offer!
Steve Elkins of Bedfords let me know recently that he had several Sony a1 bodies in stock. If one of them has your name on it, please click here and be sure to enter the BIRDSASART coupon code check the box for free shipping to enjoy free Second Day Air Fed-Ex. Right now, in lieu of the 3% credit refunded to the card you used for your purchase, you will receive a Sony 160GB CFexpress Type A TOUGH Memory Card, a $399.99 value!
Brand New and As-Good-As-Ever Bedfords BAA Discount Policy
Folks who have fallen in love with Bedfords can now use the BIRDSASART coupon code at checkout to enjoy a post-purchase, 3% off-statement credit (excluding taxes and shipping charges) on orders paid with a credit card. The 3% credit will be refunded to the card you used for your purchase. Be sure, also, to check the box for free shipping to enjoy free Second Day Air Fed-Ex. This offer does not apply to purchases of Classes, Gift Cards, or to any prior purchases.
Money Saving Reminder
Many have learned that if you need a hot photo item that is out of stock at B&H and would like to enjoy getting 3% back on your credit card along with free 2nd Day Air Fed-Ex Air shipping, your best bet is to click here, place an order with Bedfords, and enter the coupon code BIRDSASART at checkout. If an item is out of stock, contact Steve Elkins via e-mail or on his cell phone at (479) 381-2592 (Central time). Be sure to mention the BIRDSASART coupon code and check the box for Free Shipping. That will automatically upgrade to free 2nd Day Air Fed-Ex. Steve has been great at getting folks the hot items that are out of stock at B&H and everywhere else. The waitlists at the big stores can be a year or longer for the hard to get items. Steve will surely get you your gear long before that. For the past year, he has been helping BAA Blog folks get their hands on items like the SONY a 1, the SONY 200-600 G OSS lens, the Canon EOS R5, the Canon RF 100-500mm lens, and the Nikon 500mm PF. Steve is personable, helpful, and eager to please.
Important Note
As an Amazon Associate, I earn a small percentage when you purchase from Amazon after using any of the Amazon links on the blog (including the logo-link immediately above). My link works with Amazon Prime and using it will not cost you a single cent. Huge thanks, BTW 🙂
Please Remember Also
Please, if you enjoy and learn from the blog, remember to use one of my two affiliate programs when purchasing new gear. Doing so just might make it possible for me to avoid having to try to get a job as a Walmart greeter and will not cost you a single penny more. And if you use Bedfords and remember to enter the BIRDSASART code at checkout, you will (still!) save 3% on every order and enjoy free second-day air shipping. In these crazy times — I lost about fifty thousand dollars in income due to COVID 19 — remembering to use my B&H link or to shop at Bedfords will help me out a ton and be greatly appreciated. Overseas folks who cannot order from the US because of import fees, duties, and taxes, are invited to help out by clicking here to leave a blog thank you gift if they see fit.
Gear Questions and Advice
Too many folks attending BAA IPTs and dozens of photographers whom I see in the field and on BPN, are–out of ignorance–using the wrong gear, especially when it comes to tripods and more especially, tripod heads… Please know that I am always glad to answer your gear questions via e-mail. If you are desperate, you can try me on my cell at 863-221-2372. Please leave a message and shoot me a text if I do not pick up.
Tracking: Spot S AF-C with Bird-Eye/Face Detection performed very well in a difficult situation. Click on the image to enjoy the high-res version.
Image #1: Allen’ Hummingbird male calling
Not a Pelican in San Diego!
How’s this? A Brown Pelican weighs between eight and ten pounds. It takes nine Allen’s Hummingbirds to weigh one ounce. Yet I love to photograph both of them.
Having never photographed Allen’s, I was thrilled to find the bird so quickly. After more than an hour, I had created 1008 images of the single bird. I kept 101 after the first edit. Four of my favorites are below.
Tracking: Zone AF-C with Bird-Eye/Face Detection performed very well in a difficult situation. Click on the image to enjoy the high-res version.
Image #2: Allen’ Hummingbird
Photographing Tiny Birds in Low Light
When the Allen’s perched, it was pretty much oblivious to humans. There were lots of folks walking within ten feet of the bird and the little hummer never moved. My 600 lens only focuses down to 14 feet. I knew that I needed a TC to get additional pixels on the bird. The choice of the 1.4X over the 2X was an easy one because of the low light levels. I did not want to be using the higher ISOs. And it is easier to make sharp images at 840mm than at 1200mm. That said in the low light I was working with dry low shutter speeds and did lose lots of images to subject movement. But I did get a few very sharp and very good ones. Each of today’s images was cropped to about 50% of the original frame.
Tracking: Zone AF-C with Bird-Eye/Face Detection performed very well in a difficult situation. Click on the image to enjoy the high-res version.
Image #3: Allen’ Hummingbird side view
The Side View
With the breeze from the east, most of the images were of the bird facing me. That was nice because the gorget was lit up nicely more than half the time. I had one chance at a side view and was lucky that just before the bird flew to a new perch, it gave me a very nice head angle for about three seconds. How handsome!
Tracking: Spot S AF-C with Bird-Eye/Face Detection performed very well in a difficult situation. Click on the image to enjoy the high-res version.
Image #4: Allen’ Hummingbird scratching
The Best Image?
Which of the four Allen’s Hummingbird images do you think is the best? Please leave a comment and let us know why you made your choice.
San Diego offers a wealth of very attractive natural history subjects, including and especially the Pacific race of California Brown Pelican. With annual visits spanning more than four decades, I have lots of photographic experience there … Click on the composite to enjoy a larger version.
The 2022 San Diego Brown Pelicans (and more!) Mini IPT. Monday 24 January thru the morning session on Wednesday 26 January 2022. Three mornings and two afternoons: $1649.00. Deposit: $499.00. Limit: 6 photographers
Join me in San Diego to photograph the spectacular breeding plumage Brown Pelicans with their fire-engine red and olive green bill pouches; Brandt’s (nesting with eggs and possibly chicks) and Double-crested Cormorants; breeding plumage Wood and Ring-necked Duck; other duck species possible including Lesser Scaup, Redhead, Northern Shoveler and Surf Scoter; a variety of gulls including Western, California, and the gorgeous Heermann’s, all in full breeding plumage; shorebirds including Marbled Godwit, Willet, Sanderling and Black-bellied Plover; many others are possible including Least, Western, and Spotted Sandpiper, Whimbrel, Black and Ruddy Turnstone, Semipalmated Plover, and Surfbird; Harbor Seals (depending on the current regulations) and California Sea Lions. And as you can see by studying the IPT cards, there are some nice bird-scape and landscape opportunities as well. Not to mention a ton of excellent flight photography opportunities and instruction.
Please note: where permitted and on occasion, ducks and gulls may be attracted (or re-located) with offerings of grains or healthy bread.
Learning Exposure, Whether You Like It Or Not
Whether you like it or not, we will be beating the subject of exposure like a dead horse. In every new situation, you will hear my thoughts on the exposure situation along with my thoughts on both Nikon and Canon histograms and SONY Zebras. Whether you like it or not, you will learn to work in manual mode and to get the right exposure every time as long as a bird gives you ten seconds with the light constant. (Or two seconds with SONY zebras…) And you will learn what to do when the light is changing constantly. What you learn about exposure is one of the great takeaways on every IPT.
Though the pelicans will be the stars of the show on this IPT, there will be many other handsome and captivating subjects in wonderful settings. Click on the composite to enjoy a larger version.
It Ain’t Just Pelicans
With gorgeous subjects just sitting there waiting to have their pictures taken, photographing the pelicans on the cliffs is about as easy as nature photography gets. With the winds from the east almost every morning there is usually some excellent flight photography as well, often with 70-200mm lenses! And the pelicans are almost always doing something interesting: preening, scratching, bill pouch cleaning, or squabbling. And then there are those crazy head throws that are thought to be a form of intra-flock communication. You will be guided as to how to make the best of all of those opportunities. And depending on the weather and local conditions and tides, there are a variety of other fabulous photo chances available in and around San Diego.
Did I mention that there are lots of great birds and natural history subjects in San Diego in winter? Click on the composite to enjoy a larger version.
The San Diego Details
This IPT will include five three hour morning photo sessions, four one and one-half afternoon photo sessions, four working brunches that will include image review and Photoshop sessions. On rare cloudy day occasions, we may — at my discretion, stay out in the morning for a long session and skip that afternoon. To ensure early starts, breakfasts will be your responsibility. And so that we can get some sleep, dinners will be on your own as well. In the extremely unlikely event that Goldfish Point is closed due to local ordinance (or whimsy) — that has never happened in the past fifty years, I will of course do my very best to maximize our photographic opportunities.
A $499 deposit is required to hold your slot for this IPT. Best would be to call Jim or Jennifer at the office with a credit card at 863-692-0906. Your balance, payable only by check, is due immediately.
Variety is surely the spice of life in San Diego. Click on the composite to enjoy a larger version.
Getting Up Early and Staying Out Late
On all BIRDS AS ART IPTS including and especially the San Diego IPT, we get into the field early to take advantage of unique and often spectacular lighting conditions and we stay out late to maximize the chances of killer light and glorious sunset silhouette situations. We often arrive at the cliffs a full hour before anyone else shows up to check out the landscape and seascape opportunities.
Typos
With all blog posts, feel free to e-mail or to leave a comment regarding any typos or errors.
My flights to San Diego were happily non-eventful. As often happens, I got a ton of work done on consolidating the 26 SONY Alpha a1 Set-up and Info Notes e-mails. I had already completed a SONY Alpha a1 Setup and Info Getting Started Guide and an Artie’s Settings & CAMSETA2.DAT Buttons and Dials Guide e-mail. On the plane en route to Pheonix, I worked for more than four hours on the a1 CAMSETA2 INFO file. That is a compilation of the 26 e-mails that had been sent to the group members. I have a bit more work to do and when that is done, I will need to send only three e-mails to the new folks in the group (rather than the previous 28). Much of the stuff in the 26 e-mails dealt with the no-longer-relevant Viewfinder Blackout issues that were solved many months ago with the release of the V.1.10 Firmware update.
Today is Saturday 15 January 2022. I am headed to La Jolla early to scout for the first San Diego IPT. Amazingly, the early morning forecast is for cloudy with occasional light rain. For more than the past 50 years, the sun always shines when I am in San Diego. Wherever you are, and whatever you are doing, I hope that you too have a great day. This blog post took about an hour to prepare and makes 66 consecutive days with a new one.
Please remember that you can find some great photo accessories (and necessities, like surf booties!) on Amazon by clicking on the Stuff tab on the orange/yellow menu bar above. On a related note, it would be extremely helpful if blog-folks who, like me, spend too much money on Amazon, would get in the habit of clicking on the Amazon logo link on the right side of each blog post when they shop online. As you might expect, doing so will not cost you a single penny, but would be appreciated tremendously by yours truly. And doing so works seamlessly with your Amazon Prime account.
Please remember that if an item — a Delkin flash card, or a tripod head — for example, that is available from B&H and/or Bedfords, is also available in the BAA Online Store, it would be great, and greatly appreciated, if you would opt to purchase from us. We will match any price. Please remember also to use my B&H affiliate links or to save 3% at Bedfords by using the BIRDSASART discount code at checkout for your major gear purchases. Doing either often earns you free guides and/or discounts. And always earns my great appreciation.
Image #1: Pacific-race Brown Pelican, sub-adult head throw
Seeking Head Throws!
On every San Diego IPT, we strive to teach folks to anticipate the dramatic head throws and to make some good images of this cool behavior. Consider joining me on the Mini IPT above or inquiring via e-mail if you would like to explore the possibility of an In-the-Field session or two the previous week (18-20 January).
With Image #1, note the isolation of the subject, the vertical framing without clipping anything, the subject-to-film-plane orientation (perfectly square), the distant background, and that the image captured the peak of the action. Making a great head throw image is both very challenging and very rewarding.
Image #1A: RawDigger screen capture for the Pacific-race Brown Pelican, sub-adult head throw image
My Excuses
So just why is this image one full stop under-exposed?
#1: I was brand new to Sony at the time and Patrick (mostly) and I (somewhat) had not figured out how to set and utilize the Zebra technology.
Nothing has ever helped me learn to create perfect exposures to the degree that RawDigger has. I think that many folks are reluctant to learn that most of their images are underexposed by one or more full stops and that highlight warnings in Photoshop, Lightroom, Capture One, and your in-camera histogram are completely bogus as they are based on the embedded JPEGs. Only your raw files tell the truth all the time. Heck, I resisted RawDigger for several years … Once you get over that feeling, RawDigger can become your very best exposure friend no matter what system you are using. On the recent IPTs and In-the-Field sessions, we have demonstrated that fact. Convincingly.
The RawDigger (pink) Adapted Histogram
In the RawDigger e-Guide, you will learn exactly how to set up the Adapted “pink” RawDigger Histogram and how to use it to quickly and easily evaluate the exposure or raw file brightness of images from all digital cameras currently in use. RawDigger was especially helpful to me when I struggled with R5 exposures and when I learned my new camera body, the Sony Alpha a1.
San Diego offers a wealth of very attractive natural history subjects, including and especially the Pacific race of California Brown Pelican. With annual visits spanning more than four decades, I have lots of photographic experience there … Click on the composite to enjoy a larger version.
The 2022 San Diego Brown Pelicans (and more!) Mini IPT. Monday 24 January thru the morning session on Wednesday 26 January 2022. Three mornings and two afternoons: $1649.00. Deposit: $499.00. Limit: 6 photographers
Join me in San Diego to photograph the spectacular breeding plumage Brown Pelicans with their fire-engine red and olive green bill pouches; Brandt’s (nesting with eggs and possibly chicks) and Double-crested Cormorants; breeding plumage Wood and Ring-necked Duck; other duck species possible including Lesser Scaup, Redhead, Northern Shoveler and Surf Scoter; a variety of gulls including Western, California, and the gorgeous Heermann’s, all in full breeding plumage; shorebirds including Marbled Godwit, Willet, Sanderling and Black-bellied Plover; many others are possible including Least, Western, and Spotted Sandpiper, Whimbrel, Black and Ruddy Turnstone, Semipalmated Plover, and Surfbird; Harbor Seals (depending on the current regulations) and California Sea Lions. And as you can see by studying the IPT cards, there are some nice bird-scape and landscape opportunities as well. Not to mention a ton of excellent flight photography opportunities and instruction.
Please note: where permitted and on occasion, ducks and gulls may be attracted (or re-located) with offerings of grains or healthy bread.
Learning Exposure, Whether You Like It Or Not
Whether you like it or not, we will be beating the subject of exposure like a dead horse. In every new situation, you will hear my thoughts on the exposure situation along with my thoughts on both Nikon and Canon histograms and SONY Zebras. Whether you like it or not, you will learn to work in manual mode and to get the right exposure every time as long as a bird gives you ten seconds with the light constant. (Or two seconds with SONY zebras…) And you will learn what to do when the light is changing constantly. What you learn about exposure is one of the great takeaways on every IPT.
Though the pelicans will be the stars of the show on this IPT, there will be many other handsome and captivating subjects in wonderful settings. Click on the composite to enjoy a larger version.
It Ain’t Just Pelicans
With gorgeous subjects just sitting there waiting to have their pictures taken, photographing the pelicans on the cliffs is about as easy as nature photography gets. With the winds from the east almost every morning there is usually some excellent flight photography as well, often with 70-200mm lenses! And the pelicans are almost always doing something interesting: preening, scratching, bill pouch cleaning, or squabbling. And then there are those crazy head throws that are thought to be a form of intra-flock communication. You will be guided as to how to make the best of all of those opportunities. And depending on the weather and local conditions and tides, there are a variety of other fabulous photo chances available in and around San Diego.
Did I mention that there are lots of great birds and natural history subjects in San Diego in winter? Click on the composite to enjoy a larger version.
The San Diego Details
This IPT will include five three hour morning photo sessions, four one and one-half afternoon photo sessions, four working brunches that will include image review and Photoshop sessions. On rare cloudy day occasions, we may — at my discretion, stay out in the morning for a long session and skip that afternoon. To ensure early starts, breakfasts will be your responsibility. And so that we can get some sleep, dinners will be on your own as well. In the extremely unlikely event that Goldfish Point is closed due to local ordinance (or whimsy) — that has never happened in the past fifty years, I will of course do my very best to maximize our photographic opportunities.
A $499 deposit is required to hold your slot for this IPT. Best would be to call Jim or Jennifer at the office with a credit card at 863-692-0906. Your balance, payable only by check, is due immediately.
Variety is surely the spice of life in San Diego. Click on the composite to enjoy a larger version.
Getting Up Early and Staying Out Late
On all BIRDS AS ART IPTS including and especially the San Diego IPT, we get into the field early to take advantage of unique and often spectacular lighting conditions and we stay out late to maximize the chances of killer light and glorious sunset silhouette situations. We often arrive at the cliffs a full hour before anyone else shows up to check out the landscape and seascape opportunities.
Typos
With all blog posts, feel free to e-mail or to leave a comment regarding any typos or errors.
Me, in the air at 11:35am today (if everything goes as planned), headed for one of my favorite places on the planet, San Diego, CA. Today is Friday 14 January and the weather does not matter as it is a travel day for me.
I did enjoy a short photo session on Thursday and had one half-way decent chance that resulted in today’s featured image (along with and lots of lessons for the boys and girls below). Even though I was all packed I could not resist going down to the lake for sunset. I was saved from having to unpack and re-pack my Think Tank rolling bag by a strong west wind.
Right-hand man Jim Litzenberg and I are in my SUV early headed for MCO as I finish this blog post. Wherever you are, and whatever you are doing, I hope that you too have a great day. This blog post took about an hour to prepare and makes 65 consecutive days with a new one.
Please remember that you can find some great photo accessories (and necessities, like surf booties!) on Amazon by clicking on the Stuff tab on the orange/yellow menu bar above. On a related note, it would be extremely helpful if blog-folks who, like me, spend too much money on Amazon, would get in the habit of clicking on the Amazon logo link on the right side of each blog post when they shop online. As you might expect, doing so will not cost you a single penny, but would be appreciated tremendously by yours truly. And doing so works seamlessly with your Amazon Prime account.
Please remember that if an item — a Delkin flash card, or a tripod head — for example, that is available from B&H and/or Bedfords, is also available in the BAA Online Store, it would be great, and greatly appreciated, if you would opt to purchase from us. We will match any price. Please remember also to use my B&H affiliate links or to save 3% at Bedfords by using the BIRDSASART discount code at checkout for your major gear purchases. Doing either often earns you free guides and/or discounts. And always earns my great appreciation.
Sony Alpha 1 Bodies in Stock at Bedfords/free card offer!
Steve Elkins of Bedfords let me know recently that he had several Sony a1 bodies in stock. If one of them has your name on it, please click here and be sure to enter the BIRDSASART coupon code check the box for free shipping to enjoy free Second Day Air Fed-Ex. Right now, in lieu of the 3% credit refunded to the card you used for your purchase, you will receive a Sony 160GB CFexpress Type A TOUGH Memory Card, a $399.99 value!
Brand New and As-Good-As-Ever Bedfords BAA Discount Policy
Folks who have fallen in love with Bedfords can now use the BIRDSASART coupon code at checkout to enjoy a post-purchase, 3% off-statement credit (excluding taxes and shipping charges) on orders paid with a credit card. The 3% credit will be refunded to the card you used for your purchase. Be sure, also, to check the box for free shipping to enjoy free Second Day Air Fed-Ex. This offer does not apply to purchases of Classes, Gift Cards, or to any prior purchases.
Money Saving Reminder
Many have learned that if you need a hot photo item that is out of stock at B&H and would like to enjoy getting 3% back on your credit card along with free 2nd Day Air Fed-Ex Air shipping, your best bet is to click here, place an order with Bedfords, and enter the coupon code BIRDSASART at checkout. If an item is out of stock, contact Steve Elkins via e-mail or on his cell phone at (479) 381-2592 (Central time). Be sure to mention the BIRDSASART coupon code and check the box for Free Shipping. That will automatically upgrade to free 2nd Day Air Fed-Ex. Steve has been great at getting folks the hot items that are out of stock at B&H and everywhere else. The waitlists at the big stores can be a year or longer for the hard to get items. Steve will surely get you your gear long before that. For the past year, he has been helping BAA Blog folks get their hands on items like the SONY a 1, the SONY 200-600 G OSS lens, the Canon EOS R5, the Canon RF 100-500mm lens, and the Nikon 500mm PF. Steve is personable, helpful, and eager to please.
Important Note
As an Amazon Associate, I earn a small percentage when you purchase from Amazon after using any of the Amazon links on the blog (including the logo-link immediately above). My link works with Amazon Prime and using it will not cost you a single cent. Huge thanks, BTW 🙂
Please Remember Also
Please, if you enjoy and learn from the blog, remember to use one of my two affiliate programs when purchasing new gear. Doing so just might make it possible for me to avoid having to try to get a job as a Walmart greeter and will not cost you a single penny more. And if you use Bedfords and remember to enter the BIRDSASART code at checkout, you will (still!) save 3% on every order and enjoy free second-day air shipping. In these crazy times — I lost about fifty thousand dollars in income due to COVID 19 — remembering to use my B&H link or to shop at Bedfords will help me out a ton and be greatly appreciated. Overseas folks who cannot order from the US because of import fees, duties, and taxes, are invited to help out by clicking here to leave a blog thank you gift if they see fit.
Gear Questions and Advice
Too many folks attending BAA IPTs and dozens of photographers whom I see in the field and on BPN, are–out of ignorance–using the wrong gear, especially when it comes to tripods and more especially, tripod heads… Please know that I am always glad to answer your gear questions via e-mail. If you are desperate, you can try me on my cell at 863-221-2372. Please leave a message and shoot me a text if I do not pick up.
This image was created on 13 January 2022 down by the lake near my home in Indian Lake Estates. Standing as tall as possible just outside my SUV, I used the no-longer available GIT 304L/Levered-Clamp FlexShooter Pro-mounted BLUBB-supported Sony FE 600mm f/4 GM OSS lens, the Sony FE 2.0x Teleconverter, and The One, the Sony Alpha 1 Mirrorless Digital Camera.. ISO 1250. The exposure was determined perfectly by Zebras with ISO on the rear wheel: 1/500 sec. at f/8 (wide open) in Manual mode. AWB at 7:45:49am on a sunny morning.
Tracking: Spot S AF/C with Bird-Eye/Face Detection performed perfectly. Click on the image to enjoy the high-res version.
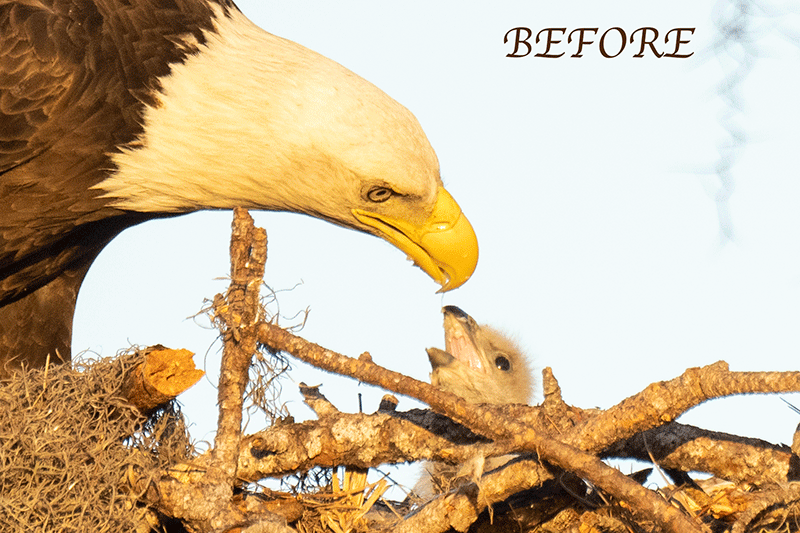
Image #1: Bald Eagle adult feeding small chick (full frame at 1200mm)
Chick-let Suspicion Confirmed!
Having watched the eagle lying low in the nest for more than a few weeks, I figured that she was incubating her clutch. On Tuesday, it looked as if she were feeding young, but I’d could not see over the edge of the nest. On Wednesday, I was pretty sure that I saw the head of a very small chick. Then finally on Thursday morning I witnessed and photographed an adult eagle feeding a chick that is probably a week or so old. I took a few frames from the vehicle working off the BLUBB but wanted to get a bit higher, so I moved the car back a bit, added the 2X TC, and worked off the tripod.
If I were not headed for San Diego I would be checking the nest each morning with my super-tall tripod and my tall sturdy, tall stepladder in the back of my vehicle (if needed). Getting two or even three feet higher would be a big advantage. The nest is relatively low and fairly open; as the chick or chicks grow to fledging, there should be some great photography in store at ILE for the next few months. Not to mention the Sandhill Cranes and chicks! Folks who own The Middle of Florida Site Guide are invited to e-mail for detailed directions to the nest along with some photo tips. Please include proof-of-purchase. Others my purchase the guide (see below) and then request the eagle nest info.
Image #1A: A highly-cropped animated GIF for the Bald Eagle feeding tiny chick (full frame at 1200mm) image
The Image Optimization
I converted the raw file with Adobe Camera Raw and brought the image into Photoshop. I did not like the YELLOW cast, a result of the sweet early morning light. I used the techniques detailed in the Saving the Whites (and lots more!) Video to restore the detail in the single bright area of the bird’s head. I reduced the YELLOW saturation for the whole image, and further reduced it after selecting the head. The latter technique is also detailed in the Saving the Whites (and lots more!) Video.
In addition, I did not like the branch sticking into the adult eagle’s neck. I shortened that stick using a series of Quick Masks each refined with the addition of a Regular Layer Mask. You can enjoy the before and after views of the head in the animated GIF above. Note that I removed the YELLOW cast from the heads of both the adult and the chick and also that I lightened the eagle’s now properly WHITE head.
The BAA Middle of Florida Photographic Site Guide
You can purchase your copy here in the BAA Online Store.
The BAA Middle of Florida Photographic Site Guide
126 pages, 87 photographs by Joe Przybyla and Arthur Morris.
The PDF for this e-Guide is an electronic download sent via e-mail.
I had thought about doing a guide to some of the great but little-known photo hotspots around central Florida for about a decade, but those plans never came to fruition. I met Joe online in the Avian Forum at BirdPhotographer’s.Net about two years ago. Joe’s photography has improved tremendously over the past few years; he credits the BAA blog, my books and PDFs, and his participation on BPN. The one thing that I learned right from the get-go about Joe is that he is a hard and tenacious worker, always striving to improve his skills and to grow his knowledge base. As he knew of more than a few good spots in central Florida, I broached the idea of us doing a photographic site guide that covered many of the little-known photographic hotspots from Brandon to Lakeland to Joe Overstreet Road to Indian Lake Estates (my Florida home for the past 20 years or so). After more than many, many dozens of hours of effort, The BIRDS AS ART Middle of Florida Photographic Site Guide is now a reality. Thanks to Joe’s wife Dottie for her review of our writing. We all learned once again that writing is a process, a back and forth process. All thanks to the white pelicans of Lakeland. Here are the locations that are detailed in this e-Guide:
Indian Lake Estates: Sandhills Cranes with chicks and colts, lots of vultures, and Ospreys up the kazoo!
Gatorland, Kissimmee: Learn to make great images of wading birds in a cluttered rookery.
The Brandon Rookery: Great for nesting Wood Storks, Great Egrets, and more.
Circle Bar B Reserve, Lakeland: Here you will find a great variety of avian subjects in a great variety of habitats.
Lake Morton, Lakeland: There are lots of silly tame birds here including and especially American White Pelican during the colder months.
Lake Mirror, Lakeland: Tame Anhingas, Limpkins, and a zillion White Ibises at times.
West Lake Parker, Lakeland: Here you will have a chance for two difficult birds, Snail Kite, and Purple Gallinule.
Joe Overstreet Road, Kenansville: Crested Caracara, meadowlarks, Loggerhead Shrike, and much more on the fenceposts and barbed wire.
Each location includes a map, a detailed description of the best spots, best season, light and time of day instructions, the expected species, and an educational and inspirational gallery that is designed to open your eyes as to the possibilities.
You can purchase a copy here in the BAA Online Store.
Image #1B: The RawDigger screen capture for the Bald Eagle feeding tiny chick (full frame at 1200mm) image
Dead-Solid Perfect!
Images where the G channel gets 2/3rds of the way from the 8000 to the 16000 line are perfect exposures. Images where the G channel gets right up to the line are dead-solid perfect. With 35 Ov-Exp pixels out of 51,000,000 today’s featured image is somewhere between perfect and dead-solid perfect. It is likely that that at the few Ov-Exp pixels are in the specular highlight in the adult bird’s eye.
RawDigger — not for the faint of heart …
Nothing has ever helped me learn to create perfect exposures to the degree that RawDigger has. I think that many folks are reluctant to learn that most of their images are underexposed by one or more full stops and that highlight warnings in Photoshop, Lightroom, Capture One, and your in-camera histogram are completely bogus as they are based on the embedded JPEGs. Only your raw files tell the truth all the time. Heck, I resisted RawDigger for several years … Once you get over that feeling, RawDigger can become your very best exposure friend no matter what system you are using. On the recent IPTs and In-the-Field sessions, we have demonstrated that fact. Convincingly.
The RawDigger (pink) Adapted Histogram
In the RawDigger e-Guide, you will learn exactly how to set up the Adapted “pink” RawDigger Histogram and how to use it to quickly and easily evaluate the exposure or raw file brightness of images from all digital cameras currently in use. RawDigger was especially helpful to me when I struggled with R5 exposures and when I learned my new camera body, the Sony Alpha a1.
RawDigger e-Guide with Two Videos
The RawDigger e-Guide with Two Videos
by Arthur Morris with Patrick Sparkman
The RawDigger e-Guide was created only for serious photographers who wish to get the absolute most out of their raw files.
Patrick and I began work on the guide in July 2020. At first, we struggled. We asked questions. We learned about Max-G values. We could not figure out why the Max G values varied by camera system. IPT veteran Bart Deamer asked lots of questions that we could not answer. We got help from RawDigger creator Iliah Borg. We learned. In December, Patrick came up with an Adapted Histogram that allows us to evaluate the exposures and raw file brightness for all images created with all digital camera bodies from the last two decades. What we learned each time prompted three complete beginning-to-end re-writes.
The point of the guide is to teach you to truly expose to the mega-Expose-to-the-Right so that you will minimize noise, maximize image quality, best utilize your camera’s dynamic range, and attain the highest possible level of shadow detail in your RAW files in every situation. In addition, your properly exposed RAW files will contain more tonal information and feature the smoothest possible transitions between tones. And your optimized images will feature rich, accurate colors.
We teach you why the GREEN channel is almost always the first to over-expose. We save you money by advising you as to which version of RawDigger you need. We teach you how to interpret the Max G values for your Canon, Nikon, and SONY camera bodies. It is very likely that the Shock-your-World section will shock you. And lastly — thanks to the technical and practical brilliance of Patrick Sparkman — we teach you a simple way to quickly and easily evaluate your exposures and raw file brightness using an Adapted RawDigger histogram.
The flower video takes you through a session where artie edits a folder of images in Capture One while checking the exposures and Max-G values in RawDigger. The Adapted Histogram video examines a series of recent images with the pink histograms and covers lots of fine points including and especially how to deal with specular highlights. The directions for setting up the Adapted Histogram are in the text.
If we priced this guide based on how much effort we put into it, it would sell it for $999.00. But as this guide will be purchased only by a limited number of serious photographers, we have priced it at $51.00. You can order yours here in the BAA Online Store.
Typos
With all blog posts, feel free to e-mail or to leave a comment regarding any typos or errors.
Wednesday morning was close to a bust photographically. I did see another pair of cranes copulating and I spotted a Purple Gallinule in the marsh just to the north of the pier after my less-than-inspiring blur session. It was cloudy most of the day, but the sun broke through just after 5:00pm so I headed down to the lake as there was a nice wind from the east. But there were lots of clouds. Thinking that my chances were somewhere between Slim and None, I brought the laptop so that I could work on this blog post. And did. Unfortunately, None was the victor — the sun ducked behind a cloud and then quickly disappeared for good.
Today is Thursday 13 January 2022, packing day. I leave for San Diego early on Friday. The forecast for the morning is for solidly cloudy with a breeze from the northeast. I will likely head down to the pier for some blurs and then check on the eagle nest. Then I need to get to work packing. Wherever you are, and whatever you are doing, I hope that you too have a great day. This blog post took about an hour to prepare and makes 64 consecutive days with a new one.
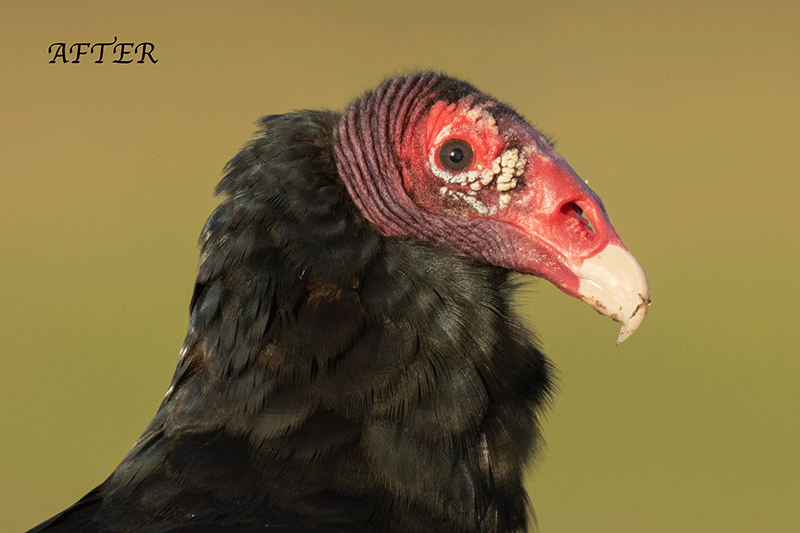
This image was created on 11 January 2022 at Indian Lake Estates. Standing outside of my SUV, I used the hand held Sony FE 200-600mm f/5.6-6.3 G OSS lens(at 600mm), and The One, the Sony Alpha 1 Mirrorless digital camera. ) ISO 1250. Exposure determined via Zebras with ISO on the rear dial: 1/400 sec. at f/6.3 (wide open) in Manual mode. AWB at 7:45:06am on a barely sunny morning.
Click on the image to enjoy a high-res version.
Image #1: Turkey Vulture on The Perch II, facing to the right
A Strange Morning
Monday had been a strange morning. It was cold with a brisk wind from the northwest. I walked out onto the pier with the big lens in one hand and the tripod in the other. There were dozens of Turkey Vultures on the pier railing. I had set up without a TC and the a1 was set up for blurs. So when the vultures took off and some of them landed on the railing a bit farther out on the pier, I made a few images. One of those turned out to be pretty cool. You will see it here at some point; it is entitled No Room at the Inn. I got to my favorite morning blur spot halfway out on the pier and saw a load of Cattle Egrets in the relatively distant marsh. As nothing was taking flight and I was freezing, I went back to the car and grabbed my bright yellow Emperor Penguin expedition parka. Again the vultures were on the railing with lots more on both sides of the pier. As it did not look as if any birds would be leaving the roost anytime soon I grabbed the 200-600 with my second a1 and set up for blurs. I went upwind of the vultures in hopes of making some pleasing blurs. I tried but that was about it.
Then the sun came over the big cloud in the east. There had been a vulture on The Perch, so I doubled back and was surprised to see that it was still there. I was glad that it did not fly off at my careful approach. I made some images and left the bird where I had found it. With my RawDigger education, I can always get the exposures very close to perfect especially with subjects that I know well. None-the-less, I am always experimenting to see if I can determine the difference between perfect and dead-solid perfect exposures in the field. With RawDigger you are constantly learning.
It is nice to see that after six months of inactivity, several species of birds have been using The Perch fairly regularly for the past few weeks.
This image was created on 11 January 2022 at Indian Lake Estates. Standing outside of my SUV, I used the hand held Sony FE 200-600mm f/5.6-6.3 G OSS lens(at 600mm), and The One, the Sony Alpha 1 Mirrorless digital camera. ) ISO 2500. Exposure determined via Zebras with ISO on the rear dial: 1/1000 sec. at f/6.3 (wide open) in Manual mode. AWB at 7:45:42am on a barely sunny morning.
Click on the image to enjoy a high-res version.
Image #2: Turkey Vulture on The Perch II, facing the camera
Your Call
Which is the stronger image? Which pose do you like best? Why? Which is the more elegant photograph?
Image #2A: RawDigger screen capture for the Turkey Vulture on The Perch II, facing the camera image
White Sky/Dark Subject
In white sky/dark subject situations, you must over-expose the sky to come up with a good exposure for the dark subject. I did just that here to the tune of 7,000,000 Ov-Exp pixels. I could have actually gone a bit lighter. Note the beautiful detail on the vulture’s black breast.
RawDigger — not for the faint of heart …
Nothing has ever helped me learn to create perfect exposures to the degree that RawDigger has. I think that many folks are reluctant to learn that most of their images are underexposed by one or more full stops and that highlight warnings in Photoshop, Lightroom, Capture One, and your in-camera histogram are completely bogus as they are based on the embedded JPEGs. Only your raw files tell the truth all the time. Heck, I resisted RawDigger for several years … Once you get over that feeling, RawDigger can become your very best exposure friend no matter what system you are using. On the recent IPTs and In-the-Field sessions, we have demonstrated that fact. Convincingly.
The RawDigger (pink) Adapted Histogram
In the RawDigger e-Guide, you will learn exactly how to set up the Adapted “pink” RawDigger Histogram and how to use it to quickly and easily evaluate the exposure or raw file brightness of images from all digital cameras currently in use. RawDigger was especially helpful to me when I struggled with R5 exposures and when learned my new camera body, the Sony Alpha a1.
RawDigger e-Guide with Two Videos
The RawDigger e-Guide with Two Videos
by Arthur Morris with Patrick Sparkman
The RawDigger e-Guide was created only for serious photographers who wish to get the absolute most out of their raw files.
Patrick and I began work on the guide in July 2020. At first we struggled. We asked questions. We learned about Max-G values. We could not figure out why the Max G values varied by camera system. IPT veteran Bart Deamer asked lots of questions that we could not answer. We got help from RawDigger creator Iliah Borg. We learned. In December, Patrick came up with an Adapted Histogram that allows us to evaluate the exposures and raw file brightness for all images created with all digital camera bodies from the last two decades. What we learned each time prompted three complete beginning to end re-writes.
The point of the guide is to teach you to truly expose to the mega-Expose-to-the-Right so that you will minimize noise, maximize image quality, best utilize your camera’s dynamic range, and attain the highest possible level of shadow detail in your RAW files in every situation. In addition, your properly exposed RAW files will contain more tonal information and feature the smoothest possible transitions between tones. And your optimized images will feature rich, accurate color.
We teach you why the GREEN channel is almost always the first to over-expose. We save you money by advising you which version of RawDigger you need. We teach you how to interpret the Max G values for your Canon, Nikon, and SONY camera bodies. It is very likely that the Shock-your-World section will shock you. And lastly — thanks to the technical and practical brilliance of Patrick Sparkman — we teach you a simple way to quickly and easily evaluate your exposures and raw file brightness using an Adapted RawDigger histogram.
The flower video takes you through a session where artie edits a folder of images in Capture One while checking the exposures and Max-G values in RawDigger. The Adapted Histogram video examines a series of recent images with the pink histograms and covers lots of fine points including and especially how to deal with specular highlights. The directions for setting up the Adapted Histogram are in the text.
If we priced this guide based on how much effort we put into it, it would sell it for $999.00. But as this guide will be purchased only by a limited number of serious photographers, we have priced it at $51.00. You can order yours here in the BAA Online Store.
Typos
With all blog posts, feel free to e-mail or to leave a comment regarding any typos or errors.
The temperature at 7:00am on Tuesday here at ILE was 54°. With a brisk wind from the north by slightly west, it seemed like the coldest morning of the year (even though we had 48° about two weeks ago). IAC, once I was out on the pier, I walked back to the car to get my Emperor Penguin expedition parka. The day began with 201 blurs, all of those on a walk-around with the 200-600 G lens and an a1. I chased Turkey Vulture blurs while my big lens sat halfway out on the pier doing nothing at all. Once the sun came up, I had one very good chance with one very handsome TV on The Perch. Then more TVs on the knoll, and then the crane pair from yesterday’s blog post walked back up on the knoll! I prayed for a repeat copulation, but alas, that did not happen.
With a stiff north/northeast wind and some nice sky color, conditions at sunset were excellent. I think that I got some special White Ibis silhouettes.
Today is Wednesday 12 January 2022. The forecast for this morning is for partly cloudy with a light north/northeast wind. You can find me down by the lake early. Wherever you are, and whatever you are doing, I hope that you too have a great day. This blog post took more than 90 minutes to prepare and makes 63 consecutive days with a new one.
Please remember that you can find some great photo accessories (and necessities, like surf booties!) on Amazon by clicking on the Stuff tab on the orange/yellow menu bar above. On a related note, it would be extremely helpful if blog-folks who, like me, spend too much money on Amazon, would get in the habit of clicking on the Amazon logo link on the right side of each blog post when they shop online. As you might expect, doing so will not cost you a single penny, but would be appreciated tremendously by yours truly. And doing so works seamlessly with your Amazon Prime account.
Please remember that if an item — a Delkin flash card, or a tripod head — for example, that is available from B&H and/or Bedfords, is also available in the BAA Online Store, it would be great, and greatly appreciated, if you would opt to purchase from us. We will match any price. Please remember also to use my B&H affiliate links or to save 3% at Bedfords by using the BIRDSASART discount code at checkout for your major gear purchases. Doing either often earns you free guides and/or discounts. And always earns my great appreciation.
Sony Alpha 1 Bodies in Stock at Bedfords/free card offer!
Steve Elkins of Bedfords let me know recently that he had several Sony a1 bodies in stock. If one of them has your name on it, please click here and be sure to enter the BIRDSASART coupon code check the box for free shipping to enjoy free Second Day Air Fed-Ex. Right now, in lieu of the 3% credit refunded to the card you used for your purchase, you will receive a Sony 160GB CFexpress Type A TOUGH Memory Card, a $399.99 value!
Brand New and As-Good-As-Ever Bedfords BAA Discount Policy
Folks who have fallen in love with Bedfords can now use the BIRDSASART coupon code at checkout to enjoy a post-purchase, 3% off-statement credit (excluding taxes and shipping charges) on orders paid with a credit card. The 3% credit will be refunded to the card you used for your purchase. Be sure, also, to check the box for free shipping to enjoy free Second Day Air Fed-Ex. This offer does not apply to purchases of Classes, Gift Cards, or to any prior purchases.
Money Saving Reminder
Many have learned that if you need a hot photo item that is out of stock at B&H and would like to enjoy getting 3% back on your credit card along with free 2nd Day Air Fed-Ex Air shipping, your best bet is to click here, place an order with Bedfords, and enter the coupon code BIRDSASART at checkout. If an item is out of stock, contact Steve Elkins via e-mail or on his cell phone at (479) 381-2592 (Central time). Be sure to mention the BIRDSASART coupon code and check the box for Free Shipping. That will automatically upgrade to free 2nd Day Air Fed-Ex. Steve has been great at getting folks the hot items that are out of stock at B&H and everywhere else. The waitlists at the big stores can be a year or longer for the hard to get items. Steve will surely get you your gear long before that. For the past year, he has been helping BAA Blog folks get their hands on items like the SONY a 1, the SONY 200-600 G OSS lens, the Canon EOS R5, the Canon RF 100-500mm lens, and the Nikon 500mm PF. Steve is personable, helpful, and eager to please.
Important Note
As an Amazon Associate, I earn a small percentage when you purchase from Amazon after using any of the Amazon links on the blog (including the logo-link immediately above). My link works with Amazon Prime and using it will not cost you a single cent. Huge thanks, BTW 🙂
Please Remember Also
Please, if you enjoy and learn from the blog, remember to use one of my two affiliate programs when purchasing new gear. Doing so just might make it possible for me to avoid having to try to get a job as a Walmart greeter and will not cost you a single penny more. And if you use Bedfords and remember to enter the BIRDSASART code at checkout, you will (still!) save 3% on every order and enjoy free second-day air shipping. In these crazy times — I lost about fifty thousand dollars in income due to COVID 19 — remembering to use my B&H link or to shop at Bedfords will help me out a ton and be greatly appreciated. Overseas folks who cannot order from the US because of import fees, duties, and taxes, are invited to help out by clicking here to leave a blog thank you gift if they see fit.
Gear Questions and Advice
Too many folks attending BAA IPTs and dozens of photographers whom I see in the field and on BPN, are–out of ignorance–using the wrong gear, especially when it comes to tripods and more especially, tripod heads… Please know that I am always glad to answer your gear questions via e-mail. If you are desperate, you can try me on my cell at 863-221-2372. Please leave a message and shoot me a text if I do not pick up.
This image was created on 11 January 2022 down by the lake near my home in Indian Lake Estates. Working from the driver’s seat of my SUV, I used the BLUBB-supported Sony FE 600mm f/4 GM OSS lens, the Sony FE 2.0x Teleconverter, and The One, the Sony Alpha 1 Mirrorless Digital Camera.. ISO 800. The exposure was determined by Zebras with ISO on the rear wheel: 1/800 sec. at f/8 (wide open) in Manual mode. AWB at 8:32:13am on a sunny morning.
Tracking: Spot S AF/C with Bird-Eye/Face Detection performed perfectly. Click on the image to enjoy the high-res version.
Image #1: Turkey Vulture in suffused green heaven (1200mm)
How to Create Bird-in-Heaven Images
The trick to creating the bird-in-heaven look with a strip of out-of-focus color at the bottom of the frame is to find a situation where there is a small rise at least a few inches in front of the bird. When you focus on the bird, the foreground element, in this case the rise, will be rendered completely and pleasingly diffused. As the bird was on the far side of a small hill, the trick for me was to drive up the hill until I could see just the top half of the bird above the grass on the crest of the hill. Next, for this image, with the northwest wind, was getting the look-back head turn! I did that for this frame only and then the bird turned away from me and walked down the hill. One is all that it takes!
Image #1A: An Animated GIF showing the detail restored to the seemingly over-exposed bill tip
Before and After Saving the Whites
By exposing to the right to the max, you ensure getting maximum detail in the vulture’s dark and black feathers. Understand that the bill tip is not over-exposed — see the RawDigger screen capture at the bottom of this blog post. But while the bill is not over-exposed — the detail is all there in the digital file, we need to know how to restore that detail. The are several things to do in the raw conversion, and many additional steps to be done once the .TIF file is in Photoshop (or in Lightroom). You rarely need to use all of the techniques on a single image, but it surely helps to have them all at your disposal. All of them are detailed in the Saving the Whites (and lots more!) Video.
The Saving the WHITEs (and lots more!) Video image
The Saving the Whites (and lots more!) Video
My two biggest challenges when optimizing images are getting the BLUEs just right, and restoring detail to the WHITEs and highlights of properly exposed raw files. There are four things that I do to accomplish the latter. All are covered in detail in this 21+ minute video, along with a dirty trick to try if the first four do not work perfectly. Sit with me at my laptop as I teach you how to save the WHITEs. I begin with the raw conversions of two different raw files, first with the Snowy Owl image featured here, and then with Joe Usewicz’s spoonbill image that was featured in the Extraordinary Over-Exposed (?) Spoonbill/Saving the WHITEs Optimization blog post here.
In addition to learning how to save the WHITEs (in both images), you will learn how to expand canvas using the amazingly convenient Content-Aware Crop Tool, to set the White Balance (color temperature), to set the WHITE and BLACK points, see Digital Eye Doctor and RawDigger in action, learn to make a Color Range Selection, and lots more.
To purchase your copy of the Saving the Whites Video (and lots more!) video, you can send a PayPal for $37.00 to us at birdsasart@verizon.net, call Jim in the office at 863-692-0906 with your credit card in hand, or visit the item in the BAA Online store by clicking here.
Image #1C: Tight crop of the face of the Turkey Vulture in suffused green heaven (1200mm)
Amazing Sharpness and Detail at 1200mm
I continue to be stunned by the sharpness, image quality, and fine-feather detail of Sony Alpha 1 images, even those created at 1200mm. Even when working off the BLUBB. Note: while the BLUBB is by far the most stable beanbag ever created, a good tripod and head will always be a bit more stable. But not anywhere as convenient when using your car as a blind.
Image #1A: RawDigger screen capture for the Turkey Vulture in suffused green heaven (1200mm) image
Dead-Solid Perfect!
Images where the G channel gets 2/3rds of the way from the 8000 to the 16000 line are perfect exposures. Images where the G channel gets right up to the line are dead-solid perfect. With 341 Ov-Exp pixels out of 51,000,000 this is a dead-solid perfect exposure. Note: if you magnify the image you can see that all of the Ov-Exp pixels are in the specular highlight in the bird’s eye.
RawDigger — not for the faint of heart …
Nothing has ever helped me learn to create perfect exposures to the degree that RawDigger has. I think that many folks are reluctant to learn that most of their images are underexposed by one or more full stops and that highlight warnings in Photoshop, Lightroom, Capture One, and your in-camera histogram are completely bogus as they are based on the embedded JPEGs. Only your raw files tell the truth all the time. Heck, I resisted RawDigger for several years … Once you get over that feeling, RawDigger can become your very best exposure friend no matter what system you are using. On the recent IPTs and In-the-Field sessions, we have demonstrated that fact. Convincingly.
The RawDigger (pink) Adapted Histogram
In the RawDigger e-Guide, you will learn exactly how to set up the Adapted “pink” RawDigger Histogram and how to use it to quickly and easily evaluate the exposure or raw file brightness of images from all digital cameras currently in use. RawDigger was especially helpful to me when I struggled with R5 exposures and when I learned my new camera body, the Sony Alpha a1.
RawDigger e-Guide with Two Videos
The RawDigger e-Guide with Two Videos
by Arthur Morris with Patrick Sparkman
The RawDigger e-Guide was created only for serious photographers who wish to get the absolute most out of their raw files.
Patrick and I began work on the guide in July 2020. At first, we struggled. We asked questions. We learned about Max-G values. We could not figure out why the Max G values varied by camera system. IPT veteran Bart Deamer asked lots of questions that we could not answer. We got help from RawDigger creator Iliah Borg. We learned. In December, Patrick came up with an Adapted Histogram that allows us to evaluate the exposures and raw file brightness for all images created with all digital camera bodies from the last two decades. What we learned each time prompted three complete beginning-to-end re-writes.
The point of the guide is to teach you to truly expose to the mega-Expose-to-the-Right so that you will minimize noise, maximize image quality, best utilize your camera’s dynamic range, and attain the highest possible level of shadow detail in your RAW files in every situation. In addition, your properly exposed RAW files will contain more tonal information and feature the smoothest possible transitions between tones. And your optimized images will feature rich, accurate colors.
We teach you why the GREEN channel is almost always the first to over-expose. We save you money by advising you as to which version of RawDigger you need. We teach you how to interpret the Max G values for your Canon, Nikon, and SONY camera bodies. It is very likely that the Shock-your-World section will shock you. And lastly — thanks to the technical and practical brilliance of Patrick Sparkman — we teach you a simple way to quickly and easily evaluate your exposures and raw file brightness using an Adapted RawDigger histogram.
The flower video takes you through a session where artie edits a folder of images in Capture One while checking the exposures and Max-G values in RawDigger. The Adapted Histogram video examines a series of recent images with the pink histograms and covers lots of fine points including and especially how to deal with specular highlights. The directions for setting up the Adapted Histogram are in the text.
If we priced this guide based on how much effort we put into it, it would sell it for $999.00. But as this guide will be purchased only by a limited number of serious photographers, we have priced it at $51.00. You can order yours here in the BAA Online Store.
Typos
With all blog posts, feel free to e-mail or to leave a comment regarding any typos or errors.
All are invited to leave a comment letting us know which of today’s six featured images they like best, and why they made their choice.
Thanks for all the comments on the Black Vulture images in yesterday’s blog post. The consensus pick was Image #4 with the interesting background. My pick was Image #2, the vertical with the somewhat crazy flight pose.
What’s Up?
On Monday morning, I enjoyed another great photo session at ILE. It began on the pier with 321 blurs. Those included eight keepers after the first edit. I took a few snaps of the eagle before and after the sun hit the nest. I am pretty sure, but not positive, that the bird was feeding a chick … Next up was a Cattle Egret on a piling at the boat ramp dock in super-sweet early morning butter light. I kept nine of 96. Each featured a lovely green background. When something spooked the egret, I followed the movement and I saw three Killdeer on the boat ramp in the shade of my SUV. Two of them bathed. In just 2 minutes 18 seconds, I created 269 images; 23 of those survived the first cut. Then I drove to the parking circle to check out The Perch. On the way, I saw two cranes atop the small knoll just to the north. I positioned the car on sun angle and working off the BLUBB, I made a bunch of ordinary images at 840mm with the 600mm f/4, the 1.4X TC, and the a1. Then things got really exciting. In all, I created 482 images of the cranes on the rise. Keep reading below to learn what happened next.
Sunset on Monday was another cloudy bust. Today is Tuesday 11 January 2022. Clearing skies with a north wind are in the forecast. I will get down to the lake for at least a while. Wherever you are, and whatever you are doing, I hope that you too have a great day. This blog post took more than three hours to prepare (including the time spent on the six image optimizations) and makes 62 consecutive days with a new one.
Please remember that you can find some great photo accessories (and necessities, like surf booties!) on Amazon by clicking on the Stuff tab on the orange/yellow menu bar above. On a related note, it would be extremely helpful if blog-folks who, like me, spend too much money on Amazon, would get in the habit of clicking on the Amazon logo link on the right side of each blog post when they shop online. As you might expect, doing so will not cost you a single penny, but would be appreciated tremendously by yours truly. And doing so works seamlessly with your Amazon Prime account.
Please remember that if an item — a Delkin flash card, or a tripod head — for example, that is available from B&H and/or Bedfords, is also available in the BAA Online Store, it would be great, and greatly appreciated, if you would opt to purchase from us. We will match any price. Please remember also to use my B&H affiliate links or to save 3% at Bedfords by using the BIRDSASART discount code at checkout for your major gear purchases. Doing either often earns you free guides and/or discounts. And always earns my great appreciation.
Sony Alpha 1 Bodies in Stock at Bedfords/free card offer!
Steve Elkins of Bedfords let me know recently that he had several Sony a1 bodies in stock. If one of them has your name on it, please click here and be sure to enter the BIRDSASART coupon code check the box for free shipping to enjoy free Second Day Air Fed-Ex. Right now, in lieu of the 3% credit refunded to the card you used for your purchase, you will receive a Sony 160GB CFexpress Type A TOUGH Memory Card, a $399.99 value!
Brand New and As-Good-As-Ever Bedfords BAA Discount Policy
Folks who have fallen in love with Bedfords can now use the BIRDSASART coupon code at checkout to enjoy a post-purchase, 3% off-statement credit (excluding taxes and shipping charges) on orders paid with a credit card. The 3% credit will be refunded to the card you used for your purchase. Be sure, also, to check the box for free shipping to enjoy free Second Day Air Fed-Ex. This offer does not apply to purchases of Classes, Gift Cards, or to any prior purchases.
Money Saving Reminder
Many have learned that if you need a hot photo item that is out of stock at B&H and would like to enjoy getting 3% back on your credit card along with free 2nd Day Air Fed-Ex Air shipping, your best bet is to click here, place an order with Bedfords, and enter the coupon code BIRDSASART at checkout. If an item is out of stock, contact Steve Elkins via e-mail or on his cell phone at (479) 381-2592 (Central time). Be sure to mention the BIRDSASART coupon code and check the box for Free Shipping. That will automatically upgrade to free 2nd Day Air Fed-Ex. Steve has been great at getting folks the hot items that are out of stock at B&H and everywhere else. The waitlists at the big stores can be a year or longer for the hard to get items. Steve will surely get you your gear long before that. For the past year, he has been helping BAA Blog folks get their hands on items like the SONY a 1, the SONY 200-600 G OSS lens, the Canon EOS R5, the Canon RF 100-500mm lens, and the Nikon 500mm PF. Steve is personable, helpful, and eager to please.
Important Note
As an Amazon Associate, I earn a small percentage when you purchase from Amazon after using any of the Amazon links on the blog (including the logo-link immediately above). My link works with Amazon Prime and using it will not cost you a single cent. Huge thanks, BTW 🙂
Please Remember Also
Please, if you enjoy and learn from the blog, remember to use one of my two affiliate programs when purchasing new gear. Doing so just might make it possible for me to avoid having to try to get a job as a Walmart greeter and will not cost you a single penny more. And if you use Bedfords and remember to enter the BIRDSASART code at checkout, you will (still!) save 3% on every order and enjoy free second-day air shipping. In these crazy times — I lost about fifty thousand dollars in income due to COVID 19 — remembering to use my B&H link or to shop at Bedfords will help me out a ton and be greatly appreciated. Overseas folks who cannot order from the US because of import fees, duties, and taxes, are invited to help out by clicking here to leave a blog thank you gift if they see fit.
Gear Questions and Advice
Too many folks attending BAA IPTs and dozens of photographers whom I see in the field and on BPN, are–out of ignorance–using the wrong gear, especially when it comes to tripods and more especially, tripod heads… Please know that I am always glad to answer your gear questions via e-mail. If you are desperate, you can try me on my cell at 863-221-2372. Please leave a message and shoot me a text if I do not pick up.
This image was created on 10 January 2022 at Indian Lake Estates. Working from the front seat of my SUV, I used the BLUBB-supported Sony FE 600mm f/4 GM OSS lens with the Sony FE 1.4x Teleconverter, and The One, the Sony Alpha 1 Mirrorless Digital Camera). ISO 800. The exposure was determined using Zebra technology with ISO on the rear wheel: 1/1250 sec. at f/5.6 (wide open) in Manual mode. AWB at 8:06:41am on a mostly sunny morning.
Tracking: Spot S AF-C performed perfectly. Be sure to click on the image to enjoy a higher-res version.
The two cranes began walking down the back side of the small hill. One of them leaned forward, almost as if bowing. This indicates one of two things:
A- The bird is about to take flight
B- The female is beginning a sequence of behaviors inviting the male to copulate.
In this case it was B. The bird that had leaned forward had been the female. She walked toward me and spread her wings low and to the side as you see in Image #1. This was a clear invitation to the male to copulate. I was vertical at 840mm. The moment that I saw the male walking up behind the female, I knew that he had accepted. Even as I made a few images, I knew that I would need to remove the teleconverter and switch from vertical to horizontal ASAP to avoid clipping wings and more.
This image was created on 10 January 2022 at Indian Lake Estates. Working from the front seat of my SUV, I used the BLUBB-supported Sony FE 600mm f/4 GM OSS lens and The One, the Sony Alpha 1 Mirrorless Digital Camera). ISO 800. The exposure was determined using Zebra technology with ISO on the rear wheel: 1/2000 sec. at f/4 (wide open) in Manual mode. AWB at 8:06:58am on a mostly sunny morning.
AF Method unknown, but whatever it was, it performed amazingly well. Be sure to click on the image to enjoy a higher-res version.
Image #2: Sandhill Crane pair copulating, male with foot raised over female’s head
The Good News and the Bad News
Faced with a rapidly-developing, pretty-much-perfect situation, my heart was pounding. You might think it strange that after 38 years of bird photography I could still get so excited. It took me 16 seconds to remove the TC, remount the camera body, turn the lens to horizontal on the BLUBB, and adjust the exposure (albeit incorrectly). During the time that it had taken me to remove the TC, the male had mounted the female. I noted way too many Zebras, so I increased the shutter speed. But I increased it only two clicks from 1/1250 sec. to 1/2000 sec. As the aperture went from f/5.6 to f/4 when I removed the TC, I should have gone three clicks to 1/2500 sec. As a result of this error, all of the raw files were over-exposed to varying degrees, some by as much as 1/3 stop. The over-exposures were all in the bright tones of the under-primary feathers. I used the knowledge gained from working with RawDigger for the past three years — all of the Ov-Exp pixels were in the G channel — and the techniques detailed in the Saving the Whites Video to successfully process the six images featured here today.
This image was created on 10 January 2022 at Indian Lake Estates. Working from the front seat of my SUV, I used the BLUBB-supported Sony FE 600mm f/4 GM OSS lens and The One, the Sony Alpha 1 Mirrorless Digital Camera). ISO 800. The exposure was determined using Zebra technology with ISO on the rear wheel: 1/2000 sec. at f/4 (wide open) in Manual mode. AWB at 8:06:58am on a mostly sunny morning.
AF Method unknown, but whatever it was, it performed amazingly well. Be sure to click on the image to enjoy a higher-res version.
Image #3: Sandhill Crane pair copulating
Pedal to the Metal
Because I had to remove the TC, I was a bit late to the party. From there, it was all over in less than four seconds. I do not remember releasing pressure on the shutter button. There were 87 images in the sequence. I opted to keep only 13. I clipped a wing in only two images; all the rest were quite excellent. But you simply cannot keep all the good ones with the a1.
Note: Images #2-5 are all quite similar, but there are small differences in each photo the led me to keep this or that image and to discard many others. The determining factors had to do primarily with differing head and wing (and even foot) positions, mostly with respect to the male bird, the one on top 🙂
This image was created on 10 January 2022 at Indian Lake Estates. Working from the front seat of my SUV, I used the BLUBB-supported Sony FE 600mm f/4 GM OSS lens and The One, the Sony Alpha 1 Mirrorless Digital Camera). ISO 800. The exposure was determined using Zebra technology with ISO on the rear wheel: 1/2000 sec. at f/4 (wide open) in Manual mode. AWB at 8:06:59am on a mostly sunny morning.
AF Method unknown, but whatever it was, it performed amazingly well. Be sure to click on the image to enjoy a higher-res version.
AF Method unknown, but whatever it was, it performed amazingly well.
On my gripped a1, I have three AF Methods enabled. But only two are enabled on my other a1. With the camera set up properly, the camera remembers both the AF Method and the position of the point or zone when you switch from vertical to horizontal. I am 100% sure that for Image #1, the vertical, I was using Tracking: Spot S. But in all the excitement, I am not sure if I was using that or Tracking: Zone. But it did not matter: every one of the 87 images in the copulation series was sharp.
This image was created on 10 January 2022 at Indian Lake Estates. Working from the front seat of my SUV, I used the BLUBB-supported Sony FE 600mm f/4 GM OSS lens and The One, the Sony Alpha 1 Mirrorless Digital Camera). ISO 800. The exposure was determined using Zebra technology with ISO on the rear wheel: 1/2500 sec. at f/4 (wide open) in Manual mode. AWB at 8:07:01am on a mostly sunny morning.
AF Method unknown, but whatever it was, it performed amazingly well. Be sure to click on the image to enjoy a higher-res version.
Image #5: Sandhill Crane pair copulating, male biting head of female
More Fine-Feather Detail?
After clicking on each image to view the high-res version, please leave a comment if you think that one of today’s images shows more fine-feather detail than the other five. If yes, which one. If they all look the same to you, you are invited to leave a comment stating that. Your answer will help me out quite a bit.
This image was created on 10 January 2022 at Indian Lake Estates. Working from the front seat of my SUV, I used the BLUBB-supported Sony FE 600mm f/4 GM OSS lens and The One, the Sony Alpha 1 Mirrorless Digital Camera). ISO 800. The exposure was determined using Zebra technology with ISO on the rear wheel: 1/2500 sec. at f/4 (wide open) in Manual mode. AWB at 8:07:01am on a mostly sunny morning.
AF Method unknown, but whatever it was, it performed amazingly well. Be sure to click on the image to enjoy a higher-res version.
Image #6: Sandhill Crane pair copulating, male dismounting
The Dismount
All good things must come to an end. To dismount, the male stepped over its mate. Less than five minutes after driving away from the knoll, I was about five seconds too late another pair of cranes copulated on the South Peninsula. Let’s hope that there are lots of crane chicks this season.
The Saving the WHITEs (and lots more!) Video image
The Saving the Whites (and lots more!) Video
My two biggest challenges when optimizing images are getting the BLUEs just right, and restoring detail to the WHITEs and highlights of properly exposed raw files. There are four things that I do to accomplish the latter. All are covered in detail in this 21+ minute video, along with a dirty trick to try if the first four do not work perfectly. Sit with me at my laptop as I teach you how to save the WHITEs. I begin with the raw conversions of two different raw files, today’s featured Snowy Owl image, and Joe Usewicz’s spoonbill image that was featured in the Extraordinary Over-Exposed (?) Spoonbill/Saving the WHITEs Optimization blog post here.
In addition to learning how to save the WHITEs (in both images), you will learn how to expand canvas using the amazingly convenient Content-Aware Crop Tool, to set the White Balance (color temperature), to set the WHITE and BLACK points, see Digital Eye Doctor and RawDigger in action, learn to make a Color Range Selection, and lots more.
To purchase your copy of the Saving the Whites Video (and lots more!) video, you can send a PayPal for $37.00 to us at birdsasart@verizon.net, call Jim in the office at 863-692-0906 with your credit card in hand, or visit the item in the BAA Online store by clicking here.
After clicking on each image, check out the nice detail in the white face of the owl in the optimized version (Image #1), with the virtually absent detail in the face of the owl in the Photo Mechanic screen capture (Image #1A). As I have been saying here often for two decades, properly exposed raw files will often appear washed out with little detail in the highlights …
Typos
With all blog posts, feel free to e-mail or to leave a comment regarding any typos or errors.
Which of today’s four featured images do you think is the best? Please leave a comment letting know why you made your choice. (Though I love all of them, I will share my clear favorite with you here fairly soon).
What’s Up?
After the stellar photo session at sunset on Saturday, I fully expected to be sharing some wading bird silhouettes with you here today, but Sunday morning was even more phenomenal. With clear skies and a fairly brisk wind from the east/northeast, conditions were perfect for setting out a road kill cafe. So I did. Be sure to click on each Black Vulture image to better note the sharpness and fine detail in each of the larger, high-res versions. And the flight poses are not bad either!
It was totally cloudy on Sunday afternoon and early evening. With no chance of sunset, I stayed home and watched football. Amazingly, I had enjoyed 15 consecutive decent sunsets going back to Christmas Eve. As usual, I have been quite blessed.
Today is Monday 10 January 2022. The forecast for this morning is for cloudy and still. You know where I will be early. Wherever you are, and whatever you are doing, I hope that you too have a great day. This blog post took about 90 minutes to prepare including the time spent on the four image optimizations and makes 61 consecutive days with a new one.
Please remember that you can find some great photo accessories (and necessities, like surf booties!) on Amazon by clicking on the Stuff tab on the orange/yellow menu bar above. On a related note, it would be extremely helpful if blog-folks who, like me, spend too much money on Amazon, would get in the habit of clicking on the Amazon logo link on the right side of each blog post when they shop online. As you might expect, doing so will not cost you a single penny, but would be appreciated tremendously by yours truly. And doing so works seamlessly with your Amazon Prime account.
Please remember that if an item — a Delkin flash card, or a tripod head — for example, that is available from B&H and/or Bedfords, is also available in the BAA Online Store, it would be great, and greatly appreciated, if you would opt to purchase from us. We will match any price. Please remember also to use my B&H affiliate links or to save 3% at Bedfords by using the BIRDSASART discount code at checkout for your major gear purchases. Doing either often earns you free guides and/or discounts. And always earns my great appreciation.
Sony Alpha 1 Bodies in Stock at Bedfords/free card offer!
Steve Elkins of Bedfords let me know recently that he had several Sony a1 bodies in stock. If one of them has your name on it, please click here and be sure to enter the BIRDSASART coupon code check the box for free shipping to enjoy free Second Day Air Fed-Ex. Right now, in lieu of the 3% credit refunded to the card you used for your purchase, you will receive a Sony 160GB CFexpress Type A TOUGH Memory Card, a $399.99 value!
Brand New and As-Good-As-Ever Bedfords BAA Discount Policy
Folks who have fallen in love with Bedfords can now use the BIRDSASART coupon code at checkout to enjoy a post-purchase, 3% off-statement credit (excluding taxes and shipping charges) on orders paid with a credit card. The 3% credit will be refunded to the card you used for your purchase. Be sure, also, to check the box for free shipping to enjoy free Second Day Air Fed-Ex. This offer does not apply to purchases of Classes, Gift Cards, or to any prior purchases.
Money Saving Reminder
Many have learned that if you need a hot photo item that is out of stock at B&H and would like to enjoy getting 3% back on your credit card along with free 2nd Day Air Fed-Ex Air shipping, your best bet is to click here, place an order with Bedfords, and enter the coupon code BIRDSASART at checkout. If an item is out of stock, contact Steve Elkins via e-mail or on his cell phone at (479) 381-2592 (Central time). Be sure to mention the BIRDSASART coupon code and check the box for Free Shipping. That will automatically upgrade to free 2nd Day Air Fed-Ex. Steve has been great at getting folks the hot items that are out of stock at B&H and everywhere else. The waitlists at the big stores can be a year or longer for the hard to get items. Steve will surely get you your gear long before that. For the past year, he has been helping BAA Blog folks get their hands on items like the SONY a 1, the SONY 200-600 G OSS lens, the Canon EOS R5, the Canon RF 100-500mm lens, and the Nikon 500mm PF. Steve is personable, helpful, and eager to please.
Important Note
As an Amazon Associate, I earn a small percentage when you purchase from Amazon after using any of the Amazon links on the blog (including the logo-link immediately above). My link works with Amazon Prime and using it will not cost you a single cent. Huge thanks, BTW 🙂
Please Remember Also
Please, if you enjoy and learn from the blog, remember to use one of my two affiliate programs when purchasing new gear. Doing so just might make it possible for me to avoid having to try to get a job as a Walmart greeter and will not cost you a single penny more. And if you use Bedfords and remember to enter the BIRDSASART code at checkout, you will (still!) save 3% on every order and enjoy free second-day air shipping. In these crazy times — I lost about fifty thousand dollars in income due to COVID 19 — remembering to use my B&H link or to shop at Bedfords will help me out a ton and be greatly appreciated. Overseas folks who cannot order from the US because of import fees, duties, and taxes, are invited to help out by clicking here to leave a blog thank you gift if they see fit.
Gear Questions and Advice
Too many folks attending BAA IPTs and dozens of photographers whom I see in the field and on BPN, are–out of ignorance–using the wrong gear, especially when it comes to tripods and more especially, tripod heads… Please know that I am always glad to answer your gear questions via e-mail. If you are desperate, you can try me on my cell at 863-221-2372. Please leave a message and shoot me a text if I do not pick up.
This image was created on 9 January 2022 down by the lake at Indian Lake Estates. Standing at full height down by the edge of the canal put me just about eye level with the birds on the ground. I used the no-longer-available Induro GIT 304L/Levered-Clamp FlexShooter Pro-mounted Sony FE 600mm f/4 GM OSS lens and The One, the Sony Alpha 1 Mirrorless Digital Camera). IS 800. The exposure was determined via Zebras with ISO on the rear wheel: 1/3200 sec. at f/4 (wide open) in Manual mode. AWB at 8:15:42am on a mostly sunny morning.
Tracking: Spot S AF-C performed very well. Be sure to click on the image to enjoy a higher-res version.
Image #1: Black Vulture feet out-stretched for landing
The Road Kill Cafe
Saturday’s road kill cafe consisted of the fresh rabbit that I picked up on Park Drive last Thursday and the carcasses of six small Red Snappers that had been filleted by Mike at Junior’s Fish Store in Lake Wales. After shooting a spot that would yield pleasing backgrounds, First, I set up the tripod down by the canal and mounted my rig on it. As always, I made sure to seat the tripod firmly in the damp soil and then leveled the silver ball of the Levered-Clamp FlexShooter Pro by centering the bubble in the scribed circle. Then I rotated the lens in the lens barrel to the horizontal click stop with the electronic level activated. That done, the lens could be pointed in any direction and produce square-to-the-world images.
Then I repositioned my SUV so that I could get some work down on the laptop and shoot from the driver’s seat with the 200-600 G lens/a1 rig (if necessary). I was in the process of plugging in my MacBook Pro so that I could start consolidating the 26 SONY Alpha a1 Set-up and Info Notes e-mails into two user-friendly files. I glanced out the window and saw a Turkey Vulture voraciously chowing down on the rabbit. As I risked scaring the bird away, I opened the door very slowly and did the same as I moved down the slope to my tripod-mounted lens.
Then more vultures flew in. And more. And more. The rabbit was devoured in less than five minutes! But with a good supply of fish carcasses, the birds kept coming. At one point, I counted more than 100 vultures on the ground. Two of the locally-nesting birds got in on the action as a Bald Eagle and a Crested Caracara landed at the fray. The action lasted about 45 minutes. There were still a few birds flying in when I left at 8:45am just after it began to cloud up.
This image was created on 9 January 2022 down by the lake at Indian Lake Estates. Standing at full height down by the edge of the canal put me just about eye level with the birds on the ground. I used the no-longer-available Induro GIT 304L/Levered-Clamp FlexShooter Pro-mounted Sony FE 600mm f/4 GM OSS lens and The One, the Sony Alpha 1 Mirrorless Digital Camera). IS) 640. The exposure was determined via Zebras with ISO on the rear wheel: 1/3200 sec. at f/4 (wide open) in Manual mode. AWB at 8:21:30am on a mostly sunny morning.
Tracking: Spot S AF-C performed very well. Be sure to click on the image to enjoy a higher-res version.
Image #2: Black Vulture turning in flight while being chased
The Cast of Characters
First to dine was a single Turkey Vulture (TV). Most of the early arrivals were TVs. Then the Black Vultures (BVs) began to fly in to feast. Because the birds fly so differently, nearly all of my best images were of BVs. The TVs flap slowly and teeter-totter in flight often circling before landing. And when they do land, they tend to land behind the mass of birds and — being a bit shyer than the BVs, on the slope that leads down to the lake. Thus, their feet and lower bodies are often obscured. The BVs fly much more directly. The ones that approached from the east, from somewhere behind me, would come in and fast and hard and then turn to land into the wind. This gave me lots of chances to create images featuring some really neat wing positions and flight postures. At times, the action was beyond frantic with birds coming in three, four, five, and even six at a time. All in all, it was the best-ever Black Vulture flight photography session. With the results to prove it.
Had there been an east wind forecast for this morning, I would have defrosted the raccoon that has been resting in the freezer for several months …
Note
Image #2 was created from a horizontal original. I executed a 2X3 crop and in the process, added just a bit of blue sky canvas using the Content-Aware Crop Tool.
This image was created on 9 January 2022 down by the lake at Indian Lake Estates. Standing at full height down by the edge of the canal put me just about eye level with the birds on the ground. I used the no-longer-available Induro GIT 304L/Levered-Clamp FlexShooter Pro-mounted Sony FE 600mm f/4 GM OSS lens and The One, the Sony Alpha 1 Mirrorless Digital Camera). IS) 800. The exposure was determined via Zebras with ISO on the rear wheel: 1/3200 sec. at f/4 (wide open) in Manual mode. AWB at 8:29:45am on a mostly sunny morning.
Tracking: Spot S AF-C performed very well. Be sure to click on the image to enjoy a higher-res version.
Image #3: Black Vulture incoming flight/dorsal view
Sony a1 AF System Learning
Careful regular readers may note that on Sunday, I began experimenting with a different AF Method for flight photography. I was thrilled by what I learned. I will be sharing the how, the what, the why, and the when with the folks in the SONY Alpha a1 Set-up and Info Notes group this week via e-mail.
This image was created on 9 January 2022 down by the lake at Indian Lake Estates. Standing at full height down by the edge of the canal put me just about eye level with the birds on the ground. I used the no-longer-available Induro GIT 304L/Levered-Clamp FlexShooter Pro-mounted Sony FE 600mm f/4 GM OSS lens and The One, the Sony Alpha 1 Mirrorless Digital Camera). IS) 800. The exposure was determined via Zebras with ISO on the rear wheel: 1/3200 sec. at f/4 (wide open) in Manual mode. AWB at 8:31:51am on a mostly sunny morning.
Tracking: Spot S AF-C performed very well. Be sure to click on the image to enjoy a higher-res version.
Image #4: Black Vulture braking to land
Learning About Flight Photography
As you view each flight image, consider the wing position and the flight pose. Note the even lighting. Note the position and the visibility of the vulture’s heads. And note that the feet play an important role in the success of three of today’s four images.
With Image #4, I love the inclusion of the marsh and a bit of the lake in the frame.
SONY Alpha a1 Set-up and Info Group
The SONY Alpha a1 Set-up and Info Group is going great guns as more and more folks chime in with thoughtful questions and experience-based answers. As the a1 is becoming more readily available, more and more folks are getting their hands on this amazing body. This week, two folks in the group ordered their third a1! I am envious. The group is now up to an astounding 102 lucky and blessed folks. Early on, we discussed the myriad AF options. I gave my opinion as to the best one for flight and general bird photography. The best news is that all who wish, can request an e-mail that includes a .DAT file with my a1 settings on it, and explicit directions on how to load my settings onto your a1; talk about convenience! (Note: I am now offering updated .DAT files).
All who purchased their Alpha a1 bodies via a BAA affiliate link will receive a free subscription to the Sony Alpha a1 Set-Up and Info Updates group after shooting me their receipts via e-mail. (Note: it may take me several days to confirm B&H orders.) This same service may be purchased by anyone with an a1 body via a $150.00 PayPal sent to birdsasart@verizon.net indicating payment for Alpha a1 Info & Updates. Alternatively, folks can call Jim weekdays at 1-863-692-0906 to pay via credit card. New members will receive composite e-mails that summarize all previous discussions.
Typos
With all blog posts, feel free to e-mail or to leave a comment regarding any typos or errors.
Though together today’s images tell a great story, and though each is well executed, none of them is a contest winner …
Try your hand at image analyses with these:
Image #1 would have been better if the bird on our left _____________________________.
Image #2 would have been better if both birds had ___________________________________.
Images #3 & #4 would have been better had the wind been more from the _______________.
What’s Up?
My morning photo session began with lots of Cattle Egret blurs and got better once I began thinking outside of my own box. The full story on that is below. Sunset was excellent with a light haze on the western horizon. I was two minutes late getting set up. I watched a Sandhill Crane fly through the bright yellow sky below the somewhat muted sun at about 5:15pm. At about 5:20, with the sky even more richly colored, a Great Egret circled too and fro in the color and was chased momentarily by another. It flew off and then returned for a second pass through the orange sky. I had several other really exciting chances and cannot wait to edit the folder.
Today is Sunday 9 January 2022. The forecast for this morning is for mostly sunny with a breeze from the east. Sounds good to me. Wherever you are, and whatever you are doing, I hope that you too have a great day. This blog post took about 90 minutes to prepare including the time spent on the four image optimizations and makes 60 consecutive days with a new one.
Please remember that you can find some great photo accessories (and necessities, like surf booties!) on Amazon by clicking on the Stuff tab on the orange/yellow menu bar above. On a related note, it would be extremely helpful if blog-folks who, like me, spend too much money on Amazon, would get in the habit of clicking on the Amazon logo link on the right side of each blog post when they shop online. As you might expect, doing so will not cost you a single penny, but would be appreciated tremendously by yours truly. And doing so works seamlessly with your Amazon Prime account.
Please remember that if an item — a Delkin flash card, or a tripod head — for example, that is available from B&H and/or Bedfords, is also available in the BAA Online Store, it would be great, and greatly appreciated, if you would opt to purchase from us. We will match any price. Please remember also to use my B&H affiliate links or to save 3% at Bedfords by using the BIRDSASART discount code at checkout for your major gear purchases. Doing either often earns you free guides and/or discounts. And always earns my great appreciation.
Sony Alpha 1 Bodies in Stock at Bedfords/free card offer!
Steve Elkins of Bedfords let me know recently that he had several Sony a1 bodies in stock. If one of them has your name on it, please click here and be sure to enter the BIRDSASART coupon code check the box for free shipping to enjoy free Second Day Air Fed-Ex. Right now, in lieu of the 3% credit refunded to the card you used for your purchase, you will receive a Sony 160GB CFexpress Type A TOUGH Memory Card, a $399.99 value!
Brand New and As-Good-As-Ever Bedfords BAA Discount Policy
Folks who have fallen in love with Bedfords can now use the BIRDSASART coupon code at checkout to enjoy a post-purchase, 3% off-statement credit (excluding taxes and shipping charges) on orders paid with a credit card. The 3% credit will be refunded to the card you used for your purchase. Be sure, also, to check the box for free shipping to enjoy free Second Day Air Fed-Ex. This offer does not apply to purchases of Classes, Gift Cards, or to any prior purchases.
Money Saving Reminder
Many have learned that if you need a hot photo item that is out of stock at B&H and would like to enjoy getting 3% back on your credit card along with free 2nd Day Air Fed-Ex Air shipping, your best bet is to click here, place an order with Bedfords, and enter the coupon code BIRDSASART at checkout. If an item is out of stock, contact Steve Elkins via e-mail or on his cell phone at (479) 381-2592 (Central time). Be sure to mention the BIRDSASART coupon code and check the box for Free Shipping. That will automatically upgrade to free 2nd Day Air Fed-Ex. Steve has been great at getting folks the hot items that are out of stock at B&H and everywhere else. The waitlists at the big stores can be a year or longer for the hard to get items. Steve will surely get you your gear long before that. For the past year, he has been helping BAA Blog folks get their hands on items like the SONY a 1, the SONY 200-600 G OSS lens, the Canon EOS R5, the Canon RF 100-500mm lens, and the Nikon 500mm PF. Steve is personable, helpful, and eager to please.
Important Note
As an Amazon Associate, I earn a small percentage when you purchase from Amazon after using any of the Amazon links on the blog (including the logo-link immediately above). My link works with Amazon Prime and using it will not cost you a single cent. Huge thanks, BTW 🙂
Please Remember Also
Please, if you enjoy and learn from the blog, remember to use one of my two affiliate programs when purchasing new gear. Doing so just might make it possible for me to avoid having to try to get a job as a Walmart greeter and will not cost you a single penny more. And if you use Bedfords and remember to enter the BIRDSASART code at checkout, you will (still!) save 3% on every order and enjoy free second-day air shipping. In these crazy times — I lost about fifty thousand dollars in income due to COVID 19 — remembering to use my B&H link or to shop at Bedfords will help me out a ton and be greatly appreciated. Overseas folks who cannot order from the US because of import fees, duties, and taxes, are invited to help out by clicking here to leave a blog thank you gift if they see fit.
Gear Questions and Advice
Too many folks attending BAA IPTs and dozens of photographers whom I see in the field and on BPN, are–out of ignorance–using the wrong gear, especially when it comes to tripods and more especially, tripod heads… Please know that I am always glad to answer your gear questions via e-mail. If you are desperate, you can try me on my cell at 863-221-2372. Please leave a message and shoot me a text if I do not pick up.
This image was created on 8 January 2021 down by the lake near my home at Indian Lake Estates, FL. Sitting, I used the hand held Sony FE 600mm f/4 GM OSS lens with the Sony FE 1.4x Teleconverter, and The One, the Sony Alpha 1 Mirrorless Digital Camera.. ISO 800. The exposure was determined by Zebras with ISO on the rear wheel: 1/2500 sec. at f/5.6 (wide open) in Manual mode. RawDigger showed that this was a dead-solid perfect exposure. AWB at 8:32:14am on a sunny morning.
Tracking: Zone AF-C with Bird-Eye/Face Detection performed very well in a difficult situation. Click on the image to enjoy the high-res version.
Image #1: Sandhill Crane chasing another
Striving for New and Different and Getting Lucky I
I’d considered trying to photograph Ospreys flying in to their nest on the northwest corner of the canal between the South Peninsula and the South Field for about twenty years. On Saturday morning, I tried it for the first time with the tripod mounted 600 f/4, the 1.4X TC, and the a1. I was surprised at how large in the frame the birds were; I even clipped a few wingtips. But with the wind from the north with very little east, most of my images had the bird’s head turned slightly away from me. Across the canal, on the South Field, I watched with interest as several Sandhill Cranes were cavorting. But with the sun headed toward the southeastern sky, the birds were well off sun angle, were blocked by grasses, and had the pier in the background.
They were headed south toward an open area so I quit on the Ospreys, grabbed the tripod, and began walking south to get in front of the birds and slightly in front of light angle. When I saw that I would have the white houses on the far shoreline in the photos, I realized that I needed to get lower. And the only way to do that was to move lower on the slope that led down to the canal, sit on the wet grass, and hand hold. So that’s what I did. I kept walking south and so did the birds. I finally wound up on the small dock near the boat ramp. I was right on sun angle and the perspective was perfect. And so were the backgrounds.
I remember whispering to the relatively distant birds as I prayed for a wing stretch, a copulation, a courtship dance, or a fight. I got a fight. It was all over in less than one second, but the a1 was up to the test.
This image was created on 8 January 2021 down by the lake near my home at Indian Lake Estates, FL. Sitting, I used the hand held Sony FE 600mm f/4 GM OSS lens with the Sony FE 1.4x Teleconverter, and The One, the Sony Alpha 1 Mirrorless Digital Camera.. ISO 800. The exposure was determined by Zebras with ISO on the rear wheel: 1/2500 sec. at f/5.6 (wide open) in Manual mode. RawDigger showed that this was a dead-solid perfect exposure. AWB at 8:32:14am on a sunny morning.
Tracking: Zone AF-C with Bird-Eye/Face Detection performed very well in a difficult situation. Click on the image to enjoy the high-res version.
Image #2: Sandhill Cranes — the chasee stands its ground
Striving for New and Different and Getting Lucky II
With the eyes of both birds relatively in the dark, the AF system grabbed the right wing of the bird on our right. The faces of both birds were rendered sharp. Why?
This image was created on 8 January 2021 down by the lake near my home at Indian Lake Estates, FL. Sitting, I used the hand held Sony FE 600mm f/4 GM OSS lens with the Sony FE 1.4x Teleconverter, and The One, the Sony Alpha 1 Mirrorless Digital Camera.. ISO 800. The exposure was determined by Zebras with ISO on the rear wheel: 1/2500 sec. at f/5.6 (wide open) in Manual mode. RawDigger showed that this was a dead-solid perfect exposure. AWB at 8:32:14am on a sunny morning.
Tracking: Zone AF-C with Bird-Eye/Face Detection performed very well in a difficult situation. Click on the image to enjoy the high-res version.
Image #3: Sandhill Cranes — the chasee turns the tables on the chaser
Striving for New and Different and Getting Lucky III
Turnabout is fair play.
This image was created on 8 January 2021 down by the lake near my home at Indian Lake Estates, FL. Sitting, I used the hand held Sony FE 600mm f/4 GM OSS lens with the Sony FE 1.4x Teleconverter, and The One, the Sony Alpha 1 Mirrorless Digital Camera.. ISO 800. The exposure was determined by Zebras with ISO on the rear wheel: 1/2500 sec. at f/5.6 (wide open) in Manual mode. RawDigger showed that this was a dead-solid perfect exposure. AWB at 8:32:14am on a sunny morning.
Tracking: Zone AF-C with Bird-Eye/Face Detection performed very well in a difficult situation. Click on the image to enjoy the high-res version.
Image #4: Sandhill Cranes — the chaser gets bit in the rear end
Striving for New and Different and Getting Lucky IV
Victory for the defended was sealed with a bite in the butt.
The Lesson
When you think that something is very difficult or impossible, try it anyway. I will be doing lots more shooting across the canal, a distance of about 50 yards from edge to edge.
SONY Alpha a1 Set-up and Info Group
The SONY Alpha a1 Set-up and Info Group is going great guns as more and more folks chime in with thoughtful questions and experience-based answers. As the a1 is becoming more readily available, more and more folks are getting their hands on this amazing body. This week, two folks in the group ordered their third a1! I am envious. The group is now up to an astounding 102 lucky and blessed folks. Early on, we discussed the myriad AF options. I gave my opinion as to the best one for flight and general bird photography. The best news is that all who wish, can request an e-mail that includes a .DAT file with my a1 settings on it, and explicit directions on how to load my settings onto your a1; talk about convenience! (Note: I am now offering updated .DAT files).
All who purchased their Alpha a1 bodies via a BAA affiliate link will receive a free subscription to the Sony Alpha a1 Set-Up and Info Updates group after shooting me their receipts via e-mail. (Note: it may take me several days to confirm B&H orders.) This same service may be purchased by anyone with an a1 body via a $150.00 PayPal sent to birdsasart@verizon.net indicating payment for Alpha a1 Info & Updates. Alternatively, folks can call Jim weekdays at 1-863-692-0906 to pay via credit card. New members will receive composite e-mails that summarize all previous discussions.
The BAA Middle of Florida Photographic Site Guide
You can purchase your copy here in the BAA Online Store.
The BAA Middle of Florida Photographic Site Guide
126 pages, 87 photographs by Joe Przybyla and Arthur Morris.
The PDF for this e-Guide is an electronic download sent via e-mail.
I had thought about doing a guide to some of the great but little-known photo hotspots around central Florida for about a decade, but those plans never came to fruition. I met Joe online in the Avian Forum at BirdPhotographer’s.Net about two years ago. Joe’s photography has improved tremendously over the past few years; he credits the BAA blog, my books and PDFs, and his participation on BPN. The one thing that I learned right from the get-go about Joe is that he is a hard and tenacious worker, always striving to improve his skills and to grow his knowledge base. As he knew of more than a few good spots in central Florida, I broached the idea of us doing a photographic site guide that covered many of the little-known photographic hotspots from Brandon to Lakeland to Joe Overstreet Road to Indian Lake Estates (my Florida home for the past 20 years or so). After more than many, many dozens of hours of effort, The BIRDS AS ART Middle of Florida Photographic Site Guide is now a reality. Thanks to Joe’s wife Dottie for her review of our writing. We all learned once again that writing is a process, a back and forth process. All thanks to the white pelicans of Lakeland. Here are the locations that are detailed in this e-Guide:
Indian Lake Estates: Sandhills Cranes with chicks and colts, lots of vultures, and Ospreys up the kazoo!
Gatorland, Kissimmee: Learn to make great images of wading birds in a cluttered rookery.
The Brandon Rookery: Great for nesting Wood Storks, Great Egrets, and more.
Circle Bar B Reserve, Lakeland: Here you will find a great variety of avian subjects in a great variety of habitats.
Lake Morton, Lakeland: There are lots of silly tame birds here including and especially American White Pelican during the colder months.
Lake Mirror, Lakeland: Tame Anhingas, Limpkins, and a zillion White Ibises at times.
West Lake Parker, Lakeland: Here you will have a chance for two difficult birds, Snail Kite, and Purple Gallinule.
Joe Overstreet Road, Kenansville: Crested Caracara, meadowlarks, Loggerhead Shrike, and much more on the fenceposts and barbed wire.
Each location includes a map, a detailed description of the best spots, best season, light and time of day instructions, the expected species, and an educational and inspirational gallery that is designed to open your eyes as to the possibilities.
You can purchase a copy here in the BAA Online Store.
Typos
With all blog posts, feel free to e-mail or to leave a comment regarding any typos or errors.
Friday morning was all blurs, 386 of them. I kept only 14 and most of those were not-too-good. With perfect conditions, I had chances at sunset and made 519 images with most of those not being very good. Perhaps the cattails are a lot taller than they were last year. So, is there a benefit of creating 905 not very good images? Considering that everything I created yesterday was with the big lens on a tripod with a TC, yes! The big advantage is that the more you shoot flight, the more your panning skills will improve. Being able to keep the bird in the center of the frame by panning smoothly at the same rate as the bird is flying will improve you flight photography by leaps and bounds. If I keep practicing, I might be able to jump over tall buildings someday …
Wanting to learn more about Christopher Reeve’s equestrian accident, paralysis, and eventual death, I did some internet surfing. I had forgotten that the name of the original actor how played Superman, the guy seen in the YouTube video above, was named George Reeves. Now that is a good Jeopardy question. Speaking of Jeopardy, congrats to the amazing Amy Schneider whose 28-game total winnings passed $1,000,000 in last’s night’s runaway victor. When she does not immediately know an answer, it seems that you can hear the hard drive in her head spinning … The woman is truly amazing.
Here’s a tough one for her: What was the name of the editor-in-chief of the Metropolis newspaper, The Daily Planet? Do you remember? (I remembered the first name but not the last.)
Today is Saturday 8 January 2022. Conditions for this morning are looking very good with clear skies and a northeast wind. And tomorrow morning in Central Florida is looking even better with east/southeast winds. If I do not get a client for Lakeland for Sunday morning, I may put out the fresh road-killed rabbit that I scooped up on Friday morning. Wherever you are, and whatever you are doing, I hope that you too have a great day. This blog post took about 90 minutes to prepare and makes 59 consecutive days with a new one.
Please remember that you can find some great photo accessories (and necessities, like surf booties!) on Amazon by clicking on the Stuff tab on the orange/yellow menu bar above. On a related note, it would be extremely helpful if blog-folks who, like me, spend too much money on Amazon, would get in the habit of clicking on the Amazon logo link on the right side of each blog post when they shop online. As you might expect, doing so will not cost you a single penny, but would be appreciated tremendously by yours truly. And doing so works seamlessly with your Amazon Prime account.
Please remember that if an item — a Delkin flash card, or a tripod head — for example, that is available from B&H and/or Bedfords, is also available in the BAA Online Store, it would be great, and greatly appreciated, if you would opt to purchase from us. We will match any price. Please remember also to use my B&H affiliate links or to save 3% at Bedfords by using the BIRDSASART discount code at checkout for your major gear purchases. Doing either often earns you free guides and/or discounts. And always earns my great appreciation.
Your-Pick In-the-Field Sessions
From Now Through Wednesday 12 January
The beauty of the Your Pick In-the-Field Sessions plans below is that I am free most days from now until I leave for San Diego on 14 January. The best news is that we can schedule sessions to coincide with the perfect weather forecast. These sessions are ideal for central Florida locals or folks visiting the region for whatever reason. Interested? Get in touch via e-mail or better yet, try my cell at 863-221-2372. Please leave a message and shoot me a text if I do not pick up. Inquire for couples and group rates.
Indian Lake Estates In-the-Field Sessions
Two hours of intensive instruction: $300.00. Add a working brunch with image review: $100.00. Sunset shoot: $100.00. Guest room lodging available. Mix and match.
Sunny mornings with east winds are best. Likely subjects include ridiculously tame Sandhill Cranes along with Black and Turkey Vultures, Crested Caracara, Limpkin, Great Egret, Great Blue Heron, and more. Bald Eagle possible; crane chicks coming soon.
Lakeland or Circle B Bar Preserve
Two hours of intensive instruction: $325.00. Add a working brunch with image review: $100.00. Mix and match.
Sunny mornings with winds that have an easterly component are best at Lakeland. Likely subjects include point-blank American White Pelican, Anhinga, Limpkin, Common Moorhen, White Ibis, a variety of wintering ducks including Ring-necked and Wood Duck, and lots more.
Cloudy mornings or afternoons (shooting sessions only in the afternoon) are best at Circle B Bar Preserve. Likely subjects include Great Blue Heron, Great Egret, Little Blue Heron, Snowy Egret, Tricolored Heron, White Ibis, Common Moorhen, Osprey, Red-shouldered Hawk, American Alligator, Wild Boar, and more. If you wish to mix and match, lodging at ILE is available.
Sony Alpha 1 Bodies in Stock at Bedfords/free card offer!
Steve Elkins of Bedfords let me know recently that he had several Sony a1 bodies in stock. If one of them has your name on it, please click here and be sure to enter the BIRDSASART coupon code check the box for free shipping to enjoy free Second Day Air Fed-Ex. Right now, in lieu of the 3% credit refunded to the card you used for your purchase, you will receive a Sony 160GB CFexpress Type A TOUGH Memory Card, a $399.99 value!
Brand New and As-Good-As-Ever Bedfords BAA Discount Policy
Folks who have fallen in love with Bedfords can now use the BIRDSASART coupon code at checkout to enjoy a post-purchase, 3% off-statement credit (excluding taxes and shipping charges) on orders paid with a credit card. The 3% credit will be refunded to the card you used for your purchase. Be sure, also, to check the box for free shipping to enjoy free Second Day Air Fed-Ex. This offer does not apply to purchases of Classes, Gift Cards, or to any prior purchases.
Money Saving Reminder
Many have learned that if you need a hot photo item that is out of stock at B&H and would like to enjoy getting 3% back on your credit card along with free 2nd Day Air Fed-Ex Air shipping, your best bet is to click here, place an order with Bedfords, and enter the coupon code BIRDSASART at checkout. If an item is out of stock, contact Steve Elkins via e-mail or on his cell phone at (479) 381-2592 (Central time). Be sure to mention the BIRDSASART coupon code and check the box for Free Shipping. That will automatically upgrade to free 2nd Day Air Fed-Ex. Steve has been great at getting folks the hot items that are out of stock at B&H and everywhere else. The waitlists at the big stores can be a year or longer for the hard to get items. Steve will surely get you your gear long before that. For the past year, he has been helping BAA Blog folks get their hands on items like the SONY a 1, the SONY 200-600 G OSS lens, the Canon EOS R5, the Canon RF 100-500mm lens, and the Nikon 500mm PF. Steve is personable, helpful, and eager to please.
Important Note
As an Amazon Associate, I earn a small percentage when you purchase from Amazon after using any of the Amazon links on the blog (including the logo-link immediately above). My link works with Amazon Prime and using it will not cost you a single cent. Huge thanks, BTW 🙂
Please Remember Also
Please, if you enjoy and learn from the blog, remember to use one of my two affiliate programs when purchasing new gear. Doing so just might make it possible for me to avoid having to try to get a job as a Walmart greeter and will not cost you a single penny more. And if you use Bedfords and remember to enter the BIRDSASART code at checkout, you will (still!) save 3% on every order and enjoy free second-day air shipping. In these crazy times — I lost about fifty thousand dollars in income due to COVID 19 — remembering to use my B&H link or to shop at Bedfords will help me out a ton and be greatly appreciated. Overseas folks who cannot order from the US because of import fees, duties, and taxes, are invited to help out by clicking here to leave a blog thank you gift if they see fit.
Gear Questions and Advice
Too many folks attending BAA IPTs and dozens of photographers whom I see in the field and on BPN, are–out of ignorance–using the wrong gear, especially when it comes to tripods and more especially, tripod heads… Please know that I am always glad to answer your gear questions via e-mail. If you are desperate, you can try me on my cell at 863-221-2372. Please leave a message and shoot me a text if I do not pick up.
This image was created on 20 January 2019 at La Jolla, CA. I used the hand held Nikon AF-S NIKKOR 200-500mm f/5.6E ED VR lens (at 370mm) and the mega mega-pixel Nikon D850 DSLR.. ISO 800: 1/1250 sec. at f/6.3 in Manual mode. AWB at 8:45am on a partly sunny morning.
Upper Center Group/Shutter Button AF. Click on the image to enjoy a larger version.
I began playing with the Nikon gear in San Diego in January 2018 and was still on the Dark Side there in 2019. In ’18, I was using both the D5, the pro body, and the D850. After that first January, the D5 sat on the shelf while I was all-in with two D850 bodies. At the time, Nikon AF was better than Canon AF for birds in flight. Many skilled photographer friends followed me by ditching Canon and going to Nikon. And pretty much all of those folks followed me on the next switch, from Nikon to Sony. That switch began in January 2019, also in San Diego.
The D850 image files were and remain superb. I like the ergonomics and the camera was — for the most part — relatively easy to use. In sort, the huge problem with the D850 is that when you are using a telephoto lens switching the AF Method requires three hands. My second gripe was that when you added a TC AF performance suffered as you moved the AF point away from the center.
This great guide includes 15 pages of text, a 46-image gallery, and a comprehensive camera handling video.
The text covers all of the menu item settings that I used on my two D850 bodies and each gallery image has a legendary BIRDS AS ART educational caption. The emphasis is two-fold:
1- getting your camera set-up so that it is optimized for bird photography.
2- sharing everything that I know about the Nikon AF system so that you can create consistently sharp images of static subjects, and most especially, of birds in flight and in action.
Though this guide is designed for the D850, nearly all of the info applies to the D5 and to the D500 as well. You can purchase your copy in the BAA On-line Store here. Both files are large so you will need a good internet connection to download them.
This image was created on 20 January 2019 at La Jolla, CA. I used the hand held Nikon AF-S NIKKOR 200-500mm f/5.6E ED VR lens (at 500mm) and the mega mega-pixel Nikon D850 DSLR.. ISO 800: 1/1600 sec. at f/6.3 in Manual mode. AWB at 10:05am on a rare cloudy morning.
Upper Center Group/Shutter Button AF. Click on the image to enjoy a larger version.
Image #2: Brown Pelican, Pacific race: sub-adult head and neck portrait
Brown Pelican Plumage Variations
I am absolutely obsessed by the great variety of plumages in Pacific-race Brown Pelicans. And that is true both with the adults in various states of breeding and non-breeding plumages and with the younger birds as well. Many individuals, like the bird featured in Image #2, seem to be one offs!
San Diego In-the-Field (I-T-F) Sessions
As I will be staying in San Diego longer than originally planned, I am offering In-the-Field Sessions as below.
San Diego I-T-F Offerings
Individual Morning Sessions on Monday 1/24, Tuesday 1/25, and Wednesday 1/26.
Three hours of intensive instruction: $399.00. Add a working brunch with image review: $100.00.
Please inquire if you would like to explore the possibility of an afternoon session on Monday 1/24 or Tuesday 1/25.
These sessions are ideal for Southern California locals or for folks visiting the region for whatever reason. Interested? Get in touch via e-mail or better yet, try my cell at 863-221-2372. Please leave a message and shoot me a text if I do not pick up. Inquire for couples and group rates.
The Nikon AF Fine-tune e-Guide: $30.00 (or free to some–see below for details on that).
by Arthur Morris/BIRDS AS ART and Patrick Sparkman
There is lots of misinformation out there on the Nikon Automatic AF Fine-tune feature. Much of that involves vast over-simplifications. Patrick Sparkman and I developed a way of using the Automatic Fine-tune feature effectively with the D5, D500, the D7500, and the D850. Patrick, however, was on a roll and perfected a method for using the Focus Peaking feature available only on the D850 to quickly and accurately micro-adjust all lenses and TC-Es with your D-850. If you own a D850 you should be using D850 Focus Peaking AF Fine-tune rather than Nikon Automatic AF Fine-tune. It is faster and easier and more accurate. While there is some halfway decent info online with regards to Nikon Automatic Fine-tune feature, I have never seen a word about using the amazing D850 Focus Peaking capabilities to determine an accurate AF Fine-tune value. You can thank Patrick Sparkman for rectifying that situation.
With both Nikon Automatic AF Fine-tune and D850 Focus Peaking AF Fine-tune, the use of a LensAlign Mark II unit is recommended as best by far for accurate results, and thus, this guide is written reflecting that. Taping a sheet of newsprint on a wall or using the FoCal kit does not assure you of the True Parallel Alignment (TPA) that is guaranteed when you set up your LensAlign properly. Without TPA your results will be off anywhere from a little to a lot. You can purchase the LensAlign Mark II alone here. Or you can purchase the LensAlign/FocusTune combo here. If you do not own either of those we suggest that you decide which to purchase after reading this guide through once. That said, we recommend the LensAlign/FocusTune combo for reasons that will become obvious as you make your way through the guide.
Image #2A: RawDigger screen capture for the Brown Pelican, Pacific race: sub-adult head and neck portrait image
Absolutely Terrible!
Images where the G channel gets 2/3rds of the way from the 8000 to the 16000 line are perfect exposures. Images where the G channel gets right up to the line are dead-solid perfect. Images where the G channel does not even reach the 8000 line are absolutely terrible as far as exposure is concerned. In fact, this image is more than 1 1/3 stops under-exposed. Working with RawDigger has helped me learn to expose to the right thus minimizing noise, maximizing image quality, best utilizing the dynamic range of my camera, and attaining the highest possible level of shadow detail in my RAW files in every situation. In addition, my properly exposed RAW files now contain more tonal information and feature the smoothest possible transitions between tones. And my optimized images feature rich, accurate color.
RawDigger — not for the faint of heart …
Nothing has ever helped me learn to create perfect exposures to the degree that RawDigger has. I think that many folks are reluctant to learn that most of their images are underexposed by one or more full stops and that highlight warnings in Photoshop, Lightroom, Capture One, and your in-camera histogram are completely bogus as they are based on the embedded JPEGs. Only your raw files tell the truth all the time. Heck, I resisted RawDigger for several years … Once you get over that feeling, RawDigger can become your very best exposure friend no matter what system you are using. On the recent IPTs and In-the-Field sessions, we have demonstrated that fact. Convincingly.
The RawDigger (pink) Adapted Histogram
In the RawDigger e-Guide, you will learn exactly how to set up the Adapted “pink” RawDigger Histogram and how to use it to quickly and easily evaluate the exposure or raw file brightness of images from all digital cameras currently in use. RawDigger was especially helpful to me when I struggled with R5 exposures and when I learned my new camera body, the Sony Alpha a1.
RawDigger e-Guide with Two Videos
The RawDigger e-Guide with Two Videos
by Arthur Morris with Patrick Sparkman
The RawDigger e-Guide was created only for serious photographers who wish to get the absolute most out of their raw files.
Patrick and I began work on the guide in July 2020. At first, we struggled. We asked questions. We learned about Max-G values. We could not figure out why the Max G values varied by camera system. IPT veteran Bart Deamer asked lots of questions that we could not answer. We got help from RawDigger creator Iliah Borg. We learned. In December, Patrick came up with an Adapted Histogram that allows us to evaluate the exposures and raw file brightness for all images created with all digital camera bodies from the last two decades. What we learned each time prompted three complete beginning-to-end re-writes.
The point of the guide is to teach you to truly expose to the mega-Expose-to-the-Right so that you will minimize noise, maximize image quality, best utilize your camera’s dynamic range, and attain the highest possible level of shadow detail in your RAW files in every situation. In addition, your properly exposed RAW files will contain more tonal information and feature the smoothest possible transitions between tones. And your optimized images will feature rich, accurate colors.
We teach you why the GREEN channel is almost always the first to over-expose. We save you money by advising you as to which version of RawDigger you need. We teach you how to interpret the Max G values for your Canon, Nikon, and SONY camera bodies. It is very likely that the Shock-your-World section will shock you. And lastly — thanks to the technical and practical brilliance of Patrick Sparkman — we teach you a simple way to quickly and easily evaluate your exposures and raw file brightness using an Adapted RawDigger histogram.
The flower video takes you through a session where artie edits a folder of images in Capture One while checking the exposures and Max-G values in RawDigger. The Adapted Histogram video examines a series of recent images with the pink histograms and covers lots of fine points including and especially how to deal with specular highlights. The directions for setting up the Adapted Histogram are in the text.
If we priced this guide based on how much effort we put into it, it would sell it for $999.00. But as this guide will be purchased only by a limited number of serious photographers, we have priced it at $51.00. You can order yours here in the BAA Online Store.
Typos
With all blog posts, feel free to e-mail or to leave a comment regarding any typos or errors.
Image #1: A 500% unsharpened crop of the master file
Before You Scroll Down …
Before you scroll down to view today’s featured image, see if you can figure out what you are looking at in the 500% crop above. And enjoy the amazing detail of a sharp Alpha 1 image file magnified to a borderline insane level.
Unfair to Birds?
With the amazing AF system of the Sony Alpha 1 (with Bird-Eye/Face Detection!), its stunning image files, the ease of getting the right exposure, and with RawDigger to teach you to further refine your exposures, bird photography today seems almost unfair to the birds. I, for one, am enjoying my photography more than ever. Today’s featured image illustrates these points perfectly.
What’s Up?
The weather on Saturday morning is looking dead-solid perfect for a Your Pick In-the-Field session at Lakeland. The details are below. And time is short as I am outta here next coming Friday.
On Thursday morning,I got down to the pier 10 minutes before sunrise. It should have been 20 … While I was setting up my gear at the car, I watched a Great Blue Heron fly right at the pier flapping hard all the way. And that bird was followed by a Sandhill Crane that did the exact same thing. Oh well. With a nice pink-purple sky to the west, I created more than 700 mostly Cattle Egrets leaving the roost blurs and kept 23. Working off the tripod with the Levered-Clamp FlexShooter Pro and the big lens with the 1.4X TC, my framing was (as expected) much better than it had been the day before when hand holding the 200-600 with the same TC. Note: with lighter, shorter focal length lenses, hand holding will usually yield better results than working on a tripod.
I drove around a bit without seeing much and then returned to the pier. There were a few Turkey Vultures on the railings along with one unusual bird. As you will see below, I did well. Sunset was looking good from the pool deck just before 5:00pm, but when I got down to the lake I saw a large dark cloud on the western horizon that would soon envelop the sun. It did. But I was enjoying the peace and quiet so I stayed and tried some extreme blurs, utilizing shutter speeds as low as 1/8 sec. I had fun and created a few almost … I should have mentioned either yesterday or above, that when I am creating hundreds of blurs while working in Shutter Priority mode, that I am changing shutter speeds often. When I pick my keepers, I do not look at the shutter speeds. It is when reviewing the keepers that the shutter speed is noted. It’s just another way to learn.
Today is Friday 7 January. I leave for San Diego in one week. Yesterday I changed my flight and extended my stay by five days. What can I say? I love the place and I love the pelicans. I get back home on the afternoon of Thursday 27 January. The forecast for this morning is for cloudy and very still early. I will be down to the pier early working on more pleasing blurs. Wherever you are, and whatever you are doing, I hope that you too have a great day. This blog post took more than 90 minutes to prepare and makes 58 consecutive days with a new one.
Please remember that you can find some great photo accessories (and necessities, like surf booties!) on Amazon by clicking on the Stuff tab on the orange/yellow menu bar above. On a related note, it would be extremely helpful if blog-folks who, like me, spend too much money on Amazon, would get in the habit of clicking on the Amazon logo link on the right side of each blog post when they shop online. As you might expect, doing so will not cost you a single penny, but would be appreciated tremendously by yours truly. And doing so works seamlessly with your Amazon Prime account.
Please remember that if an item — a Delkin flash card, or a tripod head — for example, that is available from B&H and/or Bedfords, is also available in the BAA Online Store, it would be great, and greatly appreciated, if you would opt to purchase from us. We will match any price. Please remember also to use my B&H affiliate links or to save 3% at Bedfords by using the BIRDSASART discount code at checkout for your major gear purchases. Doing either often earns you free guides and/or discounts. And always earns my great appreciation.
Your-Pick In-the-Field Sessions
The beauty of the Your Pick In-the-Field Sessions plans below is that I am free most days from now until I leave for San Diego on 14 January. The best news is that we can schedule sessions to coincide with the perfect weather forecast. These sessions are ideal for central Florida locals or folks visiting the region for whatever reason. Interested? Get in touch via e-mail or better yet, try my cell at 863-221-2372. Please leave a message and shoot me a text if I do not pick up. Inquire for couples and group rates.
Indian Lake Estates In-the-Field Sessions
Two hours of intensive instruction: $300.00. Add a working brunch with image review: $100.00. Sunset shoot: $100.00. Guest room lodging available. Mix and match.
Sunny mornings with east winds are best. Likely subjects include ridiculously tame Sandhill Cranes along with Black and Turkey Vultures, Crested Caracara, Limpkin, Great Egret, Great Blue Heron, and more. Bald Eagle possible; crane chicks coming soon.
Lakeland or Circle B Bar Preserve
Two hours of intensive instruction: $325.00. Add a working brunch with image review: $100.00. Mix and match.
Sunny mornings with winds that have an easterly component are best at Lakeland. Likely subjects include point-blank American White Pelican, Anhinga, Limpkin, Common Moorhen, White Ibis, a variety of wintering ducks including Ring-necked and Wood Duck, and lots more.
Cloudy mornings or afternoons (shooting session only) are best at Circle B Bar Preserve. Likely subjects include Great Blue Heron, Great Egret, Little Blue Heron, Snowy Egret, Tricolored Heron, White Ibis, Common Moorhen, Osprey, Red-shouldered Hawk, American Alligator, Wild Boar, and more. If you wish to mix and match, lodging at ILE is available.
Sony Alpha 1 Bodies in Stock at Bedfords/free card offer!
Steve Elkins of Bedfords let me know late yesterday that he had several Sony a1 bodies in stock. If one of them has your name on it, please click here and be sure to enter the BIRDSASART coupon code check the box for free shipping to enjoy free Second Day Air Fed-Ex. Right now, in lieu of the 3% credit refunded to the card you used for your purchase, you will receive a Sony 160GB CFexpress Type A TOUGH Memory Card, a $399.99 value!
Brand New and As-Good-As-Ever Bedfords BAA Discount Policy
Folks who have fallen in love with Bedfords can now use the BIRDSASART coupon code at checkout to enjoy a post-purchase, 3% off-statement credit (excluding taxes and shipping charges) on orders paid with a credit card. The 3% credit will be refunded to the card you used for your purchase. Be sure, also, to check the box for free shipping to enjoy free Second Day Air Fed-Ex. This offer does not apply to purchases of Classes, Gift Cards, or to any prior purchases.
Money Saving Reminder
Many have learned that if you need a hot photo item that is out of stock at B&H and would like to enjoy getting 3% back on your credit card along with free 2nd Day Air Fed-Ex Air shipping, your best bet is to click here, place an order with Bedfords, and enter the coupon code BIRDSASART at checkout. If an item is out of stock, contact Steve Elkins via e-mail or on his cell phone at (479) 381-2592 (Central time). Be sure to mention the BIRDSASART coupon code and check the box for Free Shipping. That will automatically upgrade to free 2nd Day Air Fed-Ex. Steve has been great at getting folks the hot items that are out of stock at B&H and everywhere else. The waitlists at the big stores can be a year or longer for the hard to get items. Steve will surely get you your gear long before that. For the past year, he has been helping BAA Blog folks get their hands on items like the SONY a 1, the SONY 200-600 G OSS lens, the Canon EOS R5, the Canon RF 100-500mm lens, and the Nikon 500mm PF. Steve is personable, helpful, and eager to please.
Important Note
As an Amazon Associate, I earn a small percentage when you purchase from Amazon after using any of the Amazon links on the blog (including the logo-link immediately above). My link works with Amazon Prime and using it will not cost you a single cent. Huge thanks, BTW 🙂
Please Remember Also
Please, if you enjoy and learn from the blog, remember to use one of my two affiliate programs when purchasing new gear. Doing so just might make it possible for me to avoid having to try to get a job as a Walmart greeter and will not cost you a single penny more. And if you use Bedfords and remember to enter the BIRDSASART code at checkout, you will (still!) save 3% on every order and enjoy free second-day air shipping. In these crazy times — I lost about fifty thousand dollars in income due to COVID 19 — remembering to use my B&H link or to shop at Bedfords will help me out a ton and be greatly appreciated. Overseas folks who cannot order from the US because of import fees, duties, and taxes, are invited to help out by clicking here to leave a blog thank you gift if they see fit.
Gear Questions and Advice
Too many folks attending BAA IPTs and dozens of photographers whom I see in the field and on BPN, are–out of ignorance–using the wrong gear, especially when it comes to tripods and more especially, tripod heads… Please know that I am always glad to answer your gear questions via e-mail. If you are desperate, you can try me on my cell at 863-221-2372. Please leave a message and shoot me a text if I do not pick up.
This image was created on 6 January 2021 on the pier at the lake near my home at Indian Lake Estates, FL. Standing at full height, I used the no-longer-available Induro GIT 304L/Levered-Clamp FlexShooter Pro-mounted Sony FE 600mm f/4 GM OSS lens with the Sony FE 1.4x Teleconverter, and The One, the Sony Alpha 1 Mirrorless Digital Camera.. ISO 640. The exposure was determined by Zebras with ISO on the rear wheel: 1/400 sec. at f/8 (stopped down 1 stop) in Manual mode. AWB at 8:13:04am on a sunny morning.
Tracking: Spot S AF-C with Bird-Eye/Face Detection performed perfectly. Click on the image to enjoy the high-res version.
Image #1A: Limpkin calling
Serendipitously Vertical!
There has been a Limpkin sitting on the railing near the foot of the pier for several weeks now. It is quite tame allowing folks to get within 15 feet before leaning forward and dropping down into the marsh grasses. I had been looking for a good opportunity to photograph it. When I headed out to try for some vulture on the railing head shots, I was glad to see the Limpkin in his favorite spot. With the bird lens on the tripod I needed to approach carefully while keeping the tripod very close to the boardwalk. I moved forward only inches at a time. I was creating both horizontals and verticals and by chance, I was working vertically when the bird began calling. I figured that 1/400 second would be sharp enough to freeze the calling bird. Calling Limpkins are quite loud, and sound like someone being murdered. When this bird flew to the north, another tame Limpkin landed on the pier railing so I kept on shooting.
Had I been working in horizontal format when the bird called it would have been very difficult to avoid clipping the bill. Lucky ducky me.
Image #B: Sony Imaging Edge Desktop screen capture showing the active AF point
Tracking: Spot S AF-C with Bird-Eye/Face Detection
At times, using Tracking: Spot S AF-C with Bird-Eye/Face Detection seems almost like cheating. When I think back to the days when we had to focus manually by turning the focusing ring (or one of the two large wheels on the Canon FD 800mm f/5.6 lens), I am 100% totally flat-out amazed. Oh, and the FD 800mm lens focused all the way down to 45 feet! In any case, the Sony AF technology, as you can see above, is simply beyond amazing.
SONY Alpha a1 Set-up and Info Group
The SONY Alpha a1 Set-up and Info Group is going great guns as more and more folks chime in with thoughtful questions and experience-based answers. As the a1 is becoming more readily available, more and more folks are getting their hands on this amazing body. This week, two folks in the group ordered their third a1! I am envious. The group is now up to an astounding 102 lucky and blessed folks. Early on, we discussed the myriad AF options. I gave my opinion as to the best one for flight and general bird photography. The best news is that all who wish, can request an e-mail that includes a .DAT file with my a1 settings on it, and explicit directions on how to load my settings onto your a1; talk about convenience! (Note: I am now offering updated .DAT files).
All who purchased their Alpha a1 bodies via a BAA affiliate link will receive a free subscription to the Sony Alpha a1 Set-Up and Info Updates group after shooting me their receipts via e-mail. (Note: it may take me several days to confirm B&H orders.) This same service may be purchased by anyone with an a1 body via a $150.00 PayPal sent to birdsasart@verizon.net indicating payment for Alpha a1 Info & Updates. Alternatively, folks can call Jim weekdays at 1-863-692-0906 to pay via credit card. New members will receive composite e-mails that summarize all previous discussions.
Image #1C: The RawDigger screen capture for the Limpkin calling image
Dead-Solid Perfect!
Images where the G channel gets 2/3rds of the way from the 8000 to the 16000 line are perfect exposures. Images where the G channel gets right up to the line are dead-solid perfect. With 221 OvExp pixels out of 51,000,000, this is a (yet another) dead-solid perfect exposure. All of the OvExp pixels are in the tiny specular highlights near the base of the bill.
RawDigger — not for the faint of heart …
Nothing has ever helped me learn to create perfect exposures to the degree that RawDigger has. I think that many folks are reluctant to learn that most of their images are underexposed by one or more full stops and that highlight warnings in Photoshop, Lightroom, Capture One, and your in-camera histogram are completely bogus as they are based on the embedded JPEGs. Only your raw files tell the truth all the time. Heck, I resisted RawDigger for several years … Once you get over that feeling, RawDigger can become your very best exposure friend no matter what system you are using. On the recent IPTs and In-the-Field sessions, we have demonstrated that fact. Convincingly.
The RawDigger (pink) Adapted Histogram
In the RawDigger e-Guide, you will learn exactly how to set up the Adapted “pink” RawDigger Histogram and how to use it to quickly and easily evaluate the exposure or raw file brightness of images from all digital cameras currently in use. RawDigger was especially helpful to me when I struggled with R5 exposures and when I learned my new camera body, the Sony Alpha a1.
RawDigger e-Guide with Two Videos
The RawDigger e-Guide with Two Videos
by Arthur Morris with Patrick Sparkman
The RawDigger e-Guide was created only for serious photographers who wish to get the absolute most out of their raw files.
Patrick and I began work on the guide in July 2020. At first we struggled. We asked questions. We learned about Max-G values. We could not figure out why the Max G values varied by camera system. IPT veteran Bart Deamer asked lots of questions that we could not answer. We got help from RawDigger creator Iliah Borg. We learned. In December, Patrick came up with an Adapted Histogram that allows us to evaluate the exposures and raw file brightness for all images created with all digital camera bodies from the last two decades. What we learned each time prompted three complete beginning-to-end re-writes.
The point of the guide is to teach you to truly expose to the mega-Expose-to-the-Right so that you will minimize noise, maximize image quality, best utilize your camera’s dynamic range, and attain the highest possible level of shadow detail in your RAW files in every situation. In addition, your properly exposed RAW files will contain more tonal information and feature the smoothest possible transitions between tones. And your optimized images will feature rich, accurate color.
We teach you why the GREEN channel is almost always the first to over-expose. We save you money by advising you as to which version of RawDigger you need. We teach you how to interpret the Max G values for your Canon, Nikon, and SONY camera bodies. It is very likely that the Shock-your-World section will shock you. And lastly — thanks to the technical and practical brilliance of Patrick Sparkman — we teach you a simple way to quickly and easily evaluate your exposures and raw file brightness using an Adapted RawDigger histogram.
The flower video takes you through a session where artie edits a folder of images in Capture One while checking the exposures and Max-G values in RawDigger. The Adapted Histogram video examines a series of recent images with the pink histograms and covers lots of fine points including and especially how to deal with specular highlights. The directions for setting up the Adapted Histogram are in the text.
If we priced this guide based on how much effort we put into it, it would sell it for $999.00. But as this guide will be purchased only by a limited number of serious photographers, we have priced it at $51.00. You can order yours here in the BAA Online Store.
Typos
With all blog posts, feel free to e-mail or to leave a comment regarding any typos or errors.
You are invited to leave a comment letting everyone know which of today’s featured images is your favorite, and why. If you do not like either one, you are invited to say just that and explain why.
What’s Up?
For the past few weeks, I’d seen the potential for creating pleasingly blurred images of Cattle Egrets from the pier as they leave the roost early each morning and fly south over the pier to wherever they are going. My experience so far has been that they leave well before sunrise on clear days. With a big wall of clouds to the east on Wednesday morning, I saw my chance and walked out onto the pier with the hand held 200-600/1.4X TC/a1 rig. Even though this setup is much lighter than the 600mm f/4 lens with just the a1, I have lots of trouble keeping the birds in the center of the frame at 840mm when hand holding. I do much better with the big lens on the tripod, but hand holding is a ton of fun — no large, heavy lens and no relatively heavy tripod …
My timing was excellent. The birds came, in groups of from two to twenty or more, and they kept coming for about 30 minutes. I created 801 blurs and kept 19 after the first edit. After a second pass, I was left with just three others plus today’s two featured images. Five out of 801 is not a very high percentage, but that’s how it goes with blurs. When the sun rose over the cloud bank, I was headed to the vulture trees but was interrupted by the crane family of four feeding atop the knoll just north of the parking circle. I made lots of images, but after reviewing them, felt that I should have done better. The vultures trees were productive for flight photography, and I even made a few good images of the eagle standing up on the nest when a cloud covered the sun for a bit. I finished the morning off with an Anhinga on The Perch. Those images were less than impressive. But all things considered, it was a great morning.
It was a gorgeous sunset and with the wind ‘wrong” from the west northwest, I headed out onto the pier again as the birds landing at the roost would be landing away. Buoyed by my recent success hand holding the 200-600/1.4X TC/a1 rig, I went yet again with that. For the first half hour, I was consistently in the wrong spot as most of the birds flew behind me as they headed for their evening roost. After the sun dipped below the horizon, I got really lucky. I was creating a vertical scenic of the far shoreline and the richly colored sky when a single ibis flew through the frame. After that, I got a few decent frames of the Mottled Ducks blasting off to the northwest, albeit at ISO 8000.
Today is Thursday 6 January 2022. The forecast for this morning is for dead clear with a breeze from the northwest. My plan is to get out very early and try some more Cattle Egret blurs from the pier with the tripod mounted 600mm f/4, the 1.4X TC, and the a1. In these conditions, there is a chance to work against the pink/purple/blue sky to the northwest. Wherever you are, and whatever you are doing, I hope that you too have a great day. This blog post took more than two hours to prepare including the time spent on the two image optimizations and makes 57 consecutive days with a new one.
Please remember that you can find some great photo accessories (and necessities, like surf booties!) on Amazon by clicking on the Stuff tab on the orange/yellow menu bar above. On a related note, it would be extremely helpful if blog-folks who, like me, spend too much money on Amazon, would get in the habit of clicking on the Amazon logo link on the right side of each blog post when they shop online. As you might expect, doing so will not cost you a single penny, but would be appreciated tremendously by yours truly. And doing so works seamlessly with your Amazon Prime account.
Please remember that if an item — a Delkin flash card, or a tripod head — for example, that is available from B&H and/or Bedfords, is also available in the BAA Online Store, it would be great, and greatly appreciated, if you would opt to purchase from us. We will match any price. Please remember also to use my B&H affiliate links or to save 3% at Bedfords by using the BIRDSASART discount code at checkout for your major gear purchases. Doing either often earns you free guides and/or discounts. And always earns my great appreciation.
Your-Pick In-the-Field Sessions
The beauty of the Your Pick In-the-Field Sessions plans below is that I am free most days from now until I leave for San Diego on 14 January. The best news is that we can schedule sessions to coincide with the perfect weather forecast. These sessions are ideal for central Florida locals or folks visiting the region for whatever reason. Interested? Get in touch via e-mail or better yet, try my cell at 863-221-2372. Please leave a message and shoot me a text if I do not pick up. Inquire for couples and group rates.
Indian Lake Estates In-the-Field Sessions
Two hours of intensive instruction: $300.00. Add a working brunch with image review: $100.00. Sunset shoot: $100.00. Guest room lodging available. Mix and match.
Sunny mornings with east winds are best. Likely subjects include ridiculously tame Sandhill Cranes along with Black and Turkey Vultures, Crested Caracara, Limpkin, Great Egret, Great Blue Heron, and more. Bald Eagle possible; crane chicks coming soon.
Lakeland or Circle B Bar Preserve
Two hours of intensive instruction: $325.00. Add a working brunch with image review: $100.00. Mix and match.
Sunny mornings with winds that have an easterly component are best at Lakeland. Likely subjects include point-blank American White Pelican, Anhinga, Limpkin, Common Moorhen, White Ibis, a variety of wintering ducks including Ring-necked and Wood Duck, and lots more.
Cloudy mornings or afternoons (shooting session only) are best at Circle B Bar Preserve. Likely subjects include Great Blue Heron, Great Egret, Little Blue Heron, Snowy Egret, Tricolored Heron, White Ibis, Common Moorhen, Osprey, Red-shouldered Hawk, American Alligator, Wild Boar, and more. If you wish to mix and match, lodging at ILE is available.
Sony Alpha 1 Bodies in Stock at Bedfords/free card offer!
Steve Elkins of Bedfords let me know late yesterday that he had several Sony a1 bodies in stock. If one of them has your name on it, please click here and be sure to enter the BIRDSASART coupon code check the box for free shipping to enjoy free Second Day Air Fed-Ex. Right now, in lieu of the 3% credit refunded to the card you used for your purchase, you will receive a Sony 160GB CFexpress Type A TOUGH Memory Card, a $399.99 value!
Brand New and As-Good-As-Ever Bedfords BAA Discount Policy
Folks who have fallen in love with Bedfords can now use the BIRDSASART coupon code at checkout to enjoy a post-purchase, 3% off-statement credit (excluding taxes and shipping charges) on orders paid with a credit card. The 3% credit will be refunded to the card you used for your purchase. Be sure, also, to check the box for free shipping to enjoy free Second Day Air Fed-Ex. This offer does not apply to purchases of Classes, Gift Cards, or to any prior purchases.
Money Saving Reminder
Many have learned that if you need a hot photo item that is out of stock at B&H and would like to enjoy getting 3% back on your credit card along with free 2nd Day Air Fed-Ex Air shipping, your best bet is to click here, place an order with Bedfords, and enter the coupon code BIRDSASART at checkout. If an item is out of stock, contact Steve Elkins via e-mail or on his cell phone at (479) 381-2592 (Central time). Be sure to mention the BIRDSASART coupon code and check the box for Free Shipping. That will automatically upgrade to free 2nd Day Air Fed-Ex. Steve has been great at getting folks the hot items that are out of stock at B&H and everywhere else. The waitlists at the big stores can be a year or longer for the hard to get items. Steve will surely get you your gear long before that. For the past year, he has been helping BAA Blog folks get their hands on items like the SONY a 1, the SONY 200-600 G OSS lens, the Canon EOS R5, the Canon RF 100-500mm lens, and the Nikon 500mm PF. Steve is personable, helpful, and eager to please.
Important Note
As an Amazon Associate, I earn a small percentage when you purchase from Amazon after using any of the Amazon links on the blog (including the logo-link immediately above). My link works with Amazon Prime and using it will not cost you a single cent. Huge thanks, BTW 🙂
Please Remember Also
Please, if you enjoy and learn from the blog, remember to use one of my two affiliate programs when purchasing new gear. Doing so just might make it possible for me to avoid having to try to get a job as a Walmart greeter and will not cost you a single penny more. And if you use Bedfords and remember to enter the BIRDSASART code at checkout, you will (still!) save 3% on every order and enjoy free second-day air shipping. In these crazy times — I lost about fifty thousand dollars in income due to COVID 19 — remembering to use my B&H link or to shop at Bedfords will help me out a ton and be greatly appreciated. Overseas folks who cannot order from the US because of import fees, duties, and taxes, are invited to help out by clicking here to leave a blog thank you gift if they see fit.
Gear Questions and Advice
Too many folks attending BAA IPTs and dozens of photographers whom I see in the field and on BPN, are–out of ignorance–using the wrong gear, especially when it comes to tripods and more especially, tripod heads… Please know that I am always glad to answer your gear questions via e-mail. If you are desperate, you can try me on my cell at 863-221-2372. Please leave a message and shoot me a text if I do not pick up.
Click on the screen capture to see a larger high-res version.
Image #1: The Two Originals
Image Clean-up and Photography as Art
With Image #2 (on the left, above), I covered the third egret using a series of Quick Masks of the sky, each refined with the help of a regular layer mask. I replaced the eye of the rear bird with the better-defined eye of the front bird. And I cropped from all four sides. With Image #3, I cropped to eliminate a wingtip on each frame edge and one extraneous bird on the right side of the frame. Then, using either the Patch Tool or Content-Aware Fill, I eliminated the three Cattle Egrets (yes, they are not white bats) below the line of birds along with a single, smaller, darker, very blurred bird. Do understand that I would never enter either of these images in a contest where such enhancements are not permitted. Many will argue that these are not natural history images. I would counter by saying that the two Cattle Egrets in Image #2 were really flying by the pier in soft light, and that in Image #3, a flock of Cattle Egrets was leaving the marsh in very low light.
To me, both of today’s featured images are photographs. They surely are not paintings (though the goal when creating pleasing blurs is often to wind up with a painterly or impressionistic result). What do you think?
This image was 5 January 2022 from the pier near my home at Indian Lake Estates, FL. I used the hand held Sony FE 200-600mm f/5.6-6.3 G OSS lens with the Sony FE 1.4x Teleconverter (at 840mm), and The One, the Sony Alpha 1 Mirrorless digital camera. ) Multi-metering +2 2/3 stops/AUTO ISO set ISO 800. Exposure determined via Zebras with ISO on the rear dial: 1/30 sec. at f/9 (wide open) in Shutter Priority mode. AWB at 7:21:08 am on a then very cloudy morning.
Tracking: Zone AF-C Bird Face/Eye detection worked just fine. Click on the image to enjoy a high-res version.
Image #2: Two Cattle Egrets flight blur
Understanding Low Light Exposure
Many might find it hard to believe that even though 2 2/3 stops of light were added to the exposure suggested by the camera, RawDigger showed that this image was about 1/3 stop too dark. That is how I live and learn.
This image was 5 January 2022 from the pier near my home at Indian Lake Estates, FL. I used the hand held Sony FE 200-600mm f/5.6-6.3 G OSS lens with the Sony FE 1.4x Teleconverter (at 840mm), and The One, the Sony Alpha 1 Mirrorless digital camera. ) Multi-metering +2/3 stop/AUTO ISO set ISO 800. Exposure determined via Zebras with ISO on the rear dial: 1/30 sec. at f/9 (wide open) in Shutter Priority mode. AWB at 7:21:08 am on a then very cloudy morning.
Tracking: Zone AF-C Bird Face/Eye detection worked just fine. Click on the image to enjoy a high-res version.
Image #3: “White bats” in flight over marsh blur
Exposure Question
Note that in Image #3, I dialed the + compensation from +2 2/3 stops to +2/3, two full stops darker. Why the difference?
A Very Relevant Shutter Priority Mode Question
An e-Mail Exchange with SONY Alpha a1 Set-up and Info Group member Wells Jacobson
AM: Hi Wells,
Re:
WJ: A settings question if you please.
AM: 🙂
WJ: I know that you and your not too distant neighbor, Mark Smith, are both enamored with shooting manual and determining exposure with zebras and using the rear dial for ISO.
AM: How’s this for crazy? When I came to Florida in 1994 I lived in Deltona at 1455 Whitewood Drive. I learned recently that at that time, Mark Smith was living I was living exactly two blocks away with his young family!
I am not sure that he uses Zebras …
WJ: Occasionally you show one of your photos shot with Shutter Priority with Auto ISO and I believe exposure comp on the rear wheel, and again use zebras.
AM: Correct, but when I do that I am not relying on Zebras except for the initial Exposure compensation … Late in the day, with the sun usually on the western horizon, it is, however, a lot more complicated than that.
WJ: In practice these two methods seem almost the same and I have trouble trying to figure out when you might choose one over the other. I hope a subtlety is eluding me and I’m not just missing the boat. I would love some clarification and perhaps others might as well.
AM: You are missing the boat. In fact, the boat sank. They are not the same at all. The only time that you want to use Shutter Priority with Auto ISO and EXP COMP on the rear dial is when you have backgrounds that are of a pretty much constant tonality, like a richly colored sky at sunset. Actually, you can do well with Shutter Priority mode in most situations where the background is of a consistent tonality. Doing blurs of flocks of birds in a white sky would be another example.
I use Manual mode for more than 95% of my bird photography and so should you. Why? Because birds move and when the background tonalities change, you are out of business if you are working in an Automatic (exposure) mode …
With love, artie
A Guide to Pleasing Blurs
Learn everything there is to know about creating pleasingly blurred images in A Guide to Pleasing Blurs by Denise Ippolito and yours truly. This 20,585 word, 271 page PDF is illustrated with 144 different, exciting, and artistic images. The guide covers the basics of creating pleasingly blurred images, the factors that influence the degree of blurring, the use of filters in creating pleasing blurs, and a great variety of both in-the-field and Photoshop techniques that can be used to create pleasingly blurred images.
Artie and Denise teach you many different ways to move your lens during the exposure to create a variety of pleasingly blurred images of flowers and trees and water and landscapes. They will teach you to recognize situations where subject movement can be used to your advantage to create pan blurs, wind blurs, and moving water blurs. They will teach you to create zoom-blurs both in the field and during post-processing. Artie shares the techniques that he has used and developed for making blurred images of flocks of geese in flight at his beloved Bosque del Apache and Denise shares her flower blur magic as well as a variety of creative Photoshop techniques that she has developed.
With the advent of digital capture creating blurred images has become a great and inexpensive way to go out with your camera and have fun. And while many folks think that making successful blurred images is the result of being a sloppy photographer, nothing could be further from the truth. In “A Guide to Pleasing Blurs” Artie and Denise will help you to unleash your creative self.
Typos
With all blog posts, feel free to e-mail or to leave a comment regarding any typos or errors.
All are invited to leave a comment letting us know which of today’s six featured images is their favorite and why they made their choice.
What’s Up?
Multiple IPT veteran Shelly Lake and I had an amazing session with the white pelicans at Lakeland. Shelley has had an a1 for a few months, but never joined the SONY Alpha a1 Set-up and Info Group 🙁 So we met well before dawn and working with my laptop on the tailgate shelf of my SUV, I loaded my a1 settings (via .DAT file) onto her a1. The word on the street is that the a1 menu is too complex to understand and that it is difficult to learn to use the camera. Once we had my settings on her a1, it took me all of five minutes of instruction to get her ready to go. We concentrated on the AF system (easy-peasy) and on getting the right exposure using Zebras (even easier). Before long we were photographing the American White Pelicans. For whatever reason, the birds were quite Copacetic. We worked them in the shade at first, then in early morning light, and finally in full sun. We worked on choosing the best perspective to get the most pleasing backgrounds, and I double-checked Shelley’s exposures and image designs on the rear monitor of her camera.
Shelly could not believe how amazingly well the Bird Face/Eye Detection AF worked once her Alpha 1 was set up correctly. As for the photography, she said, Artie, this was way beyond anything I could have expected. I leave for San Diego on 14 January. If you would like to join me for some In-the-Field instruction at Lakeland before then, shoot me an e-mail or try me on my cell at 863-221-2372. Please leave a message and shoot me a text if I do not pick up. The weather is looking best for this coming Saturday, Sunday, and Tuesday. The details are below.
I was pleased to learn yesterday that three new folks joined the a1 group. Conditions were perfect at sunset but for the most part, the birds were flying in too low.
Today is Wednesday 5 January 2022. The forecast for this morning is for cloudy and still. Wherever you are, and whatever you are doing, I hope that you too have a great day. This blog post took more than two hours to prepare including the time spent on the six image optimizations and makes 56 consecutive days with a new one.
Please remember that you can find some great photo accessories (and necessities, like surf booties!) on Amazon by clicking on the Stuff tab on the orange/yellow menu bar above. On a related note, it would be extremely helpful if blog-folks who, like me, spend too much money on Amazon, would get in the habit of clicking on the Amazon logo link on the right side of each blog post when they shop online. As you might expect, doing so will not cost you a single penny, but would be appreciated tremendously by yours truly. And doing so works seamlessly with your Amazon Prime account.
Please remember that if an item — a Delkin flash card, or a tripod head — for example, that is available from B&H and/or Bedfords, is also available in the BAA Online Store, it would be great, and greatly appreciated, if you would opt to purchase from us. We will match any price. Please remember also to use my B&H affiliate links or to save 3% at Bedfords by using the BIRDSASART discount code at checkout for your major gear purchases. Doing either often earns you free guides and/or discounts. And always earns my great appreciation.
Your-Pick In-the-Field Sessions
The beauty of the Your Pick In-the-Field Sessions plans below is that I am free most days from now till mid-January and we can schedule sessions to coincide with the perfect weather forecast. They are ideal for central Florida locals or folks visiting the region for whatever reason. Interested? Get in touch via e-mail or better yet, try my cell at 863-221-2372. Please leave a message and shoot me a text if I do not pick up. Inquire for couples and group rates.
Indian Lake Estates In-the-Field Sessions
Two hours of intensive instruction: $300.00. Add a working brunch with image review: $100.00. Sunset shoot: $100.00. Guest room lodging available. Mix and match.
Sunny mornings with east winds are best. Likely subjects include ridiculously tame Sandhill Cranes along with Black and Turkey Vultures, Crested Caracara, Limpkin, Great Egret, Great Blue Heron, and more. Bald Eagle possible; crane chicks coming soon.
Lakeland or Circle B Bar Preserve
Two hours of intensive instruction: $325.00. Add a working brunch with image review: $100.00. Mix and match.
Sunny mornings with east winds are best at Lakeland. Likely subjects include point-blank American White Pelican, Anhinga, Limpkin, Common Moorhen, White Ibis, a variety of wintering ducks including Ring-necked and Wood Ducks, and lots more.
Cloudy mornings or afternoons (shooting session only) are best at Circle B Bar Preserve. Likely subjects include Great Blue Heron, Great Egret, Little Blue Heron, Snowy Egret, Tricolored Heron, White Ibis, Common Moorhen, Osprey, Red-shouldered Hawk, American Alligator, Wild Boar, and more. If you wish to mix and match, loving at ILE is available.
This image was created 4 January 2022 at my favorite white pelican spot in Lakeland, just one hour from my home. I used the hand held Sony FE 200-600mm f/5.6-6.3 G OSS lens(at 600mm), and The One, the Sony Alpha 1 Mirrorless digital camera. ) ISO 1250. Exposure determined via Zebras with ISO on the rear dial: 1/500 sec. at f/6.3 (wide open) in Manual mode. AWB at 7:44:34am in the shade on a clear morning.
Tracking: Zone AF-C Bird Face/Eye detection performed to perfection. Click on the image to enjoy a high-res version.
Image #1: Small flotilla
The Flotilla
The yellow reflections are available at this spot before the sun makes its way over the buildings and trees. I would have liked this better without the pelican on the frame edge, but I loved the ducks in the background so I executed a small crop from the left and from below while maintaining the 3X2 proportions. The duck in the center is a drake ring-necked and the two darker ones are likely hens of that species. Though there were lots of Ring-necked Ducks at close range in nice light, the pelican photography was so good that we rarely glanced at them!
This image was also created 4 January 2022 at my favorite white pelican spot in Lakeland. I used the hand held Sony FE 200-600mm f/5.6-6.3 G OSS lens(at 600mm), and The One, the Sony Alpha 1 Mirrorless digital camera. ) ISO 1600. Exposure determined via Zebras with ISO on the rear dial: 1/500 sec. at f/6.3 (wide open) in Manual mode. AWB at 7:58:57am in the shade on a clear morning.
Tracking: Spot S AF-C Bird Face/Eye detection performed to perfection. Click on the image to enjoy a high-res version.
Image #2: American White Pelican head and shoulders portrait
Subject in Shade, Background in Sun
I espouse here often on the beauty of images made with the subject in the shade with the background in the sun. Here, after crouching down for the background that I wanted, I went with a ton of Zebras on sunlit water in the background to ensure a perfect exposure for the bird. In such situations, the subjects seem to glow. They are not easy to find, but when you do succeed, be sure to make lots of images.
Tracking: Spot S AF-C Bird Face/Eye detection performed to perfection. Click on the image to enjoy a high-res version.
Image #3: American White Pelican vertical head and shoulders portrait in early morning light
Sony 200-600 Hand Held Versatility!
Here again, I got low to introduce some of the red reflections into the top of the frame. The ease of hand holding the 200-600 (with or without the 1.4x TC) makes it a deadly weapon when working large, relatively tame birds. I was able to move quickly and get higher or lower as needed to control the background. If you get too low at this spot, you introduce the very distracting far shoreline into the image …
Tracking: Spot S AF-C Bird Face/Eye detection performed to perfection. Click on the image to enjoy a high-res version.
Image #4: American White Pelican young bird preening
The Young Birds
The adults far outnumber the young birds at this location. They stand out with their pinker bills. I am not sure as to how to separate birds of the year from the two or three year old birds … In addition to the differences in bill color, the younger birds have grayer feathers about the head and neck. See also Image #6 below.
Tracking: Spot S AF-C Bird Face/Eye detection performed to perfection. Click on the image to enjoy a high-res version.
Image #5: American White Pelican adult face portrait
Consider the Exposure Data
If you look carefully at the exposure data for Images #2-#5, you will see that as the light got stronger, the shutter speeds got higher and the ISOs got lower. With Image #5, made in full sun, I was able to stop down 1/3 stop for a slight boost in depth of field. I worked on the BLUEs in Images #4 & #5 during the raw conversion in ACR. I moved the BLUE Luminance slider to the right to get the BLUEs just right.
This image was also created 4 January 2022 at my favorite white pelican spot in Lakeland. I used the hand held Sony FE 200-600mm f/5.6-6.3 G OSS lens with the Sony FE 1.4x Teleconverter (at 840mm), and The One, the Sony Alpha 1 Mirrorless digital camera. ) ISO 1600. Exposure determined via Zebras with ISO on the rear dial: 1/500 sec. at f/9 (wide open) in Manual mode. AWB at 8:52:51 in the shade of a tree on a clear morning.
Tracking: Spot S AF-C Bird Face/Eye detection performed to perfection. Click on the image to enjoy a high-res version.
Image #6: American White Pelican — feather detail on back of juvenile
Just Peachy
Birds of the year of this species feature brown streaks on the back when they first arrive at Fort DeSoto. I have never seen that in Lakeland. But some of the younger birds have swatches of peach on their backs. I could not resist trying to create some feather pattern images when I saw this bird in the shade.
SONY Alpha a1 Set-up and Info Group
The SONY Alpha a1 Set-up and Info Group is going great guns as more and more folks chime in with thoughtful questions and experience-based answers. As the a1 is becoming more readily available, more and more folks are getting their hands on this amazing body. This week, two folks in the group ordered their third a1! I am envious. The group is now up to an astounding 102 lucky and blessed folks. Early on, we discussed the myriad AF options. I gave my opinion as to the best one for flight and general bird photography. The best news is that all who wish, can request an e-mail that includes a .DAT file with my a1 settings on it, and explicit directions on how to load my settings onto your a1; talk about convenience! (Note: I am now offering updated .DAT files).
All who purchased their Alpha a1 bodies via a BAA affiliate link will receive a free subscription to the Sony Alpha a1 Set-Up and Info Updates group after shooting me their receipts via e-mail. (Note: it may take me several days to confirm B&H orders.) This same service may be purchased by anyone with an a1 body via a $150.00 PayPal sent to birdsasart@verizon.net indicating payment for Alpha a1 Info & Updates. Alternatively, folks can call Jim weekdays at 1-863-692-0906 to pay via credit card. New members will receive composite e-mails that summarize all previous discussions.
Typos
With all blog posts, feel free to e-mail or to leave a comment regarding any typos or errors. Special thanks to Jordan Cait who has been doing an awesome job of proofreading the blog recently and getting in touch via e-mail.
Which of today’s featured images is the strongest. Please leave a comment letting us know which image you like best and why you made your choice.
What’s Up?
Monday morning was cold and cloudy with a stiff NW wind. I took a nice walk with the Sony 70-200 II, the 1.4x TC, and the a1. No good pix. When the sun rose above the big cloud to the east at 8:00am, I headed home. Monday sunset was not much better as it was dead clear with a north wind. Most of the birds were flying too high or too low. Right at sunset, I had one good chance when a single White Ibis flew slowly into the wind right through the richest color.
I usually swim 44 to 60 lengths of the pool. Though it was a bit chilly midday on Monday, the pool was a very pleasant 89° (thanks to the heater/chiller). Not sure why, but the water felt so good and I was so relaxed that I swam an easy mile — 88 lengths. Tomorrow is supposed to be 15° cooler! Maybe I will take the day off …
Today is Tuesday 4 January 2022. I am looking forward to working with multiple IPT veteran Shelly Lake early today in Lakeland for a Your Pick In-the-Field session. If you would like to join me for some In-the-Field instruction at either ILE or Lakeland in the next ten days or so, shoot me an e-mail or try me on my cell at 863-221-2372. Please leave a message and shoot me a text if I do not pick up. The details are below.
Wherever you are, and whatever you are doing, I hope that you too have a great day. This blog post took about two hours to prepare. This post makes 55 consecutive days with a new one.
Please remember that you can find some great photo accessories (and necessities, like surf booties!) on Amazon by clicking on the Stuff tab on the orange/yellow menu bar above. On a related note, it would be extremely helpful if blog-folks who, like me, spend too much money on Amazon, would get in the habit of clicking on the Amazon logo link on the right side of each blog post when they shop online. As you might expect, doing so will not cost you a single penny, but would be appreciated tremendously by yours truly. And doing so works seamlessly with your Amazon Prime account.
Please remember that if an item — a Delkin flash card, or a tripod head — for example, that is available from B&H and/or Bedfords, is also available in the BAA Online Store, it would be great, and greatly appreciated, if you would opt to purchase from us. We will match any price. Please remember also to use my B&H affiliate links or to save 3% at Bedfords by using the BIRDSASART discount code at checkout for your major gear purchases. Doing either often earns you free guides and/or discounts. And always earns my great appreciation.
Price Drop
Canon EF 100-400mm f/4.5-5.6L IS II USM Lens
Price Reduced on 1/4/22 BAA Record-low Price for Near-mint
Blog regular Elinor Osborn is offering a Canon EF 100-400mm f4.5-5.6L IS II USM in like-new condition (except for “On/OFF” written on the lens foot) for a BAA record low $1396.00 (was $1425.00).. The sale includes the original box, the Lens Case LZ1326, the Lens Hood ET-83D, the lens strap, the instruction sheet and booklet, the front and rear lens caps, and insured ground shipping via FedEx to lower 48 US addresses only. Your item will not ship until I receive a bank (cashier’s) check and confirm its validity via a phone call to the issuing bank.
Please contact Elinor via e-mail or by phone at 1-802 586-9994 (Eastern time)
This incredibly versatile zoom lens — with its amazing .98 meter close focus — was my favorite Canon telephoto zoom lens ever. By far. It is easy to hand hold, great for tight portraits, for birds in flight, for quasi-macro stuff, and lots more. For flight, it is fabulous with an R5! The lens sells new for $2399.00 so you can save some hard cash by grabbing Elinor’s copy now. artie
Your-Pick In-the-Field Sessions
The beauty of the Your Pick In-the-Field Sessions plans below is that I am free most days from now till mid-January and we can schedule sessions to coincide with the perfect weather forecast. They are ideal for central Florida locals or folks visiting the region for whatever reason. Interested? Get in touch via e-mail or better yet, try my cell at 863-221-2372. Please leave a message and shoot me a text if I do not pick up. Inquire for couples and group rates.
Indian Lake Estates In-the-Field Sessions
Two hours of intensive instruction: $300.00. Add a working brunch with image review: $100.00. Sunset shoot: $100.00. Guest room lodging available. Mix and match.
Sunny mornings with east winds are best. Likely subjects include ridiculously tame Sandhill Cranes along with Black and Turkey Vultures, Crested Caracara, Limpkin, Great Egret, Great Blue Heron, and more. Bald Eagle possible; crane chicks coming soon.
Lakeland or Circle B Bar Preserve
Two hours of intensive instruction: $325.00. Add a working brunch with image review: $100.00. Mix and match.
Sunny mornings with east winds are best at Lakeland. Likely subjects include point-blank American White Pelican, Anhinga, Limpkin, Common Moorhen, White Ibis, a variety of wintering ducks including Ring-necked and Wood Ducks, and lots more.
Cloudy mornings or afternoons (shooting session only) are best at Circle B Bar Preserve. Likely subjects include Great Blue Heron, Great Egret, Little Blue Heron, Snowy Egret, Tricolored Heron, White Ibis, Common Moorhen, Osprey, Red-shouldered Hawk, American Alligator, Wild Boar, and more. If you wish to mix and match, loving at ILE is available.
Sony Alpha 1 Bodies in Stock at Bedfords/free card offer!
Steve Elkins of Bedfords let me know late yesterday that he had several Sony a1 bodies in stock. If one of them has your name on it, please click here and be sure to enter the BIRDSASART coupon code check the box for free shipping to enjoy free Second Day Air Fed-Ex. Right now, in lieu of the 3% credit refunded to the card you used for your purchase, you will receive a Sony 160GB CFexpress Type A TOUGH Memory Card, a $399.99 value!
Brand New and As-Good-As-Ever Bedfords BAA Discount Policy
Folks who have fallen in love with Bedfords can now use the BIRDSASART coupon code at checkout to enjoy a post-purchase, 3% off-statement credit (excluding taxes and shipping charges) on orders paid with a credit card. The 3% credit will be refunded to the card you used for your purchase. Be sure, also, to check the box for free shipping to enjoy free Second Day Air Fed-Ex. This offer does not apply to purchases of Classes, Gift Cards, or to any prior purchases.
Money Saving Reminder
Many have learned that if you need a hot photo item that is out of stock at B&H and would like to enjoy getting 3% back on your credit card along with free 2nd Day Air Fed-Ex Air shipping, your best bet is to click here, place an order with Bedfords, and enter the coupon code BIRDSASART at checkout. If an item is out of stock, contact Steve Elkins via e-mail or on his cell phone at (479) 381-2592 (Central time). Be sure to mention the BIRDSASART coupon code and check the box for Free Shipping. That will automatically upgrade to free 2nd Day Air Fed-Ex. Steve has been great at getting folks the hot items that are out of stock at B&H and everywhere else. The waitlists at the big stores can be a year or longer for the hard to get items. Steve will surely get you your gear long before that. For the past year, he has been helping BAA Blog folks get their hands on items like the SONY a 1, the SONY 200-600 G OSS lens, the Canon EOS R5, the Canon RF 100-500mm lens, and the Nikon 500mm PF. Steve is personable, helpful, and eager to please.
Important Note
As an Amazon Associate, I earn a small percentage when you purchase from Amazon after using any of the Amazon links on the blog (including the logo-link immediately above). My link works with Amazon Prime and using it will not cost you a single cent. Huge thanks, BTW 🙂
Please Remember Also
Please, if you enjoy and learn from the blog, remember to use one of my two affiliate programs when purchasing new gear. Doing so just might make it possible for me to avoid having to try to get a job as a Walmart greeter and will not cost you a single penny more. And if you use Bedfords and remember to enter the BIRDSASART code at checkout, you will (still!) save 3% on every order and enjoy free second-day air shipping. In these crazy times — I lost about fifty thousand dollars in income due to COVID 19 — remembering to use my B&H link or to shop at Bedfords will help me out a ton and be greatly appreciated. Overseas folks who cannot order from the US because of import fees, duties, and taxes, are invited to help out by clicking here to leave a blog thank you gift if they see fit.
Gear Questions and Advice
Too many folks attending BAA IPTs and dozens of photographers whom I see in the field and on BPN, are–out of ignorance–using the wrong gear, especially when it comes to tripods and more especially, tripod heads… Please know that I am always glad to answer your gear questions via e-mail. If you are desperate, you can try me on my cell at 863-221-2372. Please leave a message and shoot me a text if I do not pick up.
This image was created on 16 December 2021 down by the lake near my home at Indian Lake Estates. I used the hand held Sony FE 70-200mm f/2.8 GM OSS II lens with the Sony FE 2x Teleconverter (at 346mm) and The One, the Sony Alpha 1 Mirrorless Digital Camera.. The exposure was determined via Zebras with Exposure Compensation on the thumb dial. Multi-metering +2 1/3 stops; AUTO ISO set ISO 200: 1/25 sec. at f/6.3 (stopped down 1/3 stop) in Shutter Priority mode. AWB at 5:38:38pm just after sunset.
Tracking: Zone AF/C with Bird-Eye/Face Detection performed perfectly. Click on the image to enjoy a high-res version.
Image #1: Icterid blur
In the New Kid on the Block: Versatile, & Deadlier Than Ever blog post here, I asked, Does anything about Image #2 (now above) bug you? One thing about it bugs me. What is it?
Neil Hickman
December 18, 2021 at 7:46pm ·
Could it be the one colour boring background? I think the cyan colour is fine for close to the horizon, but a few wispy clouds could have made a more interesting background.
Arthur Morris/BIRDS AS ART
December 21, 2021 at 8:27am
Hi Neil,
I do not mind solid sky backgrounds. And yes, a few puffy clouds would have been nice. But what bugs me is the color of the sky; it is too CYAN and not BLUE enough. I worked on the sky color but could not come up with anything that made me happy. I far prefer the BLUE sky in Image #3. with love, artie
BTW, my favorite of the four images in that post was Image #1: Icterid blur. My second fave was Image #3: Turkey Vulture braking to land.
Image courtesy of and copyright 2021: Brian Sump Photography. Click on the image to enjoy a high-res version.
Image #1: Common Goldeneye — drake floating in early morning light
My Favorite Goldeneye
In the Extraordinarily Uncommon R5 Goldeneye Images. And, if someone held a gun to your head … blog post here, I wrote, If someone held a gun to your head and asked, Which of today’s two featured images is the strongest, would you go with Image #1 or with Image #2? All are invited to leave a comment and let us know why they made their choice.
I chose the portrait (above), over the action shot. While I love the raised foot and the splashes in Image #2, the sun on the bird in Image #1 is to die for. It lit up the colors of the bird and the background beautifully. In addition, Brian Sump did a superb job with the processing so that both the whites and the dark tones revealed lots of detail. If I could say that one of those images were mine, I’d go with the sunlit portrait in an instant.
Note: I am against gun violence.
You can see what folks in the Avian Forum on BPN, had to say about this image here.
This image was created on 22 December 2021 down at Circle B Bar Reserve in Lakeland, FL Standing at full height, I used the no-longer-available Induro GIT 204/Levered-Clamp FlexShooter Mini-mounted Sony FE 600mm f/4 GM OSS lens, the Sony FE 1.4x Teleconverter, and The One, the Sony Alpha 1 Mirrorless Digital Camera.. ISO 125. The exposure was determined by Zebras with ISO on the rear wheel: 1/20,000 sec. at f/8 (stopped down 1 stop) in Manual mode. AWB at 8:23:47 am on a then very sunny morning.
Focusing information will the revealed in a future blog post soon. Click on the image to enjoy the high-res version.
Image #1A: Yes, a preening Anhinga
Mega-blasting Silhouette Lessons
In the What Gives? ISO 125: 1/20,000 second at f/8! blog post here, I wrote:
If you think that you can explain the exposure data — ISO 125: 1/20,000 second at f/8, please leave a comment. What was the background? What was the lighting?
Jake Kneale left a comment that hit the nail on the head:
My guess is a preening anhinga against the specular highlights of water in full sun
Yes, I was shooting into the blasting highlights of the full sun on the water. On a clear day, when the sun is in the frame, if you avoid over-exposing the sun, the rest of the image will be black. Period. Beware, however, of trying to include the un-muted sun in the frame as you risk eye damage. There is a way to do it without endangering your vision, but it is quite tricky.
If you want to try this, see the section on Photographing the Bright Sun in The Art of Bird Photography II (on CD). An electronic download is available here. If you are really serious about attempting this difficult shot without hurting yourself, you need to look carefully at a 5-stop, or better yet, a 10-stop ND filter that fits the drop-in filter drawer of your super-telephoto lens.
This last bit of advice is super-important: when shooting into the blasting highlights of the sun,you must focus manually. All AF systems are blinded by the brightness of the scene. If you camera offers a Focus Peaking feature, use it in these situations.
This image was created on 12 January 2020 at San Diego, CA. While standing at full height, I used the no-longer available GIT304L Grand Series 3 Stealth Carbon Fiber Tripod/Levered-Clamp FlexShooter Pro-mounted-Sony FE 600mm f/4 GM OSS lens, the Sony FE 1.4x Teleconverter, and the Sony a9 ii(now replaced, for me, by The One, the Sony Alpha 1 Mirrorless Digital Camera). ISO 640. The exposure was determined by Zebras with ISO on the rear wheel: 1/500 sec. at f/5.6 (wide open) in Manual mode. AWB at 10:15:10am on a mostly sunny morning.
Expand Flexible Spot S AF-C performed perfectly. Be sure to click on the image to enjoy a larger higher-res version.
Image #2: American Coot in holiday reflections
Image #2 for Me
In the Happy Holidays! Christmas Coots Times Two blog post here, I wrote:
I feel that one of today’s featured images is by far the stronger of the two. Which one is it? And why?
Like many who left a comment, I feel that Image #2 is by far the better image. Several folks explained why they made the same choice:
Mo
#2 is much better. I like the position of the coot in the frame, the background color is better, & the tilted head position gives the image more interest.
Chris Davidson
Mo, summed up my thoughts perfectly! The curious pose is wonderful, and the lighter and brighter colors really amp up those glorious red and green reflections in the water. I agree. low is not always the way to go. A BIRDS AS ART holiday classic IMO!
Are the folks who preferred Image #1 wrong? Not at all. Judging art is 100% subjective and 100% personal. It’s that “beauty is in the eyes of the beholder” thing.
This image was created on 24 December 2021 down by the lake near my home at Indian Lake Estates, FL. Working from my stepladder, I used the no-longer available GIT305XXL Grand Series 5 Stealth Carbon Fiber Tripod/Levered-Clamp FlexShooter Pro-mounted-Sony FE 600mm f/4 GM OSS lens, the Sony FE 2.0x Teleconverter, and The One, the Sony Alpha 1 Mirrorless Digital Camera). Multi-metering +1.7 stops/Auto ISO set ISO 1600. 1/1250 sec. at f/8 (wide open) in Shutter Priority mode. AWB at 5:36:44pm right after sunset on a clear afternoon.
Tracking: Zone AF-C Bird Face/Eye detection performed well enough. As this is a healthy crop and two birds were removed from the frame, let’s call this one a photo illustration. Be sure to click on the image to enjoy a higher-res version.
Image #2: Cattle Egret landing at evening roost
Loving the Action Shot
In the Late Afternoon Sunset Quickies blog post here, my favorite was Image #2: Cattle Egret landing at evening roost. I definitely like both images, but the richer colors, the inclusion of the far shoreline, and the dramatic flight pose were the deciding factors.
Typos
With all blog posts, feel free to e-mail or to leave a comment regarding any typos or errors.
Which of today’s two featured images do you like best? Everyone is invited to leave a comment and let us know why they made their choice. Note: be absolutely sure to click on each image to view a larger, high-res version.
What’s Up?
The sun broke through the fog just before 7:30am on Sunday morning and disappeared behind a large cloud at 8:15am. I started with a Great Blue Heron on The Perch
in the fog. I was further blessed as the bird stayed on the perch for 15 minutes. Then I worked the crane family of four with the new, hard-to-get-your-hands-on Sony FE 70-200mm f/2.8 GM OSS II lens with the 1.4X TC and the a1.
Engaged in watching several NFL games on TIVO, I was very late getting down to the lake. Most of the Cattle Egrets and Little Blue Herons had already gone to roost, but I’m glad that I made it as I learned something new. With a fairly brisk wind from the southwest, the surface of the lake was rippled and ruffled. As a result, there was no color in the water. I had been spoiled by the dead calm conditions and the still water for the past week when the sky colors were reflected by the mirror-like surface of the lake.
There was not much action, but I had another good chance on the Mottled Ducks blasting off — I had one miraculously good one out of a burst of 25. And I got some nice stuff on Boat-tailed Grackle and White Ibis. That said, I created less than 200 images, far below average for a sunset session.
Today is Monday 3 January 2022. There is a small front passing by this morning as the forecast is calling for mostly cloudy with a brisk northwest wind and falling temps. I will almost surely head down to the lake for at least a bit. Wherever you are, and whatever you are doing, I hope that you too have a great day. This blog post took about 90 minutes to prepare including the time spent on the image optimizations. This post makes 54 consecutive days with a new one.
Special thanks to Jordan Cait who has been doing an awesome job of proofreading the blog recently and getting in touch via e-mail.
I am looking forward to working with multiple IPT veteran Shelly Lake on Tuesday morning in Lakeland for a Your Pick In-the-Field session. If you would like to join me for some In-the-Field instruction at either ILE or Lakeland in the next ten days or so, shoot me an e-mail or try me on my cell at 863-221-2372. Please leave a message and shoot me a text if I do not pick up. The details are below.
Please remember that you can find some great photo accessories (and necessities, like surf booties!) on Amazon by clicking on the Stuff tab on the orange/yellow menu bar above. On a related note, it would be extremely helpful if blog-folks who, like me, spend too much money on Amazon, would get in the habit of clicking on the Amazon logo link on the right side of each blog post when they shop online. As you might expect, doing so will not cost you a single penny, but would be appreciated tremendously by yours truly. And doing so works seamlessly with your Amazon Prime account.
Please remember that if an item — a Delkin flash card, or a tripod head — for example, that is available from B&H and/or Bedfords, is also available in the BAA Online Store, it would be great, and greatly appreciated, if you would opt to purchase from us. We will match any price. Please remember also to use my B&H affiliate links or to save 3% at Bedfords by using the BIRDSASART discount code at checkout for your major gear purchases. Doing either often earns you free guides and/or discounts. And always earns my great appreciation.
Your-Pick In-the-Field Sessions
The beauty of the Your Pick In-the-Field Sessions plans below is that I am free most days from now till mid-January and we can schedule sessions to coincide with the perfect weather forecast. They are ideal for central Florida locals or folks visiting the region for whatever reason. Interested? Get in touch via e-mail or better yet, try my cell at 863-221-2372. Please leave a message and shoot me a text if I do not pick up. Inquire for couples and group rates.
Indian Lake Estates In-the-Field Sessions
Two hours of intensive instruction: $300.00. Add a working brunch with image review: $100.00. Sunset shoot: $100.00. Guest room lodging available. Mix and match.
Sunny mornings with east winds are best. Likely subjects include ridiculously tame Sandhill Cranes along with Black and Turkey Vultures, Crested Caracara, Limpkin, Great Egret, Great Blue Heron, and more. Bald Eagle possible; crane chicks coming soon.
Lakeland or Circle B Bar Preserve
Two hours of intensive instruction: $325.00. Add a working brunch with image review: $100.00. Mix and match.
Sunny mornings with east winds are best at Lakeland. Likely subjects include point-blank American White Pelican, Anhinga, Limpkin, Common Moorhen, White Ibis, a variety of wintering ducks including Ring-necked and Wood Ducks, and lots more.
Cloudy mornings or afternoons (shooting session only) are best at Circle B Bar Preserve. Likely subjects include Great Blue Heron, Great Egret, Little Blue Heron, Snowy Egret, Tricolored Heron, White Ibis, Common Moorhen, Osprey, Red-shouldered Hawk, American Alligator, Wild Boar, and more. If you wish to mix and match, loving at ILE is available.
Sony Alpha 1 Bodies in Stock at Bedfords/free card offer!
Steve Elkins of Bedfords let me know late yesterday that he had several Sony a1 bodies in stock. If one of them has your name on it, please click here and be sure to enter the BIRDSASART coupon code check the box for free shipping to enjoy free Second Day Air Fed-Ex. Right now, in lieu of the 3% credit refunded to the card you used for your purchase, you will receive a Sony 160GB CFexpress Type A TOUGH Memory Card, a $399.99 value!
Brand New and As-Good-As-Ever Bedfords BAA Discount Policy
Folks who have fallen in love with Bedfords can now use the BIRDSASART coupon code at checkout to enjoy a post-purchase, 3% off-statement credit (excluding taxes and shipping charges) on orders paid with a credit card. The 3% credit will be refunded to the card you used for your purchase. Be sure, also, to check the box for free shipping to enjoy free Second Day Air Fed-Ex. This offer does not apply to purchases of Classes, Gift Cards, or to any prior purchases.
Money Saving Reminder
Many have learned that if you need a hot photo item that is out of stock at B&H and would like to enjoy getting 3% back on your credit card along with free 2nd Day Air Fed-Ex Air shipping, your best bet is to click here, place an order with Bedfords, and enter the coupon code BIRDSASART at checkout. If an item is out of stock, contact Steve Elkins via e-mail or on his cell phone at (479) 381-2592 (Central time). Be sure to mention the BIRDSASART coupon code and check the box for Free Shipping. That will automatically upgrade to free 2nd Day Air Fed-Ex. Steve has been great at getting folks the hot items that are out of stock at B&H and everywhere else. The waitlists at the big stores can be a year or longer for the hard to get items. Steve will surely get you your gear long before that. For the past year, he has been helping BAA Blog folks get their hands on items like the SONY a 1, the SONY 200-600 G OSS lens, the Canon EOS R5, the Canon RF 100-500mm lens, and the Nikon 500mm PF. Steve is personable, helpful, and eager to please.
Important Note
As an Amazon Associate, I earn a small percentage when you purchase from Amazon after using any of the Amazon links on the blog (including the logo-link immediately above). My link works with Amazon Prime and using it will not cost you a single cent. Huge thanks, BTW 🙂
Please Remember Also
Please, if you enjoy and learn from the blog, remember to use one of my two affiliate programs when purchasing new gear. Doing so just might make it possible for me to avoid having to try to get a job as a Walmart greeter and will not cost you a single penny more. And if you use Bedfords and remember to enter the BIRDSASART code at checkout, you will (still!) save 3% on every order and enjoy free second-day air shipping. In these crazy times — I lost about fifty thousand dollars in income due to COVID 19 — remembering to use my B&H link or to shop at Bedfords will help me out a ton and be greatly appreciated. Overseas folks who cannot order from the US because of import fees, duties, and taxes, are invited to help out by clicking here to leave a blog thank you gift if they see fit.
Gear Questions and Advice
Too many folks attending BAA IPTs and dozens of photographers whom I see in the field and on BPN, are–out of ignorance–using the wrong gear, especially when it comes to tripods and more especially, tripod heads… Please know that I am always glad to answer your gear questions via e-mail. If you are desperate, you can try me on my cell at 863-221-2372. Please leave a message and shoot me a text if I do not pick up.
This image was created on 2 January 2022 at Indian Lake Estates. Working from the front seat of my SUV, I used the BLUBB-supported Sony FE 600mm f/4 GM OSS lens and The One, the Sony Alpha 1 Mirrorless Digital Camera). ISO 500. The exposure was determined using Zebra technology with ISO on the rear wheel: 1/250 sec. at f/4 (wide open) in Manual mode. AWB at 7:29:28am just as the sun broke through the light fog.
Small Spot S AF-C performed perfectly. Be sure to click on the image to enjoy a higher-res version.
It is hard to believe that after nearly 38 1/2 years of doing bird photography, there are still new lessons to be learned almost every day. On Sunday morning, I refined a BLUBB sharpness technique that I have been working on for a while. I am planning on doing a short video on that topic soon. Next, I discovered a new button setting that will improve the AF system of the world’s best bird photography camera body, the Sony a1. I will be sharing that with the a1 group this week via SONY Alpha a1 Set-up and Info Notes e-mail #27. I am continually astounded by the complexity of the a1, and the degree to which it can be customized to best meet your needs.
Eagle-eyed Image Question
There is a small distracting element in Image #1 that was eliminated in Image #2. If you can spot it — it bothers the heck out of me, please leave a comment.
This image was created on 2 January 2022 at Indian Lake Estates. Working from the front seat of my SUV, I used the BLUBB-supported Sony FE 600mm f/4 GM OSS lens with the Sony FE 1.4x Teleconverter, and The One, the Sony Alpha 1 Mirrorless Digital Camera). ISO 800. The exposure was determined using Zebra technology with ISO on the rear wheel: 1/320 sec. at f/5.6 (wide open) in Manual mode. AWB at 7:37:28am, less than 10 minutes after the sun had broken through the light fog.
Small Spot S AF-C performed perfectly. Be sure to click on the image to enjoy a higher-res version.
I am not sure when I first wrote, Add green whenever possible. It might have been in the original The Art of Bird Photography, or in the digital follow-up, The Art of Bird Photography II (on CD). An electronic download of the latter is available here. If you do not own both of these classics, you can do yourself a lot of good by ordering the Two-Book Bundle.
In any case, I try to add green whenever possible. Note that in Image #1, made with the 600mm lens alone, I could have worked horizontally and still included lots of green. Twenty years ago I would have done just that so that the image might have sold for a two-page magazine spread … Unfortunately, creating image designs for specific book and magazine usages is a thing of the past. With Image #2, I needed to work vertically to include the tops of the reeds in the bottom of the frame. The soft, early morning light did not hurt either image.
SONY Alpha a1 Set-up and Info Group
The SONY Alpha a1 Set-up and Info Group is going great guns as more and more folks chime in with thoughtful questions and experience-based answers. As the a1 is becoming more readily available, more and more folks are getting their hands on this amazing body. This week, two folks in the group ordered their third a1! I am envious. The group is now up to an astounding 99 lucky and blessed folks. Early on, we discussed the myriad AF options. I gave my opinion as to the best one for flight and general bird photography. The best news is that the all who wish can request an e-mail that includes a .DAT file with my a1 settings on it, and explicit directions on how to load my settings onto your a1; talk about convenience! (Note: I am now offering updated .DAT files).
All who purchased their Alpha a1 bodies via a BAA affiliate link will receive a free subscription to the Sony Alpha a1 Set-Up and Info Updates group after shooting me their receipts via e-mail. (Note: it may take me several days to confirm B&H orders.) This same service may be purchased by anyone with an a1 body via a $150.00 PayPal sent to birdsasart@verizon.net indicating payment for Alpha a1 Info & Updates. Alternatively, folks can call Jim weekdays at 1-863-692-0906 to pay via credit card. New members will receive composite e-mails that summarize all previous discussions.
George Lepp on TCs
While creating the New Species: Fan-tailed Vulture! Why No Teleconverter? blog post here, I thought a lot about old friend and colleague George Lepp. George writes a great Tech Tips column for Outdoor Photography magazine, and like me, was a Canon Explorer of Light, one of the original fifty-five. Learn more about George here.
Anywho, I sent this to him via e-mail the other day:
Hey George,
I hope that all is well and that you have a great 2022.
I remember clearly you saying (or writing) that images made with TC will never be as sharp as images made with bare super-telephoto lenses. You’d say something very much like this, “Images made with a 1.4X TC will be 14% less sharp than this made with the bare lens along; those made with a 2X TC will be 28% less sharp.
I’d love to hear your thoughts on this subject today. Have things changed?
With love, artie
George kindly responded (in part):
Artie:
I stand by some of what I used to say, but the change is that the new lenses are so good that the small loss in sharpness will not be noticeable. I’m getting away with 2x extenders on my Canon RF100-500mm zoom because the high ISOs are so good and when I get the file into Photoshop and then Topaz Sharpen AI, no one can tell I was at 1000mm with a zoom and at ISO 1600 or 3200. Mirrorless in the new cameras is just so good. I’m using two R5 cameras and not planning on an R3. Maybe when the R1 shows up, I’ll look at it. The 2x and even the 2x and 1.4x together on the EF600mm f/4L MK III is professionally sharp, and I can do the cover of the magazine with no excuses! I did a Bald Eagle cover with that combo with the R camera for Outdoor Photographer two years ago. It’s all just gotten better and if you use good technique, there is no reason to not use 1.4x or 2x extenders as professional tools. Not to mention that at 45 MP you even crop to some degree and get away with it!
I’m pretty much retired. Not an Explorer of Light as of last July (they cut me loose), but they gave me status as a member of the Canon Legends Group so I still get some benefits on gear purchases and with CPS. I have no complaints. I was done with the social media so they replaced me with a younger person. It used to be that between the magazine (OP), photo stock, and work I’d do for Canon (lectures and workshops), I made a very good living. I’m still a pro, but now it is mostly “Pro-Bono”. I do work for local nature organizations. My next project will be a 4K video for a local nature center that has a pair of resident Trumpeter Swans on a small lake. I’ll document the life cycle from eggs to the cygnets being ready to fledge. I did it with stills two years ago. The two swans can’t fly (injuries), so they stay on the small lake that has plenty of food. When the young swans are about to fly, they are captured and taken to a lake in eastern Oregon where there is a resident wild flock of swans that will teach them what else they need to know. The trumpeters are very rare in the western states and this helps to rebuild the numbers.
With all blog posts, feel free to e-mail or to leave a comment regarding any typos or errors. Special thanks to Jordan Cait who has been doing an awesome job of proofreading the blog recently and getting in touch via e-mail.
Been thinking of joining me on the San Diego IPT? It is getting very late. Consider taking advantage of the largest-ever late-registration discount. Scroll down here for details.
The Stronger Image?
Which of today’s images do you like best? Do understand that Images 2 and 2A are different versions of the same image. Everyone is invited to leave a comment and let us know why they made their choice. Note: be absolutely sure to click on each image to view a larger, high-res version.
What’s Up?
Apologies for not realizing until this morning that many of the comments on yesterday’s post were being held for moderation. I just approved all of them without comment. I was glad to see that all of the comments were civil, and was (happily) surprised that I did not receive a lot more flak than I did. IAC, you might find some stuff of interest by revisiting the comments.
Saturday morning was decent as the light fog lifted early. I had another Little Blue Heron on The Perch, and got some more nice images of the vultures. Sunset was not bad, but I did not get anything spectacular (as had been the case for the two previous evenings) he said modestly.
I was glad to learn on Saturday afternoon that multiple IPT veteran Shelly Lake will be joining me Tuesday morning at Lakeland for a Your Pick In-the-Field session. If you would like to join me for some In-the-Field instruction at either ILE or Lakeland in the next ten days or so, shoot me an e-mail or try me on my cell at 863-221-2372. Please leave a message and shoot me a text if I do not pick up. The details are below.
Today is Sunday 2 January 2022. The forecast for this morning is for decreasing cloudiness with a breeze from the South. As almost always when I am home, I will be heading down to the lake for a bit. Wherever you are, and whatever you are doing, I hope that you too have a great day. This blog post took about 90 minutes to prepare including the time spent on the image optimizations. This post makes 53 consecutive days with a new one.
Please remember that you can find some great photo accessories (and necessities, like surf booties!) on Amazon by clicking on the Stuff tab on the orange/yellow menu bar above. On a related note, it would be extremely helpful if blog-folks who, like me, spend too much money on Amazon, would get in the habit of clicking on the Amazon logo link on the right side of each blog post when they shop online. As you might expect, doing so will not cost you a single penny, but would be appreciated tremendously by yours truly. And doing so works seamlessly with your Amazon Prime account.
Please remember that if an item — a Delkin flash card, or a tripod head — for example, that is available from B&H and/or Bedfords, is also available in the BAA Online Store, it would be great, and greatly appreciated, if you would opt to purchase from us. We will match any price. Please remember also to use my B&H affiliate links or to save 3% at Bedfords by using the BIRDSASART discount code at checkout for your major gear purchases. Doing either often earns you free guides and/or discounts. And always earns my great appreciation.
Your-Pick In-the-Field Sessions
The beauty of the Your Pick In-the-Field Sessions plans below is that I am free most days from now till mid-January and we can schedule sessions to coincide with the perfect weather forecast. They are ideal for central Florida locals or folks visiting the region for whatever reason. Interested? Get in touch via e-mail or better yet, try my cell at 863-221-2372. Please leave a message and shoot me a text if I do not pick up. Inquire for couples and group rates.
Indian Lake Estates In-the-Field Sessions
Two hours of intensive instruction: $300.00. Add a working brunch with image review: $100.00. Sunset shoot: $100.00. Guest room lodging available. Mix and match.
Sunny mornings with east winds are best. Likely subjects include ridiculously tame Sandhill Cranes along with Black and Turkey Vultures, Crested Caracara, Limpkin, Great Egret, Great Blue Heron, and more. Bald Eagle possible; crane chicks coming soon.
Lakeland or Circle B Bar Preserve
Two hours of intensive instruction: $325.00. Add a working brunch with image review: $100.00. Mix and match.
Sunny mornings with east winds are best at Lakeland. Likely subjects include point-blank American White Pelican, Anhinga, Limpkin, Common Moorhen, White Ibis, a variety of wintering ducks including Ring-necked and Wood Ducks, and lots more.
Cloudy mornings or afternoons (shooting session only) are best at Circle B Bar Preserve. Likely subjects include Great Blue Heron, Great Egret, Little Blue Heron, Snowy Egret, Tricolored Heron, White Ibis, Common Moorhen, Osprey, Red-shouldered Hawk, American Alligator, Wild Boar, and more. If you wish to mix and match, loving at ILE is available.
Sony Alpha 1 Bodies in Stock at Bedfords/free card offer!
Steve Elkins of Bedfords let me know late yesterday that he had several Sony a1 bodies in stock. If one of them has your name on it, please click here and be sure to enter the BIRDSASART coupon code check the box for free shipping to enjoy free Second Day Air Fed-Ex. Right now, in lieu of the 3% credit refunded to the card you used for your purchase, you will receive a Sony 160GB CFexpress Type A TOUGH Memory Card, a $399.99 value!
Brand New and As-Good-As-Ever Bedfords BAA Discount Policy
Folks who have fallen in love with Bedfords can now use the BIRDSASART coupon code at checkout to enjoy a post-purchase, 3% off-statement credit (excluding taxes and shipping charges) on orders paid with a credit card. The 3% credit will be refunded to the card you used for your purchase. Be sure, also, to check the box for free shipping to enjoy free Second Day Air Fed-Ex. This offer does not apply to purchases of Classes, Gift Cards, or to any prior purchases.
Money Saving Reminder
Many have learned that if you need a hot photo item that is out of stock at B&H and would like to enjoy getting 3% back on your credit card along with free 2nd Day Air Fed-Ex Air shipping, your best bet is to click here, place an order with Bedfords, and enter the coupon code BIRDSASART at checkout. If an item is out of stock, contact Steve Elkins via e-mail or on his cell phone at (479) 381-2592 (Central time). Be sure to mention the BIRDSASART coupon code and check the box for Free Shipping. That will automatically upgrade to free 2nd Day Air Fed-Ex. Steve has been great at getting folks the hot items that are out of stock at B&H and everywhere else. The waitlists at the big stores can be a year or longer for the hard to get items. Steve will surely get you your gear long before that. For the past year, he has been helping BAA Blog folks get their hands on items like the SONY a 1, the SONY 200-600 G OSS lens, the Canon EOS R5, the Canon RF 100-500mm lens, and the Nikon 500mm PF. Steve is personable, helpful, and eager-to-please.
Important Note
As an Amazon Associate, I earn a small percentage when you purchase from Amazon after using any of the Amazon links on the blog (including the logo-link immediately above). My link works with Amazon Prime and using it will not cost you a single cent. Huge thanks, BTW 🙂
Please Remember Also
Please, if you enjoy and learn from the blog, remember to use one of my two affiliate programs when purchasing new gear. Doing so just might make it possible for me to avoid having to try to get a job as a Walmart greeter and will not cost you a single penny more. And if you use Bedfords and remember to enter the BIRDSASART code at checkout, you will (still!) save 3% on every order and enjoy free second-day air shipping. In these crazy times — I lost about fifty thousand dollars in income due to COVID 19 — remembering to use my B&H link or to shop at Bedfords will help me out a ton and be greatly appreciated. Overseas folks who cannot order from the US because of import fees, duties, and taxes, are invited to help out by clicking here to leave a blog thank you gift if they see fit.
Gear Questions and Advice
Too many folks attending BAA IPTs and dozens of photographers whom I see in the field and on BPN, are–out of ignorance–using the wrong gear, especially when it comes to tripods and more especially, tripod heads… Please know that I am always glad to answer your gear questions via e-mail. If you are desperate, you can try me on my cell at 863-221-2372. Please leave a message and shoot me a text if I do not pick up.
This image was created on 30 December 2021 down by the lake near my home at Indian Lake Estates, FL. Working off the pier, I used the no-longer available GIT305XXL Grand Series 5 Stealth Carbon Fiber Tripod/Levered-Clamp FlexShooter Pro-mounted-Sony FE 600mm f/4 GM OSS lens, the Sony FE 2.0x Teleconverter, and The One, the Sony Alpha 1 Mirrorless Digital Camera). Multi-metering +1.3 stops/Auto ISO set ISO 3200. 1/1600 sec. at f/8 (wide open) in Shutter Priority mode. AWB at 5:40:16pm several minutes after a nice sunset.
Tracking: Zone AF-C Bird Face/Eye detection performed to perfection. Be sure to click on the image to enjoy a high-res version.
Image #1: Mottled Duck departing at sunset
The Situation
The weather for the past week has been fairly consistent. It has been foggy in the mornings, partly cloudy during the day, and mostly clear in the late afternoons. With the winds (or breezes) from the south or southwest, the birds coming into roost would be landing away from me so I have been working from the pier as the birds fly over it and toward the roost, from south to north. The most commonly available shot features one or two or three silhouetted Cattle Egrets. I usually create several hundred of those each evening. The size of the bird or the birds in the frame, the wing position or positions, and the background color — water or sky, determine the very few keepers.
I really get excited when something different flies through the color. Every day, a pair of Mottled Ducks feeds on the south side of the pier in the evening, pretty much in the dark. They blast off headed west soon after the sun disappears. On Friday evening, I happened to get on the birds as they took flight and flew through the color. Image #1 is a decent crop to eliminate the second (out-of-focus) bird. On Sunday night I was on some Cattle Egrets when the ducks left. I was too late to get on them …
This image was created on 31 December 2021 down by the lake near my home at Indian Lake Estates, FL. Working off the pier, I used the no-longer available GIT305XXL Grand Series 5 Stealth Carbon Fiber Tripod/Levered-Clamp FlexShooter Pro-mounted-Sony FE 600mm f/4 GM OSS lens, the Sony FE 2.0x Teleconverter, and The One, the Sony Alpha 1 Mirrorless Digital Camera). Multi-metering +2 stops/Auto ISO set ISO 5000. 1/2000 sec. at f/8 (wide open) in Shutter Priority mode. AWB at 5:38:47pm several minutes after a nice sunset.
Tracking: Zone AF-C Bird Face/Eye detection performed to perfection. Be sure to click on the image to enjoy a high-res version.
Image #2: Great Blue Heron dorsal view at sunset/MORE YELLOW version
More Excitement!
I saw the great blue coming at about 500 yards. It was headed right for the richest water color. I stayed on it for quite a while. Conservative me fired off more than one hundred images. Even at 1200mm, every single one was sharp. I kept seven. The one above, one of the last that I made, was best by far. One image with an almost identical wing position had some vegetation at the bottom of the frame. I did not like that, but I do love the dorsal views that can be had when you are working from the pier. This was my alternative version.
This is the same image as above, processed differently.
Image #2A: Great Blue Heron dorsal view at sunset/MORE ORANGE version
Processing Silhouettes
Because I always strive to expose to the right, the colors in the raw files often look washed out. When processing silhouettes, you have lots of options when it comes to the look of the image. You have many tools at your disposal. During the raw conversion those include but are not limited to the Color Temperature and Exposure sliders, setting the white and black points, the Highlights and Shadows sliders, and the Vibrance and Saturation sliders. Most mar conversion engines allow you to work on the Hue, Saturation, and Luminance of the individual colors. In Adobe Camera Raw, you can find those sliders under the Color Mixer tab.
You can tweak the colors of your .TIF file in Photoshop after the raw conversion with a Vibrance adjustment. Hue/Saturation allows you to work on the individual color channels. I often use a Levels adjustment to further blacken the BLACKs and to control the midtones. As I final step, I will often try Image > Auto Tone or Auto Color, almost always reducing the Opacity significantly. The results can be magical. Which color version do you prefer with the GBH image?
1200mm Sharpness
I could never have conceived of the fact that I would one day be shooting flight off a tripod at 1200mm and making consistently razor sharp flight images … Even more scary is the fact that others, far more skilled and younger and stronger than I, are routinely creating sharp flight images at 1200mm while hand holding their Sony 600 GM lens with the 2X TC and the Alpha 1. It is a whole new world out there. I am glad to be part of it.
The BIRDS AS ART Current Workflow e-Guide (Digital Basics II).
You can order your copy from the BAA Online Store here, by sending a PayPal for $40 here, or by calling Jim or Jennifer weekdays at 863-692-0906 with your credit card in hand. Be sure to specify Digital Basics II.
The BIRDS AS ART Current Workflow e-Guide (Digital Basics II)
The techniques mentioned above for working on the color of your images, and tons more great Photoshop tips and techniques — along with all of my personalized Keyboard Shortcuts — are covered in detail in the BIRDS AS ART Current Workflow e-Guide (Digital Basics II), an instructional PDF that is sent via e-mail. Learn more and check out the free excerpt in the blog post here. While the new e-Guide reflects my MacBook Pro/Photo Mechanic/DPP 4/Photoshop workflow, folks using a PC and/or BreezeBrowser will also benefit greatly by studying the material on DB II. Note: folks working on a PC and/or those who do not want to miss anything Photoshop may wish to purchase the original Digital Basics along with DB II while saving $15 by clicking here to buy the DB Bundle.
Folks who learn well by following along rather than by reading can check out the complete collection of MP 4 Photoshop Tutorial Videos by clicking here. Note: all of the videos are now priced at an amazingly low $5.00 each.
You can learn how and why I converted all of my Canon digital RAW files in DPP 4 in the DPP 4 RAW Conversion Guide here. More recently, I became proficient at converting my Nikon RAW (NEF) files in Adobe Camera Raw. About three years ago I began converting my Nikon and Sony RAW files in Capture One and did that for two years. You can learn more about Capture One in the Capture One Pro 12 Simplified MP4 Video here. The next step would be to get a copy of Arash Hazeghi’s “The Nikon Photographers’ Guide to Phase One Capture One Pro e-Guide” in the blog post here.
You can learn advanced Quick Masking and advanced Layer Masking techniques in APTATS I & II. You can save $15 by purchasing the pair.
Typos
With all blog posts, feel free to e-mail or to leave a comment regarding any typos or errors.
Typos
With all blog posts, feel free to e-mail or to leave a comment regarding any typos or errors.
This image was created on 3 November 2021 at Indian Lake Estates. Talk about being lazy? This image was created from the driver’s seat of my SUV. Talk about versatility? I used the hand held Sony FE 200-600mm f/5.6-6.3 G OSS lens(at 248mm), and The One, the Sony Alpha 1 Mirrorless digital camera. ) ISO 2500. Exposure determined via Zebras with ISO on the rear dial: 1/800 sec. at f/16 (stopped down 2 2/3 stops) in Manual mode. AWB at 7:49:10am on a soon-to-be sunny morning.
Click on the image to enjoy a high-res version.
To the Dawn of a New Year
Happy New Year
Today is 1 January 2022. My right-hand man, Jim Litzenberg, my older daughter and BAA Executive Director & accountant, Jennifer Morris, and I wish you nothing but the best in the coming year. May all of you and your families enjoy good health and prosperity.
I am hoping that our country gets back on track in the coming year. If you think that everything is just dandy, you might want to stop and ask yourself: just exactly where are we with all the restrictions, mandates, shutdowns, vaccinations, joblessness, bankruptcies, foreclosures, and increasing rates of depression and suicide?
While I strive to keep the blog free of COVID-related and political topics, I am making an exception today. Why? I feel that I some point, someone has to speak up. I truly wish all of us the best …
What’s Up?
Jim and I enjoyed another 2 1/2 mile walk at Circle B Bar Reserve in Lakeland on a cool, very cloudy morning. I continue to work on small-in-the-frame mostly Great Blue Heron bird-scapes with the tripod-mounted Sony 70-200 II and the a1. Yesterday, I made one at 70mm! At some point, I will share the best of those with you here. Sunset color was great again last night. Working from the pier has been challenging with very few keepers, but almost every night I have come up with one spectacular image. Last night it was a late Great Blue Heron that flew by right through the brightest color.
The forecast for this morning is for mostly to partly cloudy with a gentle breeze from the south. I will be heading down to the lake soon. Wherever you are, and whatever you are doing, I hope that you too have a great day. This blog post took about an hour to prepare and makes 51 consecutive days with a new one.
New Laws Proposed in New York State
If you think that the video above is completely bogus, below is a section of the proposed bill, A416, cut and pasted from the New York State Senate website here.
2. UPON DETERMINING BY CLEAR AND CONVINCING EVIDENCE THAT THE HEALTH OF OTHERS IS OR MAY BE ENDANGERED BY A CASE, CONTACT OR CARRIER, OR SUSPECTED CASE, CONTACT OR CARRIER OF A CONTAGIOUS DISEASE THAT, IN THE OPINION OF THE GOVERNOR, AFTER CONSULTATION WITH THE COMMISSIONER, MAY POSE AN IMMINENT AND SIGNIFICANT THREAT TO THE PUBLIC HEALTH RESULTING IN SEVERE MORBIDITY OR HIGH MORTALITY, THE GOVERNOR OR HIS OR HER DELEGEE, INCLUDING, BUT NOT LIMITED TO THE COMMISSIONER OR THE HEADS OF LOCAL HEALTH DEPARTMENTS, MAY ORDER THE REMOVAL AND/OR DETENTION OF SUCH A PERSON OR OF A GROUP OF SUCH PERSONS BY ISSUING A SINGLE ORDER, IDENTIFYING SUCH PERSONS EITHER BY NAME OR BY A REASONABLY SPECIFIC DESCRIPTION OF THE INDIVIDUALS OR GROUP BEING DETAINED. SUCH PERSON OR GROUP OF PERSONS SHALL BE DETAINED IN A MEDICAL FACILITY OR OTHER APPROPRIATE FACILITY OR PREMISES DESIGNATED BY THE GOVERNOR OR HIS OR HER DELEGEE AND COMPLYING WITH SUBDIVISION FIVE OF THIS SECTION.
(Bold italics mine.)
All civil comments are welcome.
Typos
With all blog posts, feel free to e-mail or to leave a comment regarding any typos or errors.
Been thinking of joining me on the San Diego IPT? It is getting late. Consider taking advantage of the largest-ever late-registration discount. Details below.
The Stronger Image?
Which of today’s two featured images appeals to you more? All are invited to leave a comment and let us know why they made their choice.
What’s Up?
It was so foggy on Thursday morning that you could barely see one short block. I went down to the lake anyway. For the first time since The Perch was erected more than six months ago, I had an Osprey on it. When it comes to using the perch, the birds have taken their sweet time. But I have had some decent action for the past two weeks or so. I made lots of images of the handsome raptor from my SUV using the BLUBB. I deleted more than 100 and kept 9. After processing the best image, I deleted seven more.
I was about four minutes late getting down to the lake for sunset. As I was walking out on the pier, about 50 Cattle Egrets flew by right through the color. Then, when I was adjusting the settings on my a1, another 100 birds did the same thing. I had a very few good chances after that. A surprise was one killer frame of a Mottled Duck leaving the scene through an incredible patch of deep yellow water.
Today is Friday 31 December. With a forecast for mostly cloudy in the morning, Jim and I are heading to Lakeland, probably to Circle B Bar Reserve. If you would like some In-the-Field instruction at either ILE or Lakeland in the next ten days or so, shoot me an e-mail or try me on my cell at 863-221-2372. Please leave a message and shoot me a text if I do not pick up.
Wherever you are, and whatever you are doing, I hope that you too have a great day. This blog post took about 90 minutes to prepare including the time spent on the image optimizations. This post makes 51 consecutive days with a new one.
Please remember that you can find some great photo accessories (and necessities, like surf booties!) on Amazon by clicking on the Stuff tab on the orange/yellow menu bar above. On a related note, it would be extremely helpful if blog-folks who, like me, spend too much money on Amazon, would get in the habit of clicking on the Amazon logo link on the right side of each blog post when they shop online. As you might expect, doing so will not cost you a single penny, but would be appreciated tremendously by yours truly. And doing so works seamlessly with your Amazon Prime account.
Please remember that if an item — a Delkin flash card, or a tripod head — for example, that is available from B&H and/or Bedfords, is also available in the BAA Online Store, it would be great, and greatly appreciated, if you would opt to purchase from us. We will match any price. Please remember also to use my B&H affiliate links or to save 3% at Bedfords by using the BIRDSASART discount code at checkout for your major gear purchases. Doing either often earns you free guides and/or discounts. And always earns my great appreciation.
Your-Pick In-the-Field Sessions
The beauty of the Your Pick In-the-Field Sessions plans below is that I am free most days from now till mid-January and we can schedule sessions to coincide with the perfect weather forecast. They are ideal for central Florida locals or folks visiting the region for whatever reason. Interested? Get in touch via e-mail or better yet, try my cell at 863-221-2372. Please leave a message and shoot me a text if I do not pick up. Inquire for couples and group rates.
Indian Lake Estates In-the-Field Sessions
Two hours of intensive instruction: $300.00. Add a working brunch with image review: $100.00. Sunset shoot: $100.00. Guest room lodging available. Mix and match.
Sunny mornings with east winds are best. Likely subjects include ridiculously tame Sandhill Cranes along with Black and Turkey Vultures, Crested Caracara, Limpkin, Great Egret, Great Blue Heron, and more. Bald Eagle possible; crane chicks coming soon.
Lakeland or Circle B Bar Preserve
Two hours of intensive instruction: $325.00. Add a working brunch with image review: $100.00. Mix and match.
Sunny mornings with east winds are best at Lakeland. Likely subjects include point-blank American White Pelican, Anhinga, Limpkin, Common Moorhen, White Ibis, a variety of wintering ducks including Ring-necked and Wood Ducks, and lots more.
Cloudy mornings or afternoons (shooting session only) are best at Circle B Bar Preserve. Likely subjects include Great Blue Heron, Great Egret, Little Blue Heron, Snowy Egret, Tricolored Heron, White Ibis, Common Moorhen, Osprey, Red-shouldered Hawk, American Alligator, Wild Boar, and more. If you wish to mix and match, loving at ILE is available.
Sony Alpha 1 Bodies in Stock at Bedfords/free card offer!
Steve Elkins of Bedfords let me know late yesterday that he had several Sony a1 bodies in stock. If one of them has your name on it, please click here and be sure to enter the BIRDSASART coupon code check the box for free shipping to enjoy free Second Day Air Fed-Ex. Right now, in lieu of the 3% credit refunded to the card you used for your purchase, you will receive a Sony 160GB CFexpress Type A TOUGH Memory Card, a $399.99 value!
Brand New and As-Good-As-Ever Bedfords BAA Discount Policy
Folks who have fallen in love with Bedfords can now use the BIRDSASART coupon code at checkout to enjoy a post-purchase, 3% off-statement credit (excluding taxes and shipping charges) on orders paid with a credit card. The 3% credit will be refunded to the card you used for your purchase. Be sure, also, to check the box for free shipping to enjoy free Second Day Air Fed-Ex. This offer does not apply to purchases of Classes, Gift Cards, or to any prior purchases.
Money Saving Reminder
Many have learned that if you need a hot photo item that is out of stock at B&H and would like to enjoy getting 3% back on your credit card along with free 2nd Day Air Fed-Ex Air shipping, your best bet is to click here, place an order with Bedfords, and enter the coupon code BIRDSASART at checkout. If an item is out of stock, contact Steve Elkins via e-mail or on his cell phone at (479) 381-2592 (Central time). Be sure to mention the BIRDSASART coupon code and check the box for Free Shipping. That will automatically upgrade to free 2nd Day Air Fed-Ex. Steve has been great at getting folks the hot items that are out of stock at B&H and everywhere else. The waitlists at the big stores can be a year or longer for the hard to get items. Steve will surely get you your gear long before that. For the past year, he has been helping BAA Blog folks get their hands on items like the SONY a 1, the SONY 200-600 G OSS lens, the Canon EOS R5, the Canon RF 100-500mm lens, and the Nikon 500mm PF. Steve is personable, helpful, and eager-to-please.
Important Note
As an Amazon Associate, I earn a small percentage when you purchase from Amazon after using any of the Amazon links on the blog (including the logo-link immediately above). My link works with Amazon Prime and using it will not cost you a single cent. Huge thanks, BTW 🙂
Please Remember Also
Please, if you enjoy and learn from the blog, remember to use one of my two affiliate programs when purchasing new gear. Doing so just might make it possible for me to avoid having to try to get a job as a Walmart greeter and will not cost you a single penny more. And if you use Bedfords and remember to enter the BIRDSASART code at checkout, you will (still!) save 3% on every order and enjoy free second-day air shipping. In these crazy times — I lost about fifty thousand dollars in income due to COVID 19 — remembering to use my B&H link or to shop at Bedfords will help me out a ton and be greatly appreciated. Overseas folks who cannot order from the US because of import fees, duties, and taxes, are invited to help out by clicking here to leave a blog thank you gift if they see fit.
Gear Questions and Advice
Too many folks attending BAA IPTs and dozens of photographers whom I see in the field and on BPN, are–out of ignorance–using the wrong gear, especially when it comes to tripods and more especially, tripod heads… Please know that I am always glad to answer your gear questions via e-mail. If you are desperate, you can try me on my cell at 863-221-2372. Please leave a message and shoot me a text if I do not pick up.
This image was created on 4 January 2020 at La Jolla, CA. While standing at full height, I used the hand held Sony FE 200-600mm f/5.6-6.3 G OSS lens (at 493mm) and Sony a9 ii (now replaced by The One, the Sony Alpha 1 Mirrorless digital camera. ) ISO 640. Exposure determined via Zebras with ISO on the rear dial: 1/2000 sec. at f/6.3 (wide open) in Manual mode. AWB at 9:25:53am on a mostly sunny morning.
Tracking: Spot (S) AF-C Bird/Eye Detection AF was active at the moment OF exposure and worked just fine. Be sure to click on the image to enjoy the hi-res version.
Image #1: What is It?
Head Throw Strategies
Ever since I created a BBC Wildlife Photographer of the Year Competition-honored head throw image (with Fuji Velvia pushed one stop to ISO 100!) at La Jolla in the mid-1990s, I have been trying to do better. It ain’t easy. Creating good head throw images is a huge challenge. My best advice is to frame wider than you think is necessary. Much wider. If you are doing verticals (as I was for image #1), you will clip the bill as the first one second usually works best as a horizontal. If you start off working in horizontal format, you will surely clip the bill at the apex of the throw.
So what’s the answer? Frame wider than you could ever imagine and then crop as needed. Sometimes to a square, as with Image #1 above. If you zoom in in an effort to create tighter images, you will always clip something … Though you might miss some of the action with that approach, you might wind up with a contest-winner as the bill pouches of the Pacific race birds in California feature incredible colors — fire-engine red and olive-green for starters, along with incredible detail. On the San Diego IPT I will do my best to teach you the behavioral signals that usually signal that a head throw is coming.
BTW, head throws are thought to be a form of intra-flock communication.
The Lesson
When attempting to photograph Brown Pelican head throws, framing wider rather than higher will lead to lots more keepers.
This image was created on 4 January 2020 at La Jolla, CA. While standing at full height, I used the no-longer available GIT304L Grand Series 5 Stealth Carbon Fiber Tripod/Levered-Clamp FlexShooter Pro-mounted-Sony FE 600mm f/4 GM OSS lens and Sony a7R IV (now replaced by The One, the Sony Alpha 1 Mirrorless Digital Camera). ISO 400. The exposure was determined by Zebras with ISO on the rear wheel: 1/1250 sec. at f/7.1 (stopped down 1/3 stop) in Manual mode. AWB at 9:26:47am on a on a mostly sunny morning.
Expand Flexible Spot S AF-C performed perfectly. Be sure to click on the image to enjoy a higher-res version.
Image #2: Brown Pelican Pacific race in breeding plumage with bill pouch distended
The Classic Head and Shoulders Portrait
For me, images like this are one of the main reasons to visit San Diego. The distant Pacific-blue backgrounds complement the colors of the breeding plumaged bird perfectly. And the sweet early morning light is a given on most days.
Lesson
The greater the distance from the subject to the background, the softer the background will be rendered.
Shorter Focal Lengths Yield Greater Depth of Field
The bird in Image #1 is the same individual as in Image #2. I made both images while standing pretty much in the same spot. Note that the ocean background in image #1 has some detail in the waves (especially toward the bottom of the frame). In Image #2, however, the ocean background is super-smooth, completely defocused. That despite the slightly smaller aperture, f/7.1 as compared to f/6.3.
Lesson
When the photographer-to-subject distance is constant, the shorter the focal length, the greater the depth-of-field (at a given aperture).
San Diego, California: A Bird Photographer’s Paradise!
I’ve been visiting San Diego, California for more than 50 years, and photographing there for almost four decades. It truly is one of my favorite bird photography locations on the planet. The Pacific race Brown Pelicans with their fire-engine red and olive green bill pouches, are indeed the stars of the show, but there are lots of other great birds there that are relatively easy to photograph. Check out this five minute video to see the potential.
Be sure to subscribe to my YouTube channel by clicking here.
San Diego offers a wealth of very attractive natural history subjects, including and especially the Pacific race of California Brown Pelican. With annual visits spanning more than four decades, I have lots of photographic experience there … Click on the composite to enjoy a larger version.
The 2022 San Diego Brown Pelicans (and more!) IPT. Monday 17 January thru the morning session on Friday 21 January 2022. Four full and one-half day: $2999.00. Deposit: $899.00. Limit: 8 photographers/Openings: 6
Join me in San Diego to photograph the spectacular breeding plumage Brown Pelicans with their fire-engine red and olive green bill pouches; Brandt’s (nesting with eggs and possibly chicks) and Double-crested Cormorants; breeding plumage Wood and Ring-necked Duck; other duck species possible including Lesser Scaup, Redhead, Northern Shoveler, and Surf Scoter; a variety of gulls including Western, California, and the gorgeous Heermann’s, all in full breeding plumage; shorebirds including Marbled Godwit, Willet, Sanderling and Black-bellied Plover; many others are possible including Least, Western, and Spotted Sandpiper, Whimbrel, Black and Ruddy Turnstone, Semipalmated Plover, and Surfbird; Harbor Seals (depending on the current regulations) and California Sea Lions. And as you can see by studying the IPT cards, there are some nice bird-scape and landscape opportunities as well. Not to mention a ton of excellent flight photography opportunities and instruction.
Please click here for more info and registration details.
Typos
With all blog posts, feel free to e-mail or to leave a comment regarding any typos or errors.
Early on Wednesday, I tried some pre-sunrise Cattle Egrets-leaving-the-roost blurs from the pier with some interesting results. But nothing spectacular. A quick drive-around did not turn up much in the way of birds, so I headed for the always-dependable vulture trees. Conditions were perfect for flight, but the vultures were not in much of a flying mood. I did some perched vultures and came up with a few interesting frames, including and especially today’s featured image. The color at sunset was gorgeous as the sun peeked in and out from behind some clouds on the western horizon. But very few birds flew by the pier until after the sun was down and the color had faded. None-the-less, it was a peaceful way to spend a half hour.
Today is Thursday 30 December 2021.The forecast for the morning is for foggy then partly cloudy turning sunny with a gentle breeze from the south. I will surely head down to the lake for a least a bit. The female eagle continues to sit low on her nest, incubating her clutch. If you would like some In-the-Field instruction at either ILE or Lakeland on Friday, Saturday, or Sunday — the weather looks good for all three mornings, shoot me an e-mail or try me on my cell at 863-221-2372. Please leave a message and shoot me a text if I do not pick up.
Wherever you are, and whatever you are doing, I hope that you too have a great day. This blog post took about two hours minutes to prepare, including the time spent on the image optimization. This post makes 50 consecutive days with a new one.
Please remember that you can find some great photo accessories (and necessities, like surf booties!) on Amazon by clicking on the Stuff tab on the orange/yellow menu bar above. On a related note, it would be extremely helpful if blog-folks who, like me, spend too much money on Amazon, would get in the habit of clicking on the Amazon logo link on the right side of each blog post when they shop online. As you might expect, doing so will not cost you a single penny, but would be appreciated tremendously by yours truly. And doing so works seamlessly with your Amazon Prime account.
Please remember that if an item — a Delkin flash card, or a tripod head — for example, that is available from B&H and/or Bedfords, is also available in the BAA Online Store, it would be great, and greatly appreciated, if you would opt to purchase from us. We will match any price. Please remember also to use my B&H affiliate links or to save 3% at Bedfords by using the BIRDSASART discount code at checkout for your major gear purchases. Doing either often earns you free guides and/or discounts. And always earns my great appreciation.
Your-Pick In-the-Field Sessions
The beauty of the Your Pick In-the-Field Sessions plans below is that I am free most days from now till mid-January and we can schedule sessions to coincide with the perfect weather forecast. They are ideal for central Florida locals or folks visiting the region for whatever reason. Interested? Get in touch via e-mail or better yet, try my cell at 863-221-2372. Please leave a message and shoot me a text if I do not pick up. Inquire for couples and group rates.
Indian Lake Estates In-the-Field Sessions
Two hours of intensive instruction: $300.00. Add a working brunch with image review: $100.00. Sunset shoot: $100.00. Guest room lodging available. Mix and match.
Sunny mornings with east winds are best. Likely subjects include ridiculously tame Sandhill Cranes along with Black and Turkey Vultures, Crested Caracara, Limpkin, Great Egret, Great Blue Heron, and more. Bald Eagle possible; crane chicks coming soon.
Lakeland or Circle B Bar Preserve
Two hours of intensive instruction: $325.00. Add a working brunch with image review: $100.00. Mix and match.
Sunny mornings with east winds are best at Lakeland. Likely subjects include point-blank American White Pelican, Anhinga, Limpkin, Common Moorhen, White Ibis, a variety of wintering ducks including Ring-necked and Wood Ducks, and lots more.
Cloudy mornings or afternoons (shooting session only) are best at Circle B Bar Preserve. Likely subjects include Great Blue Heron, Great Egret, Little Blue Heron, Snowy Egret, Tricolored Heron, White Ibis, Common Moorhen, Osprey, Red-shouldered Hawk, American Alligator, Wild Boar, and more. If you wish to mix and match, loving at ILE is available.
Sony Alpha 1 Bodies in Stock at Bedfords/free card offer!
Steve Elkins of Bedfords let me know late yesterday that he had several Sony a1 bodies in stock. If one of them has your name on it, please click here and be sure to enter the BIRDSASART coupon code check the box for free shipping to enjoy free Second Day Air Fed-Ex. Right now, in lieu of the 3% credit refunded to the card you used for your purchase, you will receive a Sony 160GB CFexpress Type A TOUGH Memory Card, a $399.99 value!
Brand New and As-Good-As-Ever Bedfords BAA Discount Policy
Folks who have fallen in love with Bedfords can now use the BIRDSASART coupon code at checkout to enjoy a post-purchase, 3% off-statement credit (excluding taxes and shipping charges) on orders paid with a credit card. The 3% credit will be refunded to the card you used for your purchase. Be sure, also, to check the box for free shipping to enjoy free Second Day Air Fed-Ex. This offer does not apply to purchases of Classes, Gift Cards, or to any prior purchases.
Money Saving Reminder
Many have learned that if you need a hot photo item that is out of stock at B&H and would like to enjoy getting 3% back on your credit card along with free 2nd Day Air Fed-Ex Air shipping, your best bet is to click here, place an order with Bedfords, and enter the coupon code BIRDSASART at checkout. If an item is out of stock, contact Steve Elkins via e-mail or on his cell phone at (479) 381-2592 (Central time). Be sure to mention the BIRDSASART coupon code and check the box for Free Shipping. That will automatically upgrade to free 2nd Day Air Fed-Ex. Steve has been great at getting folks the hot items that are out of stock at B&H and everywhere else. The waitlists at the big stores can be a year or longer for the hard to get items. Steve will surely get you your gear long before that. For the past year, he has been helping BAA Blog folks get their hands on items like the SONY a 1, the SONY 200-600 G OSS lens, the Canon EOS R5, the Canon RF 100-500mm lens, and the Nikon 500mm PF. Steve is personable, helpful, and eager-to-please.
Important Note
As an Amazon Associate, I earn a small percentage when you purchase from Amazon after using any of the Amazon links on the blog (including the logo-link immediately above). My link works with Amazon Prime and using it will not cost you a single cent. Huge thanks, BTW 🙂
Please Remember Also
Please, if you enjoy and learn from the blog, remember to use one of my two affiliate programs when purchasing new gear. Doing so just might make it possible for me to avoid having to try to get a job as a Walmart greeter and will not cost you a single penny more. And if you use Bedfords and remember to enter the BIRDSASART code at checkout, you will (still!) save 3% on every order and enjoy free second-day air shipping. In these crazy times — I lost about fifty thousand dollars in income due to COVID 19 — remembering to use my B&H link or to shop at Bedfords will help me out a ton and be greatly appreciated. Overseas folks who cannot order from the US because of import fees, duties, and taxes, are invited to help out by clicking here to leave a blog thank you gift if they see fit.
Gear Questions and Advice
Too many folks attending BAA IPTs and dozens of photographers whom I see in the field and on BPN, are–out of ignorance–using the wrong gear, especially when it comes to tripods and more especially, tripod heads… Please know that I am always glad to answer your gear questions via e-mail. If you are desperate, you can try me on my cell at 863-221-2372. Please leave a message and shoot me a text if I do not pick up.
This image was created on 29 December 2021 down by the lake near my home at Indian Lake Estates, FL. While standing at full height, I used the no-longer available GIT305XXL Grand Series 5 Stealth Carbon Fiber Tripod/Levered-Clamp FlexShooter Pro-mounted-Sony FE 600mm f/4 GM OSS lens and The One, the Sony Alpha 1 Mirrorless Digital Camera). ISO 1600. The exposure was determined by Zebras with ISO on the rear wheel: 1/3200 sec. at f/4 (wide open) in Manual mode. AWB at 7:41:39am on a clear sunny morning.
Tracking: Spot S AF-C Bird Face/Eye detection performed perfectly. Be sure to click on the image to enjoy a higher-res version.
Image #1: The Photo Mechanic screen capture for the original Turkey Vulture preening primary feather image
Photo Mechanic Screen Capture
Note how much I have exposed to the right. Then compare the washed out original with the richly colored optimized image below, Image #1B. Note also the relatively large crop. If you compare the color in 1A with the color in 1B, you will see that I reduced the YELLOWs considerably while striving to leave the early morning light look. I did some of that reduction during the raw conversion via the Color Mixer tab, and some after the conversion by going Command J/Command U to bring up the Hue/Saturation dialogue box and then choosing YELLOWs from the drop-down menu. All (and tons more) as detailed in Digital Basics II.
Shutter Speed Question
Why do you think that I was at 1/3200 second when I could have easily dropped down to 1/1600 second at f/5.6 and double my depth of field? There are actually two reasons …
Why No Teleconverter?
The question has been around forever: are you better off adding a teleconverter (TC) to get more pixels on the subject or shooting your bare super-telephoto and then cropping? As regular readers know, I have long been a big fan of TCs. But with the incredible image quality of sharp Sony Alpha 1 files, I am now somewhat on the fence. And today’s featured image is one reason why. But there are more. Using the bare lens and then cropping will allow you to work at the wide open aperture. This gains you one full stop of either shutter speed or ISO as compared to losing one stop when you add the 1.4X TC, or losing two stops with the 2X TC. In addition, it is a lot easier getting the whole bird in the frame so as to avoid clipping wings, heads, and tails.
The huge advantage of working without a TC is that it is far easier to make sharp images than it is when adding a TC. Why? Gear shake errors are a factor of the square of the focal length. Add the 1.4X TC to your super-telephoto lens and sharpness problems will almost double. With the 2X TC, your gear shake errors are magnified by a factor of four.
With today’s featured image, I could have gotten a lot closer, but doing that would have increased my angle of inclination. Thus, I opted to stay well back, leave the 1.4X TC in my pocket, avoid shooting up at a steep angle, and then crop. See the result immediately below, Image #1A.
This image was created on 29 December 2021 down by the lake near my home at Indian Lake Estates, FL. While standing at full height, I used the no-longer available GIT305XXL Grand Series 5 Stealth Carbon Fiber Tripod/Levered-Clamp FlexShooter Pro-mounted-Sony FE 600mm f/4 GM OSS lens and The One, the Sony Alpha 1 Mirrorless Digital Camera). ISO 1600. The exposure was determined by Zebras with ISO on the rear wheel: 1/3200 sec. at f/4 (wide open) in Manual mode. AWB at 7:41:39am on a clear,sunny morning.
Tracking: Spot S AF-C Bird Face/Eye detection performed perfectly. Be sure to click on the image to enjoy a higher-res version.
There has been a preening Turkey Vulture on the tippy-top perch of the dead tree for a week. I am not sure that it has been the same bird, but I would not be surprised if that were the case. Anyhoo, I have created hundreds of images of preening vultures on the same perch over the past few days. This one, with the tail spread so beautifully and a nice view of the bird’s head, was the best by far.
Tracking: Spot S AF-C Bird Face/Eye detection performed perfectly. Be sure to click on the image to enjoy a higher-res version.
Image #1B: The RawDigger screen capture for the original Turkey Vulture preening primary feather image
Fine-tuning Your Exposures
When you work with the same subjects day after day, often in the same light, evaluating your raw files in RawDigger allows you to fine-tune your exposures to perfection. With the vultures, it is important to expose as far to the right as possible to open up the darkest feathers so that they reveal the fine feather detail. But you need to do that without burning (over-exposing) the very light-toned bill tip of the Turkey Vultures or toasting the legs of either species. RawDigger has enabled me to do that consistently.
In the screen capture above, note that there are a total of 822 OvExp pixels. Out of 51 million, that is close to zero. By enlarging the image, I was able to see that the Pink OvExp warnings were on the very bright shafts of three feathers. Those were eliminated easily during the raw conversion by moving the Highlight to the left. All in all, I would call this a perfect exposure.
RawDigger — not for the faint of heart …
Nothing has ever helped me learn to create perfect exposures to the degree that RawDigger has. I think that many folks are reluctant to learn that most of their images are underexposed by one or more full stops and that highlight warnings in Photoshop, Lightroom, Capture One, and your in-camera histogram are completely bogus as they are based on the embedded JPEGs. Only your raw files tell the truth all the time. Heck, I resisted RawDigger for several years … Once you get over that feeling, RawDigger can become your very best exposure friend no matter what system you are using. On the recent IPTs and In-the-Field sessions, we have demonstrated that fact. Convincingly.
The RawDigger (pink) Adapted Histogram
In the RawDigger e-Guide, you will learn exactly how to set up the Adapted “pink” RawDigger Histogram and how to use it to quickly and easily evaluate the exposure or raw file brightness of images from all digital cameras currently in use. RawDigger was especially helpful to me when I struggled with R5 exposures and when learned my new camera body, the Sony Alpha a1.
RawDigger e-Guide with Two Videos
The RawDigger e-Guide with Two Videos
by Arthur Morris with Patrick Sparkman
The RawDigger e-Guide was created only for serious photographers who wish to get the absolute most out of their raw files.
Patrick and I began work on the guide in July 2020. At first we struggled. We asked questions. We learned about Max-G values. We could not figure out why the Max G values varied by camera system. IPT veteran Bart Deamer asked lots of questions that we could not answer. We got help from RawDigger creator Iliah Borg. We learned. In December, Patrick came up with an Adapted Histogram that allows us to evaluate the exposures and raw file brightness for all images created with all digital camera bodies from the last two decades. What we learned each time prompted three complete beginning to end re-writes.
The point of the guide is to teach you to truly expose to the mega-Expose-to-the-Right so that you will minimize noise, maximize image quality, best utilize your camera’s dynamic range, and attain the highest possible level of shadow detail in your RAW files in every situation. In addition, your properly exposed RAW files will contain more tonal information and feature the smoothest possible transitions between tones. And your optimized images will feature rich, accurate color.
We teach you why the GREEN channel is almost always the first to over-expose. We save you money by advising you which version of RawDigger you need. We teach you how to interpret the Max G values for your Canon, Nikon, and SONY camera bodies. It is very likely that the Shock-your-World section will shock you. And lastly — thanks to the technical and practical brilliance of Patrick Sparkman — we teach you a simple way to quickly and easily evaluate your exposures and raw file brightness using an Adapted RawDigger histogram.
The flower video takes you through a session where artie edits a folder of images in Capture One while checking the exposures and Max-G values in RawDigger. The Adapted Histogram video examines a series of recent images with the pink histograms and covers lots of fine points including and especially how to deal with specular highlights. The directions for setting up the Adapted Histogram are in the text.
If we priced this guide based on how much effort we put into it, it would sell it for $999.00. But as this guide will be purchased only by a limited number of serious photographers, we have priced it at $51.00. You can order yours here in the BAA Online Store.
Typos
With all blog posts, feel free to e-mail or to leave a comment regarding any typos or errors.
On Tuesday morning, Joe and Jenny Casey enjoyed a second wonderful session at Indian Lake Estates. Joe, inspired by the Blurs and Moons and Suns gallery here, fell head-over-heals in love with creating pleasing blurs. You can see his neat landscape blurs here. Anyhoo, we started off by doing some vertical cattail pan blurs. Early on in the sweetest light, we had a gorgeous Great Blue Heron on The Perch, but when I stopped the car, it flew off 🙁 Next we worked the crane family of four, and then visited the vulture trees. We visited The Perch again and photographed the Little Blue Heron that had replaced the GBH. The Caseys headed back to DeSoto and found and photographed a Great Horned Owl nest on the way! All in all, we had a great time. Joe learned a ton and Jenny was excited by seeing several new species.
Today is Wednesday 29 December 2021. The forecast for the morning is for clear, sunny, and still with a slight breeze early on from the S/SE. I will try something new this morning in what looks to be very good conditions. Wherever you are, and whatever you are doing, I hope that you too have a great day. This blog post took about an hour to prepare, including the time spent on the image optimization. This post makes 49 consecutive days with a new one.
Please remember that you can find some great photo accessories (and necessities, like surf booties!) on Amazon by clicking on the Stuff tab on the orange/yellow menu bar above. On a related note, it would be extremely helpful if blog-folks who, like me, spend too much money on Amazon, would get in the habit of clicking on the Amazon logo link on the right side of each blog post when they shop online. As you might expect, doing so will not cost you a single penny, but would be appreciated tremendously by yours truly. And doing so works seamlessly with your Amazon Prime account.
Please remember that if an item — a Delkin flash card, or a tripod head — for example, that is available from B&H and/or Bedfords, is also available in the BAA Online Store, it would be great, and greatly appreciated, if you would opt to purchase from us. We will match any price. Please remember also to use my B&H affiliate links or to save 3% at Bedfords by using the BIRDSASART discount code at checkout for your major gear purchases. Doing either often earns you free guides and/or discounts. And always earns my great appreciation.
Your Pick In-the-Field Sessions
The beauty of the Your Pick In-the-Field Sessions plans below is that I am free most days from now till mid-January and we can schedule sessions to coincide with the perfect weather forecast. They are ideal for central Florida locals or folks visiting the region for whatever reason. Interested? Get in touch via e-mail or better yet, try my cell at 863-221-2372. Please leave a message and shoot me a text if I do not pick up. Inquire for couples and group rates.
Indian Lake Estates In-the-Field Sessions
Two hours of intensive instruction: $300.00. Add a working brunch with image review: $100.00. Sunset shoot: $100.00. Guest room lodging available. Mix and match.
Sunny mornings with east winds are best. Likely subjects include ridiculously tame Sandhill Cranes along with Black and Turkey Vultures, Crested Caracara, Limpkin, Great Egret, Great Blue Heron, and more. Bald Eagle possible; crane chicks coming soon.
Lakeland or Circle B Bar Preserve
Two hours of intensive instruction: $325.00. Add a working brunch with image review: $100.00. Mix and match.
Sunny mornings with east winds are best at Lakeland. Likely subjects include point-blank American White Pelican, Anhinga, Limpkin, Common Moorhen, White Ibis, a variety of wintering ducks including Ring-necked and Wood Ducks, and lots more.
Cloudy mornings or afternoons (shooting session only) are best at Circle B Bar Preserve. Likely subjects include Great Blue Heron, Great Egret, Little Blue Heron, Snowy Egret, Tricolored Heron, White Ibis, Common Moorhen, Osprey, Red-shouldered Hawk, American Alligator, Wild Boar, and more. If you wish to mix and match, loving at ILE is available.
Sony Alpha 1 Bodies in Stock at Bedfords/free card offer!
Steve Elkins of Bedfords let me know late yesterday that he had several Sony a1 bodies in stock. If one of them has your name on it, please click here and be sure to enter the BIRDSASART coupon code check the box for free shipping to enjoy free Second Day Air Fed-Ex. Right now, in lieu of the 3% credit refunded to the card you used for your purchase, you will receive a Sony 160GB CFexpress Type A TOUGH Memory Card, a $399.99 value!
Brand New and As-Good-As-Ever Bedfords BAA Discount Policy
Folks who have fallen in love with Bedfords can now use the BIRDSASART coupon code at checkout to enjoy a post-purchase, 3% off-statement credit (excluding taxes and shipping charges) on orders paid with a credit card. The 3% credit will be refunded to the card you used for your purchase. Be sure, also, to check the box for free shipping to enjoy free Second Day Air Fed-Ex. This offer does not apply to purchases of Classes, Gift Cards, or to any prior purchases.
Money Saving Reminder
Many have learned that if you need a hot photo item that is out of stock at B&H and would like to enjoy getting 3% back on your credit card along with free 2nd Day Air Fed-Ex Air shipping, your best bet is to click here, place an order with Bedfords, and enter the coupon code BIRDSASART at checkout. If an item is out of stock, contact Steve Elkins via e-mail or on his cell phone at (479) 381-2592 (Central time). Be sure to mention the BIRDSASART coupon code and check the box for Free Shipping. That will automatically upgrade to free 2nd Day Air Fed-Ex. Steve has been great at getting folks the hot items that are out of stock at B&H and everywhere else. The waitlists at the big stores can be a year or longer for the hard to get items. Steve will surely get you your gear long before that. For the past year, he has been helping BAA Blog folks get their hands on items like the SONY a 1, the SONY 200-600 G OSS lens, the Canon EOS R5, the Canon RF 100-500mm lens, and the Nikon 500mm PF. Steve is personable, helpful, and eager-to-please.
Important Note
As an Amazon Associate, I earn a small percentage when you purchase from Amazon after using any of the Amazon links on the blog (including the logo-link immediately above). My link works with Amazon Prime and using it will not cost you a single cent. Huge thanks, BTW 🙂
Please Remember Also
Please, if you enjoy and learn from the blog, remember to use one of my two affiliate programs when purchasing new gear. Doing so just might make it possible for me to avoid having to try to get a job as a Walmart greeter and will not cost you a single penny more. And if you use Bedfords and remember to enter the BIRDSASART code at checkout, you will (still!) save 3% on every order and enjoy free second-day air shipping. In these crazy times — I lost about fifty thousand dollars in income due to COVID 19 — remembering to use my B&H link or to shop at Bedfords will help me out a ton and be greatly appreciated. Overseas folks who cannot order from the US because of import fees, duties, and taxes, are invited to help out by clicking here to leave a blog thank you gift if they see fit.
Gear Questions and Advice
Too many folks attending BAA IPTs and dozens of photographers whom I see in the field and on BPN, are–out of ignorance–using the wrong gear, especially when it comes to tripods and more especially, tripod heads… Please know that I am always glad to answer your gear questions via e-mail. If you are desperate, you can try me on my cell at 863-221-2372. Please leave a message and shoot me a text if I do not pick up.
I created this image on 27 December 2021 at Indian Lake Estates, FL. Standing near the edge of a canal at the bird’s eye level, I used the hand held Sony FE 70-200mm f/2.8 GM OSS lens (at 144mm) and The One, the Sony Alpha 1 Mirrorless digital camera. ISO 500. Exposure determined via Zebras with ISO on the rear dial: 1/3200 sec. at f/4 (stopped down one stop) in Manual mode. AWB at 8:01:26am on a clear sunny morning.
Tracking: Zone AF-C Bird/Eye Detection AF was active at the moment of exposure and kept switching between the left and center birds. Be sure to click on the image to enjoy the hi-res version.
Image #1: Serendipitous Serenading Trio
Serendipitous Serenading Trio
We were working the crane family of four from down by the edge the canal so that we were right on the bird’s level. We talked a lot about crouching down a bit and a lot about perspective. When the family of three flew in the family of four began calling. When three of them lined up pretty much on the same plane, I fired off about twenty images. As I was in Tracking Zone, AF-C Bird/Eye Detection, the system switched from the eye of the bird in the middle to the eye of the bird on our left. (This turned out to be a Godsend.) The bird on our left was on the same plane as the bird on the right. As a base image, I chose the best frame with both outer birds sharp. Then, using a Quick Mask refined by a Regular Layer Mask, I borrowed the sharp head of the center bird from another similar frame and dragged it roughly into place on the base image. After a bit of fine-tuning, everything looked Kosher.
So yes, this is another photo illustration. Do understand two things: One, I have not entered a major international (or any other) photography contest in more than a few years; Two, when I used to enter such contests, I always made it a point to read and re-read the contest rules very carefully, and to abide by them.. Most — but not all, prohibited adding or removing anything from the original image capture. And all of the big contests required that folks submit the raw file for images that had made the final round of judging.
So when I improve the artistic or technical qualities of an image using Photoshop, I am doing it for me.
The Young Bird?
Today’s image depicts two adults and one young bird, less than a year old. After clicking on the image to view the high-res version, can you figure out which bird is the juvenile? How did you know?
The BIRDS AS ART Current Workflow e-Guide (Digital Basics II).
You can order your copy from the BAA Online Store here, by sending a PayPal for $40 here, or by calling Jim or Jennifer weekdays at 863-692-0906 with your credit card in hand. Be sure to specify Digital Basics II.
The BIRDS AS ART Current Workflow e-Guide (Digital Basics II)
The technique mentioned above and tons more great Photoshop tips and techniques — along with all of my personalized Keyboard Shortcuts — are covered in detail in the BIRDS AS ART Current Workflow e-Guide (Digital Basics II), an instructional PDF that is sent via e-mail. Learn more and check out the free excerpt in the blog post here. While the new e-Guide reflects my MacBook Pro/Photo Mechanic/DPP 4/Photoshop workflow, folks using a PC and/or BreezeBrowser will also benefit greatly by studying the material on DB II. Note: folks working on a PC and/or those who do not want to miss anything Photoshop may wish to purchase the original Digital Basics along with DB II while saving $15 by clicking here to buy the DB Bundle.
Folks who learn well by following along rather than by reading can check out the complete collection of MP 4 Photoshop Tutorial Videos by clicking here. Note: all of the videos are now priced at an amazingly low $5.00 each.
You can learn how and why I converted all of my Canon digital RAW files in DPP 4 in the DPP 4 RAW Conversion Guide here. More recently, I became proficient at converting my Nikon RAW (NEF) files in Adobe Camera Raw. About three years ago I began converting my Nikon and Sony RAW files in Capture One and did that for two years. You can learn more about Capture One in the Capture One Pro 12 Simplified MP4 Video here. The next step would be to get a copy of Arash Hazeghi’s “The Nikon Photographers’ Guide to Phase One Capture One Pro e-Guide” in the blog post here.
You can learn advanced Quick Masking and advanced Layer Masking techniques in APTATS I & II. You can save $15 by purchasing the pair.
Typos
With all blog posts, feel free to e-mail or to leave a comment regarding any typos or errors.
Which of today’s three featured images do you like best? Please leave a comment and let us know why you made your choice.
What’s Up?
I enjoyed a fun early morning in the fog on Monday. When it cleared, I did lots of vulture flight. Joe Casey and Jenny came over in the afternoon. We had a great time down by the lake. They got to see lots of new birds and Joe got to make some good images. The highlight was a pair of Crested Caracaras. As Joe loves blurs, we stayed until well after sunset. He learned when and why it is OK to use Shutter Priority with Auto ISO and Exposure Compensation to create blurs.
Jim prepared a great pool deck meal for us: grilled veal burgers, baked butternut squash, and a nice salad. The Caseys stayed overnight in their Winnebago Travato camper van parked in my driveway. We will be heading down to the lake at 6:45am sharp.
Today is Tuesday 28 December 2021. The morning forecast is for mostly sunny with a gentle southeast breeze. I am hoping for some more fog to start! Wherever you are, and whatever you are doing, I hope that you too have a great day. This blog post took about 90 minutes to prepare, including the time spent on the three image optimizations. This post makes 48 consecutive days with a new one.
Please remember that you can find some great photo accessories (and necessities, like surf booties!) on Amazon by clicking on the Stuff tab on the orange/yellow menu bar above. On a related note, it would be extremely helpful if blog-folks who, like me, spend too much money on Amazon, would get in the habit of clicking on the Amazon logo link on the right side of each blog post when they shop online. As you might expect, doing so will not cost you a single penny, but would be appreciated tremendously by yours truly. And doing so works seamlessly with your Amazon Prime account.
Please remember that if an item — a Delkin flash card, or a tripod head — for example, that is available from B&H and/or Bedfords, is also available in the BAA Online Store, it would be great, and greatly appreciated, if you would opt to purchase from us. We will match any price. Please remember also to use my B&H affiliate links or to save 3% at Bedfords by using the BIRDSASART discount code at checkout for your major gear purchases. Doing either often earns you free guides and/or discounts. And always earns my great appreciation.
Your Pick In-the-Field Sessions
The beauty of the Your Pick In-the-Field Sessions plans below are that I am free most days from now till mid-January. We can schedule sessions to coincide with the perfect weather forecast. They are ideal for central Florida locals or folks visiting the region for whatever reason. Interested? Get in touch via e-mail or better yet, try my cell at 863-221-2372. Please leave a message and shoot me a text if I do not pick up. Inquire for couples and group rates.
Joe Casey and his wife, visiting from Texas, will be joining me tonight and Tuesday morning for two In-the-Field sessions plus a pool deck dinner. We are all looking forward to having fun.
Indian Lake Estates In-the-Field Sessions
Two hours of intensive instruction: $300.00. Add a working brunch with image review: $100.00. Sunset shoot: $100.00. Guest room lodging available. Mix and match.
Sunny mornings with east winds are best. Likely subjects include ridiculously tame Sandhill Cranes along with Black and Turkey Vultures, Crested Caracara, Limpkin, Great Egret, Great Blue Heron, and more. Bald Eagle possible; chicks coming soon.
Lakeland or Circle B Bar Preserve
Two hours of intensive instruction: $325.00. Add a working brunch with image review: $100.00. Mix and match.
Sunny mornings with east winds are best at Lakeland. Likely subjects include point-blank American White Pelican, Anhinga, Limpkin, Common Moorhen, White Ibis, a variety of wintering ducks including Ring-necked and Wood Ducks, and lots more.
Cloudy mornings or afternoons (shooting session only) are best at Circle B Bar Preserve. Likely subjects include Great Blue Heron, Great Egret, Little Blue Heron, Snowy Egret, Tricolored Heron, White Ibis, Common Moorhen, Osprey, Red-shouldered Hawk, American Alligator, Wild Boar, and more. If you wish to mix and match, loving at ILE is available.
Sony Alpha 1 Bodies in Stock at Bedfords/free card offer!
Steve Elkins of Bedfords let me know late yesterday that he had several Sony a1 bodies in stock. If one of them has your name on it, please click here and be sure to enter the BIRDSASART coupon code check the box for free shipping to enjoy free Second Day Air Fed-Ex. Right now, in lieu of the 3% credit refunded to the card you used for your purchase, you will receive a Sony 160GB CFexpress Type A TOUGH Memory Card, a $399.99 value!
Brand New and As-Good-As-Ever Bedfords BAA Discount Policy
Folks who have fallen in love with Bedfords can now use the BIRDSASART coupon code at checkout to enjoy a post-purchase, 3% off-statement credit (excluding taxes and shipping charges) on orders paid with a credit card. The 3% credit will be refunded to the card you used for your purchase. Be sure, also, to check the box for free shipping to enjoy free Second Day Air Fed-Ex. This offer does not apply to purchases of Classes, Gift Cards, or to any prior purchases.
Money Saving Reminder
Many have learned that if you need a hot photo item that is out of stock at B&H and would like to enjoy getting 3% back on your credit card along with free 2nd Day Air Fed-Ex Air shipping, your best bet is to click here, place an order with Bedfords, and enter the coupon code BIRDSASART at checkout. If an item is out of stock, contact Steve Elkins via e-mail or on his cell phone at (479) 381-2592 (Central time). Be sure to mention the BIRDSASART coupon code and check the box for Free Shipping. That will automatically upgrade to free 2nd Day Air Fed-Ex. Steve has been great at getting folks the hot items that are out of stock at B&H and everywhere else. The wait lists at the big stores can be a year or longer for the hard to get items. Steve will surely get you your gear long before that. For the past year, he has been helping BAA Blog folks get their hands on items like the SONY a 1, the SONY 200-600 G OSS lens, the Canon EOS R5, the Canon RF 100-500mm lens, and the Nikon 500mm PF. Steve is personable, helpful, and eager-to-please.
Important Note
As an Amazon Associate, I earn a small percentage when you purchase from Amazon after using any of the Amazon links on the blog (including the logo-link immediately above). My link works with Amazon Prime and using it will not cost you a single cent. Huge thanks, BTW 🙂
Please Remember Also
Please, if you enjoy and learn from the blog, remember to use one of my two affiliate programs when purchasing new gear. Doing so just might make it possible for me to avoid having to try to get a job as a Walmart greeter and will not cost you a single penny more. And if you use Bedfords and remember to enter the BIRDSASART code at checkout, you will (still!) save 3% on every order and enjoy free second-day air shipping. In these crazy times — I lost about fifty thousand dollars in income due to COVID 19 — remembering to use my B&H link or to shop at Bedfords will help me out a ton and be greatly appreciated. Overseas folks who cannot order from the US because of import fees, duties, and taxes, are invited to help out by clicking here to leave a blog thank you gift if they see fit.
Gear Questions and Advice
Too many folks attending BAA IPTs and dozens of photographers whom I see in the field and on BPN, are–out of ignorance–using the wrong gear, especially when it comes to tripods and more especially, tripod heads… Please know that I am always glad to answer your gear questions via e-mail. If you are desperate, you can try me on my cell at 863-221-2372. Please leave a message and shoot me a text if I do not pick up.
I created this image on 27 December 2021 at Indian Lake Estates, FL. I used the hand held Sony FE 200-600mm f/5.6-6.3 G OSS lens (at 600mm) and The One, the Sony Alpha 1 Mirrorless digital camera. ISO 400. Exposure determined via Zebras with ISO on the rear dial: 1/1250 sec. at f/8 (stopped down 2/3 stop) in Manual mode. AWB at 7:26:50am on a foggy morning.
Tracking: Spot (S) AF-C Bird/Eye Detection AF was active at the moment exposure and worked just fine. Be sure to click on the image to enjoy the hi-res version.
Image #1: What is It?
What is It?
If Image #1 is not a photograph of a dead tree, and it is not a photograph of a fog-muted sun, then what the heck is it? Hint: it is a riddle of sorts …
I also created this image on 27 December 2021 at Indian Lake Estates, FL. Seated in the driver’s seat of my SUV, I used the hand held Sony FE 200-600mm f/5.6-6.3 G OSS lens (this time at 559mm), and The One, the Sony Alpha 1 Mirrorless digital camera. ISO 500. Exposure determined via Zebras with ISO on the rear dial: 1/1600 sec. at f/8 (stopped down 2/3 stop) in Manual mode. AWB at 7:38:31am on a foggy morning.
Tracking: Spot (S) AF-C Bird/Eye Detection AF was active at the moment exposure and worked perfectly. Be sure to click on the image to enjoy the hi-res version.
Image #2: Sandhill Crane foraging — backlit by mild fire in the mist
Seeing the Situation
I hustled down to the lake to look for some more foggy situations. I saw a family of three cranes feeding on the edge of the South Peninsula. The background was ground fog in the canal that separates the South Peninsula from the South Field. I created 156 images of the backlit cranes and kept seven. When you are working with a 30fps body, you need to edit brutally.
I also created this image on 27 December 2021 at Indian Lake Estates, FL. Again, Seated in the driver’s seat of my SUV, I used the hand held Sony FE 200-600mm f/5.6-6.3 G OSS lens (this time at 332mm), and The One, the Sony Alpha 1 Mirrorless digital camera. ISO 640. Exposure determined via Zebras with ISO on the rear dial: 1/5000 sec. at f/8 (stopped down 2/3 stop) in Manual mode. AWB at 7:41:58am on a foggy morning.
Tracking: Spot (S) AF-C Bird/Eye Detection AF was active at the moment exposure and worked perfectly. Be sure to click on the image to enjoy the hi-res version.
Image #3: Bald Eagle nest tree in backlit fog
The Sitting Eagle
Viewed at 400%, I can just make out the top of the eagle’s head and the upper part of its bill. Is there another bird in the frame? What is it?
I did a lousy job of framing the original; I should have zoomed in more. I did my best with a crop from three sides (all but the right). I’d love to make a similar foggy image with a large eaglet flapping its wings on the edge of the nest while facing me …
The BAA Middle of Florida Photographic Site Guide
You can purchase your copy here in the BAA Online Store.
The BAA Middle of Florida Photographic Site Guide
126 pages, 87 photographs by Joe Przybyla and Arthur Morris
The PDF for this e-Guide is an electronic download sent via e-mail.
I had thought about doing a guide to some of the great but little-known photo hotspots around central Florida for about a decade, but those plans never came to fruition. I met Joe online in the Avian Forum at BirdPhotographer’s.Net about two years ago. Joe’s photography has improved tremendously over the past few years; he credits the BAA blog, my books and PDFs, and his participation on BPN. The one thing that I learned right from the get-go about Joe is that he is a hard and tenacious worker, always striving to improve his skills and to grow his knowledge base. As he knew of more than a few good spots in central Florida, I broached the idea of us doing a photographic site guide that covered many of the little-known photographic hotspots from Brandon to Lakeland to Joe Overstreet Road to Indian Lake Estates (my Florida home for the past 20 years or so). After more than many, many dozens of hours of effort, The BIRDS AS ART Middle of Florida Photographic Site Guide is now a reality. Thanks to Joe’s wife Dottie for her review of our writing. We all learned once again that writing is a process, a back and forth process. All thanks to the white pelicans of Lakeland. Here are the locations that are detailed in this e-Guide:
Indian Lake Estates: Sandhills Cranes with chicks and colts, lots of vultures, and Ospreys up the kazoo!
Gatorland, Kissimmee: Learn to make great images of wading birds in a cluttered rookery.
The Brandon Rookery: Great for nesting Wood Storks, Great Egrets, and more.
Circle Bar B Reserve, Lakeland: Here you will find a great variety of avian subjects in a great variety of habitats.
Lake Morton, Lakeland: There are lots of silly tame birds here including and especially American White Pelican during the colder months.
Lake Mirror, Lakeland: Tame Anhingas, Limpkins, and a zillion White Ibises at times.
West Lake Parker, Lakeland: Here you will have a chance for two difficult birds, Snail Kite, and Purple Gallinule.
Joe Overstreet Road, Kenansville: Crested Caracara, meadowlarks, Loggerhead Shrike, and much more on the fenceposts and barbed wire.
Each location includes a map, a detailed description of the best spots, best season, light and time of day instructions, the expected species, and an educational and inspirational gallery that is designed to open your eyes as to the possibilities.
You can purchase a copy here in the BAA Online Store.
Typos
In all blog posts, feel free to e-mail or to leave a comment regarding any typos or errors.