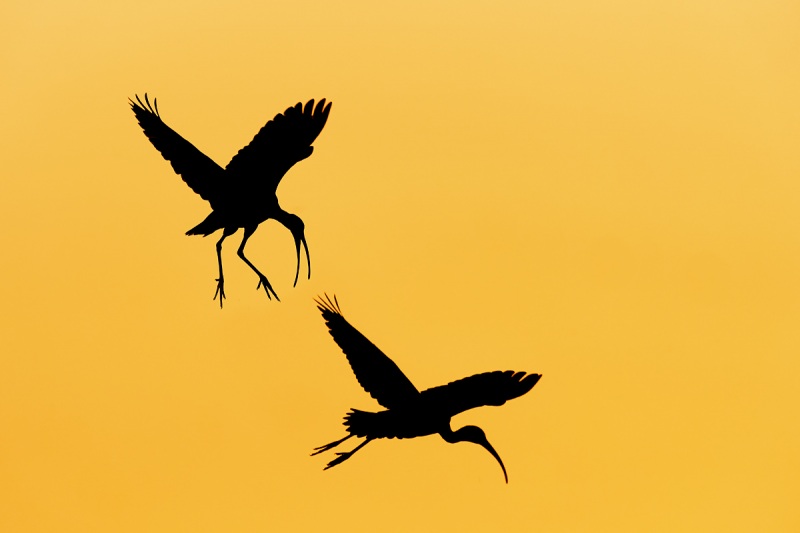
March 15th, 2021 Sunday Morning Excitement
As I stood at a kitchen counter working on yesterday’s blog post, the house began to shake gently. Then the vibrations got stronger and it got very loud. My first thought was Earthquake quickly followed by But we are in Florida. The noise got even louder and it felt as if the house might collapse. Next I thought, The home’s central air conditioning unit is getting ready to explode. Then I realized, Rocket launch. . The thought processes above took about six seconds. I went online and quickly found this:
A veteran SpaceX Falcon 9 rocket will launch 60 new Starlink internet satellites into orbit Sunday, March 14. Liftoff at Launch Complex 39A (LC-39A) at Kennedy Space Center is at 6:01 a.m.
Ironically, we were right across the Indian River from the launch site. Had we known about the launch, we could have set up our 600mm lenses in the backyard and photographed a different kind of blast-off!
What’s Up?
Donna, Bev, Magic, and I were blessed on Sunday morning with an incredible Fire in the Merritt Mist sunrise. I love my new SONY Alpha a1 that I found myself switching camera bodies when I went from the 200-600G to the 600mm f/4 GM. Photos soon. We quit early, and rested up for the better part of the day. Well, they rested, and I worked on the R5 Camera User’s Guide. A question by Bruce Dudek led me to discover that I totally screwed up the naming of three very important camera controls. I am currently in the process of going through the entire guide and making the needed corrections. Not fun, but better is far better than worse.
John Dupps made it to our AirBnB in south of Titusville. It is a spacious and amazing house in the woods with a trail down to the Indian River. Built in 1927, it features 5G WiFi! Donna and Bev went to the refuge early and Jim Dolgin met us at Black Point. The sunset was fair at best, terrible as compared to Saturday night.
Today is Monday 15 March. The forecast for Merritt Island is for clear skies with very gentle winds from the south/southwest switching to south and then southeast.
Wherever you are and whatever you are doing, I hope that you have a great day.
This blog post took about an hour to prepare and makes eighty-three days in a row with a new one. Please remember to use my B&H affiliate links or to save money at Bedfords by using the BIRDSASART discount code at checkout.
SONY Alpha a1 Set-up and Info Group
The SONY Alpha a1 Set-up and Info Group is going great guns as folks chime in with thoughtful questions and experience-based advice. Yesterday Goeff Newhouse shared an excellent treatise on SONY Eye-AF systems including the Alpha a1’s new Face/Eye Subject Bird option. You can see some the images he made recently with his Alpha a1 on his flickr page here.
And I woke up this morning to an informative e-mail from Craig Elson that contained some excellent questions. I will hit Reply All and chime in with my thoughts after I shave and shower.
All who purchased their Alpha a1 bodies via a BAA affiliate link receive a free subscription to the Sony Alpha a1 Set-Up and Info Updates. This same service may be purchased by anyone with an a1 body via a $150.00 Paypal sent to birdsasart@verizon.net indicating payment for Alpha a1 Info Updates. New members will receive all back issues.
Canon EOS R5 Camera User’s e-Guide
I worked on incorporating Bruce Dudek’s edit of the final draft (as noted above). I should have the final PDF done in a few days but I do not want to rush things. I should be getting the complete guide along with the link for the Educational R5 Image Gallery video out no later than Thursday. I hope.
Two weeks ago, I sent out about a dozen copies of the almost finished Canon EOS R5 Camera User’s e-Guide for review to folks who had previously gotten free copies of the R5/R6 AF e-Guide by using my affiliate links to purchase their Canon mirrorless gear. In the same vein, I contacted everyone who purchased the R5/R6 AF e-Guide last week. More recently, folks who purchased the R5/R6 AF Guide were offered the opportunity to purchase a copy the pre-publication guide for review. Many folks have responded with thoughtful reviews, most recently, IPT veteran Warren Howe. And Bruce Dudek has continued to be a valuable resource.
Because the camera and the Menus are so complex, this guide has required a ton of research, a huge amount of time, and a lot of effort; I am thrilled that it is almost finished. The final update of the R5/R6 AF e-Guide has become part of the complete Camera User’s e-Guide; it has already been revised and expanded.
The complete Camera User’s guide will sell for $75.00. Folks who purchased their Canon gear using my links will receive a $65.00 discount; the guide will cost them a nominal $10.00. Folks who spent more than $7500.00 on Canon mirrorless gear using either of my affiliate links (B&H or Bedfords), will receive the Camera User’s e-Guide for free. Folks who purchased the R5/R6 AF e-Guide will receive a $10.00 discount on the User’s e-Guide. The best news is that the end is in sight.
New and Better Bedfords Discount Policy!
You can now save 3% on all of your Bedfords photo gear purchases by entering the BIRDSASART coupon code at checkout. Your discount will be applied to your pre-tax total. In addition, by using the code you will get 2nd day air shipping via Fed Ex.
Grab a Nikon AF-S Teleconverter TC-14E III and save $14.99. Purchase a Canon EOS R5 and your discount will be $116.97. Purchase a Sony FE 600mm f/4 GM OSS lens and save a remarkable $389.94! Your Bedford’s purchase no longer needs to be greater than $1,000.00 for you to receive a discount. The more you spend, the more you save.
Money Saving Reminder
Many have learned that if you need a hot photo item that is out of stock at B&H and would enjoy free second-day air shipping, your best bet is to click here, place an order with Bedfords, and enter the coupon code BIRDSASART at checkout. If an item is out of stock, contact Steve Elkins via e-mail or on his cell phone at (479) 381-2592 (Central time). Be sure to mention the BIRDSASART coupon code and use it for your online order to save 3% and enjoy free 2nd-day air shipping. Steve has been great at getting folks the hot items that are out of stock at B&H and everywhere else. The wait lists at the big stores can be a year or longer for the hard to get items. Steve will surely get you your gear long before that. For the past year, he has been helping BAA Blog folks get their hands on items like the SONY a9 ii, the SONY 200-600 G OSS lens, the Canon EOS R5, the Canon RF 100-500mm lens, and the Nikon 500mm PF. Steve is personable, helpful, and eager to please.


Gear Questions and Advice
Too many folks attending BAA IPTs (remember those?) and dozens of photographers whom I see in the field and on BPN, are–out of ignorance–using the wrong gear especially when it comes to tripods and more especially, tripod heads… Please know that I am always glad to answer your gear questions via e-mail. Those questions might deal with systems, camera bodies, accessories, and/or lens choices and decisions.
|
|
|
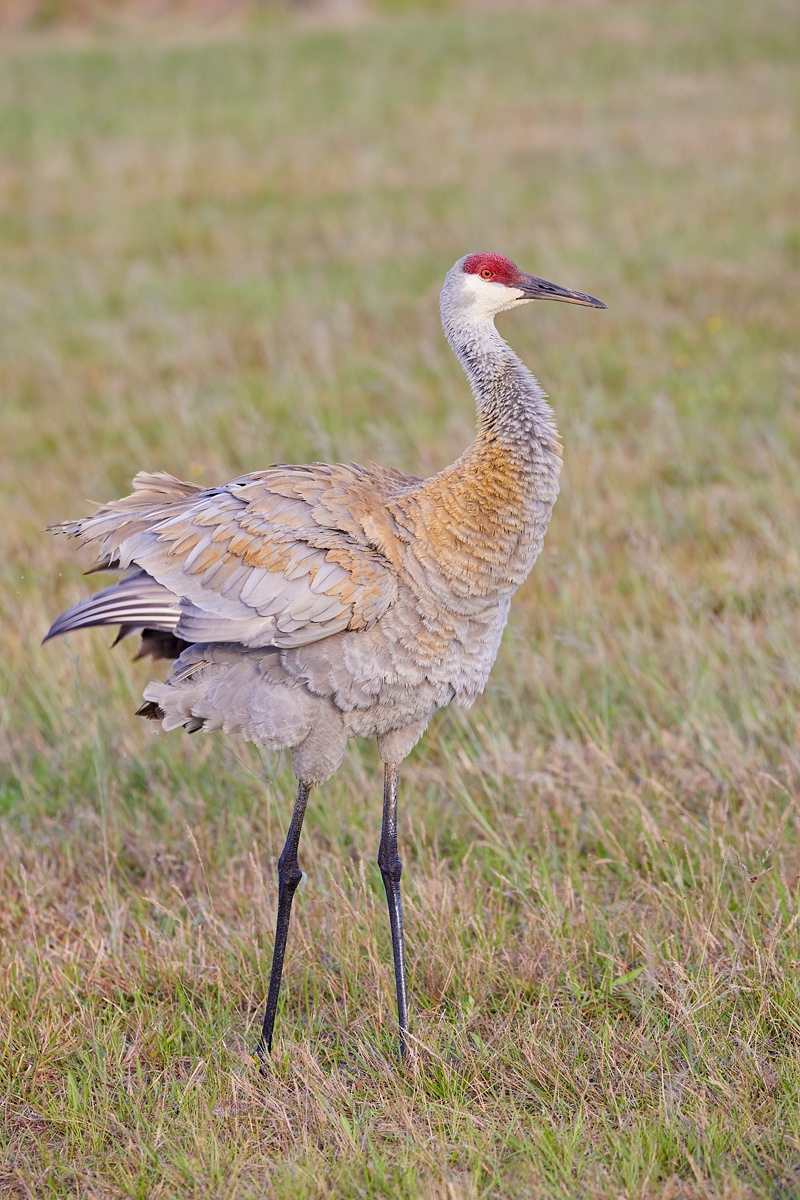
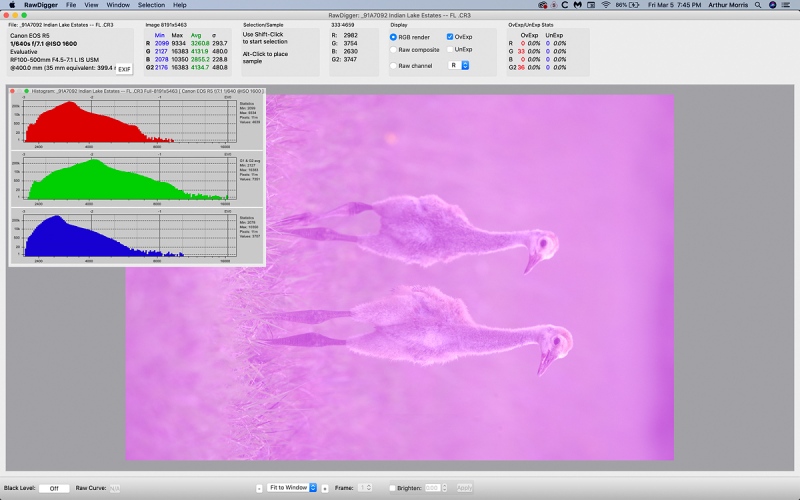
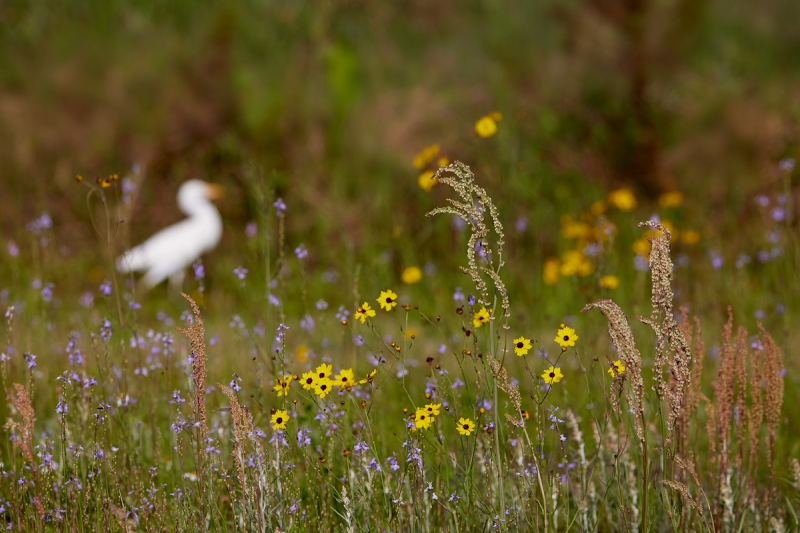
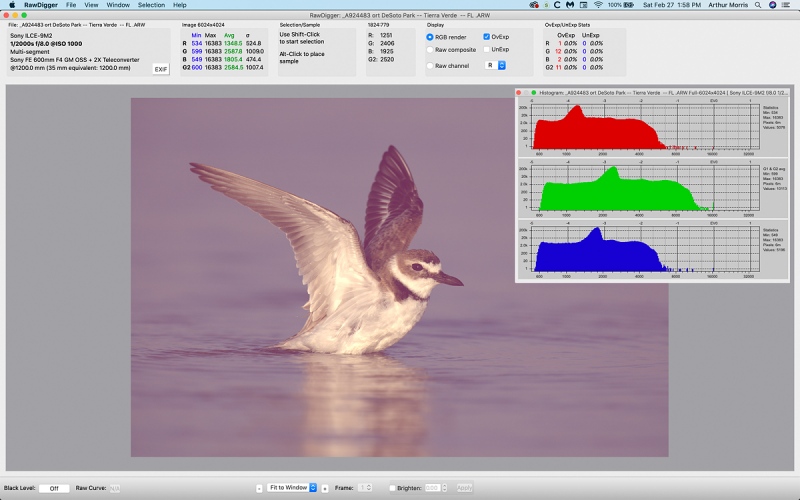
This image was created on 9 March 2021 down by the lake near my home at ILE. Standing on the North Field, I used the handheld Canon RF 100-500mm f/4.5-7.1L IS USM lens (at 300mm) and the highly touted 45MP Canon EOS R5 Mirrorless Digital camera body. ISO 1600. Exposure determined by test exposure & histogram and blinkies evaluation: 1/500 second at f/7.1 in Manual mode. RawDigger showed this one to be a very slight over-exposure. AWB at 7:27am on a slightly cloudy morning.
Face Detection plus Tracking grabbed and tracked the eye of the colt on our right.
Click on the image to see a smaller image that fits into your browser window.
Sandhill Crane adult ruffling
|
My Last R5 Image For A While. And Why …
I made this image the day before Donna Bourdon arrived at my home for three days of In-the-field sessions. Those included two very productive mornings on Clemens Van der Werf’s flats boat. Donna ordered an R5 from Steve Elkins at Bedfords along with one of the EF-RF Adapters. I loaned my RF 100-500 to Donna when she arrived and she will be using it for the entire IPT.
Thoughts on Today’s Featured Image
It was a slow cloudy morning with not much around to photograph. This adult crane was the only cooperative bird around the lakefront. I started photographing this bird from the driver’s seat of my SUV but was not happy that the demarcation line of the field and the marsh was distracting. You can see a hint of that line in the upper left corner of the frame. Knowing that I had to get taller and closer to eliminate that line, I got out of my vehicle and approached slowly. I zoomed out to give the bird’s feet at the bottom of the frame enough room, checked the exposure, and acquired focus easily with Face Detection plus Tracking AF.
When everything was just perfect, the bird leaned forward ever-so-slightly and ruffled. I snapped off about a dozen frames. And then I headed home to get to work. I kept four of the images after the first edit. The one above was my favorite. In the soft, flat light, I boosted the color and contrast a bit and was happy with the optimized image.
The Lesson
Be patient or lucky; a bit of interesting behavior can transform a boring image into something nice.
|
|
|
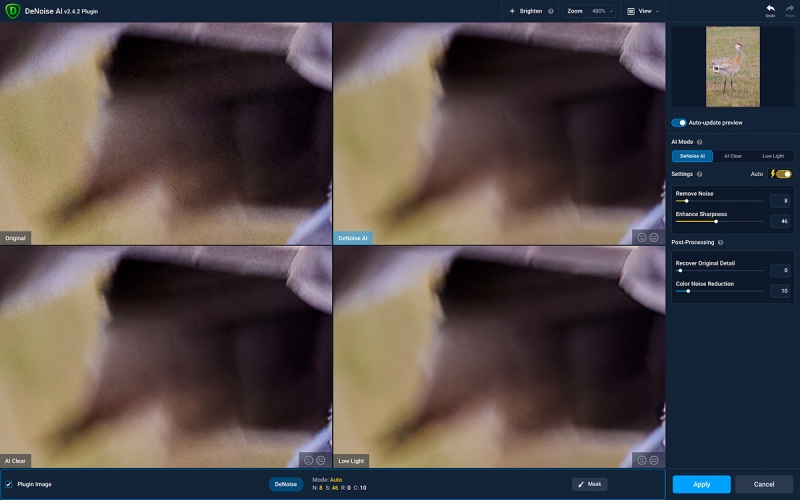
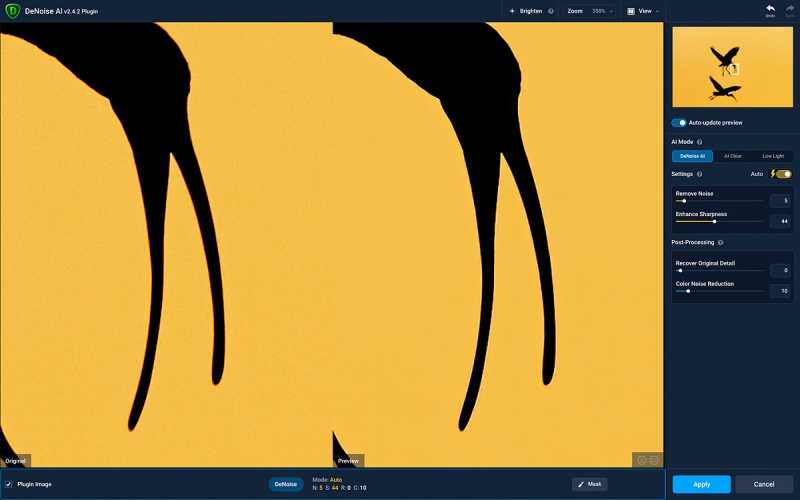
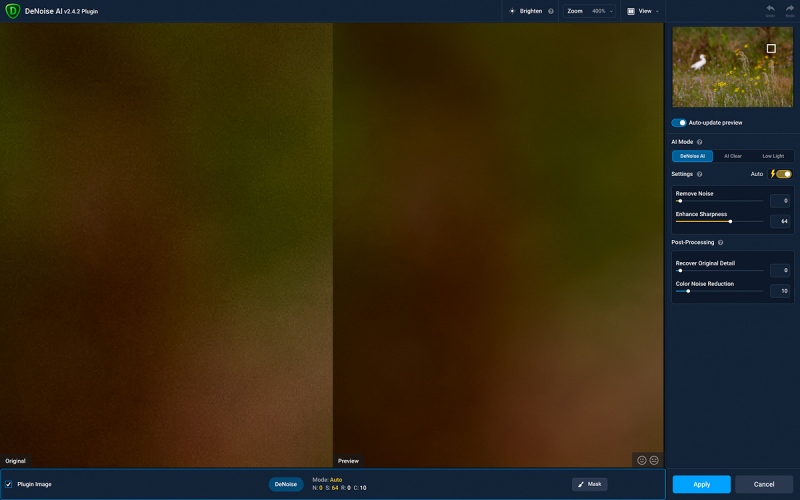
Click on the screen capture to view a larger version.
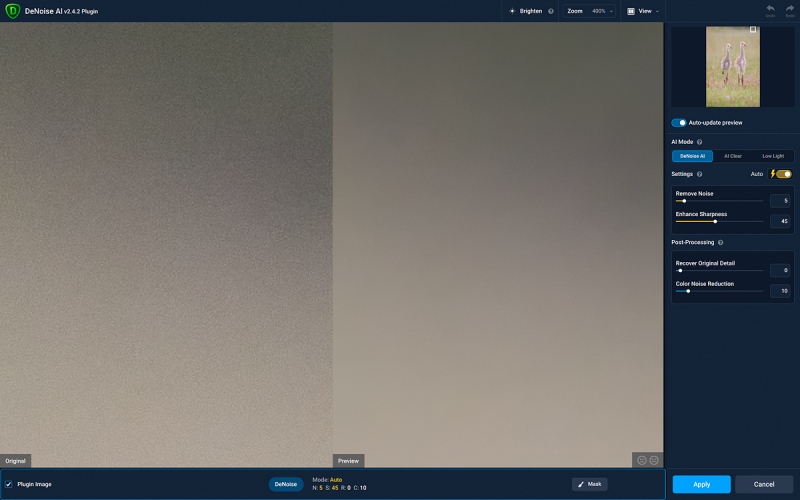
Topaz DeNoise AI on the Sandhill Crane adult ruffling image
|
Topaz DeNoise AI
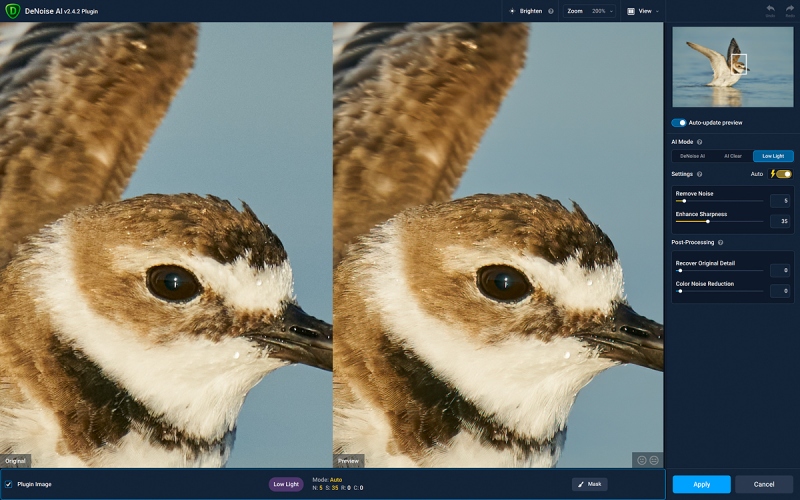
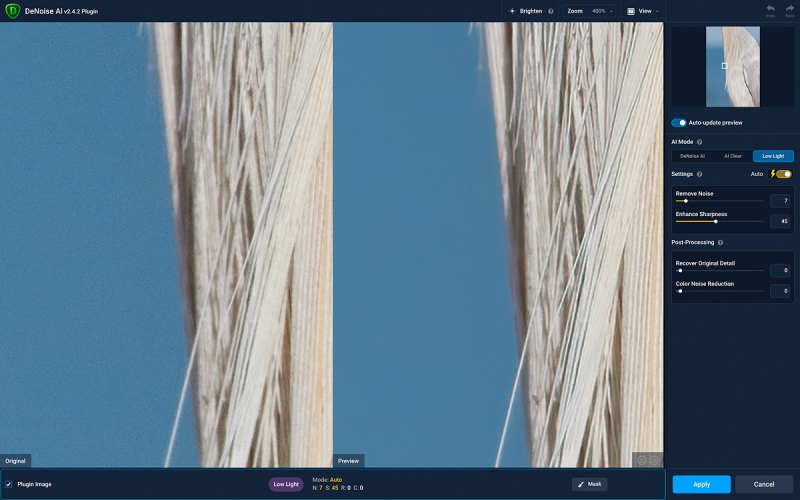
Topaz DeNoise AI on Auto continues to amaze. As do the Canon R5 and the Sony Alpha a1. With many mega-Exposed-to-the-Right images I need to blow the original (upper left) up to 400% to see the noise. As always, noise is more visible in the darkest shadowed areas of an image. Note the placement of the Navigator box in the upper right of the screen capture; I placed it on a small shadowed area just below the tip of the slightly raised wing. Here, DeNoise and and AI Clear were both clearly a bit better than Low Light. I chose to go with the namesake option, DeNoise.
Great Topaz News!
Folks who use the BAA Topaz link to purchase Sharpen AI, DeNoise AI, or the Utility Bundle (or any other Topaz plug-ins) will receive a 15% discount by entering the ARTHUR15 code at checkout. If the stuff is on sale (as it usually is), you save 15% off of the sale price! To get the discount you must use my link and you must enter the discount code. Be sure to start with this link.
Those who purchase Sharpen AI, DeNoise AI, or any other Topaz plug-ins using my link and then entering the ARTHUR15 code at checkout can e-mail to request a short Getting Started with Topaz e-Guide. Please include a copy of your Topaz receipt that shows the discount. Aside from the basics, the guide explains how to install the plug-ins so that they appear in the Photoshop Filter Menu.
Typos
With all blog posts, feel free to e-mail or to leave a comment regarding any typos or errors.
March 14th, 2021 What’s Up?
Clemens, Donna, and I had a great morning in the Stick Marsh near Vero Beach. After the session, Clemens headed back to West Palm and Donna and I headed back to ILE. After brunch, I started packing for the drive to Titusville. That was followed by my last swim till next Sunday and more packing. We left at 2:30pm. Huge thanks to Donna for doing the driving while I worked on the laptop. We arrived at Donna’s VRBO at 4:30 and met Donna’s partner Beverly Still and their dog Majik, a very large and affectionate labradoodle. I tried and failed to nap. When I awoke, I noted the wind against-sun-conditions and the potential for sunset color so we all hopped in my car and headed to Black Point Wildlife Drive.
The western sky began to get gorgeous as we looked for one single bird to silhouette. We found a Great Blue Heron in just the right spot and worked on varying our image designs with the SONY 200-600s. On the way out, the sky got even more spectacular so we stopped for some wide angle Florida postcard scenics.
Today is Sunday 14 March 2021; did you remember to spring the clocks forward? The forecast for Titusville the morning is for clear with very little wind. We are heading out very early in search of some sunrise images.
Wherever you are and whatever you are doing, I hope that you have a great day.
This blog post took about two hours to prepare and makes eighty-two days in a row with a new one. Please remember to use my B&H affiliate links or to save money at Bedfords by using the BIRDSASART discount code at checkout.
Canon EOS R5 Camera User’s e-Guide
Incredibly, the supremely helpful Bruce Dudek finished his edit of the final draft and sent it to me. I will be incorporating his edit today and getting the final PDF made ASAP. I should be getting the complete guide along with the link for the Educational R5 Image Gallery video out no later than Tuesday.
Two weeks ago, I sent out about a dozen copies of the almost finished Canon EOS R5 Camera User’s e-Guide for review to folks who had previously gotten free copies of the R5/R6 AF e-Guide by using my affiliate links to purchase their Canon mirrorless gear. In the same vein, I contacted everyone who purchased the R5/R6 AF e-Guide last week. More recently, folks who purchased the R5/R6 AF Guide were offered the opportunity to purchase a copy the pre-publication guide for review. Many folks have responded with thoughtful reviews, most recently, IPT veteran Warren Howe. And Bruce Dudek has continued to be a valuable resource.
Because the camera and the Menus are so complex, this guide has required a ton of research, a huge amount of time, and a lot of effort; I am thrilled that it is almost finished. The final update of the R5/R6 AF e-Guide has become part of the complete Camera User’s e-Guide; it has already been revised and expanded.
The complete Camera User’s guide will sell for $75.00. Folks who purchased their Canon gear using my links will receive a $65.00 discount; the guide will cost them a nominal $10.00. Folks who spent more than $7500.00 on Canon mirrorless gear using either of my affiliate links (B&H or Bedfords), will receive the Camera User’s e-Guide for free. Folks who purchased the R5/R6 AF e-Guide will receive a $10.00 discount on the User’s e-Guide. The best news is that the end is in sight.
|
|
|
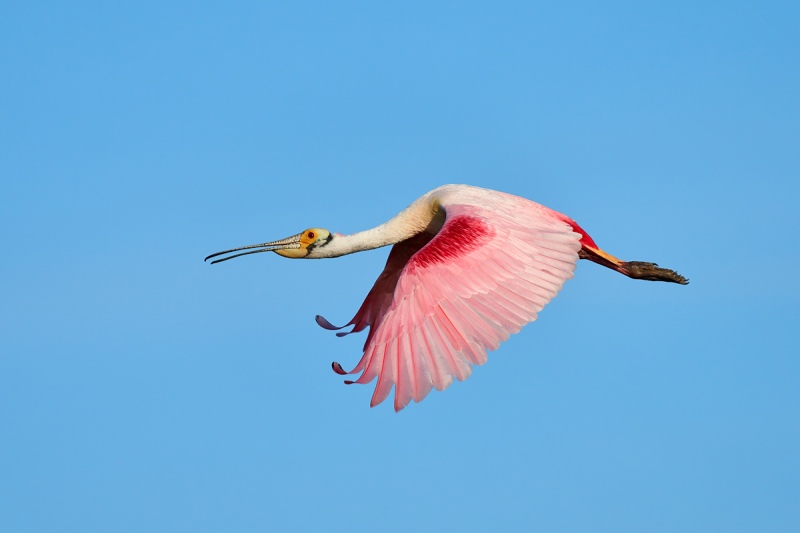
This image was created on 13 March 2021 at the Stick Marsh in Vero Beach aboard Clemens Van der Werf’s flats boat. I used the handheld Sony FE 200-600mm f/5.6-6.3 G OSS lens (at 500mm) and The One, the Sony Alpha 1 Mirrorless digital camera. ISO 640. Exposure determined with ISO on the Thumb Wheel: 1/3200 sec. at f/6.3 (wide open). AWB at 7:41am on a clear morning.
Wide/AF-C was active at the moment of exposure and performed well. Click on the image to enjoy a larger version.
Image #1: Roseate Spoonbill downstroke flight
|
Roseate Spoonbill Mission Accomplished; but it was tough!
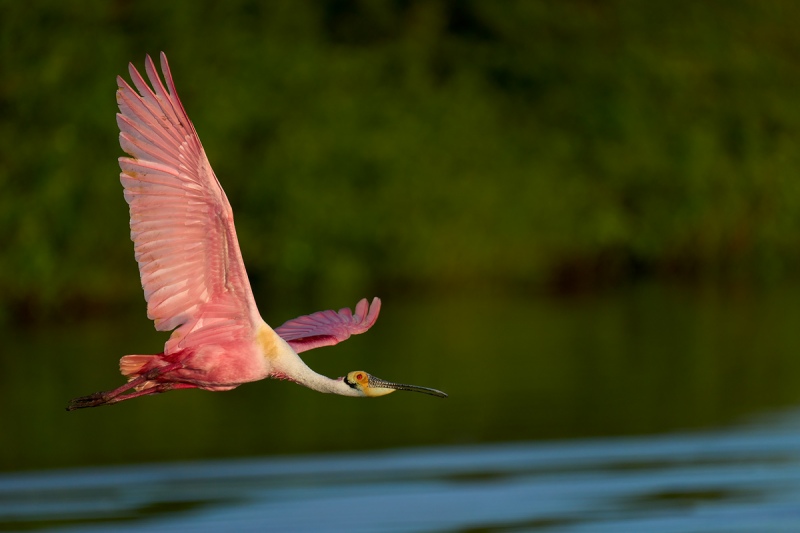
It was a beautiful morning but again the wind was more north than east: most of the birds were flying and landing away from us. As far as exposure is concerned, the Roseate Spoonbills needed one-third more light than the Great Egrets, and we never knew which bird was coming next. In addition, as the morning wore on, some light clouds came in making getting perfect exposures that much more difficult; RawDigger showed both of today’s images to be about 2/3-stop too dark.
I created more than 3,000 images. Half were insta-deletes because parts of the bird were cut off by the frame edge. That was usually caused by my being too greedy (and not zooming out as I did with Image #1 above. Most of the rest were deleted because of a poor wing positions, signs and distracting birds (and their reflections) in the background, harsh shadows, and bird-flying away issues. On the first edit I kept about 160 flight images. That will be pared down to about 30 after the second edit.
Flight photography can be tough even with a great rig.
|
|
|
This image was created on 13 March 2021 at the Stick Marsh in Vero Beach aboard Clemens Van der Werf’s flats boat. I used the handheld Sony FE 200-600mm f/5.6-6.3 G OSS lens (at 600mm) and The One, the Sony Alpha 1 Mirrorless digital camera. ISO 640. Exposure determined with ISO on the Thumb Wheel: 1/3200 sec. at f/6.3 (wide open). AWB at 7:24am on a clear morning.
Wide/AF-C was active at the moment of exposure and performed well. Click on the image to enjoy a larger version.
Image #2: Roseate Spoonbill flying low
|
The Sony Alpha a1
My new camera continued to amaze. Out of the more than 2,500 flight images made with the a1/200-600 G rig, about six were not perfectly sharp on the eye. When the light got harsh, I experimented with flight photography with the 2X TC added. Nearly all of those images were insta-deletes but amazingly, I did get a few good ones.
I sent out the first issue of the SONY Alpha a1 Set-up and Info Notes (#1) yesterday afternoon and followed that up with issue #1A answering a good question by Larry Master and sharing some new stuff that I learned from Patrick Sparkman.
As I am pretty sure that I will never do a formal Sony Alpha a1 Camera User’s e-Guide, all who purchased their Alpha a1 bodies via a BAA affiliate link have been subscribed to my Sony Alpha a1 Set-Up and Info Updates. This same service may be purchased by anyone with an a1 body via a $150.00 Paypal to birdsasart@verizon.net indicating payment for Alpha a1 Info Updates. All getting the updates will be encouraged to shoot me questions with the answers copied to all in the group.
Typos
In all blog posts and Bulletins, feel free to e-mail or to leave a comment regarding any typos or errors.
March 13th, 2021 Via blog post comment by Barry Barfield
Sony Alpha a1 Set-Up and Info updates
Will you be creating a Users Guide for the Sony Alpha a1? I bought the Guides for the A9ii and the A74R from you and have loved my Sony bodies – I may just upgrade the A74R though …
My response:
Hi Barry, Good question. After just two days of working with the Alpha a1 — with its superb image files (see below) and a better AF system than the a9 ii, I can firmly state that it instantly obsoletes all a7r series bodies and all a9 series bodies. Its $6498.00 price tag will be prohibitive for many who will enjoy bargain prices on some great SONY used gear.
At this point, having almost completed the R5 Camera User’s e-Guide, I am pretty sure I will never do a formal Alpha a1 Camera User’s guide. Too much work, too few folks using the camera. The options with the a1 are similar to what is available on the a7r series bodies and all a9 series bodies but the menu system is both confusing and different. And then there are the AF options … My early thoughts are that the Face/Eye Subject: Bird technology on the Alpha a1 performs better than Face Detection plus tracking on the Canon EOS R5 (and R6). The new SONY technology performs in a totally different manner than the Canon technology. They are quite similar in that neither is perfect: at times both may fail to detect and track a perfectly visible bird’s eye.
All who purchased their Alpha a1 bodies via a BAA affiliate link will be subscribed to my Sony Alpha a1 Set-Up and Info updates. This same service may be purchased by anyone with an a1 body via a $150.00 Paypal to birdsasart@verizon.net indicating payment for Alpha a1 Info Updates. All getting the updates will be encouraged to shoot me questions with the answers copied to all in the group.
What’s Up?
Clemens, Donna, and I had a great day on Friday. We started in Lakeland, had a fast food breakfast on the run, and found a good wine shop on the way home. After my nap, neighbor Ron called to say that he had re-located the sole surviving chick (of the four hatched this year). Clemens and Donna headed down to the lake, found the chick, and had some fun. After they took a short break, they went back down to the lake to search for the chick. That found it but were unable to photograph it. They picked me up at 6:05pm and with the perfect conditions — a somewhat muted sun and a northeast wind, we had some great action right around sunset. Then it was up to the pool deck where we dined on grilled bone-in rib-eye steaks, a huge salad, and some fine wine provided by Donna. I hit the sack fairly early and woke at 2:45am to work on this blog post.
Today is Saturday 13 March 2021. We are leaving at 5:30am for Stick Marsh near Vero Beach with Clemens’ boat in tow. We are hoping to photograph Roseate Spoonbills and possibly other wading birds in flight. The forecast is for clear skies and north/northeast winds. Not bad for flight photography but not good … Wherever you are and whatever you are doing, I hope that you have a great day.
This blog post took about two hours to prepare and makes eighty-two days in a row with a new one. Please remember to use my B&H affiliate links or to save money at Bedfords by using the BIRDSASART discount code at checkout.
Canon EOS R5 Camera User’s e-Guide
Two weeks ago, I sent out about a dozen copies of the almost finished Canon EOS R5 Camera User’s e-Guide for review to folks who had previously gotten free copies of the R5/R6 AF e-Guide by using my affiliate links to purchase their Canon mirrorless gear. In the same vein, I contacted everyone who purchased the R5/R6 AF e-Guide last week. More recently, folks who purchased the R5/R6 AF Guide were offered the opportunity to purchase a copy the pre-publication guide for review. Many folks have responded with thoughtful reviews, most recently, IPT veteran Warren Howe. And Bruce Dudek has continued to be a valuable resource.
Because the camera and the Menus are so complex, this guide has required a ton of research, a lot of time, and a lot of effort (and will continue to do so until it is complete). It should be finished by the first week in March. 2021. The final update of the R5/R6 AF e-Guide has become part of the complete Camera User’s e-Guide; it has already been revised and expanded.
The complete Camera User’s guide will sell for $75.00. Folks who purchased their Canon gear using my links will receive a $65.00 discount; the guide will cost them a nominal $10.00. Folks who spent more than $7500.00 on Canon mirrorless gear using either of my affiliate links (B&H or Bedfords), will receive the Camera User’s e-Guide for free. Folks who purchased the R5/R6 AF e-Guide will receive a $10.00 discount on the User’s e-Guide. The best news is that the end is in sight.
New and Better Bedfords Discount Policy!
You can now save 3% on all of your Bedfords photo gear purchases by entering the BIRDSASART coupon code at checkout. Your discount will be applied to your pre-tax total. In addition, by using the code you will get 2nd day air shipping via Fed Ex.
Grab a Nikon AF-S Teleconverter TC-14E III and save $14.99. Purchase a Canon EOS R5 and your discount will be $116.97. Purchase a Sony FE 600mm f/4 GM OSS lens and save a remarkable $389.94! Your Bedford’s purchase no longer needs to be greater than $1,000.00 for you to receive a discount. The more you spend, the more you save.
Money Saving Reminder
Many have learned that if you need a hot photo item that is out of stock at B&H and would enjoy free second-day air shipping, your best bet is to click here, place an order with Bedfords, and enter the coupon code BIRDSASART at checkout. If an item is out of stock, contact Steve Elkins via e-mail or on his cell phone at (479) 381-2592 (Central time). Be sure to mention the BIRDSASART coupon code and use it for your online order to save 3% and enjoy free 2nd-day air shipping. Steve has been great at getting folks the hot items that are out of stock at B&H and everywhere else. The wait lists at the big stores can be a year or longer for the hard to get items. Steve will surely get you your gear long before that. For the past year, he has been helping BAA Blog folks get their hands on items like the SONY a9 ii, the SONY 200-600 G OSS lens, the Canon EOS R5, the Canon RF 100-500mm lens, and the Nikon 500mm PF. Steve is personable, helpful, and eager to please.


Gear Questions and Advice
Too many folks attending BAA IPTs (remember those?) and dozens of photographers whom I see in the field and on BPN, are–out of ignorance–using the wrong gear especially when it comes to tripods and more especially, tripod heads… Please know that I am always glad to answer your gear questions via e-mail. Those questions might deal with systems, camera bodies, accessories, and/or lens choices and decisions.
A Bad Start Turns Around …
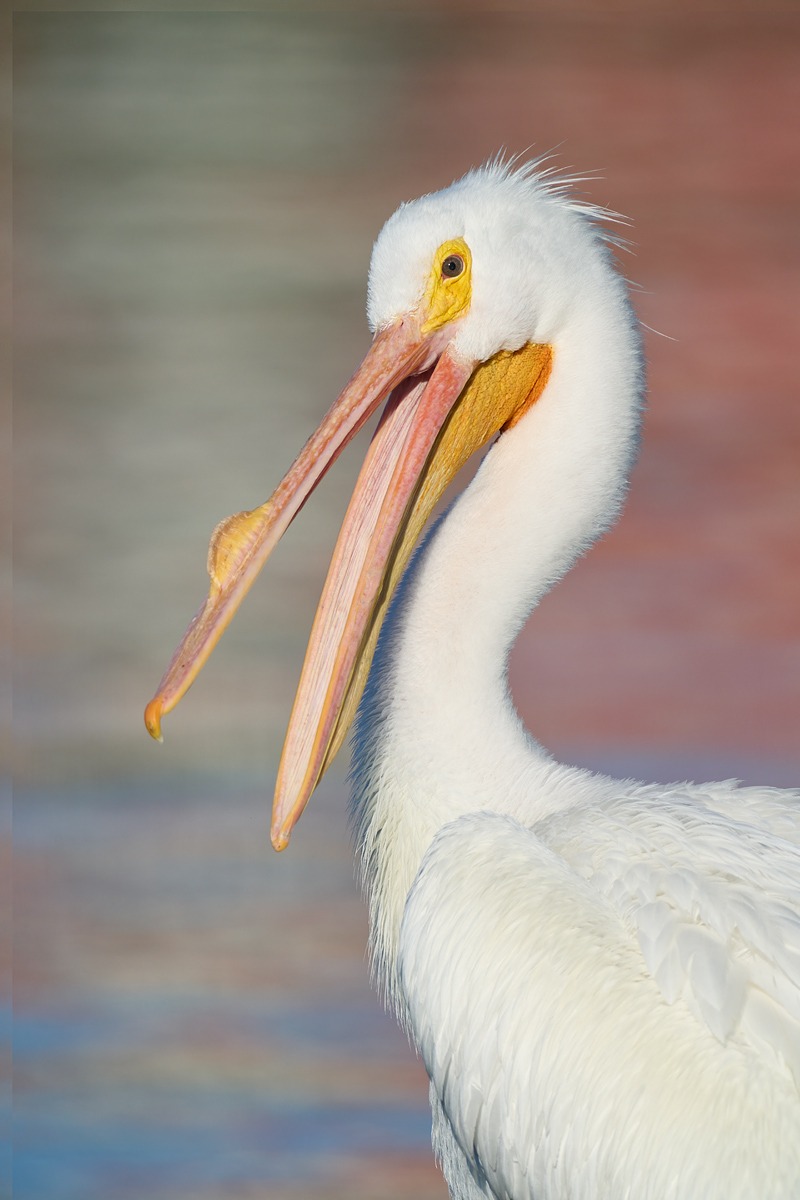
We arrived plenty early at my favorite Lakeland morning location but rather than sitting on their favorite bulkhead, the American White Pelicans were scattered around the lake. Working at 1200mm we were able to get some nice stuff on floating pelicans in pleasingly colored water. I headed east for a bit working on some pelicans, a Wood Stork, and a few Anhingas. I saw that Donna and Clemens were working a single cooperative pelican that had made its way onto the bulkhead. There are usually 15 to 20 of the huge birds on the bulkhead and isolating a single bird is difficult. Yesterday, with just one bird, doing that was very easy.
|
|
|
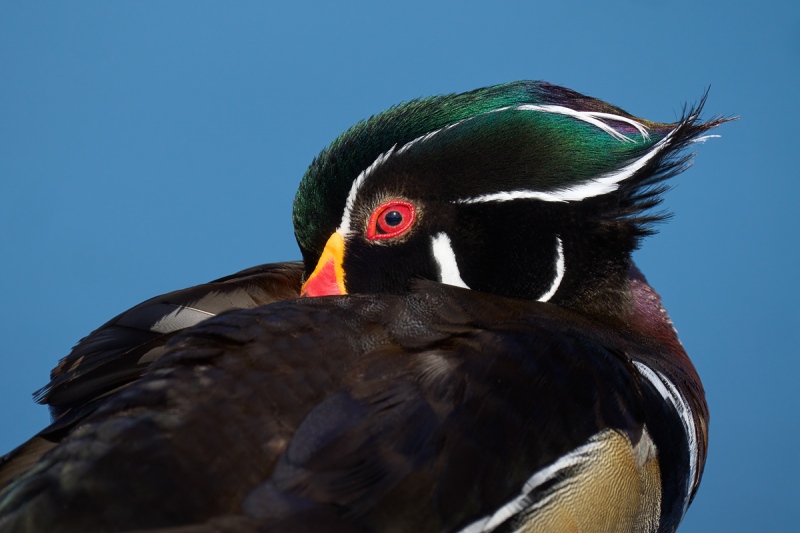
This image was created on 12 March 2021 at my morning back-up location in Lakeland. I used the hand held Sony FE 200-600mm f/5.6-6.3 G OSS Lens with the Sony FE 1.4x Teleconverter (at 840mm) and The One, the Sony Alpha 1 Mirrorless digital camera. ISO 640. Exposure determined with ISO on the Thumb Wheel. The exposure was confirmed as perfect by RawDigger: 1/1000 sec. at f/10 (stopped down 1/3-stop). AWB at 9:02am on a clear morning.
Zone/AF-C was active at the moment of exposure and performed perfectly. Click on the image to enjoy a larger version.
Image #2: Wood Duck drake resting
|
Let’s Make a Wiggle
At about 8:30, I suggested that we make a wiggle. Clemens and Donna agreed so we headed to my Lakeland back-up morning location in search of Anhinga, Limpkin, and some ducks. We found a handsome Anhinga right on the steps where The BAA Middle of Florida Photographic Site Guide says that you will find them. We worked that bird for a while. I glanced to my right and said, Wood Ducks coming! We were all astounded when a pair of woodies climbed up on the steps right in front of us. We switched tracks and worked them at point blank range for another 30 minutes. When the swam off they were replaced by a pair of Lesser Scaup, a tame Common Gallinule, and a hen Ring-necked Duck. All in all it had been a great morning.
It was my first opportunity to work with the Alpha a1’s Face/Eye Subject: Bird technology. I was pretty much astounded and interestingly enough, it works in a totally different manner than the R5’s Face Detection plus Tracking. So not only did I make lots of wonderul images, I learned a ton about my new camera.
|
|
|
Click on the image to view a larger version.
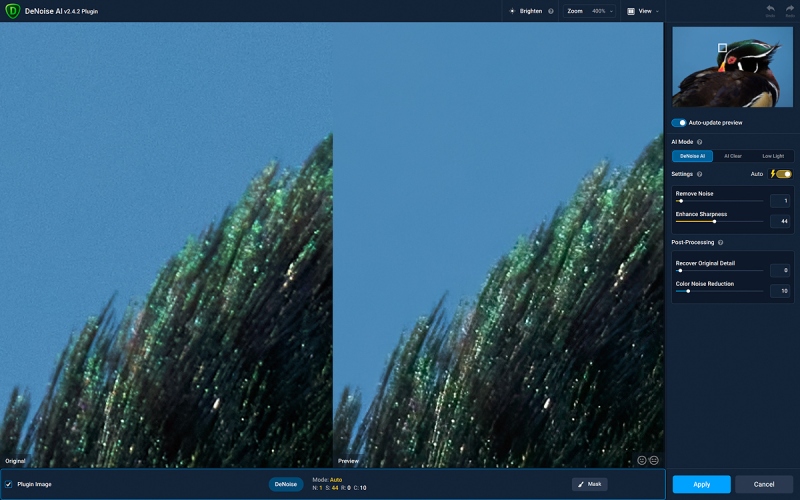
Image #2A: Topaz DeNoise on the Wood Duck drake resting image
|
Topaz DeNoise
As expected, Topaz DeNoise AI on Auto kills with a1 images. Remember that here we need to expose for the WHITEs. Doing that properly will always leave the dark tones about 1 2/3 stops too dark. If you do not get that concept you are referred to the section on Exposure Theory in the original soft cover The Art of Bird Photography. Order yours by phone and let Jim know that you would like me to personalize it for you.
|
|
|
Click on the image to view a larger version.
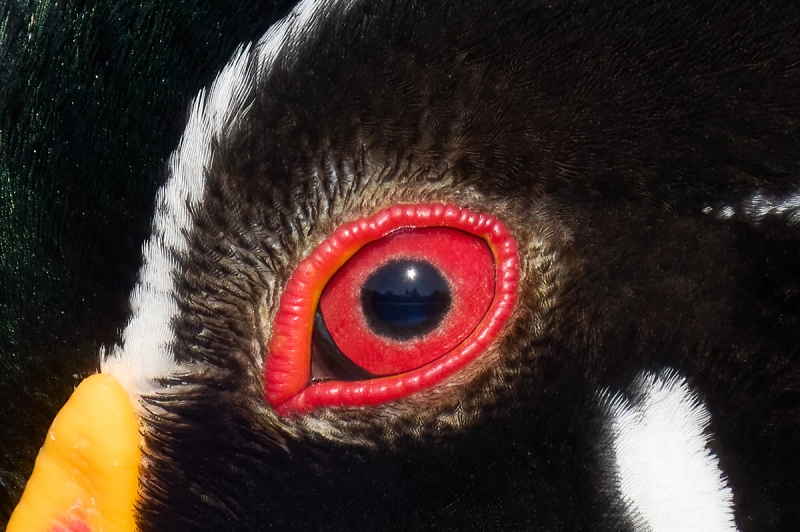
Image #2B: 200% screen capture of the Wood Duck drake resting image
|
200% Screen Capture
The sharpness and fine feather detail (FFD) of a1 image files is incredible. And don’t forget that this was made with the supposedly inferior SONY 200-600 G lens with the 1.4X teleconverter … If you go for an Alpha a1, be sure to use my B&H affiliate link or Bedfords.
|
|
|
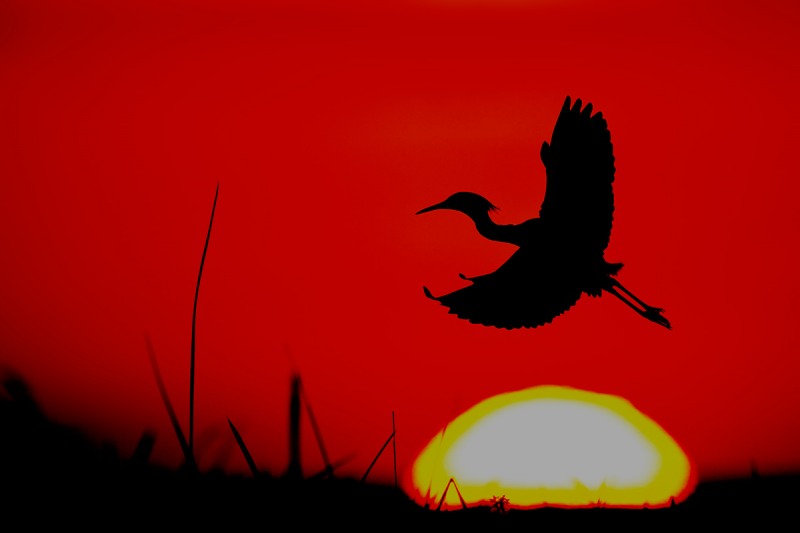
This image was created on 12 March 2021 down by the lake at ILE. I used the Induro GIT 404L/Levered-clamp FlexShooter Pro-mounted Sony FE 600mm f/4 GM OSS lens with the Sony FE 2.0x Teleconverter and The One, the Sony Alpha 1 Mirrorless digital camera. Auto ISO set ISO 1000. Exposure determined via experience with the situation with Exposure Compensation on the Thumb Wheel. Multi Metering +2/3 stop: 1/2000 sec. at f/8 (wide open) in Shutter Priority (S) mode. AWB at 6:30pm on a clear evening.
Wide/AF-C was active at the moment of exposure and performed perfectly. Click on the image to enjoy a larger version.
Image #3: Snowy Egret landing at sunset
|
A Great Ending
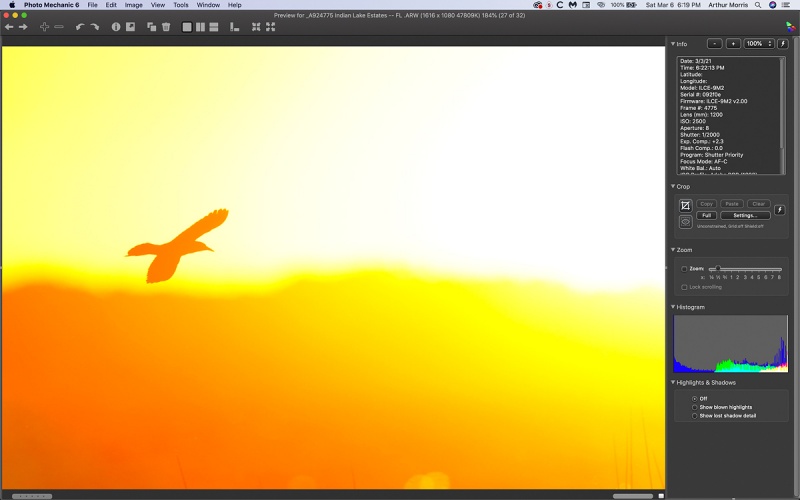
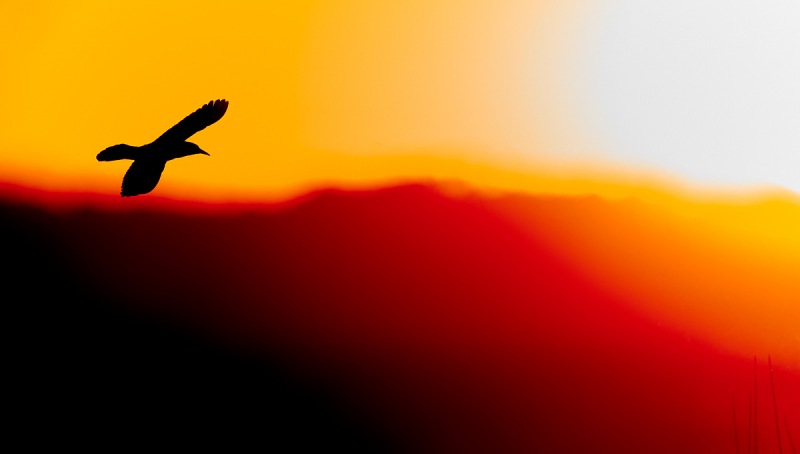
Donna and Clemens picked me up right on time at 6:05pm and we were greeted by some nice color with the wind right behind us. We had some good chances. I need to go back and see if I can determine what caused the posterization. I like came with the raw file as a result of the sun being in the frame …
|
|
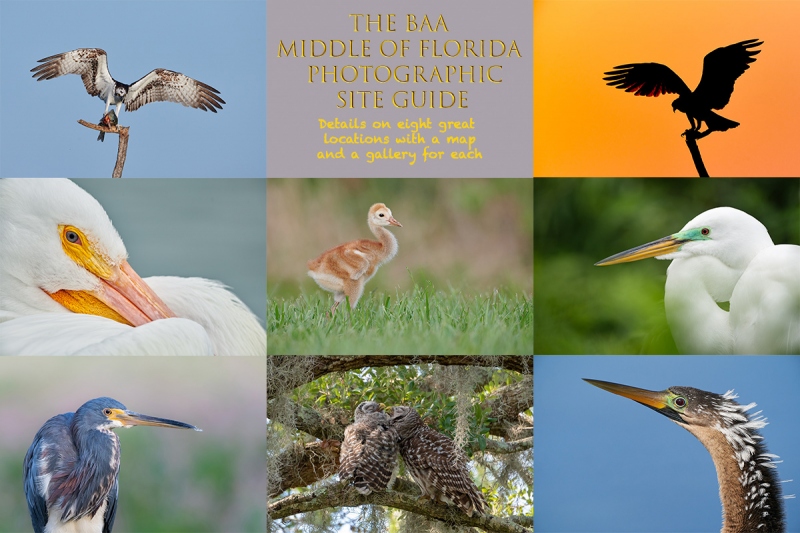
The BAA Middle of Florida Photographic Site Guide
You can purchase your copy here in the BAA Online Store.
|
The BAA Middle of Florida Photographic Site Guide
126 pages, 87 photographs by Joe Przybyla and Arthur Morris.
The PDF for this e-Guide is an electronic download sent via e-mail.
Purchase your copy here in the BAA Online Store.
I had thought about doing a guide to some of the great but little-known photo hotspots around central Florida for about a decade, but those plans never came to fruition. I met Joe online in the Avian Forum at BirdPhotographer’s.Net about two years ago. Joe’s photography has improved tremendously over the past few years; he credits the BAA blog, my books and PDFs, and his participation on BPN. The one thing that I learned right from the get-go about Joe is that he is a hard and tenacious worker, always striving to improve his skills and to grow his knowledge base. As he knew of more than a few good spots in central Florida, I broached the idea of us doing a photographic site guide that covered many of the little-known photographic hotspots from Brandon to Lakeland to Joe Overstreet Road to Indian Lake Estates (my Florida home for the past 20 years or so). After more than many, many dozens of hours of effort, The BIRDS AS ART Middle of Florida Photographic Site Guide is now a reality. Thanks to Joe’s wife Dottie for her review of our writing. We all learned once again that writing is a process, a back and forth process. All thanks to the white pelicans of Lakeland. Here are the locations that are detailed in this e-Guide:
- Indian Lake Estates: Sandhills Cranes with chicks and colts, lots of vultures, and Ospreys up the kazoo!
- Gatorland, Kissimmee: Learn to make great images of wading birds in a cluttered rookery.
- The Brandon Rookery: Great for nesting Wood Storks, Great Egrets, and more.
- Circle Bar B Reserve, Lakeland: Here you will find a great variety of avian subjects in a great variety of habitats.
- Lake Morton, Lakeland: There are lots of silly tame birds here including and especially American White Pelican during the colder months.
- Lake Mirror, Lakeland: Tame Anhingas, Limpkins, and a zillion White Ibises at times.
- West Lake Parker, Lakeland: Here you will have a chance for two difficult birds, Snail Kite, and Purple Gallinule.
- Joe Overstreet Road, Kenansville: Crested Caracara, meadowlarks, Loggerhead Shrike, and much more on the fenceposts and barbed wire.
Each location includes a map, a detailed description of the best spots, best season, light and time of day instructions, the expected species, and an educational and inspirational gallery that is designed to open your eyes as to the possibilities.
You can purchase a copy here in the BAA Online Store.
Typos
In all blog posts and Bulletins, feel free to e-mail or to leave a comment regarding any typos or errors.
March 12th, 2021 The BAA Used Gear Page
The Used Gear page continues to be very active. The BAA Used Gear Page is the place to sell your used photographic equipment. We will help you to get your gear sold quickly for 30 to 70% or more than what the big guys are offering … Doubt me? Check out the Recent Sales list at the bottom of the page.
Sony Alpha a9 ii Mirrorless Digital Camera Body
How Much Do I Love My Sony Alpha a1?
BAA Record-Low Price
Arthur Morris is offering a SONY a9 ii conservatively rated as being in excellent plus condition for a BAA record-low $3177.00. The sale includes the original box and everything that came in it (except for the battery charger) and insured UPS ground shipping to lower-48 US addresses. I will throw in a copy of The Sony Camera User’s e-Guide and One Camera Set-up Video (a $100.00 value). Your new camera will not ship until your check clears unless other arrangements are made.
Please contact artie via e-mail or by phone (or text) at 1-863-221-2372 (Eastern time zone).
From the moment I tracked that first incoming Brandt’s Cormorant, I knew that SONY a9 series bodies featured the world’ best AF. I upgraded to the a9 ii as soon as it was released for the slightly larger body size. I currently own two of them. A new a9 ii sells for $4,498.00 so you can save a very nice $1321.00 by grabbing my a9 ii ASAP. Not to mention that the new Sony A1 sells for $6498.00 … artie
What’s Up?
Clemens Van der Werf, Donna Bourdon, and I, enjoyed a pretty good Thursday morning on Lake Blue Cypress aboard Clemens’ flats boat. There was a bit too much north in the wind but by waiting until the birds turned toward us we had some pretty good chances. I used my new Sony Alpha a1 with the hand held 200-600GM to make 1837 flight images. 1836 were razor sharp on the Osprey’s eye. I gave it a great test drive and learned a ton, especially about how the amazing Face/Eye Subject: Bird technology works. The short answer is very well indeed. In fact, it performed much better than as shown in online videos by various reviewers. Read and see more about our crappie day below.
If you got your Sony Alpha a1 using my affiliate links from B&H or Bedfords, please shoot me your receipt via e-mail and I will send you my brief but very helpful set-up notes.
The wind strengthened by 9:30am and it quickly became impossible to photograph from the rocking boat. So we headed home for a smoked salmon and cream cheese brunch. At about five, joined by my right-hand man Jim Litzenberg and older daughter Jennifer, we dined on fresh tuna and Brussels’ sprouts. We went down to the lake at sunset. Conditions were perfect. Clemens made the winning image of two Ospreys fighting. The wading birds were not terribly cooperative and the sunset fizzled a bit early.
Today is Friday 12 March and the three of us are headed for Lakeland in hopes of doing some American White Pelican photography. The forecast is for clear skies with an east/northeast breeze. Wherever you are and whatever you are doing, I hope that you have a great day.
I completed a final draft of the R5 guide early this morning. It will take me a day or two to get the PDF created. I will send the link to all who earned or purchased the guide soon thereafter. In addition, a link for the Educational R5 Gallery will be included. After any errors in this version are identified and corrected (thank you very much), I will send the final PDF. There will be no updates after that. Any new stuff will be shared in the blog.
Folks who wish to purchase a copy of the final draft and the video are invited to send a Paypal for $75.00 to birdsasart@verizon.net. They will of course receive the final PDF when it is completed in a week or ten days. Your guide may not be sent until Monday as I need to get the PDF done.
I was glad to learn last night that Used Gear Page regular Don Busby sold his Canon EOS-1DX Mark III dSLR in like-new condition with less than 10,000 shutter actuations for a very low $4500.00 (was $5499.00) in early February 2021.
This blog post took about 1 1/2 hours to prepare and makes eighty-one days in a row with a new one. Please remember to use my B&H affiliate links or to save money at Bedfords by using the BIRDSASART discount code at checkout.
Canon EOS R5 Camera User’s e-Guide
Two weeks ago, I sent out about a dozen copies of the almost finished Canon EOS R5 Camera User’s e-Guide for review to folks who had previously gotten free copies of the R5/R6 AF e-Guide by using my affiliate links to purchase their Canon mirrorless gear. In the same vein, I contacted everyone who purchased the R5/R6 AF e-Guide last week. More recently, folks who purchased the R5/R6 AF Guide were offered the opportunity to purchase a copy the pre-publication guide for review. Many folks have responded with thoughtful reviews, most recently, IPT veteran Warren Howe. And Bruce Dudek has continued to be a valuable resource.
Because the camera and the Menus are so complex, this guide has required a ton of research, a lot of time, and a lot of effort (and will continue to do so until it is complete). It should be finished by the first week in March. 2021. The final update of the R5/R6 AF e-Guide has become part of the complete Camera User’s e-Guide; it has already been revised and expanded.
The complete Camera User’s guide will sell for $75.00. Folks who purchased their Canon gear using my links will receive a $65.00 discount; the guide will cost them a nominal $10.00. Folks who spent more than $7500.00 on Canon mirrorless gear using either of my affiliate links (B&H or Bedfords), will receive the Camera User’s e-Guide for free. Folks who purchased the R5/R6 AF e-Guide will receive a $10.00 discount on the User’s e-Guide. The best news is that the end is in sight.
New and Better Bedfords Discount Policy!
You can now save 3% on all of your Bedfords photo gear purchases by entering the BIRDSASART coupon code at checkout. Your discount will be applied to your pre-tax total. In addition, by using the code you will get 2nd day air shipping via Fed Ex.
Grab a Nikon AF-S Teleconverter TC-14E III and save $14.99. Purchase a Canon EOS R5 and your discount will be $116.97. Purchase a Sony FE 600mm f/4 GM OSS lens and save a remarkable $389.94! Your Bedford’s purchase no longer needs to be greater than $1,000.00 for you to receive a discount. The more you spend, the more you save.
Money Saving Reminder
Many have learned that if you need a hot photo item that is out of stock at B&H and would enjoy free second-day air shipping, your best bet is to click here, place an order with Bedfords, and enter the coupon code BIRDSASART at checkout. If an item is out of stock, contact Steve Elkins via e-mail or on his cell phone at (479) 381-2592 (Central time). Be sure to mention the BIRDSASART coupon code and use it for your online order to save 3% and enjoy free 2nd-day air shipping. Steve has been great at getting folks the hot items that are out of stock at B&H and everywhere else. The wait lists at the big stores can be a year or longer for the hard to get items. Steve will surely get you your gear long before that. For the past year, he has been helping BAA Blog folks get their hands on items like the SONY a9 ii, the SONY 200-600 G OSS lens, the Canon EOS R5, the Canon RF 100-500mm lens, and the Nikon 500mm PF. Steve is personable, helpful, and eager to please.


Gear Questions and Advice
Too many folks attending BAA IPTs (remember those?) and dozens of photographers whom I see in the field and on BPN, are–out of ignorance–using the wrong gear especially when it comes to tripods and more especially, tripod heads… Please know that I am always glad to answer your gear questions via e-mail. Those questions might deal with systems, camera bodies, accessories, and/or lens choices and decisions.
|
|
|
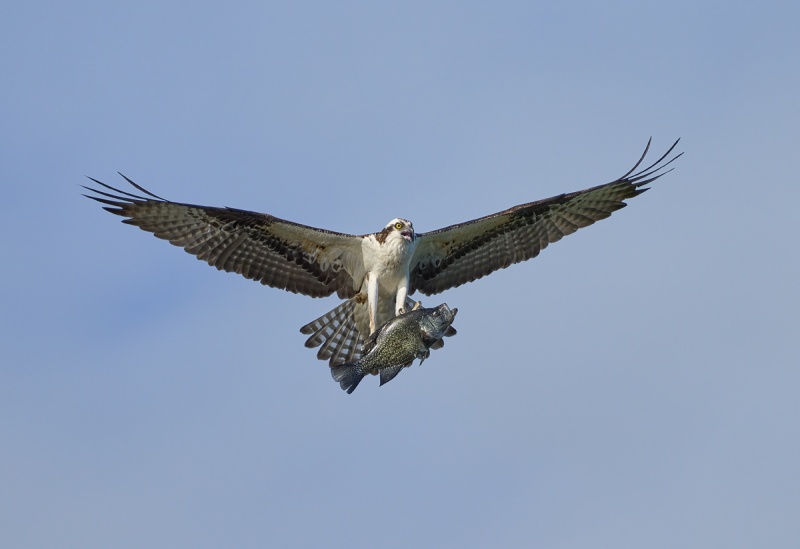
This image was created on 11 March 2021 on Lake Blue Cypress. I used the hand held Sony FE 200-600mm f/5.6-6.3 G OSS lens (at 600mm) and The One, the Sony Alpha 1 Mirrorless digital camera. ISO 640. Exposure determined with ISO on the Thumb Wheel. The exposure was confirmed as perfect by RawDigger: 1/3200 sec. at f/6.3 (wide open). AWB at 8:21am with clear morning.
Wide/AF-C was active at the moment of exposure and performed perfectly. Click on the image to enjoy a larger version.
Image #1: Osprey with whole crappie
|
A Crappie Morning on Lake Blue Cypress
crap·pie
(/ˈkräpē) noun
A North American freshwater fish of the sunfish family, the male of which builds a nest and guards the eggs and young.
The first thing that Ospreys do when they land with a fresh-caught fish is to rip the head off. For some reason, this bird kept landing and taking flight with his prized catch. It circled cooperatively several times giving us our very best chance of the morning. With too much north in the northeast winds, landing shots were tough as almost all of the birds landed slightly way from us. With east or southeast winds we would have been famous as the birds would have been landing right at us.
Typos
In all blog posts and Bulletins, feel free to e-mail or to leave a comment regarding any typos or errors.
March 11th, 2021 What’s Up?
I published yesterday’s blog post just after 7:00am and went to work setting up my brand new Sony Alpha a1. I thought that I had a chance to finish by 7:30am and get out to do some photography on what turned out to be a sunny morning. Though the options and set-up are very similar to the options and set-ups of the a9 ii and the a7r iv, the menus are totally different and I had a huge problem trying to assign ISO to the Control Wheel. I e-mailed several folks asking for guidance but nobody knew how to help me. (Thanks to Geoff Newhouse for trying!) Once Geoff told me that he was sure that it could be done, I went back at it with a vengeance and on about my fiftieth time, I finally figgered it out. All by my lonesome. If you got your a1 using my affiliate links from B&H or Bedfords, please shoot me your receipt via e-mail and I will send you my brief but very helpful set-up notes.
Donna Bourdon and I had a good wind for sunset, but the color faded well before the sun went down. I was set up with the 600 GM, the 2X TC, and the Alpha a1 in Tv mode with Auto ISO (as usual) and had only a few decent chances. I was incredibly impressed by the speed and sureness of the AF system; it absolutely slammed onto the birds in flight and locked on tenaciously. The AF system of the Alpha a1 is clearly better than the AF system of the a9 ii. Clearly. I will probably not have a chance to test the Bird Eye recognition at least until I get to Merritt Island. Unless I try it on Ospreys in flight tomorrow.
I am hoping to share an Alpha a1 Osprey image with you here tomorrow.
Today is Thursday 11 March 2021. The forecast for Lake Blue Cypress is for mostly sunny with light east/northeast winds, not too bad at all for Osprey flight. Wherever you are and whatever you are doing, I hope that you have a great day.
This blog post took a bit more less than one hour to prepare and makes eighty in a row with a new one. Please remember to use my B&H affiliate links or to save money at Bedfords by using the BIRDSASART discount code at checkout.
A Recent Comment by Jeff Walters
If Canon had Live Zebras would you be back full on? Or is Sony too far ahead?
My Reply
Great question Jeff. The short is is almost surely no. You’ve hit on SONY’s huge advantage: the Zebra technology. The other day while struggling with the R5’s in-viewfinder histogram, I realized something important. With the R5 you are looking at the admittedly lousy histogram — it usually misses seeing small bright highlights; if you go by the histogram, you wind up with some serious over-exposures. But the problem is that you are looking at the histogram while trying to frame the image. What I realized is that with SONY you are looking at the subject while noting the Zebras and dialing the ISO so that you have faint Zebras. The difference is that looking away from the subject with the R5 is always difficult at best, and usually fatal.
I have, however, avoided your question: would I switch back if Canon mirrorless offered Zebras with stills? The short answer is almost surely no. First off, AF with the a9 ii and the 600 GM with the 2X TC is insane. The best Canon might do with the R5/RF 2X TC, 600 III Is hope to tie. Another consideration is that I was unceremoniously (an inexplicably) let go as a Canon Explorer of Light about eight years ago. Huge thanks to program founder Michael Newler (aka Captain Explorer), the late Dave Metz, and Steve Inglima, for their (and Canon’s) incredible generosity over an eighteen year period. I did, and ironically, continue to do a ton for Canon; in recent months alone I have sold something like 51 R5 bodies via BAA affiliate link. I opted to take the high road when I was let go, and do not regret that. But it would be hard to imagine going back. Just because.
Don’t get me wrong, Canon has a better lens line-up by far, and the RF 100-500 is an absolute gem of a lens. I am baffled when folks e-mail complaining about the 1-5. In addition, the R5 with an adapter does extremely well on the fast EF super-telephoto lenses. On the other hand I have tried to become a SONY Artisan and my efforts have been pretty much ignored despite the fact that the number of Artisans who photograph birds is zero. As I (and Byron Katie) say often, You gotta love it.
Speaking of SONY, I took my brand new Sony Alpha a1 out for a test drive last night at sunset and was mega-impressed. I did not however, have a chance to play with the new Bird Eye recognition technology. Donna and I are headed for Lake Blue Cypress to meet up with Clemens Van der Werf and his boat to photograph Osprey. I am bringing only my SONY 600 GM, the 1.4X TC, and the Alpha a1. I will be shooting two systems for at least a while as the R5/RF100-500 with RF Extenders 1.4X and 2X TC are utterly superb for close work with tame birds. Time will tell how the Bird Eye recognition stuff stacks up against the R5’s Face Detection plus racking with animal eye.
Why No Photo in This Blog Post?
Donna got to ILE at about 3:00pm. At 3:30 we began setting up her brand new R5. We worked off and on for about an hour. Donna did not have a UHS ii card for her new body so I took the brand new Delkin UHS-II 128GB Power SD Memory Card out of my a1 and gave it to her. Now needing a card for my new camera, I figured what the heck so I opened the packet with one of my two brand new Sony 160GB CFexpress Type A TOUGH Memory Card, the super-fast card designed to maximize performance with the a1. I was smart enough to set up the a1 to shoot Compressed RAW as I need to find out how to convert the a1 raw files. But I was not smart enough to realize that I did not have a card reader that I could use to get the images onto my MacBook Pro. Duh. I had lots of other Delkin UHS-II cards that I could have used …
I will use a much slower UH-S II card all day today. Steve Elkins of Bedfords is sending me a ProGrade Digital CFexpress Type A & UHS-II SDXC Dual-Slot USB 3.2 Gen 2 Card Reader ($79.99) via Fed-Ex; it should arrive today or tomorrow the latest. That saves you $40.00 as compared to the cost of the Sony MRW-G2 CFexpress Type A/SD Memory Card Reader ($119.99) which is very hard to get right now. Right now, it looks as if Bedfords has both card readers in stock.
All of the links to the SONY stuff above go to Bedfords, so if you need a CFexpress Type A card and one of the readers to pair with your new Sony Alpha a1, be sure to enter the BIRDSASART code at checkout to save 3% and enjoy free second-day air shipping.
Tomorrow morning we are doing Stick Marsh over near Vero on Clemens boat. We head over to Merritt Island on Saturday to get in an extra day of shooting before the IPT begins.
Notes: It is likely that Delkin will — at some point, be making the CFexpress Type A cards. When that happens, I will switch to the Delkin cards. (I did have a problem with the single SONY Tough UHS-II card that I purchased in a pinch a while back …)
CEA-G Series CFexpress Type A Memory Card
Extremely fast, reliable, and compact for professionals who require the highest performance in the most extreme conditions. The CEA-G80T and CEA-G160G memory cards protect recordings and boost workflow for photographers, videographers, and enthusiasts.
CEA-G Series CFexpress Type A Memory Card
New standard for compact storage
CFexpress Type A cards are a new standard for compact, high-performance storage. Despite being smaller than a conventional SD card, their PCIe Gen3 interface offers ultra-fast data transfer. It is an ideal storage medium for the future of compact, high-bitrate video and still cameras.
High-speed performance
Sony CFexpress Type A memory cards are designed for professional photographers, videographers, and enthusiasts looking to super-charge their workflow with unrivaled speed and reliability. Ultra-high-speed performance (up to 800 MB/s read and 700 MB/s write ) is efficiently packed in the compact and durable body, to help you get the most from the latest high-end cameras.
Made incredibly TOUGH
Thanks to Sony’s unique TOUGH card design, our CFexpress Type A cards offer over 10x greater bend resistance than the CFexpress Type A standard. Designed for absolute dependability, the resin body is 5x more impact-resistant than the CFexpress Type A standard, and provides IP57 dust and water protection. New heat-dissipating materials also ensure consistent high-speed data transfers, along with resistance to X-rays, UV, and electrostatic radiation.
Work faster, be more productive
CFexpress Type A memory cards open up worlds of opportunity for professionals. Handling high-resolution files and high-speed recordings in a small but rugged format, it’s perfect for speeding up workflows and improving productivity, allowing you to have more time available for creative work.
Rapid-response photography
Dramatically expand your photographic possibilities, with uncompressed continuous RAW shooting for fast-moving action such as motor sports and wildlife. Writing speeds of up to 700 MB/s1 ensure ultra-fast camera buffer clearance for responsive, continuous shooting.
Dependable videography
Sony CFexpress Type A cards are optimized for continuous, high-bandwidth data writing, making them ideal for professional high-bitrate video recording, such as 4K 120p, where dependability is critical. For extra reassurance and video recording stability they also carry the VPG (Video Performance Guarantee) 400.
Speed up workflow with the CFexpress Type A card reader
Optimized for Sony CFexpress Type A memory cards, the optional MRW-G2 card reader allows you to transfer data via a SuperSpeed USB 10 Gbps (USB 3.2) interface and take full advantage of high-speed backups and more efficient workflows. It’s compact, easy to carry, and works with both Sony CFexpress Type A and SDXC UHS-II/UHS-I memory cards.
Sony’s TOUGH for the roughest places
With a tough design, CFexpress Type A memory cards offer superior strength up to 10x greater than the CFexpress Type A standard, additional rigidity tested to 150 newtons of force, and can withstand falls of up to 24.6 feet.
Sony’s TOUGH for the toughest places
You can rely on CFexpress Type A memory cards to work faultlessly in extreme temperatures, X-rays, electrostatic environments, and intense UV light. A dust- and water-resistant design provides the reliability needed for outdoor use in challenging conditions (IP57).
File Rescue: Recover lost files
New and Better Bedfords Discount Policy!
You can now save 3% on all of your Bedfords photo gear purchases by entering the BIRDSASART coupon code at checkout. Your discount will be applied to your pre-tax total. In addition, by using the code you will get 2nd day air shipping via Fed Ex.
Grab a Nikon AF-S Teleconverter TC-14E III and save $14.99. Purchase a Canon EOS R5 and your discount will be $116.97. Purchase a Sony FE 600mm f/4 GM OSS lens and save a remarkable $389.94! Your Bedford’s purchase no longer needs to be greater than $1,000.00 for you to receive a discount. The more you spend, the more you save.
Money Saving Reminder
Many have learned that if you need a hot photo item that is out of stock at B&H and would enjoy free second-day air shipping, your best bet is to click here, place an order with Bedfords, and enter the coupon code BIRDSASART at checkout. If an item is out of stock, contact Steve Elkins via e-mail or on his cell phone at (479) 381-2592 (Central time). Be sure to mention the BIRDSASART coupon code and use it for your online order to save 3% and enjoy free 2nd-day air shipping. Steve has been great at getting folks the hot items that are out of stock at B&H and everywhere else. The wait lists at the big stores can be a year or longer for the hard to get items. Steve will surely get you your gear long before that. For the past year, he has been helping BAA Blog folks get their hands on items like the SONY a9 ii, the SONY 200-600 G OSS lens, the Canon EOS R5, the Canon RF 100-500mm lens, and the Nikon 500mm PF. Steve is personable, helpful, and eager to please.
March 10th, 2021
But Don’t Get Too, Too Excited!
In today’s post you will see some astounding images made at 1000mm with the hand held Canon RF 100-500mm f/4.5-7.1L IS USM lens with the Canon Extender RF 2x and the highly touted 45MP Canon EOS R5 Mirrorless Digital camera body.
But don’t get too, too excited:
1- You will likely need fairly fast shutter speeds in order to create sharp images.
2- You will be working at very small apertures — wide open at 1000mm is f/14 — that will require relatively high ISO settings in any lighting conditions other than full sun.
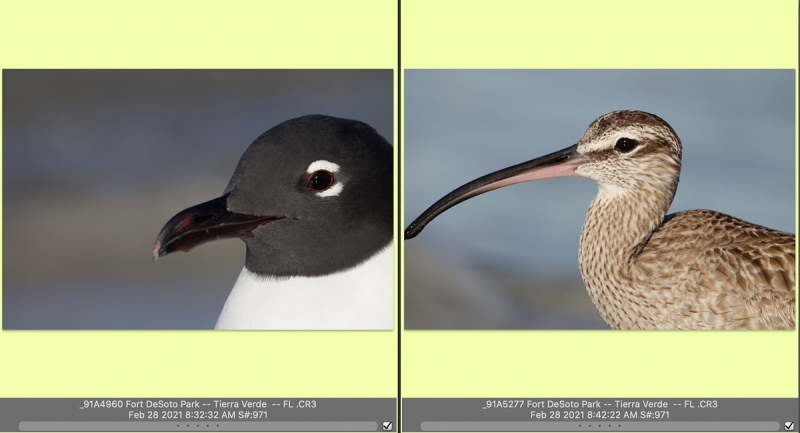
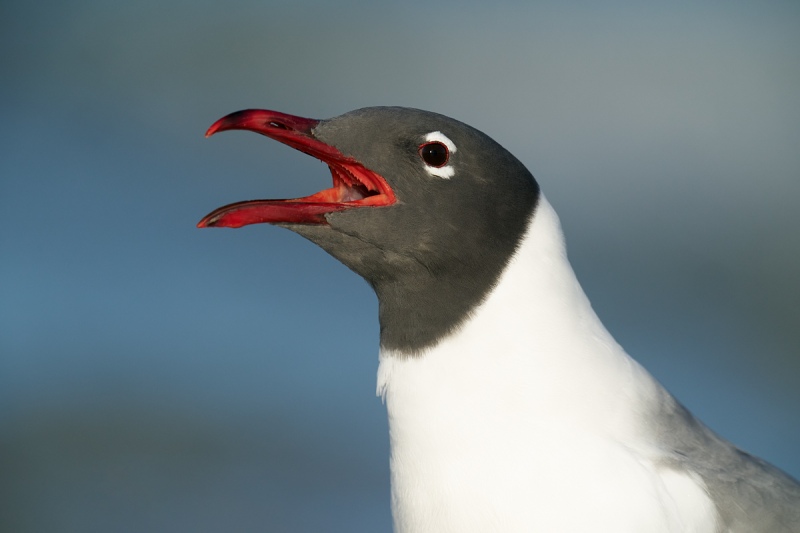
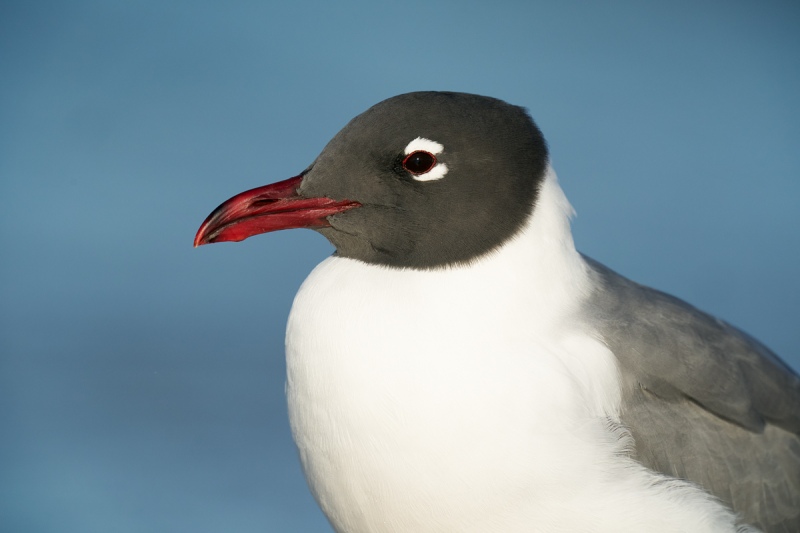
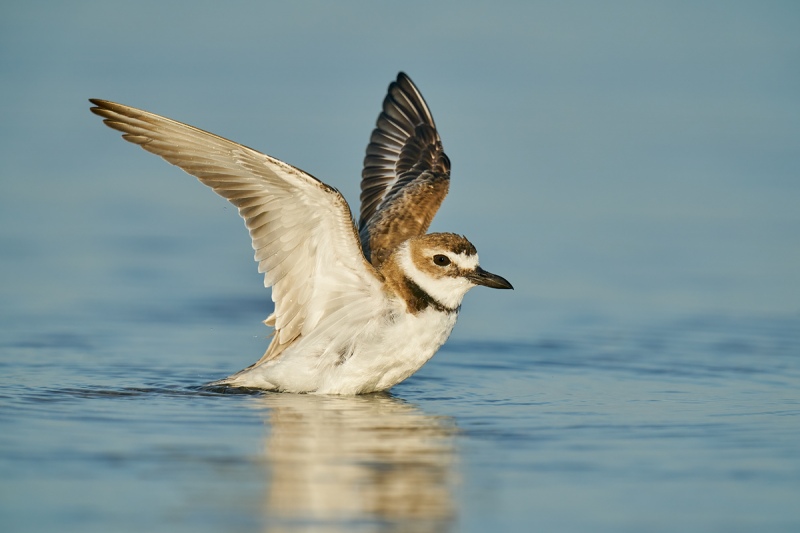
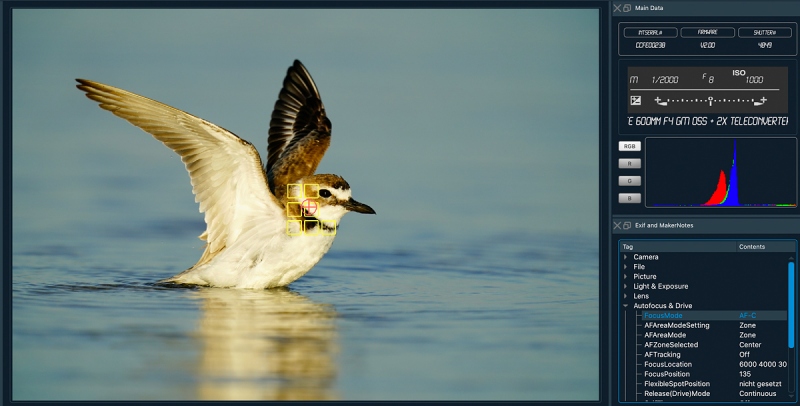
3- As seen by the two screen captures above, framing an image properly when hand holding at 1000mm (20X magnification) is extremely difficult. That is true even when the bird is completely still like the Laughing Gull was when the image on the left (above) was created. If a bird is moving in any way, framing becomes close to impossible; the Whimbrel (above, on the right), walked right in front of me. I was a bit too greedy and as a result, did not make a single image without clipping the bill tip. (I do have a plan for repairing the Whimbrel image; if I succeed you will be seeing the result here on the blog at some point.
What’s Up?
On Tuesday morning, I spotted the last surviving baby crane (of the four hatched this season) in the South Marsh with the two adults. It is apparently doing very well. I made a few nice images of an adult crane ruffling in soft light and then headed home early.
I decided to do a Camtasia video gallery presentation for the BAA Canon R5 Camera User’s e-guide. It took me less than an hour to record it, more than two hours to edit and render it for sharing, and more than three hours to upload it. Though sunset looked somewhat promising I opted to stay home and keep working. There is tons going on.
Multiple-IPT veteran and dear friend Donna Bourdon is flying from Memphis to Orlando today for three days of In-the-Field Instruction and help with her brand new R5 (that is presently sitting on my dining room table). Jim will be picking Donna up after lunch. We are hoping for a decent sunset shoot.
As the baby crane photography has fizzled with the loss of the two colts and the one chick, BAA-friend Clemens Van der Werf is driving up from West Palm with his boat in tow. We plan on meeting him and Lake Blue Cypress on Thursday morning. Donna’s partner Bev Still will meet us at my home on Saturday and the three of use will be heading over to Titusville for the Merritt Island IPT.
In addition to the video gallery, I got more work done on the R5 guide. Bruce Dudek continues to be an amazing help and resource despite that fact that he keeps asking pointed questions and making suggestions that require complete re-writes of major portions of the guide. For that I thank him.
Right now, the battery for my new SONY Alpha a-1 mirrorless camera body is on the charger. A good bit of news is that it takes the same battery as the a9/a7r series bodies. It is 6:29am as I type. If I can get this blog done and posted, I hope to have a few minutes for a cursory set-up of the a1 and head down to the lake for a bit before returning home to work on the R5 guide.
Please do not ask me my opinion of folks who constantly whine, I have nothing to do!
Today is Wednesday 10 March 2021. The forecast for this morning is for partly cloudy skies with gentle winds from the east/northeast. Wherever you are and whatever you are doing, I hope that you have a great day.
This blog post took a bit more than two hours to prepare and makes seventy-nine days in a row with a new one. Please remember to use my B&H affiliate links or to save money at Bedfords by using the BIRDSASART discount code at checkout.
The BAA Used Gear Page
The Used Gear page continues to be very active. The BAA Used Gear Page is the place to sell your used photographic equipment. We will help you to get your gear sold quickly for 30 to 70% or more than what the big guys are offering … Doubt me? Check out the Recent Sales list at the bottom of the page.
Canon EF 500 f4/L IS II USM Lens
Kirk Stitt is offering a Canon EF 500 f4/L IS II USM lens in excellent plus condition for a very low $5349.00. The sale includes a LensCoat, the rear lens cap, the lens trunk, the front lens cover, the lens strap, and insured ground shipping via major courier to lower-48 US addresses only. Your item will not ship until your check clears unless other arrangements are made.
Please contact Kirk Stitt via e-mail or by phone at 1-900-800-9898 (Mountain time zone).
With the success of the Canon EOS R5 and R6 mirrorless bodies, the series II super-teles are in high demand. The 500 f/4 super-telephotos have long been the world’s most popular lenses for birds, nature, wildlife, and sports for many decades. Canon’s Series II version is light, fast, super-sharp, and produces amazing images with both the 1.4X and 2X III TCs. The 500 II is relatively small, easily hand-holdable for some folks, and is much easier to travel with, focuses closer than, and costs a lot less than the 600 II or the 600 III!. Lastly, and you might find this amazing, the magnification for the 500 II is the same as it is for the 600 II: .15X. How is that possible? Magnification is calculated at the minimum focusing distance of the lens — 12.14 feet (3.7 meters) for the 500 II and 14.77 feet (4.5 meters) for the 600 II. Simply put, the 500 II focuses more than two feet closer than the 600 II. Please do not tarry if you are seriously interested in Kirk’s lens as it should sell quickly. artie
Canon EOS R5 Camera User’s e-Guide
Eleven days ago, I sent out about a dozen copies of the almost finished Canon EOS R5 Camera User’s e-Guide for review to folks who had previously gotten free copies of the R5/R6 AF e-Guide by using my affiliate links to purchase their Canon mirrorless gear. In the same vein, I contacted everyone who purchased the R5/R6 AF e-Guide last week. More recently, folks who purchased the R5/R6 AF Guide were offered the opportunity to purchase a copy the pre-publication guide for review. Many folks have responded with thoughtful reviews, most recently, IPT veteran Warren Howe.
Because the camera and the Menus are so complex, this guide has required a ton of research, a lot of time, and a lot of effort (and will continue to do so until it is complete). It should be finished by the first week in March. 2021. The final update of the R5/R6 AF e-Guide has become part of the complete Camera User’s e-Guide; it has already been revised and expanded.
The complete Camera User’s guide will sell for $75.00. Folks who purchased their Canon gear using my links will receive a $65.00 discount; the guide will cost them a nominal $10.00. Folks who spent more than $7500.00 on Canon mirrorless gear using either of my affiliate links (B&H or Bedfords), will receive the Camera User’s e-Guide for free. Folks who purchased the R5/R6 AF e-Guide will receive a $10.00 discount on the User’s e-Guide. The best news is that the end is in sight.
New and Better Bedfords Discount Policy!
You can now save 3% on all of your Bedfords photo gear purchases by entering the BIRDSASART coupon code at checkout. Your discount will be applied to your pre-tax total. In addition, by using the code you will get 2nd day air shipping via Fed Ex.
Grab a Nikon AF-S Teleconverter TC-14E III and save $14.99. Purchase a Canon EOS R5 and your discount will be $116.97. Purchase a Sony FE 600mm f/4 GM OSS lens and save a remarkable $389.94! Your Bedford’s purchase no longer needs to be greater than $1,000.00 for you to receive a discount. The more you spend, the more you save.
Money Saving Reminder
Many have learned that if you need a hot photo item that is out of stock at B&H and would enjoy free second-day air shipping, your best bet is to click here, place an order with Bedfords, and enter the coupon code BIRDSASART at checkout. If an item is out of stock, contact Steve Elkins via e-mail or on his cell phone at (479) 381-2592 (Central time). Be sure to mention the BIRDSASART coupon code and use it for your online order to save 3% and enjoy free 2nd-day air shipping. Steve has been great at getting folks the hot items that are out of stock at B&H and everywhere else. The wait lists at the big stores can be a year or longer for the hard to get items. Steve will surely get you your gear long before that. For the past year, he has been helping BAA Blog folks get their hands on items like the SONY a9 ii, the SONY 200-600 G OSS lens, the Canon EOS R5, the Canon RF 100-500mm lens, and the Nikon 500mm PF. Steve is personable, helpful, and eager to please.


Gear Questions and Advice
Too many folks attending BAA IPTs (remember those?) and dozens of photographers whom I see in the field and on BPN, are–out of ignorance–using the wrong gear especially when it comes to tripods and more especially, tripod heads… Please know that I am always glad to answer your gear questions via e-mail. Those questions might deal with systems, camera bodies, accessories, and/or lens choices and decisions.
|
|
|
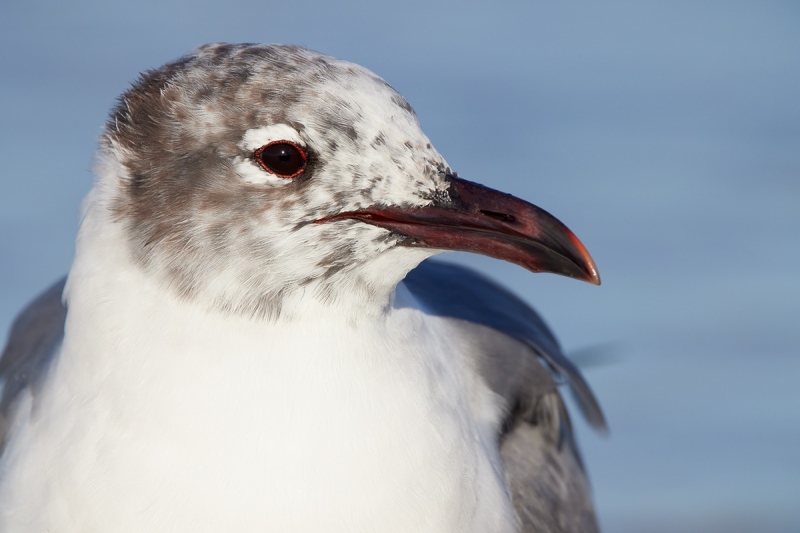
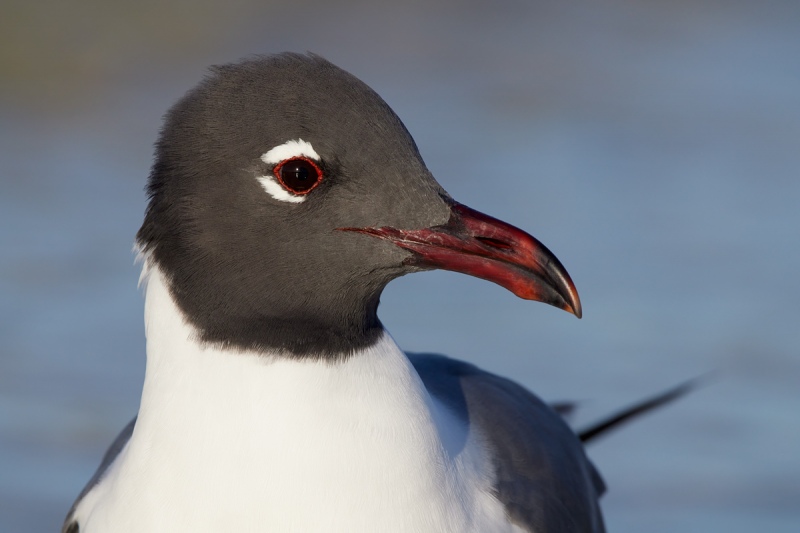
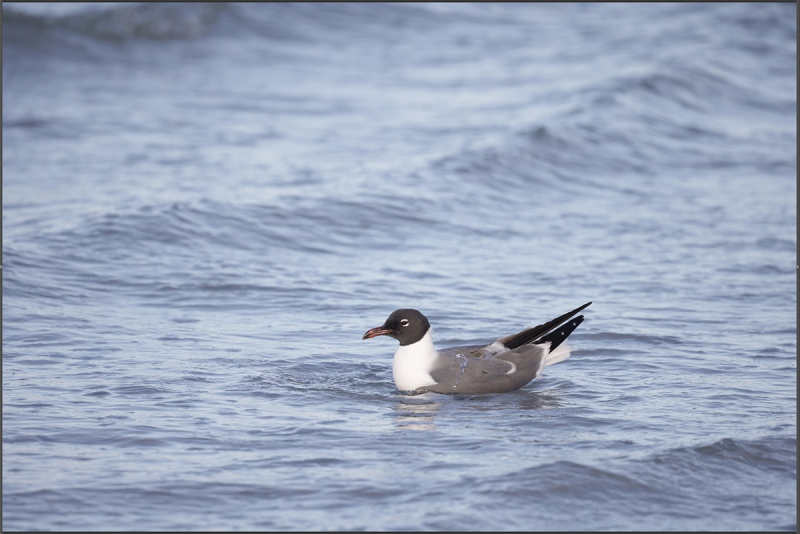
This image was created on 28 February 2021 at Fort DeSoto Park, Tierra Verde, FL. Using the knee-pod technique while seated on the wet sand, I worked with the the handheld Canon RF 100-500mm f/4.5-7.1L IS USM lens with the Canon Extender RF 2x (at 1000mm) and the highly touted 45MP Canon EOS R5 Mirrorless Digital camera body. ISO 800. Exposure determined by test exposure & histogram and blinkies evaluation: 1/800 second at f/18 (stopped down 2/3-stop) in Manual mode. RawDigger showed this one to be less than 1/3 stop under-exposed. AWB at 8:35am on a sunny morning.
Face Detection plus Tracking grabbed and tracked the gull’s eye perfectly.
Click on the image to see a larger version.
Image #1: Laughing Gull just beginning to molt into breeding plumage/head portrait
|
Thanks Steve King!
On the last day of my recent Fort DeSoto busman’s holiday, Steve King joined me for a morning of In-the-Field Instruction. We had a great day. When he mentioned that he was bringing along his Canon Extender RF 2x, I thought, Now that seems quite impractical. None-the-less, when the sun came out at about 8:15am, I asked to borrow his RF 2X and Steve kindly went to his pack and handed it over. Long story short: I ordered one from Steve Elkins the next day. Like everything R5-related, it is hard to get your hands on the RF doubler. Mine should be here Friday just before I leave for the Merritt Island IPT.
|
|
|
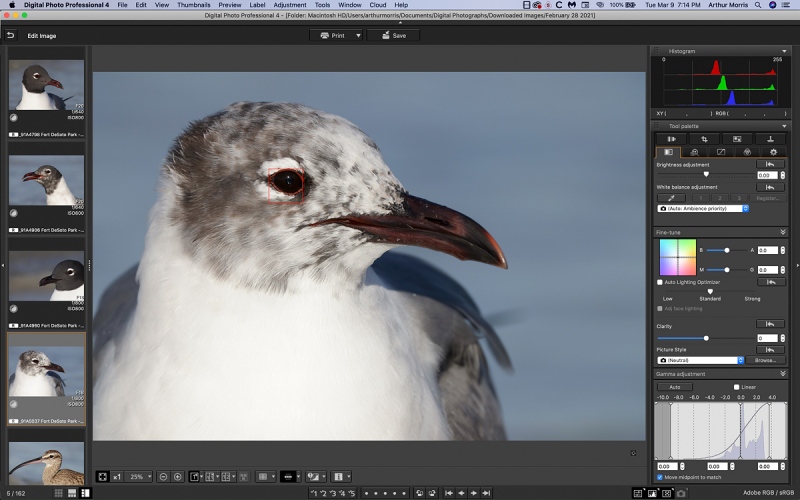
Face Detection plus Tracking grabbed and tracked the gull’s eye perfectly.
Click on the image to see a larger version.
Image #1A: DPP 4 screen capture for the Laughing Gull just beginning to molt into breeding plumage/head portrait image
|
Somewhat Amazingly
Somewhat amazingly, Face Detection plus Tracking AF performed superbly at f/14 even at 1000mm. With the camera set up as detailed in the nearly finished BAA Canon EOS R5 Camera User’s e-Guide, the performance of the AF system left me slack-jawed. As noted above, the huge problem was with framing the images properly. I worked with the 2X for about 30 minutes and created about 700 images. Well more than 400 of those were insta-deletes because they were horribly framed.
Note the red AF box squarely on the eye of the gull. Even in the mis-framed images that opened this blog post, the AF system nailed the eye.
|
|
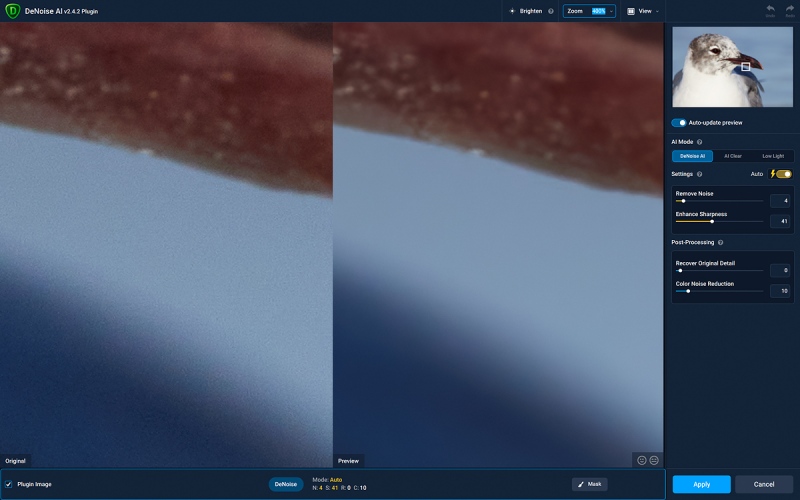
Image #1B: Topaz DeNoise on the Laughing Gull just beginning to molt into breeding plumage/head portrait image
|
Topaz DeNoise AI on DeNoise on Auto
Be sure to click on the image to see the phenomenal job that DeNoise AI did on the background noise and the noise in the shadows as well. With either DeNoise or Low Light, smooth-as-a-baby’s tush results are par for the course. It will be interesting to see what happens when I try the Canon rig at 1000mm in low light conditions …
Great Topaz News!
Folks who use the BAA Topaz link to purchase Sharpen AI, DeNoise AI, or the Utility Bundle (or any other Topaz plug-ins) will receive a 15% discount by entering the ARTHUR15 code at checkout. If the stuff is on sale (as it usually is), you save 15% off of the sale price! To get the discount you must use my link and you must enter the discount code. Be sure to start with this link.
Those who purchase Sharpen AI, DeNoise AI, or any other Topaz plug-ins using my link and then entering the ARTHUR15 code at checkout can e-mail to request a short Getting Started with Topaz e-Guide. Please include a copy of your Topaz receipt that shows the discount. Aside from the basics, the guide explains how to install the plug-ins so that they appear in the Photoshop Filter Menu.
|
|
|
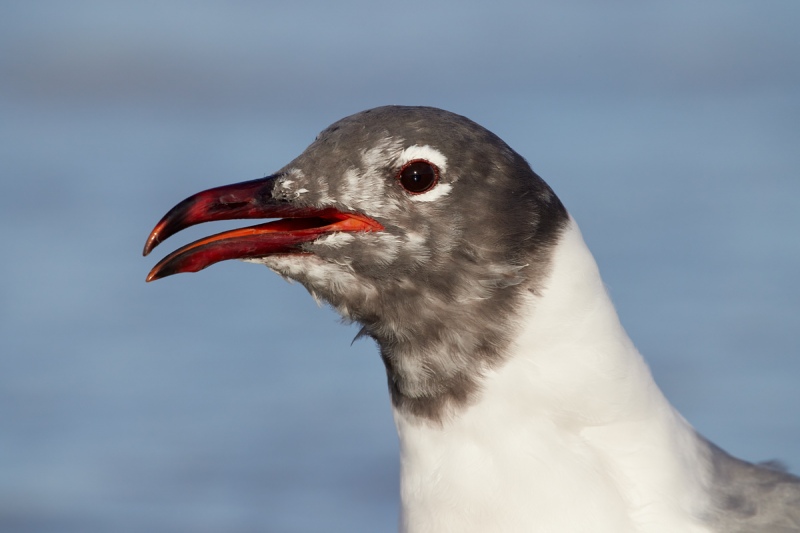
This image was also created on 28 February 2021 at Fort DeSoto Park, Tierra Verde, FL. Again, using the knee-pod technique while seated on the wet sand, I worked with the the handheld Canon RF 100-500mm f/4.5-7.1L IS USM lens with the Canon Extender RF 2x (at 1000mm) and the highly touted 45MP Canon EOS R5 Mirrorless Digital camera body. ISO 800. Exposure determined by test exposure & histogram and blinkies evaluation: 1/640 second at f/20 (stopped down one-stop) in Manual mode. RawDigger showed this one to be less than 1/3 stop under-exposed. AWB at 8:28am on a sunny morning.
Face Detection plus Tracking grabbed and tracked the gull’s eye perfectly.
Click on the image to see a larger version.
Image #2: Laughing Gull molting into breeding plumage/head portrait
|
Further Along
The bird in this image is a a bit further along in its molt to breeding plumage. Even when the bird began calling, the AF system had zero problems tracking the eye. Perhaps even more astoundingly, the images at 1000mm were incredibly sharp and featured the crispy eye skins that I love. And the fine-feather-detail (FFD) was off the charts.
Stopping Down?
Some might ask, Why stop down to f/18 and f20 when wide open at 1000mm is f/14? . Folks need to remember that the need for additional depth of field is greatest when you are working with long focal lengths at point blank range. At six feet at 1000mm wide open the total depth of field is 0.0 feet. At f/20 it increases to 0.01 feet. Not much but better than nothing.
|
|
|
This image was also created on 28 February 2021 at Fort DeSoto Park, Tierra Verde, FL. Again, using the knee-pod technique while seated on the wet sand, I worked with the the handheld Canon RF 100-500mm f/4.5-7.1L IS USM lens with the Canon Extender RF 2x (at 902mm) and the highly touted 45MP Canon EOS R5 Mirrorless Digital camera body. ISO 800. Exposure determined by test exposure & histogram and blinkies evaluation: 1/640 second at f/20 (stopped down one-stop) in Manual mode. RawDigger showed this one to be less than 1/3 stop under-exposed. AWB at 8:24am on a sunny morning.
Face Detection plus Tracking grabbed and tracked the gull’s eye perfectly.
Click on the image to see a larger version.
Image #3: Laughing Gull molting into breeding plumage/head portrait
|
The Whole Nine Yards
This bird is pretty much in full breeding plumage with the complete jet-black cap, wine-red bill, and white eye crescents. With blue water backgrounds, they are a sight to see. Most of the Laughing Gulls will be in full breeding plumage in April. They and the Royal and Sandwich Terns will be exhibiting a variety of breeding behaviors on both IPTs. Those include courtship displays and feeding, copulatory stands, and copulations.
Summing Up
The addition of the RF 2X teleconverter to the R5/RF 100-500/RF 1.4X teleconverter greatly expands the versatility of the already great Canon mirrorless rig. As with the RF 1.4X TC, you cannot zoom wider than the 300mm mark. That gives you a hand holdable 600-1000mm lens that is super-sharp and offers incredible AF (albeit with small apertures with correspondingly high ISOs.
Do note that you mount the TC you must be at the 300mm setting (or longer).
|
|
|
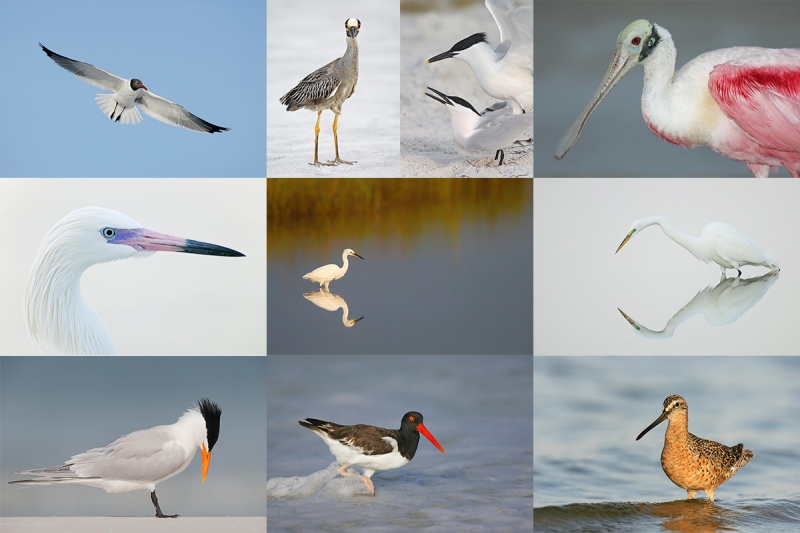
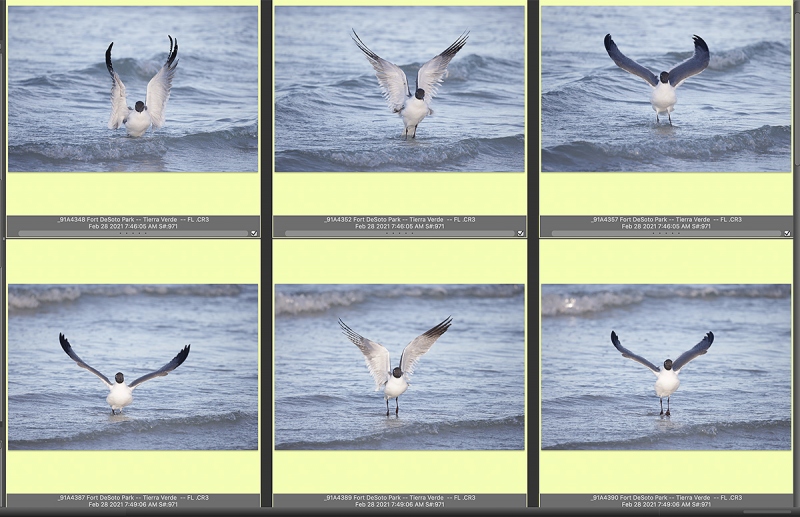
All of the images were created at Fort DeSoto in April or early May. Click on the card to enjoy a larger version.
Fort DeSoto IPT card A
|
Fort DeSoto Spring IPT #1
Fort DeSoto Spring IPT #1. 3 1/2 DAYS. SAT 10 APR thru the morning session on TEUS 13 APR 2021. $1499 includes three lunches. Limit: 6. Openings 5.
While DeSoto is one of the rare photo hotspots with the potential to be great any day of the year, it absolutely shines in spring. Many of the wading birds and shorebirds are in full breeding plumage. The terns and gulls are courting and copulating. We will have lots of flight photography opportunities. Did I mention that many of the birds are silly tame?
A $499 deposit is required to hold your spot for this IPT. You can send a check (made out to “BIRDS AS ART) to us here: BIRDS AS ART, PO Box 7245, Indian Lake Estates, FL, 33855, or call Jim or Jennifer at the office with a credit card at 863-692-0906. Your balance, payable only by check, is due immediately after you sign up. If you have any questions, please feel free to contact me via e-mail. If you cancel due to COVID 19 concerns, all of your payments will be refunded.
|
|
|
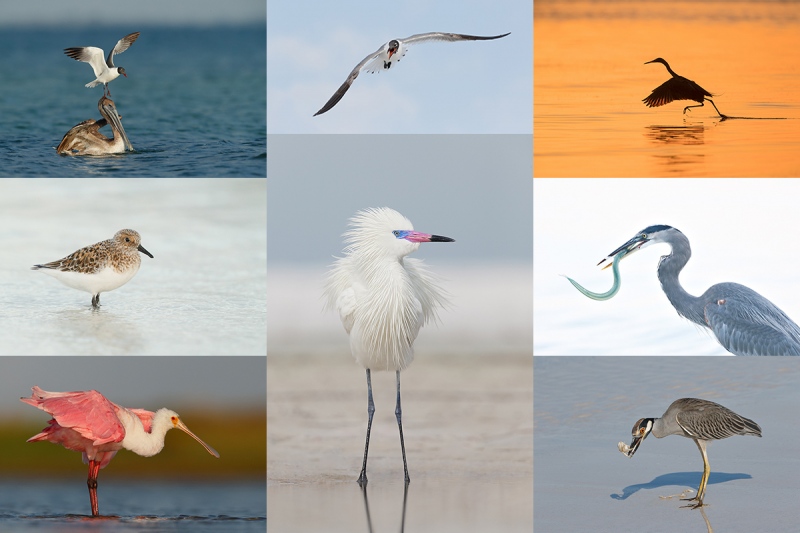
All of the images were created at Fort DeSoto in April or early May. Click on the card to enjoy a larger version.
Fort DeSoto IPT card B
|
Fort DeSoto Spring IPT #2
Fort DeSoto Spring IPT #2. 3 1/2 DAYS. MON 26 APR thru the morning session on THURS 29 APR 2021. $1499 includes three lunches. Limit: 6/Openings: 5.
Not only am I conversant in all three major camera systems used in the US — Nikon, Canon, and SONY (sorry Andy Rouse …), I have used all three within the past four years. Those include both SONY and Canon mirrorless. On both of these IPTs you will learn how to get the best exposure, how to get the most out of your AF system, and how to get close to free and wild birds. And tons more.
A $499 deposit is required to hold your spot for this IPT. You can send a check (made out to “BIRDS AS ART) to us here: BIRDS AS ART, PO Box 7245, Indian Lake Estates, FL, 33855, or call Jim or Jennifer at the office with a credit card at 863-692-0906. Your balance, payable only by check, is due immediately after you sign up. If you have any questions, please feel free to contact me via e-mail. If you cancel due to COVID 19 concerns, all of your payments will be refunded.
|
|
|
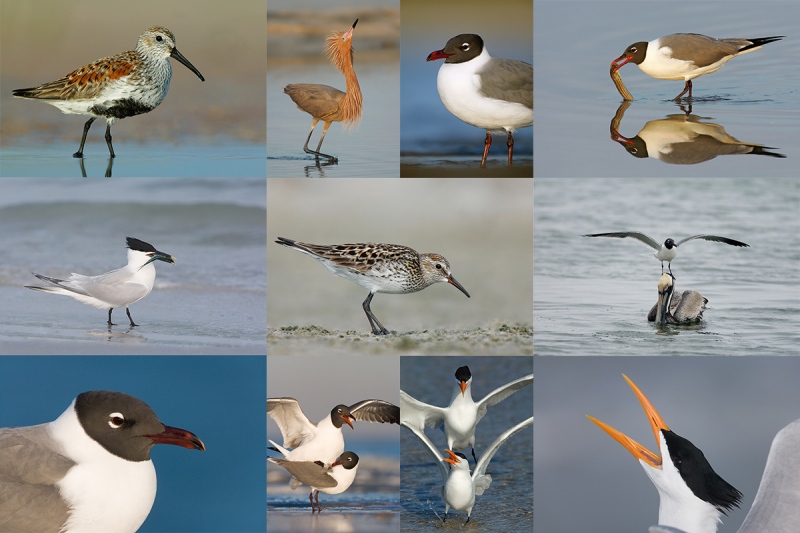
All of the images were created at Fort DeSoto in April or early May. Click on the card to enjoy a larger version.
Fort DeSoto IPT card C
|
Fort DeSoto Spring IPTs Expected Species
With any luck, we should get to photograph the following species: Laughing, Ring-billed, Herring, and Lesser Black-backed Gull; Royal, Sandwich, and Forster’s Tern: Great, Snowy, and white and dark morph Reddish Egret and Great Blue, Little Blue, and Tricolored Heron; Yellow-crowned Night-Heron, Wood Stork, Roseate Spoonbill, and Brown Pelican. We will see and photograph lots of shorebirds including American Oystercatcher, Black-bellied, Wilson’s, Semipalmated, Snowy, and Piping Plover, Marbled Godwit, Willet, Dunlin, Red Knot, Sanderling, and Western and possibly White-rumped Sandpiper.
Sign up for both IPTs and enjoy a $200 discount. Most of us will be staying in nearby Gulfport.
Typos
With all blog posts, feel free to e-mail or to leave a comment regarding any typos or errors.
March 9th, 2021 What’s Up?
Monday morning provided little action, and Monday evening’s sunset was not too good at all. Well after the sun was down, I watched one young and two adult Bald Eagles cavorting over the marsh to the north. The youngster kept diving into the marsh grasses and coming up empty. It was fun to watch. I tried some blurs at shutter speeds ranging from 1/30 to 1/8 second. And deleted them all.
Again I got a ton of work done on the BAA Canon R5 Camera User’s e-Guide. As far as the text is concerned, I have a very few loose ends to tighten up. I decided to do an educational video gallery. It is not yet 5:00am as I type so once I hit publish, the plan is to do the video before I head down to the lake.
Today is Tuesday 9 March 2021. The forecast for this morning is for partly cloudy skies with gentle winds from the northeast. I will head down to the lake for a look-see early this morning.
Wherever you are and whatever you are doing, I hope that you have a great day.
This blog post took a bit more than 1 1/2 hours to prepare and makes seventy-eight days in a row with a new one. Please remember to use my B&H affiliate links or to save money at Bedfords by using the BIRDSASART discount code at checkout.
A Tough Year for Sandhill Cranes at ILE
At about 6:00pm on Sunday evening, while checking on the crane family at the south end of the South Field, I was pleased to see that both chicks were doing well and that the family had crossed back over the canal and was over-nighting on the original nest. They had been spending their nights at an unknown location in the South Marsh. When I went to check on them on Monday morning, there was only one large chick with the parents. I sat on a slope with the R5/RF 100-500 as the family foraged their way toward me. I made some nice vertical of the surviving chick as it walked right toward me. As it kept coming I turned the camera to horizontal format and made the sweetest chick head portrait ever. Because I was relatively low, the background was absolutely creamy.
When I returned 30 minutes later, I could not — though I looked everywhere — find the family. Before sunset on Monday, I returned to the location of the nest. A friend was there, and we could only find the two adults. But just before I left, I spotted the chick foraging in the thick vegetation near the nest. Whew!
With the loss of the two colts at the north end of the North Field last Wednesday evening, only a single young crane of the four hatched this season survives. One out of four is bad news. And the surviving chick has a long way to go. I wish it luck. The typical mortality rate for young cranes here at ILE has been about 50% so 2021 has indeed already been a very poor year. I am hoping that there might be a pair on a late nest as there was last year …
I have never seen so many eagles along the lakefront …
The BAA Used Gear Page
The Used Gear page continues to be very active. The BAA Used Gear Page is the place to sell your used photographic equipment. We will help you to get your gear sold quickly for 30 to 70% or more than what the big guys are offering … Doubt me? Check out the Recent Sales list at the bottom of the page.
Price Drops
Canon EOS 5D Mark III dSLR Converted to Infrared (with Extras)
Price reduced $100.00 8 MAR 2021
BIRDS AS ART friend and multiple IPT veteran Morris Herstein is offering a Canon EOS 5D Mark III dSLR converted to infrared (830 nanometers) by Life Pixel in excellent plus condition with extras for $899.00 (was $999.00). The sale include two Canon LP-E6N batteries, the charger, the front body cap, two Lexar 128GB 1066X flash cards, and insured ground shipping via major courier to lower-48 US addresses only. Your item will not ship until your check clears unless other arrangements are made.
Please contact Morris via e-mail.
When I shot Canon exclusively, I had a ton of fun making landscapes, tree-scapes, and cloud-scapes with a 5D Mark II that had been converted to infrared. The 5D III is a step up from that. These infrared-converted bodies pair well with the 24-105 and any of the 70-200s. artie
FlexShooter Pro Tripod Head
Price reduced $50.00 8 MAR 2021
BIRDS AS ART friend and multiple IPT veteran Morris Herstein is offering a barely used FlexShooter Pro head in for a BAA record-low $448.00 (was $498.00). The sale includes insured ground shipping via major courier to lower-48 US addresses only. Your item will not ship until your check clears unless other arrangements are made.
Please contact Morris via e-mail.
The FlexShooter Pro is a ballhead that thinks and acts like a gimbal head. Thanks to the bi-directional clamp, it is great for lenses short and long. Once your rig is set up properly, long lenses stay right where you point them without your having to lock up the head! Where you point the lens is what you get. That thanks to the patented counter-balanced spring system design. I predicted that these heads would take the world of nature photography by storm. And they have. They sell new for $599.00. artie
Canon EOS R5 Camera User’s e-Guide
Ten days ago, I sent out about a dozen copies of the almost finished Canon EOS R5 Camera User’s e-Guide for review to folks who had previously gotten free copies of the R5/R6 AF e-Guide by using my affiliate links to purchase their Canon mirrorless gear. In the same vein, I contacted everyone who purchased the R5/R6 AF e-Guide last week. More recently, folks who purchased the R5/R6 AF Guide were offered the opportunity to purchase a copy the pre-publication guide for review.
Because the camera and the Menus are so complex, this guide has required a ton of research, a lot of time, and a lot of effort (and will continue to do so until it is complete). It should be finished by the first week in March. 2021. The final update of the R5/R6 AF e-Guide has become part of the complete Camera User’s e-Guide; it will be revised if warranted.
The complete Camera User’s guide will sell for $75.00. Folks who purchased their Canon gear using my links will receive a $65.00 discount; the guide will cost them a nominal $10.00. Folks who spent more than $7500.00 on Canon mirrorless gear using either of my affiliate links (B&H or Bedfords), will receive the Camera User’s e-Guide for free. Folks who purchased the R5/R6 AF e-Guide will receive a $10.00 discount on the User’s e-Guide. The best news is that the end is in sight.
New and Better Bedfords Discount Policy!
You can now save 3% on all of your Bedfords photo gear purchases by entering the BIRDSASART coupon code at checkout. Your discount will be applied to your pre-tax total. In addition, by using the code you will get 2nd day air shipping via Fed Ex.
Grab a Nikon AF-S Teleconverter TC-14E III and save $14.99. Purchase a Canon EOS R5 and your discount will be $116.97. Purchase a Sony FE 600mm f/4 GM OSS lens and save a remarkable $389.94! Your Bedford’s purchase no longer needs to be greater than $1,000.00 for you to receive a discount. The more you spend, the more you save.
Money Saving Reminder
Many have learned that if you need a hot photo item that is out of stock at B&H and would enjoy free second-day air shipping, your best bet is to click here, place an order with Bedfords, and enter the coupon code BIRDSASART at checkout. If an item is out of stock, contact Steve Elkins via e-mail or on his cell phone at (479) 381-2592 (Central time). Be sure to mention the BIRDSASART coupon code and use it for your online order to save 3% and enjoy free 2nd-day air shipping. Steve has been great at getting folks the hot items that are out of stock at B&H and everywhere else. The wait lists at the big stores can be a year or longer for the hard to get items. Steve will surely get you your gear long before that. For the past year, he has been helping BAA Blog folks get their hands on items like the SONY a9 ii, the SONY 200-600 G OSS lens, the Canon EOS R5, the Canon RF 100-500mm lens, and the Nikon 500mm PF. Steve is personable, helpful, and eager to please.


Gear Questions and Advice
Too many folks attending BAA IPTs (remember those?) and dozens of photographers whom I see in the field and on BPN, are–out of ignorance–using the wrong gear especially when it comes to tripods and more especially, tripod heads… Please know that I am always glad to answer your gear questions via e-mail. Those questions might deal with systems, camera bodies, accessories, and/or lens choices and decisions.
|
|
|
This image was created on 7 March 2021 down by the lake at ILE. I used the Induro GIT 404L/Levered-clamp FlexShooter Pro-mounted Sony FE 600mm f/4 GM OSS lens, the Sony FE 2.0x Teleconverter, and the blazingly fast AF King, the Sony Alpha a9 II Mirrorless Digital camera body. ISO 4000. The exposure was determined by experience or lack thereof. Muti metering +2 stops: 1/2000 sec. at f/8 (wide open) in Shutter Priority (S) mode. Surprisingly, RawDigger showed this raw file to be more than 1 1/2 stops too dark. AWB at 6:28pm on a clear evening. Technically, this was three minutes before sunset at Lake Wales but at ILE, the sun had already disappeared behind the distant woods on the far lakeshore.
Wide AF-C was active at the moment of exposure and performed to absolute perfection by nailing focus on the upper bird.
Click on the image to see a larger version.
Image #1: White Ibis sunset squabble
|
Making Good on a Second Chance
The wind had swung to the northeast late on Wednesday afternoon and with relatively clear skies, I figured that sunset might be outstanding. It began with two Ospreys chasing each other through the color, and then another diving right through the reddish/yellow in the western sky. I pretty much fanned on the latter chance and disregarded my own oft-given advice: Don’t chimp! When I looked away from the back of the camera, my heart sank as I saw two White Ibises fighting in mid-air right in the richest colored part of the sky just above where the sun had been a minute before. Drats! I got back to paying attention and somewhat miraculously, the two birds rose from the roost to tangle again in midair. Hooray! Of the five keepers that had both birds in the frame, this was my favorite.
|
|
Image #1A: Topaz DeNoise AI on the White Ibis sunset squabble image
|
Topaz DeNoise AI
For an ISO 5000 image that was more than 1 1/2 stops too dark, there was not a whole lot of noise in the original (on our left). Be sure to click on the screen capture to view the larger version and check on the effectiveness of this amazing plug-in. DeNoise AI on DeNoise completely eliminated the noise in smooth-as-a-baby’s butt fashion. As usual, it was a close call between DeNoise and Low Light.
The lower bird was slightly behind the plane of focus, so I selected that in Photoshop using Select > Subject. Since that selected both birds, I deselected the sharp upper bird, and placed the lower bird on its own layer. Then I ran Topaz Sharpen AI on Focus on that layer. The improvement was noticeable but not dramatic.
Great Topaz News!
Folks who use the BAA Topaz link to purchase Sharpen AI, DeNoise AI, or the Utility Bundle (or any other Topaz plug-ins) will receive a 15% discount by entering the ARTHUR15 code at checkout. If the stuff is on sale (as it usually is), you save 15% off of the sale price! To get the discount you must use my link and you must enter the discount code. Be sure to start with this link.
Those who purchase Sharpen AI, DeNoise AI, or any other Topaz plug-ins using my link and then entering the ARTHUR15 code at checkout can e-mail to request a short Getting Started with Topaz e-Guide. Please include a copy of your Topaz receipt that shows the discount. Aside from the basics, the guide explains how to install the plug-ins so that they appear in the Photoshop Filter Menu.
|
|
|
All of the images (plus lots more) were created on a very short visit at the end of January. Click on the card to enjoy a larger version.
Merritt Island NWR IPT card
|
Merritt Island NWR IPT
Merritt Island NWR IPT. 3 1/2 DAYS. MON 15 MAR thru the morning session on THURS 18 MAR 2021. $1499 includes three lunches. Limit: 6. Openings: 3 1/2.
When I visited — and later lived — in Deltona, FL, I made many trips to Black Point Wildlife Drive and environs. On a recent visit, I did quite well. The birds were much tamer than I remembered. I know the place well. Early spring was always best. There are tons of ducks, and wading birds including and especially both ibises. It can be great at sunrise with large flocks of shorebirds, waterfowl, ibises, and American White Pelicans filling the skies. We should get to do lots of flight photography on the causeway. At least a few good chances with Roseate Spoonbill are possible.
A $499 deposit is required to hold your spot for this IPT. You can send a check (made out to “BIRDS AS ART) to us here: BIRDS AS ART, PO Box 7245, Indian Lake Estates, FL, 3385, or call Jim or Jennifer at the office with a credit card at 863-692-0906. Your balance, payable only by check, is due immediately after you sign up. If you have any questions, please feel free to contact me via e-mail. If you cancel due to COVID 19 concerns, all of your payments will be refunded.
Typos
With all blog posts, feel free to e-mail or to leave a comment regarding any typos or errors.
March 8th, 2021 Via e-mail from 26-time IPT veteran Lou Newman
Hi Artie, The R5 User’s Guide is terrific! Well done! Many small changes result in huge differences! Thanks a million for this guide. It has really enhanced my ability to use the R5. Without this guide, I was missing so much … All the best, Lou
ps: Dragonflies and small songbirds in in flight! Who’da thunk it?
Via e-mail from BAA-friend John Zimmerman
I finally had a chance to look at this great piece of work you have done, the R5 User’s Guide. I’ve used your suggestions and have found a big improvement in my capture rate. John
Via e-mail from Gary Walker
I wanted to thank you for bringing Bedford Camera to my attention. By using the BIRDSASART code on my recent order for a new Canon R5 body and battery grip, I saved $400 off the price at Amazon. I always prefer buying from an independent retailer, and in this case, the savings made the deal even sweeter! Thanks again for helping fellow photographers. Gary
A Comment by Ray Lander
A BIG THANK YOU TO ARTHUR MORRIS
I read about Bedford Camera in your blog and placed an order for a Canon R5 and a lens on Monday. I had them in my hand in California on Thursday! This was fantastic as I had ordered the gear from one of the big companies in November and was sill on their waiting list!
So here is a heartfelt thank you. I have learned quite a bit from you over the years by watching many videos, quite a few on B&H. My first trip to Bosque del Apache was due to your insistence that Bosque was a great place; and indeed it was! Thank you for everything Mr. Morris.
What’s Up?
There was not much going on on Sunday morning. I put in another eight hours of solid work on the BAA R5 Camera User’s e-Guide. Bruce Dudek has continued to be a great help and yesterday, solved a perplexing problem that had been bugging us. As a result, I need to re-write the section on Screen info. settings again! I started and finished the My Menu section and will start work on the Gallery today.
The wind swung to the northeast in late afternoon and with relatively clear skies I figured that sunset might be outstanding. It began with two Ospreys chasing each other through the color, and then another diving right through the reddish/yellow in the western sky. I pretty much fanned on the latter chance. I disregarded my own oft-given advice: Don’t chimp! When I looked away from the back of the camera, I saw two White Ibises fighting in mid-air right in the richest colored sky just above where the sun had gone down. Drats! I got back to paying attention and somewhat miraculously, the two birds rose from the roost to tangle again in midair. Hooray! I quickly fired off 14 images. At least two of them are Family Jewels.
Today is Monday 8 March 2021. The forecast is for sunny with gentle winds from the north. I will heading down to the lake for a look-see as soon as I get this blog post published.
Wherever you are and whatever you are doing, I hope that you have a great day.
This blog post took a bit more than 1 1/2 hours to prepare and makes seventy-seven days in a row with a new one. Please remember …
Please Remember
With income from IPTs now at zero, please, if you enjoy and learn from the blog, remember to use one of my two affiliate programs when purchasing new gear. Doing so just might make it possible for me to avoid having to try to get a job as a Walmart greeter and will not cost you a single penny more. And if you use Bedfords and remember to enter the BIRDSASART code at checkout, you will save 3% on every order and enjoy free second-day air shipping. In these crazy times — I am out at least forty to sixty thousand dollars so far due to COVID 19 (with lots more to come) — remembering to use my B&H link or to shop at Bedfords will help me out a ton and be greatly appreciated. Overseas folks who cannot order from the US because of import fees, duties, and taxes, are invited to help out by clicking here to leave a blog thank you gift if they see fit.
Wanted to Buy
If you have a Canon EF Extender 2X III (teleconverter) that you would like to part with, please contact me via e-mail. I have an interested buyer.
Canon EOS R5 Camera User’s e-Guide
A week ago Thursday, I sent out about a dozen copies of the almost finished Canon EOS R5 Camera User’s e-Guide for review to folks who had previously gotten free copies of the R5/R6 AF e-Guide by using my affiliate links to purchase their Canon mirrorless gear. In the same vein, I contacted everyone who purchased the R5/R6 AF e-Guide yesterday. More recently, folks who purchased the R5/R6 AF Guide were offered the opportunity to purchase a copy of the pre-publication guide for review for $65.00.
Because the camera and the Menus are so complex, this guide has required a ton of research, a lot of time, and a lot of effort (and will continue to do so until it is complete). It should be finished by the second week in March. 2021. The final update of the R5/R6 AF e-Guide has become part of the complete Camera User’s e-Guide; it will be revised if warranted.
The complete Camera User’s guide will sell for $75.00. Folks who purchased their Canon gear using my links will receive a $65.00 discount; the guide will cost them a nominal $10.00. Folks who spent more than $7500.00 on Canon mirrorless gear using either of my affiliate links (B&H or Bedfords), will receive the User’s Guide for free. Folks who purchased the R5/R6 AF e-Guide will receive a $10.00 discount on the User’s e-Guide. The best news is that the end is in sight.
New and Better Bedfords Discount Policy!
You can now save 3% on all of your Bedfords photo gear purchases by entering the BIRDSASART coupon code at checkout. Your discount will be applied to your pre-tax total. In addition, by using the code you will get 2nd day air shipping via Fed Ex.
Grab a Nikon AF-S Teleconverter TC-14E III and save $14.99. Purchase a Canon EOS R5 and your discount will be $116.97. Purchase a Sony FE 600mm f/4 GM OSS lens and save a remarkable $389.94! Your Bedford’s purchase no longer needs to be greater than $1,000.00 for you to receive a discount. The more you spend, the more you save.
Money Saving Reminder
Many have learned that if you need a hot photo item that is out of stock at B&H and would enjoy free second-day air shipping, your best bet is to click here, place an order with Bedfords, and enter the coupon code BIRDSASART at checkout. If an item is out of stock, contact Steve Elkins via e-mail or on his cell phone at (479) 381-2592 (Central time). Be sure to mention the BIRDSASART coupon code and use it for your online order to save 3% and enjoy free 2nd-day air shipping. Steve has been great at getting folks the hot items that are out of stock at B&H and everywhere else. The wait lists at the big stores can be a year or longer for the hard to get items. Steve will surely get you your gear long before that. For the past year, he has been helping BAA Blog folks get their hands on items like the SONY a9 ii, the SONY 200-600 G OSS lens, the Canon EOS R5, the Canon RF 100-500mm lens, and the Nikon 500mm PF. Steve is personable, helpful, and eager to please.


Gear Questions and Advice
Too many folks attending BAA IPTs (remember those?) and dozens of photographers whom I see in the field and on BPN, are–out of ignorance–using the wrong gear especially when it comes to tripods and more especially, tripod heads… Please know that I am always glad to answer your gear questions via e-mail. Those questions might deal with systems, camera bodies, accessories, and/or lens choices and decisions.
|
|
|
This 6-frame in-camera Multiple Exposure was created on 4 March 2021 down by the lake near my home at ILE. Working from the driver’s seat of my SUV, I used the handheld Canon RF 100-500mm f/4.5-7.1L IS USM lens (at 223mm) and the highly touted 45MP Canon EOS R5 Mirrorless Digital camera body. ISO 100. Evaluative metering +1/3 stop: 1/10 sec. at f/14 in Tv (Shutter-Priority A-E) mode. AWB at 8:34am on a windy, cloudy morning.
Zone (moved up a bit)/AI Servo AF worked well by painting the upper right area of the blossoms with AF points.
Click on the image to see a smaller image that fits into your browser window.
stand of tickseed blossoms blowing in the wind
|
On: ContShtng (Continuous shooting priority) In-camera Multiple Exposures
Since I left Canon about five years ago, I have really missed some of the creative options:the ability to create in-camera Multiple Exposures and in-camera HDR (High Dynamic Range) images. The R5 offers both of those. Whenever I walk around on cloudy days I do so with my R5/100-500 RF rig. Why? Because it’s fun. And because as noted in a recent blog post, I am always striving to create something new and different.
I had been playing around for a few weeks with the idea of trying to make some 6-frame On: ContShtng in-camera Multiple Exposures. With the grey clouds and 20mph northwest winds, last Thursday presented the perfect opportunity. This stand of tickseed blossoms was in the same field that I had photographed the two now-deceased crane colts just the day before … I rested the lens on the vehicle door with the window completely open. Since I was going for a pleasing blur (note the 1/10 second shutter speed), I figured that a little movement of the lens might actually improve the image.
When shooting On: ContShtng (Continuous shooting priority) In-camera Multiple Exposures you end up with a single raw file. Detailed instructions for setting up your R5 for both types of Multiple Exposures are included in the (nearly completed) BAA Canon R5 Camera User’s e-Guide. And the same can be said about creating in-camera HDRs. Both of these features are somewhat complex. Multiple Exposures are traditionally used by flower photographers. HDR is most commonly used by folks photographing old barns, vintage cars, and city-scapes.
|
|
|
This 6-frame in-camera Multiple Exposure was also created on 4 March 2021 down by the lake near my home at ILE. Walking around near the base of the pier, I used the handheld Canon RF 100-500mm f/4.5-7.1L IS USM lens (at 300mm) and the highly touted 45MP Canon EOS R5 Mirrorless Digital camera body. ISO 400. Evaluative metering +2 1/3 stop: 1/500 sec. at f/5.6 in Tv (Shutter-Priority A-E) mode. AWB at 9:00am on a cloudy morning.
Center Zone/AI Servo AF worked perfectly.
Click on the image to enjoy a larger version.
Turkey Vulture flapping flight
|
You Gotta Be Nuts!
So why did I try using the On: ContShtng (Continuous shooting priority) In-camera Multiple Exposure feature on a bird in flight? Because I could, and again, because I am always after something new and different. With the strong winds, some of the vultures were flapping hard when they took flight. As this bird flew toward me I remember thinking, “Zoom out!” When I saw the image on the rear screen I was delighted to see that I had not clipped any of the twelve wings. During the RAW conversion I needed to blacken the BLACKs and the MIDDLE TONEs. Is this one too weird for you?
I just love striving to be creative with the R5 on dark cloudy days.
Typos
In all blog posts and Bulletins, feel free to e-mail or to leave a comment regarding any typos or errors.
March 7th, 2021 What’s Up?
This is the blog post that I had planned for yesterday (until the two crane colts disappeared). I have given up looking for them. I’m thinking bobcat …
I did not do anything on my Saturday morning visit to the lake. Sunset was dark and grey, so I did not even think about going down. I did my bursts and my swim in the afternoon. In total, I spent about eight hours working on the Canon R5 Camera User’s e-Guide yesterday. Huge thanks to J Marr Miller for his thoughtful review (and follow-ups), and to Bruce Dudek. After exchanging several long e-mails yesterday we were able to spend 30 minutes on phone ironing out several sticky points that have to do with the Q-Button and the various Screen info. settings options. To say that we each learned a lot would be an understatement.
I will be working very hard on the R5 guide again on Sunday. My Sony Alpha a1 is supposed to be here on Monday or Tuesday so I have to get started on another guide. Yikes!
Speaking of Sunday, today is Sunday 7 March 2021. The forecast is for partly cloudy turning sunny early with a brisk wind from the north. I will surely head down to the lake for a look-see.
Wherever you are and whatever you are doing, I hope that you have a great day.
This blog post took a bit more than an hour to prepare and makes seventy-six days in a row with a new one. Please remember to use the links!
|
|
|
This image was created on 3 March 2021 at my down-by-the-lake sunset spot. As usual when working there, I used the Induro GIT 304L/Levered-clamp FlexShooter Pro-mounted Sony FE 600mm f/4 GM OSS lens, the Sony FE 2.0x Teleconverter, and the blazingly fast AF King, the Sony Alpha a9 II Mirrorless Digital camera body). ISO 2500. The settings were determined by past experience.Multi-metering +2.3 stops in Shutter Priority (S) mode: 1/2500 sec. at f/8. As expected, RawDigger showed this to be a huge over-exposure with more than 7,500,000 over-exposed pixels. AWB at 6:22pm with some haze on the western horizon. .
Wide/AF-C was active at the moment of exposure and performed just fine. Click on the image to enjoy a larger version.
Image #1A: The original image capture as seen in Photo Mechanic
|
Whaddya Think?
I have been trying to train myself to keep shooting even when a bird flies through or right by the setting sun, knowing full well that with my set-up — S mode + 2 1/3 stops, the images made when the bird is set against the super-bright parts of the background will be mega-over-exposed. So why push the shutter button? Photography is like a box of chocolates; you never know what you’re gonna get. (Thanks, Forrest!)
I am pretty sure that most folks would delete this image without a second thought …
Do understand that when the bird is set against a richly colored portion of the sky, the exposure with that same set-up will be very close to perfect.
On Being Different?
Only Bob Eastman and I liked the o-o-f Cattle Egret image with the sharp flower foreground. (You have good taste, Bob!) I will re-visit that image here at some point. But my point there, and here again, with today’s featured image, is that it can never hurt to try to create images that are simply or starkly different. Different is good. Different opens eyes. Yes, learning to make sharp, well-exposed images of birds is a first step. But by striving for something different, you may be able to get to some very special places. Or not.
|
|
|
This image was created on 3 March 2021 at my down-by-the-lake sunset spot. As usual when working there, I used the Induro GIT 304L/Levered-clamp FlexShooter Pro-mounted Sony FE 600mm f/4 GM OSS lens, the Sony FE 2.0x Teleconverter, and the blazingly fast AF King, the Sony Alpha a9 II Mirrorless Digital camera body). ISO 2500. The settings were determined by past experience.Multi-metering +2.3 stops in Shutter Priority (S) mode: 1/2500 sec. at f/8. As expected, RawDigger showed this to be a huge over-exposure with more than 7,500,000 over-exposed pixels. AWB at 6:22pm with some haze on the western horizon. .
Wide/AF-C was active at the moment of exposure and performed just fine. Click on the image to enjoy a larger version.
Image #1: Boat-tailed Grackle flying near the sun
|
Red, Yellow, Wide, Clean, and Dramatic …
On a lark, I converted the image in Capture One. Needless to say, many of the sliders wound up in places they had never been before.
Like It or Hate It? Why?
Please leave a comment and let us know whether you like this image, hate it, or somewhere in between. And as always, do let us know why you feel the way you do.
Typos
In all blog posts and Bulletins, feel free to e-mail or to leave a comment regarding any typos or errors.
March 6th, 2021 The Writing Process with regards to the R5 Camera User’s e-Guide
When I taught fifth and sixth grades in NYC, there was a wonderful formal program called The Writing Process. The teachers learned to assign a writing project, have the kids sit in small groups, and have one child at a time read their story aloud to the group. Then the others would comment on, and ask questions about, the story: I don’t understand this part; which happened first?; Can you tell us more about this part, or explain it better? Do you really need this sentence? Then the author would go back, rewrite, and the process would be repeated.
The lessons were great for the kids, and for me as well. Many folks think that an author sits down and writes a story, and that’s it. Not quite. All writers are involved in the beginnings of the writing process when they write, read what they wrote, make changes, re-read, and re-craft. Decades ago when I began taking writing seriously, I got into the habit of asking friends for feedback before a story (or a book) was published. Then, considering their comments and questions, the writing process would continue. Revise. Re-read. Re-write. Share. Re-craft. And on and on. Then share some more, always looking to polish and to refine.
When writing how-to pieces the writing process becomes hugely important. Screwing up a single word or phrase while giving instructions on setting a complex menu item can leave the reader baffled and frustrated. Joel Eade was the first to offer help with the new R5 guide. He made some great catches. Steve Zehner and I exchanged multiple e-mails on Friday ironing out this or that important point. We are still at it. John Johnson asked many broad but excellent questions that helped to improve the guide.
Most recently, Bruce Dudek had offered to help me figure out the complex relationship between the Q Button and the settings at Screen info. settings under Shooting info.disp at RED Shooting Menu 7. That conversation will continue until I get it right. When you are writing how-to, “pretty good” is not at all good enough. You need perfection. Just as when choosing a surgeon!
When I re-craft a section, I cut and paste an excerpt into an e-mail and shoot it back to the helpful person who brought up the various issues and concerns that needed to be addressed. Then they get back to me and I get back to them. Today, I will be working on an extremely detailed review sent by J Marr Miller. Thanks to all those who have helped me with the process for writing the Canon R5 Camera User’s e-Guide.
I can’t believe that I almost forgot to mention how important Rudy Winston has been to this project. I’ve known Rudy for more than two decades; we met initially when I was an EoL (a Canon Explorer of Light). Rudy is Canon USA’s top tech rep. He has been incredibly helpful answering numerous e-mails and spending too-much-time on the phone with me. Two weeks ago I called and left a message. Rudy called me back twice! How nice is that?
What’s Up?
I had been planning for a different blog post today, but the missing crane colts unfortunately demanded center stage. I spent all of my time down by the lake on Friday morning searching for them. Story below.
I got a ton of work done on the Canon R5 User’s e-Guide yesterday. I finished the section on getting the right exposure with the R5 and spent several hours making corrections and e-mailing with folks who kindly took a serious look at the a pre-publication version of the guide. Read more on this process above (if you haven’t already). I still need to work on the MY MENU section and create a gallery of R5 images. I will be working very hard on the guide this weekend.
There was a nice sunset last night with a too-gentle northeast breeze and few birds.
Today is Saturday 6 March 2021. The forecast is for partly cloudy turning cloudy with rain beginning around noon and continuing for the rest of the day. Sounds wet!
Wherever you are and whatever you are doing, I hope that you have a great day.
This blog post took more than two hours to prepare and makes seventy-five days in a row with a new one. Please remember to use the affiliate links and programs!
Canon EOS-1DX Mark III professional digital camera body
Price Reduced $200 on 4 FEB 2021
Price Reduced $300 on 18 FEB 2021
Price Reduced $300 on 5 MAR 2021
Used Gear Page regular Don Busby is offering a Canon EOS-1DX Mark III dSLR in like-new condition with less than 10,000 shutter actuations for a very low $4699.00 (was $5499.00). The sale includes the original box and everything that came in it including the 64gb CF Express Card, the CFexpress reader, and an extra battery. Also included is insured ground shipping via major courier to lower-48 US addresses only. Your item will not ship until your check clears unless other arrangements are made.
Please contact Don via e-mail
The Canon 1Dx bodies have been solid performers under challenging conditions for many years. The autofocus performance of the 1Dx and 1Dx MkII had been lacking as compared to Nikon or lately Sony (A9) especially when it comes down to dynamic focusing using the whole sensor array or specific zones. on the 1DX Mark II, the Automatic AF area selection never did a great job of acquiring and tracking the subject; thus, that mode was pretty much useless for photographing birds in flight. Single-point AF or AF Expand (4 or 9 points) with the tracking sensitivity set at -2 often produced good results for me with flying birds, but the fact that you were limited as far as image design always bothered me. Nikon’s dynamic focusing and Sony’s tracking capabilities provided extra compositional flexibility. As a result, many bird photographers decided to leave Canon and switch to Nikon or a Sony a9 series body. I decided to stay the course with Canon for two reasons: my collection of great Canon lenses, and the fact that the development of sensor and AF technology is like an arms race: one day Nikon is ahead, the next day Canon is ahead. I was lucky enough to get the new Canon 1Dx MkIII camera body from Steve Elkins just in time for my trip to Alaska to photograph the bald eagles. It was the perfect place to test the improved AF capabilities of the new Canon flagship body, the EOS-1D X Mark III DSLR with CFexpress Card and Reader.
The 1Dx MkIII is a hybrid camera with an Optical Viewfinder (OVF) and Live-View shooting making it a mirrorless camera at the same time that it is a rugged dSLR. There are a ton of other great new features, but I focused primarily on testing the new enhanced AF system. I was especially interested to see if the new dynamic 191-point Automatic AF selection and the AF zones would perform better than the previous versions of the 1Dx. The conclusion is that even under difficult circumstances — the first two days with heavy winds and heavy snow) — the camera had no issue focusing on the subject and keep tracking it with the Automatic AF selection mode. I used the center point to acquire focus and as soon as it locked the focus on the bird, it did a great job keeping multiple AF points on the subject and tracking it through the frame and through the snowflakes. The same applied for the Zones — smaller AF areas with multiple AF points active. Even with busy backgrounds, the AF stayed locked on the subject. The AF modes have been reduced to 4 compared to 5 in the previous 1Dx models. I primarily used Mode 2 (Continue to Track Subjects, Ignoring Possible Obstacles) and Mode 4 (For Subjects That Accelerate or Decelerate Quickly) but was not able to see a significant difference between the modes. Even with trying the “Deep Learning” Automatic setting (Tracking Automatically Adapts to Subject Movement) I did not notice a significant difference. They all performed really well. The conclusion is that Canon has produced a camera that is now on-par or even better than its competitors with respect to AF performance. Although I did not test the mirrorless capabilities yet, other tests show that this function is also equal to or better than the Sony A9 performance, the only difference is that you can not use the OVF in mirrorless-mode with the 1DX III and have to use the display on the back of the camera (the rear monitor) instead. Due to the fact you have to keep the camera away from your eye, this is somewhat awkward for photographing birds in flight. I am very happy with the AF performance as compared to the previous Canon models and am looking forward to testing it further on Florida birds this coming spring. Clemens van der Werf
The 1DX III sells new right now for $6,499.00. Grab Don’s almost new body, save $1800.00, and get an extra battery to boot! I remember how thrilled Clemens was with his then brand-new 1DX III in Homer. You can see some of his eagle images made with the 1DX iii in the Field-testing the New Canon EOS-1DX Mark III at Homer: World-Class Nature Photographer Clemens Van der Werf Shares the Skinny on Canon’s New Flagship Camera Body post here. artie
Canon EOS R5 Camera User’s e-Guide
A week ago Thursday, I sent out about a dozen copies of the almost finished Canon EOS R5 Camera User’s e-Guide for review to folks who had previously gotten free copies of the R5/R6 AF e-Guide by using my affiliate links to purchase their Canon mirrorless gear. In the same vein, I contacted everyone who purchased the R5/R6 AF e-Guide yesterday. More recently, folks who purchased the R5/R6 AF Guide were offered the opportunity to purchase a copy the pre-publication guide for review.
Because the camera and the Menus are so complex, this guide has required a ton of research, a lot of time, and a lot of effort (and will continue to do so until it is complete). It should be finished by the first week in March. 2021. The final update of the R5/R6 AF e-Guide has become part of the complete Camera User’s e-Guide; it will be revised if warranted.
The complete Camera User’s guide will sell for $75.00. Folks who purchased their Canon gear using my links will receive a $65.00 discount; the guide will cost them a nominal $10.00. Folks who spent more than $7500.00 on Canon mirrorless gear using either of my affiliate links (B&H or Bedfords), will receive the User’s Guide for free. Folks who purchased the R5/R6 AF e-Guide will receive a $10.00 discount on the User’s e-Guide. The best news is that the end is in sight.
New and Better Bedfords Discount Policy!
You can now save 3% on all of your Bedfords photo gear purchases by entering the BIRDSASART coupon code at checkout. Your discount will be applied to your pre-tax total. In addition, by using the code you will get 2nd day air shipping via Fed Ex.
Grab a Nikon AF-S Teleconverter TC-14E III and save $14.99. Purchase a Canon EOS R5 and your discount will be $116.97. Purchase a Sony FE 600mm f/4 GM OSS lens and save a remarkable $389.94! Your Bedford’s purchase no longer needs to be greater than $1,000.00 for you to receive a discount. The more you spend, the more you save.
Money Saving Reminder
Many have learned that if you need a hot photo item that is out of stock at B&H and would enjoy free second-day air shipping, your best bet is to click here, place an order with Bedfords, and enter the coupon code BIRDSASART at checkout. If an item is out of stock, contact Steve Elkins via e-mail or on his cell phone at (479) 381-2592 (Central time). Be sure to mention the BIRDSASART coupon code and use it for your online order to save 3% and enjoy free 2nd-day air shipping. Steve has been great at getting folks the hot items that are out of stock at B&H and everywhere else. The wait lists at the big stores can be a year or longer for the hard to get items. Steve will surely get you your gear long before that. For the past year, he has been helping BAA Blog folks get their hands on items like the SONY a9 ii, the SONY 200-600 G OSS lens, the Canon EOS R5, the Canon RF 100-500mm lens, and the Nikon 500mm PF. Steve is personable, helpful, and eager to please.


Gear Questions and Advice
Too many folks attending BAA IPTs (remember those?) and dozens of photographers whom I see in the field and on BPN, are–out of ignorance–using the wrong gear especially when it comes to tripods and more especially, tripod heads… Please know that I am always glad to answer your gear questions via e-mail. Those questions might deal with systems, camera bodies, accessories, and/or lens choices and decisions.
|
|
|
This image was created on 3 March 2021 down by the lake near my home at ILE. Seated on the wet grass, I used the handheld Canon RF 100-500mm f/4.5-7.1L IS USM lens (at 400mm) and the highly touted 45MP Canon EOS R5 Mirrorless Digital camera body. ISO 1600. Exposure determined by test exposure & histogram and blinkies evaluation: 1/640 second at f/7.1. RawDigger showed this one to be dead-solid perfect. AWB at 8:14am on a cloudy morning.
Face Detection plus Tracking grabbed and tracked the eye of the colt on our right.
Click on the image to see a smaller image that fits into your browser window.
Sandhill Crane nestmate colts …
|
In Memoriam ???
I did not discover the crane family at the north end of the North Field until the chicks were at least a week old. That was about three weeks ago, and despite the fact that I had been checking out that area of the marsh for weeks as it is a favorite spot for the cranes to build a nest. The chicks were astoundingly accepting of me from the get-go. I would simply walk up to the family, sit down in the grass, and observe and photograph them. They quickly became a regular feature at the north end, foraging in the field and feeding on the lawns of the homes on the lakefront.
I photographed them on Wednesday 3 March as described above. I got one really nice frame of one of the now small colts grabbing a mole cricket from one of the adults. I checked on the family when I went down to photograph sunset that evening. The two adults, and the two chicks, all backlit, were standing on the nest ready for a good night’s rest.
On Thursday morning I got down to the lake early. There was no sign of the crane family. After scouting around for a bit, I returned to re-check. Strangely, there were two pairs of cranes feeding peacefully. But no colts … I was concerned because if a crane or a pair of cranes enters the feeding territory of a pair with chicks or colts, the parent birds will always drive the intruders away quickly. I checked the street on the other side of the canal to the east to see if the family had relocated. No luck.
On Thursday evening, I looked for the colts again. No luck. Friday morning, no luck. Friday evening I chatted with a couple who live on Palmetto Drive. They too were concerned and like me pretty sure that the colts had been predated. The woman told me that she saw the female parent on Thursday morning calling in an obvious state of distress, seemingly searching for her missing kids.
Last year was a tough one for the lakefront crane pairs. Of six hatched birds, only two survived. The typical mortality rate is about 50%. Judging by the behavior that we witnessed, the chances of the two missing and presumed dead colts showing up is about one in a hundred. The strange thing is that I have never seen a pair lose both young at once.
There are lots of predators around the lake. Last year I am pretty sure that a fox grabbed both Orange Colt and a week later, Grey Colt, the two who routinely swam back and forth across the canal. There are Bobcats. And Bald Eagles. And Great Horned Owls. Not to mention American Alligator (though I could not conceive of a gator getting two chicks in a relatively short period of time.
The pair of smaller chicks at the south end of the South Field continue to do well. I have seen them with both adults feeding in the marsh on the last two mornings. I am hoping that there might be another pair or two on eggs. Last year’s Mothers Day crane family hatched two chicks on May 9 & 10. Time will tell.
Depth of Field (or Lack Thereof)
With one crane perhaps an inch behind the other, note that with focus on the front bird the head and face of the bird to the rear is completely out-of-focus due to a lack of sufficient depth-of-field. Stopping down a ton would have required the use of a much higher ISO and brought up a ton of distracting background detail. In addition, even f/18 would not have sharpened up the second bird very much at all.
|
|
Topaz DeNoise on the Sandhill Crane nestmate colts image
|
Topaz DeNoise AI on DeNoise on Auto
Noise will always be more evident in the dark tones of an image. Thus, note the location of the white, square navigator-box in the upper right of the screen capture. Be sure to click on the screen capture to view the larger version and check on the effectiveness of this amazing plug-in.
Great Topaz News!
Folks who use the BAA Topaz link to purchase Sharpen AI, DeNoise AI, or the Utility Bundle (or any other Topaz plug-ins) will receive a 15% discount by entering the ARTHUR15 code at checkout. If the stuff is on sale (as it usually is), you save 15% off of the sale price! To get the discount you must use my link and you must enter the discount code. Be sure to start with this link.
Those who purchase Sharpen AI, DeNoise AI, or any other Topaz plug-ins using my link and then entering the ARTHUR15 code at checkout can e-mail to request a short Getting Started with Topaz e-Guide. Please include a copy of your Topaz receipt that shows the discount. Aside from the basics, the guide explains how to install the plug-ins so that they appear in the Photoshop Filter Menu.
RawDigger screen capture for the Sandhill Crane nestmate colts … image
|
The RawDigger (pink) Adapted Histogram
The Adapted Histogram here shows and absolute perfect exposure. The 69 OvExp pixels (out of 45,000,000) are in the specular highlights of the dew on the grasses.
In the RawDigger e-Guide, you will learn exactly how to set up the Adapted “pink” RawDigger Histogram and how to use it to quickly and easily evaluate the exposure or raw file brightness of images from all digital cameras currently in use. RawDigger has been especially helpful to me as I have struggled with R5 exposures.
|
|
RawDigger e-Guide with Two Videos
|
The RawDigger e-Guide with Two Videos
by Arthur Morris with Patrick Sparkman
The RawDigger e-Guide was created only for serious photographers who wish to get the absolute most out of their raw files.
Patrick and I began work on the guide in July 2020. At first we struggled. We asked questions. We learned about Max-G values. We puzzled as to why the Max G values for different cameras were different. IPT veteran Bart Deamer asked lots of questions that we could not answer. We got help from RawDigger creator Iliah Borg. We learned. In December, Patrick came up with an Adapted Histogram that allows us to evaluate the exposures and raw file brightness for all images created with all digital camera bodies from the last two decades. What we learned each time prompted three complete beginning to end re-writes.
The point of the guide is to teach you to truly expose to the mega-Expose-to-the-Right so that you will minimize noise, maximize image quality, best utilize your camera’s dynamic range, and attain the highest possible level of shadow detail in your RAW files in every situation. In addition, your properly exposed RAW files will contain more tonal information and feature the smoothest possible transitions between tones. And your optimized images will feature rich, accurate color.
We teach you why the GREEN channel is almost always the first to over-expose. We save you money by advising you which version of RawDigger you need. We teach you how to interpret the Max G values for your Canon, Nikon, and SONY camera bodies. It is very likely that the Shock-your-World section will shock you. And lastly — thanks to the technical and practical brilliance of Patrick Sparkman — we teach you a simple way to quickly and easily evaluate your exposures and raw file brightness using an Adapted RawDigger histogram.
The flower video takes you through a session where artie edits a folder of images in Capture One while checking the exposures and Max-G values in RawDigger. The Adapted Histogram video examines a series of recent images with the pink histograms and covers lots of fine points including and especially how to deal with specular highlights. The directions for setting up the Adapted Histogram are in the text.
If we priced this guide based on how much effort we put into it, it would sell it for $999.00. But as this guide will be purchased only by a limited number of serious photographers, we have priced it at $51.00. You can order yours here in the BAA Online Store.
Typos
In all blog posts and Bulletins, feel free to e-mail or to leave a comment regarding any typos or errors.
March 5th, 2021
|
|
|
All of the images were created at Fort DeSoto in April or early May. Click on the card to enjoy a larger version.
Fort DeSoto IPT card A
|
Fort DeSoto Spring IPT #1
Fort DeSoto Spring IPT #1. 3 1/2 DAYS. SAT 10 APR thru the morning session on TEUS 13 APR 2021. $1499 includes three lunches. Limit: 6. Openings 5.
While DeSoto is one of the rare photo hotspots with the potential to be great any day of the year, it absolutely shines in spring. Many of the wading birds and shorebirds are in full breeding plumage. The terns and gulls are courting and copulating. We will have lots of flight photography opportunities. Did I mention that many of the birds are silly tame?
A $499 deposit is required to hold your spot for this IPT. You can send a check (made out to “BIRDS AS ART) to us here: BIRDS AS ART, PO Box 7245, Indian Lake Estates, FL, 33855, or call Jim or Jennifer at the office with a credit card at 863-692-0906. Your balance, payable only by check, is due immediately after you sign up. If you have any questions, please feel free to contact me via e-mail. If you cancel due to COVID 19 concerns, all of your payments will be refunded.
|
|
|
All of the images were created at Fort DeSoto in April or early May. Click on the card to enjoy a larger version.
Fort DeSoto IPT card B
|
Fort DeSoto Spring IPT #2
Fort DeSoto Spring IPT #2. 3 1/2 DAYS. MON 26 APR thru the morning session on THURS 29 APR 2021. $1499 includes three lunches. Limit: 6/Openings: 5.
Not only am I conversant in all three major camera systems used in the US — Nikon, Canon, and SONY (sorry Andy Rouse …), I have used all three within the past four years. Those include both SONY and Canon mirrorless. On both of these IPTs you will learn how to get the best exposure, how to get the most out of your AF system, and how to get close to free and wild birds. And tons more.
A $499 deposit is required to hold your spot for this IPT. You can send a check (made out to “BIRDS AS ART) to us here: BIRDS AS ART, PO Box 7245, Indian Lake Estates, FL, 33855, or call Jim or Jennifer at the office with a credit card at 863-692-0906. Your balance, payable only by check, is due immediately after you sign up. If you have any questions, please feel free to contact me via e-mail. If you cancel due to COVID 19 concerns, all of your payments will be refunded.
|
|
|
All of the images were created at Fort DeSoto in April or early May. Click on the card to enjoy a larger version.
Fort DeSoto IPT card C
|
Fort DeSoto Spring IPTs Expected Species
With any luck, we should get to photograph the following species: Laughing, Ring-billed, Herring, and Lesser Black-backed Gull; Royal, Sandwich, and Forster’s Tern: Great, Snowy, and white and dark morph Reddish Egret and Great Blue, Little Blue, and Tricolored Heron; Yellow-crowned Night-Heron, Wood Stork, Roseate Spoonbill, and Brown Pelican. We will see and photograph lots of shorebirds including American Oystercatcher, Black-bellied, Wilson’s, Semipalmated, Snowy, and Piping Plover, Marbled Godwit, Willet, Dunlin, Red Knot, Sanderling, and Western and possibly White-rumped Sandpiper.
Sign up for both IPTs and enjoy a $200 discount. Most of us will be staying in nearby Gulfport.
What’s Up
Thursday morning dawned northwest windy, quite chilly, and blessedly cloudy. I took a walk with my Canon R5/RF 100-500 lens and, for the first time ever, experimented with creating some 6-frame On: ContShtng (Continuous shooting priority) Multiple Exposures. All aspects of creating in-camera Multiple Exposure (ME) and High Dynamic Range (HDR) images are detailed in the almost finished Canon R5 Camera User’s e-Guide. In addition, I share how I set up and use Custom Shooting Mode C3 to save a ton of time when I want play around with either ME or with HDR. I was surprised that I kept one pretty neat image.
I began working on the Getting the Right Exposure with the R5 section for the R5 User’s e-Guide and should have that finished today. I sent an e-mail yesterday to everyone who purchased the R5/R6 AF e-Guide offering an advance review copy of the Canon R5 Camera User’s e-Guide. If you did not receive that e-mail, please let me know via e-mail.
I am almost finished with the guide. After completing the stuff on exposure, I still need to work on the MY MENU section and create a gallery of R5 images. In addition, I got through several of the R5 Camera User’s e-Guide reviews that were e-mailed by folks who were kind enough to take a serious look at the manuscript.
Last night was another too-clear dud of a sunset; without any light clouds or fog or mist on the western horizon, there is little sunset color.
Today is Friday 5 March 2021. The forecast if for clear skies with gentle NW winds switching to the NE at about 9:00am. I will do my best to get down to the lake early.
Wherever you are and whatever you are doing, I hope that you have a great day.
This blog post took about 1 1/2 hours to prepare and makes seventy-four days in a row with a new one. Please remember …
Please Remember
With income from IPTs now at zero, please, if you enjoy and learn from the blog, remember to use one of my two affiliate programs when purchasing new gear. Doing so just might make it possible for me to avoid having to try to get a job as a Walmart greeter and will not cost you a single penny more. And if you use Bedfords and remember to enter the BIRDSASART code at checkout, you will save 3% on every order and enjoy free second-day air shipping. In these crazy times — I am out at least forty to sixty thousand dollars so far due to COVID 19 (with lots more to come) — remembering to use my B&H link or to shop at Bedfords will help me out a ton and be greatly appreciated. Overseas folks who cannot order from the US because of import fees, duties, and taxes, are invited to help out by clicking here to leave a blog thank you gift if they see fit.
Wanted to Buy
If you have a Canon EF 100-400mm f/4.5-5.6L IS II USM lens that you would like to part with, please contact me via e-mail. I have another interested buyer.
Canon EOS R5 Camera User’s e-Guide
Last Thursday, I sent out about a dozen copies of the almost finished Canon EOS R5 Camera User’s e-Guide for review to folks who had previously gotten free copies of the R5/R6 AF e-Guide by using my affiliate links to purchase their Canon mirrorless gear. In the same vein, I contacted everyone who purchased the R5/R6 AF e-Guide yesterday.
Because the camera and the Menus are so complex, this guide has required a ton of research, a lot of time, and a lot of effort (and will continue to do so until it is complete). It should be finished by the first week in March. 2021. The final update of the R5/R6 AF e-Guide has become part of the complete Camera User’s e-Guide; it will be revised if warranted.
The complete Camera User’s guide will sell for $75.00. Folks who purchased their Canon gear using my links will receive a $65.00 discount; the guide will cost them a nominal $10.00. Folks who spent more than $7500.00 on Canon mirrorless gear using either of my affiliate links (B&H or Bedfords), will receive the User’s Guide for free. Folks who purchased the R5/R6 AF e-Guide will receive a $10.00 discount on the User’s e-Guide. The best news is that the end is in sight.
New and Better Bedfords Discount Policy!
You can now save 3% on all of your Bedfords photo gear purchases by entering the BIRDSASART coupon code at checkout. Your discount will be applied to your pre-tax total. In addition, by using the code you will get 2nd day air shipping via Fed Ex.
Grab a Nikon AF-S Teleconverter TC-14E III and save $14.99. Purchase a Canon EOS R5 and your discount will be $116.97. Purchase a Sony FE 600mm f/4 GM OSS lens and save a remarkable $389.94! Your Bedford’s purchase no longer needs to be greater than $1,000.00 for you to receive a discount. The more you spend, the more you save.
Money Saving Reminder
Many have learned that if you need a hot photo item that is out of stock at B&H and would enjoy free second-day air shipping, your best bet is to click here, place an order with Bedfords, and enter the coupon code BIRDSASART at checkout. If an item is out of stock, contact Steve Elkins via e-mail or on his cell phone at (479) 381-2592 (Central time). Be sure to mention the BIRDSASART coupon code and use it for your online order to save 3% and enjoy free 2nd-day air shipping. Steve has been great at getting folks the hot items that are out of stock at B&H and everywhere else. The wait lists at the big stores can be a year or longer for the hard to get items. Steve will surely get you your gear long before that. For the past year, he has been helping BAA Blog folks get their hands on items like the SONY a9 ii, the SONY 200-600 G OSS lens, the Canon EOS R5, the Canon RF 100-500mm lens, and the Nikon 500mm PF. Steve is personable, helpful, and eager to please.


Gear Questions and Advice
Too many folks attending BAA IPTs (remember those?) and dozens of photographers whom I see in the field and on BPN, are–out of ignorance–using the wrong gear especially when it comes to tripods and more especially, tripod heads… Please know that I am always glad to answer your gear questions via e-mail. Those questions might deal with systems, camera bodies, accessories, and/or lens choices and decisions.
|
|
|
This image was created on 27 February 2021 at my back-up morning location at Fort DeSoto Park. I used the Induro GIT 304L/Levered-clamp FlexShooter Pro-mounted Sony FE 600mm f/4 GM OSS lens, the Sony FE 2.0x Teleconverter, and the blazingly fast AF King, the Sony Alpha a9 II Mirrorless Digital camera body). ISO 500. The exposure was determined by Zebras with ISO on the rear wheel: 1/1250 sec. at f/9 (stopped down 1/3-stop) in Manual mode. RawDigger showed this exposure to be less than 1/3 stop under, i.e., almost perfect. AWB at 8:01:43am on a clear morning.
Upper Left Zone/AF-C was active at the moment of exposure and performed to absolute perfection by painting the bird’s eye with AF points.
Click on the image to see an inexplicably sharper version.
Image #1: Laughing Gull — adult breeding plumage display calling/vertical front-end image design
|
Catching Up
In the Getting What I Went For, In Spades, at 1200mm … blog post here, I posted :
Your Favorite
All are invited to leave a comment letting us know which of today’s four featured images they like best. As always, please let us know why you made your choice. Comparative comments are also welcome. I will share my favorites in order from one to four here in a few days. Along with my reasons.
My Favorite
Though I love all four of the images presented in this post, #1, above, was my favorite. I love the color scheme — the red, white, and blue of Old Glory, plus the black. I love the meticulous front-end vertical framing (see more of that in item-next). I love the display/calling. I love the pretty-much perfect breeding plumage. And as mentioned in the blog post, I love the small breaking wave in just the right spot in the lower left of the frame.
Images #2 and #4 were tied as my second favorites. I liked #2 for the rather coy preening pose and the extensive blue background. And I liked #4 because I like Laughing Gulls in full breeding plumage, I like head and shoulders portraits, and I love perfection.
Lots of folks chose #3 as their favorite and for good reason. While I agree that it is a very strong image, my final tally is #1, #s 2 & 4, and #3. Thanks to the many who left a comment. Please remember that nobody is or was right or wrong.
Vertical Front-end Portraits
Anthony Ardito/March 1, 2021 at 1:21pm
#3 perfect comp and action. #1 would have been if rear end was not cut off.
Arthur Morris/BIRDS AS ART/March 2, 2021 at 7:43am
Anthony, Anthony, Anthony. See Chapter Seven, Designing the Image, in the original soft-cover The Art of Bird Photography, particularly (and coincidentally), the Laughing Gull image on the right side of page 107. The caption there includes the words, … then cut off the rear of the bird, just behind the legs.
Front-end verticals like Image #1 can be quite powerful as they will reveal much more detail than smaller in the frame images of the same subject. When working with a fixed focal length lens they are often the best option when you cannot zoom out to include the whole bird in a horizontal frame …
with love, a
An Interesting Series of Comments at the Art or Trash blog post here.
(BPN-friend) William Dix/March 4, 2021 at 11:11 am
Artie, FWIW, an unrelated bit of information that might interest some: the Audubon Photo Awards for this year have added a new stipulation: the use of Topaz Sharpen AI is not permitted on any submitted image. In response to my query they sent the following: “Sharpening is not permitted with AI software, but it is permitted, if minimal, with software like Photoshop or Lightroom.”
Warren Howe/March 4, 2021 at 11:44am
That’s interesting because “AI” means very different things to many companies. I have seen one “AI” sharpening system for out-of-focus images that actually replaces parts of the image, like teeth, earings, etc., rather than just trying to sharpen them. Now that’s AI and I would agree that that should not be used in a contest.
But, I think Topaz uses AI just to learn or predict what is actually there, not replacing from image pieces over the internet.
Arthur Morris/BIRDS AS ART/March 4, 2021 at 11:47am
Thanks, Bill. Personally, I couldn’t care less about Audubon. They have, in the magazine, shown a huge anti-photographer bias.
I was inspired in the 1970s by the great photo portfolios they published by guys like Charles Krebs and the little guy from Iowa whose name I cannot remember right now … The latter photographer specialized in the Everglades, drove around in an old VW bus, and always wore a scruffy white t-shirt. If anyone remembers his name, please let us know.
The last thirty or more years of Audubon Magazine have been nothing but junked cars and oil spills. Not that that stuff is not important, but at times, folks forget that beautiful images often inspire folks to take action and to take steps to preserve habitat. And that sometimes they can change a person’s life.
with love, artie
ps: Thanks to old VIREO friend Doug Wechsler for this: Glenn van Nimwegen was the guy’s name.
Glenn van Nimwegen
I met Glenn at Everglades National Park when I was first starting sometime in the late 1980s. At about the same time I met Charles Krebs, a highly skilled nature/stock photographer. Both were very kind to me. Below is the only thing I have been able to find online about Glenn.
Van Nimwegen, Glenn
Obituary from The Pella Chronicle, November 20, 2003
Interment for Glenn Van Nimwegen, 57 of Jackson, WY and Pella, IA, who passed away Nov. 5, 2003 was held at the Oakwood Cemetery in Pella.
Glenn Carl Van Nimwegen, born to Marion and Margaret Elizabeth Sopher Van Nimwegen, was born on May 15, 1946 in Oskaloosa. He attended the Pella Public Schools in Pella.
Glenn pursued a career in freelance nature and landscaping photography. He spent over 30 years roaming the United States in his pickup and with his camera. He traveled and photographed in 49 states. His landscape and wildlife photographs appeared in numerous publications, books, & magazines, and on calendars, posters and post cards. These included covers and photo essays in Audubon Magazine, Time-Life Books, National Graphic Books, National Wildlife Federation Magazine and Books, Natural History Magazine, Smithsonian Magazine, Birder’s World, Sierra Club and Audubon calendars, to name just a few. His work appeared regionally and locally in publications on Glacier, Yellowstone, and Grand Teton National Parks; including K. C. Publications, Sierra Press Publications, Grand Teton Natural History Association Publications, Jackson Hole-Crossroads of the West and others.
Glenn is survived by his brother Keith Lee Van Nimwegen and his wife, Patty, of West Des Moines; seven nieces and nephews.
Glenn was preceded in death by his parents: his father, Marion, his mother, Margaret, and an older brother who died at birth on July 16, 1938.
For those desiring, memorials in his memory may be given to the Nature Conservancy.
Funeral arrangements were handled by Van Dyk-Duven Funeral Home in Pella.
That Glenn was only one year older than me and has been gone for nearly two decades is a reminder of how blessed I have been. A sign of the times is that I have not been able to find a single image created by Glenn Van Nimwegen online …
March 4th, 2021 Canon R6 Bodies in Stock now at Bedfords/R5 Bodies on the Way!
Steve Elkins asked me to let you know that he has a good number of Canon EOS-R6 bodies in stock. Get yours by clicking here. Enter the BIRDSASART discount code at checkout, save 3%, and enjoy free second-day air Fed-Ex shipping. And shoot me your receipt to receive your free copy of the R5/R6 AF e-Guide and save $65.00 off the price of the R5 User’s e-Guide.
Six R5 Bodies are on the way as well …
Via e-Mail from Sarah Mayhew
Hi Artie, The Canon R5/R6 AF e-Guide has been very helpful! I had my R6 set up nicely for eye tracking flight shots, but it didn’t work at all for the small birds in the bushes. I can now toggle between the focusing methods easily. Thank goodness! And my hit rate is so much higher than with my Canon 7D II. Thank you! Sarah
What’s Up?
It was surreal down by the lake on Wednesday morning. It rained hard off and on. Though I stayed in my car the whole time, my Canon RF 100-500 lens got soaked. I followed around a large flock of Cattle Egrets feeding on the previous day’s mayfly hatch. Some were doing that in trees! And every once in a while, the whole scene would be enveloped by a huge flock of migrating Tree Swallows. I created about 800 images and kept a very few.
I finished the article for the GNPA Newsletter and sent it off via e-mail to Eric Bowles. It is entitled, A Personal Account: The Photographic Benefits of the COVID 19 Pandemic. If you would like a copy, shoot me an e-mail. I began work on the final update of the SONY e-Guide text. Today, I plan on going through several of the R5 Camera User’s e-Guide reviews that were e-mailed by folks who were kind enough to take a serious look at the manuscript.
Sunset was too northwest windy and too clear. I kept just one image. On a lark, I processed it and was dramatically surprised. I will be sharing it with you here soon.
I was glad to learn on Wednesday that good friend and multiple IPT veteran Donna Bourdon is flying to Florida next Wednesday to partake of the Sandhill Crane chicks and colts for three or four days here at ILE. We may also do a morning of American White Pelicans (and more) at Lakeland. Beverly Still will be driving down from Atlanta to join us for the upcoming Merritt Island IPT. Food and lodging are included in Donna’s visit. If you would like to do the two crane families on Sunday, Monday, and/or Tuesday, get in touch via e-mail to explore the possibilities of setting up some In-the-Field Instruction. (The weather for Saturday is looking to be horrific.)
I was glad to learn yesterday that Doug Smith sold his Canon 100-400mm L IS II lens in excellent condition for $1399.00 in early March before it was even listed.
The forecast for today — Thursday 4 March 2021 — is for fairly brisk northwest winds and early partly cloudy skies. I will head down for a bit hoping for more clouds than sun. But not expecting much. Buy hey, you never know.
Wherever you are and whatever you are doing, I hope that you have a great day.
This blog post took about one hour to prepare and makes seventy-three days in a row with a new one. Please remember …
Please Remember
With income from IPTs now at zero, please, if you enjoy and learn from the blog, remember to use one of my two affiliate programs when purchasing new gear. Doing so just might make it possible for me to avoid having to try to get a job as a Walmart greeter and will not cost you a single penny more. And if you use Bedfords and remember to enter the BIRDSASART code at checkout, you will save 3% on every order and enjoy free second-day air shipping. In these crazy times — I am out at least forty to sixty thousand dollars so far due to COVID 19 (with lots more to come) — remembering to use my B&H link or to shop at Bedfords will help me out a ton and be greatly appreciated. Overseas folks who cannot order from the US because of import fees, duties, and taxes, are invited to help out by clicking here to leave a blog thank you gift if they see fit.
Wanted to Buy
If you have a Canon EF 100-400mm f/4.5-5.6L IS II USM lens that you would like to part with, please contact me via e-mail. I have another interested buyer.
Great Topaz News!
Folks who use the BAA Topaz link to purchase Sharpen AI, DeNoise AI, or the Utility Bundle (or any other Topaz plug-ins) will receive a 15% discount by entering the ARTHUR15 code at checkout. If the stuff is on sale (as it usually is), you save 15% off of the sale price! To get the discount you must use my link and you must enter the discount code. Be sure to start with this link.
Those who purchase Sharpen AI, DeNoise AI, or any other Topaz plug-ins using my link and then entering the ARTHUR15 code at checkout can e-mail to request a short Getting Started with Topaz e-Guide. Please include a copy of your Topaz receipt that shows the discount. Aside from the basics, the guide explains how to install the plug-ins so that they appear in the Photoshop Filter Menu.
Canon EOS R5 Camera User’s e-Guide
Last week, I sent out about a dozen copies of the almost-finished Canon EOS R5 Camera User’s e-Guide for review to folks who had previously gotten free copies of the R5/R6 AF e-Guide by using my affiliate links to purchase their Canon mirrorless gear. In the same vein, I will be contacting everyone who purchased the R5/R6 AF e-Guide today.
Because the camera and the Menus are so complex, this guide has required a ton of research, a lot of time, and a lot of effort (and will continue to do so until it is complete). It should be finished by the first week in March. 2021. The final update of the R5/R6 AF e-Guide has become part of the complete Camera User’s e-Guide; it will be revised if warranted.
The complete Camera User’s guide will sell for $75.00. Folks who purchased their Canon gear using my links will receive a $65.00 discount; the guide will cost them a nominal $10.00. Folks who spent more than $7500.00 on Canon mirrorless gear using either of my affiliate links (B&H or Bedfords), will receive the User’s Guide for free. Folks who purchased the R5/R6 AF e-Guide will receive a $10.00 discount on the User’s e-Guide. The best news is that the end is in sight.
|
|
|
This image was created on 2 March 2021 down by the lake near my home at ILE. Working from the driver’s seat of my SUV, I used the handheld Canon RF 100-500mm f/4.5-7.1L IS USM lens (at 254mm) and the highly touted 45MP Canon EOS R5 Mirrorless Digital camera body. ISO 400. Exposure determined by test guesstimate in rapidly changing light: 1/2500 second at f/7.1. RawDigger showed this one to be about 2/3 stop under-exposed. AWB at 8:40am when a light cloud slid in front of the sun.
I was set up for flight with Face Detection plus Tracking and saw no reason to change that when it grabbed the tallest, spent flower stalk.
Wildflowers with out-of-focus Cattle Egret as background accent
|
Art or Trash?
Please leave a comment and let us know if you think today’s featured image should be on the wall of an art museum or in the trash can. Or somewhere in between. Let us know what you like, and what you don’t like.
I will share my inspiration for this image, the story of its creation, and my thoughts on the image with y’all here soon.
|
|
Topaz DeNoise on the Wildflowers with out-of-focus Cattle Egret as background accent image
|
Topaz DeNoise AI on DeNoise on Auto
Noise will always be more evident in the dark tones of an image. Thus, note the location of the white, square navigator-box in the upper right of the screen capture. Be sure to click on the screen capture to view the larger version and check on the effectiveness of this amazing plug-in.
Typos
In all blog posts and Bulletins, feel free to e-mail or to leave a comment regarding any typos or errors.
March 3rd, 2021 Give it a Go
If — after reading and learning from this blog post — you would like to improve your editing/picking your keepers skills, please leave a comment denoting what you think is the strongest image in each of the three groups. And let us know why you made your choices. You can indicate your choice with the GROUP and file number, like this: GROUP 1 — 4389. I like the wing position and the way the bird is framed by the waves.
Canon R6 Bodies in Stock now at Bedfords/R5 Bodies on the Way!
Steve Elkins asked me to let you know that he is receiving a good number of Canon EOS-R6 bodies today. Get yours by clicking here. Enter the BIRDSASART discount code at checkout, save 3%, and enjoy free second-day air Fed-Ex shipping. And shoot me your receipt to receive your free copy of the R5/R6 AF e-Guide and save $65.00 off the price of the R5 User’s e-Guide.
Six R5 Bodies are on the way as well …
What’s Up?
It was mostly grey on Tuesday morning with the sun trying to peek through on occasion. Both crane families are doing well. I took a zillion mostly bad images of Cattle Egrets as there was a big hatch of small mayflies. I got a very few decent flight shots and one different image that I think is really neat. I will share that one with you here soon.
I worked long and hard all morning but don’t ask me on what. I often find myself wishing that there were 48 hours in a day. Sunset was totally grey, so I stayed home.
Today is Wednesday 3 March 2021. The forecast for this morning is for cloudy-dark with SW winds and scattered thunderstorms. I may head down early for a walk and then get back to work.
Wherever you are and whatever you are doing, I hope that you have a great day.
This blog post took more than two hours to prepare and makes seventy-two days in a row with a new one. Please remember …
Please Remember
With income from IPTs now at zero, please, if you enjoy and learn from the blog, remember to use one of my two affiliate programs when purchasing new gear. Doing so just might make it possible for me to avoid having to try to get a job as a Walmart greeter and will not cost you a single penny more. And if you use Bedfords and remember to enter the BIRDSASART code at checkout, you will save 3% on every order and enjoy free second-day air shipping. In these crazy times — I am out at least forty to sixty thousand dollars so far due to COVID 19 (with lots more to come) — remembering to use my B&H link or to shop at Bedfords will help me out a ton and be greatly appreciated. Overseas folks who cannot order from the US because of import fees, duties, and taxes, are invited to help out by clicking here to leave a blog thank you gift if they see fit.
The BAA Used Gear Page
The Used Gear page continues to be very active. The BAA Used Gear Page is the place to sell your used photographic equipment. We will help you to get your gear sold quickly for 20 to 60% or more than what the big guys are offering … Doubt me? Check out the Recent Sales list for the past thirteen months at the bottom of the page.
Price Drop
Canon EOS 5D Mark II Digital SLR Camera Body with Extras!
Price Reduced $100 on 2 NOV 2020!
Price Reduced $100 on 1 MAR 2021!
Stuart Hahn is offering a Canon 5D Mark II in excellent plus condition for a silly-low $385.00 (was $585.00). The LCDs have been protected with screen protectors since day one. The sale includes everything that came with the camera originally, a RRS L bracket, and insured ground shipping via major courier to lower-48 US addresses only. Your item will not ship until your check clears unless other arrangements are made.
Please contact Stu via e-mail or by phone at 1-916-485-1630 (Pacific time zone).
Stu Hahn was the first-ever seller on the Used Gear Page many years ago when he parted with his Canon 500mm f/4L IS lens, the “old five.” This 5D II body would be ideal for a budding landscape or Urbex photographer, as well as for some looking for a great body to convert to IR. My 5D II was expertly converted by Kolari Vision. It is also a very good body for bird and nature photography; I used mine as a back-up for my old 1D Mark IV bodies. It served me very well in that capacity in the Southern Ocean a while back when I foolishly used my two 1D IVs in a driving rainstorm for two hours with the expected result. That 5D II saved the trip for me. Stu’s body is priced to sell. artie
Canon EOS R5 Camera User’s e-Guide
On Thursday, I sent out about a dozen copies of the almost finished Canon EOS R5 Camera User’s e-Guide for review to folks who had previously gotten free copies of the R5/R6 AF e-Guide by using my affiliate links to purchase their Canon mirrorless gear. In the same vein, I will be contacting everyone who purchased the R5/R6 AF e-Guide on Monday.
Because the camera and the Menus are so complex, this guide has required a ton of research, a lot of time, and a lot of effort (and will continue to do so until it is complete). It should be finished by the first week in March. 2021. The final update of the R5/R6 AF e-Guide has become part of the complete Camera User’s e-Guide; it will be revised if warranted.
The complete Camera User’s guide will sell for $75.00. Folks who purchased their Canon gear using my links will receive a $65.00 discount; the guide will cost them a nominal $10.00. Folks who spent more than $7500.00 on Canon mirrorless gear using either of my affiliate links (B&H or Bedfords), will receive the User’s Guide for free. Folks who purchased the R5/R6 AF e-Guide will receive a $10.00 discount on the User’s e-Guide. The best news is that the end is in sight.
New and Better Bedfords Discount Policy!
You can now save 3% on all of your Bedfords photo gear purchases by entering the BIRDSASART coupon code at checkout. Your discount will be applied to your pre-tax total. In addition, by using the code you will get 2nd day air shipping via Fed Ex.
Grab a Nikon AF-S Teleconverter TC-14E III and save $14.99. Purchase a Canon EOS R5 and your discount will be $116.97. Purchase a Sony FE 600mm f/4 GM OSS lens and save a remarkable $389.94! Your Bedford’s purchase no longer needs to be greater than $1,000.00 for you to receive a discount. The more you spend, the more you save.
Money Saving Reminder
Many have learned that if you need a hot photo item that is out of stock at B&H, would like a 3% discount, and would enjoy free second-day air shipping, your best bet is to click here, place an order with Bedfords, and enter the coupon code BIRDSASART at checkout. If an item is out of stock, contact Steve Elkins via e-mail or on his cell phone at (479) 381-2592 (Central time). Be sure to mention the BIRDSASART coupon code and use it for your online order to save 3% and enjoy free 2nd-day air shipping. Steve has been great at getting folks the hot items that are out of stock at B&H and everywhere else. The wait lists at the big stores can be a year or longer for the hard to get items. Steve will surely get you your gear long before that. For the past year, he has been helping BAA Blog folks get their hands on items like the SONY a9 ii, the SONY 200-600 G OSS lens, the Canon EOS R5, the Canon RF 100-500mm lens, and the Nikon 500mm PF. Steve is personable, helpful, and eager to please.


Gear Questions and Advice
Too many folks attending BAA IPTs (remember those?) and dozens of photographers whom I see in the field and on BPN, are–out of ignorance–using the wrong gear especially when it comes to tripods and more especially, tripod heads… Please know that I am always glad to answer your gear questions via e-mail. Those questions might deal with systems, camera bodies, accessories, and/or lens choices and decisions.
Initial Framing for Flapping-After-Bath Images
The image above shows approximately how you want to frame the bird while it is bathing; note that I have given the bird room to jump up into the frame. If you approach any closer, you will surely be clipping wings. With both Canon and SONY, center zone is my choice for the flapping-after-bath images. Note that you have some (up & down and side to side) latitude in framing with center zone. Thus, I was able to place the bird nicely down and slightly to the right (in the frame).
It almost goes without saying that you want the light and the wind coming from behind you so that the bird will flap while facing you and flapping into the wind.
If a bird is flapping vigorously, you may wish to move closer or add a teleconverter to go for the dramatic splashing shots. But you will surely miss the after-bath flapping images if you do. Zooming out rapidly in those situations is a huge challenge at best. I recommend that you go for one or the other.
|
|
|
These six images were created on 28 February 2021 at Fort DeSoto Park, Tierra Verde, FL on my In-the-Field morning with Steve King. For all of the images in this screen capture I used the handheld Canon RF 100-500mm f/4.5-7.1L IS USM lens and the highly touted 45MP Canon EOS R5 Mirrorless Digital camera body. All in this series were created at 1/2000 second at f/7.1 with ISOs of either 2000 (for the first three images) or 1600 (for the bottom three images).
Center Zone/AI Servo AF performed quite well.
Click on the screen capture to view a larger version.
Laughing Gulls flapping-after-bath GROUP A
|
Setting the Exposure with ISO on the Rear (Thumb) Wheel
Note with all three groups that after setting the shutter speed and the aperture (all wide open at f/7.1), I set my exposures by using ISO on the rear (thumb) wheel, just as I do with SONY. Taking a look at the EXIF for all three groups, you can see that the morning got brighter as time went by. For Canon, that means that you need to make a test exposure and evaluate the histogram every time the light changes. And when the light is changing almost second by second as a cloud passes in front of the sun, you will have to guesstimate. With SONY it is faster, simpler, and far more efficient to change the ISO as the light changes based on live Zebras in the viewfinder; you do not have to create a test image and evaluate the histogram. SONY folks can learn exactly how to do that in the Sony Camera User’s e-Guide and One Camera Set-up Video or the Sony Camera User’s e-Guide and Two Camera Set-up Videos.
Why not use the live, in-viewfinder histogram with the Canon R5?
Folks might ask, Why not use the live, in-viewfinder histogram with Canon? There are lots of problems with that approach. You have a choice of a small or a large histogram. The larger one is easier to read, but both cover a good portion of the frame; this obstructs your view and makes it difficult to design the image you want. But the major problem is that even with the large histogram, the right- (highlight-) end of the histogram is not depicted accurately. On numerous occasions, the histogram shows plenty of room on the right, but when you make an image, you will often find that it is a gross over-exposure.
|
|
|
These six images were created on 28 February 2021 at Fort DeSoto Park, Tierra Verde, FL on my In-the-Field morning with Steve King. For all of the images in this screen capture I used the handheld Canon RF 100-500mm f/4.5-7.1L IS USM lens and the highly touted 45MP Canon EOS R5 Mirrorless Digital camera body. All in this series were created with ISOs of either 1600 (for the first three images) or 1250 (for the bottom three images).
Center Zone/AI Servo AF performed quite well.
Click on the screen capture to view a larger version.
Laughing Gulls flapping-after-bath GROUP B
|
20 Frames-per-Second Editing
Even though I am conservative with regards to pressing the shutter button, I often find myself making well more than a thousand images during a decent session. I choose my keepers in Capture One. Once all the files in a folder load, you can pretty much view the images at slide-show-speed. I use T to red-tag my keepers. At times I slow down a bit to open an image in RawDigger to check the exposure. That done, I can correlate what I have learned in RawDigger with the red highlight warnings in Capture One. Assuming that you know what you are looking for (see item-next for help with that), it is possible to edit large folders in warp-speed time. I created more than 1800 images on my morning with Steve. I chose my 161 keepers in about 12 minutes. In time, that number will be reduced to about 50 after a second round of editing.
|
|
|
These six images were created on 28 February 2021 at Fort DeSoto Park, Tierra Verde, FL on my In-the-Field morning with Steve King. For all of the images in this screen capture I used the handheld Canon RF 100-500mm f/4.5-7.1L IS USM lens and the highly touted 45MP Canon EOS R5 Mirrorless Digital camera body. All in this series were created at 1/3200 second at f/7.1. The first image was created at ISO 800, the last five at ISO 640.
Center Zone/AI Servo AF performed quite well.
Click on the screen capture to view a larger version.
Laughing Gulls flapping-after-bath GROUP C
|
What Makes a Good Flapping-after-bath Image?
1- Is the subject relatively centered without any clipping of feet or wings? Is it facing forward or flying away?
2- Is the head sharp?
3- Is the flapping pose/wing position interesting, artistically pleasing, or dramatic (or relatively boring)?
4- Does the position of the feet & legs add something special?
5- Is one, or are both eyes, visible?
6- Do the background waves and wavelets add something to the motif or are they distracting?
7- Is the subject isolated? If not, can the image be saved with a small crop? Having other birds or man-made objects like piers or boats in the background is generally (but no always) an image-killer.
8- If the sun is out, are the underwings evenly illuminated? Harsh shadows are big negatives.
9- The condition of the subject and the plumage stage.
Even a single “no” answer to any of the questions above (except for #s 4 & 9), will usually result in an insta-pass-it-by delete. Six or seven yeses usually mean a red-tagged keeper. Eight or more positive responses and you just might have a family jewel.
Give it a Go
If you would like to improve your editing/picking your keepers skills, leave a comment denoting what you think is the strongest image in each of the three groups. And let us know why you made your choices. You can indicate your choice with the GROUP and file number, like this: GROUP 1 — 4389. I like the wing position and the way the bird is framed by the waves.
Typos
In all blog posts and Bulletins, feel free to e-mail or to leave a comment regarding any typos or errors.
March 2nd, 2021 Canon R6 Bodies in Stock now at Bedfords/R5 Bodies on the Way!
Steve Elkins asked me to let you know that he is receiving a good number of Canon EOS-R6 bodies today. Get yours by clicking here. Enter the BIRDSASART discount code at checkout, save 3%, and enjoy free second-day air Fed-Ex shipping. And shoot me your receipt to receive your free copy of the R5/R6 AF e-Guide and save $65.00 off the price of the R5 User’s e-Guide.
Six R5 Bodies are on the way as well …
What’s Up?
Right before I got out of my SUV to pick up and pack up the very still raccoon, I saw that about 100 or so Cattle Egrets that had been roosting on the pier railings were taking off and flying to the South Peninsula, so I pulled my vehicle up 100 yards in an effort to get some hand held flight shots from the driver’s seat. I glanced in the driver’s side mirror and saw that several vultures were feeding on the carcass. Lesson learned: my vehicle had been too close to the long-deceased raccoon.
I spent a great deal of time answering e-mails, responding to comments on yesterday’s blog post, and working on an article entitled A Personal Account: The Photographic Benefits of the COVID 19 Pandemic for the Georgia Nature Photographer Association Newsletter. After being postponed a year, I will be keynoting, speaking, and teaching at the GNPA Expo at Jekyll Island, Georgia — April 7-10, 2022.
I had a great swim in a now very warm and delightful pool. Summer has come early to central Florida. I did make it down to the lake just before sunset for a short photo session. With the wind from the southwest, I tried a new plan that did not involve birds landing directly away from me. I had a few good chances.
Today is Tuesday 2 March 2021. The forecast for ILE this morning is for mostly cloudy skies with a light north/northeast wind. I will be heading down to the lake for a bit.
Wherever you are and whatever you are doing, I hope that you have a great day.
This blog post took 1 1/2 hours to prepare and makes seventy-one days in a row with a new one. Please remember …
Please Remember
With income from IPTs now at zero, please, if you enjoy and learn from the blog, remember to use one of my two affiliate programs when purchasing new gear. Doing so just might make it possible for me to avoid having to try to get a job as a Walmart greeter and will not cost you a single penny more. And if you use Bedfords and remember to enter the BIRDSASART code at checkout, you will save 3% on every order and enjoy free second-day air shipping. In these crazy times — I am out at least forty to sixty thousand dollars so far due to COVID 19 (with lots more to come) — remembering to use my B&H link or to shop at Bedfords will help me out a ton and be greatly appreciated. Overseas folks who cannot order from the US because of import fees, duties, and taxes, are invited to help out by clicking here to leave a blog thank you gift if they see fit.
Great Topaz News!
Folks who use the BAA Topaz link to purchase Sharpen AI, DeNoise AI, or the Utility Bundle (or any other Topaz plug-ins) will receive a 15% discount by entering the ARTHUR15 code at checkout. If the stuff is on sale (as it usually is), you save 15% off of the sale price! To get the discount you must use my link and you must enter the discount code. Be sure to start with this link.
Those who purchase Sharpen AI, DeNoise AI, or any other Topaz plug-ins using my link and then entering the ARTHUR15 code at checkout can e-mail to request a short Getting Started with Topaz e-Guide. Please include a copy of your Topaz receipt that shows the discount. Aside from the basics, the guide explains how to install the plug-ins so that they appear in the Photoshop Filter Menu.
|
|
RawDigger e-Guide with Two Videos
|
The RawDigger e-Guide with Two Videos
by Arthur Morris with Patrick Sparkman
The RawDigger e-Guide was created only for serious photographers who wish to get the absolute most out of their raw files.
Patrick and I began work on the guide in July 2020. At first we struggled. We asked questions. We learned about Max-G values. We puzzled as to why the Max G values for different cameras were different. IPT veteran Bart Deamer asked lots of questions that we could not answer. We got help from RawDigger creator Iliah Borg. We learned. In December, Patrick came up with an Adapted Histogram that allows us to evaluate the exposures and raw file brightness for all images created with all digital camera bodies from the last two decades. What we learned each time prompted three complete beginning to end re-writes.
The point of the guide is to teach you to truly expose to the mega-Expose-to-the-Right so that you will minimize noise, maximize image quality, best utilize your camera’s dynamic range, and attain the highest possible level of shadow detail in your RAW files in every situation. In addition, your properly exposed RAW files will contain more tonal information and feature the smoothest possible transitions between tones. And your optimized images will feature rich, accurate color.
We teach you why the GREEN channel is almost always the first to over-expose. We save you money by advising you which version of RawDigger you need. We teach you how to interpret the Max G values for your Canon, Nikon, and SONY camera bodies. It is very likely that the Shock-your-World section will shock you. And lastly — thanks to the technical and practical brilliance of Patrick Sparkman — we teach you a simple way to quickly and easily evaluate your exposures and raw file brightness using an Adapted RawDigger histogram.
The flower video takes you through a session where artie edits a folder of images in Capture One while checking the exposures and Max-G values in RawDigger. The Adapted Histogram video examines a series of recent images with the pink histograms and covers lots of fine points including and especially how to deal with specular highlights. The directions for setting up the Adapted Histogram are in the text.
If we priced this guide based on how much effort we put into it, it would sell it for $999.00. But as this guide will be purchased only by a limited number of serious photographers, we have priced it at $51.00. You can order yours here in the BAA Online Store.
Canon EOS R5 Camera User’s e-Guide
On Thursday, I sent out about a dozen copies of the almost finished Canon EOS R5 Camera User’s e-Guide for review to folks who had previously gotten free copies of the R5/R6 AF e-Guide by using my affiliate links to purchase their Canon mirrorless gear. In the same vein, I will be contacting everyone who purchased the R5/R6 AF e-Guide on Monday.
Because the camera and the Menus are so complex, this guide has required a ton of research, a lot of time, and a lot of effort (and will continue to do so until it is complete). It should be finished by the first week in March. 2021. The final update of the R5/R6 AF e-Guide has become part of the complete Camera User’s e-Guide; it will be revised if warranted.
The complete Camera User’s guide will sell for $75.00. Folks who purchased their Canon gear using my links will receive a $65.00 discount; the guide will cost them a nominal $10.00. Folks who spent more than $7500.00 on Canon mirrorless gear using either of my affiliate links (B&H or Bedfords), will receive the User’s Guide for free. Folks who purchased the R5/R6 AF e-Guide will receive a $10.00 discount on the User’s e-Guide. The best news is that the end is in sight.
New and Better Bedfords Discount Policy!
You can now save 3% on all of your Bedfords photo gear purchases by entering the BIRDSASART coupon code at checkout. Your discount will be applied to your pre-tax total. In addition, by using the code you will get 2nd day air shipping via Fed Ex.
Grab a Nikon AF-S Teleconverter TC-14E III and save $14.99. Purchase a Canon EOS R5 and your discount will be $116.97. Purchase a Sony FE 600mm f/4 GM OSS lens and save a remarkable $389.94! Your Bedford’s purchase no longer needs to be greater than $1,000.00 for you to receive a discount. The more you spend, the more you save.
Money Saving Reminder
Many have learned that if you need a hot photo item that is out of stock at B&H and would enjoy free second-day air shipping, your best bet is to click here, place an order with Bedfords, and enter the coupon code BIRDSASART at checkout. If an item is out of stock, contact Steve Elkins via e-mail or on his cell phone at (479) 381-2592 (Central time). Be sure to mention the BIRDSASART coupon code and use it for your online order to save 3% and enjoy free 2nd-day air shipping. Steve has been great at getting folks the hot items that are out of stock at B&H and everywhere else. The wait lists at the big stores can be a year or longer for the hard to get items. Steve will surely get you your gear long before that. For the past year, he has been helping BAA Blog folks get their hands on items like the SONY a9 ii, the SONY 200-600 G OSS lens, the Canon EOS R5, the Canon RF 100-500mm lens, and the Nikon 500mm PF. Steve is personable, helpful, and eager to please.


Gear Questions and Advice
Too many folks attending BAA IPTs (remember those?) and dozens of photographers whom I see in the field and on BPN, are–out of ignorance–using the wrong gear especially when it comes to tripods and more especially, tripod heads… Please know that I am always glad to answer your gear questions via e-mail. Those questions might deal with systems, camera bodies, accessories, and/or lens choices and decisions.
|
|
|
This image was created on 26 February 2021 at Fort DeSoto Park, Tierra Verde FL. I used the handheld Canon RF 100-500mm f/4.5-7.1L IS USM lens with the Canon Extender RF 1.4x (at 700mm) and the highly touted 45MP Canon EOS R5 Mirrorless Digital camera body. ISO 800. Exposure determined via test image/histogram evaluation: 1/640 sec. at f/16 (stopped 1 1/3 stops) in Manual mode. RawDigger showed this one to be perfect. Maybe I am learning … AWB at 9:22am on a sunny morning.
1-Point/AI Servo AF performed just fine.
Image #1: What is it?
|
In the recent Killer Afternoon at DeSoto. RF 100-500 Close-focusing MFD. Age and ID Quiz: Earn a $25.00 credit in the BAA Online Store. And ask yourself … blog post here, I wrote:
Age and ID Quiz: Earn a $25.00 credit in the BAA Online Store
To earn a $25.00 credit in the BAA Online Store be the first to leave a comment on identifying the species of bird seen in Images #1 and 2 and signifying “adult” or “juvenile.” I will withhold judgement for two days so that if the first person gets it right, the rest of you can still have fun by agreeing or disagreeing. 2nd place gets zip.
I thought that Image #1, above, was easy-peasy. It was not. While five folks correctly identified the bird as an adult Brown Pelican, four others thought that it was an Anhinga … See Image #2 below.
|
|
|
This image was created on 11 November 2021 Lakeland, FL. I used the handheld Canon RF 100-500mm f/4.5-7.1L IS USM lens with the Canon Extender RF 1.4x (at 700mm) and the highly touted 45MP Canon EOS R5 Mirrorless Digital camera body. ISO 1250. Exposure determined by test image histogram evaluation; RawDigger showed some over-exposed feather shafts: 1/500 sec. at f/16 (stopped down 1 1/3 stops) in Manual mode. AWB at 8:28am on sunny morning.
Face detection + Tracking/AI Servo AF was active at the moment of exposure and actively 81 AF points on the upper center of the wing. Click the image to see a larger version.
Image #1: Anhinga wing feather detail
|
Anhinga Feather Detail
A quick glance at any North American field guide would have shown that the bird in Image #1 was not an Anhinga; even young Anhingas have the silver on black pattern on the upper wings. The R5, with its four-foot minimum focusing distance, is a great tool for creating tight, abstract images of large, tame birds. Note that it is best to stop down from one to two stops when working at very close range in order to have enough depth-of-field to cover the curved surface of the bird’s bodies.
Fine Feather Detail Image Processing
Both of the images above were first put through Topaz DeNoise AI on Low Light, and then through Topaz Sharpen AI on Stabilize. The latter shows us that we are not as steady as we think we are even when hand holding.
|
|
|
This image was created on 26 February 2021 at Fort DeSoto Park, Tierra Verde FL. I used the handheld Canon RF 100-500mm f/4.5-7.1L IS USM lens with the Canon Extender RF 1.4x (at 480mm) and the highly touted 45MP Canon EOS R5 Mirrorless Digital camera body. ISO 500. Exposure determined via test image/histogram evaluation: 1/640 sec. at f/16 (stopped 1 2/3 stops ???) in Manual mode. RawDigger showed this one to be less than 1/3-stop under. AWB at 9:34am on a sunny morning.
Again, 1-Point/AI Servo AF performed just fine.
Image #3: What is it?
|
A Lot Tougher
The second image on the other hand, was a lot tougher. The hint of auburn in the ruff clearly indicates Reddish Egret. And the light grey subterminal fringes on the covert feathers make this bird a juvenile. Scroll down to learn more about this unique individual.
And the Winner Is!
The winner of the ID Quiz is veteran bird photographer, good friend, and multiple IPT veteran Cliff Beittel. His $25.00 credit in the BAA Online store is now on the books.
|
|
|
This image was created on 26 February 2021 at Fort DeSoto Park, Tierra Verde, FL. I used the handheld Canon RF 100-500mm f/4.5-7.1L IS USM lens with the Canon Extender RF 1.4x (at 700mm) and the highly touted 45MP Canon EOS R5 Mirrorless Digital camera body. ISO 800. Exposure determined by test image histogram evaluation: RawDigger showed the exposure to be perfect: 1/1600 sec. at f/10 (wide open) in Manual mode. AWB at 9:15am on sunny morning.
Face detection + Tracking/AI Servo AF was active at the moment of exposure performed perfectly by nailing the eye squarely. Click on the image to see a larger version.
Image #4: Reddish Egret juvenile
|
Leucism
Leucism (loo’-siz-um) refers to a wide variety of genetic conditions that result in the partial loss of pigmentation in an animal—causing white, pale, or patchy coloration of the skin, hair, feathers, scales, or cuticles (but not the eyes). The adjective is leucistic (loo-si-stuhk).
One Strange Bird …
As many of you know, there are two color morphs of Reddish Egret, a dark form and a white form. There are lots of photographs of juvenile dark morph Reddish Egrets online, and very, very few of juvenile white morphs. I am currently trying to track some of those down so that I can get my hands on larger, more detailed versions.
The bird in question here is many, many shades lighter than a typical juvenile dark morph Reddish Egret. So what is it? I do not know. It is possible that it is a leucistic dark morph juvenile Reddish Egret. Or, it is possible that some juvenile white morph Reddish Egrets are a very light grey (like the bird in Images #3 and $4 above), and then become all white when they molt into their first adult plumage. In a phone conversation last night with Richard Crossley, the Brit agreed that that might very well be a possibility. He stressed that there is an amazing amount of stuff that we simply do not know about the identification and molt sequences of even the most common species.
When I learn some more, I will be posting additional images of this bird.
Typos
In all blog posts and Bulletins, feel free to e-mail or to leave a comment regarding any typos or errors.
March 1st, 2021 Your Favorite
All are invited to leave a comment letting us know which of today’s four featured images they like best. As always, please let us know why you made your choice. Comparative comments are also welcome. I will share my favorites in order from one to four here in a few days. Along with my reasons.
What’s Up?
I had a great Sunday morning with R5/RF 100-500 shooter Steve King. We both learned a ton. We photographed Laughing and Ring-billed Gulls, Brown Pelicans in flight, and several species of shorebirds (including two tame Whimbrels!), and several species of egrets and herons. While it was mostly sunny, we did have a few clouds come over at times. This gave Steve the opportunity learn the differences involved when determining the correct exposures in bright sun as compared to cloudy conditions. Steve also learned about staying on sun angle, keeping his left palm to the sky when hand holding, and about the strategies used when photographing birds flapping after their baths. And I have an idea involving the Lock Button on the R5 to eliminate an annoying problem with the R5; I will be exploring a possible solution soon. I created 1866 still-to-be edited images.
Steve kindly loaned me his RF 2X teleconverter. I was pretty much astounded by the R5/RF 100-500/2RF 2X TC combination. Face Detection plus Tracking AF was fast, responsive, and accurate. And a quick peek at the images revealed that they are astoundingly sharp. I will be sharing some of them with you here soon. While a 600-1000mm zoom lens is nothing to sneeze at, you need to pick your spots carefully; the wide open aperture at 500mm is f/14. In the bright sun, I worked at ISO 800 and 1000, used shutter speeds ranging from 1/500 to 1/1000 second, and apertures ranging from f/14 to f/20. Do understand that precise framing while hand holding at 1000mm is a huge challenge, especially if the birds are moving at all. In low light this combination will require the use of exceedingly high ISOs … All that said, I will almost surely be purchasing a Canon Extender RF 2x from Steve Elkins at Bedfords this week.
I was glad to learn that Anthony Ardito sold his SONY a7r iv body for a BAA record-low $1998.00. The winner of the $25.00 BAA store-credit ID quiz will be revealed tomorrow.
Today is Monday 1 March 2021; can you believe that it is already March??? The forecast for this morning is “partly cloudy” with south winds. I peeked out the back door at 7:00am to see clear skies everywhere. Though I have a ton of work to do, I will head down to the lake soon for a short session.
It is now 8:00am and I am sitting in my SUV working on finishing this blog post. I am parked, square to the sun, 60 feet from the long-dead road-killed raccoon, liberated from the fridge for just this occasion. There is a light breeze from the south so all I need is a few interested vultures, or a hungry Bald Eagle …
8:22am: I missed an incoming Black Vulture. I snapped a few frames of it standing near the raccoon but after a few minutes, it flew off. Back to the blog post.
8:36am: I saw an adult Bald Eagle flying right at the raccoon. I lowered the exposure (ISO) three clicks from the vulture exposure as I rated the rig to my eye, but as I had been photographing the raccoon alone I had an off-centered single-AF point. By the time I got where I needed to be, the eagle had flown well past sun angle. Had I been a bit more familiar with my Canon gear I would have gotten a few pretty good frames …
8:50am: a young Bald Eagle flew by at a distance, once having a brief interaction with an Osprey.
8:56am: a dozen Turkey Vultures circled overhead …
9:02am: two landed. One took off.
9:09am: I am about to hit Publish and give up for today. Perhaps I should have brought down some smoked salmon skins and a defrosted fish head or two … Now that would have been cheating!
Wherever you are and whatever you are doing, I hope that you have a great day.
I should have mentioned yesterday that my fine dinner at Left Bank Bistro was the first time I had eaten in a restaurant in more than a year. And that the money I spent was more than I had ever spent on a dining-alone meal.
This blog post took two hours to prepare and makes seventy days in a row with a new one. Please remember …
Please Remember
With income from IPTs now at zero, please, if you enjoy and learn from the blog, remember to use one of my two affiliate programs when purchasing new gear. Doing so just might make it possible for me to avoid having to try to get a job as a Walmart greeter and will not cost you a single penny more. And if you use Bedfords and remember to enter the BIRDSASART code at checkout, you will save 3% on every order and enjoy free second-day air shipping. In these crazy times — I am out at least forty to sixty thousand dollars so far due to COVID 19 (with lots more to come) — remembering to use my B&H link or to shop at Bedfords will help me out a ton and be greatly appreciated. Overseas folks who cannot order from the US because of import fees, duties, and taxes, are invited to help out by clicking here to leave a blog thank you gift if they see fit.
|
|
|
134 sold to rave reviews.
The SONY e-Guide by Patrick Sparkman and Arthur Morris
|
The Sony Camera User’s e-Guide (and Videos)
Click here to purchase the guide with one Camera Set-up Video. Be sure to e-mail us by clicking here to specify your camera body so that we can send you a link for the correct video.
Click here to purchase the guide with two Camera Set-up Videos. Be sure to e-mail us by clicking here to specify your two camera bodies so that we can send you links for the correct videos.
Click here to learn more about the SONY e-Guide.
Folks who have used my B&H affiliate links or purchased their SONY gear are invited to e-mail for discount information.
|
|
RawDigger e-Guide with Two Videos
|
The RawDigger e-Guide with Two Videos
by Arthur Morris with Patrick Sparkman
The RawDigger e-Guide was created only for serious photographers who wish to get the absolute most out of their raw files.
Patrick and I began work on the guide in July 2020. At first we struggled. We asked questions. We learned about Max-G values. We puzzled as to why the Max G values for different cameras were different. IPT veteran Bart Deamer asked lots of questions that we could not answer. We got help from RawDigger creator Iliah Borg. We learned. In December, Patrick came up with an Adapted Histogram that allows us to evaluate the exposures and raw file brightness for all images created with all digital camera bodies from the last two decades. What we learned each time prompted three complete beginning to end re-writes.
The point of the guide is to teach you to truly expose to the mega-Expose-to-the-Right so that you will minimize noise, maximize image quality, best utilize your camera’s dynamic range, and attain the highest possible level of shadow detail in your RAW files in every situation. In addition, your properly exposed RAW files will contain more tonal information and feature the smoothest possible transitions between tones. And your optimized images will feature rich, accurate color.
We teach you why the GREEN channel is almost always the first to over-expose. We save you money by advising you which version of RawDigger you need. We teach you how to interpret the Max G values for your Canon, Nikon, and SONY camera bodies. It is very likely that the Shock-your-World section will shock you. And lastly — thanks to the technical and practical brilliance of Patrick Sparkman — we teach you a simple way to quickly and easily evaluate your exposures and raw file brightness using an Adapted RawDigger histogram.
The flower video takes you through a session where artie edits a folder of images in Capture One while checking the exposures and Max-G values in RawDigger. The Adapted Histogram video examines a series of recent images with the pink histograms and covers lots of fine points including and especially how to deal with specular highlights. The directions for setting up the Adapted Histogram are in the text.
If we priced this guide based on how much effort we put into it, it would sell it for $999.00. But as this guide will be purchased only by a limited number of serious photographers, we have priced it at $51.00. You can order yours here in the BAA Online Store.
Canon EOS R5 Camera User’s e-Guide
On Thursday, I sent out about a dozen copies of the almost finished Canon EOS R5 Camera User’s e-Guide for review to folks who had previously gotten free copies of the R5/R6 AF e-Guide by using my affiliate links to purchase their Canon mirrorless gear. In the same vein, I will be contacting everyone who purchased the R5/R6 AF e-Guide on Monday.
Because the camera and the Menus are so complex, this guide has required a ton of research, a lot of time, and a lot of effort (and will continue to do so until it is complete). It should be finished by the first week in March. 2021. The final update of the R5/R6 AF e-Guide has become part of the complete Camera User’s e-Guide; it will be revised if warranted.
The complete Camera User’s guide will sell for $75.00. Folks who purchased their Canon gear using my links will receive a $65.00 discount; the guide will cost them a nominal $10.00. Folks who spent more than $7500.00 on Canon mirrorless gear using either of my affiliate links (B&H or Bedfords), will receive the User’s Guide for free. Folks who purchased the R5/R6 AF e-Guide will receive a $10.00 discount on the User’s e-Guide. The best news is that the end is in sight.
New and Better Bedfords Discount Policy!
You can now save 3% on all of your Bedfords photo gear purchases by entering the BIRDSASART coupon code at checkout. Your discount will be applied to your pre-tax total. In addition, by using the code you will get 2nd day air shipping via Fed Ex.
Grab a Nikon AF-S Teleconverter TC-14E III and save $14.99. Purchase a Canon EOS R5 and your discount will be $116.97. Purchase a Sony FE 600mm f/4 GM OSS lens and save a remarkable $389.94! Your Bedford’s purchase no longer needs to be greater than $1,000.00 for you to receive a discount. The more you spend, the more you save.
Money Saving Reminder
Many have learned that if you need a hot photo item that is out of stock at B&H and would enjoy free second-day air shipping, your best bet is to click here, place an order with Bedfords, and enter the coupon code BIRDSASART at checkout. If an item is out of stock, contact Steve Elkins via e-mail or on his cell phone at (479) 381-2592 (Central time). Be sure to mention the BIRDSASART coupon code and use it for your online order to save 3% and enjoy free 2nd-day air shipping. Steve has been great at getting folks the hot items that are out of stock at B&H and everywhere else. The wait lists at the big stores can be a year or longer for the hard to get items. Steve will surely get you your gear long before that. For the past year, he has been helping BAA Blog folks get their hands on items like the SONY a9 ii, the SONY 200-600 G OSS lens, the Canon EOS R5, the Canon RF 100-500mm lens, and the Nikon 500mm PF. Steve is personable, helpful, and eager to please.


Gear Questions and Advice
Too many folks attending BAA IPTs (remember those?) and dozens of photographers whom I see in the field and on BPN, are–out of ignorance–using the wrong gear especially when it comes to tripods and more especially, tripod heads… Please know that I am always glad to answer your gear questions via e-mail. Those questions might deal with systems, camera bodies, accessories, and/or lens choices and decisions.
|
|
|
This image was created on 27 February 2021 at my back-up morning location at Fort DeSoto Park. I used the Induro GIT 304L/Levered-clamp FlexShooter Pro-mounted Sony FE 600mm f/4 GM OSS lens, the Sony FE 2.0x Teleconverter, and the blazingly fast AF King, the Sony Alpha a9 II Mirrorless Digital camera body). ISO 500. The exposure was determined by Zebras with ISO on the rear wheel: 1/1250 sec. at f/9 (stopped down 1/3-stop) in Manual mode. RawDigger showed this exposure to be less than 1/3 stop under, i.e., almost perfect. AWB at 8:01:43am on a clear morning.
Upper Left Zone/AF-C was active at the moment of exposure and performed to absolute perfection by painting the bird’s eye with AF points.
Image #1: Laughing Gull — adult breeding plumage display calling/vertical front-end image design
|
I Knew Exactly What I Wanted …
I knew exactly what I wanted: clean tight and graphic head shots of a killer-plumaged Laughing Gull with a bit of behavior thrown in for good measure. So I set the tripod up low for seated shooting and added the 2X TC to the 600 GM/a9 ii. This bird flew in almost on sun angle and began calling. I moved the Zone to the upper left position, acquired focus, and fired off an eight-frame sequence. All were sharp and pretty and pretty dramatic. The one with the perfectly placed wavelet in the lower left corner of the frame was the easy pick.
|
|
|
This image was also created on 27 February 2021 at my back-up morning location at Fort DeSoto Park. I used the Induro GIT 304L/Levered-clamp FlexShooter Pro-mounted Sony FE 600mm f/4 GM OSS lens, the Sony FE 2.0x Teleconverter, and the blazingly fast AF King, the Sony Alpha a9 II Mirrorless Digital camera body). ISO 800. The exposure was determined by Zebras with ISO on the rear wheel: 1/2000 sec. at f/9 (stopped down 1/3-stop) in Manual mode. RawDigger showed this exposure to be perfect. AWB at 8:05:14am on a clear morning.
Upper Right Zone/AF-C was active at the moment of exposure and performed to absolute perfection, again by painting the bird’s eye with AF points.
Click on the image to enjoy a larger version.
Image #2: Laughing Gull — adult breeding plumage preening neck
|
Getting Better
I should have mentioned above that this individual was the most perfect Laughing Gull in all of Florida: full breeding plumage with a totally clean face and bill. As it was by itself for the most part, I did not have to worry much about isolating the subject. The bird moved toward me to just right of sun angle so I scootched a bit forward and a bit to my right. When it began preening its neck I quickly and easily moved the Zone to the upper right position and created a short sequence. Even at 20 frames per second these behavioral situations do not last very long. With this one I love the bill tip buried in the white feathers, the almost pure blue background, and the absolutely perfect head angle.
|
|
|
This image was also created on 27 February 2021 at my back-up morning location at Fort DeSoto Park. I used the Induro GIT 304L/Levered-clamp FlexShooter Pro-mounted Sony FE 600mm f/4 GM OSS lens, the Sony FE 2.0x Teleconverter, and the blazingly fast AF King, the Sony Alpha a9 II Mirrorless Digital camera body). ISO 800. The exposure was determined by Zebras with ISO on the rear wheel: 1/2000 sec. at f/9 (stopped down 1/3-stop) in Manual mode. RawDigger showed this exposure to be perfect. AWB at 8:07:01am on a clear morning.
Center Zone/AF-C was active at the moment of exposure and performed well. The active AF points were on the base of the bird’s neck, on the exact same plane as the bird’s eye.
Click on the image to enjoy a larger version.
Image #3: Laughing Gull — adult breeding plumage calling/horiztonal
|
More Calling
The bird stayed put right in front of me and right on sun angle. I would guess that I was about 25 feet from the subject. Or maybe a few feet closer. It is likely that had I moved the Zone to upper center, that the system would have grabbed the eye. But no matter, the base of the bird’s neck was on the same plane as the bird’s eye. The variegated background with shades of blue and grey was the result of breaking waves rendered totally out of focus.
|
|
|
This image was also created on 27 February 2021 at my back-up morning location at Fort DeSoto Park. I used the Induro GIT 304L/Levered-clamp FlexShooter Pro-mounted Sony FE 600mm f/4 GM OSS lens, the Sony FE 2.0x Teleconverter, and the blazingly fast AF King, the Sony Alpha a9 II Mirrorless Digital camera body). ISO 800. The exposure was determined by Zebras with ISO on the rear wheel: 1/2000 sec. at f/9 (stopped down 1/3-stop) in Manual mode. RawDigger showed this exposure to be perfect. AWB at 8:07:21am on a clear morning.
Center Zone/AF-C was active at the moment of exposure and performed well. The active AF points were on the spot where the hood meets the upper breast just below the very base of the bird’s bill. Again, on the exact same plane as the bird’s eye.
Click on the image to enjoy a larger version.
Image #4: Laughing Gull — adult breeding plumage/head and shoulders portrait
|
The Ultimate Head and Shoulders Portrait
This is the one I came for: clean, tight and graphic — a gorgeous bird, nicely framed, right on sun angle, and with the perfect head — two degrees toward.
I did see one courtship feeding and lots of displaying. On the two DeSoto IPTs, there will be dozens of equally beautiful, easy-to-photograph Laughing Gulls. We will surely have some chances to photograph them (as well as Royal and possibly Sandwich Terns), performing various courtship displays including the copulatory stands that often end with the pair copulating. Do consider joining me.
|
|
|
All of the images were created at Fort DeSoto in April or early May. Click on the card to enjoy a larger version.
Fort DeSoto IPT card A
|
Fort DeSoto Spring IPT #1
Fort DeSoto Spring IPT #1. 3 1/2 DAYS. SAT 10 APR thru the morning session on TEUS 13 APR 2021. $1499 includes three lunches. Limit: 6. Openings 5.
While DeSoto is one of the rare photo hotspots with the potential to be great any day of the year, it absolutely shines in spring. Many of the wading birds and shorebirds are in full breeding plumage. The terns and gulls are courting and copulating. We will have lots of flight photography opportunities. Did I mention that many of the birds are silly tame?
A $499 deposit is required to hold your spot for this IPT. You can send a check (made out to “BIRDS AS ART) to us here: BIRDS AS ART, PO Box 7245, Indian Lake Estates, FL, 33855, or call Jim or Jennifer at the office with a credit card at 863-692-0906. Your balance, payable only by check, is due immediately after you sign up. If you have any questions, please feel free to contact me via e-mail. If you cancel due to COVID 19 concerns, all of your payments will be refunded.
|
|
|
All of the images were created at Fort DeSoto in April or early May. Click on the card to enjoy a larger version.
Fort DeSoto IPT card B
|
Fort DeSoto Spring IPT #2
Fort DeSoto Spring IPT #2. 3 1/2 DAYS. MON 26 APR thru the morning session on THURS 29 APR 2021. $1499 includes three lunches. Limit: 6.
Not only am I conversant in all three major camera systems used in the US — Nikon, Canon, and SONY (sorry Andy Rouse …), I have used all three within the past four years. Those include both SONY and Canon mirrorless. On both of these IPTs you will learn how to get the best exposure, how to get the most out of your AF system, and how to get close to free and wild birds. And tons more.
A $499 deposit is required to hold your spot for this IPT. You can send a check (made out to “BIRDS AS ART) to us here: BIRDS AS ART, PO Box 7245, Indian Lake Estates, FL, 33855, or call Jim or Jennifer at the office with a credit card at 863-692-0906. Your balance, payable only by check, is due immediately after you sign up. If you have any questions, please feel free to contact me via e-mail. If you cancel due to COVID 19 concerns, all of your payments will be refunded.
|
|
|
All of the images were created at Fort DeSoto in April or early May. Click on the card to enjoy a larger version.
Fort DeSoto IPT card C
|
Fort DeSoto Spring IPTs Expected Species
With any luck, we should get to photograph the following species: Laughing, Ring-billed, Herring, and Lesser Black-backed Gull; Royal, Sandwich, and Forster’s Tern: Great, Snowy, and white and dark morph Reddish Egret and Great Blue, Little Blue, and Tricolored Heron; Yellow-crowned Night-Heron, Wood Stork, Roseate Spoonbill, and Brown Pelican. We will see and photograph lots of shorebirds including American Oystercatcher, Black-bellied, Wilson’s, Semipalmated, Snowy, and Piping Plover, Marbled Godwit, Willet, Dunlin, Red Knot, Sanderling, and Western and possibly White-rumped Sandpiper.
Sign up for both IPTs and enjoy a $200 discount. Most of us will be staying in nearby Gulfport.
Typos
In all blog posts and Bulletins, feel free to e-mail or to leave a comment regarding any typos or errors.
February 28th, 2021 What’s Up?
North Beach was dead again on Saturday morning. And again, the weather was gorgeous and the wind perfect. I did not wait long before heading to my back-up spot, intent on making some nice head portraits of a killer-plumaged Laughing Gull at 1200mm. And I did just that. Miraculously, the single most beautiful Laughing Gull landing right in front of me right down sun angle. It posed and preened for nearly fifteen minutes.
I headed back to my favorite afternoon beach, but there were lots of people. The wind was stronger and from a slightly different direction so the still blue water was gone. I stayed only a short while and worked a silly tame young Great Egret with the handheld 200-600. This bird simply posed and posed and posed some more while allowing me to approach as closely as I wanted. (Being seated helped.) In such situations, I work on the very fine points of exposure and image design while comparing results with Tracking Expand Flexible Spot and Zone AF. The goal is to always learn something. I did that and came away with some very nice images as well. As with Face Detection plus Tracking with animal eye, the more you practice with Tracking Expand Flexible Spot, the better you become at creating perfect compositions. For more on that subject see the recent Can Operator Error Trump Science-fiction-like Autofocus? blog post here.
I had made a reservation for dinner for one at The Left Bank Bistro ($$$$) for 7:15pm. The restaurant was — coincidentally. — less than two blocks from my AirBnB in St. Pete. I called and moved my reservation up to 5:30. The host, a very nice lady named Rhonda, suggested a Libbot Sauternes to go with my Potato Crusted Snapper — Gulf snapper, vegetable ratatouille, citrus beurre blanc, & roquette vinaigrette. My server was named Skyler; he was a wonderful waiter. My main course was superb, and the wine was fine and yummy. Bad enough, but then I had a Pot de Creme — dark french chocolate custard with bing cherries for dessert. It was like the richest, thickest chocolate pudding you ever dreamed of. My meal was a fine end to a great day.
R5/RF 100-500 shooter Steve King will be joining me for Sunday morning at DeSoto, so I will be shooting only my Canon gear. I should be headed back to ILE by about 10:00am.
Today is Sunday 28 February 2021. The forecast for this morning for Tierra Verde is for partly cloud with southeast winds — pretty good, but the more sun the better! Wherever you are and whatever you are doing, I hope that you have a great day.
This blog post took two hours to prepare and makes sixty-nine days in a row with a new one. Please remember …
Please Remember
With income from IPTs now at zero, please, if you enjoy and learn from the blog, remember to use one of my two affiliate programs when purchasing new gear. Doing so just might make it possible for me to avoid having to try to get a job as a Walmart greeter and will not cost you a single penny more. And if you use Bedfords and remember to enter the BIRDSASART code at checkout, you will save 3% on every order and enjoy free second-day air shipping. In these crazy times — I am out at least forty to sixty thousand dollars so far due to COVID 19 (with lots more to come) — remembering to use my B&H link or to shop at Bedfords will help me out a ton and be greatly appreciated. Overseas folks who cannot order from the US because of import fees, duties, and taxes, are invited to help out by clicking here to leave a blog thank you gift if they see fit.
Wanted to Buy
If you have a Canon EF 100-400mm f/4.5-5.6L IS II USM lens that you would like to part with, please contact me via e-mail. I now have two interested buyers.
|
|
RawDigger e-Guide with Two Videos
|
The RawDigger e-Guide with Two Videos
by Arthur Morris with Patrick Sparkman
The RawDigger e-Guide was created only for serious photographers who wish to get the absolute most out of their raw files.
Patrick and I began work on the guide in July 2020. At first we struggled. We asked questions. We learned about Max-G values. We puzzled as to why the Max G values for different cameras were different. IPT veteran Bart Deamer asked lots of questions that we could not answer. We got help from RawDigger creator Iliah Borg. We learned. In December, Patrick came up with an Adapted Histogram that allows us to evaluate the exposures and raw file brightness for all images created with all digital camera bodies from the last two decades. What we learned each time prompted three complete beginning to end re-writes.
The point of the guide is to teach you to truly expose to the mega-Expose-to-the-Right so that you will minimize noise, maximize image quality, best utilize your camera’s dynamic range, and attain the highest possible level of shadow detail in your RAW files in every situation. In addition, your properly exposed RAW files will contain more tonal information and feature the smoothest possible transitions between tones. And your optimized images will feature rich, accurate color.
We teach you why the GREEN channel is almost always the first to over-expose. We save you money by advising you which version of RawDigger you need. We teach you how to interpret the Max G values for your Canon, Nikon, and SONY camera bodies. It is very likely that the Shock-your-World section will shock you. And lastly — thanks to the technical and practical brilliance of Patrick Sparkman — we teach you a simple way to quickly and easily evaluate your exposures and raw file brightness using an Adapted RawDigger histogram.
The flower video takes you through a session where artie edits a folder of images in Capture One while checking the exposures and Max-G values in RawDigger. The Adapted Histogram video examines a series of recent images with the pink histograms and covers lots of fine points including and especially how to deal with specular highlights. The directions for setting up the Adapted Histogram are in the text.
If we priced this guide based on how much effort we put into it, it would sell it for $999.00. But as this guide will be purchased only by a limited number of serious photographers, we have priced it at $51.00. You can order yours here in the BAA Online Store.
Great Topaz News!
Folks who use the BAA Topaz link to purchase Sharpen AI, DeNoise AI, or the Utility Bundle (or any other Topaz plug-ins) will receive a 15% discount by entering the ARTHUR15 code at checkout. If the stuff is on sale (as it usually is), you save 15% off of the sale price! To get the discount you must use my link and you must enter the discount code. Be sure to start with this link.
Those who purchase Sharpen AI, DeNoise AI, or any other Topaz plug-ins using my link and then entering the ARTHUR15 code at checkout can e-mail to request a short Getting Started with Topaz e-Guide. Please include a copy of your Topaz receipt that shows the discount. Aside from the basics, the guide explains how to install the plug-ins so that they appear in the Photoshop Filter Menu.
Canon EOS R5 Camera User’s e-Guide
On Thursday, I sent out about a dozen copies of the almost finished Canon EOS R5 Camera User’s e-Guide for review to folks who had previously gotten free copies of the R5/R6 AF e-Guide by using my affiliate links to purchase their Canon mirrorless gear. In the same vein, I will be contacting everyone who purchased the R5/R6 AF e-Guide on Monday.
Because the camera and the Menus are so complex, this guide has required a ton of research, a lot of time, and a lot of effort (and will continue to do so until it is complete). It should be finished by the first week in March. 2021. The final update of the R5/R6 AF e-Guide has become part of the complete Camera User’s e-Guide; it will be revised if warranted.
The complete Camera User’s guide will sell for $75.00. Folks who purchased their Canon gear using my links will receive a $65.00 discount; the guide will cost them a nominal $10.00. Folks who spent more than $7500.00 on Canon mirrorless gear using either of my affiliate links (B&H or Bedfords), will receive the User’s Guide for free. Folks who purchased the R5/R6 AF e-Guide will receive a $10.00 discount on the User’s e-Guide. The best news is that the end is in sight.
New and Better Bedfords Discount Policy!
You can now save 3% on all of your Bedfords photo gear purchases by entering the BIRDSASART coupon code at checkout. Your discount will be applied to your pre-tax total. In addition, by using the code you will get 2nd day air shipping via Fed Ex.
Grab a Nikon AF-S Teleconverter TC-14E III and save $14.99. Purchase a Canon EOS R5 and your discount will be $116.97. Purchase a Sony FE 600mm f/4 GM OSS lens and save a remarkable $389.94! Your Bedford’s purchase no longer needs to be greater than $1,000.00 for you to receive a discount. The more you spend, the more you save.
Money Saving Reminder
Many have learned that if you need a hot photo item that is out of stock at B&H and would enjoy free second-day air shipping, your best bet is to click here, place an order with Bedfords, and enter the coupon code BIRDSASART at checkout. If an item is out of stock, contact Steve Elkins via e-mail or on his cell phone at (479) 381-2592 (Central time). Be sure to mention the BIRDSASART coupon code and use it for your online order to save 3% and enjoy free 2nd-day air shipping. Steve has been great at getting folks the hot items that are out of stock at B&H and everywhere else. The wait lists at the big stores can be a year or longer for the hard to get items. Steve will surely get you your gear long before that. For the past year, he has been helping BAA Blog folks get their hands on items like the SONY a9 ii, the SONY 200-600 G OSS lens, the Canon EOS R5, the Canon RF 100-500mm lens, and the Nikon 500mm PF. Steve is personable, helpful, and eager to please.


Gear Questions and Advice
Too many folks attending BAA IPTs (remember those?) and dozens of photographers whom I see in the field and on BPN, are–out of ignorance–using the wrong gear especially when it comes to tripods and more especially, tripod heads… Please know that I am always glad to answer your gear questions via e-mail. Those questions might deal with systems, camera bodies, accessories, and/or lens choices and decisions.
|
|
|
This image was created on 26 February 2021 at my favorite afternoon morning spot at Fort DeSoto Park. I used the Induro GIT 304L/Levered-clamp FlexShooter Pro-mounted Sony FE 600mm f/4 GM OSS lens, the Sony FE 2.0x Teleconverter, and the blazingly fast AF King, the Sony Alpha a9 II Mirrorless Digital camera body). ISO 1000. The exposure was determined by Zebras with ISO on the rear wheel: 1/2000 sec. at f/8 (wide open) in Manual mode. RawDigger showed this exposure to be perfect; see the screen capture below. AWB at 5:40pm on a clear afternoon.
Center Zone/AF-C was active at the moment of exposure and performed to perfection; again, see the screen capture below. Click on the image to enjoy a larger version.
Image #1: Wilson’s Plover flapping after bath
|
THE Best Image from a Really Great Afternoon!
I killed on Friday afternoon. I worked exclusively with the SONY 600 GM, the 2X TC, and the a9 ii. Overall, as expected, the images were all insanely sharp as long as I managed to do a halfway decent job of framing. For the most part, I lowered the tripod, sat on the wet sand, and worked with the lens about 18 inches off the ground. At that height, working at 1200mm, the angle of declination (to the subject) is relatively shallow; it appears as if you are working from a much lower perspective. Here’s the rule: with subject size constant, the longer the focal length, the shallowed the angle of declination (or inclination if you are photographing a bird above your position.
That said, at times, I lowered the tripod so that the lens was about 8 inches off the ground. Then I tilted out the rear monitor and used that to frame and focus without having to get down in the muck to get my (left) eye to the viewfinder. Even with my reading glasses on, it is difficult to note head angle and other small yet important details. Thus, I was shooting much more aggressively than I usually do. I did activate the level on the rear monitor and was able to see that go green, so that eliminated one potential problem. Getting really low is, however, a big plus.
At times, thinking that 8 inches was too high, I placed the lens foot on the sand, made a huge mess of the CR-X5 low foot, struggled to stay level, and got even lower. From now on I will bring a Skimmer II and a Ground Pod to facilitate super-low angle shooting while keeping the lens foot out of the muck.
I must say that the titling rear screen of the SONY a9 series bodies kills the articulating screen on the Canon R5. Rather than tilting the screen out as on the SONY, the rear monitor on the R5 needs to be flipped and then moved out to the left side of the camera body. I have tried several times to use the R5’s articulating screen to get low, and have given up quickly each time. It just is not practical.
ps: You will be seeing lots more images from that great afternoon here soon.
|
|
Image #1A: SONY AF points for the Wilson’s Plover flapping after bath image
|
SONY Zone AF-C
As I wrote in the The Sony Camera User’s e-Guide and One Camera Set-up Video, Zone AF is not always as accurate as Tracking Expand Flexible Spot, but it is a lot easier to use and is much more forgiving. It acquires focus faster and does not require any great skill to stay locked on. Here, it performed flawlessly by tracking the bird’s cheek, right on the same plane as the bird’s eye. I can’t wait to see what the new Sony Alpha a1 can do in these situations.
|
|
Image #1B: RawDigger screen capture for the Wilson’s Plover flapping after bath image
|
Exposure is so much easier with SONY Zebras …
Set the shutter speed and aperture that you want, dial up the ISO until you see Zebras, click the ISO down until the Zebras disappear, and then raise the ISO one click until they re-appear. If you have Zebras set up as detailed in the The Sony Camera User’s e-Guide and One Camera Set-up Video, you will have a perfect or near perfect exposure every time. In the guide, we differentiate between the degree of Zebras you want in the sun versus what you are looking for in low light or on cloudy days.
BTW, this one is perfect. The 26 OvExp pixels all reside in the specular catchlight (of the eye).
In the RawDigger e-Guide, you will learn exactly how to set up the Adapted “pink” RawDigger Histogram and how to use it to quickly and easily evaluate the exposure or raw file brightness of images from all digital cameras currently in use.
|
|
Image #1C: Topaz DeNoise screen capture for the Wilson’s Plover flapping after bath image
|
A Huge Benefit of Learning to Mega-Expose-to-the Right
By learning to truly mega-expose your raw files to the right (s I have done with RawDigger), noise is minimized. In the original on our left, there is very little noise visible. Click on the image to enlarge it and see that DeNoise on Low Light on Auto cleaned the noise up beautifully, and sharpened the already sharp image nicely and non-destructively.
|
|
Image #1D: Topaz Sharpen AI 100% screen capture for the Wilson’s Plover flapping after bath image
|
Selecting the Subject in Photoshop
I recently updated my Adobe Photoshop subscription (now Photoshop 2021) to the 22.2.0 Release. I gotta say that Select > Subject was greatly improved in the new version. Here I selected the subject (with just one click!), placed the selection on its own layer, and brought the image into Sharpen AI. I was not surprised that the plug-in selected Stabilize as even with the fast shutter speed of 1/2000 second, I knew that there would be some degree of motion blur.
|
|
Image #1D: Topaz Sharpen AI 400% screen capture for the Wilson’s Plover flapping after bath image
|
The Elongated Second Catchlight
A bird in the water will often show two catchlights in the eye. The upper catchlight is from the sun, the lower one from the sun reflected off the water. If the water was moving at the moment of exposure (as it was here because the bird was flapping), the lower catchlight will often be elongated. At least that is my theory … You will need to magnify the eye to 400% or so in order to see the elongated specular highlight. With this image I chose to eliminate the second catchlight during post processing and to darken the pupil as well. You can learn about Eye Doctor techniques and tons more in Digital Basics II.
Typos
In all blog posts and Bulletins, feel free to e-mail or to leave a comment regarding any typos or errors.
February 27th, 2021 Ask Yourself This
So far, four folks have signed up for the three currently scheduled IPTs. All of them have been on multiple IPTs. Ask yourself, why do you think that is?
What’s Up?
As noted previously, North Beach was terrible on Friday morning. When I spoke to other photographers, the words “hit or miss” kept popping up. Yesterday was great with two breeding plumage Reddish Egrets including a white morph! So I went to my back-up morning spot and did very well.
I got into my AirBnB by 12:30 and took a much needed nap. Then I decided not to go looking for the GHO nest and went to my favorite afternoon beach. And had one of my best days ever photographing the usual shorebirds: Short-billed Dowitcher, Semipalmated and Wilson’s Plover (one of the latter with a fiddler crab!), Sanderling, Western Sandpiper, Ruddy Turnstone, and Dunlin. Conditions were perfect. I photographed the birds bathing (splashing and splashing), flapping after their baths, preening, feeding, and posing. I ignored the Least Sandpipers and the Willets. More on that great afternoon soon. With images.
If you have a long lens and would like to join me this afternoon, please contact me ASAP via e-mail or try me on my cell at 863-221-2372.
I was glad to learn last night of the sales of IPT veteran Mike Ross’s Sony FE 400mm f/2.8 GM OSS lens in like-new condition for $9500.00 (was $9998.00) and his Sony FE 100-400mm f/4.5-5.6 GM OSS lens in like-new condition for $1898.00 became final. Mike recently sold more than $21,000 of used SONY and Canon gear.
If you shoot Canon Mirrorless, do check out the Canon EOS R5 Camera User’s e-Guide item below.
Today is Saturday 27 February and the weather at DeSoto is looking great again. I hope that you have a great day wherever you are.
This blog post took two hours to prepare and makes sixty-nine days in a row with a new one. Please remember …
Please Remember
With income from IPTs now at zero, please, if you enjoy and learn from the blog, remember to use one of my two affiliate programs when purchasing new gear. Doing so just might make it possible for me to avoid having to try to get a job as a Walmart greeter and will not cost you a single penny more. And if you use Bedfords and remember to enter the BIRDSASART code at checkout, you will save 3% on every order and enjoy free second-day air shipping. In these crazy times — I am out at least forty to sixty thousand dollars so far due to COVID 19 (with lots more to come) — remembering to use my B&H link or to shop at Bedfords will help me out a ton and be greatly appreciated. Overseas folks who cannot order from the US because of import fees, duties, and taxes, are invited to help out by clicking here to leave a blog thank you gift if they see fit.
Wanted to Buy
If you have a Canon EF 100-400mm f/4.5-5.6L IS II USM lens that you would like to part with, please contact me via e-mail. I now have two interested buyers.
|
|
|
All of the images were created at Fort DeSoto in April or early May. Click on the card to enjoy a larger version.
Fort DeSotoIPT card A
|
Fort DeSoto Spring IPT #1
Fort DeSoto Spring IPT #1. 3 1/2 DAYS. SAT 10 APR thru the morning session on TUES 13 APR 2021. $1499 includes three lunches. Limit: 6. Openings 5.
While DeSoto is one of the rare photo hotspots with the potential to be great any day of the year, it absolutely shines in spring. Many of the wading birds and shorebirds are in full breeding plumage. The terns and gulls are courting and copulating. We will have lots of flight photography opportunities. Did I mention that many of the birds are silly tame?
A $499 deposit is required to hold your spot for this IPT. You can send a check (made out to “BIRDS AS ART) to us here: BIRDS AS ART, PO Box 7245, Indian Lake Estates, FL, 33855, or call Jim or Jennifer at the office with a credit card at 863-692-0906. Your balance, payable only by check, is due immediately after you sign up. If you have any questions, please feel free to contact me via e-mail. If you cancel due to COVID 19 concerns, all of your payments will be refunded.
|
|
|
All of the images were created at Fort DeSoto in April or early May. Click on the card to enjoy a larger version.
Fort DeSoto IPT card B
|
Fort DeSoto Spring IPT #2
Fort DeSoto Spring IPT #2. 3 1/2 DAYS. MON 26 APR thru the morning session on THURS 29 APR 2021. $1499 includes three lunches. Limit: 6.
Not only am I conversant in all three major camera systems used in the US — Nikon, Canon, and SONY (sorry Andy Rouse …), I have used all three within the past four years. Those include both SONY and Canon mirrorless. On both of these IPTs you will learn how to get the best exposure, how to get the most out of your AF system, and how to get close to free and wild birds. And tons more.
A $499 deposit is required to hold your spot for this IPT. You can send a check (made out to “BIRDS AS ART) to us here: BIRDS AS ART, PO Box 7245, Indian Lake Estates, FL, 33855, or call Jim or Jennifer at the office with a credit card at 863-692-0906. Your balance, payable only by check, is due immediately after you sign up. If you have any questions, please feel free to contact me via e-mail. If you cancel due to COVID 19 concerns, all of your payments will be refunded.
|
|
|
All of the images were created at Fort DeSoto in April or early May. Click on the card to enjoy a larger version.
Fort DeSoto IPT card C
|
Fort DeSoto Spring IPTs Expected Species
With any luck, we should get to photograph the following species: Laughing, Ring-billed, Herring, and Lesser Black-backed Gull; Royal, Sandwich, and Forster’s Tern: Great, Snowy, and white and dark morph Reddish Egret and Great Blue, Little Blue, and Tricolored Heron; Yellow-crowned Night-Heron, Wood Stork, Roseate Spoonbill, and Brown Pelican. We will see and photograph lots of shorebirds including American Oystercatcher, Black-bellied, Wilson’s, Semipalmated, Snowy, and Piping Plover, Marbled Godwit, Willet, Dunlin, Red Knot, Sanderling, and Western and possibly White-rumped Sandpiper.
Sign up for both IPTs and enjoy a $200 discount. Most of us will be staying in nearby Gulfport.
The BAA Used Gear Page
The Used Gear page continues to be very active. The BAA Used Gear Page is the place to sell your used photographic equipment. We will help you to get your gear sold quickly for 20 to 60% or more than what the big guys are offering … Doubt me? Check out the Recent Sales list for the past eleven months at the bottom of the page.
Recent Sales
IPT veteran Mike Ross sold his Sony FE 400mm f/2.8 GM OSS lens in like-new condition for $9500.00 (was $9998.00) and a Sony FE 100-400mm f/4.5-5.6 GM OSS lens in like-new condition for $1898.00, both in late-February 2020.
Ted Keltz sold his Canon EOS 7D Mark II in excellent condition for a BAA record-low $546.00 in late February 2021.
Ted Keltz sold his Tamron SP 150-600 F/5-6.3 Di VC USD for Canon EF in like-new condition for the bargain price of $399.00 and a Canon EF 24-105 f/4L IS lens in excellent condition for $249.00 in mid-February 2021 just a few days after they were listed.
Craig Mossey sold his SONY a7r iv in near-mint condition for a very low $2198.00 (was $2398.00) in mid-February 2021.
IPT veteran Mike Ross sold his Sony a9ii mirrorless digital camera body in like-new condition for a BAA record-low $3197.00, a Sony a9 mirrorless digital camera body in like-new condition with only 341 shutter actuations for a BAA record-low $1900.00 (was $1996.00), a Sony a7r iii mirrorless digital camera body in like-new condition for $1498.00, a Canon EF 400mm f/4 DO IS II USM lens in like-new condition for $3898.00, and a Canon Extender EF 1.4X iii in like-new condition for a very low $219.00 all within days of their being listed.
Craig Mossey sold his SONY A9 body in excellent condition with 4304 shutter actuations for $1998.00 (was $2,198.00) in early February 2021.
BAA-friend Robert Kimbrell sold his Sony a7r IV Mirrorless Digital camera body in like-new condition for the ridiculously low price of $1948.00 (was $2198.00) inn early February 2021.
Chuck Carlson sold his Canon EOS 5D Mark IV body in excellent condition for the BAA record-low price of $1249.00, a BG-E20 Battery Grip for the EOS 5D Mark IV in new condition for $149.00, a Canon EF 100-400mm f/4.5-5.6L IS II USM lens in excellent condition for a BAA record-low $1299.00, a Canon EF 24-70 f2.8L II USM lens in near-mint condition for the BAA record-low price of $799.00, and a Canon Extender EF 1.4X iii in excellent condition for a very low $219.00, all within one day of their being listed in early February.
BAA-friend and multiple IPT veteran Bill Schneider sold his Sony a9 ii Mirrorless Digital camera body in like-new condition for the very low price of $3198.00 (was $3498.00) in early February 2021.
BAA-friend and multiple IPT veteran William Schneider sold his Sony a7r IV Mirrorless Digital camera body in like-new condition for the very low price of $2598.00 one hour after it was listed in late January.
BAA-friend Craig Elson sold his Sony a9 ii Mirrorless Digital camera body in like-new condition for the very low price of $3198.00 two hours after it was listed in late January 2021.
Arthur Morris sold his Sony a7r IV Mirrorless Digital camera body in excellent-plus condition for the BAA record-low price of $2098.00 (was $2498.00) after three price reductions in late January 2021.
Price Drop
Sony Alpha a7r IV Mirrorless Digital Camera Body
Price Reduced $400 on 27 FEB 2021
BAA-friend Anthony Ardito is offering a Sony a7r IV Mirrorless Digital camera body in like-new condition for the very low price of $1998.00 (was $2398.00). The sale includes the original box and everything that came in it and insured UPS ground shipping to lower-48 US addresses. Your new camera will not ship until payment clears unless other arrangements are made.
Please contact Anthony via e-mail or by phone at 610-248-6876 (Eastern time zone).
For the past two years you have seen the incredible detail in my a7r IV images made with a variety of SONY lenses and both teleconverters. I’ve typically used my 7r IV for about 50% of my bird photography and my a9 II in pure flight situations. As the 7r IV sells new right now for $3498.00, you can save a cool $1100.00 by grabbing Anthony’s pretty much new a7r iv. Though this 61-MP body is especially attractive to landscape and macro photographers, it is great for birds as well as you can pretty much crop to your heart’s content. artie
Canon EOS R5 Camera User’s e-Guide
I sent out about a dozen copies of the almost finished Canon EOS R5 Camera User’s e-Guide for review to folks who had previously gotten free copies of the R5/R6 AF e-Guide by using my affiliate links to purchase their Canon mirrorless gear. In the same vein, I will be contacting everyone who purchased the R5/R6 AF e-Guide on Monday
Because the camera and the Menus are so complex, this guide has required a ton of research, a lot of time, and a lot of effort (and will continue to do so until it is complete). It should be finished by the first week in March. 2021. The final update of the R5/R6 AF e-Guide has become part of the complete Camera User’s e-Guide; it will be revised if warranted.
The complete Camera User’s guide will sell for $75.00. Folks who purchased their Canon gear using my links will receive a $65.00 discount; the guide will cost them a nominal $10.00. Folks who spent more than $7500.00 on Canon mirrorless gear using either of my affiliate links (B&H or Bedfords), will receive the User’s Guide for free. Folks who purchased the R5/R6 AF e-Guide will receive a $10.00 discount on the User’s e-Guide. The best news is that the end is in sight.
Great Topaz News!
Folks who use the BAA Topaz link to purchase Sharpen AI, DeNoise AI, or the Utility Bundle (or any other Topaz plug-ins) will receive a 15% discount by entering the ARTHUR15 code at checkout. If the stuff is on sale (as it usually is), you save 15% off of the sale price! To get the discount you must use my link and you must enter the discount code. Be sure to start with this link.
Those who purchase Sharpen AI, DeNoise AI, or any other Topaz plug-ins using my link and then entering the ARTHUR15 code at checkout can e-mail to request a short Getting Started with Topaz e-Guide. Please include a copy of your Topaz receipt that shows the discount. Aside from the basics, the guide explains how to install the plug-ins so that they appear in the Photoshop Filter Menu.
New and Better Bedfords Discount Policy!
You can now save 3% on all of your Bedfords photo gear purchases by entering the BIRDSASART coupon code at checkout. Your discount will be applied to your pre-tax total. In addition, by using the code you will get 2nd day air shipping via Fed Ex.
Grab a Nikon AF-S Teleconverter TC-14E III and save $14.99. Purchase a Canon EOS R5 and your discount will be $116.97. Purchase a Sony FE 600mm f/4 GM OSS lens and save a remarkable $389.94! Your Bedford’s purchase no longer needs to be greater than $1,000.00 for you to receive a discount. The more you spend, the more you save.
Money Saving Reminder
Many have learned that if you need a hot photo item that is out of stock at B&H and would enjoy free second-day air shipping, your best bet is to click here, place an order with Bedfords, and enter the coupon code BIRDSASART at checkout. If an item is out of stock, contact Steve Elkins via e-mail or on his cell phone at (479) 381-2592 (Central time). Be sure to mention the BIRDSASART coupon code and use it for your online order to save 3% and enjoy free 2nd-day air shipping. Steve has been great at getting folks the hot items that are out of stock at B&H and everywhere else. The wait lists at the big stores can be a year or longer for the hard to get items. Steve will surely get you your gear long before that. For the past year, he has been helping BAA Blog folks get their hands on items like the SONY a9 ii, the SONY 200-600 G OSS lens, the Canon EOS R5, the Canon RF 100-500mm lens, and the Nikon 500mm PF. Steve is personable, helpful, and eager to please.


Gear Questions and Advice
Too many folks attending BAA IPTs (remember those?) and dozens of photographers whom I see in the field and on BPN, are–out of ignorance–using the wrong gear especially when it comes to tripods and more especially, tripod heads… Please know that I am always glad to answer your gear questions via e-mail. Those questions might deal with systems, camera bodies, accessories, and/or lens choices and decisions.
|
|
|
This image was created on 26 February 2021 at Fort DeSoto Park, Tierra Verde FL. I used the handheld Canon RF 100-500mm f/4.5-7.1L IS USM lens with the Canon Extender RF 1.4x (at 700mm) and the highly touted 45MP Canon EOS R5 Mirrorless Digital camera body. ISO 800. Exposure determined via test image/histogram evaluation: 1/640 sec. at f/16 (stopped 2 2/3 stops ???) in Manual mode. RawDigger showed this one to be perfect. Maybe I am learning … AWB at 9:22am on a sunny morning.
1-Point/AI Servo AF performed just fine.
Image #1: What is it?
|
RF 100-500 Close-focusing MFD
With a minimum focusing distance of about 4 feet at 500mm, the RF 100-500 offers slightly less magnification than either the SONY 100-400 or the Canon 100-400 II. But at 500mm, it provides greater working distance. Even very tame birds like the one in Image #1 have their limits. Had I taken even a half-step more, the bird would have flown.
|
|
|
This image was created on 26 February 2021 at Fort DeSoto Park, Tierra Verde FL. I used the handheld Canon RF 100-500mm f/4.5-7.1L IS USM lens with the Canon Extender RF 1.4x (at 480mm) and the highly touted 45MP Canon EOS R5 Mirrorless Digital camera body. ISO 500. Exposure determined via test image/histogram evaluation: 1/640 sec. at f/16 (stopped 2 1/3 stops ???) in Manual mode. RawDigger showed this one to be less than 1/3-stop under. AWB at 9:34am on a sunny morning.
Again, 1-Point/AI Servo AF performed just fine.
Image #2: What is it?
|
Age and ID Quiz: Earn a $25.00 credit in the BAA Online Store
To earn a $25.00 credit in the BAA Online Store be the first to leave a comment on identifying the species of bird seen in Images #1 and 2 and signifying “adult” or “juvenile.” I will withhold judgement for two days so that if the first person gets it right, the rest of you can still have fun by agreeing or disagreeing. 2nd place gets zip.
|
|
Image #2C: Topaz DeNoise AI screen capture for the second What is it? image
|
Topaz DeNoise AI Stuff
After clicking on the 400% view screen capture to enlarge it, check out the background noise in the original (the “before”) on the left. Then compare that to the smooth-as-a-baby’s butt background of the “after” version on the right. With the near-perfect exposure (thanks to my work with RawDigger), you might ask why there seems to be some much background noise in the original.
There are two reasons for that:
1- We are viewing at 400%!
2- As we are exposing for the very light-toned feathers, the darker toned water is about 2/3-stop under-exposed. Remember, light tones need less light to be properly exposed than any darker tones. Remember also that under-exposed portions of an image will always show more noise than properly exposed portions of an image. Confused? Study the section on Exposure Theory in the original soft cover, The Art of Bird Photography, the book that inspired many of today’s top bird photographers. Follow that up by mastering digital exposure as detailed in The Art of Bird Photography II (on CD) or via electronic download.
Color EFEX Pro Detail Extractor
I have recently gotten back to using Color EFEX Pro Detail Extractor as detailed in Digital Basics II.. The fine feather detail (FFD) in tight plumage images (TPIs) often seems somewhat lacking no matter how much depth-of-field you’ve used. As with today’s two featured images, Detail Extractor really brings up those details. If you are new to bird photography, save $10 by getting the Two-Book Bundle.
Typos
In all blog posts and Bulletins, feel free to e-mail or to leave a comment regarding any typos or errors.
February 26th, 2021
|
|
Twenty-five of my favorites from Friday morning at Fort DeSoto.
|
What’s Up?
Conditions at DeSoto on Friday morning were perfect with clear blue skies, acres of still blue water, and a nice wind from the southeast. There were, however, no birds at North Beach. I bailed at 7:23, headed for my back-up morning location, and did quite well with more than a few tame and cooperative subjects. I worked first with the Canon R5/RF 100-500 rig and finished up with the SONY a9 ii/200-600, both often with the 1.4X TC. Both rigs are superb. I created 1235 images and kept 49. I learned the location of a Great Horned Owl nest with chicks that is supposed to be good for morning flight photography …
If you would like to join me for one or more inexpensive In-the-Field Instructional sessions on Saturday or Sunday morning, please contact me immediately via e-mail or try me on my cell at 863-221-2372. T
With love, artie
ps: if you can identify and age the bird in the lower left corner please leave a comment.
February 26th, 2021 What’s Up?
Me, early, on the way to Fort DeSoto on Friday morning for a busman’s holiday.
Photography on Thursday morning at ILE was fair. I did some of the larger crane chicks. They act as if I do not exist. They were hanging in a spot where the grass was too high. I did some Cattle Egret flight from the car, got one good one, and continued to learn about R5 AF.
Speaking of the R5, I am pretty much finished with the guide, but for the gallery and the section on MY MENU. I will be sending out a few review copies very soon and should have the guide available in the store by the end of next week the latest.
The forecast for Thursday night is looking very good: clear with northeast winds. I will be heading down at about 6pm and hope to be sound asleep by 7pm so that I am well rested for the drive to Fort DeSoto.
The weekend weather for DeSoto is still looking excellent. If you would like to join me for one or more inexpensive In-the-Field Instructional sessions, please contact me ASAP via e-mail or try me on my cell at 863-221-2372. Saturday morning is looking perfect.
I was glad to learn that Morris Herstein sold his Venus Optics Laowa 15mm f/4 Macro Lens for Canon EF within hours of it being listed on Thursday.
Today is Friday 26 February and I hope that you have a great day wherever you are.
This blog post took less than an hour to prepare and makes sixty-eight days in a row with a new one. Please remember …
Please Remember
With income from IPTs now at zero, please, if you enjoy and learn from the blog, remember to use one of my two affiliate programs when purchasing new gear. Doing so just might make it possible for me to avoid having to try to get a job as a Walmart greeter and will not cost you a single penny more. And if you use Bedfords and remember to enter the BIRDSASART code at checkout, you will save 3% on every order and enjoy free second-day air shipping. In these crazy times — I am out at least forty to sixty thousand dollars so far due to COVID 19 (with lots more to come) — remembering to use my B&H link or to shop at Bedfords will help me out a ton and be greatly appreciated. Overseas folks who cannot order from the US because of import fees, duties, and taxes, are invited to help out by clicking here to leave a blog thank you gift if they see fit.
Wanted to Buy
If you have a Canon EF 100-400mm f/4.5-5.6L IS II USM lens that you would like to part with, please contact me via e-mail. I now have two interested buyers.
|
|
|
All of the images were created at Fort DeSoto in April or early May. Click on the card to enjoy a larger version.
Fort DeSotoIPT card A
|
Fort DeSoto Spring IPT #1
Fort DeSoto Spring IPT #1. 3 1/2 DAYS. SAT 10 APR thru the morning session on TEUS 13 APR 2021. $1499 includes three lunches. Limit: 6. Openings 5.
While DeSoto is one of the rare photo hotspots with the potential to be great any day of the year, it absolutely shines in spring. Many of the wading birds and shorebirds are in full breeding plumage. The terns and gulls are courting and copulating. We will have lots of flight photography opportunities. Did I mention that many of the birds are silly tame?
A $499 deposit is required to hold your spot for this IPT. You can send a check (made out to “BIRDS AS ART) to us here: BIRDS AS ART, PO Box 7245, Indian Lake Estates, FL, 3385, or call Jim or Jennifer at the office with a credit card at 863-692-0906. Your balance, payable only by check, is due immediately after you sign up. If you have any questions, please feel free to contact me via e-mail. If you cancel due to COVID 19 concerns, all of your payments will be refunded.
|
|
|
All of the images were created at Fort DeSoto in April or early May. Click on the card to enjoy a larger version.
Fort DeSoto IPT card B
|
Fort DeSoto Spring IPT #2
Fort DeSoto Spring IPT #2. 3 1/2 DAYS. MON 26 APR thru the morning session on THURS 29 APR 2021. $1499 includes three lunches. Limit: 6.
Not only am I conversant in all three major camera systems used in the US — Nikon, Canon, and SONY (sorry Andy Rouse …), I have used all three within the past four years. Those include both SONY and Canon mirrorless. On both of these IPTs you will learn how to get the best exposure, how to get the most out of your AF system, and how to get close to free and wild birds. And tons more.
A $499 deposit is required to hold your spot for this IPT. You can send a check (made out to “BIRDS AS ART) to us here: BIRDS AS ART, PO Box 7245, Indian Lake Estates, FL, 3385, or call Jim or Jennifer at the office with a credit card at 863-692-0906. Your balance, payable only by check, is due immediately after you sign up. If you have any questions, please feel free to contact me via e-mail. If you cancel due to COVID 19 concerns, all of your payments will be refunded.
|
|
|
All of the images were created at Fort DeSoto in April or early May. Click on the card to enjoy a larger version.
Fort DeSoto IPT card C
|
Fort DeSoto Spring IPTs Expected Species
With any luck, we should get to photograph the following species: Laughing, Ring-billed, Herring, and Lesser Black-backed Gull; Royal, Sandwich, and Forster’s Tern: Great, Snowy, and white and dark morph Reddish Egret and Great Blue, Little Blue, and Tricolored Heron; Yellow-crowned Night-Heron, Wood Stork, Roseate Spoonbill, and Brown Pelican. We will see and photograph lots of shorebirds including American Oystercatcher, Black-bellied, Wilson’s, Semipalmated, Snowy, and Piping Plover, Marbled Godwit, Willet, Dunlin, Red Knot, Sanderling, and Western and possibly White-rumped Sandpiper.
Sign up for both IPTs and enjoy a $200 discount. Most of us will be staying in nearby Gulfport.
Image Perspective Question
In a recent Fort DeSoto in Spring! Announcing Two DeSoto IPTs. New and Selected Used Gear Listings. The Under-Appreciated Laughing Gull. And an Image Perspective Question blog post here, I asked, with regards to the image above: Why would today’s featured image have been twenty times better if I had gotten down on my belly?
Kudos to Jeff Walters, the only one to take a stab at the question when he left this comment:
You would get more blue sky in the background had you gotten on your belly and may have eliminated the dark spot in the foreground.
His answer was correct in part (there is no sky in the image), but he missed the two most important reasons:
#1 (by far). Had I gotten down on my belly all of the butt-ugly detail and texture in the sand would have disappeared; gone, goodbye, forget it. Imagine that you are looking down at a patterned tablecloth. You would see the entire pattern. Yes the foreground and distant background would have been nicely out-of-focus, but you would still have seen the pattern. Now imagine that you kneel down so that your eyes are at table-top level? Would you see a shred of the pattern? No, not at all.
#2: Being down at the level of the birds, the image would have had a much more intimate feel to it, as if you were part of their world,
#3: Note: the blue strip at the top of the image was actually the Gulf, not the sky. So had I gotten wet and sandy, we would have had a lot more of the blue Gulf water along with some probably grey sky. But again, all of the ugly detail in the sand would have been gone.
I plan on getting down and dirty whenever possible at DeSoto.
Typos
In all blog posts and Bulletins, feel free to e-mail or to leave a comment regarding any typos or errors.
February 25th, 2021 This Just In!
I took one look at the weather forecast for St. Petersburg for the next few days: clear with southeast winds for Friday and Saturday mornings switching to southwest in the afternoons, and booked an AirBnB for two nights. Sunday morning is looking good also with partly cloudy skies and south winds. I will be driving over in the dark on Friday morning — leaving ILE at about 4:30am, and returning home after shooting on Sunday morning.
If you would like to join me for one or more inexpensive In-the-Field Instructional sessions, please contact me immediately via e-mail or try me on my cell at 863-221-2372. There is room for you on the couch if you would like to stay a night or two.
With love, artie
|
|


