May 7th, 2021 What’s Up?
On Thursday morning I stayed in to finish yesterday’s blog post while Anita went down to the lake. Again, she came back with some fine images. I ran some errands in town, had a great swim, and answered lots of e-mails. Thanks to the many who purchased the video webinar on day one.
Today is Friday 7 May 2021. The forecast is for clear with a gentle breeze from the north/northwest. We will probably head down to the lake early to see what’s up. Wherever you are, and whatever you are doing, I hope that you have a great day.
This blog post took less than an hour to prepare, and makes 134 consecutive days with a new one. Please remember that if an item — a Delkin flash card, or a tripod head, for example, that is available from B&H and/or Bedfords and is also available in the BAA Online Store, it would be great if you opt to purchase from us. We will match any price. Please remember also to use my B&H affiliate links or to save 3% at Bedfords by using the BIRDSASART discount code at checkout. Doing either often earns you free guides and/or discounts. And always earns my great appreciation.
Please Remember
With income from IPTs greatly reduced, please, if you enjoy and learn from the blog, remember to use one of my two affiliate programs when purchasing new gear. Doing so just might make it possible for me to avoid having to try to get a job as a Walmart greeter and will not cost you a single penny more. And if you use Bedfords and remember to enter the BIRDSASART code at checkout, you will save 3% on every order and enjoy free second-day air shipping. In these crazy times — I am out at least forty to sixty thousand dollars so far due to COVID 19 (with lots more to come) — remembering to use my B&H link or to shop at Bedfords will help me out a ton and be greatly appreciated. Overseas folks who cannot order from the US because of import fees, duties, and taxes, are invited to help out by clicking here to leave a blog thank you gift if they see fit.
New and Better Bedfords Discount Policy!
You can now save 3% on all of your Bedfords photo gear purchases by entering the BIRDSASART coupon code at checkout. Your discount will be applied to your pre-tax total. In addition, by using the code you will get 2nd day air shipping via Fed Ex.
Grab a Nikon AF-S Teleconverter TC-14E III and save $14.99. Purchase a Canon EOS R5 and your discount will be $116.97. Purchase a Sony FE 600mm f/4 GM OSS lens and save a remarkable $389.94! Your Bedford’s purchase no longer needs to be greater than $1,000.00 for you to receive a discount. The more you spend, the more you save.
Money Saving Reminder
Many have learned that if you need a hot photo item that is out of stock at B&H and would enjoy free second-day air shipping, your best bet is to click here, place an order with Bedfords, and enter the coupon code BIRDSASART at checkout. If an item is out of stock, contact Steve Elkins via e-mail or on his cell phone at (479) 381-2592 (Central time). Be sure to mention the BIRDSASART coupon code and use it for your online order to save 3% and enjoy free 2nd-day air shipping. Steve has been great at getting folks the hot items that are out of stock at B&H and everywhere else. The wait lists at the big stores can be a year or longer for the hard to get items. Steve will surely get you your gear long before that. For the past year, he has been helping BAA Blog folks get their hands on items like the SONY a9 ii, the SONY 200-600 G OSS lens, the Canon EOS R5, the Canon RF 100-500mm lens, and the Nikon 500mm PF. Steve is personable, helpful, and eager to please.


Gear Questions and Advice
Too many folks attending BAA IPTs (remember those?) and dozens of photographers whom I see in the field and on BPN, are–out of ignorance–using the wrong gear especially when it comes to tripods and more especially, tripod heads… Please know that I am always glad to answer your gear questions via e-mail
|
|
Designing and Creating Pleasing and Dramatic Natural History Images
A Video Webinar: $30 by electronic download
Order your copy by clicking here.
|
Designing and Creating Pleasing and Dramatic Natural History Images
A Video Webinar
In this 1 hour 28 minute plus video you will learn and be inspired. We cover everything from the very basics to the fine points. After a brief bio, the topics include Behavior, Action, Diagonal Lines, and the Cuteness Factor; Birds in Flight — The Holy Grail of Bird Photography; Mis-Framing!; Basic Image Design/HORIZONTALS: Get the subject out of the center of the frame. Basic Image Design/VERTICALS: The center of the frame is generally fine; The Importance of BACKGROUND; Isolating the Subject; Other Elements of Composition; On Getting Low; Going Wide for Bird-scapes; Super-tight!; Working in Sunny Conditions; Working in Cloudy Conditions; Working in Foggy Conditions; Working in the Shade; Working in Bad Weather; Creating Back-lit Images; Creating Silhouettes; and Creating Pleasing Blurs.
Each segment of the program consists of an average of about 15 images that will drive home the points being made, educate you, and inspire. The instructions and advice, given clearly and concisely, are based on my near-38 years of experience photographing birds with telephoto and super-telephoto lenses. And on several decades of creating educational blog posts.
This presentation is based on the webinar that I did for the South Shore Camera Club in April. Below are comments from two of the folks who viewed the webinar the night before the DeSoto IPT began.
You can order your copy of Designing and Creating Pleasing and Dramatic Natural History Images/A Video Webinar by clicking here or by calling Jim with your credit card in hand at 863-692-0906.
Anita North
Though I have been inspired by and learned from you for several years, doing the webinar the night before the IPT began was particularly noteworthy. I should watch it or create and study a cheat-sheet based on it before every shoot. In the video you cover all the bases: assessing the location, the weather, the light, the wind direction, and the sun angle. You talked about finding good opportunities, isolating the subject, composing the image, getting low or high, seeing the background, leaving an unproductive location trying somewhere else, and lots more. Photographing birds at the beach is a big challenge on all accounts and doing the session the night before was terrific and helpful. I was attentive and focused on what I needed to do. The webinar reminded me of the walk-around check-list that pilots are trained to do before they fly.
Donna Bourdon
Doing the webinar as the introductory program for the DeSoto IPT was a stroke of brilliance. When we headed out each of the next four days, I was inspired and felt completely prepared. Your instructional style is always easy to relate to, especially as you describe the attention to detail in each of the photographs that you shared in the webinar. You reminded us of the importance of getting low, of paying attention to the image design, particularly at the bottom of the frame, and to trust the focus tracking. These instructions improved my images a thousand-fold. I always avoided getting low because I don’t like sand all over me and my camera. But because of the inspiring images and your comments during the webinar, I decided to challenge myself. As is usual, you were right. What a difference it made to be at or near eye level with our subjects rather than be shooting down on a beautiful bird. I also started trusting the focus tracking on the Canon R5 and wasn’t disappointed; thanks again for helping me set it up correctly. It tracked perfectly and I was able to set up pleasing compositions in camera instead of during post-processing. Thank you Artie for always encouraging me to be my best.
|
|
|
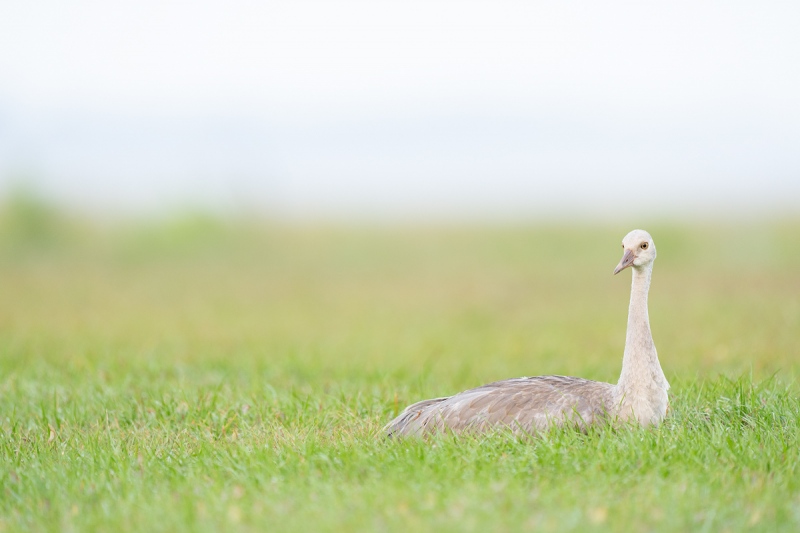
This image was created on 1 May 2021 down by the lake at ILE. I used the Induro GIT 304L/Levered-clamp FlexShooter Pro-mounted Sony FE 600mm f/4 GM OSS lens and The One, the Sony Alpha 1 Mirrorless digital camera. ISO 1000. Exposure determined via Zebras with ISO on the rear dial: 1/200 sec. at f/4 (wide open) in Manual mode. AWB at 7:05:16am on a heavily overcast morning.
Wide/AF-C was active at the moment of exposure and performed perfectly. Click on the image to see a larger version.
Image #1: Sandhill Crane colt lying down
|
Lying Down on the Job
Cranes do not spend a lot of time lying down in the grass. So when I see one lying down, I strive to make a few good images before they stand back up. For Image #1 I set up the tripod very close to the canal, the lowest spot available, just a few inches above the point where I would have been right on the bird’s level. But …
|
|
|
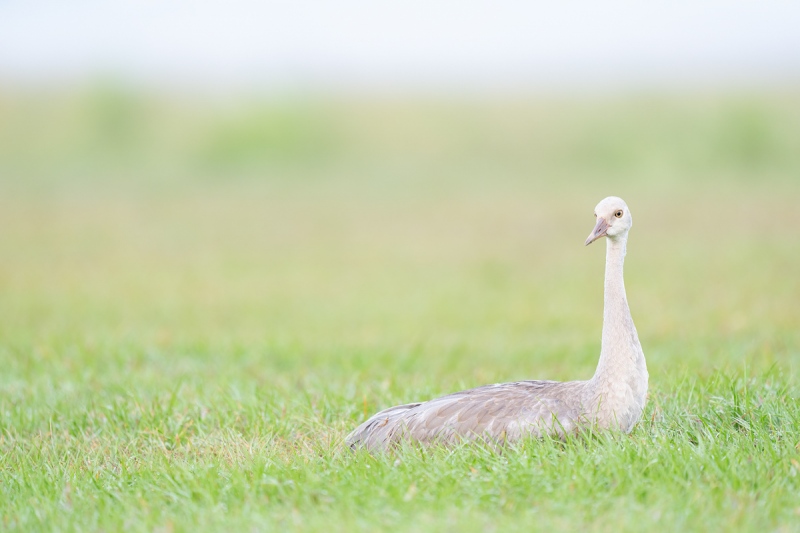
This image was created on 1 May 2021, 34 seconds after Image #1, both down by the lake at ILE. I used the Induro GIT 304L/Levered-clamp FlexShooter Pro-mounted Sony FE 600mm f/4 GM OSS lens and The One, the Sony Alpha 1 Mirrorless digital camera. ISO 1000. Exposure determined via Zebras with ISO on the rear dial: 1/160 sec. at f/4 (wide open) in Manual mode. AWB at 7:05:50am on a heavily overcast morning.
Wide/AF-C was active at the moment of exposure and performed perfectly. Click on the image to see a larger version.
Image #2: Sandhill Crane colt lying down
|
Think and Work Fast!
Wanting to try a different perspective before the young crane stood up, I moved up the slope a bit and re-leveled the rig via the Levered-clamp FlexShooter Pro. Thirty-four seconds after I made the first image I made this one. In bird and nature photography, being totally familiar with your gear allows you to move and make changes quickly. Even a second or two can mean the difference between getting the shot and missing it. Note also that I added 1/3 stop to the exposure, and because I had moved a bit closer to the subject, the bird in Image #2 was larger in the frame.
Your Call
Compare the two images. Which is the stronger one? Why? Is lower always better?
|
|
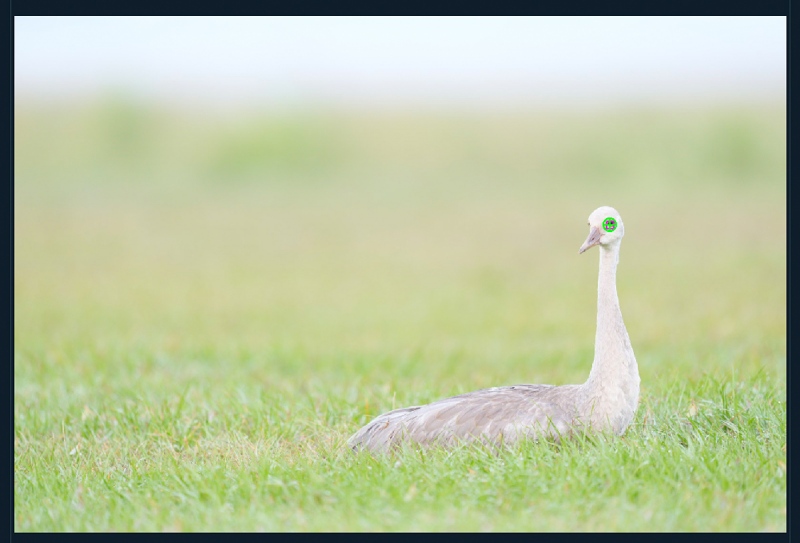
Image #2A: AF Point for the Sandhill Crane colt lying down image
|
When I Said “Worked Perfectly …”
When I said worked perfectly, I was not kidding. A new a1 costs $6498.00 plus the cost of two very expensive Sony CFexpress Type A TOUGH Memory Cards. Folks who used a link to purchase their A1s receive free membership in the SONY Alpha a1 Set-up and Info Group. The cost is $150.00 for those who did not. It baffles me that folks who have spent almost $7,000 on their camera body, are unwilling to spend 2% of the purchase price to learn how to best use their cameras …
Sony Alpha a1 AF
The performance of the Sony Alpha a1 AF system at any focal length (when the a1 is set up properly as detailed in the in e-mails to the Sony Alpha a1 Info & Updates group), continues to amaze me. Early on, there was lots of discussion within the group with many preferring multiple back button approaches. For me a simple shutter button approach with the right AF settings that yield 99% sharp-on-the-eye images is best. By far. It is super-simple and mega-effective. In the next SONY Alpha a1 Set-up and Info Group e-mail, I will be sharing what I have learned as to when and it what situations it is best to abandon Zone. We have already learned to limit the AF Area choices and to switch AF Areas quickly and conveniently. The default method of switching AF points with the C2 button is both slow and cumbersome.
SONY Alpha a1 Set-up and Info Group
The SONY Alpha a1 Set-up and Info Group is going great guns as folks chime in with thoughtful questions and experience-based advice. We are now up to an astounding 41 folks. Early on, we discussed the myriad AF options. I gave my opinion as to the best one for flight and general bird photography. More recently, we have been in contact with folks at SONY sharing our thoughts, experiences, and frustrations with the EVF blackout problem.
All who purchased their Alpha a1 bodies via a BAA affiliate link will receive a free subscription to the Sony Alpha a1 Set-Up and Info Updates after shooting me their receipts via e-mail. (Note: it may take me several days to confirm B&H orders.) This same service may be purchased by anyone with an a1 body via a $150.00 PayPal sent to birdsasart@verizon.net indicating payment for Alpha a1 Info Updates. Alternatively, they can call Jim weekday afternoons at 1-863-692-0906 to pay via credit card. New members will receive composite e-mails that summarize all previous discussions.
Typos
With all blog posts, feel free to e-mail or to leave a comment regarding any typos or errors.
May 6th, 2021 What’s Up?
After many, many consecutive days of photography, I opted to take a day off on Wednesday. Anita went down to the lake and came back with some beautiful wing-stretch images of the large surviving colt.
I spent several hours working on this blog post and getting the webinar into the BAA Online Store. Those who are confident that they will learn from the video and anxious to watch and learn from it, can skip all the fanfare below and order their copy of Designing and Creating Pleasing and Dramatic Natural History Images/A Video Webinar by clicking here.
Today is Thursday 6 May 2021. It is cloudy-dark and still at 7:00am so I am taking another day off to get some work done. Wherever you are, and whatever you are doing, I hope that you have a great day.
This blog post took about four hours to prepare, and makes 133 consecutive days with a new one. Please remember that if an item — a Delkin flash card, or a tripod head, for example, that is available from B&H and/or Bedfords and is also available in the BAA Online Store, it would be great if you opt to purchase from us. We will match any price. Please remember also to use my B&H affiliate links or to save 3% at Bedfords by using the BIRDSASART discount code at checkout. Doing either often earns you free guides and/or discounts. And doing so always earns my great appreciation.
The Bluer Sky
Thanks to the many who posted thoughtful comments yesterday. Yes, Clemens shot and processed darker than I did. But as he was photographing from about two feet higher than I was, he was seeing a different portion of sky. As things were, I was pointing my lens up at the subject into a part of the sky with lots of clouds, while Clemens had set his image against a lower, darker, and bluer section of the sky.
The point that I thought that I was making (and failed miserably to do), is that on a clear day, the sky darkens by about two stops as you raise your lens from just above the horizon to directly overhead.
Low Carb Seafood Curry
I never work from a recipe but often create my own. I tried this last night with spectacularly delicious results.
Cut up ten ounces of Brussels sprouts, place in a foil wrap, pour on two ounces of avocado oil, season with salt and pepper, loosely seal the foil wrap, and place on a hot barbecue while you prepare the seafood curry as below.
1- Sautée 1/2 large yellow onion and two stalks of celery in Avocado oil for five minutes.
2- Slowly pour in two ounces of no sugar added almond milk.
3- Add curry powder to taste.
4- Salt to taste
5- Stir and simmer until the sauce begins to thicken.
6- Slowly pour in two more ounces of no sugar added almond milk.
7- Add six ounces of jumbo shrimp and six ounces of scallops (or 12 ounces of chicken or lamb).
8- Simmer and continue to stir gently for about five minutes until the protein is done.
Once the sprouts are well done — I love mine crispy on the grill, add them to the curry and serve two. Enjoy.
|
|
Designing and Creating Pleasing and Dramatic Natural History Images
A Video Webinar: $30 by electronic download
Order your copy by clicking here.
|
Designing and Creating Pleasing and Dramatic Natural History Images
A Video Webinar
In this 1 hour 28 minute plus video you will learn and be inspired. We cover everything from the very basics to the fine points. After a brief bio, the topics include Behavior, Action, Diagonal Lines, and the Cuteness Factor; Birds in Flight — The Holy Grail of Bird Photography; Mis-Framing!; Basic Image Design/HORIZONTALS: Get the subject out of the center of the frame. Basic Image Design/VERTICALS: The center of the frame is generally fine; The Importance of BACKGROUND; Isolating the Subject; Other Elements of Composition; On Getting Low; Going Wide for Bird-scapes; Super-tight!; Working in Sunny Conditions; Working in Cloudy Conditions; Working in Foggy Conditions; Working in the Shade; Working in Bad Weather; Creating Back-lit Images; Creating Silhouettes; and Creating Pleasing Blurs.
Each segment of the program consists of an average of about 15 images that will drive home the points being made, educate you, and inspire. The instructions and advice, given clearly and concisely, are based on my near-38 years of experience photographing birds with telephoto and super-telephoto lenses. And on several decades of creating educational blog posts.
This presentation is based on the webinar that I did for the South Shore Camera Club in April. You can find some of the comments below along with comments from two of the folks who viewed the webinar the night before the DeSoto IPT began.
You can order your copy of Designing and Creating Pleasing and Dramatic Natural History Images/A Video Webinar by clicking here or by calling Jim with your credit card in hand at 863-692-0906.
Anita North
Though I have been inspired by and learned from you for several years, doing the webinar the night before the IPT began was particularly noteworthy. I should watch it or create and study a cheat-sheet based on it before every shoot. In the video you cover all the bases: assessing the location, the weather, the light, the wind direction, and the sun angle. You talked about finding good opportunities, isolating the subject, composing the image, getting low or high, seeing the background, leaving an unproductive location trying somewhere else, and lots more. Photographing birds at the beach is a big challenge on all accounts and doing the session the night before was terrific and helpful. I was attentive and focused on what I needed to do. The webinar reminded me of the walk-around check-list that pilots are trained to do before they fly.
Donna Bourdon
Doing the webinar as the introductory program for the DeSoto IPT was a stroke of brilliance. When we headed out each of the next four days, I was inspired and felt completely prepared. Your instructional style is always easy to relate to, especially as you describe the attention to detail in each of the photographs that you shared in the webinar. You reminded us of the importance of getting low, of paying attention to the image design, particularly at the bottom of the frame, and to trust the focus tracking. These instructions improved my images a thousand-fold. I always avoided getting low because I don’t like sand all over me and my camera. But because of the inspiring images and your comments during the webinar, I decided to challenge myself. As is usual, you were right. What a difference it made to be at or near eye level with our subjects rather than be shooting down on a beautiful bird. I also started trusting the focus tracking on the Canon R5 and wasn’t disappointed; thanks again for helping me set it up correctly. It tracked perfectly and I was able to set up pleasing compositions in camera instead of during post-processing. Thank you Artie for always encouraging me to be my best.
Joe Usewicz
Excellent program last night. Zoom is not easy. Stopping for questions, as well as the quality of questions, really worked out well.
Phill Bird
Great program last night, Artie. Thanks very much for inviting your followers to attend. Your photos and instruction are inspiring.
Elinor Osborn
Thanks for the invitation to last night’s program. It was very informative and beautiful as usual.
Bruce Boswell
Absolutely wonderful program last night. Thanks so much for inviting us to the zoom presentation. At the end I wanted to see more!
Michael Pollak
Thanks for last night’s excellent and informative presentation. The examples of your photography you shared were very inspiring.
Walt Foreman
Thank you for setting up last night’s webinar so blog readers could join in. It was enjoyable and educational! The webinar was a great success from my audience point of view. And I’m sure there were plenty of other people “out there,” like me, who wanted to jump in with “cosmos” and “lenticular”! The energy was there in both directions, even if you mainly felt your own generous expenditure.
|
|
|
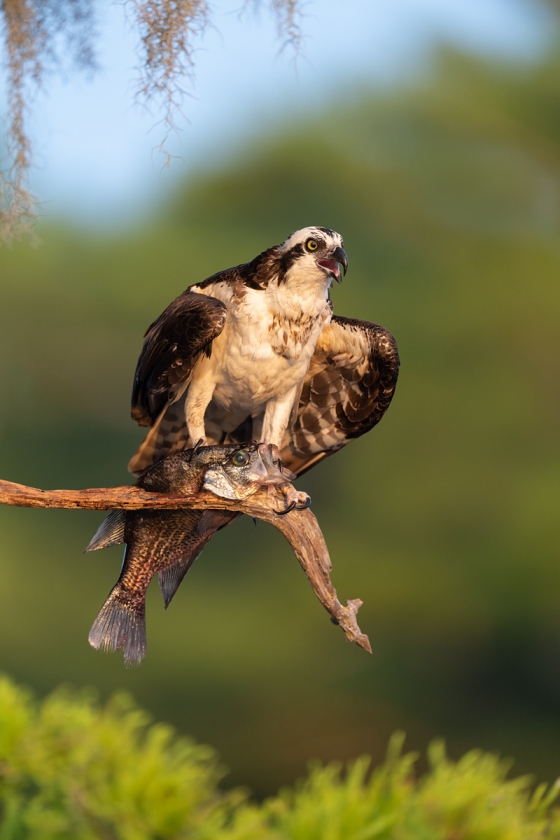
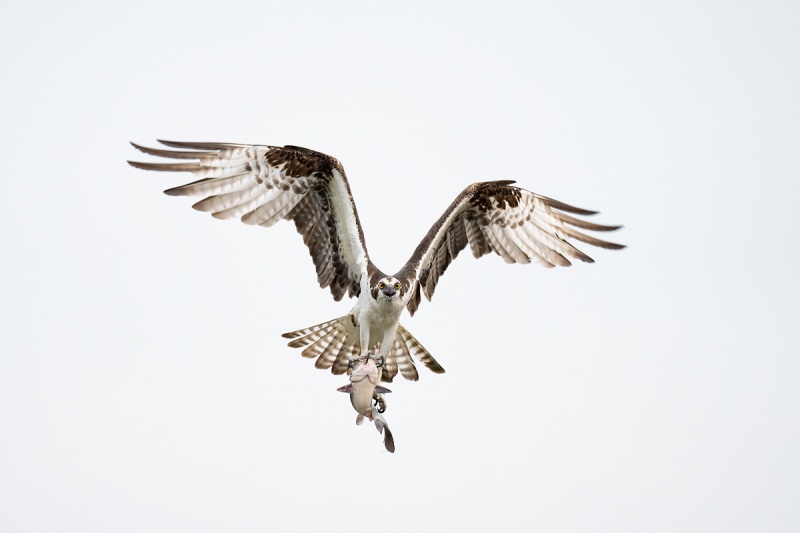
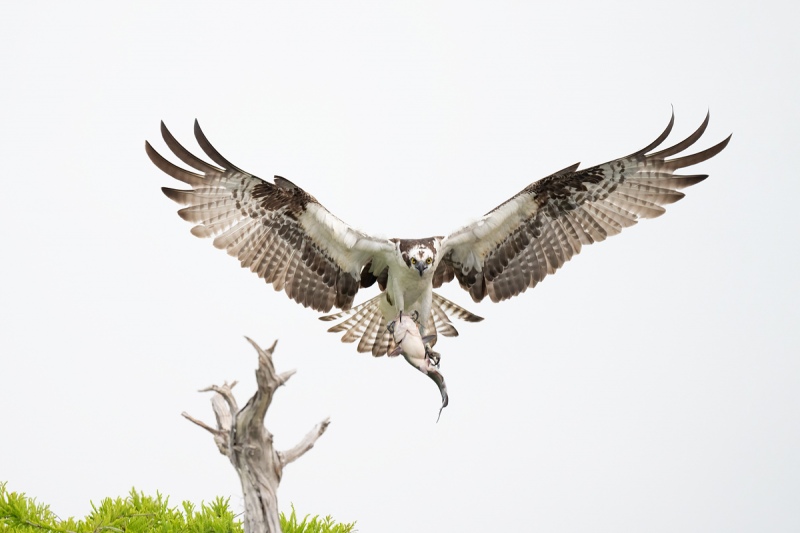
This image was created on 2 May 2021 on Lake Blue Cypress working from Clemens Van der Werf’s flats boat. I used the hand held Sony FE 600mm f/4 GM OSS lens and The One, the Sony Alpha 1 Mirrorless digital camera. ISO 2500. Exposure determined via Zebras with ISO on the rear dial: 1/640 sec. at f/4 (wide open) in Manual mode. AWB at 6:55am with a cloud in front of the rising sun.
Wide/AF-C was active at the moment of exposure and performed perfectly. Click on the image to see a larger version.
Image #1: Osprey with whole Black Crappie in low light
|
My Favorite?
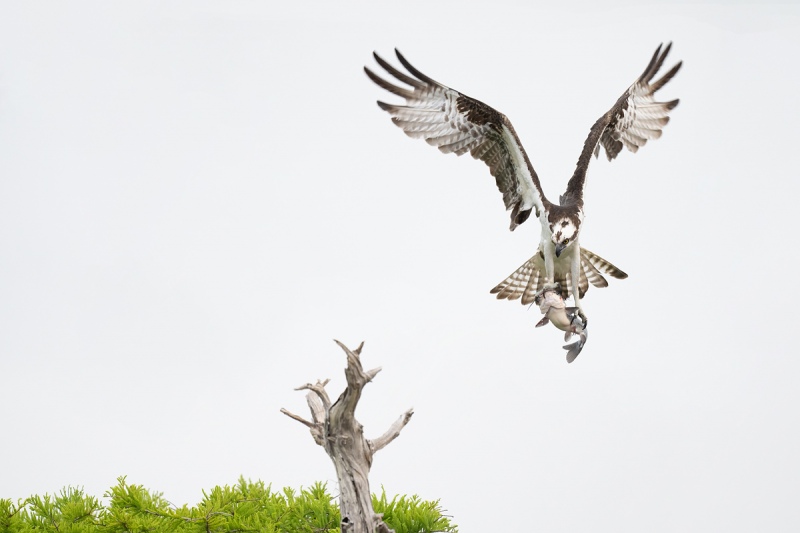
From the start, I liked the tighter image, #2 below, best. But after a while, I came to appreciate the wider view and the softer light in Image #1 (immediately above). I still love them both, but might actually give a slight edge to the wider, cooler version that better shows the habitat. Go figure.
|
|
|
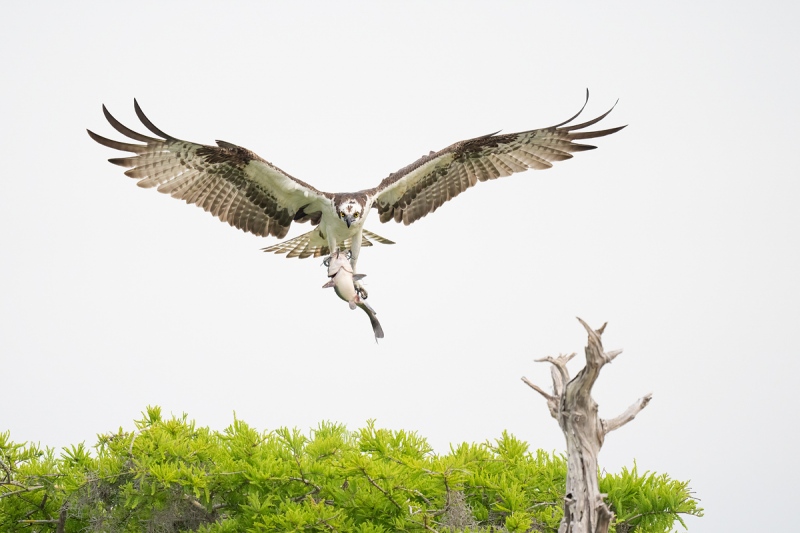
This image was also created on 2 May 2021 on Lake Blue Cypress working from Clemens Van der Werf’s flats boat. Again, I used the hand held Sony FE 600mm f/4 GM OSS lens and The One, the Sony Alpha 1 Mirrorless digital camera. ISO 1600. Exposure determined via Zebras with ISO on the rear dial: 1/1000 sec. at f/4 (wide open) in Manual mode. AWB at 7:04am in very soft golden light.
Wide/AF-C was active at the moment of exposure and performed perfectly.
Image #2: Osprey with whole Black Crappie in soft, sweet light
|
Why the Larger, Heavier, More Difficult to Hand Hold 600mm f/4?
In the Osprey with Black Crappie: Cool Light/Warm Light. And Hand Holding a 600mm f/4 Lens … blog post here, Why would I hand hold the much heavier 600mm f/4 GM when the 200-600 G with my second a1 body lay on the deck?
Many folks brought up depth-of-field issues. But depth-of-field had nothing to do with my decision (and little to no effect on either image). Scroll down to learn more about long lenses and depth-of-field. In low light, I went with (and will always go with) the 600f/4 because of its speed; working at f/4 saves you 1 1/3 stops of either shutter speed or ISO. With both featured images I went with a shutter speed that would likely yield a sharp image. Had I used the 200-600 for the Image #1, I would have had to raise the ISO from 2500 to 6400 to maintain the 1/640 sec. shutter speed. For Image #2, I would have had to raise it from 1600 to 4000 to stay at 1/1000 sec. Don’t forget that the boat was rocking a bit in the breeze.
Byron Prinzmetal and Chris Loffredo flirted with the correct answer while mentioning depth-of-field. Kudos to Adam, who hit the nail on the head when he wrote, The answer is in your settings, Tv 1/1000, f/4, ISO 1600. Had you used the 200-600 at f/6.3 you would have had to adjust by 1 1/3rd stops either dropping the Tv or increasing the ISO (or both).
Folks who read the fine print can try this on for size: in general — when hand holding in difficult situations, the closer you are to the subject at a given focal length, the more shutter speed you will need to make a sharp image. Here is an easy way to grasp this concept: if you are shooting a flock of distant geese at a shutter speed of 1/30 sec. while panning smoothly, many of the birds will look quite sharp. If you are photographing a single goose flying by you at close range at the same shutter speed, the best result would be an extreme angelic blur. As we had gotten a lot closer to the subject, I instinctively raised the shutter speed from 1/640 sec. for the first Osprey image to 1/1000 sec. for the second image.
|
|
|
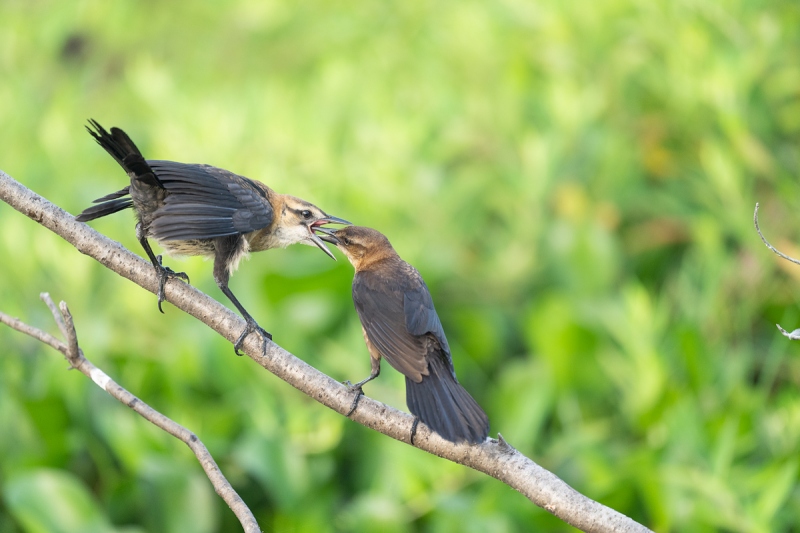
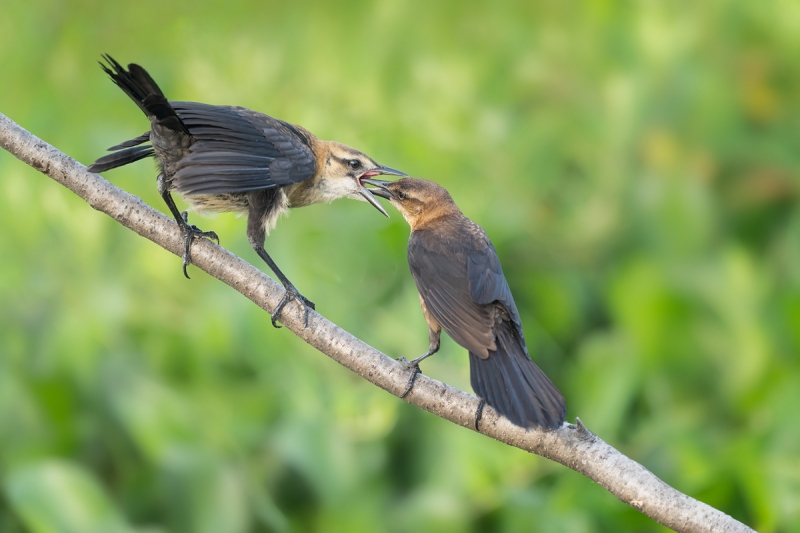
This image was created on 3 May 2021 near Coleman Landing at Shady Oaks from Clemens Van der Werf’s flats boat. I used the hand held ??? lens and The One, the Sony Alpha 1 Mirrorless digital camera. ISO 1250. Exposure determined via Zebras with ISO on the rear dial: 1/800 sec. at f/???? in Manual mode. AWB at 7:53am with some heavy cloud cover on the eastern horizon.
Wide/AF-C was active at the moment of exposure and performed perfectly. Click on the image to see a larger version.
Image #1: this is a representation of the raw file for the Boat-tailed Grackle feeding young image
|
Aperture/Depth-of-Field Multiple Choice Question
In the Aperture/Depth-of-Field Multiple Choice Question. And Turn-around is Fair Play: Viveza Revisited blog post here, the following appeared:
Aperture/Depth-of-Field Multiple Choice Question
There is a much too much background detail in the original image above. Scroll down to see the optimized image.
What aperture was used for the image above?
a:f/4
b: f/6.3
Subject to Background Distance: More Important Than Aperture!
Only a few folks proffered an opinion; those were split right down the middle. Adam flirted with the right answer without nailing it. What folks often miss (and Adam hinted at), the distance from the subject to the background plays a far more important role in the background than the aperture. If you photograph a warbler at f/2.8 with a wall of leaves behind it the leaves will be unpleasantly in focus and thus, distracting. If you photograph a perched Bald Eagle at f/16 with a garbage dump background that is a mile away, the dump will be rendered as a pleasing out-of-focus wall of color.
The focal length and the distance to the subject will also affect the look of the background. If the focal length and the distance from the subject to the background remain constant (as with the two Osprey images above), the background will appear softer as you move closer to the subject. That is why the background in the second Osprey image appears softer and more detail-less than the background in the first Osprey image.
Typos
With all blog posts, feel free to e-mail or to leave a comment regarding any typos or errors.
May 5th, 2021 What’s Up?
On Tuesday, Clemens, Anita, and I had another very good morning at Lake Blue Cypress. The highlight was a just-fledged Osprey on a relatively clean (but tall) perch. I got lots of practice hand holding at 1200mm. Clemens kindly dropped me back at the dock at 8:45am so that I could make my dental cleaning appointment. He and Anita stayed out for another two hours looking for and photographing Osprey chicks.
Today is Wednesday 5 May 2021. It is still and cloudy. Anita headed down to the lake to visit with the two crane families. I opted to take the morning off. Wherever you are, and whatever you are doing, I hope that you have a great day.
I will be addressing the points raised in the last two blog posts tomorrow. Promise.
This blog post took less than an hour to prepare and makes 132 consecutive days with a new one. Please remember that if an item — a Delkin flash card, or a tripod head, for example, that is available from B&H and/or Bedfords and is also available in the BAA Online Store, it would be great if you opt to purchase from us. We will match any price. Please remember also to use my B&H affiliate links or to save 3% at Bedfords by using the BIRDSASART discount code at checkout. Doing either often earns you free guides and/or discounts. And doing so always earns my great appreciation.
Please Remember
With income from IPTs greatly reduced, please, if you enjoy and learn from the blog, remember to use one of my two affiliate programs when purchasing new gear. Doing so just might make it possible for me to avoid having to try to get a job as a Walmart greeter and will not cost you a single penny more. And if you use Bedfords and remember to enter the BIRDSASART code at checkout, you will save 3% on every order and enjoy free second-day air shipping. In these crazy times — I am out at least forty to sixty thousand dollars so far due to COVID 19 (with lots more to come) — remembering to use my B&H link or to shop at Bedfords will help me out a ton and be greatly appreciated. Overseas folks who cannot order from the US because of import fees, duties, and taxes, are invited to help out by clicking here to leave a blog thank you gift if they see fit.
New and Better Bedfords Discount Policy!
You can now save 3% on all of your Bedfords photo gear purchases by entering the BIRDSASART coupon code at checkout. Your discount will be applied to your pre-tax total. In addition, by using the code you will get 2nd day air shipping via Fed Ex.
Grab a Nikon AF-S Teleconverter TC-14E III and save $14.99. Purchase a Canon EOS R5 and your discount will be $116.97. Purchase a Sony FE 600mm f/4 GM OSS lens and save a remarkable $389.94! Your Bedford’s purchase no longer needs to be greater than $1,000.00 for you to receive a discount. The more you spend, the more you save.
Money Saving Reminder
Many have learned that if you need a hot photo item that is out of stock at B&H and would enjoy free second-day air shipping, your best bet is to click here, place an order with Bedfords, and enter the coupon code BIRDSASART at checkout. If an item is out of stock, contact Steve Elkins via e-mail or on his cell phone at (479) 381-2592 (Central time). Be sure to mention the BIRDSASART coupon code and use it for your online order to save 3% and enjoy free 2nd-day air shipping. Steve has been great at getting folks the hot items that are out of stock at B&H and everywhere else. The wait lists at the big stores can be a year or longer for the hard to get items. Steve will surely get you your gear long before that. For the past year, he has been helping BAA Blog folks get their hands on items like the SONY a9 ii, the SONY 200-600 G OSS lens, the Canon EOS R5, the Canon RF 100-500mm lens, and the Nikon 500mm PF. Steve is personable, helpful, and eager to please.


Gear Questions and Advice
Too many folks attending BAA IPTs (remember those?) and dozens of photographers whom I see in the field and on BPN, are–out of ignorance–using the wrong gear especially when it comes to tripods and more especially, tripod heads… Please know that I am always glad to answer your gear questions via e-mail
|
|
|
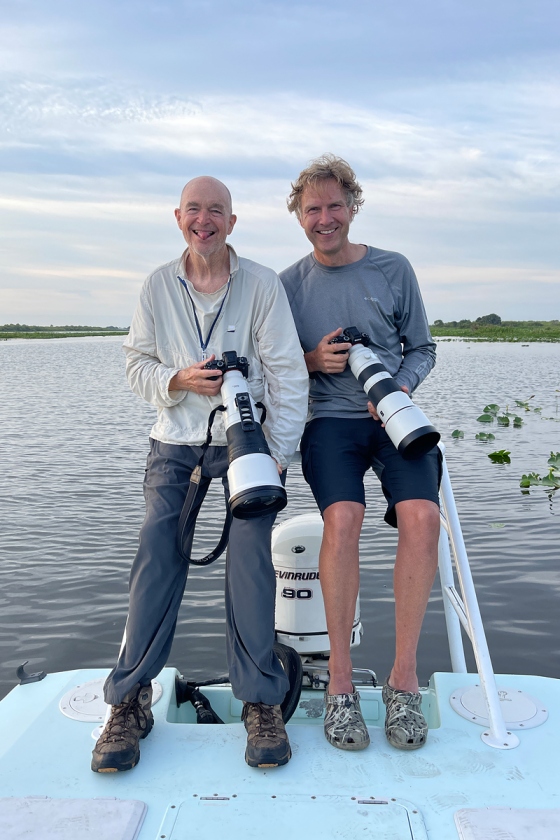
This i-phone image was created on 4 May 2021 by Anita North.
Image #1: artie and Clemens
Image Courtesy of and copyright 2021: Anita North
|
artie and Clemens
I’ve got Clemens by about twenty years. And though it is hard to tell from this image — he’s pretty much sitting while I am pretty much standing, he’s got me by about eight inches. Clemens will often stand up on the platform we are leaning against and has been known to place his big Yeti cooler on the platform and stand on top of the cooler! All that while I have some trouble just standing up in the boat …
|
|
|
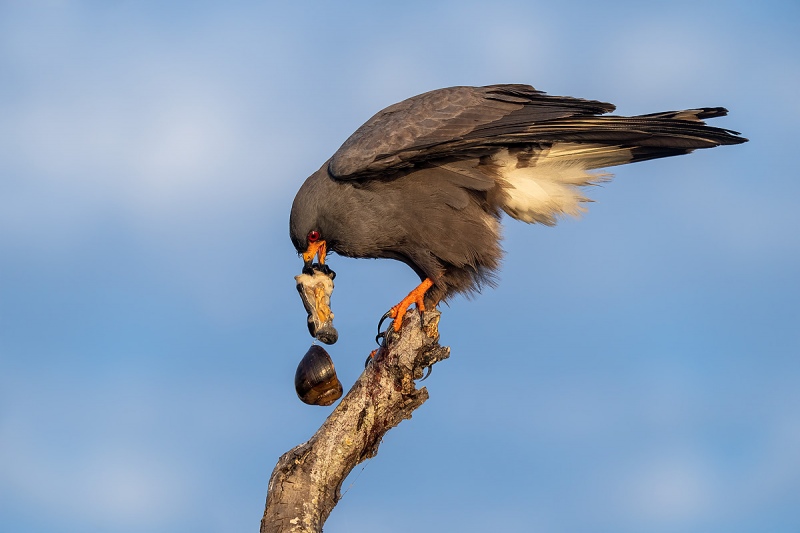
This image was created on 3 May 2021 by Clemens Van der Werf. He used the hand held Sony FE 200-600mm f/5.6-6.3 G OSS lens (at 397mm) and The One, the Sony Alpha 1 Mirrorless digital camera. ISO 1250: 1/1250 sec. at f/6.3 (wide open) in Manual mode. AWB at 7:17:17am on a clear, sunny morning.
Wide/AF-C was active at the moment of exposure and performed perfectly. Click on the image to see a larger version.
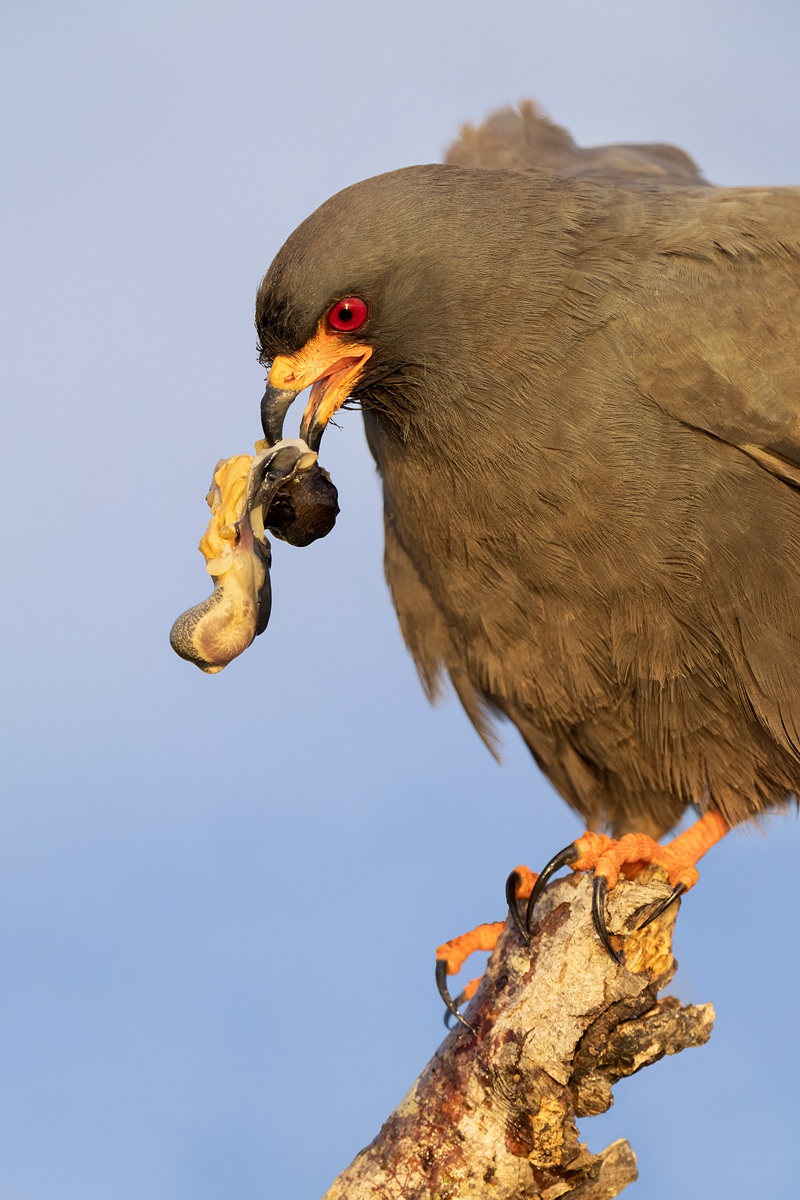
Image #2: Snail Kite extracting meat from snail
Image Courtesy of and copyright 2021: Clemens Van der Werf
|
Clemens and SONY
Clemens has used Canon gear for all of his nature photography for more than a decade. Anita kindly loaned him a 200-600/a1 rig. He created this image while standing atop the platform at the back of the boat. With just a very bit of instruction, Clemens — not unexpectedly, began making great images from the get-go. He was quite impressed with the AF system, and when I loaned him my 600 GM, he was amazed its light weight. He also loved the a1’s 30 fps frame rate as it enabled him to catch the shell of the snail in flight! He has the Canon 600mm f/4L IS II lens and his main camera body is the 1DX III. Together, those weigh a proverbial ton.
Note that I have removed the lens hood from the 600 GM to save a bit of weight.
A Different Vision
I was standing on the deck at the back of the boat hand holding the 600 when the kite landed quite close to us right down sun angle. After making a very few frames, I went for the gusto by adding the 1.4X TC to get me tighter at 840mm. I figured that it would take a minute or two for the bird to extract the meat from the shell. After the first edit I kept 23 images made at 840 and three made at 600.
On Processing Differences …
I’ve long said that if you process an image on Monday and then again on Tuesday while working in the same ambient light, that the results will vary. Often considerably. It would be expected then, that images of the same subject made in the same light just a minute or so apart would have a different look when processed by to different photographers. In the image that Clemens processed, the kite is much darker than the same bird in my image. Image processing is always done to one’s personal taste.
A Sky Question
This is a tough one, but there are lots of clues above. Apart from processing tastes, why is the sky in Clemens’ image so much bluer than the sky in my image? When I asked Clemens why his sky was bluer, he could not figure it out …
|
|
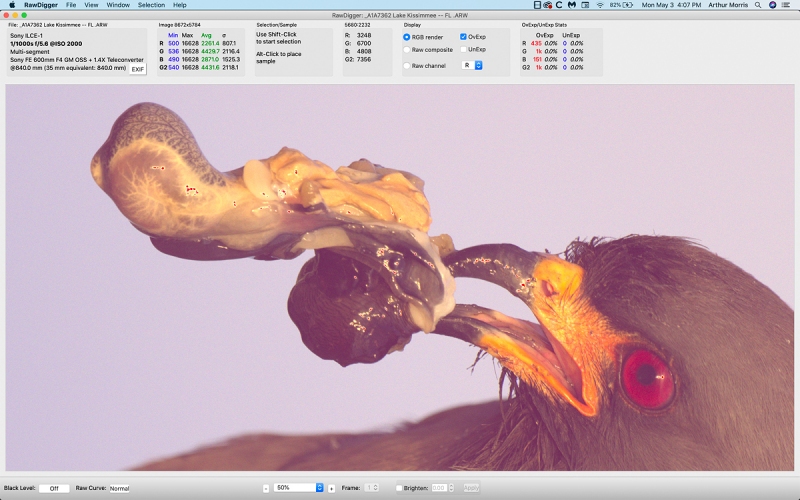
Image #2A: RawDigger screen capture for the Snail Kite with extracted meat from snail image
|
RawDigger
Clicking on the screen capture to enlarge it will enable you to see the the 2,586 OvExp pixels are all from the specular highlights (that were toned down during the post-processing). Note that out of 51,000,000 pixels, those worked out to zero percent OvExp. In other words, the raw file brightness was dead-solid-perfect.
RawDigger — not for the faint of heart …
Nothing has ever helped me learn to create perfect exposures to the degree that RawDigger has. I think that many folks are reluctant to learn that most of their images are underexposed by one or more full stops and that highlight warnings in Photoshop, Lightroom, Capture One, and your in-camera histogram are bogus as they are based on the embedded JPEGs. Only your raw files tell the truth all the time. Heck, I resisted RawDigger for several years … Once you get over that feeling, RawDigger can become your very best exposure friend no matter what system you are using. On the recent IPTs and In-the-Field sessions, we have demonstrated that fact. Convincingly.
The RawDigger (pink) Adapted Histogram
In the RawDigger e-Guide, you will learn exactly how to set up the Adapted “pink” RawDigger Histogram and how to use it to quickly and easily evaluate the exposure or raw file brightness of images from all digital cameras currently in use. RawDigger was especially helpful to me as I struggled with R5 exposures and learned my new camera body, the Sony Alpha a1.
|
|
RawDigger e-Guide with Two Videos
|
The RawDigger e-Guide with Two Videos
by Arthur Morris with Patrick Sparkman
The RawDigger e-Guide was created only for serious photographers who wish to get the absolute most out of their raw files.
Patrick and I began work on the guide in July 2020. At first we struggled. We asked questions. We learned about Max-G values. We puzzled as to why the Max G values for different cameras were different. IPT veteran Bart Deamer asked lots of questions that we could not answer. We got help from RawDigger creator Iliah Borg. We learned. In December, Patrick came up with an Adapted Histogram that allows us to evaluate the exposures and raw file brightness for all images created with all digital camera bodies from the last two decades. What we learned each time prompted three complete beginning to end re-writes.
The point of the guide is to teach you to truly expose to the mega-Expose-to-the-Right so that you will minimize noise, maximize image quality, best utilize your camera’s dynamic range, and attain the highest possible level of shadow detail in your RAW files in every situation. In addition, your properly exposed RAW files will contain more tonal information and feature the smoothest possible transitions between tones. And your optimized images will feature rich, accurate color.
We teach you why the GREEN channel is almost always the first to over-expose. We save you money by advising you which version of RawDigger you need. We teach you how to interpret the Max G values for your Canon, Nikon, and SONY camera bodies. It is very likely that the Shock-your-World section will shock you. And lastly — thanks to the technical and practical brilliance of Patrick Sparkman — we teach you a simple way to quickly and easily evaluate your exposures and raw file brightness using an Adapted RawDigger histogram.
The flower video takes you through a session where artie edits a folder of images in Capture One while checking the exposures and Max-G values in RawDigger. The Adapted Histogram video examines a series of recent images with the pink histograms and covers lots of fine points including and especially how to deal with specular highlights. The directions for setting up the Adapted Histogram are in the text.
If we priced this guide based on how much effort we put into it, it would sell it for $999.00. But as this guide will be purchased only by a limited number of serious photographers, we have priced it at $51.00. You can order yours here in the BAA Online Store.
Typos
With all blog posts, feel free to e-mail or to leave a comment regarding any typos or errors.
May 4th, 2021 What’s Up?
On Monday, we put Clemens Van der Werf’s flats boat in at Coleman Landing at Shady Oaks, just 20 minutes from my home. The highlight of the morning occurred early on when a male Snail Kite landed very close to us right down sun angle with a large snail and then extracted the meat. Photos soon. After brunch, we shared and worked on lots of images. After a rib-eye/salad pool-deck dinner I hit the sack early.
Lot of folks commented on yesterday’s Osprey with Black Crappie: Cool Light/Warm Light. And Hand Holding a 600mm f/4 Lens … blog post — I will be sharing my thoughts on that post here tomorrow.
Today is Tuesday 4 May 2021. We are headed to Lake Blue Cypress for more Osprey photography. The forecast is for partly cloudy with south winds, pretty good for bird photography. Wherever you are, and whatever you are doing, I hope that you have a great day.
This blog post took less than an hour to prepare and makes 131 consecutive days with a new one. Please remember that if an item — a Delkin flash card, or a tripod head, for example, that is available from B&H and/or Bedfords and is also available in the BAA Online Store, it would be great if you opt to purchase from us. We will match any price. Please remember also to use my B&H affiliate links or to save 3% at Bedfords by using the BIRDSASART discount code at checkout. Doing either often earns you free guides and/or discounts. And doing so always earns my great appreciation.
Please Remember
With income from IPTs greatly reduced, please, if you enjoy and learn from the blog, remember to use one of my two affiliate programs when purchasing new gear. Doing so just might make it possible for me to avoid having to try to get a job as a Walmart greeter and will not cost you a single penny more. And if you use Bedfords and remember to enter the BIRDSASART code at checkout, you will save 3% on every order and enjoy free second-day air shipping. In these crazy times — I am out at least forty to sixty thousand dollars so far due to COVID 19 (with lots more to come) — remembering to use my B&H link or to shop at Bedfords will help me out a ton and be greatly appreciated. Overseas folks who cannot order from the US because of import fees, duties, and taxes, are invited to help out by clicking here to leave a blog thank you gift if they see fit.
New and Better Bedfords Discount Policy!
You can now save 3% on all of your Bedfords photo gear purchases by entering the BIRDSASART coupon code at checkout. Your discount will be applied to your pre-tax total. In addition, by using the code you will get 2nd day air shipping via Fed Ex.
Grab a Nikon AF-S Teleconverter TC-14E III and save $14.99. Purchase a Canon EOS R5 and your discount will be $116.97. Purchase a Sony FE 600mm f/4 GM OSS lens and save a remarkable $389.94! Your Bedford’s purchase no longer needs to be greater than $1,000.00 for you to receive a discount. The more you spend, the more you save.
Money Saving Reminder
Many have learned that if you need a hot photo item that is out of stock at B&H and would enjoy free second-day air shipping, your best bet is to click here, place an order with Bedfords, and enter the coupon code BIRDSASART at checkout. If an item is out of stock, contact Steve Elkins via e-mail or on his cell phone at (479) 381-2592 (Central time). Be sure to mention the BIRDSASART coupon code and use it for your online order to save 3% and enjoy free 2nd-day air shipping. Steve has been great at getting folks the hot items that are out of stock at B&H and everywhere else. The wait lists at the big stores can be a year or longer for the hard to get items. Steve will surely get you your gear long before that. For the past year, he has been helping BAA Blog folks get their hands on items like the SONY a9 ii, the SONY 200-600 G OSS lens, the Canon EOS R5, the Canon RF 100-500mm lens, and the Nikon 500mm PF. Steve is personable, helpful, and eager to please.


Gear Questions and Advice
Too many folks attending BAA IPTs (remember those?) and dozens of photographers whom I see in the field and on BPN, are–out of ignorance–using the wrong gear especially when it comes to tripods and more especially, tripod heads… Please know that I am always glad to answer your gear questions via e-mail
|
|
|
This image was created on 3 May 2021 near Coleman Landing at Shady Oaks from Clemens Van der Werf’s flats boat. I used the hand held ??? lens and The One, the Sony Alpha 1 Mirrorless digital camera. ISO 1250. Exposure determined via Zebras with ISO on the rear dial: 1/800 sec. at f/???? in Manual mode. AWB at 7:53am with some heavy cloud cover on the eastern horizon.
Wide/AF-C was active at the moment of exposure and performed perfectly. Click on the image to see a larger version.
Image #1: this is a representation of the raw file for the Boat-tailed Grackle feeding young image
|
Aperture/Depth-of-Field Multiple Choice Question
There is a much too much background detail in the original image above. Scroll down to see the optimized image.
What aperture was used for the image above?
a:f/4
b: f/6.3
Please let us know why you made your choice.
|
|
|
This image was created on 3 May 2021 near Coleman Landing at Shady Oaks from Clemens Van der Werf’s flats boat. I used the hand held ??? lens and The One, the Sony Alpha 1 Mirrorless digital camera. ISO 1250. Exposure determined via Zebras with ISO on the rear dial: 1/800 sec. at f/???? in Manual mode. AWB at 7:53am with some heavy cloud cover on the eastern horizon.
Wide/AF-C was active at the moment of exposure and performed perfectly. Click on the image to see a larger version.
Image #1A: the optimized version of the Boat-tailed Grackle feeding young image
|
Turn-around is Fair Play
Probably a decade ago, I taught Clemens to use Viveza. Over the years, it disappeared from my workflow. On Tuesday afternoon, Clemens kindly gave me a refresher course on using Viveza II. I will not soon forget Viveza …
After converting the image in Camera Raw, I executed my crop and then ran Topaz Denoise on Auto. Then I used Viveza to magically soften up the background in today’s featured image and to reduce the brightness and saturation as well. Be sure to compare the optimized version (Image #1A) with the original (Image #1) to see what I was thinking and what I did in Photoshop.
Typos
With all blog posts, feel free to e-mail or to leave a comment regarding any typos or errors.
May 3rd, 2021 Oops!
I forgot to ask, which of the two favorite images is your favorite, the wider habitat shot, or the tighter vertical?
What’s Up?
Anita North, Clemens Van der Werf, and I had a great morning on Lake Blue Cypress. Again, we were blessed early by an Osprey with a fish with the head still on it! I created 1333 images, most with the hand held 600 f/4 GM, and kept 138. Six-eight of those were of the bird featured in today’s blog post, perched with a large Black Crappie in its talons.
Today is Monday 3 May 2021. We will be heading out for Snail Kites soon. Wherever you are, and whatever you are doing, I hope that you have a great day.
This blog post took about two hours to prepare and makes 130 consecutive days with a new one. Please remember that if an item — a Delkin flash card, or a tripod head, for example, that is available from B&H and/or Bedfords and is also available in the BAA Online Store, it would be great if you opt to purchase from us. We will match any price. Please remember also to use my B&H affiliate links or to save 3% at Bedfords by using the BIRDSASART discount code at checkout. Doing either often earns you free guides and/or discounts. And doing so always earns my great appreciation.
Please Remember
With income from IPTs now at zero, please, if you enjoy and learn from the blog, remember to use one of my two affiliate programs when purchasing new gear. Doing so just might make it possible for me to avoid having to try to get a job as a Walmart greeter and will not cost you a single penny more. And if you use Bedfords and remember to enter the BIRDSASART code at checkout, you will save 3% on every order and enjoy free second-day air shipping. In these crazy times — I am out at least forty to sixty thousand dollars so far due to COVID 19 (with lots more to come) — remembering to use my B&H link or to shop at Bedfords will help me out a ton and be greatly appreciated. Overseas folks who cannot order from the US because of import fees, duties, and taxes, are invited to help out by clicking here to leave a blog thank you gift if they see fit.
New and Better Bedfords Discount Policy!
You can now save 3% on all of your Bedfords photo gear purchases by entering the BIRDSASART coupon code at checkout. Your discount will be applied to your pre-tax total. In addition, by using the code you will get 2nd day air shipping via Fed Ex.
Grab a Nikon AF-S Teleconverter TC-14E III and save $14.99. Purchase a Canon EOS R5 and your discount will be $116.97. Purchase a Sony FE 600mm f/4 GM OSS lens and save a remarkable $389.94! Your Bedford’s purchase no longer needs to be greater than $1,000.00 for you to receive a discount. The more you spend, the more you save.
Money Saving Reminder
Many have learned that if you need a hot photo item that is out of stock at B&H and would enjoy free second-day air shipping, your best bet is to click here, place an order with Bedfords, and enter the coupon code BIRDSASART at checkout. If an item is out of stock, contact Steve Elkins via e-mail or on his cell phone at (479) 381-2592 (Central time). Be sure to mention the BIRDSASART coupon code and use it for your online order to save 3% and enjoy free 2nd-day air shipping. Steve has been great at getting folks the hot items that are out of stock at B&H and everywhere else. The wait lists at the big stores can be a year or longer for the hard to get items. Steve will surely get you your gear long before that. For the past year, he has been helping BAA Blog folks get their hands on items like the SONY a9 ii, the SONY 200-600 G OSS lens, the Canon EOS R5, the Canon RF 100-500mm lens, and the Nikon 500mm PF. Steve is personable, helpful, and eager to please.


Gear Questions and Advice
Too many folks attending BAA IPTs (remember those?) and dozens of photographers whom I see in the field and on BPN, are–out of ignorance–using the wrong gear especially when it comes to tripods and more especially, tripod heads… Please know that I am always glad to answer your gear questions via e-mail
|
|
|
This image was created on 2 May 2021 on Lake Blue Cypress working from Clemens Van der Werf’s flats boat. I used the hand held Sony FE 600mm f/4 GM OSS lens and The One, the Sony Alpha 1 Mirrorless digital camera. ISO 2500. Exposure determined via Zebras with ISO on the rear dial: 1/640 sec. at f/4 (wide open) in Manual mode. AWB at 6:55am with a cloud in front of the rising sun.
Wide/AF-C was active at the moment of exposure and performed perfectly. Click on the image to see a larger version.
Image #1: Osprey with whole whole Black Crappie in low light
|
In the Cool Light
A foggy cloud blocked the sun early. As always, such light has a blue cast. During the raw conversion I raised the Color Temperature from 3800 to 4300 to warm the image up a bit.
Hand Holding the 600 f/4 GM Lens
Hand holding the SONY 600 f/4 GM lens, the lightest 600mm f/4 lens ever manufactured at 6.7 pounds, is a struggle for me. It is much harder to hand hold it for static subjects like today’s perched Osprey than it is for flight photography. With flight, I keep the lens hood resting on something in the ready position and do not raise the lens until I see a bird flying into the optimal zone, that is toward me and toward the light.
With perched subjects, you want to stay on the bird as long as possible in case it flaps or takes flight; the muscles in both arms begin to burn quickly as lactic acid builds up. The only way to get relief is to lower the lens. I missed one spectacular take-off yesterday when I did just that. As usual, the victory goes to the stronger (and usually younger). Oh, and by the way, with a 10mph southeast wind had the boat was rocking yesterday; that makes framing the image properly a big challenge.
Note: for many skilled younger photographers like Patrick Sparkman, Clemens Van der Werf, and Arash Hazeghi, hand holding a 600 f/4 is child’s play. And that includes the older 600mm f/4 lenses that weighed eight, nine, and even twelve or more pounds not to mention a three-pound camera body …
|
|
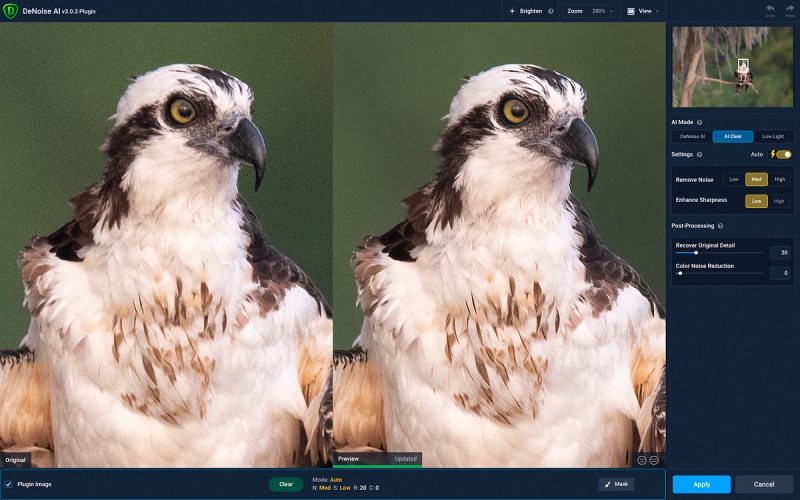
Image #1A:Topaz AI Clear on the Osprey with whole Black Crappie in low light image
|
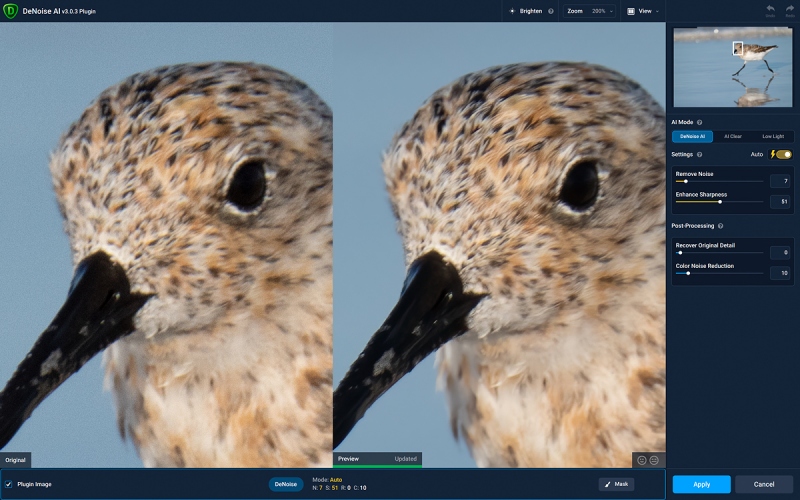
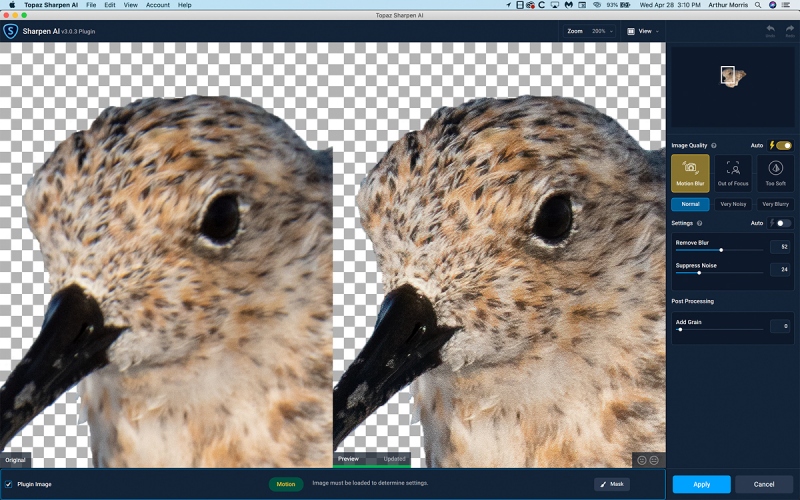
Topaz Denoise AI
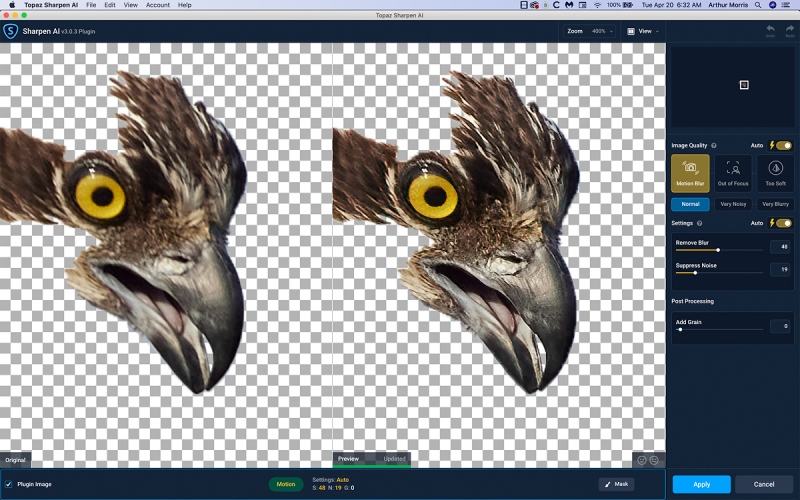
As noted recently, I go by rote with DeNoise with images made in the sun, but with images made in low light I go to the Comparison View as Low Light and AI Clear often produce better results. With Image #1, AI Clear was the clear choice.
Great Topaz News!
Folks who use the BAA Topaz link to purchase Sharpen AI, DeNoise AI, or the Utility Bundle (or any other Topaz plug-ins), will receive a 15% discount by entering the ARTHUR15 code at checkout. If the stuff is on sale (as it usually is), you save 15% off of the sale price! To get the discount you must use my link and you must enter the discount code. Be sure to start with this link.
Those who purchase Sharpen AI, DeNoise AI, or any other Topaz plug-ins using my link and then entering the ARTHUR15 code at checkout can e-mail to request a short Getting Started with Topaz e-Guide. Please include a copy of your Topaz receipt that shows the discount. Aside from the basics, the guide explains how to install the plug-ins so that they appear in the Photoshop Filter Menu.
|
|
|
This image was also created on 2 May 2021 on Lake Blue Cypress working from Clemens Van der Werf’s flats boat. Again, I used the hand held Sony FE 600mm f/4 GM OSS lens and The One, the Sony Alpha 1 Mirrorless digital camera. ISO 1600. Exposure determined via Zebras with ISO on the rear dial: 1/1000 sec. at f/4 (wide open) in Manual mode. AWB at 7:04am in very soft golden light.
Wide/AF-C was active at the moment of exposure and performed perfectly.
Image #2: Osprey with whole whole Black Crappie in soft, sweet light
|
In the Warm Light
A few minutes after we spotted the bird with the crappie, s the sun broke through the foggy cloud bank. As always, such light has a strong yellow/red cast. During the raw conversion, I lowered the Color Temperature from 5050 to 4300 to cool the image down a bit. The fact that both images wound up at 4300 was coincidental. Image #1 looks as if it were created in the low, cool light of predawn, and Image #2 looks as if it were created in warm, early light. Some might have preferred Image #2 a bit warmer.
Why Hand Hold the 600mm f/4 GM?
Why would I hand hold the much heavier 600mm f/4 GM when the 200-600 G with my second a1 body lay on the deck?
|
|
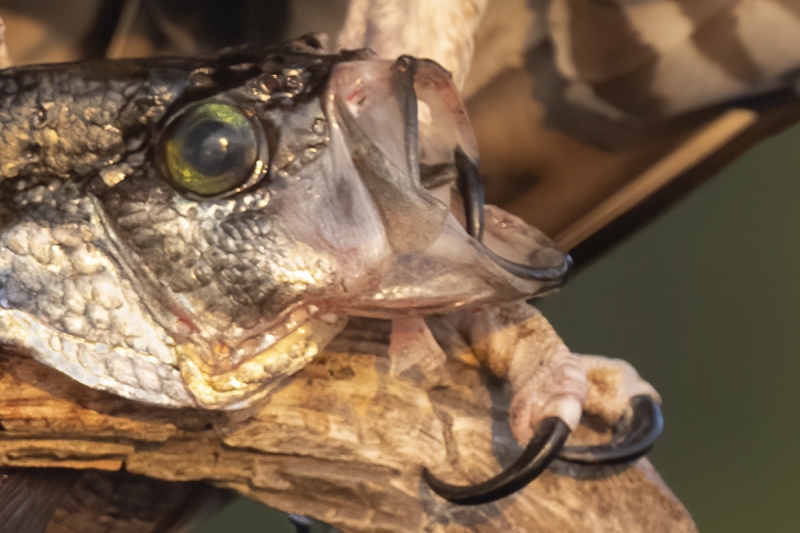
Image #2A: Unsharpened 100% crop of the Osprey with whole whole Black Crappiein soft, sweet light image
|
An Unsharpened 100% Crop
The a1 produces the most detailed image files I have ever had the pleasure to work with. Don’t forget here that the sharpest focus was on the Osprey’s eye, not not the fish. In any case, you’ve got to be impressed by those talons!
I recently began converting my a1 raw files in Camera Raw (rather than in Capture One), as I get truer color right out of the box. By truer color, I mean that the converted TIF files better match the color space in my mind, that is the colors that I saw in the field and the color of the raw file.
Typos
With all blog posts, feel free to e-mail or to leave a comment regarding any typos or errors.
May 2nd, 2021 What’s Up?
As noted in yesterday’s (published-rather-late) blog post, Anita North and I enjoyed a fine session with the two crane families on Saturday morning. I took an early nap and an early swim. I edited several folders of images and did some image-sharing and Photoshop with Anita. Clemens Van der Werf came by for a pool-deck dinner. We will be joining him on his flats boat for some photography for the next few days.
Today is Sunday 2 May 2021. The Ospreys at Lake Blue Cypress are on the morning menu. Wherever you are, and whatever you are doing, I hope that you have a great day.
This blog post took about two hours to prepare and makes 129 consecutive days with a new one. Please remember that if an item — a Delkin flash card, or a tripod head, for example, that is available from B&H and/or Bedfords and is also available in the BAA Online Store, it would be great if you opt to purchase from us. We will match any price. Please remember also to use my B&H affiliate links or to save 3% at Bedfords by using the BIRDSASART discount code at checkout. Doing either often earns you free guides and/or discounts. And doing so always earns my great appreciation.
|
|
|
145 sold to rave reviews.
The SONY e-Guide by Patrick Sparkman and Arthur Morris
|
The Sony Camera User’s e-Guide (and Videos)
Folks new to SONY receive who are in the A1 group receive a free copy of this guide as many of the a1 settings mimic the settings in previous SONY bodies.
Click here to purchase the guide with one Camera Set-up Video. Be sure to e-mail us by clicking here to specify your camera body so that we can send you a link for the correct video.
Click here to purchase the guide with two Camera Set-up Videos. Be sure to e-mail us by clicking here to specify your two camera bodies so that we can send you links for the correct videos.
Click here to learn more about the SONY e-Guide.
Folks who have used my B&H affiliate links or purchased their SONY gear are invited to e-mail for discount information.
|
|
|
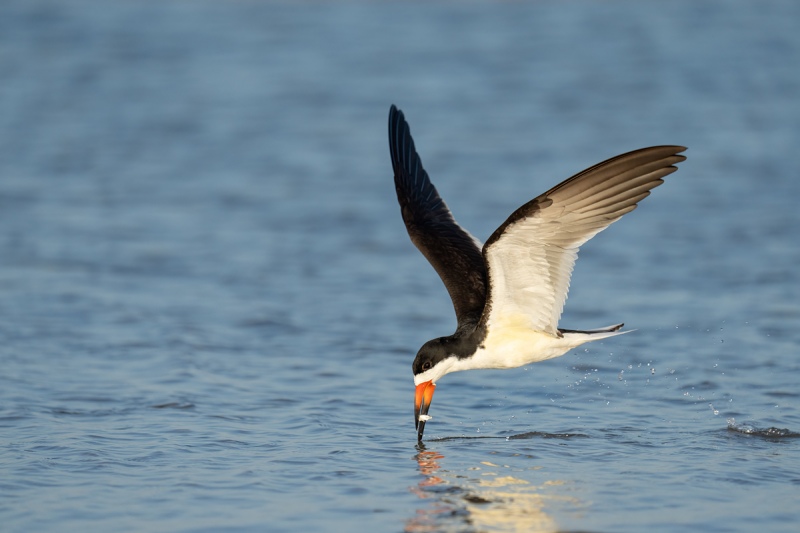
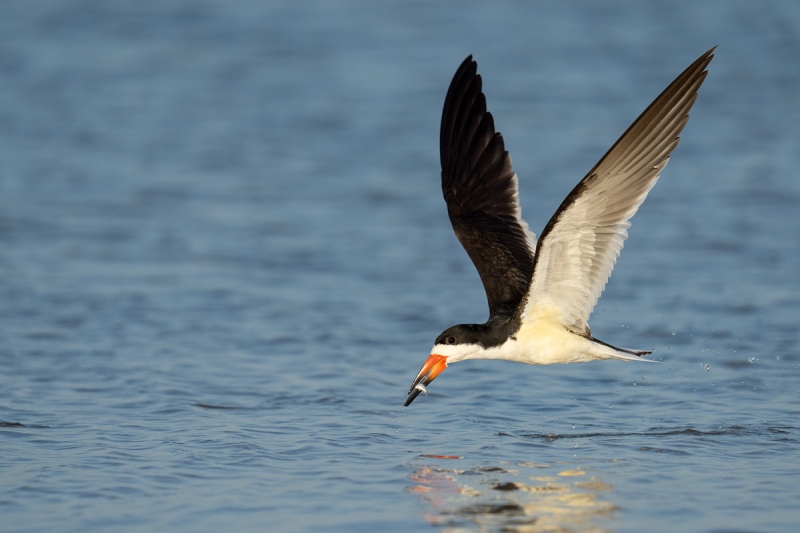
This image was created on 29 April 2021, the last morning of the second DeSoto IPT. While seated, I used the hand held Sony FE 200-600mm f/5.6-6.3 G OSS lens (at 452mm) and The One, the Sony Alpha 1 Mirrorless digital camera. ISO 640. Exposure determined via Zebras with ISO on the rear dial: 1/4000 sec. at f/6.3 (wide open) in Manual mode. The exposure was confirmed as about 1/3 too dark by RawDigger. AWB at 7:49:57am on a clear, sunny morning.
Wide/AF-C was active at the moment of exposure and performed perfectly. Click on the image to see a larger version.
Image #1: Black Skimmer milliseconds after striking the baitfish
|
Simply Deadly
Every image that I made during the four morning sessions of the second DeSoto IPT was created with the hand held SONY 200-600 and the Alpha a1. On rare occasion, I added the 1.4X TC to the mix. On the third morning, I lugged the 600 f/4 GM around. And never used it once. For those who can handle the weight — the lens weighs less than 4 1/2 lbs with the foot removed for hand holding, the 2-6 is immensely versatile when you are working with relatively tame birds in decent light.
And the 2-6/a1 combo absolutely kills for flight photography especially when the sun is shining. Heck, my quest to become a better flight photographer began more than five years ago when I switched from Canon to Nikon. And with the switch to SONY three years ago things got even better. I am still not very good, but the gear is now so good that by sheer determination I can create a few very good flight images now and then.
The rig’s relatively small size and light weight make it easy to follow feeding flocks to stay on sun angle. It is much easier to get up and down off the ground with the 2-6 than it is with the 600 GM either on a tripod or hand held. Had I been hand holding the 600 GM for today’s two featured images, I could not have fit the bird in the frame. Zooming out is done in advance and, when done successfully, is the result of making a good educated guess-timate. Today’s featured images were consecutive frames, frames five and six of at least an 8-frame sequence. The first and likely several previous frames were sharp. The next three were not sharp as the bird’s head struck the water. The last four were razor-sharp on the eye. Unusual for me was the fact that all the images in the series were properly framed.
The AF system of the a1 is unmatched by any current camera body. In my hands, the R5 is a close second. And with the light weight of the Alpha a1 I can easily handled the 2-6/a1 rig for long photo sessions, even as I approach my 75th birthday.
|
|
|
This image, the next frame in the series, was of course created on 29 April 2021, the last morning of the second DeSoto IPT. While seated, I used the hand held Sony FE 200-600mm f/5.6-6.3 G OSS lens (at 452mm) and The One, the Sony Alpha 1 Mirrorless digital camera. ISO 640. Exposure determined via Zebras with ISO on the rear dial: 1/4000 sec. at f/6.3 (wide open) in Manual mode. The exposure was confirmed as about 1/3 too dark by RawDigger. AWB at 7:49:57am on a clear, sunny morning.
Wide/AF-C was active at the moment of exposure and performed perfectly. Click on the image to see a larger version.
Image #2: Black Skimmer in full flight with baitfish
|
Comparing the Two Images
All are invited to leave a comment comparing the virtues of today’s two featured images. Yes, both are exceeding fine images. Both are un-cropped. Which is the stronger image? Which wing position is best. Which image is more dramatic? Which features the best underwing detail? The best head position? The best pose? Is one or the other sharper?
Sony Alpha a1 AF
The performance of the SONY AF system at any focal length (when the a1 is set up properly as detailed in the in e-mails to the Sony Alpha a1 Info & Updates group), continues to amaze me. Early on, there was lots of discussion within the group with many preferring multiple back button approaches. For me a simple shutter button approach with the right AF settings that yield 99% sharp-on-the-eye images is best. By far. It is super-simple and mega-effective. In the next SONY Alpha a1 Set-up and Info Group e-mail, I will be sharing what I have learned as to when and it what situations it is best to abandon Zone. We have already learned to limit the AF Area choices and to switch AF Areas quickly and conveniently. The default method of switching AF points with the C2 button is both slow and cumbersome.
SONY Alpha a1 Set-up and Info Group
The SONY Alpha a1 Set-up and Info Group is going great guns as folks chime in with thoughtful questions and experience-based advice. We are now up to an astounding 39 folks. Early on, we discussed the myriad AF options. I gave my opinion as to the best one for flight and general bird photography. More recently, we have been in contact with folks at SONY sharing our thoughts, experiences, and frustrations with the EVF blackout problem.
All who purchased their Alpha a1 bodies via a BAA affiliate link will receive a free subscription to the Sony Alpha a1 Set-Up and Info Updates after shooting me their receipts via e-mail. (Note: it may take me several days to confirm B&H orders.) This same service may be purchased by anyone with an a1 body via a $150.00 PayPal sent to birdsasart@verizon.net indicating payment for Alpha a1 Info Updates. Alternatively, they can call Jim weekday afternoons at 1-863-692-0906 to pay via credit card. New members will receive composite e-mails that summarize all previous discussions.
Typos
With all blog posts, feel free to e-mail or to leave a comment regarding any typos or errors.
May 1st, 2021 What’s Up?
Donna and I photographed down by the lake for a bit on Friday morning. We found and photographed the large colt, but could not find the two small colts. Jim and I got Donna to MCO in plenty of time for her flights to Chattanooga (via ATL). Then Jim drove me to the Apple Store in Brandon for my Genius Bar appointment. That went well. Then we headed to the TPA Rental Car Center to hook up with Anita North and grab all of her stuff so that she could return her rental. She was in a huge traffic jam on her way to Tampa. The plan was for us to meet in the cell phone lot but that never happened. We wound up getting permission to bring my SUV, a “private vehicle,” into the Rental Car Center so that we could execute the transfer.
We headed to the bar near the Brandon Rookery for dinner. It was my second visit there in a week, and again, everyone loved the food. I am hooked on their Black and Blue Burger (no bun). As always, I gave all of my French fries to Anita. The rookery was in sight. There was lots of action. The light was sweet and the wind perfect from the southwest. But we were all so, so tired that we opted to head back to ILE. (If you own a copy of the Middle of Florida Site Guide and would like the name of the bar, please shoot me an e-mail that includes proof of purchase.)
Today is Saturday 1 May 2021. I slept till a very-late-for-me 6:30am. Anita and I headed down to the lake and quickly found and photographed both crane families; what a difference a day makes. Today I will be creating and sending a new e-mail to the SONY a1 Info and Updates group and catching up on some much-needed file editing. Wherever you are, and whatever you are doing, I hope that you have a great day.
This blog post took about two hours to prepare and makes 128 consecutive days with a new one. Please remember that if an item — a Delkin flash card, or a tripod head, for example, that is available from B&H and/or Bedfords and is also available in the BAA Online Store, it would be great if you opt to purchase from us. We will match any price. Please remember also to use my B&H affiliate links or to save 3% at Bedfords by using the BIRDSASART discount code at checkout. Doing either often earns you free guides and/or discounts. And doing so always earns my great appreciation.
Wanted to Buy
If you have a Canon EF 100-400mm L IS II lens sitting on a shelf that you would like to sell, please LMK via e-mail.
There’s No Telling What You Might Learn on the BAA Blog
Steve left a wonderfully interesting comment at the Running With Both Feet Off the Ground blog post two days ago:
April 29, 2021 at 4:27pm
Artie, your image of the running sanderling reminded me of an important development in the history of photography. In 1878, Eadweard Muybridge photographed a horse in various stages of gallop, demonstrating for the first time that the animal does have all its hooves off the ground at one point in its gait (something that was unknown at the time).
Learn more about the photographs and about Muybridge in the Smithsonian article here.
From the article: After a bad injury, Muybridge was often described as erratic and emotionally volatile.
Muybridge found out his wife was having an affair because of a picture. One day, he came across a letter written by his wife that was addressed to Harry Larkyns, a “roguish” drama critic about town. Enclosed in the letter was a photo of Florado Helios Muybridge, and on the back of it were the words “Little Harry.” Muybridge got a gun and boarded a train that would take him to where Larkyns was.
“He finds a cabin in which Larkyns was playing cards,” says Braun. “He knocks on the door. He asks for Larkyns. And when Larkyns comes to the door, Muybridge says, ‘I have a message from my wife,’ and shoots him dead.” At a three-day trial for a murder that he committed in front of several witnesses, Muybridge pleaded insanity. His lawyer, who many believe was hired by Stanford, had people who had known Muybridge testify that his personality had changed drastically after the stagecoach accident.
Click on Steve’s link above to read the whole and very fascinating article.
R5 Guide Kudos
Unsolicited, via e-mail, from Fernando Ramos
The excellent Canon EOS R5 Camera User’s e-Guide is unlike anything I’ve encountered. Your detailed instruction supported by excellent reasoning is exactly what I needed to set-up my Canon EOS R5. Thank you for sharing your expertise with me; as a result, you saved me immeasurable time. Fernando
Unsolicited, via e-mail, from Joel Eade
Thank you so much for the R5 guide! It is a wonderfully written, extremely comprehensive document that would benefit any R5 user. It is evident that a tremendous amount of time and effort was required to create it. After reading through, I can say it that flows in a logical fashion and that each item is carefully described in a way that is not difficult to follow. I agree with 99% of your set up suggestions 🙂 Joel
|
|
|
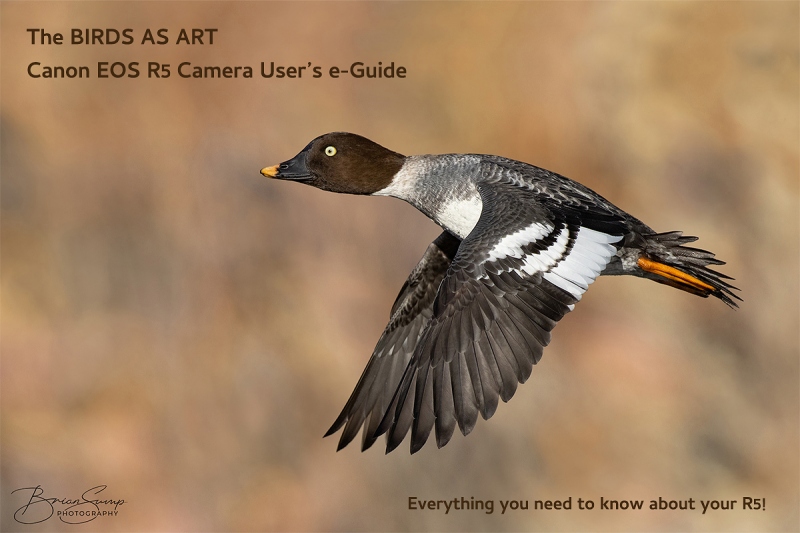
Cover Image courtesy of and Copyright 2021 Brian Sump (Sump scores!)
|
The BIRDS AS ART Canon EOS R5 Camera User’s e-Guide: $75.00
The guide is 82 pages long: 21,458 words. More than 50 DPP 4 Autofocus-depicting screen captures. And a 31 minute 44 second educational video. This guide took three and a half months of hard work and a ton of help from at least seventeen very helpful and generous folks.
The guide covers — in great detail — all Menu Items that are relevant to bird, nature, and wildlife photography. It does not cover video. The section on AF methods and the AF Gallery has been expanded from the R5/R6 AF e-guide. It remains the one of the great strengths of this guide. I share my thoughts on what I am sure is the single best AF Method for photographing birds in flight. As most of you know, the guide includes a simple and easy way to change AF Methods that was introduced to me by Geoff Newhouse. In the AF Gallery you will see exactly how Face Detection plus Tracking AF works. In the Educational R5 Gallery video, I share my favorite R5 images along with dozens of bird photography tips and techniques.
In addition, I teach you how to get the best exposures with your R5. Detailed instructions on using the great In-camera HDR and Multiple Exposure features will be appreciated by creative folks who like to have fun. The three shutter modes are explained in detail as well. Bruce Dudek solved the can’t-get-to-Auto ISO problem that had stumped everyone at Canon. This information is of course shared in the guide. You will learn how to set up your EVF (Electronic Viewfinder) and Screen toggle options. Not to mention that the mysterious performance of the Q Button is revealed and simplified. Brian Sump’s images reveal how well you can do when using the R5 with EF lenses using one of the three Canon EF-EOS R Mount Adapters. You will learn how I use Customize Dials to put either ISO or EC on the Thumb Dial and how to set up and save Custom Shooting Modes (C1-C3) that can remember both your Customize Dial and Customize Button settings! That is something that none of the SONY bodies do. 🙁 Near the end of the guide I share my all-important MY MENU items with you.
Like all BAA educational materials, the R5 guide is written in my informal, easy-to-follow style. I am quite proud of this guide and look forward to hearing your thoughts on our hard work.
You can purchase your copy of the BIRDS AS ART Canon EOS R5 Camera User’s e-Guide for $75.00 here in the BAA Online Store or by calling Jim in the office weekday afternoons at 863-692-0906 with your credit card in hand.
Please Remember
With income from IPTs now at zero, please, if you enjoy and learn from the blog, remember to use one of my two affiliate programs when purchasing new gear. Doing so just might make it possible for me to avoid having to try to get a job as a Walmart greeter and will not cost you a single penny more. And if you use Bedfords and remember to enter the BIRDSASART code at checkout, you will save 3% on every order and enjoy free second-day air shipping. In these crazy times — I am out at least forty to sixty thousand dollars so far due to COVID 19 (with lots more to come) — remembering to use my B&H link or to shop at Bedfords will help me out a ton and be greatly appreciated. Overseas folks who cannot order from the US because of import fees, duties, and taxes, are invited to help out by clicking here to leave a blog thank you gift if they see fit.
New and Better Bedfords Discount Policy!
You can now save 3% on all of your Bedfords photo gear purchases by entering the BIRDSASART coupon code at checkout. Your discount will be applied to your pre-tax total. In addition, by using the code you will get 2nd day air shipping via Fed Ex.
Grab a Nikon AF-S Teleconverter TC-14E III and save $14.99. Purchase a Canon EOS R5 and your discount will be $116.97. Purchase a Sony FE 600mm f/4 GM OSS lens and save a remarkable $389.94! Your Bedford’s purchase no longer needs to be greater than $1,000.00 for you to receive a discount. The more you spend, the more you save.
Money Saving Reminder
Many have learned that if you need a hot photo item that is out of stock at B&H and would enjoy free second-day air shipping, your best bet is to click here, place an order with Bedfords, and enter the coupon code BIRDSASART at checkout. If an item is out of stock, contact Steve Elkins via e-mail or on his cell phone at (479) 381-2592 (Central time). Be sure to mention the BIRDSASART coupon code and use it for your online order to save 3% and enjoy free 2nd-day air shipping. Steve has been great at getting folks the hot items that are out of stock at B&H and everywhere else. The wait lists at the big stores can be a year or longer for the hard to get items. Steve will surely get you your gear long before that. For the past year, he has been helping BAA Blog folks get their hands on items like the SONY a9 ii, the SONY 200-600 G OSS lens, the Canon EOS R5, the Canon RF 100-500mm lens, and the Nikon 500mm PF. Steve is personable, helpful, and eager to please.


Gear Questions and Advice
Too many folks attending BAA IPTs (remember those?) and dozens of photographers whom I see in the field and on BPN, are–out of ignorance–using the wrong gear especially when it comes to tripods and more especially, tripod heads… Please know that I am always glad to answer your gear questions via e-mail
|
|
|
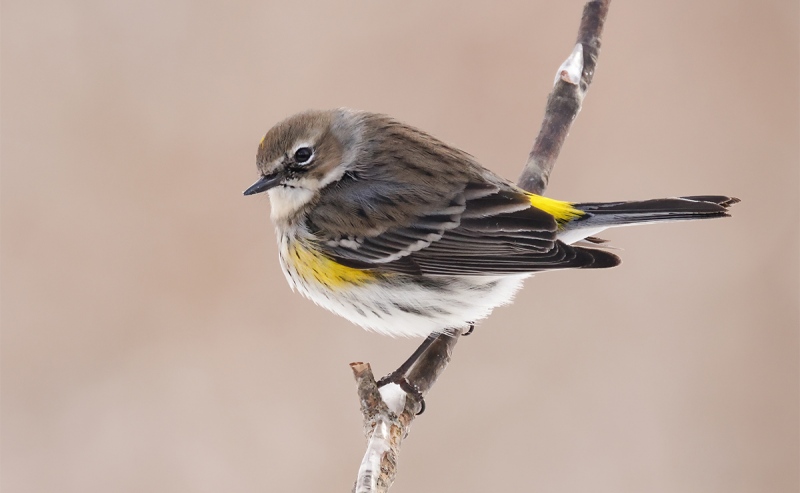
This image was created by In-the-Field session veteran Joel Eade. He used the hand held Canon RF 800mm f/11 IS STM lens and the highly touted 45MP Canon EOS R5 Mirrorless Digital camera body. ISO 3200. Exposure determined via test image and blinkies evaluation: 1/800 sec. at f/11 (wide open) in Manual (M) mode. AWB on a partly day.
Eye AF as detailed in the R5 e-Guide was active at the moment of exposure and performed perfectly. Click on the image to enjoy a larger version.
Image courtesy of and copyright 2021 Joel Eade
Image #1: Yellow-rumped Warbler, Kentucky
|
Yellow-rumps in Winter
Seeing Joel’s image of this species with snow in the frame brought me back to Great Kills Park on Staten Island in the late-1980s. There were times when I spished the yellow-rumps and they nearly flew through the open driver’s side window. I was trying to photograph them with my first telephoto lens, the Canon FD 400mm f/4.5 lens.
|
|
|
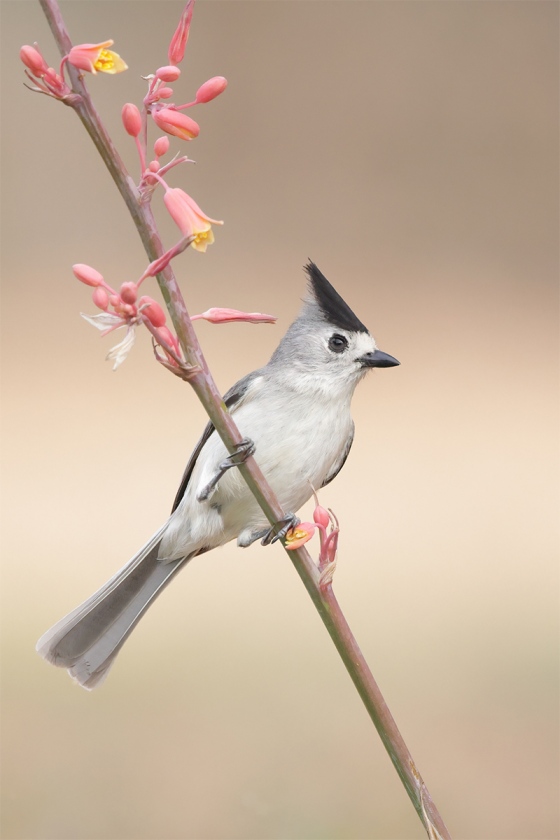
This image was created by In-the-Field session veteran Joel Eade. He used the hand held Canon RF 100-500mm f/4.5-7.1L IS USM lens (at 400mm) and the highly touted 45MP Canon EOS R5 Mirrorless Digital camera body. ISO 4000. Exposure determined via test image and blinkies evaluation: 1/2500 sec. at f/6.3 (wide open) in Manual (M) mode. AWB on a cloudy day.
Eye AF as detailed in the R5 e-Guide was active at the moment of exposure and performed perfectly.
Image courtesy of and copyright 2021 Joel Eade
Image #2: Black-crested Titmouse, Laguna Seca Ranch, Rio Grande Valley, TX
|
Laguna Seca Ranch
Joel visited Laguna Seca Ranch in the Rio Grande Valley on his own and was guided by the personable ranch owner, Gene Gwin. It was Gene who created the lovely wildflower set-up above. Gene was a top-gun fighter pilot who flew McDonnell Douglas F-4 Phantom IIs and McDonnell Douglas F-15 Eagles in the US Air Force for 21 years, and then worked as a commercial pilot first for America West and then for American Airlines for 15 years. He has owned and operated the ranch for the past 12 years.
Slow Canon RF Lenses and Topaz Denoise AI
When I first learned of the two very slow f/11 Canon RF super-telephoto lenses, the Canon RF 600mm f/11 IS STM and the Canon RF 800mm f/11 IS STM, I thought that they were a joke. And the Canon RF 100-500mm f/4.5-7.1L IS USM lnes is, at f/7.1 is the slowest in its class. But, as Joel’s two fine images here show, Topaz Denoise AI can do wonders for high ISO images created in relatively low light with the slow and relatively slow Canon RF lenses. Note that Joel needed high ISO to attain fast-enough shutter speeds in low light situations.
With Topaz, the Canon RF two f/11 super-telephotos have become viable options for budget-conscious bird photographers.
Great Topaz News!
Folks who use the BAA Topaz link to purchase Sharpen AI, DeNoise AI, or the Utility Bundle (or any other Topaz plug-ins), will receive a 15% discount by entering the ARTHUR15 code at checkout. If the stuff is on sale (as it usually is), you save 15% off of the sale price! To get the discount you must use my link and you must enter the discount code. Be sure to start with this link.
Those who purchase Sharpen AI, DeNoise AI, or any other Topaz plug-ins using my link and then entering the ARTHUR15 code at checkout can e-mail to request a short Getting Started with Topaz e-Guide. Please include a copy of your Topaz receipt that shows the discount. Aside from the basics, the guide explains how to install the plug-ins so that they appear in the Photoshop Filter Menu.
Typos
With all blog posts, feel free to e-mail or to leave a comment regarding any typos or errors.
April 30th, 2021 What’s Up?
On the final morning of the second Fort DeSoto IPT we enjoyed yet another great session. The tern/skimmer flock was nowhere to be seen so we quickly made our way to the large pool and set to work photographing yet another very active feeding aggregation.
With Jake Levin and Jim Miller having headed home, Anita North, Shelley Lake, Donna Bourdon and I met at Anita’s AirBnB to polish off the remaining smoked salmon and cold (previously grilled) tuna. Yummy. After we said our goodbyes, Donna and I headed back to ILE stopping in Lake Wales to do a few errands. I took a quick swim. After dinner, we worked on two of Donnas images from the IPT.
Today is Friday 30 April 2021. Donna and I will head down to the lake early to try for the crane chicks/now small colts. At about 10am, Jim and I will take Donna to MCO for her flight back to Chattanooga. Then Jim and I will be off to the Apple Store in Brandon where I have a Genius Bar appointment as my MacBook Pro is having some battery/power issues. Then we will meet Anita North who will be transferring a bunch of her stuff to my SUV and returning her rental vehicle to TPA. The the three of us will have an early dinner in Brandon and photograph at the rookery, probably getting back to ILE between 8 and 9pm. Wherever you are, and whatever you are doing, I hope that you have a great day.
This blog post took about two hours to prepare and makes 127 consecutive days with a new one. Please remember that if an item — a Delkin flash card, or a tripod head, for example, that is available from B&H and/or Bedfords and is also available in the BAA Online Store, it would be great if you opt to purchase from us. We will match any price. Please remember also to use my B&H affiliate links or to save 3% at Bedfords by using the BIRDSASART discount code at checkout. Doing either often earns you free guides and/or discounts. And doing so always earns my great appreciation.
Symbiotic Relationships
sym·bi·ot·ic (/simbīˈädik/) adjective: BIOLOGY
Involving interaction between two different organisms living in close physical association.
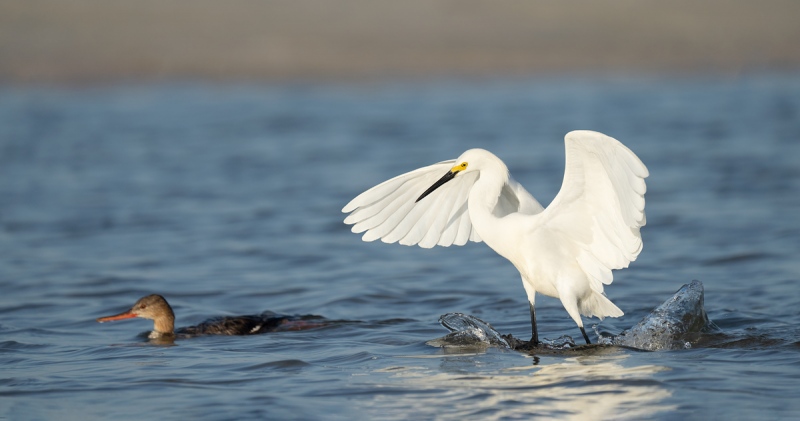
On the wintering grounds, the relationship between Snowy Egret and Red-breasted Merganser is a symbiotic one. In Florida, we often see feeding sprees consisting primarily of these two species. The snowies usual follow the mergansers as they rush through the shallows in pursuit of small baitfish, landing near them to pick up a baitfish scattered by their feeding partners. In the same manner, it is likely that a dip-feeding Snowy Egret will drive bait right into the serrated bills of the mergs.
For each of the past four IPT mornings, we enjoyed a feeding spree that was made up of two to five mergansers and as many as a dozen Snowy Egrets. Other wading bird species including Great and Reddish Egret and Great and Little Blue Blue Heron often joined in, with the latter two species usually hanging on the periphery while the snowies especially are right in the heaviest action with the mergansers.
|
|
|
This image was created on 29 April 2021, the last morning of the second DeSoto IPT. While seated, I used the hand held Sony FE 200-600mm f/5.6-6.3 G OSS lens (at 582mm) and The One, the Sony Alpha 1 Mirrorless digital camera. ISO 640. Exposure determined via Zebras with ISO on the rear dial: 1/3200 sec. at f/6.3 (wide open) in Manual mode. The exposure was confirmed as dead-solid perfect by RawDigger. AWB at 7:54am on a clear, sunny morning.
Wide/AF-C was active at the moment of exposure and performed perfectly. Click on the image to see a larger version.
Image #1: Snowy Egret landing near Red-breasted Merganser
|
The Serendipitous Image
On our last morning the wind was strong from the south/southeast. I constantly advised the group to move to the south, to our left, to stay ahead of the birds so that we would have them them flying toward us, into the wind, and into the light. We were constantly on the move as the feeding aggregation moved from north to south the length of the long pool.
By the end of the morning everyone in the group was exhausted as not only were we moving with the birds but every time that we got ahead of the feeding flock we would sit down to throw the choppy water and the far shoreline pleasingly out of focus. And then we had to get up. Down and up, move to the left, and down and up again. Repeat. And repeat some more. But as you can see with today’s featured image, the rewards can be quite pleasing.
I did my job by setting a perfect exposure for the white birds, getting ahead of the birds, getting low, acquiring focus while panning with the Snowy Egrets in flight, and firing away at 30 fps. Please don’t think that I saw either the merganser or the Snowy Egret’s amazing landing-splash in the viewfinder. The fortuitous juxtaposition of the two birds could not have been more perfect if I had painted the scene. The rest was pure luck. Thus, the serendipitous image.
|
|
Image #1A: RawDigger screen capture of the (pink) Adapted Histogram for the Snowy Egret landing near Red-breasted Merganser image image
|
RawDigger
It would be impossible to overstate how much I have learned by studying RawDigger and how much better my exposures have become since I started with the program almost a year ago. The raw file brightness for Image #1 is dead solid perfect with the great bulk of the G channel just inside the 16000 line. The 340 OvExp pixels (out of 51,000,000) are all in the specular highlights in the splash. You can see the RED OvExp warnings in the big splash in front of the snowies right leg.
RawDigger — not for the faint of heart …
Nothing has ever helped me learn to create perfect exposures to the degree that RawDigger has. I think that many folks are reluctant to learn that most of their images are underexposed by one or more full stops and that highlight warnings in Photoshop, Lightroom, Capture One, and your in-camera histogram are usually way off (as they are based on the embedded JPEGs). Only your raw files tell the truth all the time. Heck, I resisted RawDigger for several years … Once you get over this feeling, RawDigger can become your very best exposure friend no matter what system you are using. On the recent IPTs and In-the-Field sessions, we have demonstrated that fact. Convincingly.
The RawDigger (pink) Adapted Histogram
In the RawDigger e-Guide, you will learn exactly how to set up the Adapted “pink” RawDigger Histogram and how to use it to quickly and easily evaluate the exposure or raw file brightness of images from all digital cameras currently in use. RawDigger was especially helpful to me as I struggled with R5 exposures and learned my new camera body, the Sony Alpha a1.
|
|
RawDigger e-Guide with Two Videos
|
The RawDigger e-Guide with Two Videos
by Arthur Morris with Patrick Sparkman
The RawDigger e-Guide was created only for serious photographers who wish to get the absolute most out of their raw files.
Patrick and I began work on the guide in July 2020. At first we struggled. We asked questions. We learned about Max-G values. We puzzled as to why the Max G values for different cameras were different. IPT veteran Bart Deamer asked lots of questions that we could not answer. We got help from RawDigger creator Iliah Borg. We learned. In December, Patrick came up with an Adapted Histogram that allows us to evaluate the exposures and raw file brightness for all images created with all digital camera bodies from the last two decades. What we learned each time prompted three complete beginning to end re-writes.
The point of the guide is to teach you to truly expose to the mega-Expose-to-the-Right so that you will minimize noise, maximize image quality, best utilize your camera’s dynamic range, and attain the highest possible level of shadow detail in your RAW files in every situation. In addition, your properly exposed RAW files will contain more tonal information and feature the smoothest possible transitions between tones. And your optimized images will feature rich, accurate color.
We teach you why the GREEN channel is almost always the first to over-expose. We save you money by advising you which version of RawDigger you need. We teach you how to interpret the Max G values for your Canon, Nikon, and SONY camera bodies. It is very likely that the Shock-your-World section will shock you. And lastly — thanks to the technical and practical brilliance of Patrick Sparkman — we teach you a simple way to quickly and easily evaluate your exposures and raw file brightness using an Adapted RawDigger histogram.
The flower video takes you through a session where artie edits a folder of images in Capture One while checking the exposures and Max-G values in RawDigger. The Adapted Histogram video examines a series of recent images with the pink histograms and covers lots of fine points including and especially how to deal with specular highlights. The directions for setting up the Adapted Histogram are in the text.
If we priced this guide based on how much effort we put into it, it would sell it for $999.00. But as this guide will be purchased only by a limited number of serious photographers, we have priced it at $51.00. You can order yours here in the BAA Online Store.
|
|
Image #1B: AF points screen capture for the Snowy Egret landing near Red-breasted Merganser image.
|
Sony Alpha a1 AF
The performance of the SONY AF system at any focal length (when the a1 is set up properly as detailed in the in e-mails to the Sony Alpha a1 Info & Updates group), continues to amaze me. Early on, there was lots of discussion within the group with many preferring multiple back button approaches. For me a simple shutter button approach with the right AF settings that yield 99% sharp-on-the-eye images is best. By far. It is super-simple and mega-effective. In the next SONY Alpha a1 Set-up and Info Group e-mail, I will be sharing what I have learned as to when and it what situations it is best to abandon Zone. We have already learned to limit the AF Area choices and to switch AF Areas quickly and conveniently. The default method of switching AF points with the C2 button is both slow and cumbersome.
SONY Alpha a1 Set-up and Info Group
The SONY Alpha a1 Set-up and Info Group is going great guns as folks chime in with thoughtful questions and experience-based advice. We are now up to an astounding 39 folks. Early on, we discussed the myriad AF options. I gave my opinion as to the best one for flight and general bird photography. More recently, we have been in contact with folks at SONY sharing our thoughts, experiences, and frustrations with the EVF blackout problem.
All who purchased their Alpha a1 bodies via a BAA affiliate link will receive a free subscription to the Sony Alpha a1 Set-Up and Info Updates after shooting me their receipts via e-mail. (Note: it may take me several days to confirm B&H orders.) This same service may be purchased by anyone with an a1 body via a $150.00 PayPal sent to birdsasart@verizon.net indicating payment for Alpha a1 Info Updates. Alternatively, they can call Jim weekday afternoons at 1-863-692-0906 to pay via credit card. New members will receive composite e-mails that summarize all previous discussions.
Typos
With all blog posts, feel free to e-mail or to leave a comment regarding any typos or errors.
April 29th, 2021 Whats Up?
Though I did not create as many images on Wednesday morning as I had on Monday, the 3rd morning of the second DeSoto IPT was fantastic. The terns and skimmers were great right at sunrise but all the birds took flight and left without explanation. So we headed for the calmest pool to see what was up. We started with a gorgeous Marbled Godwit and its mirror image reflection. Next was a feeding spree with a half-dozen each of Snowy Egrets and Red-breasted Mergansers. We followed the birds along to stay on sun angle as much as possible. We had lots of great chances with the flying and landing snowies. As usual, Donna Bourdon opted to stay with a frantically dancing Reddish Egret. Shelley Lake and I worked some nice feeding Dunlins at ground level. All in all, it was a truly great morning. And when Shelley saw her images, she was astounded by their beauty and intimacy.
After our second delicious smoked salmon brunch in three days, we recorded a Camtasia video during which I edited a single folder with 2586 images from both sessions on 27 April. I wound up with 248 keepers after the first edit. It had been a very good morning. The video will be offered for sale soon for those who wish to learn to quickly pick their keepers from large files from the super-high frame rate bodies.
On Wednesday afternoon, we headed to a rookery in Brandon, FL. We arrived way too early to find the harsh light on a very warm — make that hot, afternoon. We found some good chow right nearby to kill some time. With tons of clutter, nests right next to each other, and too many branches everywhere, rookeries are difficult places to photograph. We hung in till the light was sweet and were rewarded when the two large chicks in the accessible Great Blue Blue Heron nest at the very top of the south colony island were fed. We were not headed back to Gulfport until 8:00pm. It was a long and rewarding day.
Today is Thursday 28 April, the last morning of the DeSoto IPT. The forecast for St. Pete is for test another perfect morning: clear and sunny with a southeast wind at 11mph. Wherever you are, and whatever you are doing, I hope that you have a great day.
This blog post took about two hours to prepare and makes 126 consecutive days with a new one. Please remember that if an item — a Delkin flash card, or a tripod head, for example, is available from B&H and/or Bedfords and is also available in the BAA Online Store, it would be great if you opt to purchase from us. We will match any price. Please remember also to use my B&H affiliate links or to save money at Bedfords by using the BIRDSASART discount code at checkout. Doing either often earns you free guides and/or discounts. And doing so always earns my great appreciation.
Hard to Figure …
After more than 20 folks left insightful comments on the Whole Catfish blog post, it is hard to figure out why only a single person left a comment in yesterdays A Catch-up Learning Day on the BIRDS AS ART Blog post here when asked to pick their favorite of four very strong images.
I really did enjoy Steve’s quite clever comment:
April 28, 2021 at 8:23 pm · Reply · Edit
In image #3 above, the Osprey forms a spectacular hood ornament for the flying catfish.
Thanks for dputting a smile on my face Steve.
Great Topaz News!
Folks who use the BAA Topaz link to purchase Sharpen AI, DeNoise AI, or the Utility Bundle (or any other Topaz plug-ins), will receive a 15% discount by entering the ARTHUR15 code at checkout. If the stuff is on sale (as it usually is), you save 15% off of the sale price! To get the discount you must use my link and you must enter the discount code. Be sure to start with this link.
Those who purchase Sharpen AI, DeNoise AI, or any other Topaz plug-ins using my link and then entering the ARTHUR15 code at checkout can e-mail to request a short Getting Started with Topaz e-Guide. Please include a copy of your Topaz receipt that shows the discount. Aside from the basics, the guide explains how to install the plug-ins so that they appear in the Photoshop Filter Menu.
Please Remember
With income from IPTs now at zero, please, if you enjoy and learn from the blog, remember to use one of my two affiliate programs when purchasing new gear. Doing so just might make it possible for me to avoid having to try to get a job as a Walmart greeter and will not cost you a single penny more. And if you use Bedfords and remember to enter the BIRDSASART code at checkout, you will save 3% on every order and enjoy free second-day air shipping. In these crazy times — I am out at least forty to sixty thousand dollars so far due to COVID 19 (with lots more to come) — remembering to use my B&H link or to shop at Bedfords will help me out a ton and be greatly appreciated. Overseas folks who cannot order from the US because of import fees, duties, and taxes, are invited to help out by clicking here to leave a blog thank you gift if they see fit.
New and Better Bedfords Discount Policy!
You can now save 3% on all of your Bedfords photo gear purchases by entering the BIRDSASART coupon code at checkout. Your discount will be applied to your pre-tax total. In addition, by using the code you will get 2nd day air shipping via Fed Ex.
Grab a Nikon AF-S Teleconverter TC-14E III and save $14.99. Purchase a Canon EOS R5 and your discount will be $116.97. Purchase a Sony FE 600mm f/4 GM OSS lens and save a remarkable $389.94! Your Bedford’s purchase no longer needs to be greater than $1,000.00 for you to receive a discount. The more you spend, the more you save.
Money Saving Reminder
Many have learned that if you need a hot photo item that is out of stock at B&H and would enjoy free second-day air shipping, your best bet is to click here, place an order with Bedfords, and enter the coupon code BIRDSASART at checkout. If an item is out of stock, contact Steve Elkins via e-mail or on his cell phone at (479) 381-2592 (Central time). Be sure to mention the BIRDSASART coupon code and use it for your online order to save 3% and enjoy free 2nd-day air shipping. Steve has been great at getting folks the hot items that are out of stock at B&H and everywhere else. The wait lists at the big stores can be a year or longer for the hard to get items. Steve will surely get you your gear long before that. For the past year, he has been helping BAA Blog folks get their hands on items like the SONY a9 ii, the SONY 200-600 G OSS lens, the Canon EOS R5, the Canon RF 100-500mm lens, and the Nikon 500mm PF. Steve is personable, helpful, and eager to please.


Gear Questions and Advice
Too many folks attending BAA IPTs (remember those?) and dozens of photographers whom I see in the field and on BPN, are–out of ignorance–using the wrong gear especially when it comes to tripods and more especially, tripod heads… Please know that I am always glad to answer your gear questions via e-mail
|
|
|
This image was also created on 26 April 2021, yet another from the great first morning of the second DeSoto IPT. Lying flat on my belly in the wet sand, I used the handheld Sony FE 200-600mm f/5.6-6.3 G OSS lens with the Sony FE 1.4x Teleconverter (at 840mm) and The One, the Sony Alpha 1 Mirrorless digital camera. ISO 800. Exposure determined via Zebras with ISO on the rear dial: 1/2500 sec. at f/9 (wide open) in Manual mode. AWB at 8:17am on a clear, sunny morning.
Wide/AF-C was active at the moment of exposure and performed to perfection. Click on the image to see a larger version.
Image #1: Sanderling running
|
The Series
This running Sanderling image was made while I was seated. It is one of a series of five, all nicely framed. Hand holding the 200-60, even with the 1.4X TC, is a dream. The first four were razor-sharp on the eye, the last one, todays featured image, showed some motion blur on the face so it needed some special post processing care. See the Topaz Sharpen AI item below. I chose to optimize this one because the bird had both feet off the ground.
The bird is pretty much getting close to breeding plumage. The upperparts may become more orange over the next few weeks, but this species — even in full breeding plumage — shows lots of variation in color.
|
|
Image #1B: Topaz Denoise AI on the Sanderling running image
|
Topaz Denoise AI
With images made in full sun, I will generally go with DeNoise on Auto, rarely changing any of the sliders. With higher ISO images made in low light, I will always go to the Comparison view and often find that either Low Light or AI Clear does a better job. In many cases, increasing the magnification to 200 or 400% makes it easier to see the differences in the three options. Note the complete elimination of background noise in this ISO 800 image. Remember that when the WHITEs are properly exposed, the middle tones are one stop too dark. Confused by that? See the section on Exposure Theory in the original (soft cover) The Art of Bird Photography.
|
|
Image #1B: Topaz Sharpen AI on the Sanderling running image
|
Topaz Sharpen AI
So why might the fifth image in the series showed more motion blur than the first four? That likely occurred because I did not pan as smoothly with the last image as I had with the first four; the bird was higher in the frame than it was in the four sharp frames. To me, that shows that I jerked the lens a bit at the end. Or not.
In any case, the ability of Sharpen AI to re-align pixels to correct motion blur is nothing short of remarkable. Click on the screen capture above to better see the remarkable difference in the before image on our right and the after image on our left.
You can see that I applied Sharpen AI to a rough selection of the birds head (on a layer). As I have a hard time telling if that layer is over sharpened, I run Sharpen AI at full strength, go back to Photoshop, magnify the image, and click the visibility eyeball on and off. If it looks too crispy I will simply reduce the Opacity to taste. With this image, I reduced the Opacity to 60%.
Typos
With all blog posts, feel free to e-mail or to leave a comment regarding any typos or errors.
April 28th, 2021 What’s Up?
Tuesday morning was good, but nowhere as good as Monday morning on the second DeSoto IPT had been. With our best pair of copulating Royal Terns — in the very shallow water on the edge fo the Gulf in sweet early light, we got photo bombed as a tern with a dirty breast landed in front and just to the right of the copulating pair. The two gorgeous birds went at it enthusiastically for about 8 minutes! We had several pairs of copulating Sandwich Terns as well, but none ever offered a clean chance. The morning back-up location paid off nicely with lots of flying Brown Pelicans. Jake Levin concentrated on the Ruddy Turnstones catching clam spat.
We enjoyed a great brunch of fresh grilled tuna and a big salad. That was followed by a photoshop session where we discussed creating and using Regular and Inverse Layer Masks, Expanding canvas with the Content-Aware Fill Crop Tool method, and bringing up detail in properly exposed, sunlit WHITEs. For the latter we used both Linear Burn and Color EFEX Pro and compared results by turning the layers on and off with an eyeball click. That after teaching the group to make Color Range selections.
Despite the east wind, Tuesday afternoon was fantastic, much better than Monday afternoon had been. We began and ended at my favorite afternoon location with a gorgeous, breeding plumage, dark morph Reddish Egret. After that bird departed, we worked several Great Blue Herons and Great Egrets and fewer shorebirds than had been present the previous day. Jake noted that a large flock of shorebirds had landed several hundred yards to our right; the star of that show was a bathing Wilson’s Plover. Then Jim Miller spotted a lovely and cooperative immature Little Blue Heron fishing in still blue water and that is how we ended our day.
Ah, I almost forgot, I came up with an astoundingly easy and effective way to shoot using the tilted rear screen of the monitor. I will be sharing that with your hear soon.
Today is Wednesday 28 April. The forecast for this morning is perfect: sunny with a southeast breeze. Wherever you are, and whatever you are doing, I hope that you have a great day.
This blog post took about two hours to prepare and makes 126 consecutive days with a new one. Please remember that if an item — a Delkin flash card, or a tripod head, for example, is available from B&H and/or Bedfords and is also available in the BAA Online Store, it would be great if you opt to purchase from us. We will match any price. Please remember also to use my B&H affiliate links or to save money at Bedfords by using the BIRDSASART discount code at checkout. Doing either often earns you free guides and/or discounts. And doing so always earns my great appreciation.
|
|
The BIRDS AS ART Current Workflow e-Guide (Digital Basics II).
You can order your copy from the BAA Online Store here, by sending a PayPal for $40 here, or by calling Jim or Jennifer weekdays at 863-692-0906 with your credit card in hand. Be sure to specify Digital Basics II.
|
The BIRDS AS ART Current Workflow e-Guide (Digital Basics II)
All of the techniques mentioned above, and tons more great Photoshop tips and techniques (with the exception of Capture One RAW Conversions) — along with all of my personalized Keyboard Shortcuts — are covered in detail in the BIRDS AS ART Current Workflow e-Guide (Digital Basics II), an instructional PDF that is sent via e-mail. Learn more and check out the free excerpt in the blog post here. While the new e-Guide reflects my MacBook Pro/Photo Mechanic/DPP 4/Photoshop workflow, folks using a PC and/or BreezeBrowser will also benefit greatly by studying the material on DB II. Note: folks working on a PC and/or those who do not want to miss anything Photoshop may wish to purchase the original Digital Basics along with DB II while saving $15 by clicking here to buy the DB Bundle.
Folks who learn well by following along rather than by reading can check out the complete collection of MP 4 Photoshop Tutorial Videos by clicking here. Note: all of the videos are now priced at an amazingly low $5.00 each.
You can learn how and why I converted all of my Canon digital RAW files in DPP 4 in the DPP 4 RAW Conversion Guide here. More recently, I became proficient at converting my Nikon RAW (NEF) files in Adobe Camera Raw. About two years ago I began converting my Nikon and Sony RAW files in Capture One Pro 12 and continue to do so today.
To purchase Capture One, please use this link. Then you can learn more about Capture One in the Capture One Pro 12 Simplified MP4 Video here. The next step would be to get a copy of Arash Hazeghi’s “The Nikon Photographers’ Guide to Phase One Capture One Pro e-Guide” in the blog post here.
You can learn advanced Quick Masking and advanced Layer Masking techniques in APTATS I & II. You can save $15 by purchasing the pair. Folks can learn sophisticated sharpening and (NeatImage) Noise Reduction techniques in The Professional Post Processing Guide by Arash Hazeghi and edited by yours truly. Please use this link to purchase NeatImage.
|
|
|
This image was created on 24 April 2021 on Lake Blue Cypress working from Clemens Van der Werf’s flats boat. I used the hand held Sony FE 600mm f/4 GM OSS lens and The One, the Sony Alpha 1 Mirrorless digital camera. ISO 3200. Exposure determined via Zebras with ISO on the rear dial: 1/6000 sec. at f/4 (wide open) in Manual mode. AWB at 7:23:25am on an overcast morning.
Wide/AF-C was active at the moment of exposure and performed perfectly. Click on the image to see a larger version.
Image #3: Osprey with whole catfish
|
#3 For Me
In the Whole Catfish! blog post here, I asked which of the four images was best. The responses — as expected — were all over the place with no clear favorite. Everyone who commented did a great job and explained why they made their picks. In such an exercise, there is no right or wrong. The idea as always is to get folks thinking and analyzing.
Honestly, I like all four of them. If I had to choose a favorite, it would be #3, the image without a trace of the nest tree in the frame. Why? I love the direct stare and the fully flared wings. #4 would be a close second. Thanks again to the many who left thoughtful comments.
Silly-Tame Red-shouldered Hawk. And Focal Length Quiz
In the Silly-Tame Red-shouldered Hawk. And Focal Length Quiz blog post here, I wrote, After clicking on the image to see the larger version and checking out the 100% crop of the bird’s eyeball below, I’d love for you to guess (or figure out — there is a single clue …) the lens and TC that I used along with the focal length.
BPN-friend Joseph J. Przybyla played the role of spoiler by being the first to answer:
April 25, 2021 at 6:44am
Hey Artie, good morning… nice tight image of a Red-shouldered Hawk. I say you used your 200-600mm with the 2x Teleconverter. Have a wonderful day.
In an effort to throw folks off the right track, I replied as below
April 25, 2021 at 6:50am
Thanks, Joe. Good try! with love, a
Byron Prinzmetal left an insightful comment:
April 25, 2021 at 12:51 pm · Reply · Edit
F/13 should have more depth of field but some feathers on left side in the back are not sharp, but on right they are really sharp so I’m guessing the 200-600 with the 1.4 extender at 840mm, maybe even the 2x extender to explain the narrow depth of field. The f/13 should have more depth of field though so don’t understand the feathers on the back left side not looking real sharp, but the ones on the right sharper than the left. Suppose you used Topaz Sharpen AI and applied more on the right side? Topaz works wonders even on the best of best images in my opinion. Glad you put me onto the software and it get better with each update. Bp
The image above was created with the handheld 200-600, the 2X teleconverter, and the Alpha a1 at 1200mm. The clue was the f/13. I would rarely if ever stop down to f/13, but in this case, that was the wide open aperture. And the depth-of-field wide open at 1200mm at less than ten feet from the subject is razor thin. So with the birds head angled well toward us, the feathers on the back of the head are beyond the range of sharp focus. Thus, Byron’s analysis was pretty much spot-on. And so was Joe’s.
Warning: Stay Away!
In the Shorebird Behavior Quiz. SONY Alpha a1 Crop-ability! blog post here, everyone including me loved the image, but nobody took a crack at identifying the head down/tail up behavior. The posture seen in the image above is an aggressive one that is often used by sandpipers and other shorebirds when defending a feeding territory. If the intruding bird does not move away, a tussle often ensues.
Shorebirds; Beautiful Beachcombers
My My Shorebirds: Beautiful Beachcombers, written for naturalists and birders, will teach you everything you’ve always wanted to know about the aging, identification, behavior, feeding habits and strategies, and the timing and routes of migration of North America’s sandpipers, godwits, yellowlegs, phalaropes, plovers, avocets, stilts, and oystercatchers. It was written especially for you.
The image above was featured in the A Short But Great Move Pays Off! Can a Big Over-exposure Be Best? blog post here. There was not, as some folks assumed, anything distracting to the left of the sun. I placed the bird on the left side of the frame so as to include the vegetation that to balance the sun ball on the left side of the frame and because it added to the motif.
Ted Willcox hit the nail on the head on April 16, 2021 at 11:28am when he commented as below:
You placed the bird on the left side to show more of the vegetation on the right which I believe makes the image that much better!
Well said, Ted.
|
|
|
This image was created in Katchemak Bay, Homer, AK. I used the hand held Sony FE 70-200mm f/2.8 GM OSS lens (at 112mm!) and the AF King, the Sony Alpha a9 II Mirrorless Digital Camera body.. ISO 1000. Exposure determined via blinkies with ISO on the Thumb Dial: 1/2000 sec. at f/3.2 in Manual mode.
Center Zone AF-C performed perfectly. Click on the image to view a larger version
Sub-adult Bald Eagle in flight on snowy day
|
In the 112 millimeters? Surely You Jest ! Depth-of-Field Question blog post here, I asked, Would stopping down one full stop here to f/4.5 have been a good idea? Why are why not?
The two Warrens commented most accurately:
Warren Hatch/April 7, 2021 at 7:55pm ·
If you went to f/4.5 (and kept the same ISO), your shutter speed would have been 1/1000 for the equivalent exposure. You had plenty of depth of field (so there was) no reason so sacrifice the extra sharpness you achieved at 1/2000.
Warren Howe/April 6, 2021 at 9:25am
No, I don’t think stopping down would have been a good idea. At that focal range, you already had plenty of depth of field. The entire eagle is sharp and even the tall grass behind the subject is fairly sharp. Even the distant trees are fairly sharp. Stopping down would have made them more in focus and therefore, more distracting. Also, and importantly, it would have increased the ISO or resulted in a slower shutter, (none of) which would have helped …
To my eye, the entire subject is more than sharp enough as it was pretty much covered by the depth-of-field at 112mm. FYI, the total depth of field at f/3.2 at approximately 30 feet is 2.82 feet, 1.34 feet in front of the point of focus.
Typos
With all blog posts, feel free to e-mail or to leave a comment regarding any typos or errors.
April 27th, 2021 What’s Up?
The DeSoto IPT got off to an incredible start on Monday. The morning session was filled with pairs of copulating Royal Terns, a dancing Reddish Egret, two wonderfully cooperative Laughing Gulls in a perfect setting, and a nice variety of shorebirds, including and especially some fairly bright Sanderlings molting into breeding plumage. The sweet light and the east wind made bird photography a pleasure.
Jake Levin and Jim Miller arrived with brand new SONY Alpha a1 bodies that they had not set up. I suggested that I copy all of my settings to their bodies using the Save/Load Settings feature so that we would be on the exact same page. Both agreed. The process took less than a minute. Both were utterly astounded by the AF performance of the a1 as the AF system locked onto the bird’s eyes and never let it go. And with ISO on the rear wheel, getting the right exposure is a snap (as long as you have the correct Zebra settings as detailed in the Sony Camera User’s e-Guide). Note: everyone in the SONY Alpha a1 Set-up and Info Group receives a free copy of the Sony Camera User’s e-Guide if they do not already have a copy.
Though the east wind persisted in the afternoon, we enjoyed a second great session on Monday afternoon with lots of shorebirds including Dunlin, Short-billed Dowitcher, Semipalmated and Black-bellied Plovers, Least Sandpiper, Sanderling, and Willet. And one of the Willets was quite proficient at catching and eating small crabs.
I created 4023 images yesterday. I have not finished my first edit. I did make many fine images.
Thanks to the many who commented on yesterdays four Osprey images. I will be chiming in on that topic and catching up with some previous blog questions in tomorrows post.
Today is Tuesday 27 April 2021. The forecast for St. Pete this morning is again perfect: clear skies with a nice east wind. Wherever you are, and whatever you are doing, I hope that you have a great day.
This blog post took about one hour to prepare and makes 125 consecutive days with a new one. Please remember that if an item — a Delkin flash card, or a tripod head, for example, is available from B&H and/or Bedfords and is also available in the BAA Online Store, it would be great if you opt to purchase from us. We will match any price. Please remember also to use my B&H affiliate links or to save money at Bedfords by using the BIRDSASART discount code at checkout. Doing either often earns you free guides and/or discounts. And doing so always earns my great appreciation.
Canon EF 800mm f/5.6 L USM Lens
IPT veteran Sandra Calderbank is offering a Canon EF 800mm f/5.6 L USM lens in excellent condition for $6798.00. The sale includes the rear lens cap, the lens trunk, the original tough front lens cover, the lens strap, the original Canon tripod foot, a Really Right Stuff replacement foot, a LensCoat cover and a Hoodie and insured ground shipping via major courier to lower-48 US addresses only. Your item will not ship until your check clears unless other arrangements are made.
Please contact Sandra via e-mail or by phone at 1-828 412 1047 Eastern time zone.
I used this lens, often with a 1.4X TC, as my main super-telephoto lens for close to five years. It is a superb lens that offers lots of reach for those working with birds that are skittish. It is great from the car. I was astounded that about 15 of the 67 images in the San Diego exhibit (and in the 100 Best CD as well) were created with my 800. I missed it terribly for years. As the lens sells new at B&H for $12,999, Sandra’s lens — that will kill with an R5 — is a superb buy; grab it now and save a very sweet $6201.00! artie
Canon EOS 7D Mark II
IPT veteran Sandra Calderbank is offering a Canon EOS 7D Mark II in-near mint condition with 21,069 actuations for $649.00. The sale includes the strap, the original product box, one battery, the front cap, the software, manual, & cables, a Really Right Stuff plate, and insured ground shipping via major courier to lower-48 US addresses only. Your item will not ship until your check clears unless other arrangements are made.
Please contact Sandra via e-mail or by phone at 1-828 412 1047 Eastern time zone.
Both Patrick Sparkman and I used and loved the 7D Mark II until about four years ago when we both committed — at the time — to using full-frame Canon bodies. We both made some truly great images with it. Two of my three 2016 Nature’s Best honored entries were created with the 7D II, one still, and one video. One thing is for sure: the 7D Mark II is the greatest value ever in a digital camera body. artie
Please Remember
With income from IPTs now at zero, please, if you enjoy and learn from the blog, remember to use one of my two affiliate programs when purchasing new gear. Doing so just might make it possible for me to avoid having to try to get a job as a Walmart greeter and will not cost you a single penny more. And if you use Bedfords and remember to enter the BIRDSASART code at checkout, you will save 3% on every order and enjoy free second-day air shipping. In these crazy times — I am out at least forty to sixty thousand dollars so far due to COVID 19 (with lots more to come) — remembering to use my B&H link or to shop at Bedfords will help me out a ton and be greatly appreciated. Overseas folks who cannot order from the US because of import fees, duties, and taxes, are invited to help out by clicking here to leave a blog thank you gift if they see fit.
New and Better Bedfords Discount Policy!
You can now save 3% on all of your Bedfords photo gear purchases by entering the BIRDSASART coupon code at checkout. Your discount will be applied to your pre-tax total. In addition, by using the code you will get 2nd day air shipping via Fed Ex.
Grab a Nikon AF-S Teleconverter TC-14E III and save $14.99. Purchase a Canon EOS R5 and your discount will be $116.97. Purchase a Sony FE 600mm f/4 GM OSS lens and save a remarkable $389.94! Your Bedford’s purchase no longer needs to be greater than $1,000.00 for you to receive a discount. The more you spend, the more you save.
Money Saving Reminder
Many have learned that if you need a hot photo item that is out of stock at B&H and would enjoy free second-day air shipping, your best bet is to click here, place an order with Bedfords, and enter the coupon code BIRDSASART at checkout. If an item is out of stock, contact Steve Elkins via e-mail or on his cell phone at (479) 381-2592 (Central time). Be sure to mention the BIRDSASART coupon code and use it for your online order to save 3% and enjoy free 2nd-day air shipping. Steve has been great at getting folks the hot items that are out of stock at B&H and everywhere else. The wait lists at the big stores can be a year or longer for the hard to get items. Steve will surely get you your gear long before that. For the past year, he has been helping BAA Blog folks get their hands on items like the SONY a9 ii, the SONY 200-600 G OSS lens, the Canon EOS R5, the Canon RF 100-500mm lens, and the Nikon 500mm PF. Steve is personable, helpful, and eager to please.


Gear Questions and Advice
Too many folks attending BAA IPTs (remember those?) and dozens of photographers whom I see in the field and on BPN, are–out of ignorance–using the wrong gear especially when it comes to tripods and more especially, tripod heads… Please know that I am always glad to answer your gear questions via e-mail. Those questions might deal with systems, camera bodies, accessories, and/or lens choices and decisions.
|
|
|
This image was created on 26 April 2021, first morning of the second DeSoto IPT. Lying flat on my belly in the wet sand, I used the handheld Sony FE 200-600mm f/5.6-6.3 G OSS lens with the Sony FE 1.4x Teleconverter (at 840mm) and The One, the Sony Alpha 1 Mirrorless digital camera. ISO 800. Exposure determined via Zebras with ISO on the rear dial: 1/1000 sec. at f/10 (stopped down 1/3 stop) in Manual mode. AWB at 9:15:50am on a clear, sunny morning.
Wide/AF-C was active at the moment of exposure and performed to perfection. Click on the image to see a larger version.
Image #1: Dunlin ruffling
|
How Low Do You Go?
One of the main topics that we covered during both sessions dealt with how low to go and how to get there. We had folks lying or sitting on the wet sand and hand holding. Some used the tilted rear screen while sitting. Some sat behind their lowered tripods and some lay on the ground with the tripod legs splayed flat. During the afternoon session, I tried the Levered-clamp FlexShooter Pro atop a Skimmer II.
Being too high reveals shells and pebbles on the beach. Being too low loses the birds feet or the lower half of the female of a copulating pair. Note: some of the latter images worked surprisingly well! Other considerations when getting low are the effect of the breaking waves on an image as well as the placement of the horizon line.
As today’s two featured images were created on the edge of a pool, waves were not an issue. For me, the perspective is perfect with a fuzzy peek at the top of the bird’s feet, a killer background, and an intimate look at the life of a shorebird.
|
|
|
This image was created on 26 April 2021, first morning of the second DeSoto IPT. Lying flat on my belly in the wet sand, I used the handheld Sony FE 200-600mm f/5.6-6.3 G OSS lens with the Sony FE 1.4x Teleconverter (at 840mm) and The One, the Sony Alpha 1 Mirrorless digital camera. ISO 800. Exposure determined via Zebras with ISO on the rear dial: 1/1000 sec. at f/10 (stopped down 1/3 stop) in Manual mode. AWB at 9:15:50am on a clear, sunny morning.
Wide/AF-C was active at the moment of exposure and performed to perfection. Click on the image to see a larger version.
Image #2: Dunlin ruffling
|
Best?
The a1’s thirty frames/second (only with the fast card while shooting compressed raw) gives you lots of poses to choose from. With this single ruffle, I had about 45 poses to choose from. These two images were chosen from my nine favorites. Your job is even harder: choose the better of these two images and leave a comment letting us know why you made your choice.
SONY Alpha a1 Set-up and Info Group
The SONY Alpha a1 Set-up and Info Group is going great guns as folks chime in with thoughtful questions and experience-based advice. We are now up to an astounding 35 folks. Early on, we discussed the myriad AF options. I gave my opinion as to the best one for flight and general bird photography. More recently, we have been in contact with folks at SONY sharing our thoughts, experiences, and frustrations with the EVF blackout problem.
All who purchased their Alpha a1 bodies via a BAA affiliate link will receive a free subscription to the Sony Alpha a1 Set-Up and Info Updates after shooting me their receipts via e-mail. (Note: it may take me several days to confirm B&H orders.) This same service may be purchased by anyone with an a1 body via a $150.00 PayPal sent to birdsasart@verizon.net indicating payment for Alpha a1 Info Updates. Alternatively, they can call Jim weekday afternoons at 1-863-692-0906 to pay via credit card. New members will receive composite e-mails that summarize all previous discussions.
Typos
With all blog posts, feel free to e-mail or to leave a comment regarding any typos or errors.
April 26th, 2021 Which is the Best Image?
Selecting my four favorites from the 48 keepers (out of 436 sharp images) after the first edit was a challenge. Now you face a tougher one: which of today’s four featured images is the strongest? All are invited to leave a comment and share their thoughts as to why.
What’s Up?
On Sunday morning, Clemens Van der Werf, Donna Bourdon, Anita North, and I photographed from Clemens’ flat boat. We tried for Snail Kites at a local lake near ILE. With the wind from the west southwest and the sun out most of the time we pretty much struck out with flight shooting but had a few decent perched males.
We headed back to my house for a smoked salmon brunch. Afterwards, I napped, swam, and finished packing. Clemens headed home and the three of us drove over to Gulfport for the second DeSoto IPT.
On Sunday evening, I met most of the group — Jim Miller is driving down from Tallahassee on Monday. We ran through the Designing and creating pleasing and dramatic natural history images and recorded the session with Camtasia. It will be available in the BAA Online Store soon.
Today is Monday 26 April 2021. The morning forecast for St. Pete is for clear with east northeast winds — not great, but pretty darned good. Wherever you are, and whatever you are doing, I hope that you have a great day.
This blog post took about two hours to prepare and makes 124 consecutive days with a new one. Please remember that if an item — a Delkin flash card, or a tripod head, for example, is available from B&H and/or Bedfords and is also available in the BAA Online Store, it would be great if you opt to purchase from us. We will match any price. Please remember also to use my B&H affiliate links or to save money at Bedfords by using the BIRDSASART discount code at checkout. Doing either often earns you free guides and/or discounts. And doing so always earns my great appreciation.
My Laptop
Many folks are not aware that I do all of my image processing on a MacBook Pro. Though less than ideal, it is — considering all of the traveling that I do, the best solution for me. And I love the speed and the 4TB internal hard drive. The Apple 16″ MacBook Pro (Updated in 2020, Space Gray) is the updated version of my 2019 device.
Please Remember
With income from IPTs now at zero, please, if you enjoy and learn from the blog, remember to use one of my two affiliate programs when purchasing new gear. Doing so just might make it possible for me to avoid having to try to get a job as a Walmart greeter and will not cost you a single penny more. And if you use Bedfords and remember to enter the BIRDSASART code at checkout, you will save 3% on every order and enjoy free second-day air shipping. In these crazy times — I am out at least forty to sixty thousand dollars so far due to COVID 19 (with lots more to come) — remembering to use my B&H link or to shop at Bedfords will help me out a ton and be greatly appreciated. Overseas folks who cannot order from the US because of import fees, duties, and taxes, are invited to help out by clicking here to leave a blog thank you gift if they see fit.
New and Better Bedfords Discount Policy!
You can now save 3% on all of your Bedfords photo gear purchases by entering the BIRDSASART coupon code at checkout. Your discount will be applied to your pre-tax total. In addition, by using the code you will get 2nd day air shipping via Fed Ex.
Grab a Nikon AF-S Teleconverter TC-14E III and save $14.99. Purchase a Canon EOS R5 and your discount will be $116.97. Purchase a Sony FE 600mm f/4 GM OSS lens and save a remarkable $389.94! Your Bedford’s purchase no longer needs to be greater than $1,000.00 for you to receive a discount. The more you spend, the more you save.
Money Saving Reminder
Many have learned that if you need a hot photo item that is out of stock at B&H and would enjoy free second-day air shipping, your best bet is to click here, place an order with Bedfords, and enter the coupon code BIRDSASART at checkout. If an item is out of stock, contact Steve Elkins via e-mail or on his cell phone at (479) 381-2592 (Central time). Be sure to mention the BIRDSASART coupon code and use it for your online order to save 3% and enjoy free 2nd-day air shipping. Steve has been great at getting folks the hot items that are out of stock at B&H and everywhere else. The wait lists at the big stores can be a year or longer for the hard to get items. Steve will surely get you your gear long before that. For the past year, he has been helping BAA Blog folks get their hands on items like the SONY a9 ii, the SONY 200-600 G OSS lens, the Canon EOS R5, the Canon RF 100-500mm lens, and the Nikon 500mm PF. Steve is personable, helpful, and eager to please.


Gear Questions and Advice
Too many folks attending BAA IPTs (remember those?) and dozens of photographers whom I see in the field and on BPN, are–out of ignorance–using the wrong gear especially when it comes to tripods and more especially, tripod heads… Please know that I am always glad to answer your gear questions via e-mail. Those questions might deal with systems, camera bodies, accessories, and/or lens choices and decisions.
|
|
|
This image was created on 24 April 2021 on Lake Blue Cypress working from Clemens Van der Werf’s flats boat. I used the hand held Sony FE 600mm f/4 GM OSS lens and The One, the Sony Alpha 1 Mirrorless digital camera. ISO 3200. Exposure determined via Zebras with ISO on the rear dial: 1/1250 sec. at f/4 (wide open) in Manual mode. AWB at 7:20:39am on a heavily overcast morning.
Wide/AF-C was active at the moment of exposure and performed perfectly. Click on the image to see a larger version.
Image #1: Osprey with whole catfish
|
The Whole Catfish
It is common to see Osprey flying around with fish, but nine times out of ten they will have already torn off and eaten the fish’s head. Having this bird flying around and around with a whole, fresh caught catfish was a real treat.
Many Great Catfish Chances
We spotted this male Osprey with a large, whole catfish flying around while the light levels were still quite low; I was doing blurs. The first of two keeper blurs was created at 7:17:17am. Then I switched to sharp. The last keeper of what was a very long series was created at 7:25:06. I wound up with 48 keepers out of 436 sharp images.
The bird would fly into the nest, touch down briefly, take flight, and then circle around again. And again. And again. The show went on for about eight whole minutes. The male finally landed with its mate right on it tail. Breakfast time.
|
|
|
This image was also created on 24 April 2021 on Lake Blue Cypress working from Clemens Van der Werf’s flats boat. I used the hand held Sony FE 600mm f/4 GM OSS lens and The One, the Sony Alpha 1 Mirrorless digital camera. ISO 3200. Exposure determined via Zebras with ISO on the rear dial: 1/1250 sec. at f/4 (wide open) in Manual mode. AWB at 7:20:40am on a heavily overcast morning.
Wide/AF-C was active at the moment of exposure and performed perfectly. Click on the image to see a larger version.
Image #2: Osprey with whole catfish
|
Gear and Shutter Speed Decisions
The 200-600 with the a1 is a deadly combination, especially when hand holding for flight photography. The 600 GM is much heaver, much larger, and thus — much more difficult to hand hold. So why not go with the 2-6?
In the extreme low light conditions of a very overcast morning, the 600 at f/4 saves you four clicks (1 1/3 stops) of ISO. Had In sunny conditions, I will almost always opt for the 200-600 for flight while choosing 1/3200 second as my ideal shutter speed. On Saturday morning, once I switched from doing blurs to trying to create sharp images, I really skimped on shutter speed by first working at 1/1250 second. When things brightened up a bit, I moved up to 1/1600 second. All of the images were more than sharp enough on the bird’s eyes.
|
|
|
This image was also created on 24 April 2021 on Lake Blue Cypress working from Clemens Van der Werf’s flats boat. I used the hand held Sony FE 600mm f/4 GM OSS lens and The One, the Sony Alpha 1 Mirrorless digital camera. ISO 3200. Exposure determined via Zebras with ISO on the rear dial: 1/1600 sec. at f/4 (wide open) in Manual mode. AWB at 7:23:25am on an overcast morning.
Wide/AF-C was active at the moment of exposure and performed perfectly. Click on the image to see a larger version.
Image #3: Osprey with whole catfish
|
My Biggest Problem
Even though the SONY 600 f/4GM is the lightest (by one ounce over the Canon 600 III) 600 f/4 ever produced, my biggest problem was with the framing, keeping the bird in the center of the frame. Only practice and weight training can help me there.
The SONY AF System
The performance of the SONY AF system at any focal length (when the a1 is set up properly as detailed in the in e-mails to the Sony Alpha a1 Info & Updates group), continues to amaze me. Early on, there was lots of discussion within the group with many preferring multiple back button approaches. For me a simple shutter button approach with the right AF settings that yield 99% sharp-on-the-eye images is best. By far. It is super-simple and mega-effective.
SONY Alpha a1 Set-up and Info Group
The SONY Alpha a1 Set-up and Info Group is going great guns as folks chime in with thoughtful questions and experience-based advice. We are now up to an astounding 35 folks. Early on, we discussed the myriad AF options. I gave my opinion as to the best one for flight and general bird photography. More recently, we have been in contact with folks at SONY sharing our thoughts, experiences, and frustrations with the EVF blackout problem.
All who purchased their Alpha a1 bodies via a BAA affiliate link will receive a free subscription to the Sony Alpha a1 Set-Up and Info Updates after shooting me their receipts via e-mail. (Note: it may take me several days to confirm B&H orders.) This same service may be purchased by anyone with an a1 body via a $150.00 PayPal sent to birdsasart@verizon.net indicating payment for Alpha a1 Info Updates. Alternatively, they can call Jim weekday afternoons at 1-863-692-0906 to pay via credit card. New members will receive composite e-mails that summarize all previous discussions.
|
|
|
This image was also created on 24 April 2021 on Lake Blue Cypress working from Clemens Van der Werf’s flats boat. I used the hand held Sony FE 600mm f/4 GM OSS lens and The One, the Sony Alpha 1 Mirrorless digital camera. ISO 3200. Exposure determined via Zebras with ISO on the rear dial: 1/6000 sec. at f/4 (wide open) in Manual mode. AWB at 7:25:04am on an overcast morning.
Wide/AF-C was active at the moment of exposure and performed perfectly. Click on the image to see a larger version.
Image #4: Osprey with whole catfish
|
Eye Doctor Work
In the dingy light, and with the bird’s nictitating membrane covering part of the eye or eyes in two of the four images, I did some eye doctor work on each of today’s featured images. I used the Clone Stamp Tool to lose the nictitating membrane, selected and brightened the yellow irises, and used Tim Grey Dodge and Burn to darken the pupils. Then I selected the bird’s face in each image and applied a Contrast Mask to selectively sharpen and darken that layer only.
|
|
The BIRDS AS ART Current Workflow e-Guide (Digital Basics II).
You can order your copy from the BAA Online Store here, by sending a PayPal for $40 here, or by calling Jim or Jennifer weekdays at 863-692-0906 with your credit card in hand. Be sure to specify Digital Basics II.
|
The BIRDS AS ART Current Workflow e-Guide (Digital Basics II)
The Eye Doctor and Contrast Mask techniques mentioned above, and tons more great Photoshop tips and techniques (with the exception of Capture One RAW Conversions) — along with all of my personalized Keyboard Shortcuts — are covered in detail in the BIRDS AS ART Current Workflow e-Guide (Digital Basics II), an instructional PDF that is sent via e-mail. Learn more and check out the free excerpt in the blog post here. While the new e-Guide reflects my MacBook Pro/Photo Mechanic/DPP 4/Photoshop workflow, folks using a PC and/or BreezeBrowser will also benefit greatly by studying the material on DB II. Note: folks working on a PC and/or those who do not want to miss anything Photoshop may wish to purchase the original Digital Basics along with DB II while saving $15 by clicking here to buy the DB Bundle.
Folks who learn well by following along rather than by reading can check out the complete collection of MP 4 Photoshop Tutorial Videos by clicking here. Note: all of the videos are now priced at an amazingly low $5.00 each.
You can learn how and why I converted all of my Canon digital RAW files in DPP 4 in the DPP 4 RAW Conversion Guide here. More recently, I became proficient at converting my Nikon RAW (NEF) files in Adobe Camera Raw. About two years ago I began converting my Nikon and Sony RAW files in Capture One Pro 12 and continue to do so today.
To purchase Capture One, please use this link. Then you can learn more about Capture One in the Capture One Pro 12 Simplified MP4 Video here. The next step would be to get a copy of Arash Hazeghi’s “The Nikon Photographers’ Guide to Phase One Capture One Pro e-Guide” in the blog post here.
You can learn advanced Quick Masking and advanced Layer Masking techniques in APTATS I & II. You can save $15 by purchasing the pair. Folks can learn sophisticated sharpening and (NeatImage) Noise Reduction techniques in The Professional Post Processing Guide by Arash Hazeghi and edited by yours truly. Please use this link to purchase NeatImage.
Typos
With all blog posts, feel free to e-mail or to leave a comment regarding any typos or errors.
April 25th, 2021 What’s Up?
Donna Bourdon, Clemens Van der Werf, and I enjoyed a stellar, cloudy-bright Saturday morning on Lake Blue Cypress. We enjoyed another fine dinner on the pool deck: rib-eye steak done rare on the grill, barbecued Brussels sprouts, and some more fine wine. After we ate, I edited the 2287 image folder from that morning. Most were of Ospreys in flight. I kept 11 out of 370 blurs and 48 out of 436 of the landing-with-whole-catfish images. All in all I kept only 97 images of the original 2287. Deleted 2190. Perhaps 30 or 40 will survive the second edit …
Today is Sunday 25 April 2021. We are headed back to a local lake for more Snail Kite photography. The forecast is for partly cloudy turning cloudy with a gentle breeze from the southwest. Not great, not terrible. Wherever you are, and whatever you are doing, I hope that you have a great day.
This blog post took less than an hour to prepare and makes 123 consecutive days with a new one. Please remember that if an item — a Delkin flash card, or a tripod head, for example, is available from B&H and/or Bedfords and is also available in the BAA Online Store, it would be great if you opt to purchase from us. We will match any price. Please remember also to use my B&H affiliate links or to save money at Bedfords by using the BIRDSASART discount code at checkout. Doing either often earns you free guides and/or discounts. And doing so always earns my great appreciation.
Stuck in Time
Via e-mail from Steve Schiff
Hi Artie —
I think your shutter counter is stuck again. From your recent blog posts:
4/21: This blog post took more than an hour to prepare and makes 119 consecutive days with a new one.
4/22: This blog post took more than an hour to prepare and makes 119 consecutive days with a new one.
4/23: This blog post took more than an hour to prepare and makes 119 consecutive days with a new one.
4/24: This blog post took more than an hour to prepare and makes 119 consecutive days with a new one.
Steve in NJ
Working too fast has its hazards! Thanks to Steve, I have corrected my errors and will probably refrain from making similar ones for at least a week or two.
Please Remember
With income from IPTs now at zero, please, if you enjoy and learn from the blog, remember to use one of my two affiliate programs when purchasing new gear. Doing so just might make it possible for me to avoid having to try to get a job as a Walmart greeter and will not cost you a single penny more. And if you use Bedfords and remember to enter the BIRDSASART code at checkout, you will save 3% on every order and enjoy free second-day air shipping. In these crazy times — I am out at least forty to sixty thousand dollars so far due to COVID 19 (with lots more to come) — remembering to use my B&H link or to shop at Bedfords will help me out a ton and be greatly appreciated. Overseas folks who cannot order from the US because of import fees, duties, and taxes, are invited to help out by clicking here to leave a blog thank you gift if they see fit.
New and Better Bedfords Discount Policy!
You can now save 3% on all of your Bedfords photo gear purchases by entering the BIRDSASART coupon code at checkout. Your discount will be applied to your pre-tax total. In addition, by using the code you will get 2nd day air shipping via Fed Ex.
Grab a Nikon AF-S Teleconverter TC-14E III and save $14.99. Purchase a Canon EOS R5 and your discount will be $116.97. Purchase a Sony FE 600mm f/4 GM OSS lens and save a remarkable $389.94! Your Bedford’s purchase no longer needs to be greater than $1,000.00 for you to receive a discount. The more you spend, the more you save.
Money Saving Reminder
Many have learned that if you need a hot photo item that is out of stock at B&H and would enjoy free second-day air shipping, your best bet is to click here, place an order with Bedfords, and enter the coupon code BIRDSASART at checkout. If an item is out of stock, contact Steve Elkins via e-mail or on his cell phone at (479) 381-2592 (Central time). Be sure to mention the BIRDSASART coupon code and use it for your online order to save 3% and enjoy free 2nd-day air shipping. Steve has been great at getting folks the hot items that are out of stock at B&H and everywhere else. The wait lists at the big stores can be a year or longer for the hard to get items. Steve will surely get you your gear long before that. For the past year, he has been helping BAA Blog folks get their hands on items like the SONY a9 ii, the SONY 200-600 G OSS lens, the Canon EOS R5, the Canon RF 100-500mm lens, and the Nikon 500mm PF. Steve is personable, helpful, and eager to please.


Gear Questions and Advice
Too many folks attending BAA IPTs (remember those?) and dozens of photographers whom I see in the field and on BPN, are–out of ignorance–using the wrong gear especially when it comes to tripods and more especially, tripod heads… Please know that I am always glad to answer your gear questions via e-mail. Those questions might deal with systems, camera bodies, accessories, and/or lens choices and decisions.
|
|
|
This image was created along a canal at Lake Blue Cypress on 23 April 2021. I used the hand held (???) lens with the (???) teleconverter and The One, the Sony Alpha 1 Mirrorless digital camera. ISO 1000. Exposure determined via Zebras with ISO on the rear dial: 1/500 sec. at f/13 in Manual mode. AWB at 6:18pm on a sunny afternoon.
Wide/AF-C was active at the moment of exposure and nailed the focus. Click on the image to see a larger version.
Red-shouldered Hawk head portrait
|
Focal Length Quiz
This is the free and wild red-shoulder that we encountered on Friday afternoon when all seemed hopeless. It was beyond silly-tame, and more amazingly, it was sitting with its back to the wind so that its face was perfectly lit. The image as presented represents the full frame original capture.
After clicking on the image to see the larger version and checking out the 100% crop of the bird’s eyeball below, I’d love for you to guess (or figure out — there is a single clue …) the lens and TC that I used along with the focal length.
|
|
|
This image was created along a canal at Lake Blue Cypress on 23 April 2021. I used the hand held (???) lens with the (???) teleconverter and The One, the Sony Alpha 1 Mirrorless digital camera. ISO 1000. Exposure determined via Zebras with ISO on the rear dial: 1/500 sec. at f/13 in Manual mode. AWB at 6:18pm on a sunny afternoon.
Wide/AF-C was active at the moment of exposure and nailed the focus. Click on the image to see a larger version.
An unsharpened 100% crop of the eyeball of the Red-shouldered Hawk head portrait image
|
What an Eyeball!
Click on the image to enlarge the eye and you can see the three of us in Clemens’ flats boat. Clemens is the tall one in the back. The bird was so tame that I eventually stood on the bow platform without flushing the bird. Note the sharpness of the eyelashes in the front of the eye (to our right) and the reflection of the eyelashes at the back of the eye (to our left).
|
|
|
This image was created along a canal at Lake Blue Cypress on 23 April 2021. I used the hand held (???) lens with the (???) teleconverter and The One, the Sony Alpha 1 Mirrorless digital camera. ISO 1000. Exposure determined via Zebras with ISO on the rear dial: 1/500 sec. at f/13 in Manual mode. AWB at 6:18pm on a sunny afternoon.
Wide/AF-C was active at the moment of exposure and nailed the focus. Click on the image to see a larger version.
The active AF point for the Red-shouldered Hawk head portrait image
|
The Active AF Point
The performance of the SONY AF system at any focal length (when the a1 is set up properly as detailed in the in e-mails to the Sony Alpha a1 Info & Updates group), continues to amaze me. Early on, there was lots of discussion within the group with many preferring multiple back button approaches. For me a simple shutter button approach with the right AF settings that yield 99% sharp-on-the-eye images is best. By far. It is super-simple and mega-effective. Note: info on the program that I use to ascertain SONY AF point information is detailed in one of the SONY Alpha a1 Set-up and Info Group e-mails. I plan on making that information available here soon for all SONY camera users. You guessed it, I am working on a guide. 🙂
SONY Alpha a1 Set-up and Info Group
The SONY Alpha a1 Set-up and Info Group is going great guns as folks chime in with thoughtful questions and experience-based advice. We are now up to an astounding 35 folks. Early on, we discussed the myriad AF options. I gave my opinion as to the best one for flight and general bird photography. More recently, we have been in contact with folks at SONY sharing our thoughts, experiences, and frustrations with the EVF blackout problem.
All who purchased their Alpha a1 bodies via a BAA affiliate link will receive a free subscription to the Sony Alpha a1 Set-Up and Info Updates after shooting me their receipts via e-mail. (Note: it may take me several days to confirm B&H orders.) This same service may be purchased by anyone with an a1 body via a $150.00 PayPal sent to birdsasart@verizon.net indicating payment for Alpha a1 Info Updates. Alternatively, they can call Jim weekday afternoons at 1-863-692-0906 to pay via credit card. New members will receive composite e-mails that summarize all previous discussions.
Typos
With all blog posts, feel free to e-mail or to leave a comment regarding any typos or errors.
April 24th, 2021 What’s Up?
Donna, Clemens, and I spent Friday morning on Clemens’ flats boat at a local lake trying for Snail Kites. Clemens’ strength, height, and skill stole the day. We headed back to my house for brunch. I took too long a nap and when I woke, they said, We are head to Lake Blue Cypress now. So we went. Conditions were looking dismal with bright sun and a strong east wind. There was not much going on so we went on a sight-seeing tour traversing the many canals at the eastern end of the lake. There were lots of Ospreys with big fish, really big fish, all flying directly away from us into the wind with the sun behind use — it was classic wind against sun — disastrous for bird photography. On the way back to the lake, I lay down on the floor of the boat with my head on my rolled up sweatshirt and my feet on the big Yeti cooler.
We were tooling along when both Donna and Clemens called out, What is that? I sat up, saw the bird they were pointing at, and said, It’s a Red-shouldered Hawk. It was sitting on a water control device. Amazingly, it had its back to the wind and was beautifully lit. Perfect. I said, These guys can be very tame; there is a good chance that we can get right up to this bird.. Long story short — we wound up getting tight head portraits without even trying!
Once we got back to the main lake, we had another hour to kill until sunset color. Again we lucked out with some nice golden tones in the western sky and an Osprey landing right at us. So what looked like a total photo disaster turned out to be a great afternoon. Early on Saturday morning I did the first edit of the 14 APR 2021 folder: 94 keepers out of 2642 images. The process took exactly 26 minutes. Learn how in the The Laughing Gull/Red Knot (and more) DeSoto Picking Your Keepers Video here. For a1 users, I recently — with help from Anita North and the great folks from Camera Bits, came up with a new even faster method of selecting my keepers. I will be sharing that with the group in the next e-mail issue of the SONY Alpha a1 Set-up and Info Group. Scroll down for details. IAC, photos soon.
Today is Saturday 24 April and the three of us are heading back to Lake Blue Cypress for Ospreys. The forecast is calling for southwest winds (great!) and early cloudy (not terrible). Wherever you are, and whatever you are doing, I hope that you have a great day.
This blog post took more than an hour to prepare and makes 122 consecutive days with a new one. Please remember that if an item — a Delkin flash card, for example, is available from B&H and/or Bedfords and is also available in the BAA Online Store, that it would be great if you purchase from us. We will match any price. Please remember also to use my B&H affiliate links or to save money at Bedfords by using the BIRDSASART discount code at checkout. Doing either often earns you free guides and/or discounts. And doing so always earns my great appreciation.
Please Remember
With income from IPTs now at zero, please, if you enjoy and learn from the blog, remember to use one of my two affiliate programs when purchasing new gear. Doing so just might make it possible for me to avoid having to try to get a job as a Walmart greeter and will not cost you a single penny more. And if you use Bedfords and remember to enter the BIRDSASART code at checkout, you will save 3% on every order and enjoy free second-day air shipping. In these crazy times — I am out at least forty to sixty thousand dollars so far due to COVID 19 (with lots more to come) — remembering to use my B&H link or to shop at Bedfords will help me out a ton and be greatly appreciated. Overseas folks who cannot order from the US because of import fees, duties, and taxes, are invited to help out by clicking here to leave a blog thank you gift if they see fit.
New and Better Bedfords Discount Policy!
You can now save 3% on all of your Bedfords photo gear purchases by entering the BIRDSASART coupon code at checkout. Your discount will be applied to your pre-tax total. In addition, by using the code you will get 2nd day air shipping via Fed Ex.
Grab a Nikon AF-S Teleconverter TC-14E III and save $14.99. Purchase a Canon EOS R5 and your discount will be $116.97. Purchase a Sony FE 600mm f/4 GM OSS lens and save a remarkable $389.94! Your Bedford’s purchase no longer needs to be greater than $1,000.00 for you to receive a discount. The more you spend, the more you save.
Money Saving Reminder
Many have learned that if you need a hot photo item that is out of stock at B&H and would enjoy free second-day air shipping, your best bet is to click here, place an order with Bedfords, and enter the coupon code BIRDSASART at checkout. If an item is out of stock, contact Steve Elkins via e-mail or on his cell phone at (479) 381-2592 (Central time). Be sure to mention the BIRDSASART coupon code and use it for your online order to save 3% and enjoy free 2nd-day air shipping. Steve has been great at getting folks the hot items that are out of stock at B&H and everywhere else. The wait lists at the big stores can be a year or longer for the hard to get items. Steve will surely get you your gear long before that. For the past year, he has been helping BAA Blog folks get their hands on items like the SONY a9 ii, the SONY 200-600 G OSS lens, the Canon EOS R5, the Canon RF 100-500mm lens, and the Nikon 500mm PF. Steve is personable, helpful, and eager to please.


Gear Questions and Advice
Too many folks attending BAA IPTs (remember those?) and dozens of photographers whom I see in the field and on BPN, are–out of ignorance–using the wrong gear especially when it comes to tripods and more especially, tripod heads… Please know that I am always glad to answer your gear questions via e-mail. Those questions might deal with systems, camera bodies, accessories, and/or lens choices and decisions.
|
|
|
This image was created by blog regular Bob Eastman on 8 April 2021 near the Wisconsin River right below the Wisconsin Dells Dam. He used the hand held Sony FE 200-600mm f/5.6-6.3 G OSS lens (at 582mm) and The One, the Sony Alpha 1 Mirrorless digital camera. ISO 1000. Exposure determined via Zebras with ISO on the rear dial: 1/2000 sec. at f/6.3 (wide open) in Manual mode. AWB at 4:46pm on a sunny afternoon.
Wide/AF-C was active at the moment of exposure and nailed the focus. Click on the image to see a larger version.
Turkey Vulture in flight
Image courtesy of and copyright 2021 Bob Eastman
|
Saved by the Alpha a1
Bob started e-mailing me about five months ago — I can’t make a single sharp flight shot with my 200-600. I have your SONY Guide and I think that I have everything set up just right but I am worried that I don’t … I asked, With what body Bob? He answered, ‘The a7r iv.” “You are not doing anything wrong, Bob; as I have been saying on the blog for a year, the a7r iv simply does not play well with the 200-600. The a9 ii does just fine.”
Anyhoo, Bob ordered a Sony Alpha a1 from Bedfords and saved a very handsome $194.94 by using the BIRDSASART discount code at checkout. That qualified him for a free subscription to the SONY Alpha a1 Set-up and Info Group. He set up his a1 according to the gospel, headed out, and made this fabulous flight image during his first photo session with the new body!
Note: this image was cropped from a horizontal original.
Sony Alpha a1 AF Magic …
The AF system of the a1 — set up as detailed in e-mails to the Sony Alpha a1 Info & Updates group, continues to amaze me. Early on, there was lots of discussion within the group with many preferring multiple back button approaches. For me a simple shutter button approach with the right AF settings that yield 99% sharp-on-the-eye images is best. By far. It is super-simple and mega-effective. Note: info on the program that I use to ascertain SONY AF point information is detailed in one of the SONY Alpha a1 Set-up and Info Group e-mails. I plan on making that information available here soon for all SONY camera users. You guessed it, I am working on a guide. 🙂
SONY Alpha a1 Set-up and Info Group
The SONY Alpha a1 Set-up and Info Group is going great guns as folks chime in with thoughtful questions and experience-based advice. We are now up to an astounding 35 folks. Early on, we discussed the myriad AF options. I gave my opinion as to the best one for flight and general bird photography. More recently, we have been in contact with folks at SONY sharing our thoughts, experiences, and frustrations with the EVF blackout problem.
All who purchased their Alpha a1 bodies via a BAA affiliate link will receive a free subscription to the Sony Alpha a1 Set-Up and Info Updates after shooting me their receipts via e-mail. (Note: it may take me several days to confirm B&H orders.) This same service may be purchased by anyone with an a1 body via a $150.00 PayPal sent to birdsasart@verizon.net indicating payment for Alpha a1 Info Updates. Alternatively, they can call Jim weekday afternoons at 1-863-692-0906 to pay via credit card. New members will receive composite e-mails that summarize all previous discussions.
Typos
With all blog posts, feel free to e-mail or to leave a comment regarding any typos or errors.
April 23rd, 2021 Whats Up?
Anita North and I visited Stick Marsh on Thursday morning and with a brisk north wind, we did not do very well. Jim picked up Donna Bourdon from the airport and Clemens Van der Werf showed up just in time for yet another grilled fresh tuna dinner on the pool deck. After said dinner, both Anita and Clemens shared images and everyone was in awe of what they saw.
After a bit too much wine we headed down to the lake for sunset and arrived about two minutes too late …
Today is Friday 23 April and we are headed somewhere to photograph from Clemens’ flats boat. Wherever you are, and whatever you are doing, I hope that you have a great day.
This blog post took more than an hour to prepare and makes 121 consecutive days with a new one. Please remember that if an item — a Delkin flash card, for example, is available from B&H and/or Bedfords and is also available in the BAA Online Store, that it would be great if you purchase from us. We will match any price. Please remember also to use my B&H affiliate links or to save money at Bedfords by using the BIRDSASART discount code at checkout. Doing either often earns you free guides and/or discounts. And doing so always earns my great appreciation.
Please Remember
With income from IPTs now at zero, please, if you enjoy and learn from the blog, remember to use one of my two affiliate programs when purchasing new gear. Doing so just might make it possible for me to avoid having to try to get a job as a Walmart greeter and will not cost you a single penny more. And if you use Bedfords and remember to enter the BIRDSASART code at checkout, you will save 3% on every order and enjoy free second-day air shipping. In these crazy times — I am out at least forty to sixty thousand dollars so far due to COVID 19 (with lots more to come) — remembering to use my B&H link or to shop at Bedfords will help me out a ton and be greatly appreciated. Overseas folks who cannot order from the US because of import fees, duties, and taxes, are invited to help out by clicking here to leave a blog thank you gift if they see fit.
New and Better Bedfords Discount Policy!
You can now save 3% on all of your Bedfords photo gear purchases by entering the BIRDSASART coupon code at checkout. Your discount will be applied to your pre-tax total. In addition, by using the code you will get 2nd day air shipping via Fed Ex.
Grab a Nikon AF-S Teleconverter TC-14E III and save $14.99. Purchase a Canon EOS R5 and your discount will be $116.97. Purchase a Sony FE 600mm f/4 GM OSS lens and save a remarkable $389.94! Your Bedford’s purchase no longer needs to be greater than $1,000.00 for you to receive a discount. The more you spend, the more you save.
Money Saving Reminder
Many have learned that if you need a hot photo item that is out of stock at B&H and would enjoy free second-day air shipping, your best bet is to click here, place an order with Bedfords, and enter the coupon code BIRDSASART at checkout. If an item is out of stock, contact Steve Elkins via e-mail or on his cell phone at (479) 381-2592 (Central time). Be sure to mention the BIRDSASART coupon code and use it for your online order to save 3% and enjoy free 2nd-day air shipping. Steve has been great at getting folks the hot items that are out of stock at B&H and everywhere else. The wait lists at the big stores can be a year or longer for the hard to get items. Steve will surely get you your gear long before that. For the past year, he has been helping BAA Blog folks get their hands on items like the SONY a9 ii, the SONY 200-600 G OSS lens, the Canon EOS R5, the Canon RF 100-500mm lens, and the Nikon 500mm PF. Steve is personable, helpful, and eager to please.


Gear Questions and Advice
Too many folks attending BAA IPTs (remember those?) and dozens of photographers whom I see in the field and on BPN, are–out of ignorance–using the wrong gear especially when it comes to tripods and more especially, tripod heads… Please know that I am always glad to answer your gear questions via e-mail. Those questions might deal with systems, camera bodies, accessories, and/or lens choices and decisions.
Price Drop
Canon EOS-1DX Mark II Professional Digital Camera Body (with great extras!)
Price reduced $200.00 22 APR 2021
IPT veteran William Wingfield is offering a Canon EOS-1DX Mark II camera in near-mint condition with lots of extras for $2198.00 (was $2398.00). The sale includes the front lens cap, one extra battery, the battery charger, the original box, the manual, three CFast cards (two @ 128GB and 1@ 64GB), the CFast reader, One @ 64 GB CF card, and insured ground shipping via major courier to lower-48 US addresses only. Your item will not ship until your check clears unless other arrangements are made.
Please contact Bill via e-mail or by phone at 1-843-729-6670 (Eastern time zone).
The 1DX Mark II is a rugged, blazingly fast Canon professional digital camera body. It features an amazing AF system and high quality image files with great dynamic range. When he used Canon, it was the first choice of Arash Hazeghi, one of the world’s premier birds-in-flight photographers. This body is still in production and currently sells new for $4,499.00. Save a very sweet $2301.00 by grabbing Bill’s dSLR ASAP. artie
Wildflower Identification
Identifying wildflowers is a tricky business. There are often dozens of different species with similar looking flowers that can only be identified by keying out — identifying a large array of characteristics of both the blossom and the plant itself. Tickseeds are a perfect example. While I love photographing wildflowers, I have neither the time nor the inclination to do the hard work necessary to positively identify a given flower. Some plant IDs seem fairly simple (and a very few actually are). That is to say that once you match the flower to the photo or drawing in one of the many ID guides, you actually know what the flower is. Or not.
The identification of the waterlily seen in both of today’s featured images seem straightforward to this beginner. Both the leaves and the flowers match their descriptions in Roger L. Hammer’s very excellent Complete Guide to Florida Wildflowers. (FYI: like pretty much all of the wildflower guides for a given state or region this one is far, far from being complete — there are just too many different species to cover in a single volume.)
Now, here is the strangest thing to me (as explained by my friend John Bradford). Once you think you have identified a given plant or flower, say Tropical Royalblue Waterlily (Nymphaea elegans), you need to check the ISB Atlas of Florida Plants and see if a specimen of that species has been collected (and certified?) for your county (in this case, Polk County). My understanding is that even if the species has been documented in surrounding counties, you cannot be sure of your ID or sure that the plant you are trying to identify positively is truly wild, in other words, that it did not spread to your county from a garden or a collection.
So I guess that I will have to go on photographing beautiful flowers without ever being sure of exactly what I am photographing.
A Matter of Perspective
I love that both of today’s feature images are of the same subject (whatever it is). Image #1 is the small-in-the-frame shot, Image #2 is the clean, tight, and graphic view. I know which one I think is stronger. If you can think of a better title for this blog post, one that emphasizes the huge difference in perspective of the two images, please leave it in a comment.
The Laowa Tripod Collar
As detailed here previously, the tripod collar for the Venus Optics Laowa 100mm f/2.8 2X Ultra Macro APO Lens for Sony E is a complete joke as there is no place on the lens to firmly seat the collar. In order to make an image, you need to do quite a bit of jury-rigging. I use some tape to firm things up. After that, you have to be meticulously careful when setting up the shot lest you move the lens and throw off the focus. The big attraction of this lens is getting to two times life size. For all the difficulty of using it, the results can be spectacular.
You can learn more by doing a search for “Laowa” in the little white search box on the top right of each blog post page.
Typos
With all blog posts, feel free to e-mail or to leave a comment regarding any typos or errors.
April 22nd, 2021 What’s Up?
Anita North and I spent two cloudy hours with the growing crane chicks on Wednesday morning. In the afternoon, we took an airboat ride and learned some important lessons. Airboats have no way of slowing down as there is no reverse. Anchoring an airboat is a lengthy procedure. With their flat bottoms, airboat are not very stable. As you might have figured out by now, bird photography from an airboat is pretty much a losing proposition.
Today is Thursday 22 April. The forecast for Fellsmere is for clear with gentle north winds switching early to northeast. We will be heading to Stick Marsh at about 6am. Clemens Van der Werf is coming up with his flats boat midday, and Jim is picking up Donna Bourdon at MCO at 2pm. I will enjoy three days of busman’s holiday photography. Then Donna and I head over to Gulfport for the second DeSoto IPT. We are now pretty much set at four: Donna, IPT veterans Jim Miller, Shelly Lake, and Jake Levin. But there are still two openings; I would love to have you along. Wherever you are, and whatever you are doing, I hope that you have a great day.
This blog post took more than an hour to prepare and makes 120 consecutive days with a new one. Please remember that if an item — a Delkin flash card, for example, is available from B&H and/or Bedfords and is also available in the BAA Online Store, that it would be great if you purchase from us. We will match any price. Please remember also to use my B&H affiliate links or to save money at Bedfords by using the BIRDSASART discount code at checkout. Doing either often earns you free guides and/or discounts. And doing so always earns my great appreciation.
Please Remember
With income from IPTs now at zero, please, if you enjoy and learn from the blog, remember to use one of my two affiliate programs when purchasing new gear. Doing so just might make it possible for me to avoid having to try to get a job as a Walmart greeter and will not cost you a single penny more. And if you use Bedfords and remember to enter the BIRDSASART code at checkout, you will save 3% on every order and enjoy free second-day air shipping. In these crazy times — I am out at least forty to sixty thousand dollars so far due to COVID 19 (with lots more to come) — remembering to use my B&H link or to shop at Bedfords will help me out a ton and be greatly appreciated. Overseas folks who cannot order from the US because of import fees, duties, and taxes, are invited to help out by clicking here to leave a blog thank you gift if they see fit.
New and Better Bedfords Discount Policy!
You can now save 3% on all of your Bedfords photo gear purchases by entering the BIRDSASART coupon code at checkout. Your discount will be applied to your pre-tax total. In addition, by using the code you will get 2nd day air shipping via Fed Ex.
Grab a Nikon AF-S Teleconverter TC-14E III and save $14.99. Purchase a Canon EOS R5 and your discount will be $116.97. Purchase a Sony FE 600mm f/4 GM OSS lens and save a remarkable $389.94! Your Bedford’s purchase no longer needs to be greater than $1,000.00 for you to receive a discount. The more you spend, the more you save.
Money Saving Reminder
Many have learned that if you need a hot photo item that is out of stock at B&H and would enjoy free second-day air shipping, your best bet is to click here, place an order with Bedfords, and enter the coupon code BIRDSASART at checkout. If an item is out of stock, contact Steve Elkins via e-mail or on his cell phone at (479) 381-2592 (Central time). Be sure to mention the BIRDSASART coupon code and use it for your online order to save 3% and enjoy free 2nd-day air shipping. Steve has been great at getting folks the hot items that are out of stock at B&H and everywhere else. The wait lists at the big stores can be a year or longer for the hard to get items. Steve will surely get you your gear long before that. For the past year, he has been helping BAA Blog folks get their hands on items like the SONY a9 ii, the SONY 200-600 G OSS lens, the Canon EOS R5, the Canon RF 100-500mm lens, and the Nikon 500mm PF. Steve is personable, helpful, and eager to please.


Gear Questions and Advice
Too many folks attending BAA IPTs (remember those?) and dozens of photographers whom I see in the field and on BPN, are–out of ignorance–using the wrong gear especially when it comes to tripods and more especially, tripod heads… Please know that I am always glad to answer your gear questions via e-mail. Those questions might deal with systems, camera bodies, accessories, and/or lens choices and decisions.
The Situation
We were all sitting on the wet sand at the end of a long tidal pool where several dozen shorebirds were actively feeding on invertebrates. We stayed for about an hour. The Westerns were the most numerous. We also had some Semipalmated Plovers and Dunlin, a few Sanderling, and a Least Sandpiper or two. The birds move so fast that when we were done, I didn’t think that I had gotten anything good. When I reviewed my images, however, I was quite thrilled. Of my 92 keepers after the first edit, I had three Dunlin images. All the rest were Western Sandpipers.
What’s Going On Here?
When you see groups of sandpipers feeding on a mudflat, you will often see one or more of them tipping forward with their tails up and their heads down. If you know what this behavior is, or would like to make a guess, please leave a comment.
Sony Alpha a1 Crop-ability
Here, I cropped the original image file to a vertical, getting rid of 66.6% of the original pixels. (Photoshop tip: select the 2X3 preset from the Crop Tool dropdown menu.) The image quality of the resulting 63MB master file is superb. As we discussed here and seen fairly recently, if you begin with a sharp, properly exposed image, the large files of the high mega-pixel camera bodies, they will stand up to healthy crops.
|
|
Image #1A: AF Points for the Western Sandpiper molting into breeding plumage image
|
SONY Alpha a1 AF
Set up correctly, the subject detection, face tracking, and animal eye tracking AF system of the a1 is currently second to none. And it kills for flight as well. The results above are typical and can usually be obtained effortlessly. Even though the system was a fraction off the bird’s eye, the eye was laser/razor sharp, and the eye-skin crispy just the way it should be.
Close Enough to Perfect!
With your Sony Alpha a1 set up correctly, the AF system is science-fiction-like (even, as we have seen, at 1200mm). As always, no matter how amazing the AF performance, it is up to the operator to correctly frame the image …
Sony Alpha a1 AF Magic …
The AF system of the a1 — set up as detailed in e-mails to the Sony Alpha a1 Info & Updates group, continues to amaze me. Early on, there was lots of discussion within the group with many preferring multiple back button approaches. For me a simple shutter button approach with the right AF settings that yield 99% sharp-on-the-eye images is best. By far. It is super-simple and mega-effective. Note: info on the program that I use to ascertain SONY AF point information is detailed in one of the SONY Alpha a1 Set-up and Info Group e-mails. I plan on making that information available here soon for all SONY camera users. You guessed it, I am working on a guide. 🙂
SONY Alpha a1 Set-up and Info Group
The SONY Alpha a1 Set-up and Info Group is going great guns as folks chime in with thoughtful questions and experience-based advice. We are now up to an astounding 35 folks. Early on, we discussed the myriad AF options. I gave my opinion as to the best one for flight and general bird photography. More recently, we have been in contact with folks at SONY sharing our thoughts, experiences, and frustrations with the EVF blackout problem.
All who purchased their Alpha a1 bodies via a BAA affiliate link will receive a free subscription to the Sony Alpha a1 Set-Up and Info Updates after shooting me their receipts via e-mail. (Note: it may take me several days to confirm B&H orders.) This same service may be purchased by anyone with an a1 body via a $150.00 PayPal sent to birdsasart@verizon.net indicating payment for Alpha a1 Info Updates. Alternatively, they can call Jim weekday afternoons at 1-863-692-0906 to pay via credit card. New members will receive composite e-mails that summarize all previous discussions.
Typos
With all blog posts, feel free to e-mail or to leave a comment regarding any typos or errors.
April 21st, 2021 What’s Up?
Tuesday was dark, dingy, overcast, and gray; it rained softly most of the day. I never got down to the lake even once as I had to run lots of errands in town. I answered lots of e-mails and worked on a few images.
Today is Wednesday 21 April 2021. The forecast for this morning is for cloudy with a 10mph northwest wind. I will be heading down to the lake early to check on the three young Sandhill Cranes. Wherever you are, and whatever you are doing, I hope that you have a great day.
This blog post took more than an hour to prepare and makes 119 consecutive days with a new one. Please remember that if an item — a Delkin flash card, for example, is available from B&H and/or Bedfords and is also available in the BAA Online Store, that it would be great if you purchase from us. We will match any price. Please remember also to use my B&H affiliate links or to save money at Bedfords by using the BIRDSASART discount code at checkout. Doing either often earns you free guides and/or discounts. And doing so always earns my great appreciation.
Sales Tax Update
In the blog post here, I covered the site-by-state tax situations with regards to Bedfords, B&H, and the B&H Payboo card. Please understand that all of the tax situations are subject to change at a moment’s notice. For example, the day after that blog post was published, Colorado sent Bedfords a notice that they now have NEXUS, so they had to add CO to their list of sales tax states.
Important Note: If a retailer does not charge sales tax, consumers are (generally) required to self-assess and pay the sales tax to their local state and or city. Individual tax compliance is, of course, a personal choice.
Please Remember
With income from IPTs now at zero, please, if you enjoy and learn from the blog, remember to use one of my two affiliate programs when purchasing new gear. Doing so just might make it possible for me to avoid having to try to get a job as a Walmart greeter and will not cost you a single penny more. And if you use Bedfords and remember to enter the BIRDSASART code at checkout, you will save 3% on every order and enjoy free second-day air shipping. In these crazy times — I am out at least forty to sixty thousand dollars so far due to COVID 19 (with lots more to come) — remembering to use my B&H link or to shop at Bedfords will help me out a ton and be greatly appreciated. Overseas folks who cannot order from the US because of import fees, duties, and taxes, are invited to help out by clicking here to leave a blog thank you gift if they see fit.
New and Better Bedfords Discount Policy!
You can now save 3% on all of your Bedfords photo gear purchases by entering the BIRDSASART coupon code at checkout. Your discount will be applied to your pre-tax total. In addition, by using the code you will get 2nd day air shipping via Fed Ex.
Grab a Nikon AF-S Teleconverter TC-14E III and save $14.99. Purchase a Canon EOS R5 and your discount will be $116.97. Purchase a Sony FE 600mm f/4 GM OSS lens and save a remarkable $389.94! Your Bedford’s purchase no longer needs to be greater than $1,000.00 for you to receive a discount. The more you spend, the more you save.
Money Saving Reminder
Many have learned that if you need a hot photo item that is out of stock at B&H and would enjoy free second-day air shipping, your best bet is to click here, place an order with Bedfords, and enter the coupon code BIRDSASART at checkout. If an item is out of stock, contact Steve Elkins via e-mail or on his cell phone at (479) 381-2592 (Central time). Be sure to mention the BIRDSASART coupon code and use it for your online order to save 3% and enjoy free 2nd-day air shipping. Steve has been great at getting folks the hot items that are out of stock at B&H and everywhere else. The wait lists at the big stores can be a year or longer for the hard to get items. Steve will surely get you your gear long before that. For the past year, he has been helping BAA Blog folks get their hands on items like the SONY a9 ii, the SONY 200-600 G OSS lens, the Canon EOS R5, the Canon RF 100-500mm lens, and the Nikon 500mm PF. Steve is personable, helpful, and eager to please.


Gear Questions and Advice
Too many folks attending BAA IPTs (remember those?) and dozens of photographers whom I see in the field and on BPN, are–out of ignorance–using the wrong gear especially when it comes to tripods and more especially, tripod heads… Please know that I am always glad to answer your gear questions via e-mail. Those questions might deal with systems, camera bodies, accessories, and/or lens choices and decisions.
|
|
|
This image was created in Katchemak Bay, AK — across from Homer — on one of the two 2020 Bald Eagle IPTS. I used the hand held Sony FE 70-200mm f/2.8 GM OSS lens (at 170mm) and the former AF King, the Sony Alpha a9 II Mirrorless Digital Camera Body. ISO 500. Exposure determined via t\Zebras with ISO on the Thumb Wheel: 1/3200 sec. at f/3.2 (stopped down 1/3 stop)in Manual (M) mode. AWB at 3:08am on a cloudy afternoon.
Center Zone AI Servo AF was active at the moment of exposure and performed perfectly. Click on the image to enjoy a larger version.
Bald Eagle perfect t-shot
|
Perfect Tee Shots Golf
Not many know that in my early twenties I was a pretty fair golfer. My home course was Marine Park in Brooklyn, built on a garbage dump near the Kings Plaza Mall. As a senior, I was captain of the Brooklyn College golf team. Though a four-handicap at my best, I always choked in the big tournaments. One year, I missed qualifying for the second round of the New York State Public Links Championship by one stroke. After starting with a triple bogey seven on a short par four (with three balls in the water on one hole!), I played the best seventeen holes of my life on a tough course to shoot 80. Ask me someday about the late Dom Ferrone, who — as a huge long-shot, won the MGA Intercollegiate Championship in 1968. He became the head teaching pro at Calloway Gardens for several decades, and like Luis Grunauer, died too young. He called me “Boom-boom.”
That brings us to the perfect tee shot. For me, that was a 300-yard fade right down the middle of the fairway. I was always long, but not always straight.
While searching the web for info on Dom, I came across this link to an interview article for SaviorLabs as an Edge of Innovation Podcast that I did more than three years ago with : Living the Dream as a Nature Photographer With Arthur Morris, by Paul Parisi. You can read it or listen. I just read the whole thing and found it quite interesting, especially the part about my sixth grade teacher, Mrs.McMenamin. It’s short and a great read. And Paul has a great voice.
In my early twenties, I had the great pleasure of playing many rounds with the late Charlie Owens, a Black paratrooper who played on the PGA and the Senior Tour, once winning two of three events on the latter. While checking him out as I worked on this blog post, I learned that he died in 2017 at age 85 while living in Winter Haven, FL, just 45 minutes from my home. I would have loved to have visited him.
Perfect T-Shots in Bird Photography
In bird photography a t-shot is an image of a bird in flight that is flying directly overhead. They usually work best when the bird is gliding with flat wings rather than when flapping. In a perfect world, the bird’s wings are symmetrical. Todays’ featured image checks all the boxes.
What Do Snow and White Sand Have in Common?
Both snow and light-toned sand can act as reflectors that light the underwings of birds in flight, even on cloudy days (as with today’s featured image). I schedule my Homer IPTs (2022 dates to be announced soon) very early, in hopes of photographing during a blizzard 🙂 and in hopes of having snow on the ground. Aside from acting as a reflector, fresh snow makes for clean, gorgeous, studio-like backgrounds.
Image Question
Should I have placed this bird a bit lower in the frame? Why or why not?
|
|
|
144 sold to rave reviews.
The SONY e-Guide by Patrick Sparkman and Arthur Morris
|
The Sony Camera User’s e-Guide (and Videos)
Click here to purchase the guide with one Camera Set-up Video. Be sure to e-mail us by clicking here to specify your camera body so that we can send you a link for the correct video.
Click here to purchase the guide with two Camera Set-up Videos. Be sure to e-mail us by clicking here to specify your two camera bodies so that we can send you links for the correct videos.
Click here to learn more about the SONY e-Guide.
Folks who have used my B&H affiliate links or purchased their SONY gear are invited to e-mail for discount information.
Typos
With all blog posts, feel free to e-mail or to leave a comment regarding any typos or errors.
April 20th, 2021 What’s Up?
On Monday morning, the thunder, lightning, and rain stopped at about 10am. I headed down to the lake at about eleven. The two crane chicks and the large colt were healthy and accounted for. I created a few flower images; none of them were any good. I continued my second and third edits. I deleted 510 raw files from the Homer 2020 folder and 192 from the DEC 2020 folder.
I was shocked to learn of the sudden and unexpected death of my good friend and multiple IPT veteran Luis Grunauer. This e-mail was forwarded to me by mutual friend Albert Ryckman:
With my broken heart this news I’m sharing with you… this is Silvia Grunauer; my husband suffered an aneurysm and a stroke on 3/28. He passed on Sunday 4/11.
I am sending love, strength, energy, and a big hug to Silvia and the rest of the Grunauer family. (I called yesterday, but was unable to reach her.)
Luis was as nice and as enthusiastic person as you would ever hope to run into. He will be missed by all who were lucky enough to know him. Rest in peace my little brother.
Today is Tuesday 20 April. It is still, humid, and grey out. Wherever you are, and whatever you are doing, I hope that you have a great day.
This blog post took more than two hours to prepare and makes 118 consecutive days with a new one. Please remember to use my B&H affiliate links or to save money at Bedfords by using the BIRDSASART discount code at checkout. Doing either often earns you free guides or discounts. And doing so always earns my great appreciation.
Please Remember
With income from IPTs now at zero, please, if you enjoy and learn from the blog, remember to use one of my two affiliate programs when purchasing new gear. Doing so just might make it possible for me to avoid having to try to get a job as a Walmart greeter and will not cost you a single penny more. And if you use Bedfords and remember to enter the BIRDSASART code at checkout, you will save 3% on every order and enjoy free second-day air shipping. In these crazy times — I am out at least forty to sixty thousand dollars so far due to COVID 19 (with lots more to come) — remembering to use my B&H link or to shop at Bedfords will help me out a ton and be greatly appreciated. Overseas folks who cannot order from the US because of import fees, duties, and taxes, are invited to help out by clicking here to leave a blog thank you gift if they see fit.
New and Better Bedfords Discount Policy!
You can now save 3% on all of your Bedfords photo gear purchases by entering the BIRDSASART coupon code at checkout. Your discount will be applied to your pre-tax total. In addition, by using the code you will get 2nd day air shipping via Fed Ex.
Grab a Nikon AF-S Teleconverter TC-14E III and save $14.99. Purchase a Canon EOS R5 and your discount will be $116.97. Purchase a Sony FE 600mm f/4 GM OSS lens and save a remarkable $389.94! Your Bedford’s purchase no longer needs to be greater than $1,000.00 for you to receive a discount. The more you spend, the more you save.
Money Saving Reminder
Many have learned that if you need a hot photo item that is out of stock at B&H and would enjoy free second-day air shipping, your best bet is to click here, place an order with Bedfords, and enter the coupon code BIRDSASART at checkout. If an item is out of stock, contact Steve Elkins via e-mail or on his cell phone at (479) 381-2592 (Central time). Be sure to mention the BIRDSASART coupon code and use it for your online order to save 3% and enjoy free 2nd-day air shipping. Steve has been great at getting folks the hot items that are out of stock at B&H and everywhere else. The wait lists at the big stores can be a year or longer for the hard to get items. Steve will surely get you your gear long before that. For the past year, he has been helping BAA Blog folks get their hands on items like the SONY a9 ii, the SONY 200-600 G OSS lens, the Canon EOS R5, the Canon RF 100-500mm lens, and the Nikon 500mm PF. Steve is personable, helpful, and eager to please.


Gear Questions and Advice
Too many folks attending BAA IPTs (remember those?) and dozens of photographers whom I see in the field and on BPN, are–out of ignorance–using the wrong gear especially when it comes to tripods and more especially, tripod heads… Please know that I am always glad to answer your gear questions via e-mail. Those questions might deal with systems, camera bodies, accessories, and/or lens choices and decisions.
|
|
|
This image was created on Clemens Van der Werf’s flats boat on 2 February 2021. I used the hand held Canon RF 100-500mm f/4.5-7.1L IS USM lens (at 500mm) and the highly touted 45MP Canon EOS R5 Mirrorless Digital camera body. ISO 1000. Exposure determined via test image and blinkies evaluation: 1/2500 sec. at f/7.1 (wide open) in Manual (M) mode. AWB at 4:02am on a partly cloudy afternoon.
Zone AI Servo AF (as detailed in the R5 e-Guide) was active at the moment of exposure and performed perfectly. Click on the image to enjoy a larger version.
Image #1: Osprey with wings raised after landing
|
Lake Blue Cypress for Ospreys
Lake Blue Cypress is an incredibly gorgeous location. It often seems that every dead or dying Cypress tree has an Osprey nest on it. The bad news is that you need some type of watercraft to photograph there. For me, boats are like dogs. I love dogs, as long as they are not mine (and I don’t have to walk them) … Thanks, Clemens!
|
|
|
Cover Image courtesy of and Copyright 2021 Brian Sump (Sump scores!)
|
The BIRDS AS ART Canon EOS R5 Camera User’s e-Guide: $75.00
The guide is 82 pages long: 21,458 words. More than 50 DPP 4 Autofocus-depicting screen captures. And a 31 minute 44 second educational video. This guide took three and a half months of hard work and a ton of help from at least seventeen very helpful and generous folks.
The guide covers — in great detail — all Menu Items that are relevant to bird, nature, and wildlife photography. It does not cover video. The section on AF methods and the AF Gallery has been expanded from the R5/R6 AF e-guide. It remains the one of the great strengths of this guide. I share my thoughts on what I am sure is the single best AF Method for photographing birds in flight. As most of you know, the guide includes a simple and easy way to change AF Methods that was introduced to me by Geoff Newhouse. In the AF Gallery you will see exactly how Face Detection plus Tracking AF works. In the Educational R5 Gallery video, I share my favorite R5 images along with dozens of bird photography tips and techniques.
In addition, I teach you how to get the best exposures with your R5. Detailed instructions on using the great In-camera HDR and Multiple Exposure features will be appreciated by creative folks who like to have fun. The three shutter modes are explained in detail as well. Bruce Dudek solved the can’t-get-to-Auto ISO problem that had stumped everyone at Canon. This information is of course shared in the guide. You will learn how to set up your EVF (Electronic Viewfinder) and Screen toggle options. Not to mention that the mysterious performance of the Q Button is revealed and simplified. Brian Sump’s images reveal how well you can do when using the R5 with EF lenses using one of the three Canon EF-EOS R Mount Adapters (as Donna did with Image #1 below). You will learn how I use Customize Dials to put either ISO or EC on the Thumb Dial and how to set up and save Custom Shooting Modes (C1-C3) that can remember both your Customize Dial and Customize Button settings! That is something that none of the SONY bodies do. 🙁 Near the end of the guide I share my all-important MY MENU items with you.
Like all BAA educational materials, the R5 guide is written in my informal, easy-to-follow style. I am quite proud of this guide and look forward to hearing your thoughts on our hard work.
You can purchase your copy of the BIRDS AS ART Canon EOS R5 Camera User’s e-Guide for $75.00 here in the BAA Online Store or by calling Jim in the office weekday afternoons at 863-692-0906 with your credit card in hand.
|
|
Image #1A: Topaz Sharpen AI on the face of the Osprey with wings raised after landing image
|
Topaz Sharpen AI
I have been learning recently that even with accurately focused, tack-sharp images made at relatively high shutter speeds (like 1/3200 and 1/2500 second), Topaz Sharpen AI (on Auto) can almost always detect some motion blur and re-align the offending pixels. At times, as with today’s Image #1, the improvement can be dramatic. Before bringing this image into Sharpen AI, I ran Topaz Denoise AI as the first step in my workflow after opening the (Capture One-) converted TIF file in Photoshop.
Great Topaz News!
Folks who use the BAA Topaz link to purchase Sharpen AI, DeNoise AI, or the Utility Bundle (or any other Topaz plug-ins), will receive a 15% discount by entering the ARTHUR15 code at checkout. If the stuff is on sale (as it usually is), you save 15% off of the sale price! To get the discount you must use my link and you must enter the discount code. Be sure to start with this link.
Those who purchase Sharpen AI, DeNoise AI, or any other Topaz plug-ins using my link and then entering the ARTHUR15 code at checkout can e-mail to request a short Getting Started with Topaz e-Guide. Please include a copy of your Topaz receipt that shows the discount. Aside from the basics, the guide explains how to install the plug-ins so that they appear in the Photoshop Filter Menu.
|
|
|
This image was created by Colin Driscoll of Lake Macquarie, Australia. Working from the back deck of his home, he used the tripod mounted Canon EF 600mm f/4L IS III USM lens with the Canon Mount Adapter EF-EOS R, the Canon Extender EF 2X III,, and the highly-touted 45MP Canon EOS R5 Mirrorless Digital Camera Body. ISO 1250. Evaluative metering +1 stop: 1/3200 sec. at f/9 in Shutter Priority AE mode. AWB at 4:02am on a partly cloudy afternoon.
Face Detection plus Tracking AI Servo AF was active at the moment of exposure and performed perfectly.
Image #2: Osprey taking flight
Image courtesy of and copyright 2021: Colin Driscoll
Crop and post processing by BIRDS AS ART
|
Learning a Ton from Colin’s Osprey Image
I ran across Colin’s version of Image #2 here in the Avian Forum on BirdPhotographers.Net. It was obvious to all who commented that there was something rotten in Denmark. The challenge was to figure out the cause of the unsharpness and the poor image quality. Toward that end, I asked Colin to shoot me the raw (CR.3) file via a large file sending service. He did. Whether or not you own an R5, I urge you to visit the thread to see what I learned from examining and re-processing the raw file. In the comments, there are probably a dozen important and basic bird photography lessons. If you would like to see my complete analysis including the screen captures, please click here to shoot me an e-mail requesting same.
The Resulting e-Mail Exchange
AM: Hi Colin, It is good to hear back from you. Thanks for being open to learning.
CD: Thanks so much for the invaluable insights.
AM: YAW.
CD: You saved me from the embarrassment of sending the body to Canon and having them return it with a charge!
AM 🙂
CD: As I noted on BPN, because of a very demanding work load I have little opportunity to go out on photo shoots. Yet I desperately wish to get to a high standard.
AM: Understood about work! Wanting to improve is key.
CD: So the process is a bit slow. One benefit of my job is that the gear is tax deductible because it is also used in my job — I either buy good gear or pay more tax, easy choice.
AM: That is good. When I talked with Brian Sump yesterday, we both spoke of times when we feel that we cannot make a good image and that we should throw our gear in the nearest lake. And Brian made a good point on the thread that it often takes a while to get in sync with one’s new gear.
CD: Brian, your shots with similar gear are a great motivation.
AM: For sure. That is why one of Brian’s images was chosen to grace the cover of the R5 guide.
CD: You’ve been quiet, Daniel, but you are a humbling inspiration and an example of the rule that it is the photographer first and gear second, love your work.
Note: BPN Super-moderator Daniel Cadieux was copied on my original e-mail to Colin; he has been busy at work.
AM: Ditto on that. I have featured Daniel’s extraordinary work with his Canon EOS 7D and then 7D II on the blog many times.
With thanks and love to all, a
artie
BirdPhotogrpahers.Net
BPN, where honest critiques are done gently. And it ain’t just birds! If you are honestly interested in improving your skills as a nature photographer, investing in a BPN membership, posting images, and commenting on the image of others, will surely be the best $40 you have ever spent on photography. Click here to become a BPN member. Right now, there are some amazing images on the first page of Avian.
Typos
With all blog posts, feel free to e-mail or to leave a comment regarding any typos or errors.
April 19th, 2021 IR Survey
However you feel about infrared (IR) photography — love it, hate it, or could care less, please leave a comment and let us know why. Those who like it, are invited to let us know their thoughts on which of today’s five featured images they feel is the strongest of the lot.
What’s Up?
On Sunday morning, I played around with a group of adult cranes with the 600 f/4G lens on the ground on a Skimmer II and re-learned an important lesson: sometimes low can be too low … I plan to be using the Skimmer at lot at DeSoto; they are currently out of stock so please e-mail if you would like us to get one for you.
I did two more second edits, JAN & FEB 2021. I deleted another 1501 images. (January must have been a third edit …) You can learn how I pick my first round keepers in the The Laughing Gull/Red Knot (and more) DeSoto Picking Your Keepers Video.
I’ve been swimming every day in a delightfully warm pool. A few weeks ago, I cut back from 64 to 44 lengths and my shoulders have appreciated that change a lot.
Today is Monday 19 April. The weatherman finally got it right. The scattered thunderstorms have been parked over and pounding away at ILE since 3am with no signs of abating any time soon. If they do, I will head down to the lakeshore to check out the puddles. Wherever you are, and whatever you are doing, I hope that you have a great day.
This blog post took about an hour to prepare and makes 117 consecutive days with a new one. Please remember to use my B&H affiliate links or to save money at Bedfords by using the BIRDSASART discount code at checkout. Doing either often earns you free guides or discounts, and always earns my great appreciation.
The BAA Used Gear Page
The Used Gear page continues to be very active. The BAA Used Gear Page is the place to sell your used photographic equipment. We will help you to get your gear sold quickly for 20 to 60% or more than what the big guys are offering … Doubt me? Check out the Recent Sales list for the past eleven months at the bottom of the page.
IR Price Drop
Canon EOS 5D Mark III dSLR Converted to Infrared (with Extras)
Price reduced $100.00 8 MAR 2021
Price reduced $100.00 18 APR 2021
BIRDS AS ART friend and multiple-IPT veteran Morris Herstein is offering a Canon EOS 5D Mark III dSLR converted to infrared (830 nanometers) by Life Pixel in excellent plus condition with extras for $799.00 (was $999.00). The sale includes two Canon LP-E6N batteries, the charger, the front body cap, two Lexar 128GB 1066X flash cards, and insured ground shipping via major courier to lower-48 US addresses only. Your item will not ship until your check clears unless other arrangements are made.
Please contact Morris via e-mail.
When I shot Canon exclusively, I had a ton of fun making landscapes, tree-scapes, and cloud-scapes with a 5D Mark II that had been converted to infrared. The 5D III is a step up from that. These infrared-converted bodies pair well with the 24-105 and any of the 70-200s. artie
Re-Runs
Canon EOS-1DX Mark II Professional Digital Camera Body (with great extras!)
IPT veteran William Wingfield is offering a Canon EOS-1DX Mark II camera in near-mint condition with lots of extras for $2398.00. The sale includes the front lens cap, one extra battery, the battery charger, the original box, the manual, three CFast cards (two @ 128GB and 1@ 64GB), the CFast reader, One @ 64 GB CF card, and insured ground shipping via major courier to lower-48 US addresses only. Your item will not ship until your check clears unless other arrangements are made.
Please contact Bill via e-mail or by phone at 1-843-729-6670 (Eastern time zone).
The 1DX Mark II is a rugged, blazingly fast Canon professional digital camera body. It features an amazing AF system and high quality image files with great dynamic range. When he used Canon, it was the first choice of Arash Hazeghi, one of the world’s premier birds-in-flight photographers. This body is still in production and currently sells new for $4,499.00. Save a very sweet $2101.00 by grabbing Bill’s dSLR ASAP. artie
Canon 100-400mm f/4.5-5.6L IS II USM Lens
Sold 19 APR 2021
William Wingfield is offering a Canon 100-400mm f/4.5-5.6L IS II USM lens in like-new condition for $1499.00. The sale includes the front and rear lens caps, the tough fabric lens case, the original box, and insured ground shipping via major courier to lower-48 US addresses only. Your item will not ship until your check clears unless other arrangements are made.
Please contact Bill via e-mail or by phone at 1-843-729-6670 (Eastern time zone).
This incredibly versatile zoom lens — with its amazing .98 meter close focus — was my favorite Canon telephoto zoom lens ever. By far. It is great for tight portraits, birds in flight, quasi-macro stuff, and lots more. It sells new for $2399.00 so you can save some hard cash by grabbing Bill’s pretty much new lens now. artie
Canon EOS R Mirrorless Digital Camera Body
Sold 19 APR 2021
Ted Keltz is offering a Canon EOS R Mirrorless Digital Camera body in like-new condition for a very low $1199.00. The sale includes the body, the body cap, the battery, the battery charger, the original camera strap, the original printed manual, and insured ground shipping via UPS to lower-48 US addresses only. Your item will not ship until your check clears unless other arrangements are made.
Please contact Ted via e-mail.
A new EOS R5 costs $3899.00. A new EOS R goes for $1799.00. I have had several folks on IPT who used their EOS R bodies with great success using the Standard Canon Mount Adapter EF-EOS R with Canon EF super-telephoto lenses, with both TCs! Grabbing Ted’s practically new EOS R would be a great way to get started with Canon mirrorless while saving some handsome dollars. artie
|

|
|
This image was created on the second Palouse IPT with the hand held Canon EF 11-24mm f/4L USM lens (at 14mm) and an EOS-5D Mark II converted to Infrared at 720nm by Kolari Vision. Evaluative metering +1 1/3 stops: 1/500 sec. at f/11. Custom WB.
Center AF point/One Shot/Shutter Button AF as framed. Click on the image to see a larger version.
Image #1: Modern Grain Elevators/Infrared Capture
|
|

|
|
This image was created on the first Palouse IPT with the hand held Canon EF 11-24mm f/4L USM lens (at 20mm) and an EOS-5D Mark II converted to Infrared at 720nm by Kolari Vision. Evaluative metering +1 stop: 1/1250 sec. at f/9. Custom WB.
Center AF point/One Shot/Shutter Button AF on the branches and recompose while half-pressing the shutter button. Click on the image to see a larger version.
Image #2: Denise’s Tree/Infrared Capture/Image copyright 2015: Arthur Morris/BIRDS AS ART
|
|

|
|
This image was created on the second Palouse IPT with the hand held Canon EF 11-24mm f/4L USM lens (at 11mm) and an EOS-5D Mark II converted to Infrared at 720nm by Kolari Vision. Evaluative metering +1 1/3 stops: 1/200 sec. at f/8. Custom WB.
Center AF point/One Shot/Shutter Button AF on the center of the bridge and recompose while half-pressing the shutter button. Click on the image to see a larger version.
Image #3: Old Railroad Bridge/Infrared Capture
|
|

|
|
This image was created on the first 2016 Palouse IPT with the hand held Canon 24-105mm zoom lens (at 82mm) and the EOS-5D Mark II converted to Infrared by Kolari vision. The old 24-104 is being replaced by the Canon EF 24-105mm f/4L IS II USM lens. ISO 400. Evaluative metering -1/3 stop: 1/250 sec. at f/8. Custom IR WB.
Center AF point/AI Servo Expand/Rear Focus AF on the house and re-compose. Click on the image to see a larger version.
Image #4: Prairie farmhouse/Infrared vertical
|
|

|
|
This image was on Thanksgiving Day at Bosque with the hand held Canon EF 100-400mm f/4.5-5.6L IS II USM lens (at 278mm) and my Kolari Vision-converted EOS-5D Mark II (now effectively replaced by the Canon EOS 5D Mark III.) ISO 800. Evaluative metering +2 stops: 1/800 sec. at f/5.6. Custom WB.
All 9 AF points/AI Servo/Shutter Button AF was active at the moment of exposure (as is always best when hand holding). Click on the image to see a larger version.
Image #5: Red-winged Blackbird flock in front of mountains, Bosque del Apache NWR, NM/IR > B&W
|
Typos
With all blog posts, feel free to e-mail or to leave a comment regarding any typos or errors.
April 18th, 2021 What’s Up?
On Saturday morning I spent some quality time with the quickly growing crane chicks sitting on the ground behind the tilted rear screen of my SONY a1, and then some quality time with the large surviving colt and lots of tickseed blossoms working from the driver’s seat of my SUV, all — because of the heavy overcast — with the 600 f/4 GM.
I began what will be a huge laptop clean-up project by doing the 2nd edit of my March 2021 All folder. I started with 2193 images, deleted 1661 that had made the first cut, and wound up keeping 532 images. Remember my rules for picking your keepers. On the first edit, if you are not sure, keep it. On the second edit, if you are not sure delete it. For the third edit — still to be done for this folder, if you don’t love it, delete it. I will be keeping you abreast of my progress.
Today is Sunday 18 April 2021. The forecast for ILE this morning is for partly cloudy skies with a gentle southwest breeze. With the sun rising in the east/southeast, a southwest wind is not all bad — most of the birds will be square to the back of your camera. I will likely be heading down to the lake at least for a bit.
|
|
Image #1: My Missing Fanny Pack Returns from the Dead
|
Fort DeSoto Miracle Resurrection …
On the first two mornings of the Desoto IPT, we absolutely killed at my back-up morning spot. On the third morning, we decided to try my #1 morning spot. While we were getting our gear ready, I could not find my fanny pack. I did a pretty thorough search of my vehicle, but the rear compartment was such a mess I figured that it was hidden in the clutter. After an amazing morning, we decided to re-visit my back-up spot. We killed there too. On the way back to my vehicle, the three of us –John Johnson, Monte Brown, and yours truly, were chatting.
Suddenly, John turned and called out, “What’s that?” He was pointing at a small black belt pouch on top of an orange watch cap. Both had been placed on the corner of a low concrete wall. Everything was covered in sand. I was thrilled and amazed. I had left my (open) fanny pack on the beach 24 hours ago. Someone must have found it that morning and placed it on the low wall in hopes that the owner — that would be me, would come looking for it. Though it had rained hard that night, everything — including one of my two SONY 1.4X teleconverters was fine. I literally jumped for joy.
Had it not been for the brightly colored watch cap, John might not have made the connection. He gets 51% of the credit for bringing my fanny pack back to me. The other 49% goes to my late-wife Elaine, who has made it a habit of saving me from myself on a regular basis …
|
|
Image #2: Contents of the Fanny Pack
|
Contents of the Fanny Pack
The fanny pack itself was a gift from my late Mother. It surely did not cost much more than ten bucks when it was new twenty years ago. A Carhartt men’s watch cap now costs $16.99.
From left to right starting with the top row:
Paint Brush: $7.99 — used to brush sand off my gear
Set of SONY teleconverter caps: probably about $20.00, but they have been on back order for more than 18 months …
SONY 1.4X teleconverter: $548.00
Spare SONY NP-FZ100 Rechargeable Lithium-Ion Battery: $78.00
P-5 Camera Body plate: $52.00
Teleconverter screw screwdriver — part of a set that costs $59.00
Two pairs of fine tweezers: about $20.00 each
Sharpie indelible silver marking pen: $2.99 — we buy them by the box of twelve
Various Allen Wrenches — a couple of bucks each
The two large ones are needed to tighten the legs on Induro (and other) tripods — one does not do you any good …
Getting the Fanny Pack returned: priceless!
If you’ve ever lost something was eventually and miraculously recovered, please do share your story by leaving a comment.
On the Other Hand
There days ago Anita North put her SONY 200-600/a7r iv rig in a Think Tank lens holster down on the beach at Fort DeSoto and walked down the beach with her tripod-mounted 600 GM/a1. When she returned, the 2-6 was gone. She is hoping still that it might be returned …
I have often left either the 200-600 or the 600 GM on the beach and walked more than a half mile away without giving it a second thought. I will not be doing that any more. If you are reading this and have been hoping to get in touch with the owner, please contact me via e-mail.
Be careful out there …
|
|
|
This image was created on 12 April 2021 on the first DeSoto IPT. I used the Sony FE 600mm f/4 GM OSS lens (with the lens foot resting on the ground) and The One, the Sony Alpha 1 Mirrorless digital camera. ISO 2500. Exposure determined via Zebras with ISO on the rear dial: 1/500 sec. at f/4.5 (stopped down 1/3-stop; should have been wide open) in Manual mode. AWB at 7:36:58am on a still, cloudy morning.
Wide/AF-C was active at the moment of exposure and performed perfectly. Click on the image to see a larger version.
Image #2: Marbled Godwit swimming
|
In the Marbled Godwit Swimming in Heaven blog post here, I wrote:
If you had to delete one of today’s two featured images, each admittedly superb, which one would you put in the trash? Why?
Most of the many folks who commented liked Image #1 better than Image #2. Despite the open bill with the flexible tip and the tiny wavelet behind the swimming birds, if I had to delete one of the two featured images I would have deleted Image #1. Image #2, above here, features a perfect head angle and thus, a connection to the viewer.
You can see what the folks in the Avian Forum on Bird Photographers.Net had to say in my post here.
BPN, where honest critiques are done gently is the best place on the planet to learn to improve as a nature photographer. Membership is only $40/year and it ain’t just birds!
The Fort DeSoto Site Guide
Though a bit long in the tooth (like me), the Fort DeSoto Site Guide will get you to my two favorite morning spots. John Johnson and I recently killed at DeSoto for three straight mornings.
|
|
|
All of the images were created at Fort DeSoto in April or early May. Click on the card to enjoy a larger version.
Fort DeSoto IPT card A
|
Fort DeSoto Spring IPT #2
Fort DeSoto Spring IPT #2. 3 1/2 DAYS. MON 26 APR thru the morning session on THURS 29 APR 2021. $1499 includes three lunches. Limit: 6. Openings: 4.
Not only am I conversant in all three major camera systems used in the US — Nikon, Canon, and SONY (sorry Andy Rouse …), I have used all three within the past four years. Those include both SONY and Canon mirrorless. On both of these IPTs you will learn how to get the best exposure, how to get the most out of your AF system, and how to get close to free and wild birds. And tons more.
|
|
|
All of the images were created at Fort DeSoto in April or early May. Click on the card to enjoy a larger version.
Fort DeSoto IPT card B
|
A $499 deposit is required to hold your spot for this IPT. You can send a check (made out to “BIRDS AS ART) to us here: BIRDS AS ART, PO Box 7245, Indian Lake Estates, FL, 33855, or call Jim or Jennifer at the office with a credit card at 863-692-0906. Your balance, payable only by check, is due immediately after you sign up. If you have any questions, please feel free to contact me via e-mail. If you cancel due to COVID 19 concerns, all of your payments will be refunded.
|
|
|
All of the images were created at Fort DeSoto in April or early May. Click on the card to enjoy a larger version.
Fort DeSoto IPT card C
|
Fort DeSoto Spring IPTs Expected Species
With any luck, we should get to photograph the following species: Laughing, Ring-billed, Herring, and Lesser Black-backed Gull; Royal, Sandwich, and Forster’s Tern: Great, Snowy, and white and dark morph Reddish Egret and Great Blue, Little Blue, and Tricolored Heron; Yellow-crowned Night-Heron, Wood Stork, Roseate Spoonbill, and Brown Pelican. We will see and photograph lots of shorebirds including American Oystercatcher, Black-bellied, Wilson’s, Semipalmated, Snowy, and Piping Plover, Marbled Godwit, Willet, Dunlin, Red Knot, Sanderling, and Western and possibly White-rumped Sandpiper.
Typos
With all blog posts, feel free to e-mail or to leave a comment regarding any typos or errors.
|
|


