December 15th, 2017 Stuff
On Wednesday evening I enjoyed some more dime-a-dozen crane silhouette photography down by the lake and had lots of action on Thursday morning as well. That with a handsome Osprey on The Perch (but not for long!) and lots of foraging Cattle Egrets. I began adding images to the 5D Mark IV User’s Guide and enjoyed a cold, slow, half-mile swim. The air temperature was fine with no wind but the pool was 70.5 degrees. Brrr.
I was glad to learn on Thursday that the sale of Mike Newman’s Canon EF 100mm f2.8/L IS USM macro lens in like-new condition for only $599 is pending (as of the first day of listing).
Once again we ask that you use the BAA Amazon link below for all of your online shopping needs.
Right now two folks are signed up for San Diego #2 with two more interested; San Diego #1 has been sold out for some time. IPT #2 represents an amazing opportunity to enjoy some great bird photography with the spectacular breeding plumage Pacific race of Brown Pelican and to learn from possibly the finest bird photography teacher to ever walk on the planet (he said with all modesty …) This IPT is the first to offer a free morning session the day before the IPT starts. I hope that you can join me.
Yesterday’s Blog Post
I’d still love to hear a few more blatantly honest opinions on yesterday’s image.
Click on the logo-link above for great holiday savings!
$300 off on the Canon 100-400 II!
Facebook
If you have sent me a FB friends request that has gone unrequited, it is because I am up to the 5,000 limit on my personal FB page. You are invited to click here and then Like and Follow the identical content. 🙂
The Streak
Today makes one hundred forty days in a row with a new educational blog post! This one took about two hours to prepare. With all of my upcoming free time (or not …), the plan right now is to break the current record streak of 480 … Good health and good internet connections willing.
Click on the logo-link above
Amazing 5D Mark IV Bundles and Deals
Booking.Com
Booking.Com came through for me twice again recently with both the DeSoto Fall IPT and next July’s UK Puffins, Gannets, and Bempton Pre-trip room reservations. And all the rates were great. If you’d like to give Booking.Com a shot, click here and you will earn a $25 reward. Thanks to the many who have already tried and used this great service.
Gear Questions and Advice
Too many folks attending BAA IPTs and dozens of folks whom I see in the field, and on BPN, are–out of ignorance–using the wrong gear especially when it comes to tripods and more especially, tripod heads… Please know that I am always glad to answer your gear questions via e-mail. Those might include system, camera body, accessory, and lens choices and decisions.
|
|
|
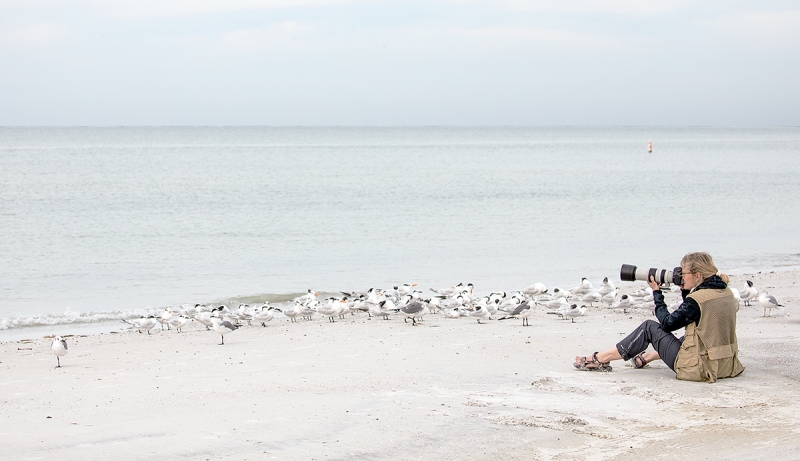
This image was created at Fort DeSoto on the late morning of December 4, 2017 with the hand held Canon EF 100-400mm f/4.5-5.6L IS II USM lens (at 100mm) and my favorite B-roll photography camera body, the Canon EOS 5D Mark IV. ISO 800. Evaluative metering +2 1/3 stops off the gray sky: 1/2000 sec. at f/6.3 in Manual mode. AWB. 11:38am on a cloudy bright day.
LensAlign/FocusTune micro-adjustment: -2.
Center AF Point/AI Servo/Expand Rear button AF on the sitting photographer and re-compose. Click here to see the latest version of the Rear Focus Tutorial. Click on the image to see a larger version.
Photographer working tern/gull pile
|
The Situation
My first location was pretty good in early morning light with an adult and a first year Yellow-crowned Night Heron. My next location was fair to good but certainly not great. I said to Anita North (pictured above), “Let’s take a long, exploratory walk with just the 100-400s. Don’t forget to take our 1.4X TC.” Part of my motivation was to check things out but it was the clouds moving in from the east that sealed the deal. Had it been a clear morning, I would have left the beach at nine am. We walked and walked and were just about to head back to the car when I spotted a small group of terns and gulls resting on the beach. “Let’s go,” I said and we did. We got into position low and slow. In the B-roll image above that I made when the flight photography had petered out after two good hours, Anita is doing lots of things right. She has gotten quite close to the birds without disturbing them. The wind coming over her right shoulder. What little directional light there was was coming over her left shoulder. She is holding the lens well out on the barrel and she is exhibiting perfect knee-pod form. Her 1.4X teleconverter is in a vest pocket. My great preference when headed out for a hand holding session with the 1-4 II (without a tripod) is to unscrew the lens foot with the Wimberley P-10 lens plate (reversed for better balance when on a tripod) and place it in a corner of my Think Tank rolling bag (that stays in my vehicle covered up by my security blankets).
|
|
|
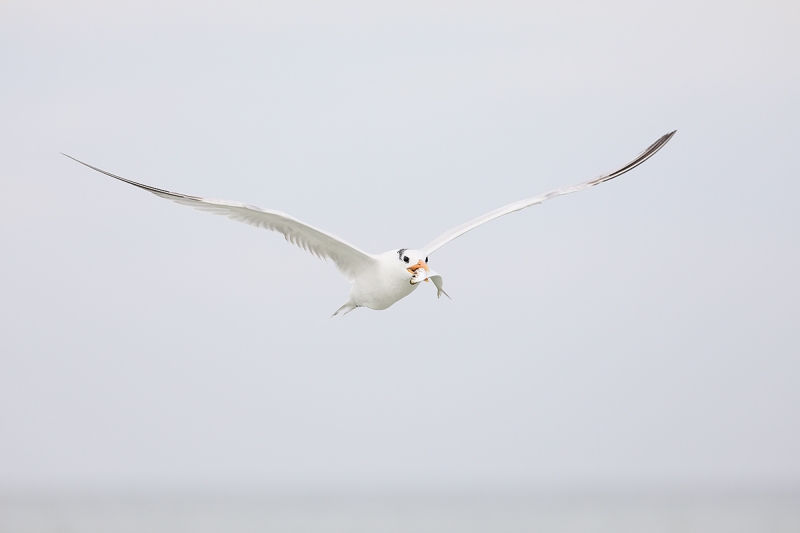
This image was also created at Fort DeSoto on the late morning of December 4, 2017 with the hand held Canon EF 100-400mm f/4.5-5.6L IS II USM lens (at 400mm) and my favorite flight photography camera body, the Canon EOS 5D Mark IV. ISO 800. Evaluative metering +2 1/3 stops off the gray sky: 1/2000 sec. at f/6.3 in Manual mode. AWB. 11:29am on a cloudy bright day.
LensAlign/FocusTune micro-adjustment: -5.
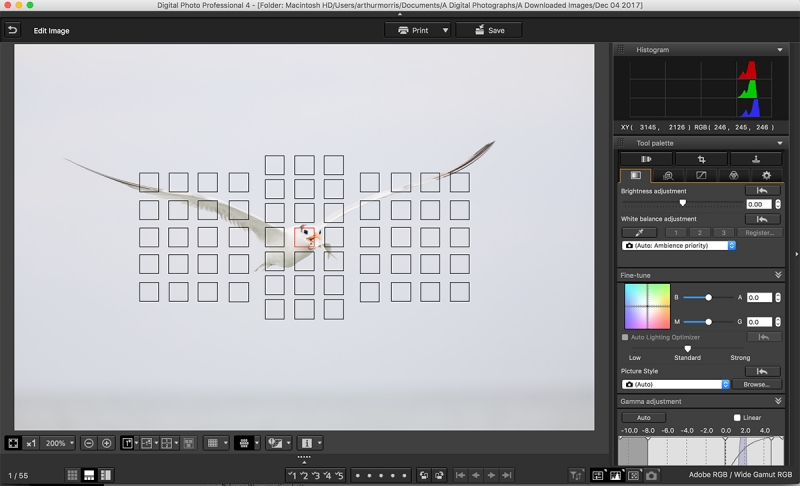
Center AF Point/AI Servo/Expand shutter button AF was active at the moment of exposure. The selected AF point (as seen in the the DPP 4 screen capture below, was squarely on the tern’s face.
Click on the image to enjoy a larger version with more detail.
Royal Tern, winter plumage adult carrying baitfish
|
Tern/Gull Pile Photography Tips: Part I
1-Understand what a good situation is. On a sunny day that means that both the wind and the sun should be at your back. On a cloudy day the wind needs to be at your back, and if the light shows any direction at all, it should also be at your back (or close to it). Do understand that when conditions are bad that making a single good image will be either difficult or impossible.
2-Hand holding for incoming flight is much better than working off a tripod as it is easier to acquire the birds in the frame and to track them in flight. Sitting is better than kneeling is better than standing so that you do not cause an incoming bird to abort. And by shooting up (rather than down) you can often eliminate background birds that are already on the beach.
3-Approach the birds low and slow. At popular beaches like DeSoto the terns and gulls are often quite tame and thus quite approachable. Remember to keep the wind behind you so that the birds are flying and landing toward you.
4-For best results, your teleconverters belong in your pocket, fanny pack, or vest; AF is much faster and more accurate with the lens alone.
5-Unless you are young, strong, talented, skilled, and practiced you will do better with short lenses than with big, long, fast super-telephotos. My two favorite lenses for flight photography are the Canon 100-400mm II and the Canon 400mm f/4 DO II.
6-Get as close as you can without causing any of the birds to move away from you.
7-Understand that the folks walking on the beach and disturbing your flock of birds are the #1 reason that the birds are so tame. And if folks walk right along the shoreline and flush the whole flock that can actually be a huge plus if you are hoping to do flight photography. Why? Nine times out of ten the birds will return to the very spot that they just left giving you multiple chances to photograph the incoming birds. That is exactly what happened on the late morning of December 4, 2017.
8-If you are trying to create images of birds at rest (more on that in additional blog posts soon) and you see an oblivious person or an oblivious couple walking right at your flock and you would like to try to deflect them, here is the best strategy: wave gently at them and call out, “Good morning.” If they slow down or stop and are looking at you, motion them around your position by pointing and asking, “Can you please walk around us?” This is a far better strategy than screaming “Stop you a-holes! You are gonna scare our birds.” Sometimes it works and sometimes it doesn’t. If it does not work and they scare the whole flock, practice loving what is and just say “Good morning.” And then get ready for some good flight photography.
|
|
DPP 4 Screen Capture for today’s featured image
Click on the image so that you can read the fine print.
|
The DPP 4 Screen Capture
Doing Everything Perfectly is Always a Plus
So just what did I do perfectly? The exposure and color balance are perfect with the RGB values for the brightest WHITEs coming in at an almost perfect 246, 245, 246. And — amazingly for me — I got the selected AF point right on the bird’s face and tracked it successfully. Regular readers know that that is something that I do only rarely. After loading my 5D Mark IV ISO 800 recipe the only thing that I did in DPP 4 was to move the Brightness slider one half stop to the left to 0.05. Once I got the image TIF into Photoshop I did not do much. I selected the fish, feathered and saved the selection, put it on its own layer, and sharpened it with a Contrast Mask (Unsharp Mask at 15/65/0). I merged that layer, loaded the selection, and ran a Linear Burn on (again on the fish only). That made the fish’s belly too dark so I added a Regular Layer mask and painted away the dark belly.
Support the Blog
Please help support my (stupendous) efforts here on the blog by remembering to click on the logo link above each time that you shop Amazon. That would be greatly appreciated. with love, artie
|
|
|
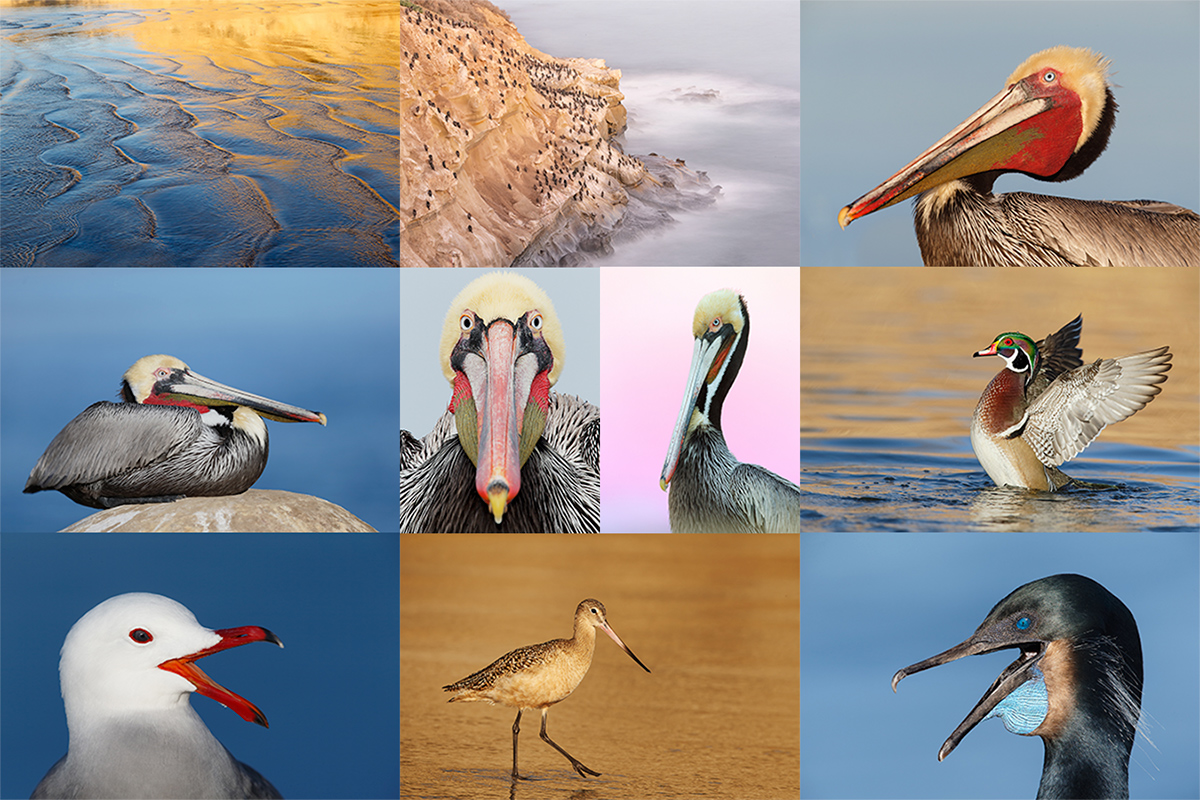
San Diego offers a wealth of very attractive natural history subjects. With annual visits spanning more than three decades I have lot of experience there….
|
With gorgeous subjects just sitting there waiting to have their pictures taken, photographing the pelicans on the cliffs is about as easy as nature photography gets. With the winds from the east almost every morning there is usually some excellent flight photography. And the pelicans are almost always doing something interesting: preening, scratching, bill pouch cleaning, or squabbling. And then there are those crazy head throws that are thought to be a form of intra-flock communication. You can do most of your photography with an 80- or 100-400 lens …
Did I mention that there are wealth of great birds and natural history subjects in San Diego in winter?
|
|
|
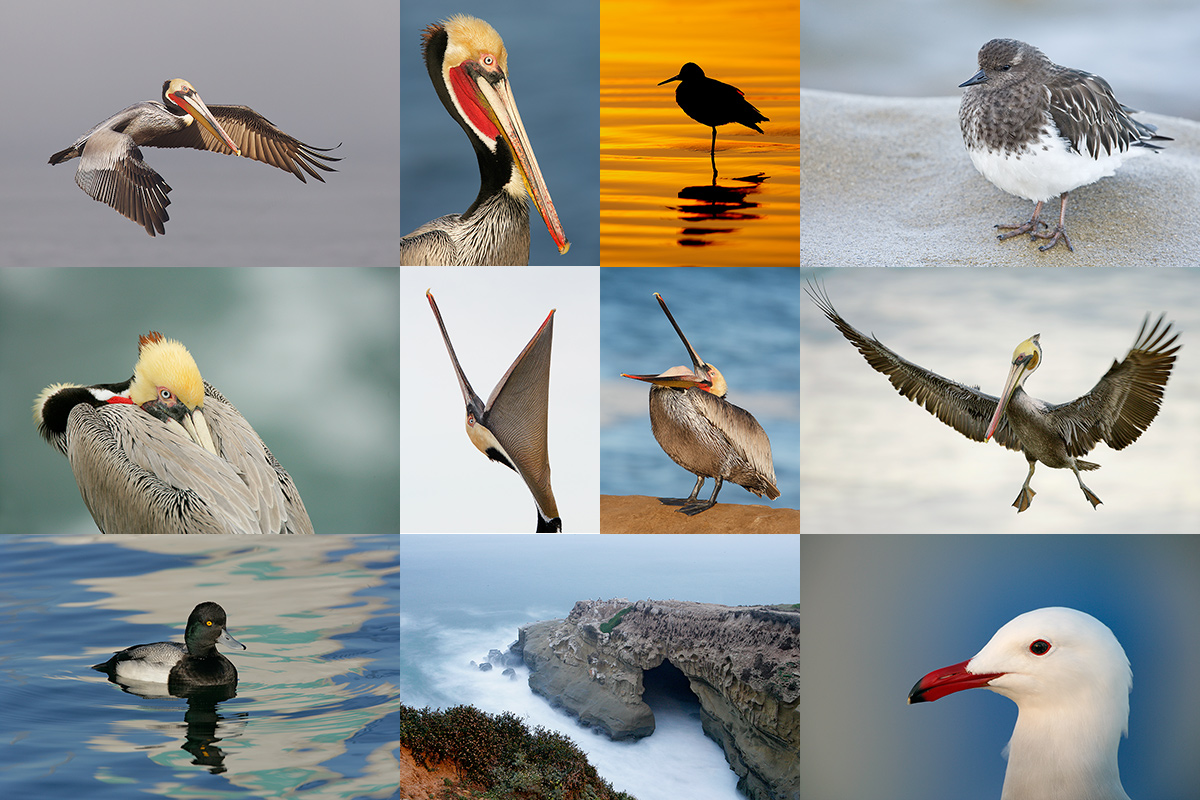
Though the pelicans will be the stars of the show on this IPT there will be many other handsome and captivating subjects in wonderful settings.
|
The San Diego Details
This IPT will include four 3 1/2 hour morning photo sessions, three 2 1/2 hour afternoon photo sessions, three lunches, and after-lunch image review and Photoshop sessions. To ensure early starts, breakfasts will be your responsibility. Dinners are on your own so that we can get some sleep.
A $599 non-refundable deposit is required to hold your slot for this IPT. You can send a check (made out to “Arthur Morris) to us at BIRDS AS ART, PO Box 7245, Indian Lake Estates, FL, 33855. Or call Jim or Jennifer at the office with a credit card at 863-692-0906. Your balance is payable only by check. Please print, complete, and sign the form that is linked to here and shoot it to us along with your deposit check. If you register by phone, please print, complete and sign the form as noted above and either mail it to us or e-mail the scan. If you have any questions, please feel free to contact me via e-mail.
If In Doubt …
If in doubt about using the BAA B&H affiliate link correctly, you can always start your search by clicking here. Please note that the tracking is invisible. Web orders only. Please, however, remember to shoot me your receipt via e-mail.


Please Remember to use my Affiliate Links and to Visit the New BAA Online Store 🙂
To show your appreciation for my continuing efforts here, we ask, as always, that you get in the habit of using my B&H affiliate links on the right side of the blog for all of your photo and electronics purchases. Please check the availability of all photographic accessories in the New BIRDS AS ART Online Store, especially the Mongoose M3.6 tripod head, Wimberley lens plates, Delkin flash cards and accessories, and LensCoat stuff.
As always, we sell only what I have used, have tested, and can depend on. We will not sell you junk. We know what you need to make creating great images easy and fun. And please remember that I am always glad to answer your gear questions via e-mail.
I would of course appreciate your using our B&H affiliate links for all of your major gear, video, and electronic purchases. For the photographic stuff mentioned in the paragraph above, and for everything else in the new store, we, meaning BAA, would of course greatly appreciate your business. Here is a huge thank you to the many who have been using our links on a regular basis and those who will be visiting the New BIRDS AS ART Online Store as well.
Facebook
Be sure to like and follow BAA on Facebook by clicking on the logo link upper right. Tanks a stack.
Typos
In all blog posts and Bulletins, feel free to e-mail or to leave a comment regarding any typos or errors. Just be right :).
December 14th, 2017 Stuff
There was some nice action down at the lake early on Wednesday despite the clear skies and brisk wind from the west/northwest. I photographed the two species of vultures, a female Anhinga on The Perch, and lots of forage Cattle Egrets; beats nothing all to pieces.
It is still cool in central Florida. Yesterday I put a pair of socks on and then pulled my neoprene ankle-high snorkeling socks over them and my feet stayed pretty warm. Today I tried the same thing up top: I put on an orange woolen watch cap and pulled my neoprene snorkeling hat over that. Despite the pool being just a bit over 70 degrees I was able to do my slow half mile — 44 lengths, in relative comfort.
Right now it looks as if only two folks are signed up for San Diego #2 with more interested; San Diego #1 has been sold out for some time. IPT #2 represents an amazing opportunity to enjoy some great bird photography with the spectacular breeding plumage Pacific race of Brown Pelican and to learn from possibly the finest bird photography teacher to ever walk on the planet (he said with all modesty …) This IPT is the first to offer a free morning session the day before the IPT starts. I hope that you can join me.
Click on the logo-link above for great holiday savings!
$300 off on the Canon 100-400 II!
Brand New Listing
Canon EF 100mm f2.8/L IS USM macro Lens
Mike Newman, fresh off the sale of his near-mint 600 II, is offering his Canon EF 100mm f2.8/L IS USM macro lens in like-new condition for only $599. The sale includes the lens hood, the front and rear lens caps, the warranty card, the original product box (with the bar code removed), and insured shipping via the US Postal Service to US addresses only. Your item will not ship until your check clears unless other arrangements are made. Photos are available upon request.
Please contact Mike via e-mail or by phone at (706) 829-8060 (Eastern time).
Both Denise Ippolito and I love this lens for flowers and more. She uses it hand held almost all the time; I am on a tripod about 75% of the time. Different strokes. It is a lightweight super sharp lens. At the MFD of 12 inches it offers true macro at 1:1 magnification. Note: the tripod ring is not included with this lens even when you buy a new one; you can go with the Canon Tripod Mount Ring D for IS 100mm f/2.8L Macro lens or the far less expensive Vello Tripod Collar D (Black) for Canon EF 100mm f/2.8L IS USM Macro lens. artie
Facebook
If you have sent me a FB friends request that has gone unrequited, it is because I am up to the 5,000 limit on my personal FB page. You are invited to click here and then Like and Follow the identical content. 🙂
The Streak
Today makes one hundred thirty-nine days in a row with a new educational blog post! This one took about an hour to prepare. With all of my upcoming free time (or not …), the plan right now is to break the current record streak of 480 … Good health and good internet connections willing.
Click on the logo-link above
Amazing 5D Mark IV Bundles and Deals
Booking.Com
Booking.Com came through for me twice again recently with both the DeSoto Fall IPT and next July’s UK Puffins, Gannets, and Bempton Pre-trip room reservations. And all the rates were great. If you’d like to give Booking.Com a shot, click here and you will earn a $25 reward. Thanks to the many who have already tried and used this great service.
Gear Questions and Advice
Too many folks attending BAA IPTs and dozens of folks whom I see in the field, and on BPN, are–out of ignorance–using the wrong gear especially when it comes to tripods and more especially, tripod heads… Please know that I am always glad to answer your gear questions via e-mail. Those might include system, camera body, accessory, and lens choices and decisions.
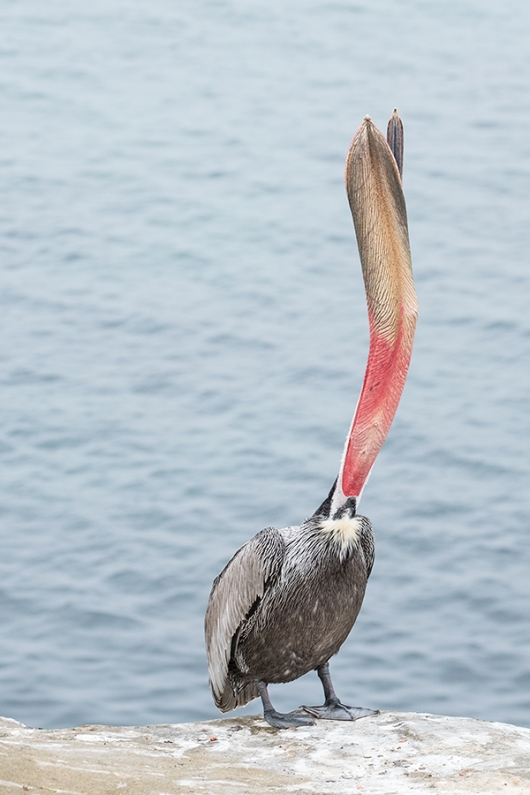
The Elusive Head Throw
One of my first BBC honored images was a full bird vertical Brown Pelican head throw from La Jolla. About a zillion years ago, on Fuji Velvia 50 pushed one stop to ISO 100. I’ve been trying for nearly two decades to create one half as good with digital capture. I am still working on it. 🙂
A Good Critique
A good critique includes both positives and negatives, what you like and what you don’t like. And why. Comments on image quality, impact, the quality of the light, sharpness, image design, color and contrast, are all fair game. And the same goes for suggestions for improvement either in the field or at the computer. That said, if you can do your critiques honestly while being gentle, you will soon become a master at evaluating images.
Your Critique Needed
Please let me know what you think of today’s featured image, the good, the bad, and the ugly. You most honest response is appreciated.
Fujifilm X-T2 Mirrorless Digital Camera
Joel Williams is offering a Fujifilm X-T2 camera in near-mint condition for only $1099. Included in the sale are the Metal Hand Grip for the X-T2 (a $109 value), two extra Fujifilm batteries (both items also in near-mint condition), the original boxes and everything that came in them, and insured ground shipping via UPS to US addresses only. The items will not ship until your check clears unless other arrangements are made.
Please contact Joel via e-mail.
The XT-2 is currently Fuji’s flagship digital camera body. I had a chance to test this camera for about six weeks and enjoyed its small size and light weight a ton. I made more than a few excellent images with my Fujifilm gear. If you click on Postlist 2017 on the orange/yellow menu bar and do a page search for XT-2 you can find nearly a dozen blog posts featuring images from this great little camera body. In addition to being decent for birds, nature, and wildlife the Fuji gear (including many of the lenses listed below) will make a superb travel/landscape rig. artie
Fuji X-T2 VPB Vertical Power Booster Grip
Joel Williams is also offering a Fuji X-T2 VPB Vertical Power Booster Grip in near-mint condition for $189. Learn more here. This item sells new for $329. The price includes insured ground shipping via UPS to US addresses only. The items will not ship until your check clears unless other arrangements are made.
Please contact Joel via e-mail.
This grip holds two batteries for a total of three at the same time. I used and enjoyed it with my XT-2. artie
Support the Blog
Please help support my (stupendous) efforts here on the blog by remembering to click on the logo link above each time that you shop Amazon. That would be greatly appreciated. with love, artie
|

|
|
San Diego offers a wealth of very attractive natural history subjects. With annual visits spanning more than three decades I have lot of experience there….
|
With gorgeous subjects just sitting there waiting to have their pictures taken, photographing the pelicans on the cliffs is about as easy as nature photography gets. With the winds from the east almost every morning there is usually some excellent flight photography. And the pelicans are almost always doing something interesting: preening, scratching, bill pouch cleaning, or squabbling. And then there are those crazy head throws that are thought to be a form of intra-flock communication. You can do most of your photography with an 80- or 100-400 lens …
Did I mention that there are wealth of great birds and natural history subjects in San Diego in winter?
|

|
|
Though the pelicans will be the stars of the show on this IPT there will be many other handsome and captivating subjects in wonderful settings.
|
The San Diego Details
This IPT will include four 3 1/2 hour morning photo sessions, three 2 1/2 hour afternoon photo sessions, three lunches, and after-lunch image review and Photoshop sessions. To ensure early starts, breakfasts will be your responsibility. Dinners are on your own so that we can get some sleep.
A $599 non-refundable deposit is required to hold your slot for this IPT. You can send a check (made out to “Arthur Morris) to us at BIRDS AS ART, PO Box 7245, Indian Lake Estates, FL, 33855. Or call Jim or Jennifer at the office with a credit card at 863-692-0906. Your balance is payable only by check. Please print, complete, and sign the form that is linked to here and shoot it to us along with your deposit check. If you register by phone, please print, complete and sign the form as noted above and either mail it to us or e-mail the scan. If you have any questions, please feel free to contact me via e-mail.
If In Doubt …
If in doubt about using the BAA B&H affiliate link correctly, you can always start your search by clicking here. Please note that the tracking is invisible. Web orders only. Please, however, remember to shoot me your receipt via e-mail.


Please Remember to use my Affiliate Links and to Visit the New BAA Online Store 🙂
To show your appreciation for my continuing efforts here, we ask, as always, that you get in the habit of using my B&H affiliate links on the right side of the blog for all of your photo and electronics purchases. Please check the availability of all photographic accessories in the New BIRDS AS ART Online Store, especially the Mongoose M3.6 tripod head, Wimberley lens plates, Delkin flash cards and accessories, and LensCoat stuff.
As always, we sell only what I have used, have tested, and can depend on. We will not sell you junk. We know what you need to make creating great images easy and fun. And please remember that I am always glad to answer your gear questions via e-mail.
I would of course appreciate your using our B&H affiliate links for all of your major gear, video, and electronic purchases. For the photographic stuff mentioned in the paragraph above, and for everything else in the new store, we, meaning BAA, would of course greatly appreciate your business. Here is a huge thank you to the many who have been using our links on a regular basis and those who will be visiting the New BIRDS AS ART Online Store as well.
Facebook
Be sure to like and follow BAA on Facebook by clicking on the logo link upper right. Tanks a stack.
Typos
In all blog posts and Bulletins, feel free to e-mail or to leave a comment regarding any typos or errors. Just be right :).
December 13th, 2017 Stuff
It was cold again on Monday evening and when I woke on Tuesday morning the pool was a very chilly 67.8 degrees. By the time I got in the water it was up to a balmy 72. I swam 34 laps right after lunch and was planning on swimming another 32 laps before dinner but after getting my first of three SynVisc injections in my bone-on-bone left knee I decided to take it easy till tomorrow.
Again I went down to the lake early and late but again there was not a whole lot going on. I did get some more work done on the 5D Mark IV User’s Guide and should be finished with the text in a day or two. Then it will be time to add the illustrative images with the legendary BIRDS AS ART educational captions.
Right now it looks as if only two folks are signed up for San Diego #2 with one more interested; San Diego #1 has been sold out for some time. IPT #2 represents an amazing opportunity to enjoy some great bird photography with the spectacular breeding plumage Pacific race of Brown Pelican and to learn from possibly the finest bird photography teacher to ever walk on the planet (he said with all modesty …) This IPT is the first to offer a free morning session the day before the IPT starts. I hope that you can join me.
Click on the logo-link above for great holiday savings!
$300 off on the Canon 100-400 II!
One More Day to Try the Make the Best Image Challenge
Yesterday, several more folks responded to the Make the Best Image Challenge: cropping and clean-up (if needed) blog post here. If you would like to take a crack at it, perhaps inspired by today’s blog post, do check it out and remember to first ask yourself, “What it the best part of this image?” And then look for a crop that emphasizes what you like best about the photograph. item.
Facebook
If you have sent me a FB friends request that has gone unrequited, it is because I am up to the 5,000 limit on my personal FB page. You are invited to click here and then Like and Follow the identical content. 🙂
The Streak
Today makes one hundred thirty-eight days in a row with a new educational blog post! This one took about an hour to prepare. With all of my upcoming free time (or not …), the plan right now is to break the current record streak of 480 … Good health and good internet connections willing.
Click on the logo-link above
Amazing 5D Mark IV Bundles and Deals
Booking.Com
Booking.Com came through for me twice again recently with both the DeSoto Fall IPT and next July’s UK Puffins, Gannets, and Bempton Pre-trip room reservations. And all the rates were great. If you’d like to give Booking.Com a shot, click here and you will earn a $25 reward. Thanks to the many who have already tried and used this great service.


Gear Questions and Advice
Too many folks attending BAA IPTs and dozens of folks whom I see in the field, and on BPN, are–out of ignorance–using the wrong gear especially when it comes to tripods and more especially, tripod heads… Please know that I am always glad to answer your gear questions via e-mail. Those might include system, camera body, accessory, and lens choices and decisions.
Scroll Down Slowly 🙂
Before you scroll down, decide if you would keep or delete the image below, and if the former, how you would go about handling the clipped wingtips.
|
|
|
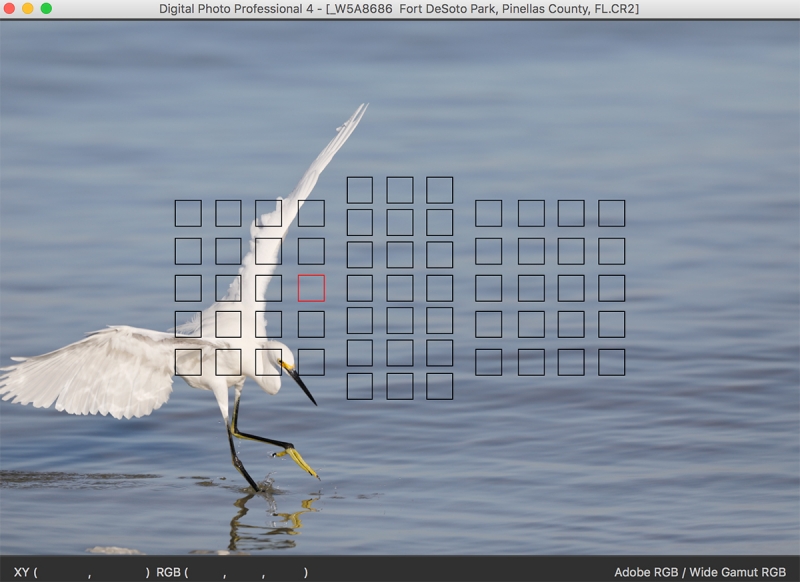
This image was created at Fort DeSoto on the morning of October 21, 2017 with the Induro GIT304L Grand Series 3 Stealth Carbon Fiber Tripod/Mongoose M3.6-mounted Canon EF 600mm f/4L IS II USM lens and my favorite fishing Snowy Egret photography camera body, the Canon EOS 5D Mark IV. ISO 800. Evaluative metering at zero as framed: 1/4000 sec. at f/5.6 in Manual mode. AWB on a clear morning at 8:53am.
LensAlign/FocusTune micro-adjustment: -2.
Left Large Zone/AI Servo/Shutter Button AF was active at the moment of exposure. The system activated a single AF point as seen above.
Fishing/Dancing Snowy Egret
DPP 4 Screen Capture Showing AF Points
|
Getting Greedy Compositionally …
With me a good distance from the subject, I got a bit greedy in a compositional sense by opting to go with Left Large Zone, that in an effort to keep the bird out of the center of the frame … In retrospect, the framing would have been a lot better if I had gone with Center Large Zone. I have no explanation as to what the AF system was thinking or seeing at the moment of exposure with the single activated point that completely missed the bird but it is obvious that the system was successfully and accurately tracking the subject as the eye is razor sharp.
|
|
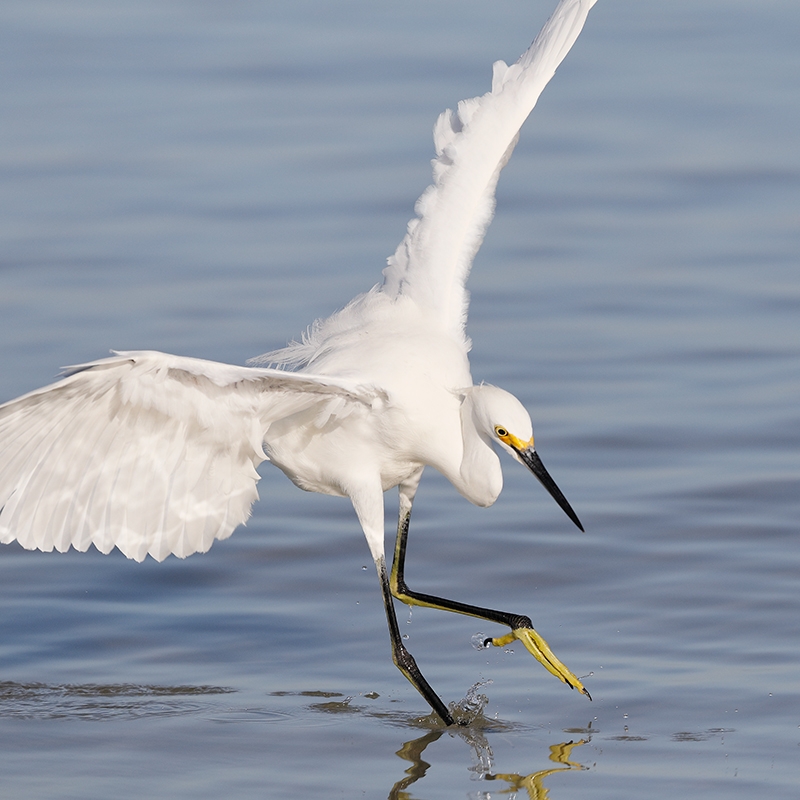
The optimized version of today’s featured image: Fishing/Dancing Snowy Egret
|
The Optimized Version
I considered expanding the canvas on the left and adding the clipped wingtips but with the patterns in the water there I decided to go tight and square. Again, as we saw recently in the Kill Me Why Don’t You blog post here, we see that a sharp 5D Mark IV image file is of high enough quality to stand up to a healthy crop while still maintaining a ton of fine and juicy detail. With today’s image the water droplets and the sharpness and detail of the feet, the legs, and the face and eye are quite remarkable and best viewed up close. Note also the effect of the sunlight reflected off the water on the raised right wing.
|

|
|
San Diego offers a wealth of very attractive natural history subjects. With annual visits spanning more than three decades I have lot of experience there….
|
With gorgeous subjects just sitting there waiting to have their pictures taken, photographing the pelicans on the cliffs is about as easy as nature photography gets. With the winds from the east almost every morning there is usually some excellent flight photography. And the pelicans are almost always doing something interesting: preening, scratching, bill pouch cleaning, or squabbling. And then there are those crazy head throws that are thought to be a form of intra-flock communication. You can do most of your photography with an 80- or 100-400 lens …
Did I mention that there are wealth of great birds and natural history subjects in San Diego in winter?
|

|
|
Though the pelicans will be the stars of the show on this IPT there will be many other handsome and captivating subjects in wonderful settings.
|
The San Diego Details
This IPT will include four 3 1/2 hour morning photo sessions, three 2 1/2 hour afternoon photo sessions, three lunches, and after-lunch image review and Photoshop sessions. To ensure early starts, breakfasts will be your responsibility. Dinners are on your own so that we can get some sleep.
A $599 non-refundable deposit is required to hold your slot for this IPT. You can send a check (made out to “Arthur Morris) to us at BIRDS AS ART, PO Box 7245, Indian Lake Estates, FL, 33855. Or call Jim or Jennifer at the office with a credit card at 863-692-0906. Your balance is payable only by check. Please print, complete, and sign the form that is linked to here and shoot it to us along with your deposit check. If you register by phone, please print, complete and sign the form as noted above and either mail it to us or e-mail the scan. If you have any questions, please feel free to contact me via e-mail.
If In Doubt …
If in doubt about using the BAA B&H affiliate link correctly, you can always start your search by clicking here. Please note that the tracking is invisible. Web orders only. Please, however, remember to shoot me your receipt via e-mail.


Please Remember to use my Affiliate Links and to Visit the New BAA Online Store 🙂
To show your appreciation for my continuing efforts here, we ask, as always, that you get in the habit of using my B&H affiliate links on the right side of the blog for all of your photo and electronics purchases. Please check the availability of all photographic accessories in the New BIRDS AS ART Online Store, especially the Mongoose M3.6 tripod head, Wimberley lens plates, Delkin flash cards and accessories, and LensCoat stuff.
As always, we sell only what I have used, have tested, and can depend on. We will not sell you junk. We know what you need to make creating great images easy and fun. And please remember that I am always glad to answer your gear questions via e-mail.
I would of course appreciate your using our B&H affiliate links for all of your major gear, video, and electronic purchases. For the photographic stuff mentioned in the paragraph above, and for everything else in the new store, we, meaning BAA, would of course greatly appreciate your business. Here is a huge thank you to the many who have been using our links on a regular basis and those who will be visiting the New BIRDS AS ART Online Store as well.
Facebook
Be sure to like and follow BAA on Facebook by clicking on the logo link upper right. Tanks a stack.
Typos
In all blog posts and Bulletins, feel free to e-mail or to leave a comment regarding any typos or errors. Just be right :).
|
|


