Arthur Morris/BIRDS AS ART
October 21st, 2017

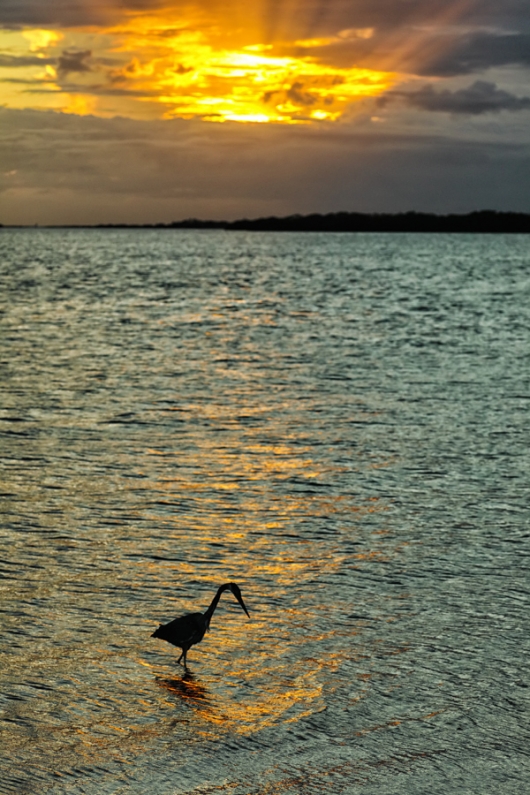
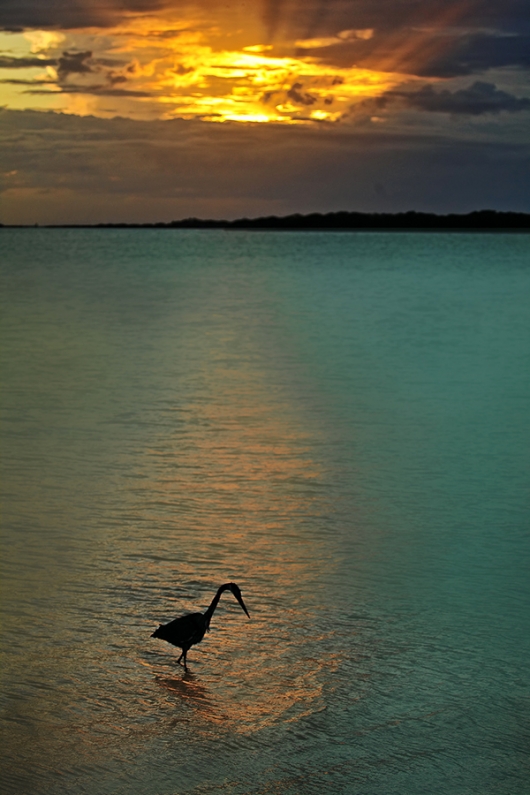
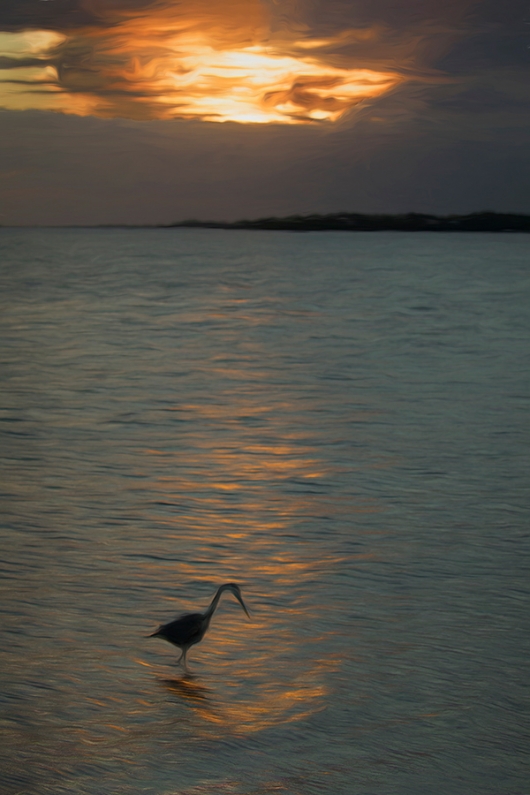
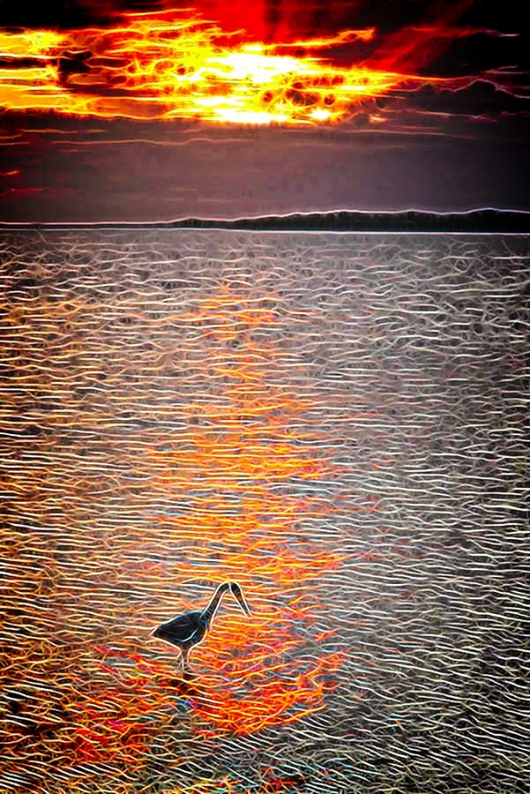
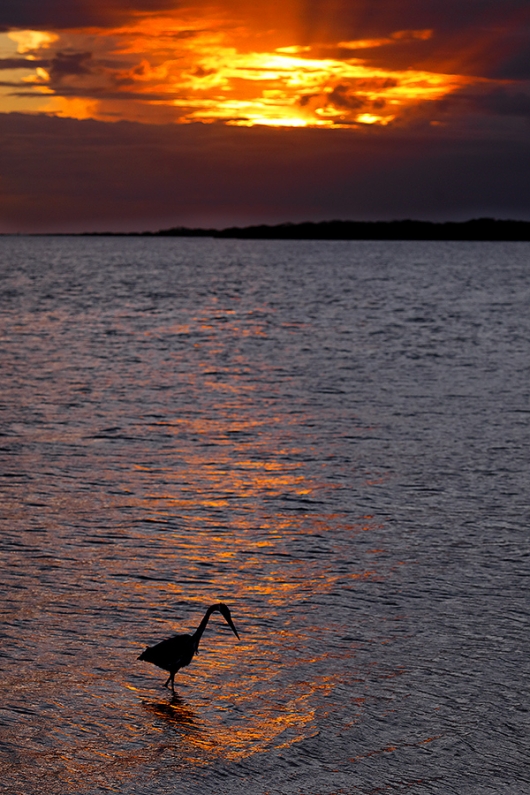
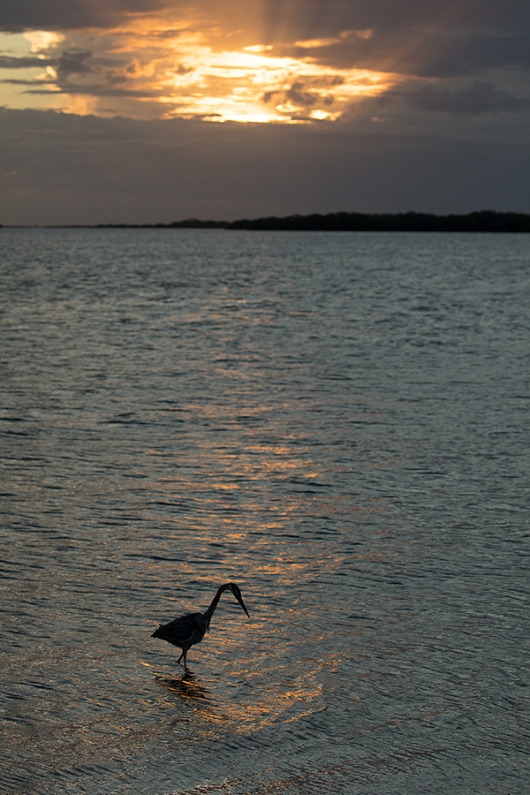
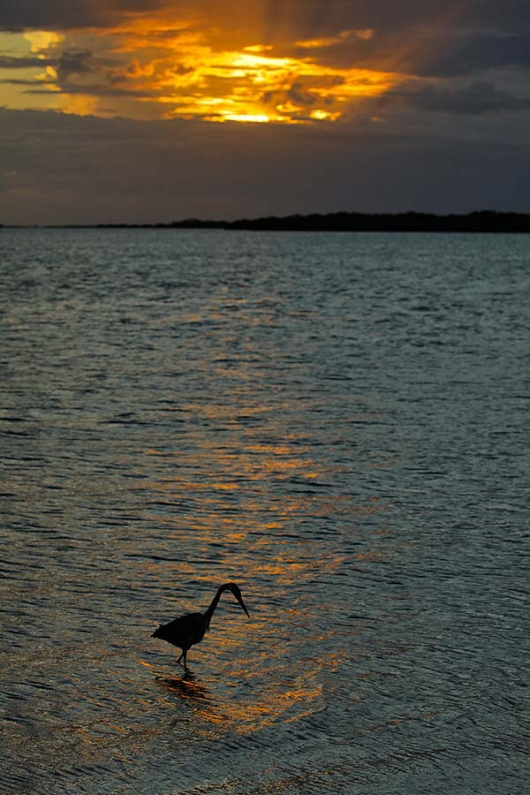
Six Versions of the GBH sunrise scenic w/god-rays image

Stuff

On Friday afternoon I will drive to Brandon to get my almost brand new i-Phone 8+ replaced. I somehow managed to drop it out of my car at 35 mph last week 🙂 I did purchase the Apple Care insurance. Then I continue on to Fort DeSoto for another busman’s holiday, in hopes of running into the mystery heron/egret again.

The Streak

Today makes eighty-six days in a row with a new educational blog post! This blog post took less than an hour to prepare. With all of my upcoming free time (or not…), the plan right now is to break the current record streak of (I think) four hundred eighty something … Good health and good internet connections willing.

Booking.Com

Booking.Com came through for me twice again recently with both the DeSoto Fall IPT and next July’s UK Puffins, Gannets, and Bempton Pre-trip room reservations. And all the rates were great. If you’d like to give Booking.Com a shot, click here and you will earn a $25 reward. Thanks to the many who have already tried and used this great service.


Gear Questions and Advice

Too many folks attending BAA IPTs and dozens of folks whom I see in the field, and on BPN, are–out of ignorance–using the wrong gear especially when it comes to tripods and more especially, tripod heads… Please know that I am always glad to answer your gear questions via e-mail.

This image was created on the late afternoon of Friday, October 13 with the hand held Canon EF 100-400mm f/4.5-5.6L IS II USM lens (at 112mm) and my favorite bird photography camera, the Canon EOS 5D Mark IV. ISO 800. Evaluative metering -2/3 stop: 1/2,000 sec. at f/6.3 in Av mode. AWB.

Center AF point/AI Servo/Expand/Rear Button AF and recompose.

FocusTune/LensAlign Micro Adjustment: -2.

Great Blue Heron sunrise scenic with god-rays.

Please Note

Please note that by any standard the colors and contrast in the image above are boring!

The First-Ever RAW File/Image Optimization Challenge

I posted the following in the The First-Ever RAW File/Image Optimization Challenge blog post here:

If you would like to take a crack at this image please click here to download the RAW file. Save the image to your hard drive, convert it in the program of your choice, and then optimize it with the program of your choice. save the TIF. Then create a sharpened 900 pixel tall JPEG and shoot it to me via e-mail.
Assuming that I receive at least a few decent images, I will publish at least the best one here on Friday along with my optimized version.

If at least a few folks give it a try, we can play this game again. If not — well, you can figure it out. Those who try will wind up learning a ton. And who knows, they may create an image that is stronger than mine 🙂

The Reaction

About 20 folks responded by sending their version of the posted image. I responded to each by commenting on their version at times, offering suggestions for improvement. Many folks did a decent job but left to image too dark overall (for reasons noted immediately below). The way to deal with these situations is to do a Curves adjustment that includes pinning the light tones (in this case, the sky), and then pulling the rest of the curve up. Thanks to all who participated. Though it involves a lot of work for me, we will be doing this exercise again.

My Critique

The JPEG above represents the RAW file converted straight up in ACR (with no adjustments). The image overall is way too dark because of the underexposure that was needed to hold back the bright sections of the sky … As both the bird and the god rays are a bit too centered, I wish that I had moved two steps to my right so that the bird would have been closer to the lower left corner and the god rays closer to the upper right corner. I created the image at K-7600 to juice up the colors but the underexposure muted those quite a bit. I converted the image in DPP 4 and optimized it in Photoshop. I will share it with you here in a few days.

Great Blue Heron sunrise scenic with god-rays.

Conversion and optimization by Nick Clayton.

Middle of the Road …

Nick Clayton’s version was well done — he did a nice job of boosting the colors — but is too middle of the road for me. In part, because he failed to deal with the tonality. Again, the way to deal with these situations is to do a Curves adjustment that includes pinning the light tones (in this case, the sky), and then pulling the rest of the curve up.

Great Blue Heron sunrise scenic with god-rays.

Conversion and optimization by Anthony Ardito.

Brighter

Anthony Ardito’s version was a brighter than the boring ACR-converted version that I posted. Please note that I cast no aspersions at ACR — had I wanted to, I could have just as easily boosted the colors and dealt with the tonality in ACR as I did in DPP 4.

Great Blue Heron sunrise scenic with god-rays.

Conversion and optimization by Jerry Turner.

Getting Creative

Jerry Turner opted to soften up the wavelets by applying a fairly strong layer of Surface Blur and then reducing the opacity until a bit of wave detail showed. HIs first version had an unnatural glow around the brighter tones in the water; he eliminated that on his second try. I just noticed that he somehow introduced what looks like a large dust spot in the sky above the trees on the right. I am not a big fan of the CYAN water …

Great Blue Heron sunrise scenic with god-rays.

Conversion and optimization by Michael Eckstein.

More Creativity

Michael Eckstein used Topaz Impressions to come up with his version. I love the effect but he could have done a lot more with the color and contrast.

Great Blue Heron sunrise scenic with god-rays.

Conversion and optimization by Pat Dunnuck.

Over the Top?

Pat Dunnuck used Topaz Studio with a radiance adjustment to come up with her wild version. She sent many versions. Some were too light without much contrast. Though her last version, the one presented here, is way over the top, I do like her creativity. I am pretty sure that there is a less out of the box version that might be more pleasing while still being dramatic.

Great Blue Heron sunrise scenic with god-rays.

Conversion and optimization by Arthur Morris.

artie’s version

Above is my version, converted in DPP 4 and optimized in Photoshop. I will detail the image optimization in a future blog post. How did I move the god rays to the right hand corner of the image?

Comments Welcome

Please feel free to comment on any of all of the images above. What did you like and why? Which is your favorite. Do you have any suggestions for improvement for any of the photos?

If In Doubt …

If in doubt about using the BAA B&H affiliate link correctly, you can always start your search by clicking here. Please note that the tracking is invisible. Web orders only. Please, however, remember to shoot me your receipt via e-mail.


Please Remember to use my Affiliate Links and to Visit the New BAA Online Store 🙂

To show your appreciation for my continuing efforts here, we ask, as always, that you get in the habit of using my B&H affiliate links on the right side of the blog for all of your photo and electronics purchases. Please check the availability of all photographic accessories in the New BIRDS AS ART Online Store, especially the Mongoose M3.6 tripod head, Wimberley lens plates, Delkin flash cards and accessories, and LensCoat stuff.

As always, we sell only what I have used, have tested, and can depend on. We will not sell you junk. We know what you need to make creating great images easy and fun. And please remember that I am always glad to answer your gear questions via e-mail.

I would of course appreciate your using our B&H affiliate links for all of your major gear, video, and electronic purchases. For the photographic stuff mentioned in the paragraph above, and for everything else in the new store, we, meaning BAA, would of course greatly appreciate your business. Here is a huge thank you to the many who have been using our links on a regular basis and those who will be visiting the New BIRDS AS ART Online Store as well.

Amazon.com

Those who prefer to support BAA by shopping with Amazon may use the logo link above.

Amazon Canada

Many kind folks from north of the border, eh, have e-mailed stating that they would love to help us out by using one of our affiliate links but that living in Canada and doing so presents numerous problems. Now, they can help us out by using our Amazon Canada affiliate link by starting their searches by clicking here.

Facebook

Be sure to like and follow BAA on Facebook by clicking on the logo link upper right. Tanks a stack.

Typos

In all blog posts and Bulletins, feel free to e-mail or to leave a comment regarding any typos or errors. Just be right :).

October 20th, 2017

A Unique Concept. And Fort DeSoto Weekend In-the-Field Instructional Photo-Sessions.

Stuff

Thursday was another mile in the pool and lots of exercise. My plan is to share some of the images that I received as part of the The First-Ever RAW File/Image Optimization Challenge with you here on Saturday. Along with my version. And on Sunday to will chime in on the recent Black Skimmer images from the blog post here. Very few folks participated in that editing exercise but it is not too late for you to go back and take a crack at it.

If you missed the announcement of the The LensAlign/FocusTune Micro-Adjusting Tutorial e-Guide, click here. San Diego IPT #1 is now sold out. See the info on San Diego #2 below.

Very Recent Fort DeSoto Images

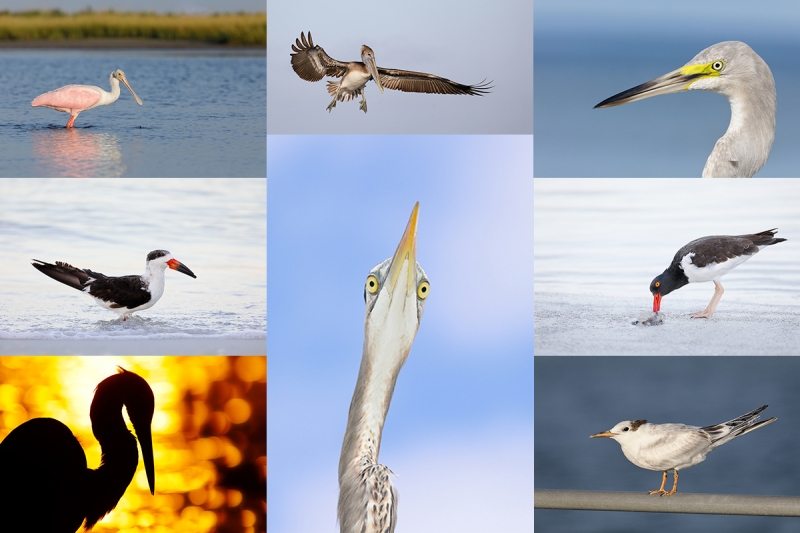
From bottom left clockwise back to center: Great Egret, blasting sunrise highlights; Black Skimmer, winter plumage in pre-dawn light; Roseate Spoonbill foraging; Brown Pelican, juvenile landing; hybrid heron X egret; American Oystercatcher feeding; Royal Tern, worn juvenile; Great Blue Heron from below.

Cheap Weekend Fort DeSoto In-the-Field Instruction

Saturday, October 21, 2017: Morning session — 6:45am for 3 1/2 hours: $149. Add lunch, image review, and Photoshop session: $249 (total).

Saturday, October 21, 2017: Afternoon session — 4:00pm for 3 1/2 hours: $99.

Saturday October 21, 2017, both sessions including lunch: $329.

Sunday, October 22, 2017: Morning session — 6:45am for 3 1/2 hours: $149.

Learn to get the right exposure every time, to approach free and wild (and often tame!) birds, and to design a pleasing image. And learn the location of my new Fort DeSoto hotspot. To register on Friday call Jim at 863-692-0906 before noon. After that, shoot me an e-mail or call or text me at 863-221-2372.

Canon lens rentals are available on a limited basis: 600 II, 500 II, 400 DO II, 200-400 f/4 with Internal TC, and 100-400 II.

Cheap but great instruction.

The Streak

Today makes eighty-five days in a row with a new educational blog post! This blog post took more than two hours to prepare. With all of my upcoming free time (or not…), the plan right now is to break the current record streak of (I think) four hundred eighty something … Good health and good internet connections willing.

New Listing

Xtrahand Vest

BAA friend Jim Roetzel is offering an Xtrahand Vest, green — size XL — for $275. The vest is in like-new condition with the thick shoulder pads, two large and two small front pockets, the large rear pocket, the rear tripod pocket, and 2 extra side pockets. Jim is including a slightly used BLUBB along with the vest. Full disclosure: a mouse ate a dime-sized hole in the BLUBB to get at the birdseed inside so you will need some sewing skills or sticky heavy-duty tape to it fully functional. The price includes insured ground shipping via UPS to U.S. addresses only. Check or Paypal OK. If by check, the kit will ship when your check clears. Please contact Jim via e-mail or by phone at 1-330-687-4073 (Eastern time). Photos available upon request.

Price Reduction

Canon 500mm f/4L IS USM Lens

Price Reduced $115 AUD/Australia and New Zealand Sale Only

IPT veteran Barry Barfield from Down Under is offering a used Canon 500mm f/4L IS USM lens (the “old five”) in excellent condition for $4900 AUD ($3825 USD) was $5015 AUD ($4050 USD). The sale includes the lens trunk with keys, the front leather cover, the rear lens cap, a Max 4 LensCoat, a Forest Green Hoodie, and insured ground shipping to Australia and New Zealand. Your item will not ship until your check clears unless other arrangements are made. Photos are available upon request.

Please contact Barry via e-mail or by cell phone at +61.418780575.

The 500 f/4s have been the world’s most popular telephoto lenses for birds, nature, wildlife, and sports for many decades. I owned and used and loved my “old five” for many years. If you live Down Under and don’t have the cash for the 500 II and can handle the additional 1 1/2 pounds (exactly), then this is your next best option. artie

Booking.Com

Booking.Com came through for me twice again recently with both the DeSoto Fall IPT and next July’s UK Puffins, Gannets, and Bempton Pre-trip room reservations. And all the rates were great. If you’d like to give Booking.Com a shot, click here and you will earn a $25 reward. Thanks to the many who have already tried and used this great service.


Gear Questions and Advice

Too many folks attending BAA IPTs and dozens of folks whom I see in the field, and on BPN, are–out of ignorance–using the wrong gear especially when it comes to tripods and more especially, tripod heads… Please know that I am always glad to answer your gear questions via e-mail.

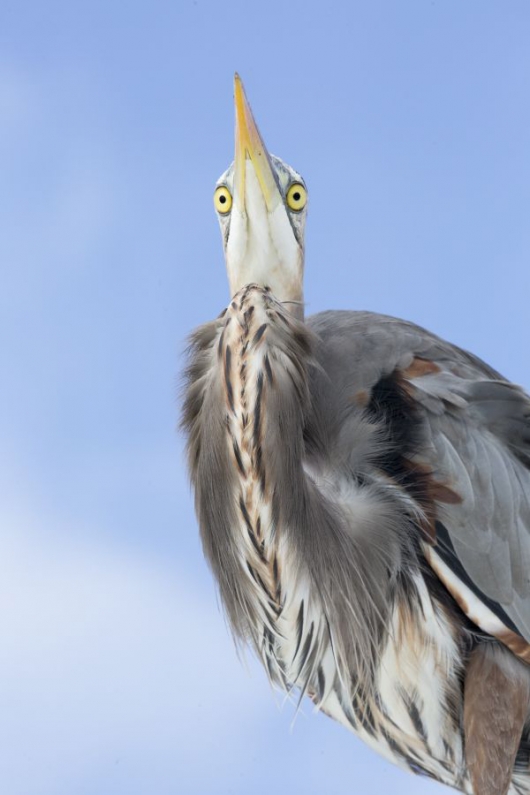
This image was created on the last morning of the 2017 Fort DeSoto Fall IPT by participant Jim Miller with the hand held Canon EF 100-400mm f/4.5-5.6L IS II USM lens (at 400mm) and the EOS 5D Mark II( (now replaced by and my favorite heron eyeball photography camera body, the Canon EOS 5D Mark IV. ISO 400. Evaluative metering +1/3 stop: 1/320 sec. at f/16 in Av mode. Daylight WB.

Great Blue Heron from below

Image courtesy of and copyright 2017: Fall DeSoto IPT participant Jim Miller.

A Unique Concept

Here is a unique concept that you can use to learn to create great images:

1-Stay close to the leader.

2-Listen carefully.

3-Follow the simple directions.

4-Ask questions if you get confused.

5-Make lots of great images!

Thanks to Jim for the use of his wonderful image. He stayed close to me for the whole IPT as did most of the group. Most everyone went home with many wonderful images. He made his while standing right next to me as I made the image featured in the Here’s Looking Down at You! And another depth-of-field lesson … blog post here and on the DeSoto composite image card above. You know, come to think of it I just might like Jim’s image better than mine …

2017 in San Diego was a very good year ….

2018 San Diego 3 1/2-DAY BIRDS AS ART IPT #2: Sunday, JAN 28 thru and including a morning session on Wednesday, JAN 31, 2018: 3 1/2 days: $1699.
Limit: 8: Openings: 7

Meet and Greet at 6:30pm on the evening before the IPT begins; Saturday, Jan 27, 2018.

San Diego IPT #2: Shorter and Less Expensive!

Please remember: I go with one.

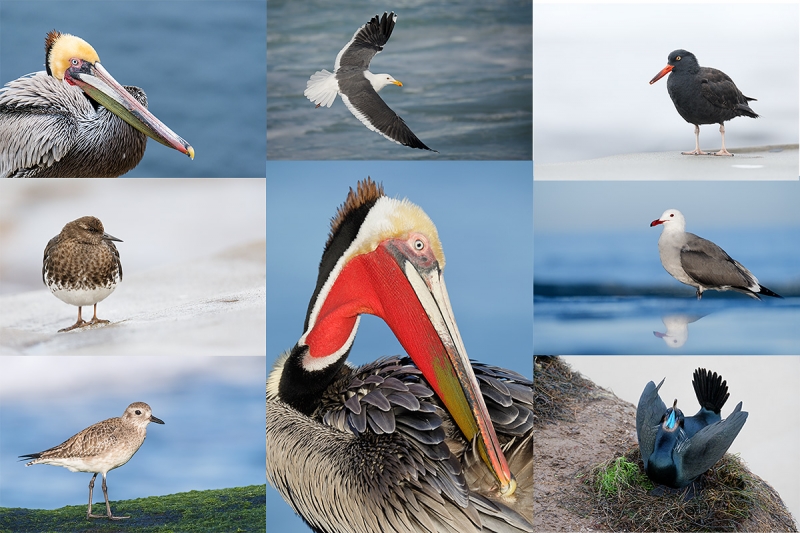
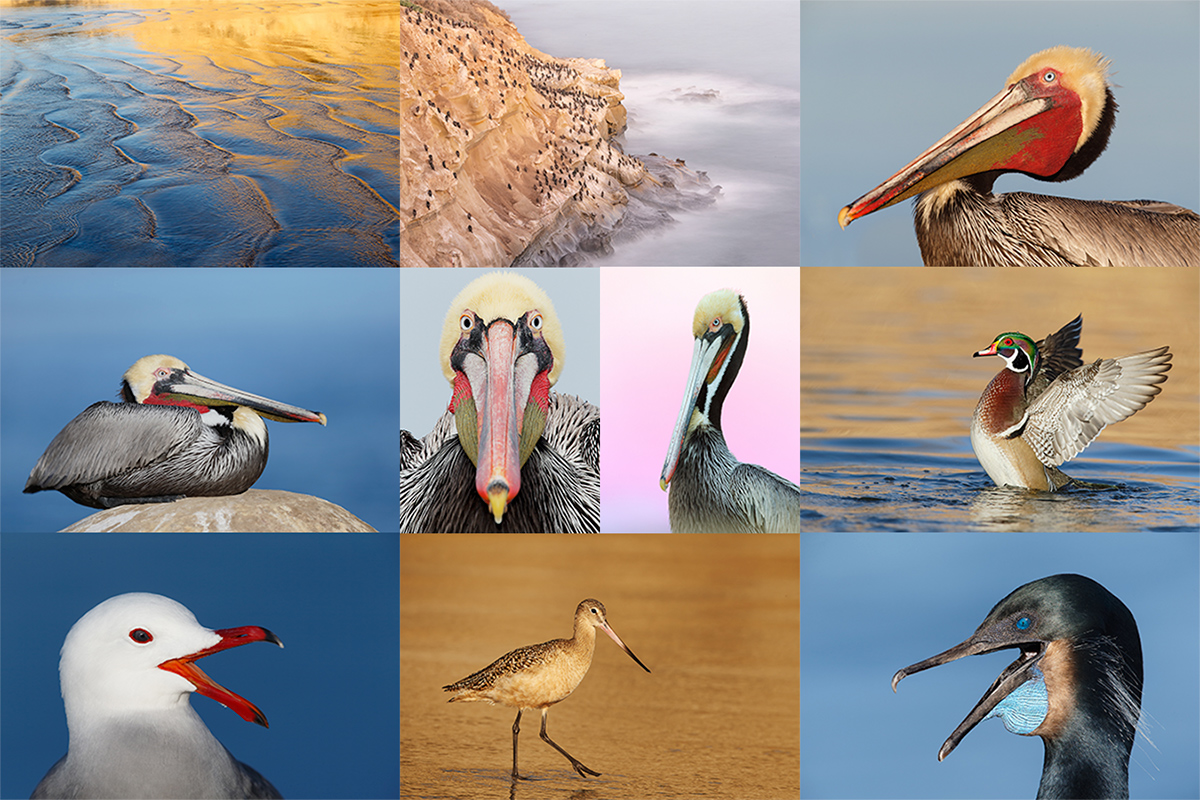
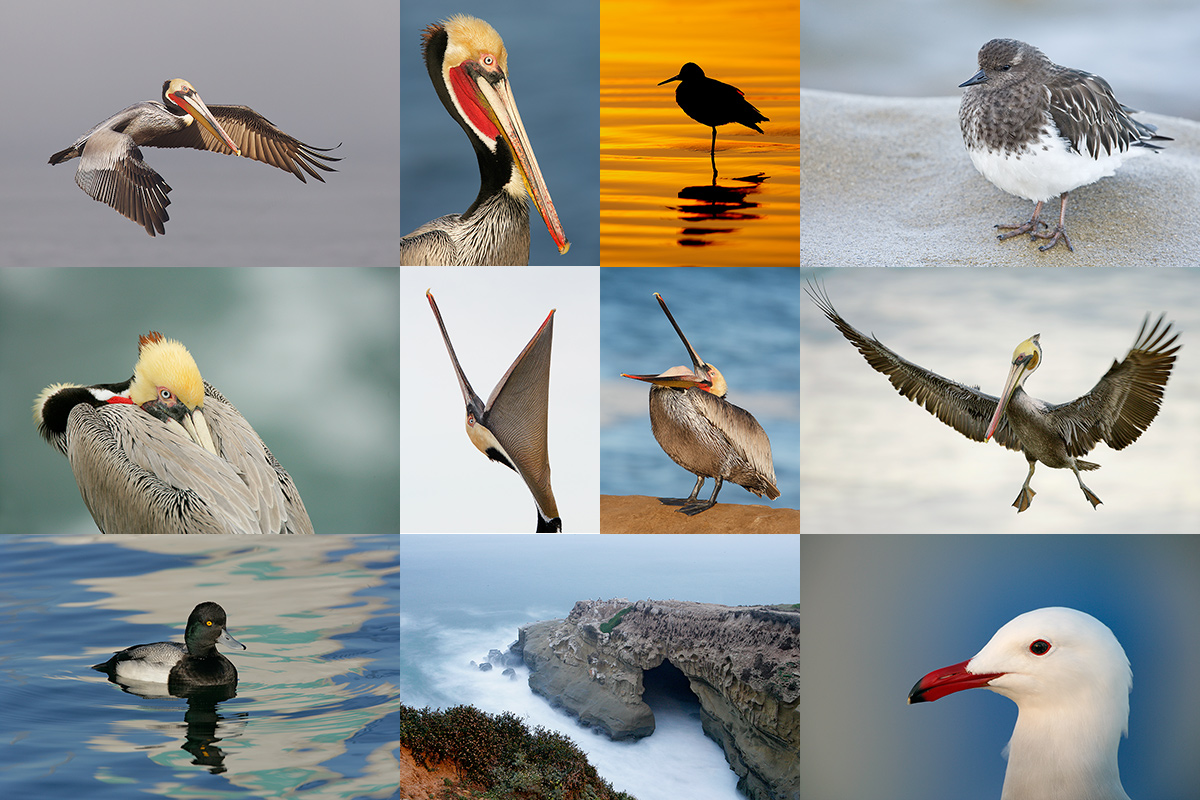
Join me in San Diego near the end of January to photograph the spectacular breeding plumage Brown Pelicans with their fire-engine red and olive green bill pouches; Brandt’s (usually nesting and displaying) and Double-crested Cormorants; breeding plumage Ring-necked Duck; other duck species possible including Lesser Scaup, Redhead, Wood Duck and Surf Scoter; a variety of gulls including Western, California, and the gorgeous Heerman’s, all in full breeding plumage; shorebirds including Marbled Godwit, Whimbrel, Willet, Sanderling and Black-bellied Plover; many others possible including Least, Western, and Spotted Sandpiper, Black and Ruddy Turnstone, Semipalmated Plover, and Surfbird; Harbor Seal (depending on the current regulations) and California Sea Lion; and Bird of Paradise flowers. And as you can see by studying the two IPT cards there are some nice bird-scape and landscape opportunities as well. Please note: formerly dependable, both Wood Duck and Marbled Godwit have been declining at their usual locations for the past two years …


san-diego-card-neesie

San Diego offers a wealth of very attractive natural history subjects. With annual visits spanning more than three decades I have lot of experience there….

With gorgeous subjects just sitting there waiting to have their pictures taken, photographing the pelicans on the cliffs is about as easy as nature photography gets. With the winds from the east almost every morning there is usually some excellent flight photography. And the pelicans are almost always doing something interesting: preening, scratching, bill pouch cleaning, or squabbling. And then there are those crazy head throws that are thought to be a form of intra-flock communication. You can do most of your photography with an 80- or 100-400 lens …

Did I mention that there are wealth of great birds and natural history subjects in San Diego in winter?


san-diego-card-b

Though the pelicans will be the stars of the show on this IPT there will be many other handsome and captivating subjects in wonderful settings.

The San Diego Details

This IPT will include four 3 1/2 hour morning photo sessions, three 2 1/2 hour afternoon photo sessions, three lunches, and after-lunch image review and Photoshop sessions. To ensure early starts, breakfasts will be your responsibility. Dinners are on your own so that we can get some sleep.

A $599 non-refundable deposit is required to hold your slot for this IPT. You can send a check (made out to “Arthur Morris) to us at BIRDS AS ART, PO Box 7245, Indian Lake Estates, FL, 33855. Or call Jim or Jennifer at the office with a credit card at 863-692-0906. Your balance, payable only by check, will be due on 11/1/2016. If we do not receive your check for the balance on or before the due date we will try to fill your spot from the waiting list. Please print, complete, and sign the form that is linked to here and shoot it to us along with your deposit check. If you register by phone, please print, complete and sign the form as noted above and either mail it to us or e-mail the scan. If you have any questions, please feel free to contact me via e-mail.

If In Doubt …

If in doubt about using the BAA B&H affiliate link correctly, you can always start your search by clicking here. Please note that the tracking is invisible. Web orders only. Please, however, remember to shoot me your receipt via e-mail.


Please Remember to use my Affiliate Links and to Visit the New BAA Online Store 🙂

To show your appreciation for my continuing efforts here, we ask, as always, that you get in the habit of using my B&H affiliate links on the right side of the blog for all of your photo and electronics purchases. Please check the availability of all photographic accessories in the New BIRDS AS ART Online Store, especially the Mongoose M3.6 tripod head, Wimberley lens plates, Delkin flash cards and accessories, and LensCoat stuff.

As always, we sell only what I have used, have tested, and can depend on. We will not sell you junk. We know what you need to make creating great images easy and fun. And please remember that I am always glad to answer your gear questions via e-mail.

I would of course appreciate your using our B&H affiliate links for all of your major gear, video, and electronic purchases. For the photographic stuff mentioned in the paragraph above, and for everything else in the new store, we, meaning BAA, would of course greatly appreciate your business. Here is a huge thank you to the many who have been using our links on a regular basis and those who will be visiting the New BIRDS AS ART Online Store as well.

Amazon.com

Those who prefer to support BAA by shopping with Amazon may use the logo link above.

Amazon Canada

Many kind folks from north of the border, eh, have e-mailed stating that they would love to help us out by using one of our affiliate links but that living in Canada and doing so presents numerous problems. Now, they can help us out by using our Amazon Canada affiliate link by starting their searches by clicking here.

Facebook

Be sure to like and follow BAA on Facebook by clicking on the logo link upper right. Tanks a stack.

Typos

In all blog posts and Bulletins, feel free to e-mail or to leave a comment regarding any typos or errors. Just be right :).
October 19th, 2017

Finally. And very proud of it ...

Stuff

With lots of phone and e-mail help from Michael Tapes over the past few days I finally put the finishing touches on the LensAlign/FocusTune Micro-Adjusting Tutorial e-Guide late on Wednesday. Jim got it into the BIRDS AS ART Online Store after dinner. Learn more below.

I was glad to learn that Dave Williams of Santa Barbara, CA signed up for his first IPT: San Diego IPT #1. That trip is now sold out. There is, however, still lots of room on San Diego #2. If you are considering this trip and might be interested in adding on a free day of instruction before the IPT begins please shoot me an e-mail.

I got back in the pool twice on Wednesday: 48 lengths and 40 lengths made an even mile, with lots of exercise during the day as well. It all felt good.

The Streak

Today makes eighty-four days in a row with a new educational blog post! This blog post took more than two hours to prepare. With all of my upcoming free time (or not …), the plan right now is to break the current record streak of (I think) four hundred eighty something … Good health and good internet connections willing.

2017 in San Diego was a very good year ….

2018 San Diego 3 1/2-DAY BIRDS AS ART IPT #2: Sunday, JAN 28 thru and including a morning session on Wednesday, JAN 31, 2018: 3 1/2 days: $1699. Limit: 8: Openings: 7

Meet and Greet at 6:30pm on the evening before the IPT begins; Saturday, Jan 27, 2018.

San Diego IPT #2: Shorter and Less Expensive!

Please remember: I go with one.

Click here for details.

Booking.Com

Booking.Com came through for me twice again recently with both the DeSoto Fall IPT and next July’s UK Puffins, Gannets, and Bempton Pre-trip room reservations. And all the rates were great. If you’d like to give Booking.Com a shot, click here and you will earn a $25 reward. Thanks to the many who have already tried and used this great service.


Gear Questions and Advice

Too many folks attending BAA IPTs and dozens of folks whom I see in the field, and on BPN, are–out of ignorance–using the wrong gear especially when it comes to tripods and more especially, tripod heads… Please know that I am always glad to answer your gear questions via e-mail.

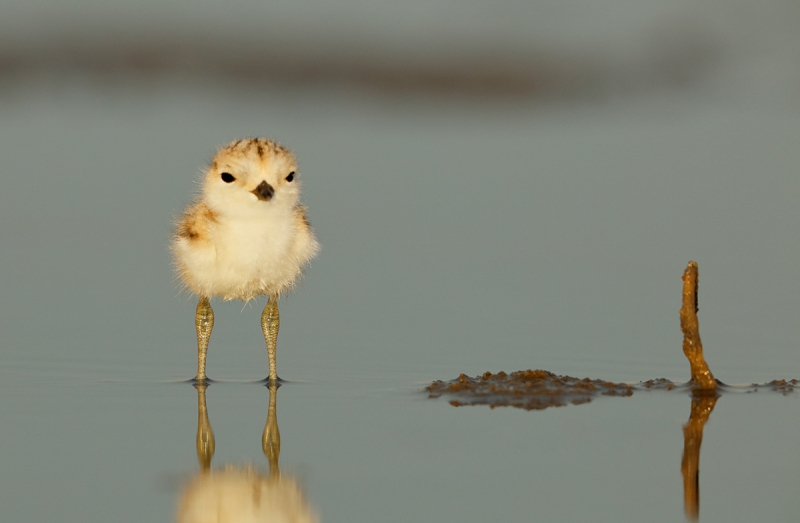
White-breasted Plover chick, Namibia IPT

The Poster Child for the the LensAlign/FocusTune Micro-Adjusting Tutorial e-Guide

I consider the White-fronted Plover chick image above to be the poster child for micro-adjusting; it shows just what can happen when you opt to work with gear that has not been micro-adjusted. I made it to Namibia at great expense both financially and time-wise. This baby plover presented the best avian opportunity of the trip. It was late afternoon and the light was gorgeous. And I got relatively close to this tiny gem of a subject. When I viewed the image on my laptop I quickly realized that sharp focus was on the bird’s legs, not on the eye where I had carefully focused.

In error, I used my back-up 5DS R body with a 2X III TC and the 600 II lens. This combination had not been micro-adjusted. Though the image above might look OK as a small JPEG, it is unusable, i.e., worthless junk: the chick’s eyes are nowhere near sharp. Except as great advertising for this guide. When we got back to the hotel I did a quickie micro-adjustment on this set-up in the hallway of the hotel (near a large window) and obviously without my lighting set-up. The AFA turned out to be -19 … Many times when micro-adjusting you wind up at zero or +1 or -2 and think, “No big deal there.” And you would be correct; tiny AFA values like those will not make a great difference in the final image. But when you wind up at -7 or +11 as frequently happens, the difference in the sharpness of your images can be huge. Not to mention minus 19 … With properly micro-adjusted big lenses folks can begin to routinely create sharp images, even when working with working with 2X teleconverters.

Ordering Info

To purchase the LensAlign/FocusTune package ($124.90) please click here.

Click here to order your copy of the LensAlign/FocusTune Micro-Adjusting Tutorial e-Guide: $50.

The LensAlign/FocusTune Back-story by Michael Tapes (October 2017)

LensAlign was developed as a reliable and repeatable way to test and analyze problems in DSLR autofocus systems, among the bodies, firmware and lenses.

The original LensAlign hardware target was introduced in 2007. It provided a tool that helped photographers to assess the degree of front or back focus with various combinations of their camera bodies and lenses, a problem that was becoming more prevalent. Before then, determining AF accuracy and reliability was hit or miss. The forums were bursting with allegations claiming that photographers did not know how to use their gear, and that front, or back, focus issues were a matter of illusion.
However, with the increases in sensor resolution, and the growing number of photographers shooting DSLR cameras, the complexity and prevalence of AF inaccuracy issues grew.

At the time I invented LensAlign, there was no camera with a user-based provision to adjust for such issues. We needed a reliable tool that could test for, and measure the degree of the AF issues, along with the ability to document them in a repeatable fashion so that the camera makers could acknowledge the problems and fix them. Equally important, when the gear came back from the repair station, the photographers needed a method to verify the repair. In truth, fixes in most cases were not done, or they were inadequate.

Sometime between the LensAlign concept, and the subsequent product release more than a year later, Canon did, in fact, introduce what they called AF Micro-adjustment in the EOS 1D Mark III. I had been in consultation with Canon during my development of LensAlign, but I had no idea if my work influenced the development of this feature or not. However, I was clearly glad they did, since photographers could now “fix” the problem on their own. Of course, this would be a catalyst for LensAlign sales. Although Nikon made no mention of such a feature in their D3 product release, they quickly copied the Canon feature (precisely) and added it to the Nikon D3 calling it AF Fine-Tune. Since that time virtually every mid/high end DSLR camera from all manufacturers have included a provision for AF adjustment, requiring a LensAlign or lesser method to do the actual testing and analysis.

The first LensAlign hardware system (called the Pro Version) sold for $179. It was extremely labor intensive to build and required individual laser calibration (for each unit). I soon discovered that this business model could not be sustained. The price was too high, and the time-and-labor made it impractical to build.

Enter LensAlign MkII, a about 2 years later; it overcame many obstacles:

• It was easier to manufacture (although it required expensive solid steel blanking dies.)
• It could be shipped in a Priority Mail envelope, reducing shipping costs.
• It could be disassembled for travel.
• It was more accurate than the original, and no longer required individual calibration.
• It provided a sensible, and profitable, business model for me and a lower retail price for the end user (then $79.95 and now $84.95)]

With the MkII design established, we concentrated on a companion software solution to couple it with. FocusTune Calibration Software would raise the bar by facilitating the precision (and objectivity) of computer analysis of the test photos, thus eliminating the subjective nature of human analysis. Further, the new software made the AF adjustment task considerably easier and quicker. FocusTune software was designed so that it could be used in conjunction (together with) with any LensAlign hardware (system) or even without LensAlign with a wall mounted target.

Moreover, the FocusTune application actually promoted our development effort that led to additional improvements in both the LensAlign hardware and the FocusTune software! In order for these developments to stretch the envelope of possibilities, we optimized the LensAlign MkII’s Target and Ruler in a series of revisions culminating in the current Generation 4.

The downside was that in order to gain the greatly increased accuracy and speed that the new FocusTune made possible, its utilization necessarily was tied to LensAlign MkII with its new Target and Ruler. This ended FocusTune’s use as a standalone product or its use with older LensAlign designs (the Pro and Lite)

The good news is that we finally have what we wanted were striving for — a unique and phenomenal Hardware + Software solution that aids, enhances, accelerates and improves the task of analyzing and correcting troublesome AF front / back focusing inaccuracies that plague all DSLR cameras. No other commercial system available today is able to explore these issues and offer AF adjustment setting recommendations based on a precision 3-dimensional target that is crucial for accurate calibration. This is what makes the LensAlign/FocusTune system so powerful.

The LensAlign/Micro-Adjusting Tutorial e-Guide: $50

Don’t need to read the sales pitch? Click here to order your copy.

The LensAlign/FocusTune Micro-Adjusting Tutorial e-Guide: $50

For serious photographers using telephoto lenses including the Canon 100-400 II.

Don’t faint. The LensAlign/FocusTune Micro-Adjusting Tutorial e-Guide is finally finished and available for purchase. Before I begin to (briefly) sing its praises — I have to send huge thanks to my brilliant friend Michael Tapes. For the following:

1- Conceiving of, developing, and marketing first the LensAlign hardware and then doing the same with the amazing FocusTune software.
2- Driving down from Orlando to my home at Indian Lake Estates three times over the years to educate me on the use of LensAlign and then finally, FocusTune.
3- Spending many hours on the phone with me over the past few years answering my micro-adjusting questions. And then doing the same thing all over again for the past few months. And the past few days!
4- Skillfully reviewing the final draft of the manuscript and then graciously spending several more hours on the phone with me ironing out the final details.

Thank you Micheal.

Thanks also to dear friend Patrick Sparkman who helped me a lot along the micro-adjusting trail and provided a careful review of the final text.

Note however that any errors in the text are all on me.

The purpose of this guide is to teach you how to use the LensAlign hardware and the FocusTune software to determine an accurate AFA (autofocus adjustment) value for a given gear combination. It is written for users of current Canon camera bodies; folks who use the older Canon bodies and users of Nikon bodies that offer the ability to fine-tune focus will also benefit tremendously.

What can I say about the guide other than “It’s great!” It was about eight months in development. I spent dozens of hours writing it and many hundreds of hours testing and re-testing all of my lenses, teleconverters, and camera bodies, while at the same time fine-tuning the text. I even did some micro-adjusting on IPTs, some of those with the light setup! Most of the many improvements that I made in my techniques over the years were a result of finally listening to and implementing what Michael Tapes had told me in the first place. I can be stubborn, but then again, Michael and I are very much alike in that regard. The problem is that he is smarter than me.

Apologies to the many who were supposed to receive early drafts of this guide but did not. I only sent one to a very few folks as I was never completely comfortable with the contents and the flow and the clarity of the work. I am now. Very much so. I did get a copy to Bill Hill who wrote, “Thanks a ton. As in the past, I rely on you to interpret what the geeks write. Even though the version of the e-guide that you sent was far from complete, I found it much more helpful than anything that I had read online.”

Michael Tapes had this to say about the new guide: “I especially like the second half of the document where you show all of the examples.” He was referring to the many sample graphs in the guide that are accompanied by my illustrative comments:”Here is what I saw. This is what I thought. Here is what I did. And this is why I did it.”

Over the years many have come to value my simple, easy-to-follow instructions, my conversational style, and the clarity of my writing. Many find micro-adjusting to be complicated, time-consuming, and as I did often (and still do on occasion), frustrating. In the new guide, I have worked very hard to take you by the hand and lead through the process step by step. The guide includes camera and lens set-up lists, precise instructions on setting up, positioning, and aiming the gear, and detailed instructions on the testing, the strategies I developed and used, and interpreting the FocusTune graphs (that many find mystifying). Instructions for micro-adjusting zoom lenses at the T (tight or telephoto) end and the W (wide or zoomed out) setting are of course included. Plus dozens of practical tips to make your micro-adjusting experience a lot less frustrating than mine was 🙂

For years many folks have marveled at my ability to create sharp images with Canon 2X teleconverters and long f/4 super-telephoto lenses. Now the secret for much of that success is out of the bag. There is not a single sharp image in the guide; to see those simply surf the blog for the past two years. You will find hundreds of super-sharp images each accompanied by the AFA (autofocus micro-adjustment) that was in play.

Note that micro-adjusting is not for the faint-of-heart. Only serious photographers interested in creating the sharpest possible RAW files with their telephoto lenses (and teleconverters) should apply …

Nuff said.

Ordering Info

To purchase the LensAlign/FocusTune package ($124.90) please click here.

Click here to order your copy of the LensAlign/FocusTune Micro-Adjusting Tutorial e-Guide: $50.

If In Doubt …

If in doubt about using the BAA B&H affiliate link correctly, you can always start your search by clicking here. Please note that the tracking is invisible. Web orders only. Please, however, remember to shoot me your receipt via e-mail.


Please Remember to use my Affiliate Links and to Visit the New BAA Online Store 🙂

To show your appreciation for my continuing efforts here, we ask, as always, that you get in the habit of using my B&H affiliate links on the right side of the blog for all of your photo and electronics purchases. Please check the availability of all photographic accessories in the New BIRDS AS ART Online Store, especially the Mongoose M3.6 tripod head, Wimberley lens plates, Delkin flash cards and accessories, and LensCoat stuff.

As always, we sell only what I have used, have tested, and can depend on. We will not sell you junk. We know what you need to make creating great images easy and fun. And please remember that I am always glad to answer your gear questions via e-mail.

I would of course appreciate your using our B&H affiliate links for all of your major gear, video, and electronic purchases. For the photographic stuff mentioned in the paragraph above, and for everything else in the new store, we, meaning BAA, would of course greatly appreciate your business. Here is a huge thank you to the many who have been using our links on a regular basis and those who will be visiting the New BIRDS AS ART Online Store as well.

Amazon.com

Those who prefer to support BAA by shopping with Amazon may use the logo link above.

Amazon Canada

Many kind folks from north of the border, eh, have e-mailed stating that they would love to help us out by using one of our affiliate links but that living in Canada and doing so presents numerous problems. Now, they can help us out by using our Amazon Canada affiliate link by starting their searches by clicking here.

Facebook

Be sure to like and follow BAA on Facebook by clicking on the logo link upper right. Tanks a stack.

Typos

In all blog posts and Bulletins, feel free to e-mail or to leave a comment regarding any typos or errors. Just be right :).